Managing SKILL IDE Tool Assistants
SKILL IDE provides you with options to help you manage your assistants. You can also move and reposition the tool assistants to change your workspace layout.
Displaying Tool Assistants
To display or hide a tool assistant, choose Window – Assistants – <Assistant name>. To display or hide all tool assistants at once, choose Window – Assistants – Show All or Window – Assistants – Hide All.
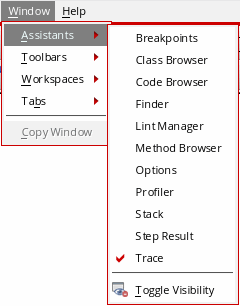
Alternatively, to display or hide an assistant, right click the menu bar and choose Assistants – <Assistant name>. The assistants you choose for display have a selected check box in front as illustrated in the image below:
Docking or Floating Tool Assistants
To dock a floating assistant pane:
- Drag the assistant pane by its title bar and move it close to the edges of the SKILL IDE window frame. When an outlined area appears, release the mouse button; the assistant pane snaps and fits in the outlined area.
- Double-click the title bar of the floating assistant pane.
-
Click the Float/Dock
 button on the title bar of the docked pane.
To make a docked assistant pane float:
- Drag a docked pane by its title bar away from the edges of the SKILL IDE window frame and release the mouse button. The assistant pane becomes a floating assistant pane.
- Double-click the title bar of the docked assistant pane.
-
Click the Float/Dock
button on the title bar of the floating pane.
Displaying Tool Assistants as Tabs
You can display assistant panes as tabs by dragging and dropping one assistant on top of another.
To display an assistant in a tabbed format:
You can click the Float/Dock
button to detach one assistant from the other tabbed assistant.
Related Topics
Return to top