Auto P&R Assistant User Interface for Device-Level Placement
The Auto P&R assistant is the integrated, automatic placement and routing solution available in Virtuoso. Use the Auto P&R assistant to initialize, generate, place, and route layout designs automatically, as per your requirements.
Initialize
The following table describes the fields available on the Initialize tab of the Auto P&R assistant.
| Field | Description |
|---|---|
|
Generates all the instances in the schematic that do not have any ignore properties attached to them. |
|
|
Specifies the layer in the source schematic that contains the device pins to be generated in the target layout. |
|
|
Specifies whether power pins are to be generated. You can select the layer in the source schematic that contains the power and ground pins that are to be generated in the target layout. By default, power and ground pins are not generated. The first metal layer in the layer stack is set as the default value. |
|
|
Environment variable: init_boundaryUtilizationOrWidth |
|
|
Specifies the percentage of area within the cell boundary that can be filled with objects. The default is 25%. Environment variable: init_boundaryUtilizationVal |
|
|
Specifies the width-to-height ratio of the PR boundary. The default value is 1, which indicates a square boundary. An aspect ratio of 0.5 specifies a boundary twice as high as it is wide. A value of 2 specifies a boundary twice as wide as its height. |
|
|
Specifies the exact width of the PR boundary. This option is available in the Utilization drop-down list. Environment variable: init_boundaryWidthVal |
|
|
Specifies the exact height of the PR boundary. This option is available in the Aspect Ratio drop-down list. |
|
|
This section is available only in Layout MXL and is part of the assisted custom layout design migration flow. Use the options in this section to capture source data and apply it to a target layout. |
|
|
Specifies the path to the directory in which the captured source data is stored. The target layout references this location for applying the captured source data. |
|
|
Captures data from the source layout and stores it in the specified Migration Directory. |
|
|
Specifies the target layout to which the captured reuse information must be applied. |
|
|
Specifies the objects in the target layout to which reuse settings are to be applied. The available options are: |
|
|
Loads PDK settings from a specified file. This option is useful for loading additional parameters and values, for example fill overrides, environment variables, and device registration that are applicable only at lower nodes.
In the custom settings file, the |
|

Constraints
The following table describes the fields available on the Constraints tab of the Auto P&R assistant.
| Field | Description |
|---|---|
|
Restricts propagation of self-symmetry of multiple grouped instances into a single symmetry constraint. |
|
|
After creating constraints, displays a preview of the virtual groups before placement. All devices are arranged in columns according to their virtual groups. Environment variable: arrangeByVGs |
|
|
This section is available only in Layout MXL and is part of the assisted custom layout design migration flow. Use the options in this section to capture source data and apply it to a target layout. |
|
|
Displays the Highlight Extract Group form, where you can select the groupings to be highlighted. |
|
|
Captures groupings from the source layout. This information is stored in the specified Directory. |
|
|
Select or Deselect all Constraint Groups  |
|
 |
|
 |
|
|
Hide Unused Categories / Show All Categories  |
|
 |
Highlights all instances of the selected constraint groups in the layout and schematic views. Each constraint group is highlighted in a different color. |
|
Loads the constraint order from a preset file |
|
|
Saves the current constraint order to a preset file |
|
|
Lists all available constraint finder groups. You can select the required finder groups to be run when you click Find Structures. |
|
|
Searches for matching structures in the source cellview and lists them under respective categories in the Groups and Constraints pane. |
|
|
Generates the constraints in the form of Modgens and symmetry constraints in the Constraint Manager. |


Setup
The following table describes the fields available on the Setup tab of the Auto P&R assistant.
| Field | Description |
|---|---|
|
Opens the Pin Planner tab of the Pin Placement form. Use the options in this form to set constraints and plan the placement of the pins in the design. The form also includes the Pin Optimization tab that lets you position the pins of blocks in a manner that helps obtain the shortest possible net length at a particular level in the design. |
|
|
Creates a diffusion grid based on the heights of the diffusion layers of different devices in the design. All row region-related options are automatically inactivated.
The Create Diffusion Grid check box appears on this tab only if enablePlaceWithWsp is set to See Placing Multi-Height Devices Using Automatic Device Placer. |
|
|
Creates a row region as per your specifications. The options to specify row height are enabled. Environment variable: createPatternRegion
By default, the name of the row region does not include the cell name. Set includeCellNameInRRName to |
|
|
Specifies the row period. The option is selected by default. In this state, the tool calculates the row height based on the devices in the design, for example the maximum instance height and the heights of the gate, source, and drain tracks are considered. The calculated value is displayed in the Row Height field.
If not selected, you can specify the required value. |
|
|
Considers passive components, such as inductors, transformers, and transmission lines, for row height calculations. By default, passive components are ignored during row region and poly grid generation. |
|
|
Lets you specify the row height. |
|
|
Lets you to import existing row templates. |
|
|
Controls the distribution of P and N devices in rows. The default value is */*/*, in which case the row region specification has a single row attribute.
The available patterns are |
|
|
Generates flipped rows and lets you select the orientation of the first (bottom-most) row. The available options are Start with R0 and Start with MX. |
|
|
Creates poly layer patterns as WSPs. |
|
|
Specifies the offset of poly grids. Environment variables: specifyGridOffset, gridOffset |
|
|
Recognizes the poly layer patterns of passive devices while generating WSPs.
Only physical layers are considered for height calculation.
Environment variable: includePassiveComponentPoly
|
|
|
Creates a row template, a row region, rows, and poly patterns, as specified. |
|
|
Clears the row region settings and resets them to their default values. |
Place
The following table describes the fields available on the Place tab of the Auto P&R assistant.
| Field | Description |
|---|---|
|
Specifies that the placement area must be calculated based on the specified aspect ratio. Environment variable: autoPlaceFixedAR
The default value is 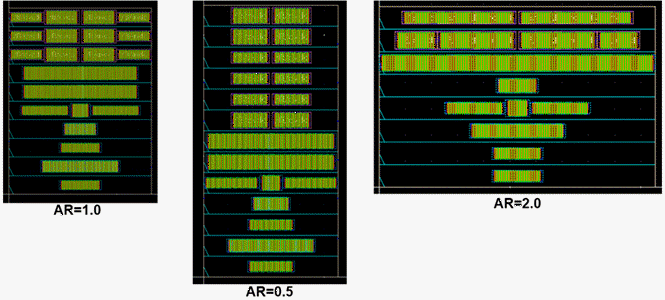
You can specify either a single value or multiple values in the Aspect Ratio field. When a single value is specified, the result is displayed in the same view. When multiple values are specified, a _number suffix is added at the view name. For example, for a view named
If there is a comma after a single value, for example |
|
In Aspect Ratio mode, you can set autoPlaceAdjustBoundary to To enable the placer to follow the aspect ratio specified in the initialization step, set PR Boundary as the placement region. Otherwise, the placer follows the aspect ratio specified in the placement options.
To lock the aspect ratio of all Modgens while running the placer, set autoPlaceLockFGAR to |
|
|
Fits all the objects inside the specified boundary.
|
|
|
Locks the aspect ratio of all Modgens when running the Virtuoso device-level placer. |
|
|
Adjusts the PR boundary while running the placer according to the placement results. This option is available only when Boundary is set to PR Boundary. Environment variable: autoPlaceAdjustBoundary |
|
|
Automatically adjusts the row region while running the Virtuoso device-level placer according to the placement results. Environment variable: autoPlaceAdjustRowRegion |
|
|
Runs the Virtuoso device-level automatic placer on the entire design. |
|
|
Runs the placer on unplaced devices such as unplaced, overlapping, non-grid compliant, and non-row compliant devices. These devices are placed based on their connectivity with the placed components, while honoring all constraints and grids. The incremental placer runs without changing the aspect ratio of the figGroups and Modgens, and therefore the options in the Floor Plan section are not available. However, the PR boundary and row regions are automatically adjusted. The incremental place run results depend on the starting layout. |
|
|
Lets you choose the following optimization options: When Mode is set to Auto, the available placement options are: Area (for compaction), Wire Length (for better routability), and Area and Wire Length (both compaction and better routability). When Mode is set to Incremental, the available placement options are: Area (for compaction), Similarity (for placement similar to the placed devices), and Area and Similarity (both compaction and similar placement). |
|
|
Runs the placer only on those the objects that are selected in the layout canvas. |
|
|
Ignores passive devices while running the placer. This option is useful when the design contains large passive devices that occupy most of the design aspect ratio. Honoring such passive devices might impact the placement quality of active components. With this option selected, the active devices are given a higher priority during placement. |
|
|
Inserts trims to devices automatically while running the automatic or incremental placer. All existing trims are deleted before inserting new ones. To avoid shorts, add transition spacing between virtual groups so that the trims in one virtual group do not overlap the bbox of any other virtual group. Also ensure that adjacent trim layers are at least two MD pins apart. If not, add dummies or change the placement to increase the spacing between them. |
|
|
Adds transition rows or spacing above, below, or between the row regions. This space can be used for inserting guard rings, tap cells, or transition cells. The available options are:
|
|
|
Resizes the PR boundary such that it covers the devices placed outside the PR boundary. |
|
|
Swaps colors of flipped rows automatically while running the placer and updates the color swap parameters such that same-masked colors do not face each other.
When selected, the
When not selected, the |
|
|
Minimizes the capacitance on M0 nets in addition to the regular trim insertion. |
|
|
Highlights all virtual groups in the layout canvas. The icon automatically changes to Dehighlight Virtual Group, which lets you remove the highlights. |
|
Fill
The following table describes the fields available on the Fill tab of the Auto P&R assistant.
| Field | Description |
|---|---|
|
Inserts dummies to fill gaps between Modgens in virtual groups. You can select the required Modgens before clicking this icon. If no Modgens are selected, the command is run on all active device Modgens in the current cellview. If there are unabuttable devices in the Modgen, the tool checks cell fill to identify the fill object information for the gap and inserts identical dummies. Gaps caused by unabuttable devices are filled with the least number of dummies. |
|
|
Specifies the type of Modgen dummies to be inserted when the Fill Modgen Dummies button is clicked. The available dummy types are:
Environment variables: modgenDummyTypeAnalogLCV, modgenDummyTypeStackLCV, modgenDummyTypeStackNum |
|
|
Inserts dummy fill in the gaps between instances. |
|
|
Specifies whether dummy fill can be inserted in hierarchical designs. |
|
|
Specifies whether the cell fill must be extended in all directions to cover the gaps within the PR boundary. With this option selected, the fill inserted in the empty spaces are further extended in the horizontal and vertical directions to cover all gaps within the PR boundary. Use environment variables vgFillSpaceSpecifyUnit and vgFillSpacePitchesOrUserUnit to specify the values by which fill are to be extended. Environment variables: dummyFillEnableFillEmptyRow, |
|
|
Converts fill to a figGroup when the fill is executed on a draw region. |
|
|
Inserts poly fill in the gaps between instances. Poly fill extends the gate poly ands add cut poly rails as per the DRC rules. As part of poly fill, the tool supports poly extensions, cut poly rails, and local interconnect layers, along with rails on the associated cut layer. Poly fill does not fill diffusion areas and areas with placement blockages. |
|
|
Specifies the layer-purpose pair to be used by the placer to derive cut-poly fill. |
|
|
Uses the abutting layer as the fill layer instead of the poly fill layer.
Select this option when there are instances with dummy poly to fill active gates with |
|
|
Allows poly fill to be inserted around diffusion shapes. When this option is not selected, poly fill are kept away from diffusion shapes. |
|
|
Highlights dummies in the layout. Click this button after adding fill devices to differentiate between active devices and dummies. |
|
|
Specifies whether fill is inserted in all row regions or only in the row region selected from the drop-down list. |
|
|
Generates the required dummy and poly fill as per your specifications. |
|
|
These buttons are available only for certain advanced node flows. The Create Guard Ring and Delete Guard Ring buttons work for both row regions and custom area. When there is no a valid row region, these buttons are disabled. Add fill before creating a guard ring, especially if the existing virtual groups are not rectangular or contain gaps. |
Related Topics
Initializing a Layout in the Automated Device Placement and Routing Flow
Generating Constraints and Constraint Groups
Virtuoso Automated Device Placement and Routing Flow
Generating and Deleting Base Layer Fill
Return to top