Placing Devices in Mature Node Designs
The Virtuoso device-level automatic placer is not restricted only to advanced node designs. You can run the placer on mature nodes designs as well after making a few initial settings. The placement options for mature nodes are different from those for advanced nodes.
To run the placer on a mature node design:
- Open the required layout cellview.
-
Set the matureOrAdvancedNode environment to
mature. When set toauto, the tool reads the virtuoso techfile constraints to automatically determine an appropriate process node. - Open the Auto P&R assistant.
- Generate the design using the options on the Initialize tab. See Initializing a Layout in the Automated Device Placement and Routing Flow.
- Generate the required constraints using the options on the Constraints tab. See Generating Constraints and Constraint Groups.
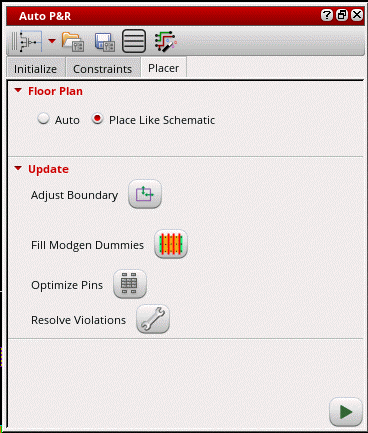
- Open the Place tab.
- In the Floor Plan section, set the placement mode to one of the following:
-
With Floor Plan set to Auto, select a placement effort level — Low, Medium or High.
The runtime of the placer depends on the effort chosen. The time for each effort level increases in roughly linear increments. For example, if a design takes five minutes to place on Low, then it would take ten minutes on Medium, and fifteen minutes on High effort levels.
Try the Low effort level first, because many designs perform well at this level. Low effort level is best suited for regular, structured designs with no non-conformal group boundaries. If your design is less structured or includes a large number of constraints, run the design at the Medium effort level. You may also consider this effort level if you have a few conformal group boundaries under placer control. If a design fails to meet your expectations at Medium effort, then increase the effort level to High. High effort utilizes the same algorithms as Medium, but exerts itself more fully on each step of the process. -
Click
 to run the placer.
 - Click Adjust Boundary icon in the Update section to resize the PR boundary such that it covers any devices that were earlier placed outside the PR boundary.
- Click Fill Modgen Dummies to fill the gaps between Modgens selected on the layout canvas with Modgen dummies. If there are no Modgens selected, then dummies are added to fill the gaps of all the Modgens inside the PR Boundary on the layout canvas.
- Click Optimize Pins to run the pin optimizer to position pins in a manner that helps obtain the shortest possible net length.
- Click Resolve Violations to resolve DRC violations and any overlaps happened during placement.

Related Topics
Initializing a Layout in the Automated Device Placement and Routing Flow
Generating Constraints and Constraint Groups
Return to top