1
What is CDF?
Overview
The Component Description Format (CDF) describes the parameters and the attributes of parameters of individual components and libraries of components. The CDF lets you create and describe your own components.
This topic describes how you can use the Component Description Format to create and describe your own components.
This topic assumes that you are a computer-aided design librarian or a circuit designer and that you are familiar with designing and developing electronic components with Virtuoso® design and simulation software.
A CDF description assigns parameters and parameter attributes to libraries and cells for many purposes:
- Assigning parameter names and values
- Allocating units and default values
- Checking that values lie within specified ranges
- Dynamically changing how parameters are displayed depending on predefined conditions
-
Executing a SKILL callback function whenever certain information is changed
- a single location for storing all component information so that applications can share and reuse parts of the component description.
- independence from applications and cellviews.
- a graphical user interface (the Edit CDF form) for entering and editing component information.
- strict checking so that tools do not need to check component data before using it.
- basic units and scale factors that are common in electrical design.
- a modular format, so that you can edit and update parts of a description.
- a command to copy the CDF description of one component into another component.
Licensing Requirements
For information on licensing in the Virtuoso Studio design environment, see Virtuoso Software Licensing and Configuration Guide.
A Typical Application
The CDF encompasses all levels of components, including discrete and full-custom components, and all cellviews of components. For example, the resistor cell res can take on two forms: an ideal resistor or a thin film resistor. If you want an ideal resistor, you specify the value of resistance desired. If you want a thin-film resistor, which models discontinuities as well as skin and substrate effects, you specify the length and width of the resistor and the resistivity of the material in which the resistor body is built.
You can choose how to specify the thin film resistivity by
- Specifying the resistivity as a sheet resistance (ohms per square)
- Specifying the bulk resistivity of the material
In this case, you need to also specify the height of the resistor body.
To determine what parameters the resistor needs, follow the decision tree in the following figure:
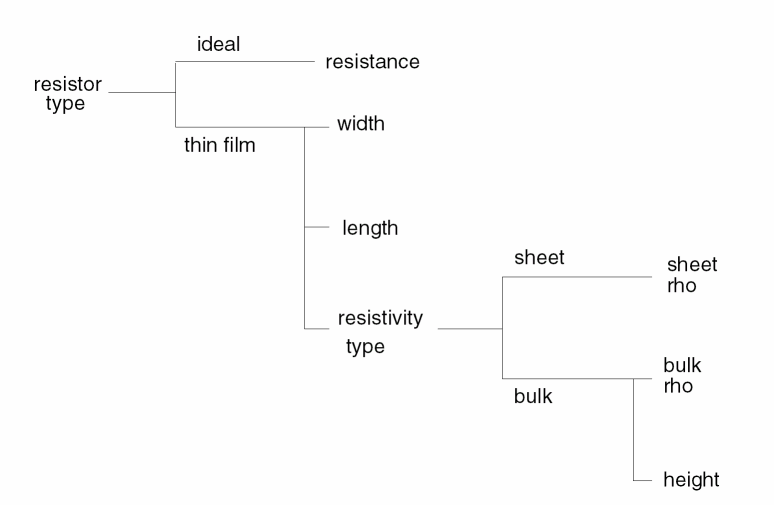
This pattern of resistor parameters illustrates how you can construct a CDF description for this resistor that lets you automatically switch between different choices.
To create a complete CDF for this resistor, you create eight parameters.
The first parameter is the radio button field, resistorType. It is always displayed and editable and has only two values, ideal and thin_film.
The second parameter, resistance, uses a cdfgData variable expression to test the value of resistorType.
The cdfgData variable is used within the callback code to either read or write the CDF data for the current parameter. It uses the value field to get the current value of any parameter in the CDF description.
In the example below, the cdfgData variable is used to read the value of resistance parameter:
?use "cdfgData->resistorType->value == \"ideal\""
Implying that the resistance parameter should be used only if the resistor type is set to ideal. (== is an equality test, not an assignment.)
You can also use cdfgData to set the value of a parameter. For example,
?use "cdfgData->paramName->value = paramValue"
cdfgData callback is also triggered by the Edit Object Properties Form to get the current value of a parameter.
The third, fourth, and fifth parameters behave in the opposite manner from resistance. Through another cdfgData expression for each parameter, width, length, and resistType become active if resistorType = thin_film, and they become unavailable if resistorType = ideal. The width and length parameters have floating-point numerical values. The resistType parameter is a string with only two values, sheet and bulk.
The last three parameters, srho, brho, and height, have floating-point numerical values. srho becomes active when resistType = sheet, while brho and height become active when resistType = bulk.
Additionally, you can use CDF to display prompts that spell out the complete name of each variable (bulk rho instead of brho), and you can also set the CDF of this resistor to accept expressions (such as those in the Analog Expression Language (AEL) for the values of these parameters.
When a designer accesses this resistor through the Add Instance, Create Instance, or Edit Properties command, the form prompts the designer for the necessary values. The form changes based on the values entered.
The CDF description of the resistance parameters for this resistor is stored in the following SKILL code.
libId = ddGetObj("base")
cellId = ddGetObj("base" "res")
cdfDataId = cdfCreateBaseCellCDF(cellId)
cdfParamId = cdfCreateParam(cdfDataId
?name       "resistorType"
?type       "radio"
?prompt       "Type:"
?defValue       "ideal"
?choices       list("ideal" "thin film")
?callback       "myResistorTypeCB()")
cdfParamId = cdfCreateParam(cdfDataId
?name       "resistance"
?type       "float"
?prompt       "Resistance:"
?defValue       100.0
?use "cdfgData->resistorType->value == \"ideal\""
?callback       "myResCB()")
cdfParamId = cdfCreateParam(cdfDataId
?name       "width"
?type       "float"
?prompt       "Width:"
?defValue       20e-6
?use "cdfgData->resistorType->value == \"thin film\""
?callback       "myWidthCB()")
cdfParamId = cdfCreateParam(cdfDataId
?name       "length"
?type       "float"
?prompt       "Length:"
?defValue       100e-6
?use "cdfgData->resistorType->value == \"thin film\""
?callback       "myLengthCB()")
cdfParamId = cdfCreateParam(cdfDataId
?name       "resistType"
?type       "radio"
?prompt       "Resistivity Type:"
?defValue       "sheet"
?choices       list("sheet" "bulk")
?use       "cdfgData->resistorType->value ==\"thin film\""
?callback       "myResTypeCB()")
cdfParamId = cdfCreateParam(cdfDataId
?name       "srho"
?type       "float"
?prompt       "Sheet Rho:"
?defValue       25.0
?use       "cdfgData->resistorType->value == \"thin
film\"   && cdfgData->resistType->value == \"sheet\""
?callback       "mySheetRhoCB()")
cdfParamId = cdfCreateParam(cdfDataId
?name       "brho"
?type       "float"
?prompt       "Bulk Rho:"
?defValue       25e-10
?use       "cdfgData->resistorType->value == \"thin
film\"   && cdfgData->resistType->value == \"bulk\""
?callback       "myBulkRhoCB()")
cdfParamId = cdfCreateParam(cdfDataId
?name       "height"
?type       "float"
?prompt       "Height:"
?defValue       25e-10
?use       "cdfgData->resistorType->value == \"thin
film\"   && cdfgData->resistType->value == \"bulk\""
?callback       "myHeightCB()")
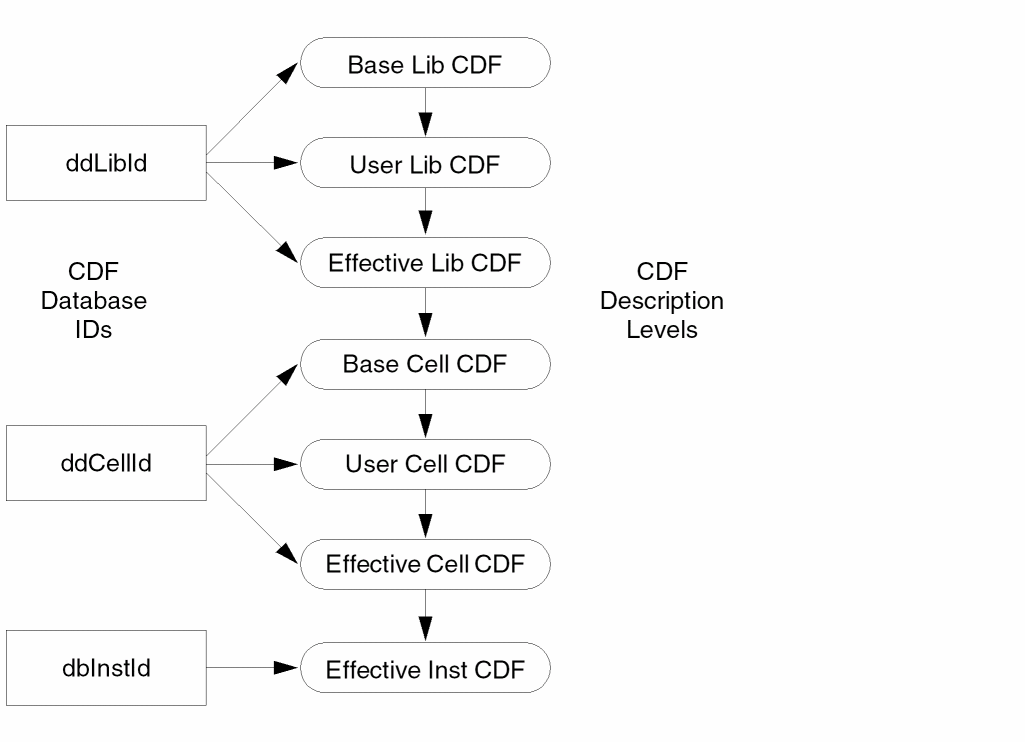
Levels of CDF Data
You can attach a CDF description to either a component or a library of components. When you attach a description to a library, all components in the library inherit the description. When you attach a description to a component, you only attach the description to the cell.
Librarians usually create and maintain the CDF descriptions for components. Library users see the effects of the descriptions as they use components from the library. However, you might want to override parts of the default description. For example, you might want to specify your own default values for CDF parameters. So that you can override the description, Cadence defines the following description levels:
- The base-level CDF is the description that is permanently attached to a cell or library. When the system reads in a cell or library, any base-level CDF attached to it is also read. The creator of a base-level CDF must have write permission on the object to which the description is being attached.
- The user-level CDF is a user-specific overlay description on top of the base-level CDF for a cell or a library (although the base-level does not have to exist). The system never saves a user-level CDF, so you must save it to a file and reload this level on startup. You do not need write permission to attach user-level CDF information to an object.
- The effective-level CDF is an overlay of a user-level CDF description on top of a corresponding base-level CDF description.
“Overlay” means “effectively replaces.” A user cell value of 10,000 ohms for the resistor parameter r takes the place of any base- or library-level value for r. Each level of CDF is optional. You can create cell-level CDFs without having library-level CDFs, and you can create user-level CDFs without having base-level CDFs.
Both libraries and cells can have base- and user-level CDF descriptions. The effective-library CDF is the overlay of the user-library CDF on top of the base-library CDF. The effective cell-level CDF is the overlay of the user cell CDF on top of the base cell CDF, overlaid on top of the effective library-level CDF. Finally, the effective instance CDF is the effective cell-level CDF with instance-specific information added to the CDF description. The following figure shows the relationship between CDF levels and the Cadence database.
CDF Worksheet
Before you start to build a component, you need to decide how you intend to use it, in which applications, and with what requirements. Before you create the cell and CDF, you need to determine the following:
- What applications will you use?
- What views are required by the applications you will use?
- What parameters are required by the applications?
- What restrictions do the applications impose on the parameters?
- What dependencies do the parameters have on each other?
- How do you want the user interface (the Add Instance and Edit Property forms) to appear?
This user guide illustrates each task with examples based on two components. In the first example, you examine the CDF of the functional block description of a complex pole. This component uses a macro model and is set up for simulation using the Virtuoso Spectre simulator. This example illustrates parameter passing in hierarchical designs.
In the second example, you create the CDF for a BICMOS NFET from the CDF information for another component. The NFET is specified as a parameterized cell (Pcell) that can be simulated with Analog LVS. This example illustrates some of the consequences of specifying particular values for a component CDF description.
For example, the answers to the set of questions for the BICMOS NFET cell would be as follows:
- What applications will you use?
-
What views are required by the applications?
- Schematics — symbol with G, S, and D pins for the gate, source, and drain. You do not need a bulk node connection in this case.
- Simulation — spectre interfaces to the Spectre simulator.
- Layout — Pcell for the usual case, but also a large power transistor for I/O in a flat layout. Both layouts have G, S, and D connections.
- Design Checking — auLvs
- What parameters are required by the applications?
-
What restrictions do the applications impose on the parameters?
- Simulation — simulator parameters must be strings.
- Layout — Pcell parameters need to be floating-point numbers and the defaults between the CDF and the Pcell must match.
- The length parameter has a minimum and a maximum. The width parameter has a minimum and a maximum. The length and width must be on grid. There are no other specific discrete values.
-
Do the parameters have dependencies on each other?
- The number of gates is a function of width. If the width exceeds 120, the layout changes to have two gates (a bend with connections).
- If a designer selects the alternate large layout, the width and length are updated to reflect the value.
- Length and width of each two parameters: one a string for simulation and one a floating-point number for the Pcell. You should not have to enter both and they should be synchronized.
- The model parameters are dependent on the physical parameters. For example, you might calculate a value for the drain diffusion area and a value for the source diffusion area based on the physical parameters.
-
How do you want the user interface to appear? Are there parameters that you want to be hidden from designers? Are there parameters that you want the designers to see but not edit? What parameters should appear at the top of the list?
- If a designer selects the alternate large size layout, the width and length cannot be edited because there is only one large size device.
- The bends parameter is not visible to a designer because it is not under the designer’s control.
- The Pcell length and width are not visible to a designer. You want the designer to specify the width and length only once so that the forms show only the string version.
- Because drain and source diffusion areas are calculated, they should not be editable.
- Show width and length and the layout choice at the top of the forms because those are the parameters that designers must frequently edit.
Return to top