1
Introducing Diva Verification
The Diva® product is a set of physical verification tools that lets you find and correct design errors. Using layer processing to prepare data, this set of verification tools checks physical design and electrical functionality and performs layout versus schematic comparisons. Diva helps you find errors early in the design process and lets you view them interactively to help speed error diagnosis and correction. Diva also allows you to perform incremental checks on areas that you change.
Diva Verification Tool Set
The Diva verification tool set has five interactive products:
- Design Rule Checker (DRC)
- Layout Parasitic Extractor (LPE)
- Parasitic Resistance Extractor (PRE)
- Electrical Rules Checker (ERC)
- Layout Versus Schematic program (LVS)
DRC
The Design Rule Checker, DRC, helps you find deviations from design constraints. The DRC program works with any technology and handles all layout methodologies, including full custom, structured custom, standard cell, macro cell, gate array, and automated layout.
DRC’s interactive tools give such broad design rule coverage that it almost eliminates false errors. You can use DRC to check material spacing, enclosure, and overlap. Its hierarchical operation, incremental checking, and unique pattern-recognition capabilities reduce run times.
LPE
The Layout Parasitic Extractor, LPE, extracts physical devices. It can extract complex parameters and parasitics from most technologies. The LPE program operates in flat or hierarchical mode to produce a complete network database that can be used by other products, such as performance analyzers, simulators, and netlisters.
PRE
The Parasitic Resistor Extractor, PRE, extracts parasitic resistance and capacitance and converts the circuit interconnect into a complete resistor-capacitor (R-C) network. The PRE program handles all layout topologies, including bend and transition compensation, contact area and edge resistance, and user-defined coefficients. You can also select among various representations for the extracted R-C network.
ERC
The Electrical Rules Checker, ERC, checks network connectivity. The ERC program highlights electrical problems, such as floating interconnect and devices, and abnormal connections in physical or schematic designs. The ERC program uses networks generated from either the layout or schematic.
ERC performs conventional checks, such as verifying pull up/pull down and isolating inactive devices. It can also convert a MOS transistor-level network into a gate-level network with gate-level parameters. This lets the network be processed by gate-level simulators.
LVS
The comparison product Layout Versus Schematic, LVS, checks for matching nets, devices, and parameters in circuit networks. The LVS program compares a layout and schematic, two layouts, or two schematics. The LVS program has advanced capabilities, including full device permutability. To aid in error correction, you can view the results interactively using error probing and correspondence cross-probing.
Diva Verification Programs
The five interactive products are integrated into three programs that let you run verification checks and display errors graphically. The programs, the processes they perform, and the products they use, are shown below.
| Program | Process | Product |
|---|---|---|
Diva Verification Product Flow
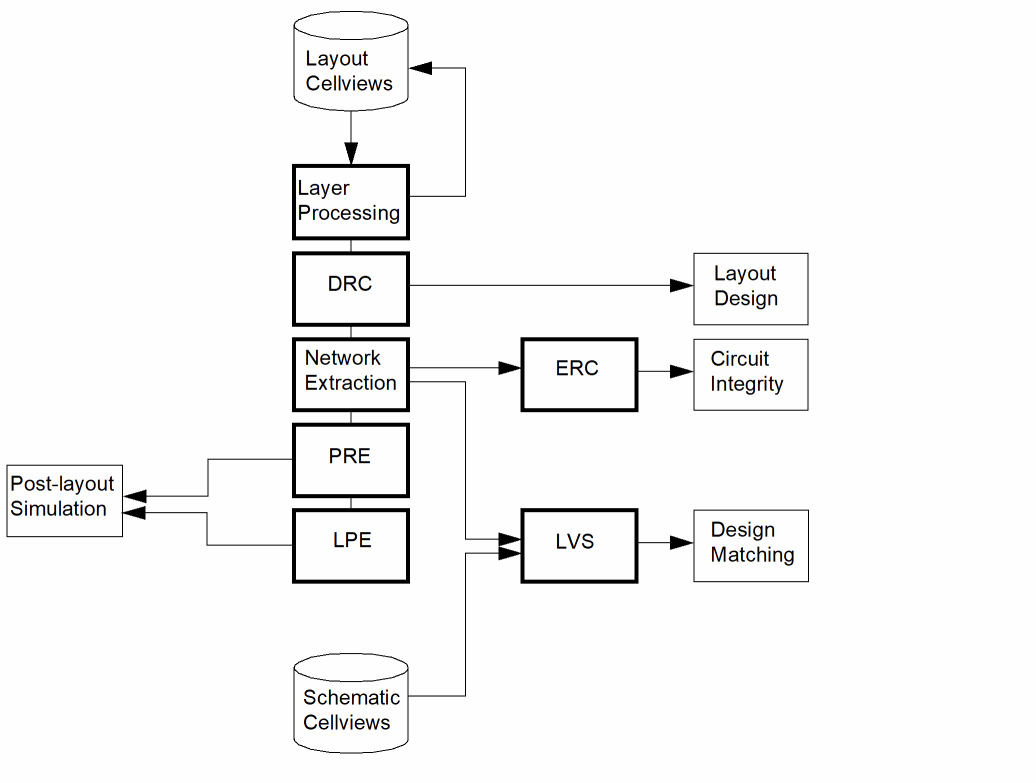
The Diva verification products are interrelated and, in some cases, dependent on each other. For example, to do an Electrical Rules Check (ERC) or a Layout Versus Schematic (LVS) comparison, you must first do an extraction on the layout. However, you can run other processes independently. You can do a Design Rule Check (DRC) or an extraction without reference to any other product. This is a typical verification sequence.
- Do a DRC to check the layout for physical design constraints and correct construction flaws.
- Do an extraction to prepare the layout design for ERC or LVS verification checks. You can also use Extract (LPE) to prepare a circuit for post-layout simulation.
- Do an ERC to check basic electrical functions for circuit consistency. You can use ERC to check both layout and schematic data.
- Do an LVS to compare layout and schematic designs.
This figure shows the flow of products that are used for interactive verification.
Prerequisites for Diva Verification
To run Diva in interactive mode, you must have
- The Cadence® design framework II software
- The Open Simulation System (for ERC and LVS)
- A set of verification rules
To run Diva in batch mode from the UNIX prompt, you must have
Design Framework II
Virtuoso Design Environment is an integrated design environment in which you can run the Cadence design tools. It has a unified database that provides a consistent way of storing design information, a way for tools to communicate with each other, and a way to distribute design data. You must have Virtuoso Design Environment to run Diva in interactive, graphics mode. For more information, refer to the Virtuoso Design Environment User Guide
Simulation Environment
The Open Simulation System (OSS) contains the netlisters and simulators supported by your system. The ERC and LVS programs both run under its control. When you start an ERC or LVS job, the OSS takes control and performs a number of operations. These include running the system netlister, if required, running the ERC or LVS program, and translating the output so that you can do probing and cross-probing. For more information about OSS, refer to the
Verification Rule File
Before you can run a verification check, you must define the rules for the routine you want to run: DRC, extraction, ERC, or LVS. You use a text editor to write these rules as a series of SKILL commands in a verification rules file.
You can store this file anywhere in your file system and reference it when you run Diva. A common location for these rules is in a technology library. By default, for DRC and extraction, Diva looks for the files divaDRC.rul and divaEXT.rul in the technology library. There is no default location for the LVS or ERC rules files. If you store the file anywhere in a technology library, you must include a dot in the file name to distinguish it from other library entries. If you use a standard convention of adding a .rul suffix to your file names, you can always identify the Diva rules files.
See
Using Diva Verification
Mouse button assignments vary slightly from application to application. The Virtuoso Design Environment User Guide
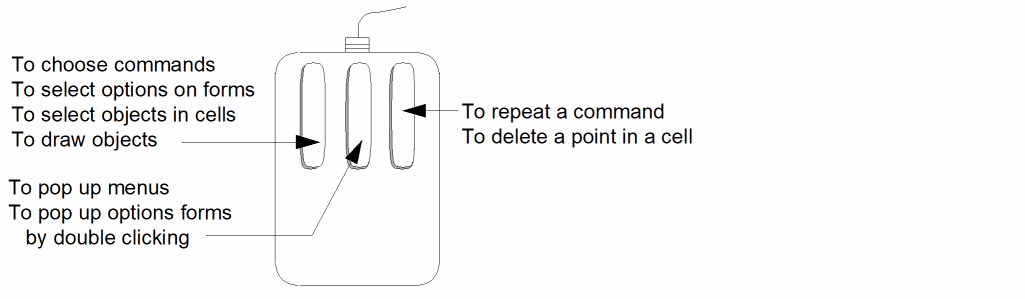
About the Mouse
This manual uses the following terms to tell you how to use the mouse.
Using the Mouse Buttons
The following figure shows how to use the mouse.
Using the Verify Menu
The Diva commands are located on the Verify menu at the top of either a layout or a schematic window. This illustration shows parts of the layout menu and the Verify menu at the top of a layout window.
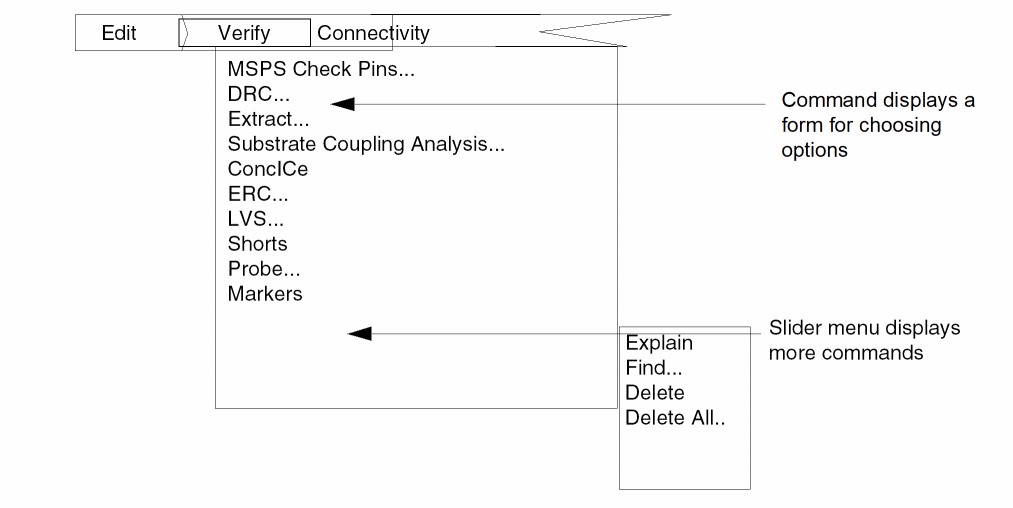
To display the Verify menu, click on the name of the menu. To select a command from the Verify menu, move the pointer to the item you want and click the left mouse button. The item you select displays a form or another menu.
- When you click on an item followed by three dots (...), you see a form for choosing options before you execute the command.
- When you click on the Markers command, which is followed by an arrow (→), you see a “slider” menu with more commands. To select a command, you hold down the left mouse button and slide the pointer to the item you want, then release the button.
See
Using Forms
This section describes how to use the forms that appear as you use the Diva commands. For more details about using forms, see Virtuoso Design Environment User Guide.
The buttons across the top of forms are suited to the work you are doing at the moment.
- “Standard” forms appear when you select a command followed by three dots (...).
- “Options” forms appear when you use a command that requires repeated input.
Standard Forms
Standard form values take effect when you execute the command by clicking OK or Apply. A standard form looks like this.

The buttons at the top of a standard form function as follows.
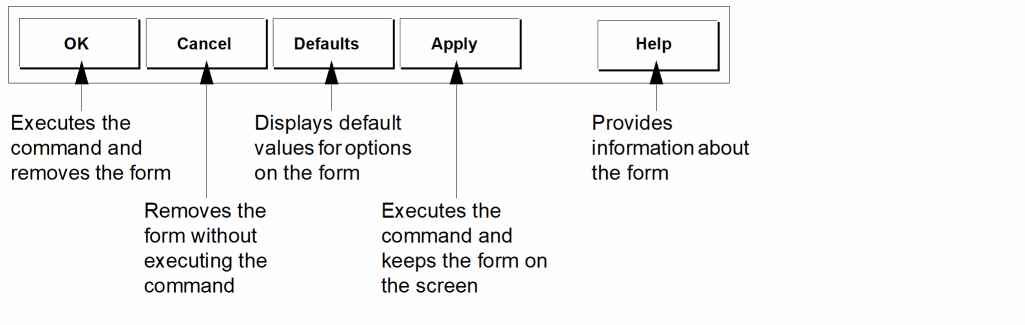
Pressing Return has the same effect as clicking on OK.
Options Forms
The values you select or enter on options forms take effect immediately. For example, you can use the options form for the Ellipse command to change settings while you are drawing an ellipse.

The buttons on an options form are different from standard form buttons. Here’s how they work.
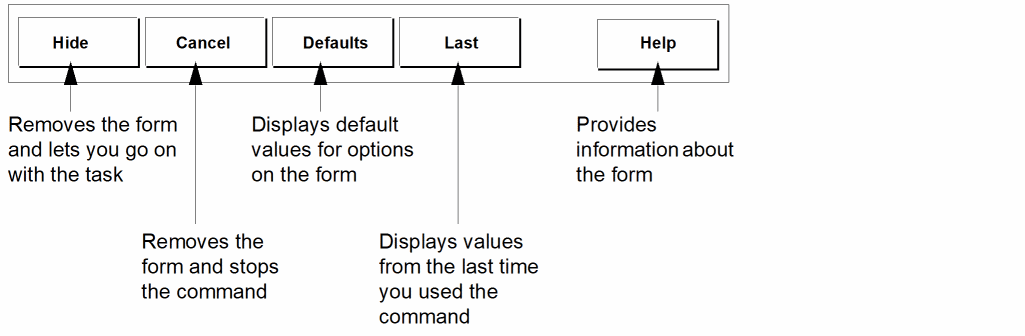
Pressing Return has the same effect as clicking on Hide.
Displaying or Suppressing Options Forms
When your company first receives the Cadence software, options forms display automatically. After you are comfortable using the Cadence software, you might not need to use the options forms. You can turn off this feature from the User Preferences form which controls how the Cadence software behaves.
You can turn off the options forms setting as follows.
-
Select User Preferences from the Set Options menu in the Command Interpreter Window (CIW).
The User Preferences form appears.
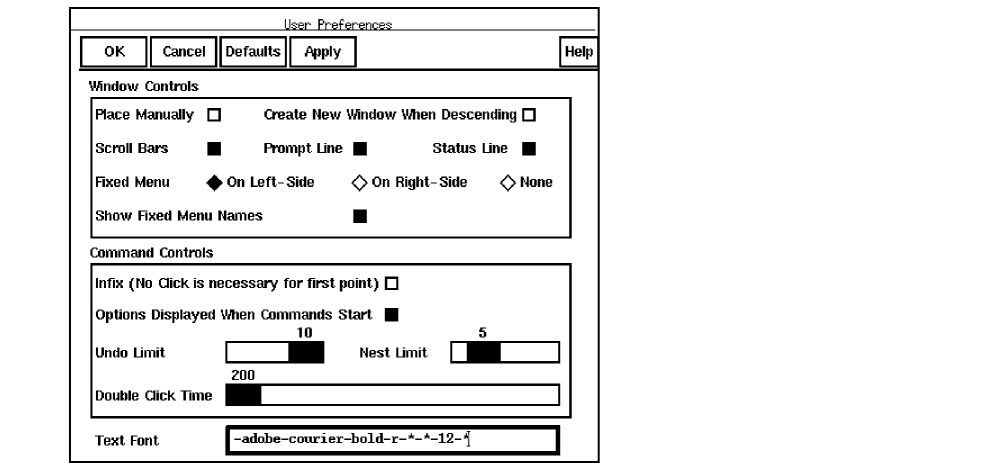
- Click the Options Displayed When Commands Start button.
- Click OK to close the form.
Removing and Retrieving Options Forms
To remove options forms from the screen and retrieve them, use the Hide button.
- To make an options form disappear temporarily, click on the Hide button. The options form disappears.
- To redisplay the options form, double click the middle mouse button.
Return to top