- Removing Pipe Character from Instance Names
- Viewing PCells in Innovus
- Global Net Name Collision Resolution
- NanoRoute Support for Nets
- Saving Blackboxes in OpenAccess
- Importing the Power and Ground Nets Connections Using Verilog Netlist
- Turning Off Power and Ground Connections in a Netlist
- Generating Power and Ground Pins
- Using Abstract Views in Innovus
- Performing Power Routing Outside Innovus
- Generating Abstracts with Antenna Information
- Mapping Virtuoso Bind Keys to Innovus Bind Keys
- SKILL to TCL Mapping
- Generating a Verilog Netlist for Innovus from a Virtuoso Schematic
- Creating a Non-Default Rule in Virtuoso and then Using it in Innovus
- Troubleshooting Common Errors in Innovus OpenAccess Flow
- Working with Old Versions of OpenAccess Data
23.1 Removing Pipe Character from Instance Names
Generate physical hierarchy prefixes the ‘|’ pipe character to instance names in the generated layout. This change in instance names can cause interoperability issues in certain flows where tools are name specific.
For example, suppose you have an OA-based VDI flow where the top level schematic is created from a verilog netlist using verilog2oa. Now, when you create a layout from the schematic view, the layout netlist prefixes all instances with “|”. This means if the instance names are I0, I1, I2, and so on in the schematic, they are changed to |I0, |I1, |I2 and so on in the generated layout.
To avoid such issues, set the following variable in the .cdsinit file before starting Virtuoso session:
envSetVal("layoutXL" "prefixLayoutInstNamesWithPipe" 'boolean nil)
When you do so, the layout generation flow from schematic using Generate From Source does not prefix the ‘|’ pipe character to instance names in the layout database.
23.2 Viewing PCells in Innovus
To view parameterized cells (PCells) in Innovus, set the following variables on UNIX prompt before starting the Innovus session:
setenv CDS_ENABLE_EXP_PCELL TRUE
setenv CDS_EXP_PCELL_DIR <directory path>/.expressPcells
23.3 Global Net Name Collision Resolution
If the module dtmf_chip_block has a local net name ?VDD? that collides with a global net name ?VDD?, then a local instance terminal power-connection requires access to the global net that is blocked by the local net with the same name. Therefore, a new global net ?OAX_VDD_1? will be created while reading a design inside Innovus, as an equivalent net to the ?VDD? global net and will be used for these power-connections. The two nets are effectively the same nets.
To avoid this collision, do not use local net names that collide with global net names.
23.4 NanoRoute Support for Nets
NanoRoute supports the following two use models for pre-routed nets.
- If a via does not match the net's non-default rule (NDR) via list, it is still allowed.
Note: Presently, there is a workaround that forces it to become a special via but NanoRoute will change to fully support it without changing it to a special via.
- If a routing segment has an NDR that does not match the net's NDR, it will be allowed.
Note: If NanoRoute is used to route a net (for ECO routing or so on), it will rip-up all the odd vias and routing segments, and reroute them. There are a variety of ways NanoRoute can avoid routing a net:
- By setting
setAttribute -skip_routingtotruefor that net.
- By marking all the route segments as
FIXED, and so on.
23.5 Saving Blackboxes in OpenAccess
A blackbox must be committed into a partition before saving it to OpenAccess. After doing this, a cell type will not remain as blackbox, but will get saved as a block.
23.6 Importing the Power and Ground Nets Connections Using Verilog Netlist
Innovus can infer global net connectivity from Verilog netlist so that you may not specify it through the multiple globalNetConnect commands. To enable this:
- All undefined PG connections should be defined by using
globalNetConnect.
- All power and ground net names must be defined in the configuration file.
- Use the
-overrideparameter such thatglobalNetConnectdoes not override the PG connections in the netlist.
- Use the new
-netlistOverrideparameter. Doing so, the physical netlist will reflect overrides but the logical netlist will not reflect such changes.
23.7 Turning Off Power and Ground Connections in a Netlist
The oa2verilog command contains a mechanism to determine which terminals of the cells in a library should be included in the output netlist. If a cell library has power and ground terminals, but you prefer to generate a Verilog netlist that does not contain power and ground terminals, run the verilogAnnotate command on a reference library containing cells to indicate the ports that should be output in the Verilog netlist.
23.7.1 verilogAnnotate Command Syntax
verilogAnnotate
-refLibs libList
-verilog fileList
[-libDefFile file]
[-logFile file]
[-noInfo msgIds]
[-noWarning msgIds]
[-refViews viewList]
[-templateFile file]
[-tolerate]
[-h | -help]
[-v]
[-version]
23.8 Generating Power and Ground Pins
Power and ground pins are created in three ways:
- When you create a power mesh in Innovus, power and ground pins are automatically generated in VDI.
- In
sroute, you have an option to create pins at the intersection of the power grid andprBoundary.
- Use the
createPGPincommand in Innovus.
23.9 Using Abstract Views in Innovus
Innovus is designed to use abstract views. If the cells remastered with layout views are read in Innovus, then errors might appear with verifyGeometry, and so on.
23.10 Performing Power Routing Outside Innovus
Power routes created using Virtuoso might not have the stripe attribute that is needed by sroute in Innovus. To set the shape attribute on all the special wires (power routes) of $my_nets to stripe, use the following command in Innovus:
dbSet $my_nets.sWires.shape stripe
23.11 Generating Abstracts with Antenna Information
To generate abstracts with antenna information, you can use either write_lef_abstract (after verifyProcessAntenna), save_abstract (after verifyProcessAntenna), or use the abstract tool. If you want to do cover obstruction style modeling for the completed partition, use write_lef_abstract/save_abstract. For detailed modeling, you can use the abstract tool.
For determining metal density, you can run verifyMetalDensity -saveToDB before write_lef_abstract/save_abstract.
Note: Using non-overlapping windows is recommended for this usage.
23.12 Mapping Virtuoso Bind Keys to Innovus Bind Keys
There is an internal map that tries to find Innovus equivalent commands for the user's Virtuoso bindkeys and assigns them to the keys according to the user's Virtuoso setup. For example, if a Virtuoso bindkey uses hiRedraw() as bindkey instead of the default key in Innovus, the Innovus behavior aligns in a way that it now maps to the redraw command in Innovus.
The following table describes the mapping between Virtuoso bind keys to Innovus bind keys.
|
Virtuoso Action |
Innovus Action |
|
|
|
|
|
|
|
|
|
|
|
|
|
|
|
|
|
|
|
|
|
|
|
|
|
|
|
|
|
|
|
|
|
|
|
|
|
|
|
|
|
|
|
|
|
|
|
|
|
|
|
|
|
|
|
|
|
|
|
|
|
|
|
|
|
|
|
|
|
|
|
|
|
|
|
|
|
|
|
|
|
|
|
|
|
|
|
|
|
|
|
|
|
23.13 SKILL to TCL Mapping
The following table shows the mapping of Virtuoso SKILL functions to Innovus TCL functions while using the setOaxMode -bindkeyFile parameter.
|
Virtuoso Key |
SKILL Function |
Innovus Key |
Innovus Action |
|
|
|
|
|
|
|
|
|
|
|
|
|
|
|
|
|
|
|
|
|
|
|
|
|
|
|
|
|
|
|
|
|
|
|
|
|
|
|
|
|
|
|
|
|
|
|
|
|
|
|
f |
|
|
|
|
|
|
|
|
|
|
|
|
|
|
|
|
|
|
|
|
|
|
|
|
|
|
|
|
|
|
|
|
|
|
|
|
|
|
|
|
|
|
|
|
|
|
|
|
|
|
|
Up |
|
|
|
|
Down |
|
|
|
|
Left |
|
|
|
|
Right |
|
|
|
|
|
|
|
|
|
Delete |
|
|
|
|
Escape |
|
|
|
|
|
|
|
|
|
|
|
|
|
|
|
|
|
|
|
|
|
Note: If the setOaxMode -bindkeyFile parameter is used, then the Virtuoso Key column applies to Innovus for all of the equivalent commands in the mapping.
23.14 Generating a Verilog Netlist for Innovus from a Virtuoso Schematic
This section describes the various settings available to generate Verilog netlist for Innovus from a Virtuoso schematic. These settings are categorized as:
- Netlisting Options
- Schematic and Hierarchy Editor setup
- Netlist Generation
23.14.1 Netlisting Options
The following table describes the variable settings that need to be done in the .simrc file:
|
Settings |
Function |
|
|
Preserves the bus syntax in order to avoid the individual bits to be created instead of the bus syntax. |
|
|
Dumps explicit connection which is required for Innovus. |
simVerilogGenerateLogicalVerilog=t |
Generates a logical verilog netlist for a design. |
|
|
Generates a single netlist instead of splitting them into multiple ones (one netlist per module). |
|
|
Expands the iterated instances for Innovus. |
|
|
Dumps out the Verilog version. |
23.14.2 Schematic and Hierarchy Editor Setup
- Ensure that there are no PCells at the top-level schematic. If you don't want the power and ground connections to be a part of the netlist, see the Filtering Power and Ground Nets in Verilog section.
- In the Hierarchy Editor (control schematic traversal), set the
viewListand thestopListin order to traverse the design correctly. For each instance make sure to define the `view to use' accurately.
- `viewToUse' symbol
Instances with `viewToUse' specified as symbol are interpreted in Innovus as follows:
- If no Verilog netlist exists and `abstract' view exists, it is considered as an IP (stop at the IP level).
- If Verilog netlist exists and no `abstract' exists, it is considered as a module with no physical representation (physically flatten).
- If no Verilog netlist exists and no `abstract' exists, it is considered as an empty module with no physical representation.
23.14.3 Netlist Generation
Generate the netlist using CIW--Tools--NC-Verilog or from Virtuoso Schematic Editor using Launch--Simulation--NC-Verilog.
Now, use the Commands-Generate Netlist menu command after initializing the design.
Following is the SKILL equivalent of the NC-Verilog based command:
deInstallApp(getCurrentWindow() "NC-Verilog")
vtoolsIseGNCForm->simSimButton->value= nil
vtoolsIseGNCForm->simElabButton->value= nil
vtoolsIseGNCForm->simCompileButton->value= t
vlogifNCInitDesign()
vlogifNCNetlist()
ThevlogifNCNetlist()skill function generates the verilog netlist from the schematic from which it has been run.
For more information on generating a netlist, see Virtuoso NC-Verilog Environment User Guide.
23.14.4 Problems and Solutions
- If you have the inherited connections dumped out (
inh_xxports).
Solution: Read the Filtering Power and Ground Nets in Verilog.
- Verilog netlist is naming array instance as
INST_n_but the instance name in Virtuoso isINST(n).
Solution: Type the following:hnlMapInstName = `("!" "#" "$" "%" "&" "(" ")" "*" "+" "," "-" ("." "_") ("/" "_") ":" ";" ( "<" "(") "=" (">" ")" ) "?" "@" "[""\\" "]" "^" "`" " "{" "|" "}" "~")
You need as well to escape manually iterated instances due to the (): AND2_C \I5(0) ( .g(net7[0]), .A(A), .B(B));
23.14.5 Filtering Power and Ground Nets in Verilog
The following methods can be used to filter power and ground nets in Verilog:
- Netlisting Options
- Schematic modifications
23.14.6 Netlisting Options
Set the following in the.simrc file:
simVerilogGenerateLogicalVerilog=t
This option could be used in addition to the ones mentioned in the Schematic Modifications section.
23.14.7 Schematic Modifications
Perform the following schematic modifications:
23.14.7.1 Modify Schematic views
- Set the signal type
powerto specify power nets. - Set the signal type
groundto specify ground nets. - Set the signal type to
tieHi/tieLoon signals which need to be of these types.
Note: Ensure that the nets which are not power or ground are set to a signal type other than power, ground, tieHi or tieLo.
23.14.7.2 Modify Symbol views
- Set the signal type to
powerfor the power symbol pins. - Set the signal type to
groundfor the ground symbol pins. - Set the signal type to
tieHi/tieLoon signals which need to be of that type
Note: Ensure that the pins which are not power or ground are set to signal type different than power, ground, tieHi or tieLo.
23.14.7.3 Schematic modifications: Manual
Schematic Net signal type
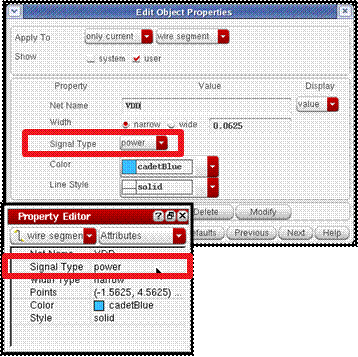
- Select the Net in the Navigator or in the canvas.
- Use the Edit Object Properties window or the Property Editor assistant to change the signal type to
powerorground.
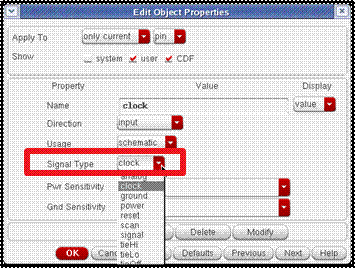
Symbol Pin Signal Type
- Select the pin in the navigator or in the canvas.
- Change the signal type to
powerorground.
23.14.7.4 Schematic Modifications: Automated
- Register the power and ground nets for the auto assignment of signal type.
ciRegisterNet("supply" '("vdd" "vdd!") ?regexNetNames '("^vdd"))ciRegisterNet("ground" '("gnd" "gnd!") ?regexNetNames '("^gnd")) - Check the current registered nets.
ciGetNetNames("supply")ciGetNetNames("ground") - Set the SKILL variable to enable the auto assignment of signal type based on registered net during check and save.
schSetEnv(postProcNetSigTypes t) - Activate the signal type consistency check into the schematic during check and save.
schSRCForm->tabField->page7->enableSigTypeChecks->value= t - Run the schematic hierarchical check and save.
schHiCheckHier()
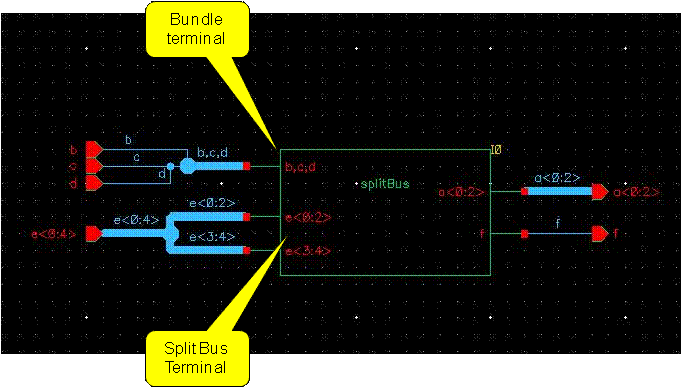
23.14.8 Limitation due to Split Bus and Bundle with `Merge All'
You could face a problem when you use a mix of split bus and bundle with the Merge All option of NC-Verilog.
The following picture illustrate the type of configuration which could lead to a problem.
23.15 Creating a Non-Default Rule in Virtuoso and then Using it in Innovus
You can create a valid NDR in Virtuoso and then use it in Innovus using the following steps:
23.15.1 Using Virtuoso
- Run Virtuoso
- Select Tools - Library manager.
- Select the Lib/Cell/View of the design.
- Once the view is open, Select Layout GXL.
- From the Workspace option, run the Virtuoso Constraint Editor.
- Open the Process Rule Editor. You create NDRs in the Process Rule Editor.
- Select the Design radio button. This option is selected because we want to create an NDR which is a part of the design.
- Specify the NDR name in the Create Constraint Group option. For example,
myNDR3. - Click on + to create the NDR.
- In the next step, we need to assign properties to the NDR to make it a valid NDR in Innovus. In Innovus, an NDR is considered to be valid if it has valid routing layers defined.
- Select Minimum Width, Minimum Spacing Same Layer, Valid Layers, Valid Vias from the Create Process Rule text box and select + to assign this property to the NDR.
- Click on Value to assign layers. Select Metal1, Metal 2...Metal 6 and click Update.
- To define valid vias in the NDR, select vias and click Update.
- To specify minimum width or spacing for the valid layers, select minimum width/minimum spacing and specify a value.
- You can also copy process rules from other constraint groups using Copy Process Rules and Paste buttons.
- After pasting the rules, if needed, select and modify the values.
- Select Close.
- In the constraints manager, select nets.
- Create a net class constraint.
- Change default group of the net class to the one you created. For example,
myNDR3. - Save the design in Virtuoso.
- Exit Virtuoso.
23.15.2 Using Innovus
- Run Innovus.
- Open the same cellview for which you created the NDR using File - Restore Design or File – Import Design.
- Open the Integration Constraints Editor.
- To view the NDR created in Virtuoso, select
myNDR3. It has same values which you specified in Virtuoso. - In this procedure, you created an NDR in Virtuoso, assigned nets with the NDR, save the design, and import the design in Innovus with the same values.
23.16 Troubleshooting Common Errors in Innovus OpenAccess Flow
23.16.1 IMPOAX-717 Error
**ERROR: (IMPOAX-717): There should be a cut layer after layer 'mxx'. Check the order of layers in the technology information read from OA database.
Cause: The technology file needs to have a cut layer in between any two routing layers defined. In this case, either layer mxx does not have the cut layer defined or the same layer is defined in the tech multiple times, perhaps with a different width or thickness.
Solution: To investigate this issue further, dump the tech in Virtuoso and look for the presence of a cut layer between any two routing layers. If the error is being caused because of multiple definitions of the same metal layer (with different width/thickness), the tech file might not have been created properly. This method of defining multiple version of the same metal layer is referred to as a Multi Metal Stack Option (MMSO).
The proper way of creating a tech file with multiple metal stack is to create a LEFdefaultRouteSpec (LDRS) in the OpenAccess tech for each metal-stack. The LDRS for a metal stack will have only the layers used for that specific stack. Once this is done, Innovus can choose the correct metal stack for a particular design by using the following command.
set init_oa_default_rule LEFdefaultRouteSpec_name
23.17 Working with Old Versions of OpenAccess Data
A useful utility to run on old versions of OpenAccess data is oaScan. It can be found in both the Innovus and Virtuoso hierarchies. It scans the contents of a library and checks for inconsistencies in the OpenAccess design, tech, and DMData databases. Such inconsistencies in data can cause the software to hang, crash, or work incorrectly. You can run oaScan on cells/designs to to repair these inconsistencies and debug random crashes and hangs.
Executable Path:
<INNOVUS or VIRTUOSO Installation>/tools/bin/oaScan
Usage:
Syntax: oaScan-lib libName[-libPath libPath][-cell cellName][-view viewName] [-viewType viewTypeName] [-dataModel version] [-repair] [-verbose] [-forceLibPath] #Ignores check for .oalib in libPath[-fixWarnings] [-noWarnings] [-logFile file] [-templateFile file] #File that collects command options[-h | -help] [-version]
Document Location:
<INNOVUS or VIRTUOSO Installation>/doc/oascan/oascan.pdf