1
EDIF 200 In
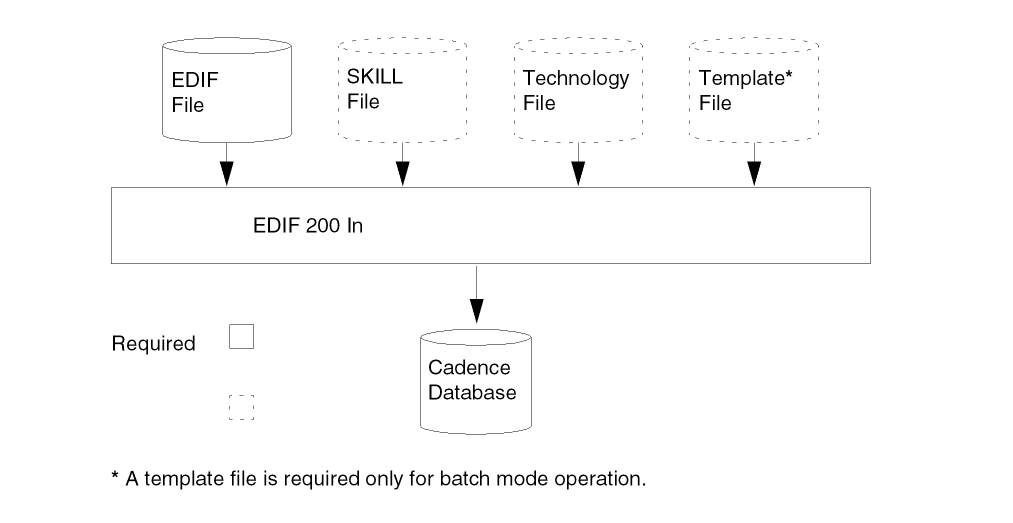
EDIF 200 In translates design data files from the EDIF 200 format into the Cadence® Design Framework II (DFII) format.
- An overview of the EDIF 200 In translation process, see “Understanding EDIF”
- Procedures for starting and controlling an EDIF 200 In translation, see “Using EDIF 200 In”
- Explanations of how EDIF 200 In translates different kinds of views, see “How EDIF 200 In Translates Data”
- An overview of the EDIF 200 In output files, see “EDIF 200 In Output Files”
- A description of the EDIF 200 In form fields, see “EDIF 200 In Form Fields”
Licensing Requirements
For information on licensing in the Virtuoso Studio Design Environment, see Virtuoso Software Licensing and Configuration Guide.
Working in the Team Design Manager Environment
If you choose to run EDIF 200 In in a team design manager (TDM) workArea, note the following:
- For a new library, EDIF 200 In does not check anything in to the TDM environment.
-
For an existing library that is already under TDM control, EDIF 200 In overwrites this library and checks everything in to the TDM environment.
If adding a new cell to an existing library that is already under TDM control, EDIF 200 In automatically checks this cell in to the TDM environment.
Understanding EDIF
The Electronic Design Interchange Format (EDIF) is a non-proprietary, standard interchange format that uses text to describe electronic design data. To express constructs that represent electronic design, EDIF 200 uses a syntax similar to LISP, a list-processing programming language.
For more information about the EDIF 200 syntax and the functional and semantic descriptions of each EDIF 200 construct, see the Electronic Design Interchange Format Version 200, ANSI/EIA 548 Manual.
Overview of Translation Process
The Cadence EDIF 200 In translator translates design data from an EDIF 200 format into the DFII format.
EDIF 200 In Support Features
The EDIF 200 In translator supports
- EDIF version 200
- Keyword Level 0
- EDIF constructs
-
Legal EDIF files that pass the semantic checker written by University of Manchester, EDIF Technical Centre
The semantic checker generates error and warning messages. Warning messages do not prevent processing. -
Other input files with Component Description Format (CDF) information for any EDIF file generated by Cadence EDIF 200 Out
EDIF 200 In automatically looks for the CDF files in the run directory.
Using this feature, you can bring a Cadence design with CDF information back into the Cadence environment (providing the CDF information was stored in the EDIF format using EDIF 200 Out). The CDF information is reapplied to the design when you run EDIF 200 In.
The EDIF 200 In translator does not support
- Version 110 or any other version of EDIF
- Aliases or keyword macros
- Variables, expressions, or control flow
EDIF 200 Limitations
You need to be aware of the following EDIF 200 limitations:
- EDIF 200 does not include an equivalent to the DFII layer-purpose pair. See “Mapping EDIF Constructs to DFII Objects” for more information.
-
You cannot describe donuts in EDIF 200.
Donuts are complex shapes that you construct as composite shapes. - The EDIF 200 standard does not include the concept of a net that is global to an arbitrary hierarchical depth.
- EDIF 200 does not support the following design styles:
Example 1
This example shows inconsistent port grouping between the symbol view and the schematic view of a cell.

In the example, cell cpu has two interface ports: A<0:3> and B<0:3>. Port A<0:3> is grouped on the symbol of cell cpu. But on the schematic, port A<0:3> is divided into ports A<0:1> and A<2:3>.
In most CAE systems, you establish connectivity by connection and by name, such that ports A<0:1> and A<2:3> are members of port A<0:3>. However, in EDIF 200, ports A<0:1> and A<2:3> cannot be represented because the interface (which defines ports) contains only A<0:3> and B<0:3>.
Example 2
This example shows replication of a tapped bit from a bus or bundle.
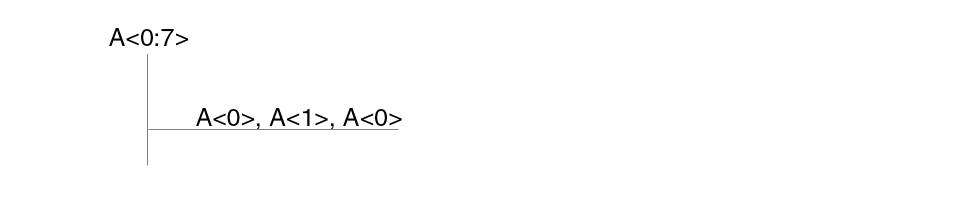
In the example, the bus slice is three bits wide. The first bit is A<0>, the second bit is A<1>, and the third bit is A<0>. This slice cannot be represented in EDIF 200 because it requires A<0> to be represented twice in the port list of a joined statement.
Using EDIF 200 In
You can start and control EDIF 200 In from either a UNIX prompt or from the Command Interpreter Window (CIW).
Starting EDIF 200 In from a UNIX Prompt
From a UNIX prompt, you refer to a template file. The template file contains the name of the data file that you want to read in and the preset values for the EDIF 200 In options that you want to apply during the translation process. Template files are described later in this section.
-
To refer to a template file from a UNIX prompt, type the following:
edifin
templateFile -
To refer to a template file from a UNIX prompt and use a specific
cds.libfile, type the following:edifin
templateFile-cdslibcdslibFile
This command tells the software to use a particular cds.lib file instead of searching for the cds.lib file in the standard locations. See Cadence Library Path Editor User Guide for more information about cds.lib files.
Starting EDIF 200 In from the CIW
From the CIW, you can access the EDIF 200 In form to specify the options you want to apply to the current design translation.
To access the EDIF 200 In form,
-
Choose File – Import – EDIF 200.
The EDIF 200 In form appears.
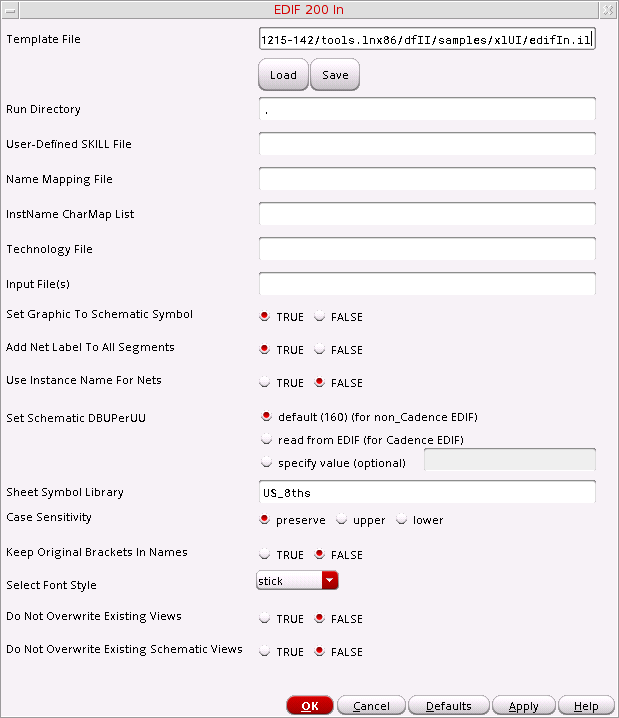 The
Thecds.libfile replaces the search path from earlier versions of EDIF 200 In. Thecds.libfile identifies the locations of your reference libraries. For more information, see Cadence Library Path Editor User Guide. -
Complete the Input File(s) field.
The input files are the EDIF 200 files to be translated. -
Specify any other options you want to apply during the translation.
Information about the optional fields is provided in the “EDIF 200 In Form Fields”. -
Do one of the following:
- Click OK to close the EDIF 200 In form and begin the translation process.
- Click Apply to keep the EDIF 200 In form open and begin the translation process.
EDIF 200 In creates a log file callededifin.login the run directory. The translated library is also created in the run directory. (By default, the Run Directory field is set to the current working directory.)If you translated a schematic, you must use the Design – Check and Save command from the schematic window to ensure connectivity. See Virtuoso Schematic Editor User Guide for more information.
Creating a Template File
A template file is a text file that contains preset values for the options you want to apply during an EDIF 200 In translation.
There are three ways to create a template file:
- Click Save on the EDIF 200 In form to save the values you specified on the form. The information is saved to the filename you enter in the Template File field.
-
Use your local text editor to copy the sample template file to a new file and modify the new file as needed. The sample template file (
edifIn.il) is located in the your_install_dir/tools/dfII/samples/xlUIdirectory. - Use your local text editor to create a new template file, like the one shown in the sample below. The sample shows all the EDIF 200 In variable names and the SKILL property list format.
Sample Template File
The following is a sample EDIF 200 In template file:
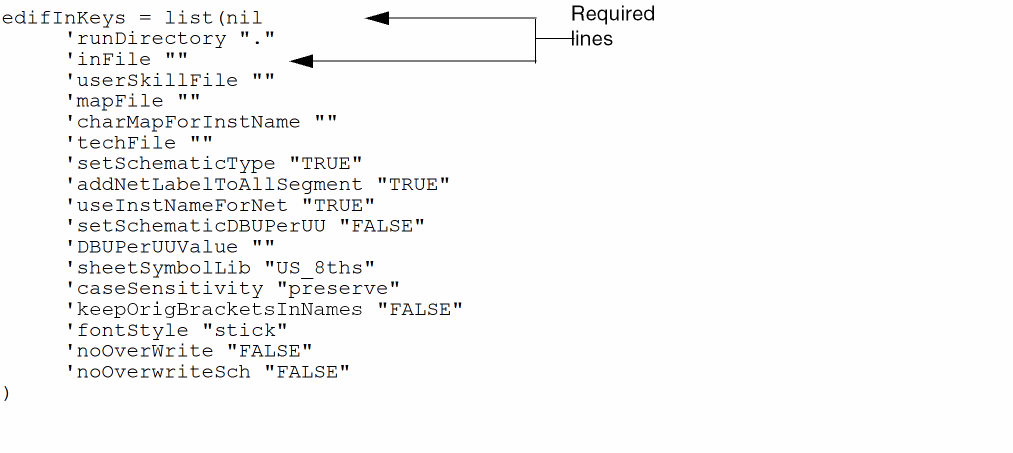
Mapping Form Fields to Template File Entries
The following table maps the EDIF 200 In form fields to their corresponding template file entries. For descriptions of the form fields, see “EDIF 200 In Form Fields”.
| EDIF 200 In form field | EDIF 200 In template file entry | Default value |
|---|---|---|
Any value you enter for 'DBUPerUUValue overrides the value in the 'setSchematicDBUPerUU field. If you use 'DBUPerUUValue, make sure the value you choose is the same value you used to create the EDIF file, and set the 'setSchematicDBUPerUU field to "FALSE". For more information, see
How EDIF 200 In Translates Data
Each construct in EDIF 200 is associated with one or more view types. EDIF 200 In supports only constructs associated with general, netlist, schematic, masklayout, and graphic view types. EDIF 200 In does
Mapping EDIF Constructs to DFII Objects
The following table shows how EDIF 200 constructs are mapped to the DFII objects by EDIF 200 In.
| EDIF 200 construct | DFII object |
|---|---|
How EDIF 200 In Translates Constructs
The following sections discuss EDIF 200 constructs. There are five types of constructs:
- General constructs
- Netlist view constructs
- Schematic view constructs
- Masklayout view constructs
- Graphic view constructs
General Constructs
The general constructs described in this section are often used or translated differently than as defined by the Electronic Industries Association (EIA) standards.
Cell Construct
EDIF 200 In converts EDIF 200 cells to DFII cells.
Contents Construct
The contents construct defines a detailed implementation of the cellview. Most objects that go into the database of the DFII view are defined in constructs within the EDIF 200 contents construct.
Direction Construct
The direction construct defines whether a port is input, output, or bidirectional. If no direction is defined, EDIF 200 In sets the direction to unknown.
Display Construct
The display construct is supported for displaying text. For example, EDIF 200 In uses the display construct, within the context of the keywordDisplay construct, to create a label for displaying the cell name as follows:
(keywordDisplay CELL
     (display textLayer
          (justify LOWERCENTER)
          (origin (pt 0 -20))
     )
)
External Construct
EDIF 200 uses the external construct to declare libraries that are referenced but not defined in the EDIF file. EDIF 200 In expects to find libraries declared as external to exist on the system and to be accessible through the paths specified in the cds.lib file.
EDIF 200 In uses the cds.lib file to locate the views, opens each view in the read-only mode, and verifies the existence of the ports declared in the interface section.
External library declarations must be edifLevel 0. Parameterization is not supported.
Figure and FigureGroup Constructs
EDIF 200 In reads the figureGroup construct in the EDIF file and the set of system layers in the technology file to define the layer name and layer-purpose. You must define the layer name and layer-purpose for each shape. If the shape is a pin, the default layer name is pin and the layer-purpose is drawing. If the shape is a net, the default layer name is wire and the layer-purpose is drawing. If the shape is a net label, the default layer name is wire and the layer-purpose is label.
Library Construct
EDIF 200 In uses the library construct to create the library that contains the cellviews. If a library defined in the EDIF file exists in the DFII environment, EDIF 200 In opens the library in append mode.
OpenShape Construct
The openShape construct describes a shape that is open.
Port Construct
Ports and port bundles defined in the EDIF 200 interface section are mapped to DFII terminals. When EDIF 200 In encounters a port construct, it generates a terminal. The DFII environment supports only one-dimensional arrayed ports.
PortBundle Construct
When EDIF 200 In reads a portBundle construct, it generates a terminal name by concatenating the name of each port listed in the listOfPorts construct. This list is separated by commas. Consider the following example:
(portBundle pbExample
     (listOfPorts
          (port a)
          (port b)
     (port (array c 3))
     )
)
In this example, EDIF 200 In creates a terminal named a,b,c<0:2>.
PortImplementation Construct
EDIF 200 In uses the portImplementation connectlocation construct to define a pin shape and to set the layer name to pin and the layer-purpose to drawing. You must set the layer name and layer-purpose if you want to use the schematic editor to edit the design.
Scale Construct
In the numberDefinition construct, the scale construct establishes the ratio of DFII units to user units. The formula is as follows:
ScaleRatio = (edifUnits / userUnits in meters) * conversion
The user units conversion is .0254 m/inch for schematics, and 1.0 x10⁻⁶ m/micron for mask layouts. But because netlists are not graphic, distances are meaningless for netlist views. Therefore, the DFII point is equivalent to the EDIF point divided by the ScaleRatio.
For example, if the EDIF file contains
(numberDefinition
     (scale 1 (E 254-6) (unit DISTANCE))
)
..
(viewtype schematic)
boundingBox (rectangle (pt 0 0) (pt 80 60))
the DFII mapping points are as follows:
Technology Construct
The technology file information in DFII 4.4 and beyond is not compatible with version 4.3.x.
View Construct
EDIF 200 In maps EDIF 200 view constructs to DFII cellview objects. Then EDIF 200 In attaches properties to the cellviews.
Netlist View Constructs
The netlist view describes the design connectivity for circuit simulators and layout tools. Because the schematic view contains network topology plus graphic information, netlist view constructs are a subset of schematic view constructs.
Contents Construct
For the netlist view type, the contents construct defines the connectivity of instances, nets and netBundles, and ports.
UserUnits Construct
For the netlist view type, EDIF 200 In sets the userUnits construct to "inches" and the conversion number to 2.54*10 m/UU.
Schematic View Constructs
The schematic view is a logical description of an electronic design. It is a superset of the netlist view because the schematic view specifies all the connectivity information of the design plus graphic information.
The EDIF 200 schematic view can contain symbol libraries and schematics at the block, gate, and transistor level.
Contents Construct
The contents construct of a schematic view consists of connectivity and graphics that include instances and nets of standard device symbols and descriptive labels. In addition, the contents is subdivided into pages. The existence of page constructs in the contents construct of a schematic view causes EDIF 200 In to create an indexed schematic.
Page Construct
EDIF 200 In supports the page construct for the schematic view and generates multisheet schematics. EDIF 200 In uses the offPageConnector construct in the contents construct outside the scope of a page to establish off-page connectors in the DFII database.
Symbol Construct
Use the symbol construct to generate symbols for schematics or symbolic layouts. In a schematic view type, the symbol construct defines graphics for a schematic symbol, such as a NAND gate.
A schematic symbol is a standalone entity that the DFII environment places as an instance in a schematic; EDIF 200 In defines a schematic symbol using the symbol construct embedded in an interface construct, not in the context of a sheet schematic.
Transform Construct
For schematic views that have geometrical constructs, EDIF 200 In supports the transform construct of an instance.
UserUnits Construct
For the schematic view type, set userUnits to "inches" and the conversion number to 2.54*10-2 m/UU.
Masklayout View Constructs
The masklayout view constructs are discussed below. masklayout constructs are often used or translated differently than as defined by the EIA standards.
Contents Construct
A masklayout view can contain connectivity, but the primary information transmitted to the database is the mask artwork defined by the figure constructs within the contents construct.
Transform Construct
For masklayout views that have geometrical constructs, EDIF 200 In supports the transform construct of an instance.
UserUnits Construct
Set masklayout userUnits to "microns" and use a conversion number of
10-6m/UU; for example:
Graphic View Constructs
The graphic view construct that EDIF 200 In supports is the graphic view type.
User Units
Set graphic userUnits to "microns" and use a conversion number of
10-6m/UU, for example:
How EDIF 200 In Translates Connectivity
EDIF 200 In imposes certain constraints because of differences in connectivity rules and models between EDIF 200 and DFII. These constraints and differences are discussed in the following sections.
Differences in Connectivity Rule
DFII allows one master port for each port joined in a net at a given level of hierarchy. The joining of two or more master ports at the same level constitutes a short.
For example, the following connection is allowed because port P1 at the current level of hierarchy is joined to port P1 on instance I1.
(net N1
     (joined (portRef P1) (portRef P1 (instanceRef I1)))
)
But the following connection is not
(net N2
     (joined (portRef P1) (portRef P2))
)
Differences in Connectivity Models
The EDIF 200 connectivity model differs from the DFII connectivity model. EDIF 200 uses net-based connectivity; that is, EDIF 200 defines a net and establishes connectivity by stating which ports are connected to the net. The DFII environment supports a terminal-based connectivity model.
Consider the following example:
(port (array P 2))
...
(instance i1 (viewRef v1 (cellRef c1 (libraryRef l1))))
..
(net a
     (joined
          (portRef (member p 0))
          (portRef p1 (instanceRef i1))
     )
)
(net b
     (joined
          (portRef (member p 1))
          (portRef p2 (instanceRef i1))
     )
)
For a schematic view, EDIF 200 In generates a net named a,b and connects the p<0:1> terminal to it. The a net connects to the p1 port on instance i1. The b net connects to the p2 port on instance i1.
For a netlist view, EDIF 200 In generates net a and net b. The a net connects to the p<0> terminal. The b net connects to the p<1> terminal.
Physical Implementation of Nets
EDIF 200 expresses the physical implementation of a net through a figure within the context of the net construct. EDIF 200 In also supports commentGraphics and property constructs.
Critical Nets
EDIF 200 In uses the criticality construct to define the relative importance of a net. Placement and routing uses the criticality construct to establish net criticality.
Rippers
When EDIF 200 In translates a cell whose cell type is RIPPER, the string property schType is attached to the cellview and its value is set to "ripper".
EDIF 200 In processes the interface section of RIPPER cellviews differently from GENERIC cellviews. Rather than creating a terminal, EDIF 200 In creates a pin for each port defined in the interface and a terminal for each joined construct declared in the interface.
The pins are attached to the terminals based on the references in the joined constructs. The following EDIF fragment illustrates this concept:
(cell rip (cellType RIPPER)
     (view symbol (viewType SCHEMATIC)
     (interface
          (port  (array A 512)  (direction INOUT))
          (port  (array B 512)  (direction INOUT))
          (port  (array C 512)  (direction INOUT))
          (joined
               (portRef A)
               (portRef B)
               (portRef C)) ... )))
In this example, EDIF 200 In creates a pin for ports A, B, and C. EDIF 200 In creates a terminal named ripTerm when it processes the joined constructs. Because all three ports are referenced in the single joined construct, the pins corresponding to each of these ports are attached to the terminal.
When the terminal and its associated pins are created for a ripper, the width of the pins is not recorded. The widths of the connections between the ports of the ripper are determined when the ripper is instantiated. The connectivity is established when the ripper is used.
When the ripper is used in a net, EDIF 200 In extracts the information from the joined constructs in the nets connected to the ripper. It builds a connection expression for each port of the ripper that is connected.
The connection expression, a string property attached to the instance, denotes the connectivity between the net and a particular ripper cell pin. The property name contains the ripper pin name. The following EDIF fragment contains an instance that refers to the ripper cell defined in the previous example:
instance I1 (viewRef symbol (cellRef rip)) ...)
     ...
     (net
     (joined
          (portRef D)
          (portRef (member A 0) (instanceRefI1))) ...)
When EDIF 200 In processes this net, it extracts the member information for the referenced port instance A. Because the instance is a ripper cell, EDIF 200 In uses the member information to construct a net expression property that attaches to instance I1 (instanceRefI1). The name of the net expression property is edifNetExpr_A. The value of the property is "0=0".
Both vectors are equivalent and, therefore, a shorter notation can be applied and the value can be set to "0" (zero).
The syntax for the net expression properties is as follows:
net_expression_name::= ’edifNetExpr_’ripperPinName
net_expression::=vector_expression’=’vector_expression
EDIF 200 In uses a subset of the available vector expressions. For more information about vector expressions, refer to
EDIF 200 In supports one-dimensional, two-dimensional, and multidimensional rippers. One-dimensional rippers are connection points between wires and buses of different sizes. Two-dimensional rippers are those cells that have two ports that are not implemented in the same location. Multidimensional rippers are those that rip out several signals from a bus with a single ripper.
How EDIF 200 In Translates Design Hierarchy
EDIF 200 In establishes design hierarchy through the instance construct. However, EDIF 200 In does not support either the parameterAssign construct, which assigns parameters to instances, or the portInstance construct, which applies and modifies properties on instance terminals.
How EDIF 200 In Translates Parameters
You can set the parameters for some Cadence applications by setting user properties in the DFII environment. For example, you can use the graphics editor to set properties on graphics data, which is equivalent to setting parameters for an application that runs in the graphics environment.
The following example shows how you can set properties for schematic views. In the example, EDIF 200 In uses the values in the scale construct together with the viewType to determine scaling.
(library L
     (edifLevel 0)
     (technology
          (numberDefinition
               (scale 160 (e 254 -4) (unit DISTANCE))
          )
     )
     (cell C
          (cellType GENERIC)
          (view V
               (viewType SCHEMATIC)
               (interface ...)
               (property screenGridSpacing
                    (number (e 125 -3))
               )
               (property snapSpacing
               (number (e 625 -4))
               )
               (property screenGridMultiple
                    (integer 8)
               )
               ...
          )
     )
)
In the preceding example, the scale construct says that every 160 distance units in the EDIF file corresponds to 254*10-4 meters. The viewType is schematic. Therefore, EDIF 200 In sets the userUnit attribute to "inches" and uses a conversion of 2.54*10-2 m/UU. The scaling is calculated as follows:
The other properties in the example set the screen grid spacing, snap spacing, and screen grid multiple of the graphics editor. For more information about setting user properties, see Virtuoso Studio Design Environment User Guide.
How EDIF 200 In Translates Mosaics
EDIF 200 In translates mosaics only for mask layout. EDIF 200 In supports two-dimensional instance arrays. For example, the following fragment produces a 3 by 5 simple mosaic in the DFII database.
(instance (array mosaic1 3 5)
(viewRef V1 (cellRef C1 (libraryRef L1)))
)
If you replace the viewRef construct in the example with a viewList construct (which places instances of different views in the array), EDIF 200 In generates a complex mosaic that does not permit connectivity.
The DFII environment does not support connectivity involving mosaic instances. However, the following one-dimensional arrayed instance generates an iterated instance (not a mosaic instance) in the DFII database. And EDIF 200 In supports connection to ports on iterated instances.
(instance (array I2 8)
(6viewRef V2 (cellRef C2 (libraryRef L1)))
)
How EDIF 200 In Translates Object Attributes
Most objects in the DFII environment have associated attributes that are used by one or more applications. Attributes are similar to user-defined properties because they are pieces of information attached to an object. However, properties exist only at your discretion, whereas attributes always exist as a permanent part of the database.
Cadence specifies the attribute type. When the DFII environment creates a database object, it assigns a value to each of the object’s attributes. If you do not specify a value, the system chooses a default value. You can change the attribute value at any time.
You can set certain attributes in EDIF 200 In. Use the EDIF 200 property construct with an owner "Cadence" qualification to distinguish the attribute from the usual property construct.
For example, to set a ground net signal type, use the following construct:
(net (rename GND "gnd!")
(joined
     (portRef S (instanceRef &0))
     (portRef GND (instanceRef &2))
)
     (property sigType
     (string "ground")
     (owner "Cadence")
     )
)
To set object attributes using owner "Cadence" properties, use certain key words for both the property name and the property value. The next sections describe which property names and property values to set for figure groups, instances, and nets.
Figure Groups
A figure group must contain the following property information:
The following example shows how you can use EDIF 200 In to translate a figure group:
(library L1
     (edifLevel 0)
     (technology
          (figureGroup diffusion
               (property layer
                    (integer 52)
                    (owner "Cadence")
               )
               (property priority
                    (integer 37)
                    (owner "Cadence")
               )
          )
     )
)
Instances
An instance must contain the following property information:
The following example shows how you can use EDIF 200 In to translate an instance:
|
|
(instance I1
     (viewRef ...)
     (transform ...)
     ...
     (property placementStatus
          (string "suggested")
          (owner "Cadence")
     )
     ...
)
Nets
The three net types are as follows:
The following three sections describe the property information of each net type.
Net Connection Status
A net connection status must contain the following property information:
The following example shows how you can use EDIF 200 In to translate net connection status:
(net N1
     (joined ...)
     ...
     (property connStatus)
          (string "connectOutside")
          (owner "Cadence")
     )
     ...
)
Net Signal Type
A net signal type must contain the following property information:
The following example shows how you can use EDIF 200 In to translate net signal type:
(net VDD
     (joined ...)
     ...
     (property sigType)
          (string "supply")
          (owner "Cadence")
     )
     ...
)
Net Global Status
A net global status must contain the following property information:
The following example shows how you can use EDIF 200 In to translate net global status:
(net VDD
     (joined ...)
     ...
     (property global
          (boolean (true))
          (owner "Cadence")
     )
     ...
)
For a schematic view, EDIF 200 In automatically appends an exclamation point (!) to the end of the global signal name. For example, it changes VDD to VDD! to represent a global signal. For a netlist view, EDIF 200 In does not modify the global net name.
Net Names
EDIF 200 In converts curly braces ({ }) and brackets ([ ]) in net names to angle brackets (< >). EDIF 200 In also converts double periods (..) and hyphens (-) in the bit range of net names into colons (:). The table shows how EDIF 200 In expands net names and vector expressions
| Name | Number of Members | Expanded Form |
|---|---|---|
As shown in the table, the expanded form of a name is semantically equivalent to the original specification. It is created by expanding the range specifications, applying repeat operators, and removing parentheses.
To determine the nth member name, use a zero-based counting scheme to find the nth element in the expanded form. For example, member zero of <*2>(a,<*2>b) is a, member one is b, member two is b, and so on. If the name contains a vector expression, such as b<0:1,2:2>, then member zero is called b<0>, member one is b<1>, and member two is b<2>.
EDIF 200 In Output Files
In addition to a translated design data file, EDIF 200 In produces log messages. The messages are written to either a file or the screen, depending on how you started EDIF 200 In.
-
When you use the EDIF 200 In form to start EDIF 200 In, the software writes the log messages to the
CDS.logfile in your home directory and to theedifin.logfile in your run directory. -
When you start EDIF 200 In by typing the
edifincommand at the UNIX prompt, the software displays the log messages on your screen and writes error and warning messages toedifin.logfile in your run directory.
You can redirect the messages by piping the messages to a file. To pipe the messages to a file, type the following at the UNIX prompt:
edifintemplateFile>&file.log
where templateFile is the name of the template file and file.log is the name of the log file you want to create.
EDIF 200 In Form Fields
- Template File— specifies the name of a text file that contains filenames and values for the options you want to apply during an EDIF 200 In translation process.
- Load—button reads the template file and applies its contents (field names and values) to the EDIF 200 In form.
- Save—button creates a template file that contains the filenames and option values you specify in the form. The information is written to the filename you specify in the Template File field.
- Run Directory—is the directory where the output files and libraries are generated. You must have write permission to this directory. The default is the current working directory from which you started the software.
- User-Defined SKILL File—is a file that contains user-defined SKILL routines.
- Name Mapping File—lets you specify the file in which EDIF 200 In writes specific name mapping information such as the legal names that EDIF 200 In substitutes for illegal names. If you do not provide a filename in this field, EDIF 200 In does not generate the file.
-
InstName CharMap List—is a file that contains the user-defined mapping information. The mapping information tells EDIF 200 In how to handle instance names that contain illegal characters.
The format is a list containing mapping pairs enclosed in parentheses. For example, the string “( / | ) ($ - )” maps the character “/” in an instance name to the character “|” and maps the character “$” to the character “-”. That is, the first character in the parentheses is the original character and the second character is the character to which the first one is mapped. - Technology File —specifies the name of a technology file. A technology file sets the library configuration. If you do not specify a technology file, EDIF 200 In uses the current library configuration.
- Input File(s)—specifies the names of the EDIF 200 files to translate. Specify more than one input file by separating each file with a space. You must specify at least one input file.
- Set Graphic To Schematic Symbol—specifies whether EDIF 200 In converts graphic symbols to schematic symbols.
- Add Net Label To All Segments—specifies whether EDIF 200 In adds labels to all net segments without labels.
- Use Instance Name For Nets—specifies the net name for an unconnected terminal.
-
Set Schematic DBUPerUU—specifies how EDIF 200 In sets the value for DBUPerUU (database units per user unit), which is the value for the grid spacing on the schematic.
- default (160) for non_Cadence EDIF—specifies that the default value of 160 DBUPerUU is used. Use this setting for third-party EDIF files.
- read from EDIF for Cadence EDIF—specifies that EDIF 200 In is to take this value from the EDIF file. Use this setting for EDIF files generated by EDIF 200 Out.
- specify value (optional)—lets you enter a specific value. Any value you enter in this field overrides the two previous choices.
-
Sheet Symbol Library—specifies the library containing sheet symbols used to generate schematic sheets. The default is the
US_8thslibrary. - Case Sensitivity—specifies whether EDIF 200 In changes the case of letters in all the EDIF identifiers; that is, all the names (including cell names, net names, and instance names), renames, and keywords in the EDIF file.
-
Keep Original Brackets In Names—specifies whether the bus notation stays in its original form or is mapped into Cadence bus notation.
- TRUE—keeps the original bus notation in the EDIF 200 file.
-
FALSE—converts non-angle-bracketed bus notation into the Cadence bus notation, which uses angle brackets (< >).If the EDIF file is schematic view, the bus notation must be mapped into the Virtuoso® Schematic Composer schematic capture bus notation. That is, if you are going to use the composer tool for design entry, use FALSE to convert bus notation into Cadence bracketed notation. Otherwise, the composer tool does not generate the correct connectivity for the design. Use TRUE if the design is going to be worked in another tool.
-
Select Font Style—sets the font style you want to use in the DFII database. The font choices are
stick,euroStyle,fixed,gothic,math,roman,script, andswedish. The default isstick. - Do Not Overwrite Existing Views—specifies whether the existing cellview has to be recreated during EDIF 200 In translation or not.
- Do Not Overwrite Existing Schematic Views—specifies whether the existing schematic cellview has to be re-created while updating the symbol views during EDIF 200 In translation or not.
Return to top