8
Large-Signal S-Parameter Simulation (LSSP)
Large-Signal S Parameters
Characterizing RF circuits with small-signal S-parameters is a well established practice. However, small-signal S-parameters are not sufficient to describe nonlinear circuits with moderate to large amplitude signals.
As a natural extension of small-signal S-parameters, large-signal S-parameters (LSSPs) are defined as the ratio of reflected (or transmitted) waves to incident waves. Since small-signal S-parameters are based on the simulation of a linearized circuit, they are independent of the input power. LSSPs include the nonlinear effects at different amplitudes.
The LSSP capability is implemented for harmonic balance and PSS (shooting and harmonic balance) simulations.
Starting with the MMSIM13.1 release, the LSSP capability has been integrated into the hb and pss (shooting and hb) Choosing Analyses form. With this integration, the simulation is now much easier to set up, and allows the input and output frequencies to be different. Direct plot functions have also been implemented to allow plotting the large-signal S-Parameters on a Smith Chart. When these expressions are added under the Maestro tab of the ADE Explorer window from the Direct Plot Form, ADE Explorer plots the output on the Smith Chart.
Large-Signal S parameters for a Two Port Circuit
Consider calculating LSSPs for a two-port circuit. When you apply a signal at port 1 on the left and terminate port 2 on the right, as shown below, you can measure S 11 and S 21.
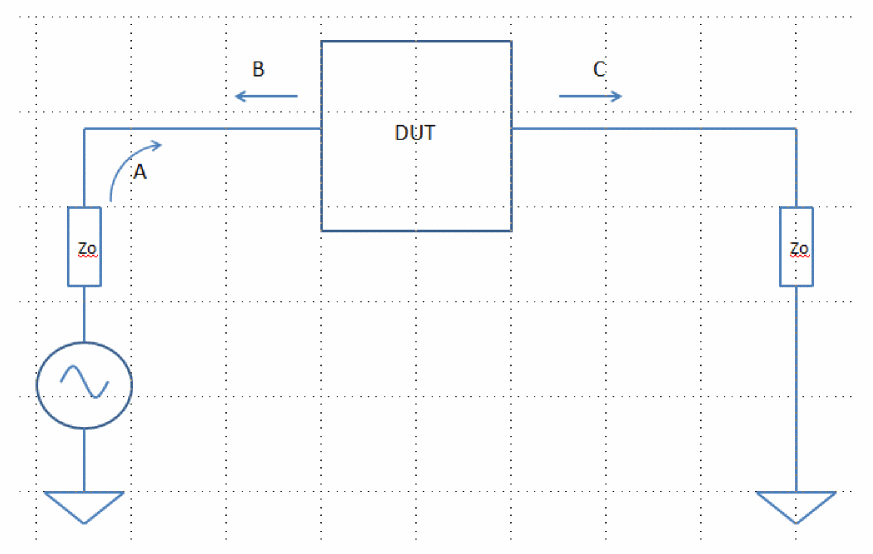
For a wave A launched from port1 on the left, S11 is B/A, and S21 is C/A, where A, B, and C are all vectors. When this measurement is done, the power in the load resistor is calculated.
Similarly, when you launch wave D at port 2 on the right, and terminate port 1 on the left as shown below, you can measure S 12 and S 22. The power measured above is set in port2 for this measurement.
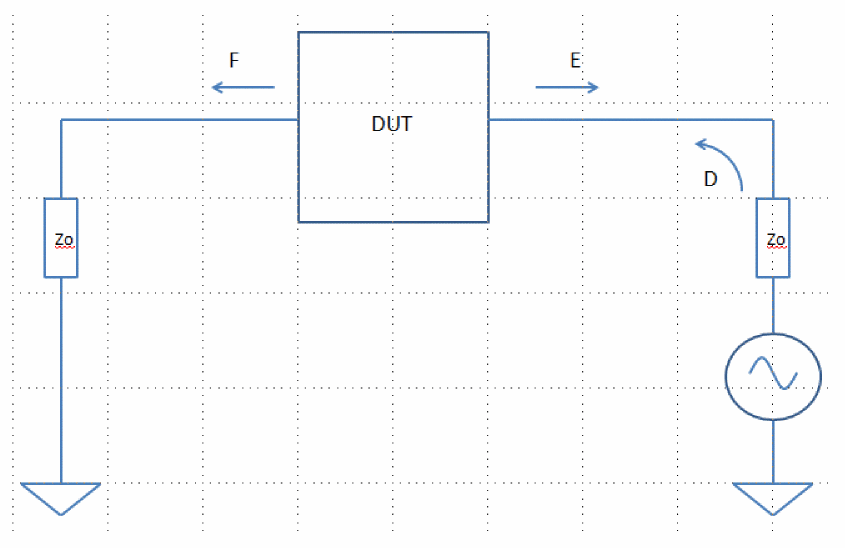
For a wave launched from port2 on the right, S22 is E/D, and S12 is F/D, where D, E, and F are all vectors.
For nonlinear circuits, the values of the S-Parameters can change as the amplitude of the signal changes. In addition, the frequency can be swept for a single input and output amplitude at a time
Circuit Setup
The normal setup for large-signal S-Parameter measurement is similar to the setup for a swept input power simulation, with the addition of setting the output Source type to sine and leaving all the properties for the sine wave blank. LSSP analysis causes port 1 to be driven first so the S11 and S21 measurements can be made, and then causes port 2 to be driven next so the S12 and S22 measurements can be made. The power in port 2 from the S21 measurement is set in port 2 for the S22 and S12 measurement.
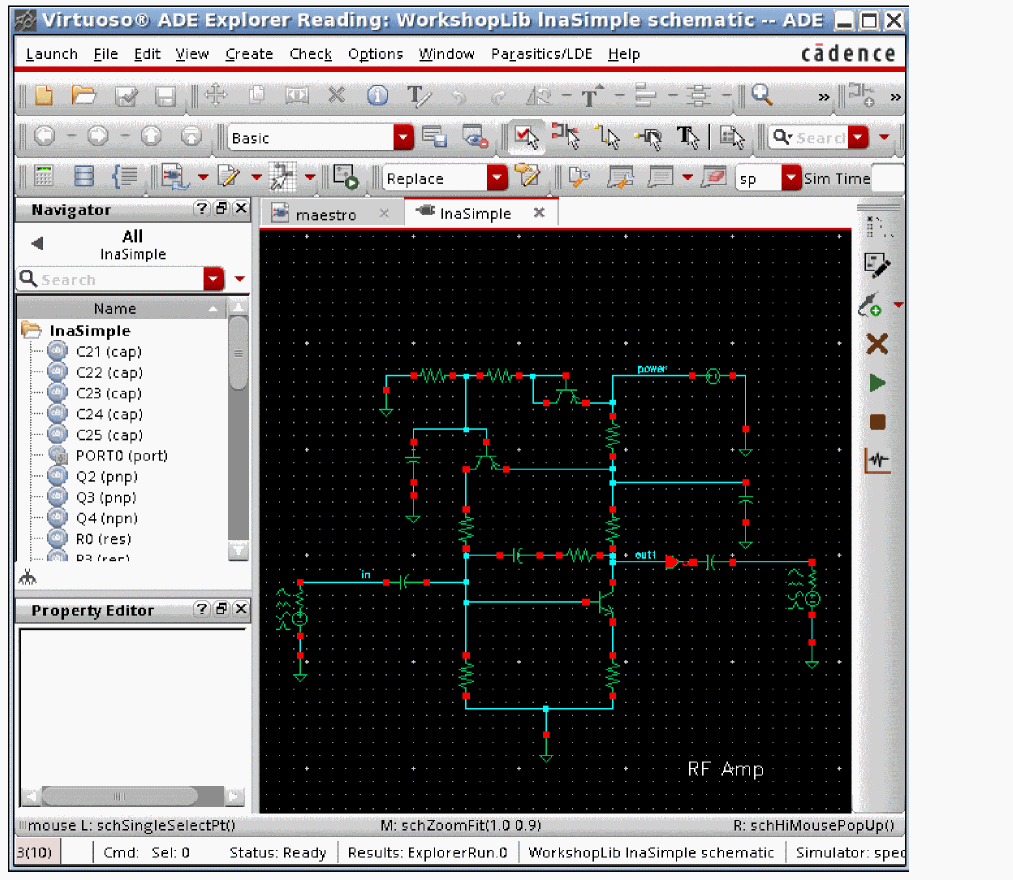
A behavioral low noise amplifier is shown below.
LSSP expects that a variable is used to set the input power. The normal setup is to specify the input power sweep as normal and then select the LSSP check box in the Choosing Analyses form. When this is chosen, you define the source and load ports in the Ports field, and you select the frequency of the output in the Load Harmonic field. The output frequency defines the frequency for the forward S21 measurement, and the frequency of port 2 for the S22 and S12 measurements. Set the output Source type to sine with no properties to define the frequency or amplitude.
The input port RF and output port PORT2 setup are shown below.
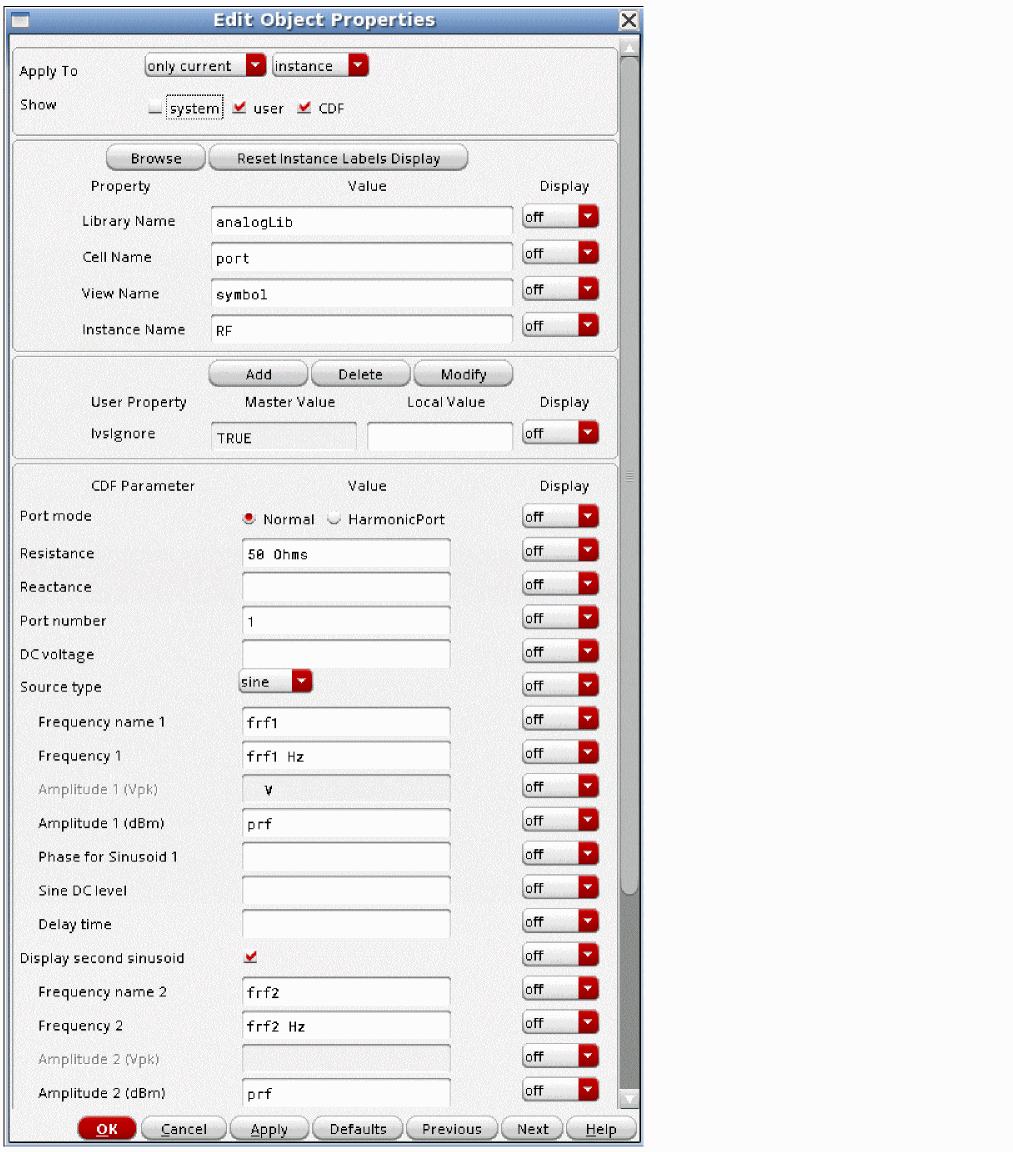
Note that the input source is set to produce two RF signals. Both signals have frequencies that are set by the variables frf1 and frf2. The amplitude of both signals are set to the variable name prf. This is a common way to set sources because it allows changing the frequencies and amplitudes using variable names in ADE Explorer without needing to change the schematic.
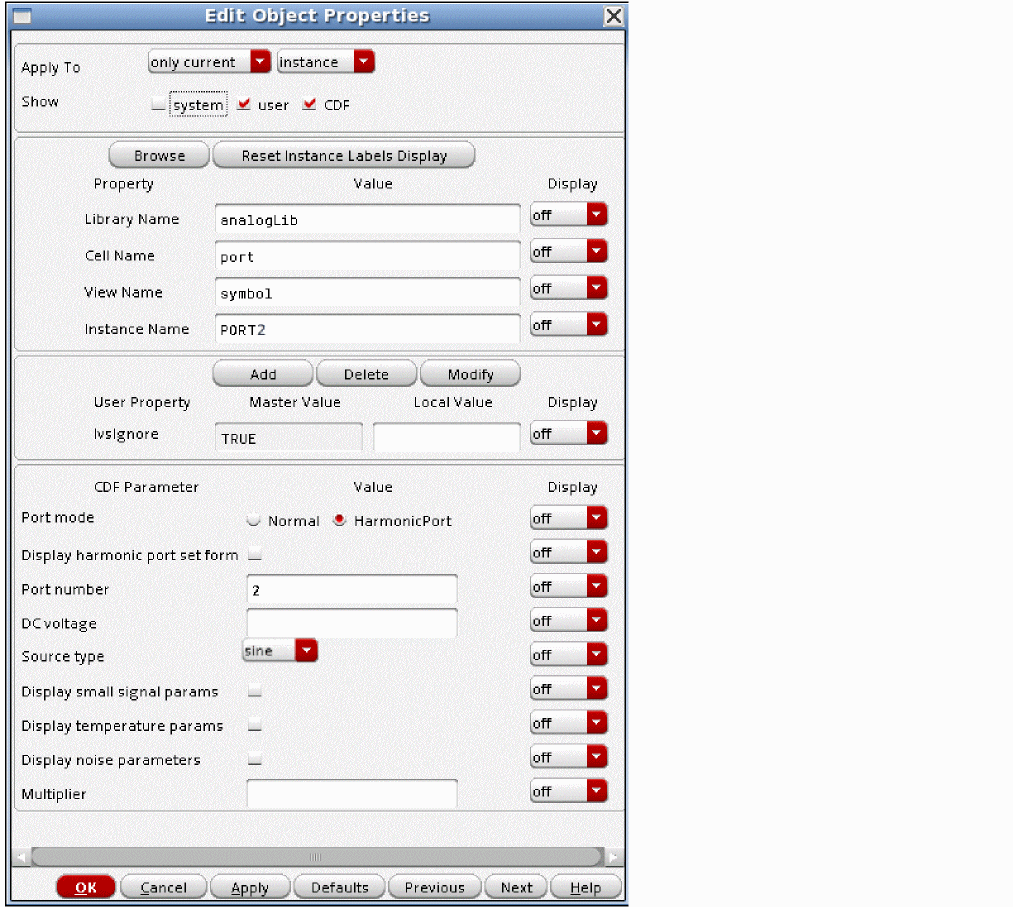
The normal setting for the load port is to set the Source type to sine, and leave all the properties that define the sinusoid blank, as shown above.
ADE Explorer Setup
The ADE Explorer setup is shown below with the variables defined in the Design Variables section.
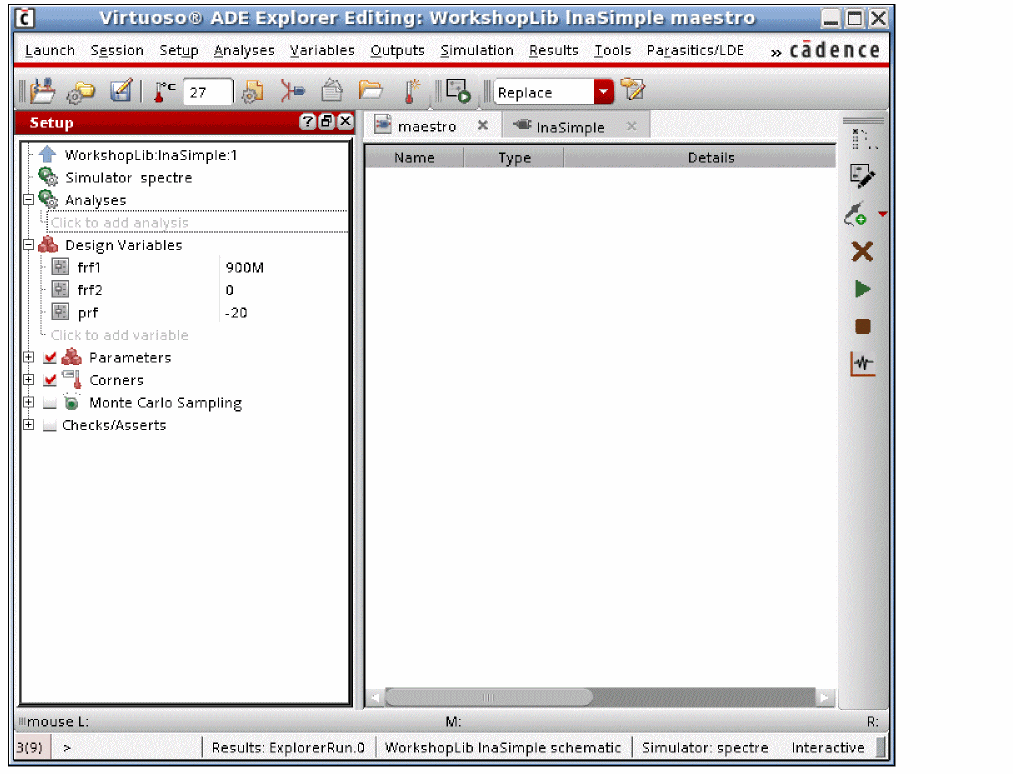
Note that the variable frf2 has been set to zero to disable the second RF tone.
Analysis Setup
Next, set up the hb Choosing Analyses form, as shown below.
-
Select Analyses - Choose from the ADE Explorer window.
The Choosing Analyses form is displayed, as shown below.
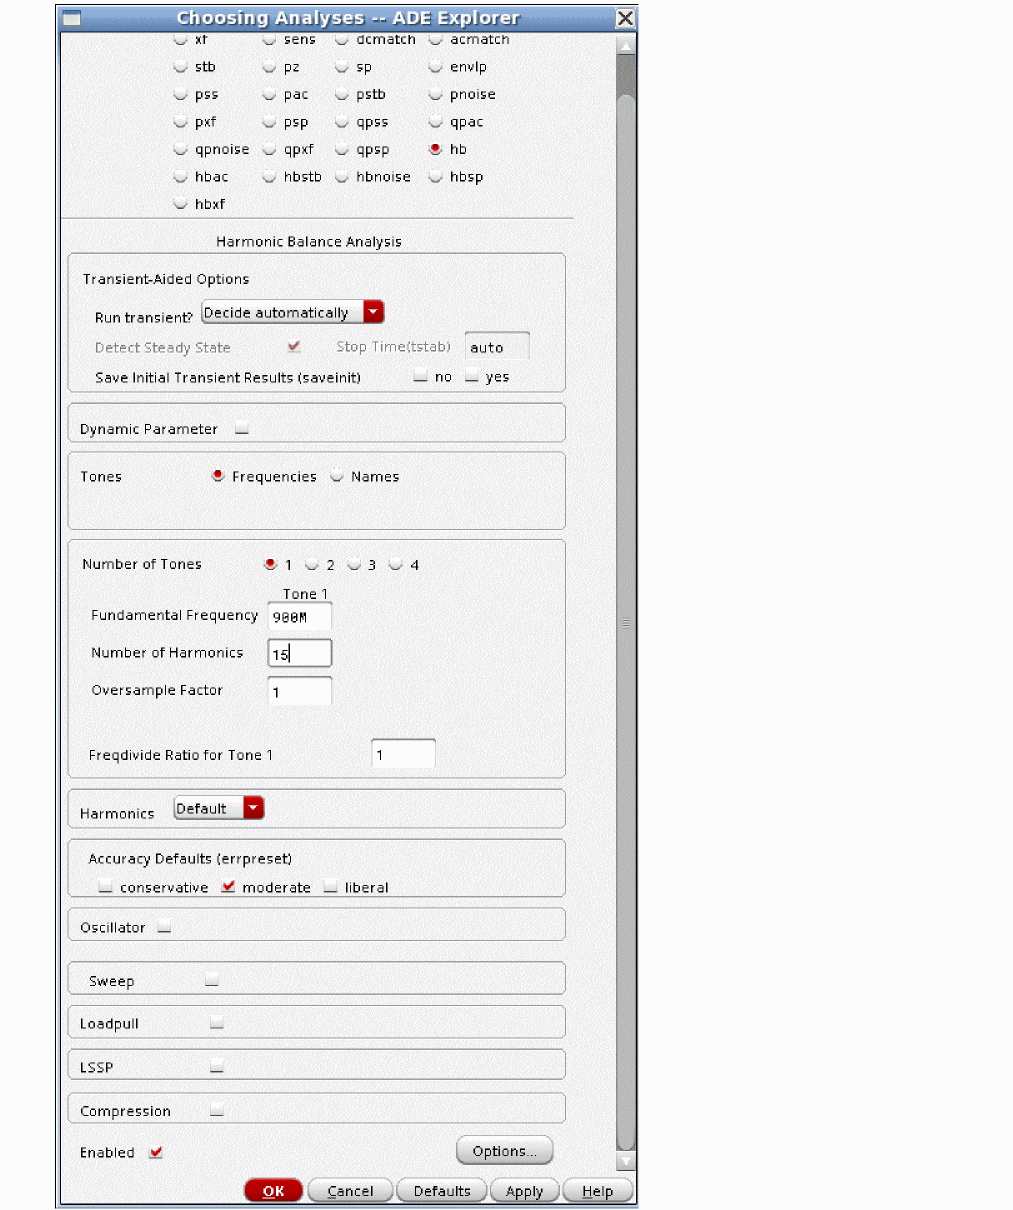
- Specify the fundamental frequency in the Fundamental Frequency field. Here, 900M has been specified.
-
Specify the number of harmonics in the Number of Harmonics field. Here, 15 is specified.
It is recommended to set the number of harmonics manually and specify a value that is high enough to get accurate results at the highest input power level in the sweep. -
Select the LSSP check box. The LSSP options are displayed, as shown below.

-
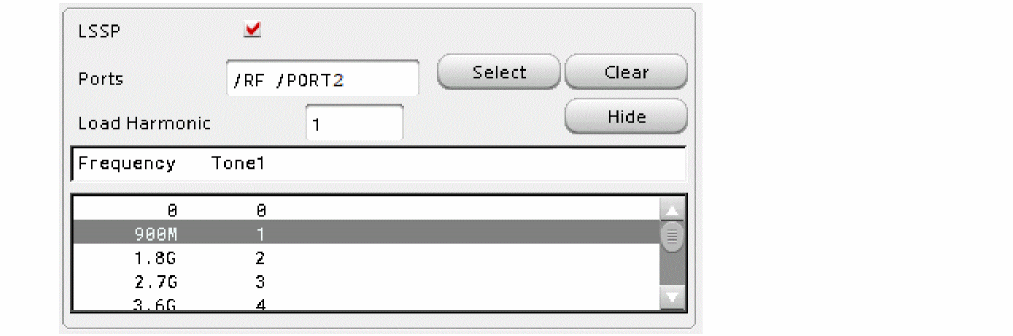
Click Select to the right of the Ports field and select the input source and output source from the schematic. The Ports field is populated with the names of the input and output ports, as shown below.

- Click Choose to the right of the Load Harmonic field.
-
Select the frequency and tone, as shown below.
- Click Apply.
LSSP Amplitude Sweep
To set up the amplitude sweep:
-
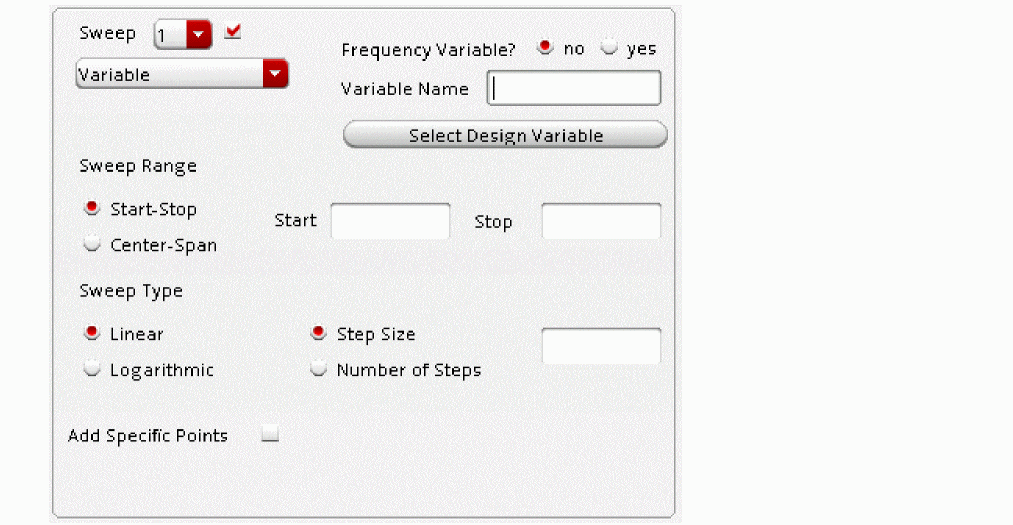
Select the Sweep check box. The Sweep options are displayed, as shown below.
-
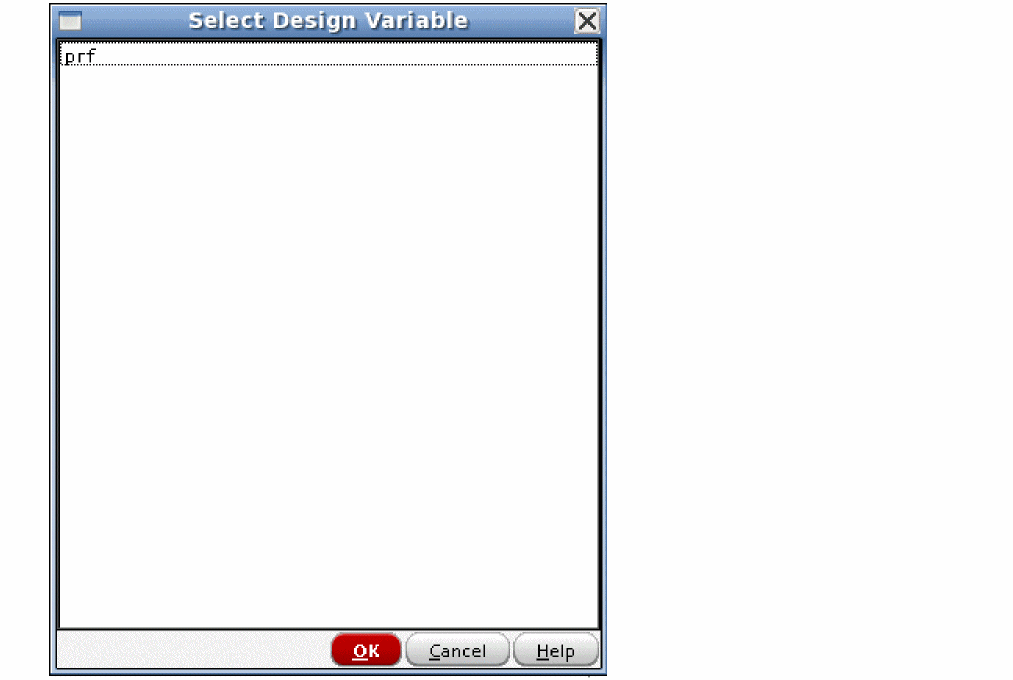
Click Select Design Variable. The Select Design Variable form is displayed, as shown below.
-
Select a variable from the available list of variables. The Variable Name field is populated with the name of the variable, as shown below.
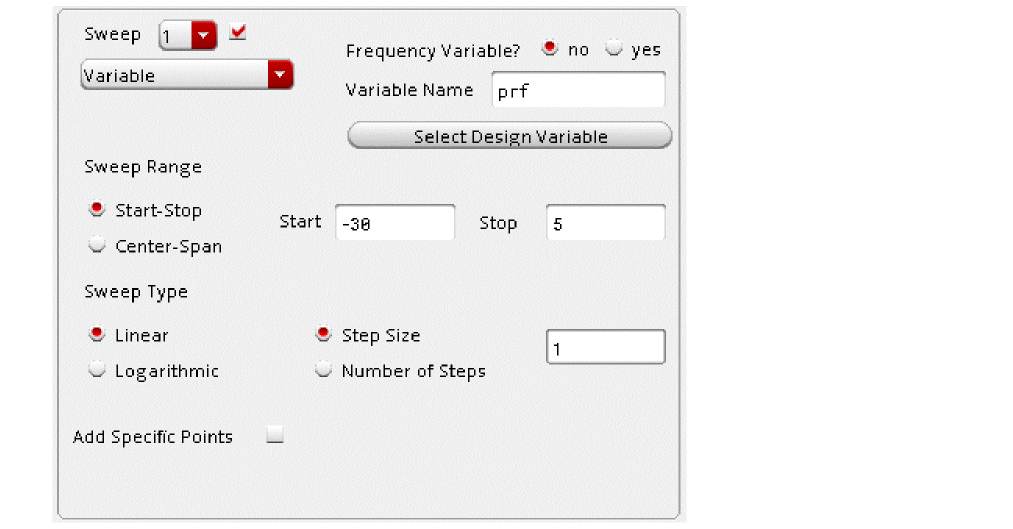
- Specify the sweep range in the Start and Stop fields.
- Specify the step size in the Step Size field.
- Click OK.
- Run the simulation.
Plotting the S11 Curve
-
In the ADE Explorer window, choose Results - Direct Plot - Main Form. The Direct Plot Form is displayed, as shown below.
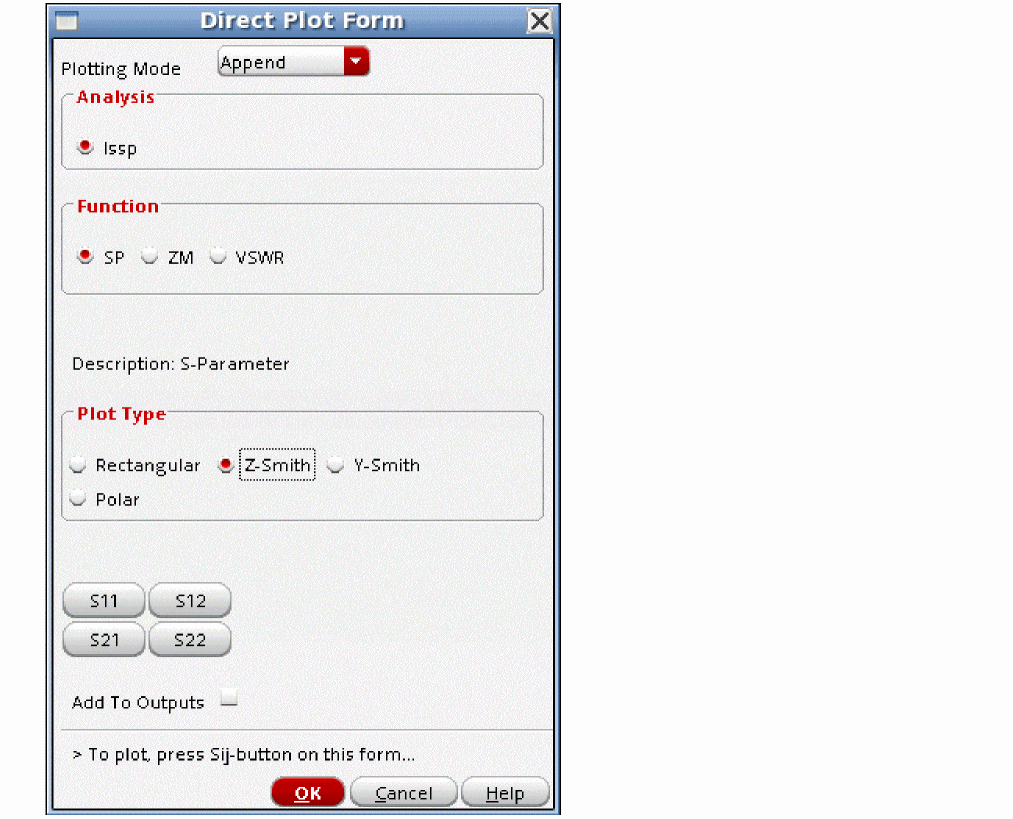
- Choose Z-Smith from the Plot Type section.
- Select the Add to Outputs check box to add the expression in the Outputs section of the ADE Explorer window.
-
Click the S11 button.
The input reflection coefficient is displayed on the Smith chart, as shown below.
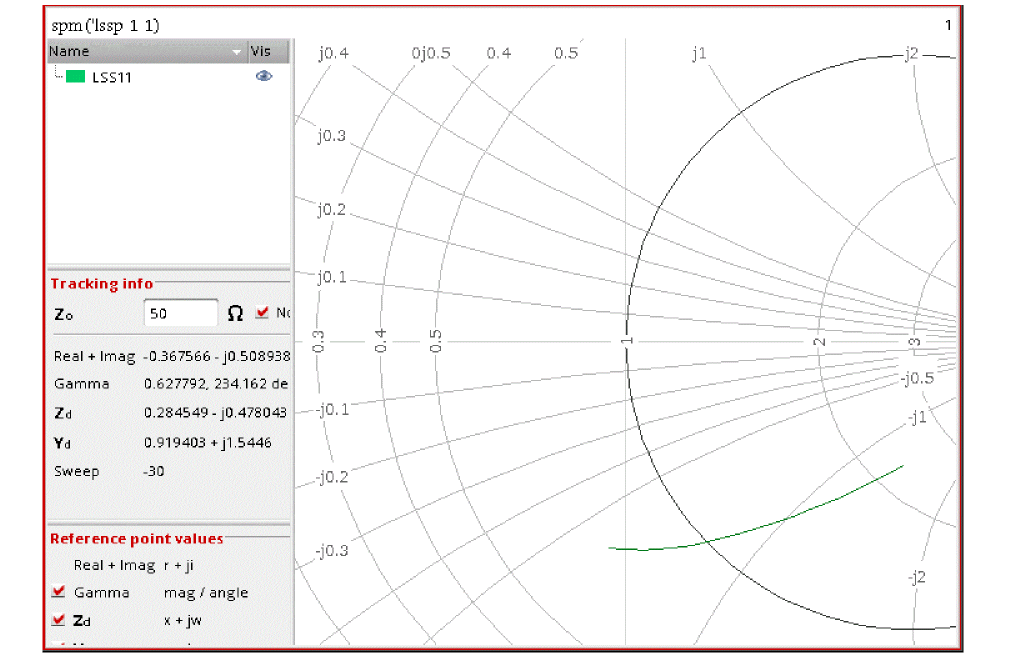
-
Double-click the trace legend. The Complex Trace Properties for LSS11 window is displayed, as shown below.
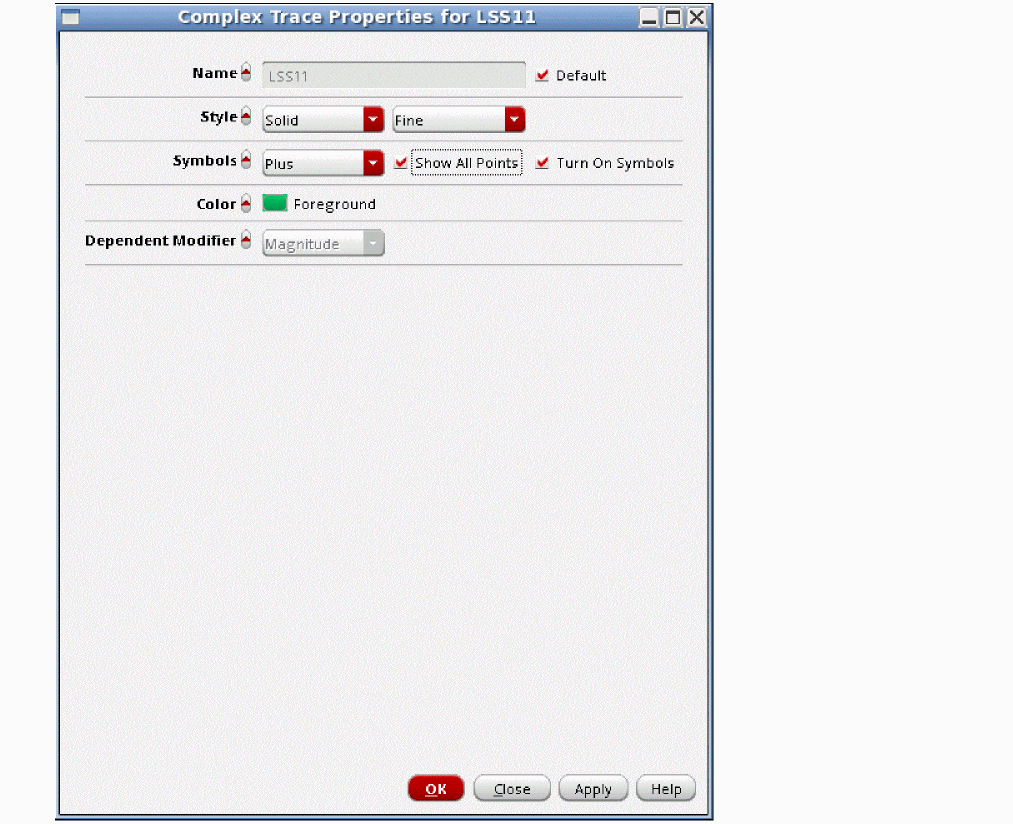
- Select the Turn On Symbols check box.
- Select the Show All points check box.
- Click OK.
-
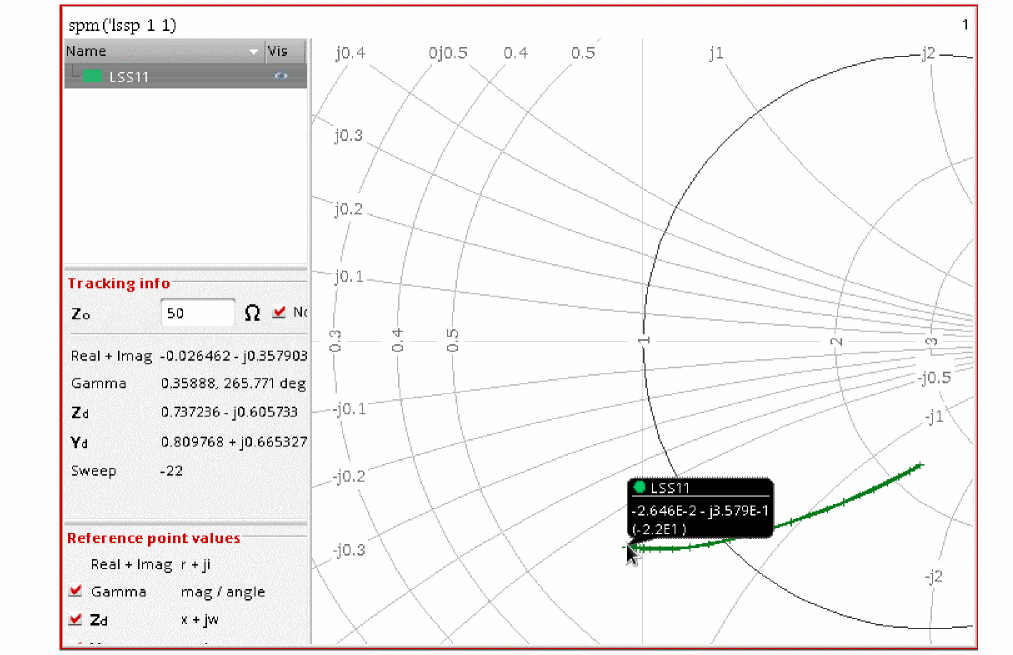
In the waveform window, select Marker - Snap Track Cursor and move the mouse pointer over the trace legend.
The tracking cursor displays the input power level, as shown below.
Similarly, you can plot the S12 curve.
Plotting the Input Impedance Magnitude and Phase Curves
To plot the input impedance magnitude and phase curves:
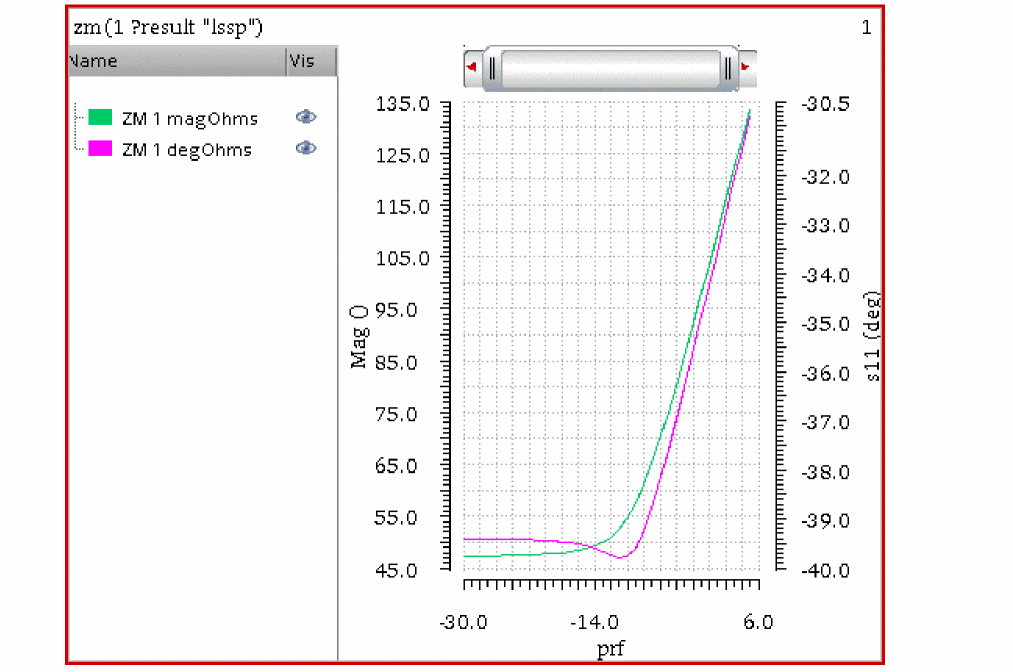
- In the Direct Plot Form, select ZM from the Function section.
- Select Magnitude from the Modifier section.
- Click ZM1.
- Select Phase from the Modifier section.
-
Click ZM1 again.
The impedance and phase curves are displayed in the waveform tool, as shown below.
Return to top