|
Field
|
Description
|
|
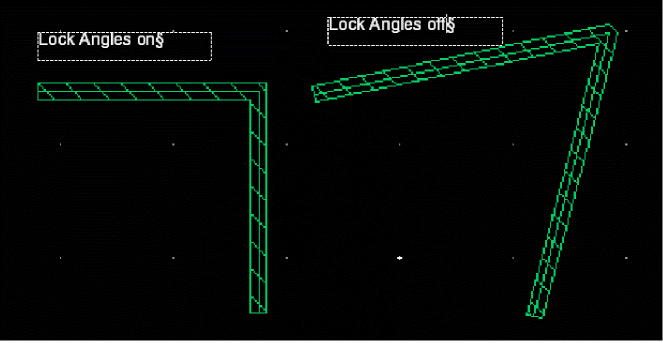
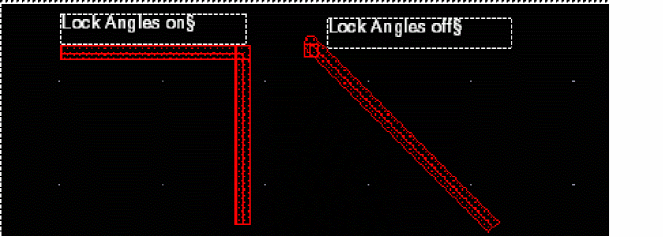
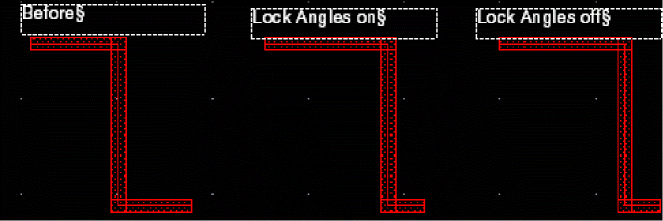
Lock Angles
|
Prevents you from changing the angle of a corner or edge as you stretch it. When off, Lock Angles may snap a pathSeg to a different legal angle; a path may take on any angle. In all cases, the non-selected end does not move.
-
Stretching a corner of a path:
When Lock Angles is on, stretching a corner does nothing. When Lock Angles is off, you can stretch the corner of a path by moving the corner to any new location desired, possibly creating any-angle segments and acute angles.
-
Stretching a segment in a path:
When Lock Angles is on, the lengths of the neighboring segments are adjusted. When Lock Angles is off, you can move the segment to any new location desired, possibly creating any-angle segments and acute angles.
|
|
|
-
Stretching a corner of a pathSeg:
When Lock Angles is on, stretching a corner does nothing. When Lock Angles is off, you can stretch the corner of a pathSeg corner to any new location desired on a 45 degree grid.
-
Stretching a segment in a pathSeg:
When Lock Angles is on or off, the lengths of the neighboring segments are adjusted on a 45 degree grid.
|
|
Snap Mode
|
Controls the direction in which you can stretch an edge.
Environment variable: snapMode
|
|
Delta X,Y
|
Lets you specify the number of user units the object will stretch on the X and/or Y axes relative to its point of origin.
|
|
Apply
|
Stretches the origin point of the selected object as specified in the Delta X and Delta Y fields.
|
|
Display draglines
|
Controls whether drag-lines are displayed during the Stretch command. By default, the drag-lines indicate connections from the pins of the object you are moving to pins of the nearest objects.
Environment variable: flightLineEnable
|
|
Connections Section
|
This section lets you specify the wire connection settings.
|
|
Move Connected Instances and Wires
|
Controls whether the instances and wires connected to an instance are also moved or stretched to maintain connectivity when you move the instance. (Layout EXL Only)
Environment variable: moveConnectedInstancesAndWires
|
|
Keep Wires Connected to
|
Stretches paths, pathsegs, and via vertices coincident with a selected vertex. These are stretched as a set. It also allows overlapping wires on the same net to remain connected during the stretch command.
-
All wires and vias: Maintains pathseg-to-pathseg and pathseg-to-via connections during stretch.
-
Spine wires only: Maintains connections to spine pathsegs but not to connecting vias when stretching a spine. This option is selected by default.
-
No wires and vias: Does not maintain pathseg-to-pathseg and pathseg-to-via connections during stretch.
Environment variable: maxNumConnWireElements
|
|
Keep wires connected to shapes
|
Maintains connection with shapes, such as pin figures, rectangles, polygons, and MPP, coincident with the selected vertex during the stretch operation. This check box is selected by default.
Environment variable: keepWiresConnectedToNonWires
|
|
Lock Unselected Vias
|
Locks the vias that are not selected while stretching a wire. Since the via is locked, the wire is modified to keep the shape connected. In case, the wire could not be modified to maintain the connection, the via is anyway moved to maintain the connection.
By default, this option is disabled. It is enabled only when the All wires and vias option is selected from the Keep Wires Connected To list.
|
|
Keep guard ring ends connected
|
Enables you to keep the two touching ends of a guard ring together while stretching the guard ring. If the check box is not selected, only the selected end of the guard ring is stretched and results in opening up the guard ring. This check box is not selected by default.
This check box is common in the Quick Align Form. The setting in one form is preserved in the other form.
|
|
Chain Mode
|
Lets you move device chains. You can only completely select instances, not parts of instances, so that the stretch command will only allow you to move them using the stretch command. To stretch parts of instances you must use the stretch handles.
-
All: Moves all the instances in a chain.
-
Selected: Moves only selected instances.
-
Selected Plus Left: Moves the selected instance and all instances to the left of it in the chain.
-
Selected Plus Right: Moves the selected instance and all instances to the right it in the chain.
|
|
Special Objects Section
|
This section lets you specify the settings for selecting vias and mosaics.
|
|
Mosaic Partial Selection
|
Allows partial selection of mosaics.
|
|
Via Partial Selection
|
Allows partial selection of vias.
When you select this option, the Via Mode option is enabled.
|
|
Via Mode
|
Lets you defines the mode of stretching a via, when the Via Partial Selection option is enabled.
-
Stretch Metal: Fills the metal in the via as per the dimensions of the new box created after the stretch operation.
-
Stretch Row/Col: Maintains the number of rows when stretching horizontally and the number of columns when stretching vertically.
-
Allow opposite metal extend: Ensures that the cut box stays at the same location even if the enclosure is increased after the stretch operation. The metal of the new via goes beyond the existing metal. This option is available only when the Stretch Row/Col via mode is selected.
Environment variable: stretchViaMode
|
|
Snap Section
|
-
Pins and boundary to grid: Snaps the stretched object to a grid depending on the block type. If it is an analog block, the place and route boundary and pin edges are snapped to the manufacturing grid. If it is a digital block, the place and route boundary is snapped to the placement grid and the pin centers are snapped to the routing grid. Pins with placement status
unplaced, fixed, locked, or unknown are not snapped, even if they were touching the boundary before the stretch.
Environment variable: snapToGrid -
Pins to boundary: Snaps pins to the place and route boundary automatically.
-
Soft Block Pins to: Snaps snaps soft block pins either to the Modified Edge or to the Closest Edge automatically after the reshape is complete.
During the stretch operation, in case the soft block is stretched outside the top-level PR boundary, then all the instance pins on the soft block, with the placement status as placed, are snapped to the manufacturing grid. This is irrespective of the block type because the routing grid is not initialized outside the PR boundary but the manufacturing grid exists outside the PR boundary.
|
|
Boundary Section
|
-
Constant area stretch:
Maintains the area of a soft block constant while its place and route boundary is stretched. Additional options let you specify the adjustable edges, that is, the edges that can be moved automatically in order to maintain a constant area.
-
Left edge, Right edge, Top edge, Bottom edge: Determines the direction in which the boundary is expanded, whether left, right, top, or bottom edge, after the reshape is complete. For example, when you select Right edge and Top edge, only these edges are stretched keeping the left and bottom edges anchored. This helps to maintain a constant area while having control over the edges to be moved.
-
Stretch with P&R boundary: Stretches along with the PR boundary, the shapes intersecting an edge of a PR boundary or abutted to an edge of a PR boundary. The supported shapes are orthogonal pathSegs, rectilinear pins, rectangles and row regions.
Environment variable: stretchWithPRBoundary
|