2
Requirements in Virtuoso ADE Verifier
Requirements are central to a design verification flow implemented using Virtuoso ADE Verifier (Verifier). Requirements form the hierarchical verification plan of your design verification project. You map requirements to their implementations. Verifier determines the verification status of the requirements using this mapping information, along with other settings and results. For details on implementations, see Implementations and Mappings in Virtuoso ADE Verifier
In addition to adding requirements manually, you can copy or reference requirements from a spreadsheet, a comma-separated values (CSV) file, or another Verifier cellview. It is also possible to export requirements to a CSV file for reference and reuse. Verifier lets you edit local requirements directly in the requirements hierarchy or through the Requirement Editor Assistant. To edit referenced requirements, you must modify its source.
Related Topics
Organizing the Requirements Hierarchy
Import Requirements from External Sources
Filters in the Requirements Hierarchy
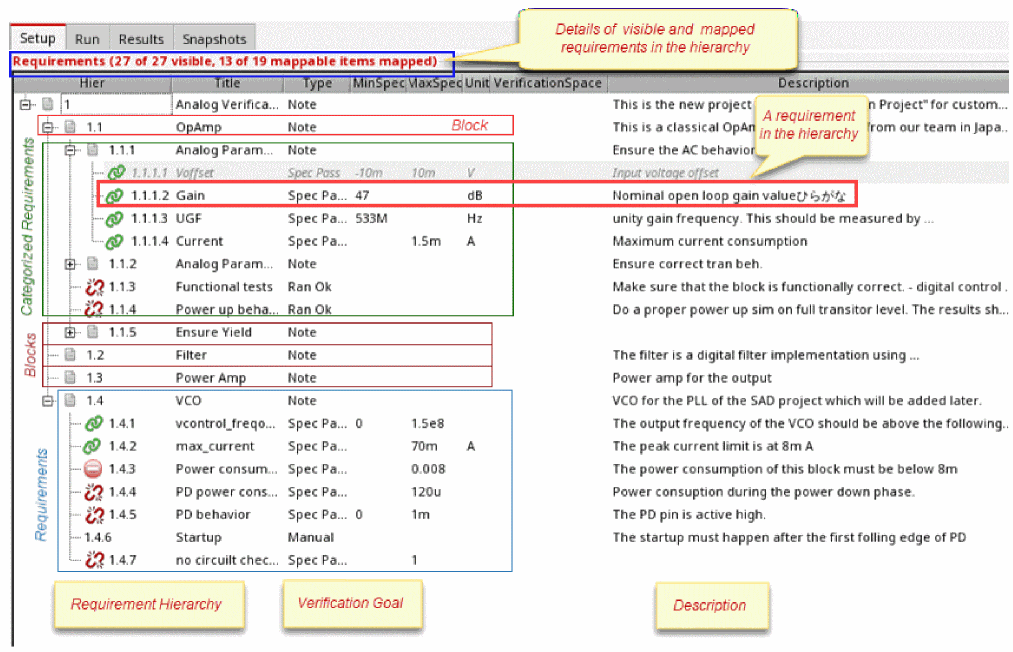
Details of a Requirement
A requirement is an abstract description of a design aspect that needs to be verified. You organize the requirements of a verification project in a hierarchy, which is also referred to as the verification plan. When defining the requirements for a design verification project, focus on what aspects of the design you want to verify. You can later define how those aspects must be verified by mapping them with their corresponding implementations.
It is important to appreciate the difference between requirements and implementations. Having separate sets of requirements and implementations can help in refining the verification project and quality. For example, when you review the implementations, you can identify aspects that are missing from the verification plan. Such differences can help you to better understand and capture the verification challenges and find the best use of your verification resources.
In your verification project, you can treat the verification plan as a living document, which you can refine throughout the verification cycle. It is also useful to continue to use the verification plan to ensure that the plan accommodates the unique needs of your verification project.
To determine the status of the verification project, Verifier uses the information stored in the requirements, along with other related information and settings. For example, you can set a requirement to pass verification if the mapped implementation is simulated successfully. In this case, Verifier checks the simulation status of the mapped implementation to determine the verification status of the requirement. The overall verification status largely depends on the verification plan. For example, if a set of requirements are missing from the verification plan, the design verification results will be inaccurate.
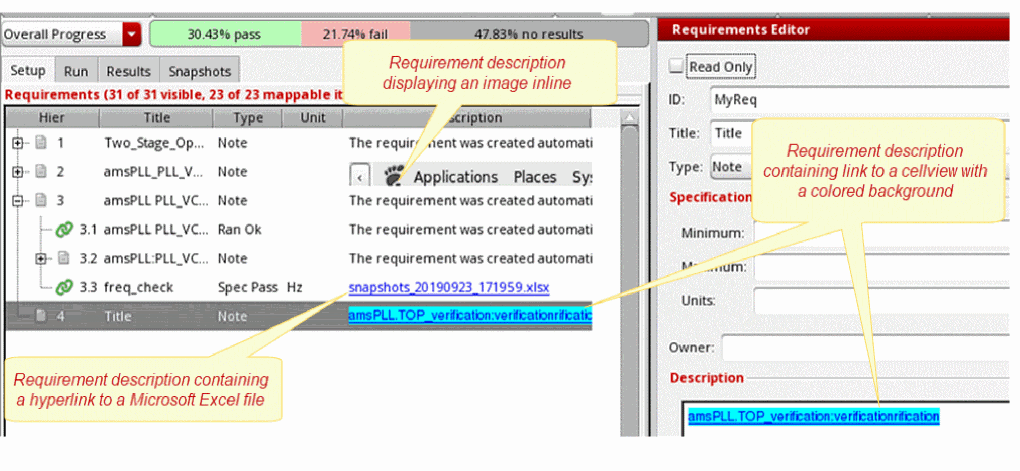
The following figure illustrates a hierarchy of requirements. Also see Requirements.
You can show or hide the columns of the requirements hierarchy. For this, right-click anywhere on the column headings in the requirements area and select the columns you want to show. Verifier hides the columns that are not selected.
To sort columns, you can use the drag-and-drop method and change the display of columns. Additionally, you can specify the default column order and hidden columns by using the environment variables reqColumnOrder and reqHiddenColumns.
The following table describes the details of a requirement.
| Column | Description | |
|---|---|---|
|
Unique hierarchical number that Verifier assigns to a requirement to identify its placement in the requirements hierarchy. You cannot edit this number. When you change the requirements hierarchy, the hierarchical number of the requirements update according to the new hierarchy. The Hier column is always displayed and includes the mapping status icon with the hierarchical number for each requirement.  |
||
|
Mapping status icons displayed with the hierarchical number: |
||
|
The requirement |
||
|
The requirement is mapped with one or more implementations where one of them is a custom implementation. |
||
|
The requirement needs to be mapped, but is not mapped with any implementations. |
||
|
The specification checks failed, which indicate the following:
This status is the same as the implementation status Spec Check Fail. |
||
|
The requirement is referenced from an existing Verifier cellview. |
||
|
The requirement that is referenced from an existing Verifier cellview, is out-of-date. |
||
|
Unique ID of the requirement. The ID column is hidden by default. When you add a new requirement, Verifier automatically assigns to it a Universally Unique Identifier (UUID), such as 00f9a512-0154-4592-b0fa-7b3767f716fd. The ID column is hidden by default. To assign a different requirement ID, you can use idCreationFunction. It defines a public SKILL function for creating a new requirement ID. Ensure that you define IDs of a reasonable size. For example, if 100 unique IDs are to be created, specify an ID that contains at least three to four random characters. When a user-defined SKILL function returns an ID that is not unique, an incremental suffix is added to the ID to make it unique. |
||
|
Verification type of the requirement. The type can be one of the following:
For details, see External References in Virtuoso ADE Verifier |
||
|
Minimum specification value. It is used to determine if the requirement passed when the type is set to Spec Pass. You can specify a numeric as well as string value. The string value is shown as the blue-colored text. |
||
|
Maximum specification value. It is used to determine if the requirement has passed when the type is set to Spec Pass. You can specify a numeric as well as string value. The string value is shown as in blue-colored text. |
||
|
Unit of measurement of the specified minimum and maximum specification values. |
||
|
Owner of the requirement when multiple people are involved in the design verification project. You can specify a list of comma-separated owners for a requirement. The current user is the default owner of the new requirements you add in the Verifier session. |
||
|
Specifies a 'tag' to define a group of requirements or results that belong together. You can filter the hierarchical plan and the results based on the scope by using this tag. |
||
|
Specifies if the requirement is analog ( |
||
|
Detailed description of the requirement. See |
||
|
Select to make the requirement read-only. The read-only requirements appear in gray italic text. |
||
|
Specifies the deadline or due-date for a requirement in the predefined date format. Environment variable: deadlineFormat. |
||
|
Shows a comma-separated list of items that are mapped to the current requirement. A mappable item can be an implementation, run, reliability setup, test or an output. The values in this column allow you to quickly validate if all the requirements are mapped to the correct implementation. The Mapped column is hidden by default. 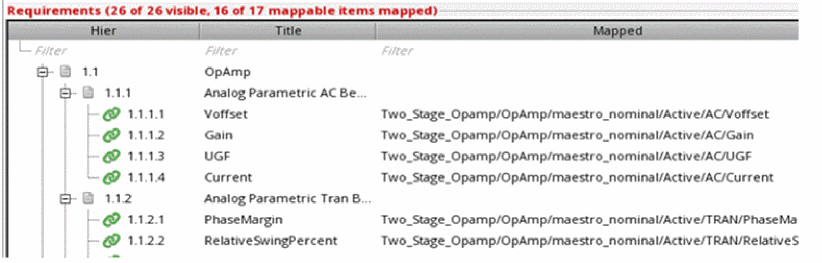 |
||
| Row | Description | |
|
This option is available when you right-click anywhere on the column headings and select Filter Row. This row contains individual filters for every column in the requirement hierarchy. You can enter the required criteria in a column filter to display only the requirements matching the criteria. You can also refine the filtered requirements by specifying criteria in other columns. This row is hidden by default. See Filtering Requirements Based on Text Criteria. |
||
Related Topics
Shortcut Menu Options in the Requirements and Implementations Pane
The following table describes the shortcut menu options available in the Requirements and Implementations panes:
| Option | Description |
|---|---|
|
Opens the implementation cellview in edit mode. Displayed for Requirement type Spec Pass. |
|
|
Opens the implementation cellview in read-only mode and load the last history that was active during the last Verifier run. Displayed for Requirement type Spec Pass. If the implementation cellview uses the integrated history management, you receive a popup asking you to convert the cellview to use the separate history management scheme. |
|
|
Lets you view the simulation log for the specified test in the implementation cellview. Displayed for Requirement type Spec Pass. If the implementation cellview uses the integrated history management, you receive a popup asking you to convert the cellview to use the separate history management scheme. |
|
|
Adds a requirement in the hierarchy. By default, this option adds a requirement of the type Note. |
|
|
Imports an existing Verifier cellview as a copy or an external reference. |
|
|
Reassigns the ID for the selected requirements hierarchically. |
|
|
Specifies the owner of the requirement when multiple people are involved in the design verification project. You can specify a list of comma-separated owners for a requirement. The current user is the default owner of the new requirements you add in the Verifier session. For details, see External References in Virtuoso ADE Verifier. |
|
|
Makes the requirement read-only. The read-only requirements appear in gray italic text. |
|
|
Makes changes to the description of the selected requirement. For details, see Description Editor for Requirements. |
|
|
Copies the selected requirement. Press the |
|
|
Assigns a verification space to the specified requirements and then use them to calculate the coverage. |
|
|
Removes the assignment of the verification space to the specified requirements. |
|
|
Expands the selected nodes in the hierarchy. If no node is selected, all nodes are expanded. |
|
|
Shows the requirements that are Mapped, Unmapped or have Spec Check Fail. |
Related Topics
Adding Requirements
Verifier lets you add requirements in multiple ways. In a top-down flow, you can create a blank cellview and import requirements, or you can create requirements manually. In a bottom-up flow, you can create requirements from implementations.
While creating requirements, the parent requirement should always be assigned with type Note. While creating requirement from an implementation cellview or an implementation test, two requirements are created where the parent requirement is assigned with type Note, and the child requirement is assigned with type Ran OK.
Related Topics
Import Requirements from External Sources
Creating Requirements from Implementations
Editing Requirements in the Requirements Hierarchy
Editing Requirements Using the Requirements Editor Assistant
Adding a Requirement Manually
You can add unique requirements manually.
- Click the Setup tab to display the requirements area.
-
Do one of the following:
A new requirement is added.

- Add the requirement details in the Requirements Editor. See Adding Requirements using the Requirements Editor Assistant.
You can edit the requirement details, except for the auto-generated hierarchical number under the column Hier.
- The default type of a new requirement is Note.
- The default owner of a new requirement is the current Verifier user.
- It is possible to change the current user name that Verifier uses for requirements. For this, choose Edit – Preferences and type the user name in the Current User Name field. This field displays the login name by default. For details, see External References in Virtuoso ADE Verifier.
- When you select a requirement and add a new requirement, the type of selected requirement influences the position of the new requirement.
- The hierarchical number is auto-generated for the requirements based on the updated hierarchy. You cannot edit this number manually.
-
By default, Verifier assigns to each new requirement an alphanumeric UUID of a format similar to
00f9a512-0154-4592-b0fa-7b3767f716fd. To specify a requirement ID of a user-defined format, set the idCreationFunction environment variable.
The regular expression for the valid IDs is: ^[-a-zA-Z0-9_.]+$. This means that the valid characters include only the alphabets in uppercase and lowercase, digits and the characters '-', '_' or '.'.
Related Topics
Import Requirements from External Sources
Creating Requirements from Implementations
Editing Requirements in the Requirements Hierarchy
Editing Requirements Using the Requirements Editor Assistant
Import Requirements from External Sources
You can maintain a master design verification plan that contains a hierarchy of requirements and reuse it in different design verification projects. For example, you can maintain the master verification plan in a spreadsheet. You can then import this plan in different verification projects managed through Verifier, with or without variations. In a
Verifier lets you import requirements from the following sources:
-
Spreadsheet (
.xlsx,.XLSX,.xlsm,.XLSM) -
Comma-separated values file (
.csv,.CSV) -
Cellview of the type
verifier
You can import requirements from an Excel file saved in the format .xlsx,.XLSX, .xlsm, or .XLSM. Files that are saved in the .xls or .XLS format are not supported.
For details on working with requirements imported from CSV or Excel file, see Copy Requirements from File and Important Points to Note when Importing Excel Files.
For Verifier cellview source, you can import requirements into a Verifier session by copying or referencing them from the source. Import requirements by copying them when you want to edit the requirements in Verifier. Import requirements by referencing them when you want to maintain the source as the requirements master. In this case, Verifier displays the referenced requirements in read-only mode. To change requirements imported by reference, you must edit the source. Verifier displays the reference source filename as the topmost node.
For details on working with the requirements copied from the imported cellview, see Importing Requirements from a Verifier Cellview.
For details on working with multiple referenced cellviews, see External References in Virtuoso ADE Verifier.
For information on editing and deleting referenced requirements, see Flow for Referencing External Cellviews and Deleting Requirements, respectively.
Related Topics
Importing Requirements from File
Importing Requirements from a Verifier Cellview
Importing Requirements from File
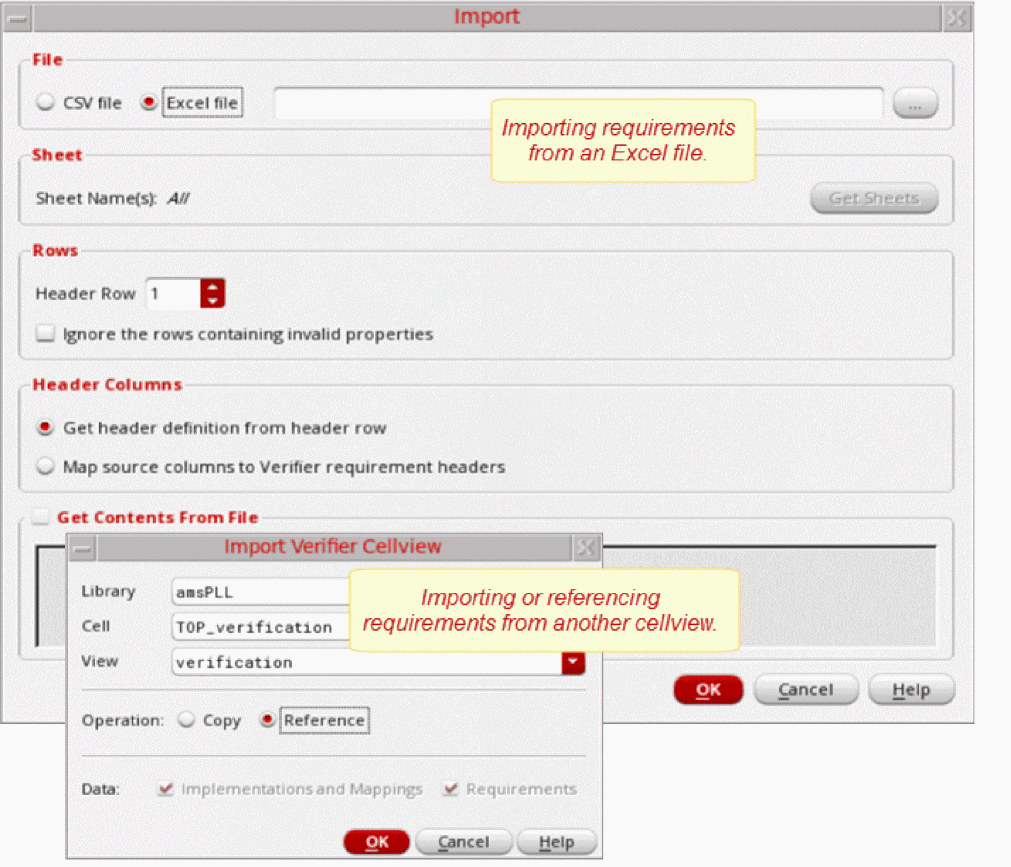
You can use the Import form to import requirements from a CSV file or a Microsoft Excel file. The fields in this form depend on the type of the requirements source.
To import requirements into an existing Verifier session:
-
Start the import process.
- To start importing requirements in the opened Verifier session, choose File – Import – File.
- To start the import process in a new Verifier session:
-
Click Tools – ADE Verifier from Virtuoso CIW.
The Choose Verifier Cellview Form form is displayed. - Specify a Cell and a new View.
- Click Import Requirements.
The Import Form is displayed. -
Select the source type.
-
To import the requirements stored in a
.csvor.CSVfile, click CSV file. -
To import the requirements stored in a Microsoft Excel
.xlsx,.XLSX,.xlsm, or.xlsmfile, click Excel file. For more information, see Important Points to Note when Importing Excel Files.
-
To import the requirements stored in a
-
Specify the source.
For example, specify the location and filename in the File Name field.
Excel file names can only contain the following characters:a-z,A-Z,0-9,!,@,#,$,%,&,(,),-,_,+,=,[,],.,,, and space. -
If your source is a Microsoft Excel file with multiple sheets, specify the sheet that contains the requirements you want to import. For this, click Get Sheets and select one or more sheet names or All, as required.
Ensure the following:- All the blank spaces are replaced with underscore in the sheet name.
- A unique requirement ID without spaces is created for file or sheet.
- All the sheets are included in the group box.
- By default, all the sheets in a file are selected. Click Select All to select all the sheets and Clear All to clear selection of all the sheets.
-
If all the sheets are selected,
Allis shown with Sheet Name(s).
- Select the Ignore the rows containing invalid properties check box to ignore all the errors while importing from an Excel or CSV file. By default, it is deselected.
-
Set the Header Columns group box as follows:
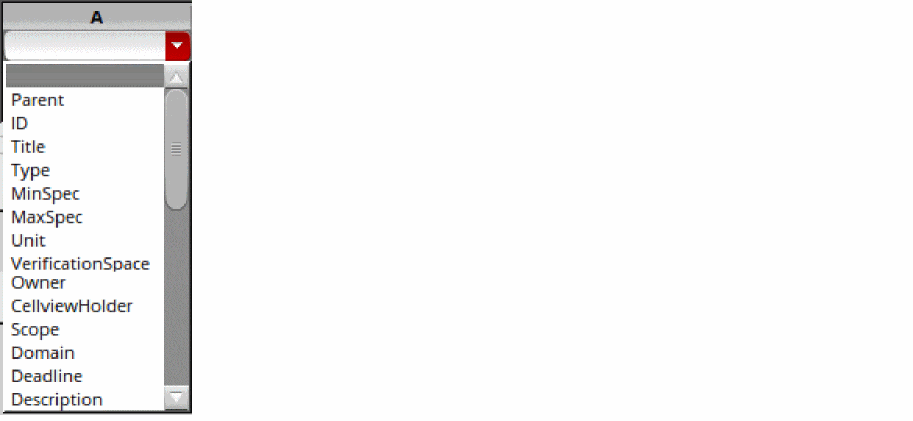
To use the requirement column definitions from the source file, click Get header definition from row and specify the header row number. Ensure that the headers in the source use the following text. The mandatory header isTitle.Parent,ID,Title,Type,MinSpec,MaxSpec,Unit,VerificationSpace,Owner,CellviewHolder,Scope,Domain,Deadline,Description
If an invalid value is specified for these columns, the corresponding row of specifications is not imported as a requirement and a message containing the recommended format for these values is displayed. -
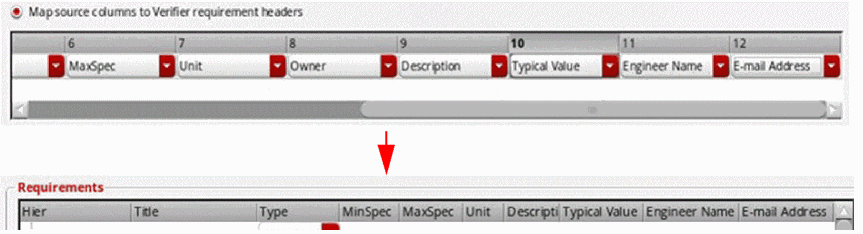
Map the source columns to the Verifier requirement columns by doing the following.
- Click Map source columns to Verifier requirement headers.
- In the Number of Columns to be Loaded group box, specify the number of columns you want to import. The column mapping table in the Header Columns group box updates accordingly.
-
Map the columns in the source file to the Verifier requirement columns. You can change the sequence of the columns based on the sequence in which they exist in the source file. For example, if the third column in the source file is the description instead of the title, select Description under 3.You can merge multiple cells by assigning the same target to multiple columns. For example, if the columns 10 and 11 of the file contain information that you want to add as the description of the imported requirements, assign
Descriptionto both these columns.- The hierarchy number (Hier) is auto-assigned by Verifier and is not part of the import process.
-
You can import multiple custom fields from Excel and CSV files.The custom fields are added to the files by using the environment variable. When the file is imported, the custom requirement fields are displayed in the drop-down list boxes in the Header Columns group box. For details, refer to Custom Fields.
-
Select Get Contents From File to view some rows in the source file to ensure that you have specified the correct file and mapping details. The number of rows that will be shown in this field is Top rows +
1. - Click OK.
The requirements are imported in the Verifier session.
You can choose to load requirements and implementations from a cellview of the type verifier. For this, choose File – Import – Verifier Cellview, and specify the other required details, including the library, cell and view. You can also right-click on a requirement of the type Note and select the shortcut menu option Import Cellview, to add the cellview below the selected requirement in the hierarchy. For details, see Importing Implementations from Another ADE Verifier Cellview.
Important Points to Note when Importing Excel Files
-
You can import requirements from an Excel file saved in the format
.xlsx,.XLSX,.xlsm, or.XLSM. The.xlsor.XLSfile format is not supported. - In addition to plain text, you can import UTF-8/Unicode characters from an Excel file, including text with symbols outside the ASCII format, and text in different languages, such as Chinese, Japanese, and Korean.
-
You can manually hide the columns of the source Excel file. However, to hide a column in Verifier, it should meet the following conditions:
- The column is hidden in the source Excel sheet.
-
The column is not mapped to any Verifier requirement header yet.
Verifier gets the real column count and hidden column count from the first selected sheet. After obtaining the information, set the current or maximum value of the Columns drop-down list box to the real column count to ensure that the hidden columns are not displayed in the header columns table.
- If you import an Excel file that contains merged cells, the details are imported into individual cells, where each cell contains the same value as the merged cell. For example, if the file contains two cells merged into one cell and contain the value <any_value>, after import, the merged cell is imported as two individual cells, where each cell contains the value <any_value>. This is especially useful when you want to import a large number of requirements. For example, you can merge the Owner column with a value and import the requirements. After import, the correct owner will be set for each requirement.
Related Topics
Import Requirements from External Sources
Importing Requirements from a Verifier Cellview
Importing Requirements from a Verifier Cellview
You can use the Import Verifier Cellview form to import requirements from a Verifier cellview.
To import requirements into a Verifier session:
-
Start the import process.
To start importing requirements in the opened Verifier session, choose File – Import – Verifier Cellview or choose the shortcut menu option Import Cellview... in the requirement hierarchy.
The Import Verifier Cellview Form form opens. -
Specify the details of the Verifier Cellview to import.
- If you specify valid details for a Verifier cellview, the Verifier session imports the cellview as a Copy or external Reference.
- If you specify invalid details for the Verifier Cellview, a hierarchical node is created in the Requirements pane with an error icon.
For details, see Importing Implementations from Another ADE Verifier Cellview. - Specify the import Operation.
Related Topics
Import Requirements from External Sources
Importing Requirements from File
Creating Requirements from Implementations
If you do not have a requirement plan, but have included implementations in Verifier, you can create a requirement plan corresponding to the implementations. Verifier also maps the new requirements to the corresponding implementations.
For details on implementations, see Implementations and Mappings in Virtuoso ADE Verifier
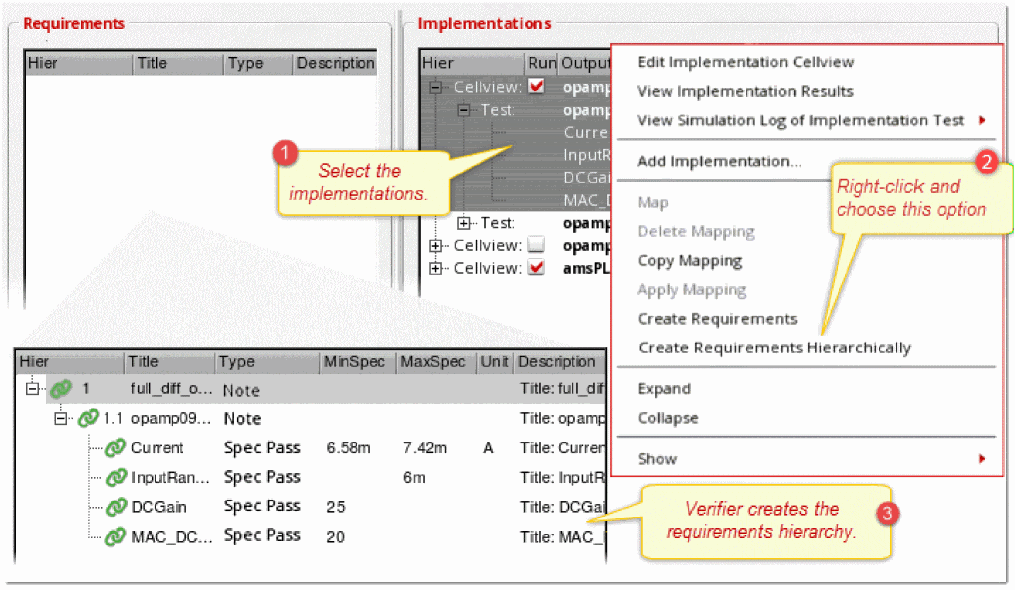
To create requirements from implementations:
Verifier generates the respective requirement or requirements hierarchy and maps the requirements to their corresponding implementation. You can edit the requirements, as needed.
- Verifier creates requirements only for unmapped implementations. The shortcut menu command Create Requirements Hierarchically ignores the specifications hierarchy of mapped implementations.
- The hierarchical number of the requirements are auto-generated based on their hierarchy levels.
- The title of the requirements indicate the cellview name, test name, or output name of the corresponding implementation. In the requirement titles, '/' replaces '_' and ' ' is used as a separator.
- The default type of the requirements of cell and tests is Ran OK and the default type of the requirements of outputs is Spec Pass.
-
You can create Ran OK requirements for a required subset of an implementation, run, reliability, test, by setting the autoCreateRanOkRequirement
environment variable to the only the required set. For example, to create hierarchical requirements only for the implementation, run, and test, setautoCreateRanOkRequirementto "Implementation, Run,Test". - Verifier adds the implementation specifications to the requirements.
Related Topics
Import Requirements from External Sources
Importing Requirements from File
Importing Requirements from a Verifier Cellview
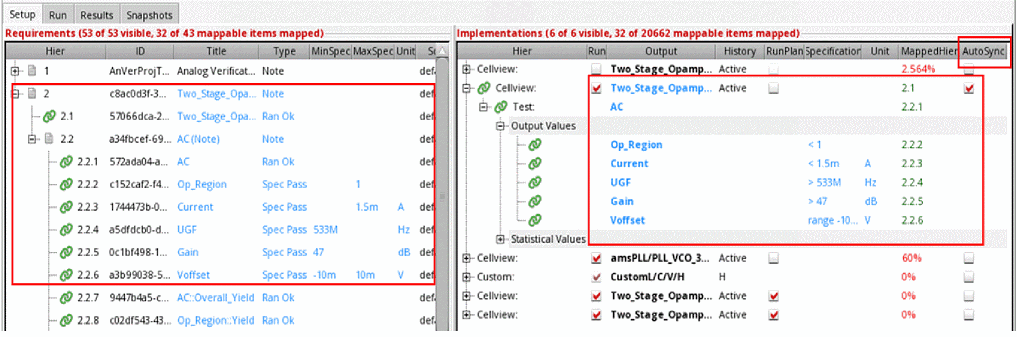
Simulation Runs Using Auto-Synced Requirements
You can use ADE Verifier only as a regression tool for running simulations. If you want to run simulations using implementations, without the need to manually create requirements and mappings, you can display the AutoSync column from the header area in the Implementations pane. This column is hidden by default. After the column is displayed, you need to select the AutoSync check box for the selected implementation.
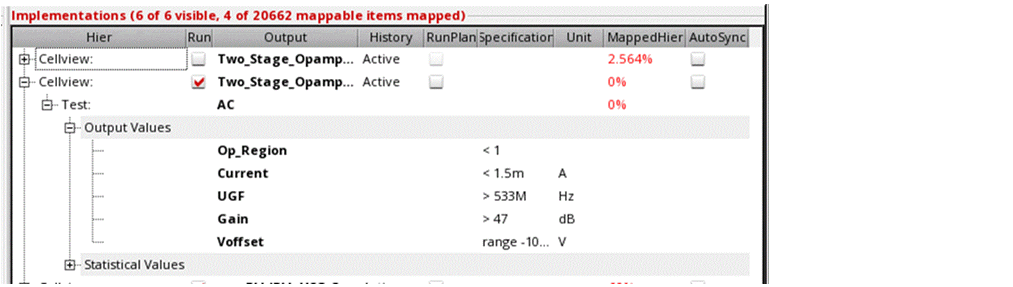
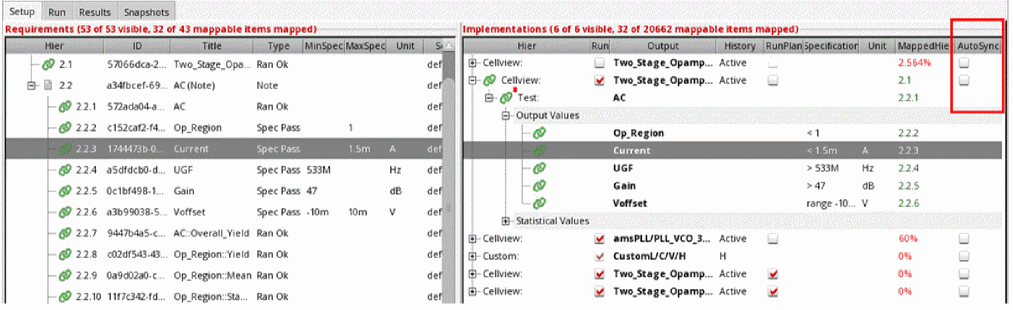
When you select the AutoSync check box for the first time, the implementation is updated with the setup data from the maestro cellview. Additionally, requirements and mappings are created automatically for the selected implementation and displayed in blue text, as long as the AutoSync check box is selected. The requirements hierarchy created is identical to the implementation hierarchy.
Whenever there is a change in the maestro view, the implementation is automatically updated to match these changes, and then the requirements are updated as well. The requirements and mappings remain in sync with the implementation outputs. Updates in an implementation are triggered when you do the following:
- Open the Verifier cellview
- Change the run mode in ADE Assembler from a previous value to Single Run, Sweeps and Corners, or Monte Carlo Sampling
-
Add, delete, or modify a run, reliability analysis, test, or output in ADE Assembler
Except the top auto-synced requirement, which is of type Note, you cannot move the requirements up or down in the hierarchy. Other modifications, such as changes to mappings or requirements through the GUI are also not available.
The values in the Title, Type, MinSpec, MaxSpec, and Unit fields of the Requirements pane, and in the Output, Specifications, and Unit fields of the Implementations pane, are read-only and displayed in blue text. All other fields of the auto-synchronized requirements and implementation are editable.
You cannot move other items into the hierarchy displayed in blue text. For example, if you drag any other requirement which appears in black text, you cannot drop it onto the auto-synchronized section. Specifically, the requirements in blue text cannot be mixed or matched with the usual requirements.
If you deselect the AutoSync check box, the synchronization between the requirements and the implementations stops. In such a case, the requirements hierarchy and the mappings that were created for the implementation stay the same but become editable.
Any changes that you make to the requirements or mappings persist unless you select the AutoSync check box which removes all changes and synchronizes the requirements hierarchy again.
When you select the AutoSync check box, the simulation results might show the results status as out-of-date. This happens because ADE Assembler runs simulations in editable mode, and Verifier picks up the writable history, thereby considering the cellview as changed. With AutoSync selected, Verifier reloads the implementation, which again marks the results as out-of-date. Typically, it is recommended to set disableReadOnly to its default value nil.
To ignore specific outputs when creating auto-synced requirements, you can use the Create requirements for outputs with no specification values preference option or the autoSyncOutputFilter environment variable. You can use either one or both of these at the same time. For example, to create auto-synced requirements for all outputs that start with X, set the autoSyncOutputFilter environment variable using the required regular expression string.
Related Topics
autoSyncOutputFilter (Environment variable)
Editing Requirements in the Requirements Hierarchy
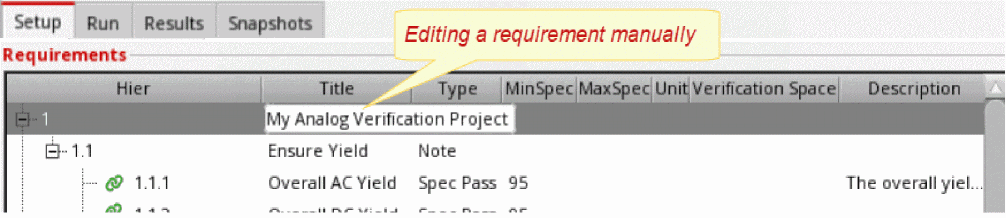
You can edit a local requirement directly in the requirements hierarchy, except the Description field. The following figure illustrates how you edit a requirement in the hierarchy.
To edit a requirement directly in the requirements hierarchy
- Click the Setup tab and select the requirement.
- To edit the ID, title, and specifications, click the field and change its value.
- To change the type, select your option from the drop-down list.
- To make the requirement read-only, select the Read Only check box.
- To make the requirement editable again, deselect the Read Only check box. You cannot change the hierarchical number.
Verifier updates the requirement as you edit it.
Editing Requirements Using the Requirements Editor Assistant
If you want to update the description or other details of a requirement, choose to edit it in the Requirements Editor assistant. You can edit all the fields in the Requirement Editor Assistant.
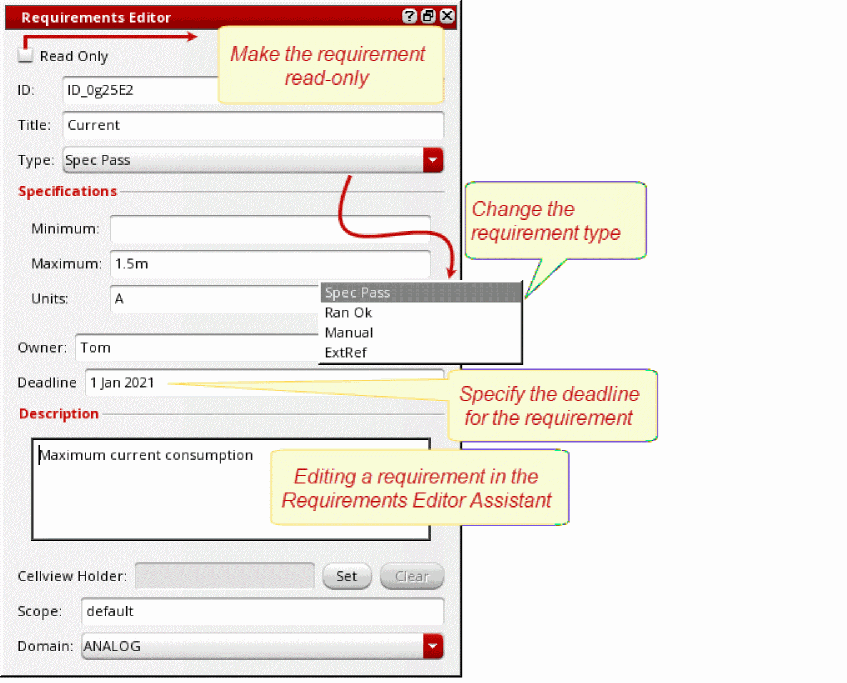
To edit a requirement using the Requirement Editor Assistant:
-
Open the Requirements Editor Assistant.
The assistant appears in the right pane. - Select a requirement in the Requirements pane.
- Edit the requirement details using the assistant.
To close the requirement editor, see Requirements Editor Assistant.
You can choose to display the Requirements Editor Assistant from the Edit menu, Window menu, and the Verifier toolbar, under the Setup and Results tabs. It is not required under the Run tab.
To edit multiple requirements using the Requirement Editor Assistant:
-
Open the Requirements Editor Assistant.
The assistant displays in the right pane. -
Select multiple requirements in the Requirements pane while keeping the Shift or Ctrl key pressed.
The fields in the Requirements Editor display <various> as shown below for all requirement properties that have different values:
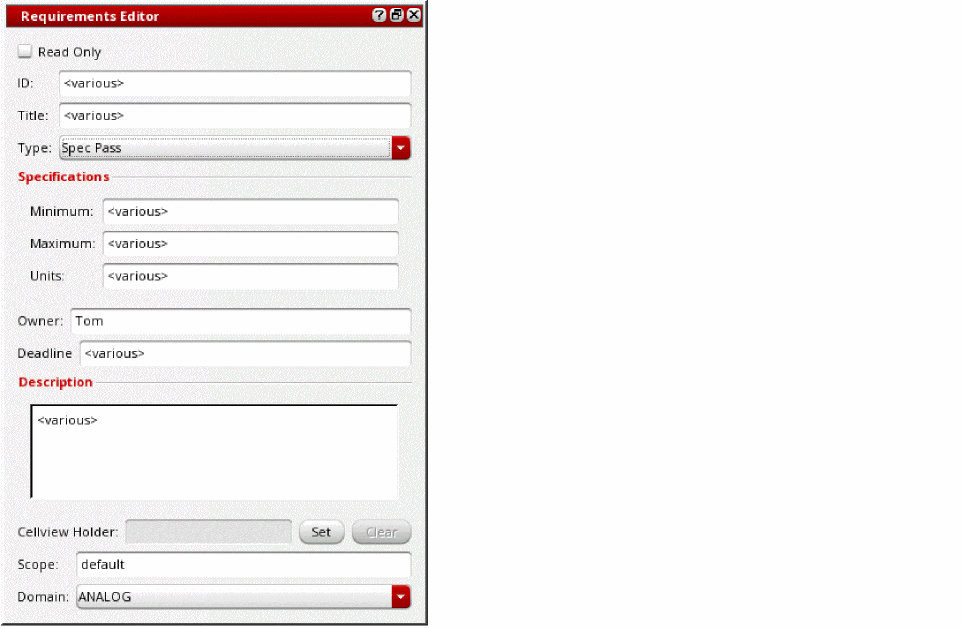
-
Edit the requirement details using the assistant.
All selected requirements are updated with the values that you specify in the assistant. The values of those fields that display <various> are not changed.
To close the requirement editor, see Requirements Editor Assistant.
Copying Requirements in the Hierarchy
You can copy the requirements as a single entry or hierarchically and paste them using multiple ways in the requirements hierarchy.
To copy and paste requirements, do one of the following:
-
Use the shortcut menu commands to copy and paste at the desired location.
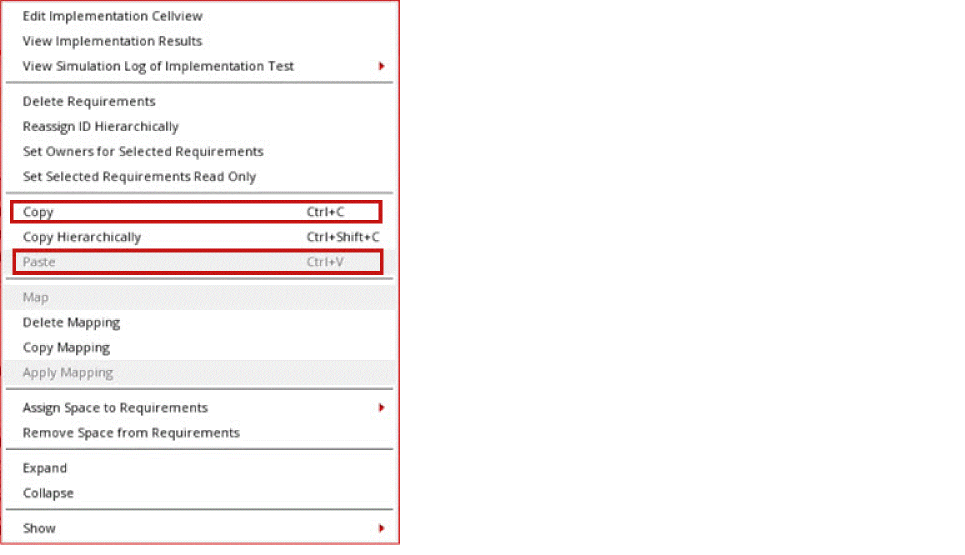
-
Use the bindkeys
Ctrl+C(Copy), andCtrl+Shift+C(Copy Hierarchically) to copy from, andCtrl+V(Paste) to paste requirements.
When read-only requirements are copied, the read-only feature remains intact while pasting. However, in all cases, new IDs are assigned when pasting the requirements.
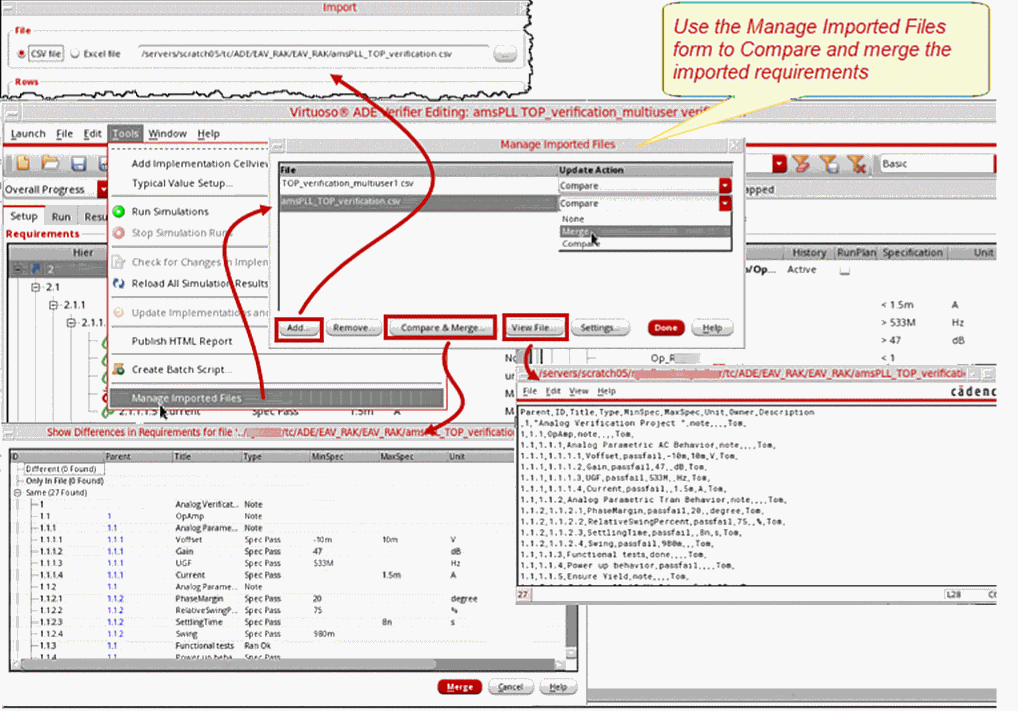
Copy Requirements from File
While importing requirements from a CSV or an Excel file, you can copy the requirements from the source file, but the information about the reference source is retained. You can compare to check if the source information and copied information are in sync. If the information is not in sync, you can merge the requirements so that requirements from the source file can be added. This flow reduces the risk of purely referencing an external file, such as renaming, corruption, or unreadability of the source file.
The requirements in the CSV or Excel file are compared with the requirements in Verifier to list the Different, Only, Same, or Ignore requirements in a tree:
- Different indicates the requirements in both the source file and Verifier that have different properties;
- Only indicates the requirements only in the source file;
- Same indicates the requirements in the source file and Verifier with same properties;
- Ignore indicates the requirements in the source file but without ID or the specified properties of the requirement contain invalid data.
When you merge the requirements in CSV or Excel to Verifier, the following happens:
Different requirements are updated, Only are added in the cellview, and Same are kept as is.
The extra top-level requirements of type Note for the imported file or data sheets are ignored while comparing and merging the requirements. Click Cancel on the Show Differences in Requirements for File form to ignore the differences and keep the requirement as it is.
The following figure illustrates how you manage the requirements imported from a file.
To edit a copied requirement in the hierarchy:
- Right-click a referenced requirement and click Open Reference.
- Edit the requirement in the source.
- Save the source.
If your source is an Excel file, edit and save the changes outside Verifier.
To import requirements from a file:
- Start a new Verifier session.
- Open the Import form using one of these:
- Set the options in the Import form.
- Click OK to import the data from the source file as local requirements.
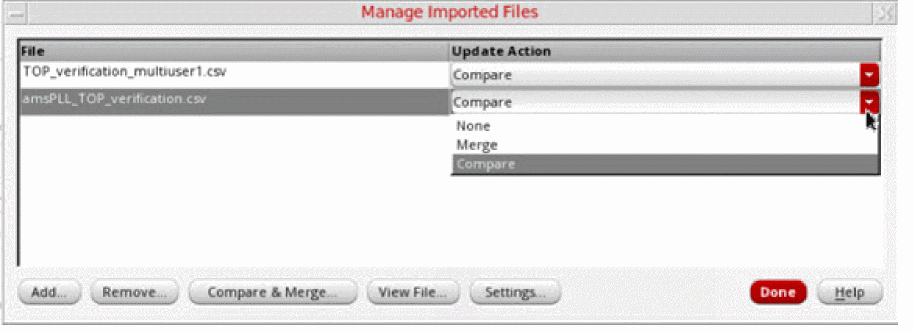
Managing Imported Files
To manage imported files, you can perform the following tasks:
- Click Tools – Manage Imported Files to open the form.
- Click Add in the Manage Imported Files form to add a new imported file.
- Select a file item.
- Click Remove in the Manage Imported Files form to delete the selected imported file.
- Select a file item and click Settings in the Manage Imported Files form to edit the setup data for the imported file.
- Select a CSV file item and click View in the Manage Imported Files form to open the file in a dialog box.
-
Select the required option from the following three options for automated tasks in Verifier by using the Auto drop-down list box in the Manage Imported Files form.
- None: Nothing is being done during the setup sync.
- Merge: Automatically merges any changes to the requirements in the file to Verifier.
-
Compare: Compares the requirements automatically in the file with the requirements in Verifier. The differences are reported, if any. You are prompted to use Compare & Merge.Click Merge in the Show Differences in Requirements for File form to merge all the selected requirements from the source file to Verifier.
Setting Up Requirement Owners
When you add a requirement manually, Verifier sets its default owner as the current Verifier user. When you include requirements from a CSV or Microsoft Excel file, Verifier sets the owners as specified in the source file. For details, see Adding Requirements.
The Owner column is hidden by default. To display this column, click the Show button for the requirements and select Owners.
To specify the owner of a requirement, do one of the following
-
Right-click the requirement, choose Set Owners for Selected Requirements, type the owner, and click OK.
You can use this method to set the same owners for multiple selected requirements. - Edit the owner name directly in the requirements hierarchy.
-
Display the requirement editor and specify the owner in the Owner field.
For details on editing the name in the hierarchy and using the requirement editor, see Editing Requirements in the Requirements Hierarchy and Editing Requirements Using the Requirements Editor Assistant.
Consider the following important points when you assign the owners of the requirements in the master cellview.
- The default owner of a new top-level requirement is the current Verifier user name. The default owner of a new sub-level requirement is the same as the owner of its parent requirement.
-
You can change the current Verifier user name, which is used as the default owner name of new high-level requirements. For this, choose Edit – Preferences, type the user name in the Current User Name field, and click OK.
When you add a new top-level requirement in the master cellview manually, Verifier leaves the current user name as blank. - All requirement owners can map their requirements with implementations in their local cellviews only.
Related Topics
Organizing the Requirements Hierarchy
Verifier lets you organize requirements in a hierarchy for improved usability. You can change the hierarchy level of a local requirement, and move it up or down the hierarchy. If you want to change the hierarchy of referenced requirements, modify the source.
When you change the hierarchy, Verifier updates the hierarchical number of the requirements to reflect the current hierarchy.
To rearrange a local requirement in the hierarchy:
Reassigning IDs Hierarchically
As a project manager, you may want to rename your requirement ID. This ensures that the IDs are easily identifiable and unique.
Verifier lets you rename the requirement IDs when you choose Reassign ID Hierarchically from the shortcut menu. Reassign ID Hierarchically changes the name of selected ID and its child requirement ID names to random unique IDs.
To rename the requirements ID in the hierarchy:
The selected requirement and the corresponding child requirements are renamed hierarchically and the mapping information is retained.
Exporting Requirements
Verifier lets you export the requirements hierarchy in the current Verifier session to a new CSV or Excel file. You can store the exported requirements hierarchy for future reference and reuse it in other verification projects.
Customized requirement fields can also be exported to the destination files. The customized requirement field names should not be same as the available field names in the destination files.
You can also export the mappings and results for requirements in the current Verifier session to imported files.
The following properties can be exported from a Verifier session:
Parent,ID,Title,Type,MinSpec,MaxSpec,Unit,Owner,Scope,Domain,Description,Deadline,Overall Status,Mapping,History,Result Data Age,Min Value,Typical Value,Max Value,Passed,Failed,No Results,Unmapped,Verification Space,Coverage,CellviewHolder,Disabled,FailCoverage,Hier,NoneCoverage,PassCoverage,ReadOnly,ReadOnly,Signoff,StatusDescription,Yield,Min,Max,Mean,StandardDeviation,SigmaToTarget,Cpk
The StatusDescription properties in the exported file contains the tooltip information that is displayed on the OverallStatus column of the Results tab.
The following snippet shows the format used in Verifier to store the fields and their order in a CSV file. The snippet includes the fields and an example requirement.
To export the requirements hierarchy:
-
Choose File – Export and select from the following formats of exporting requirements:
-
CSV
The Export Requirements to CSV File form appears.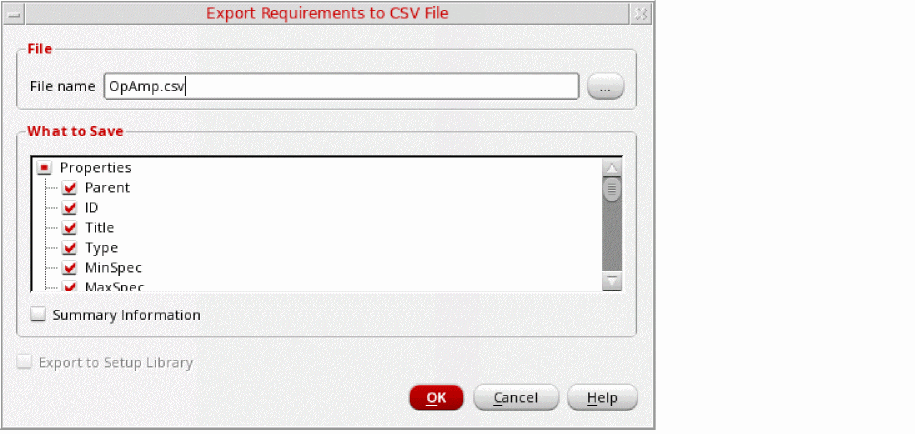
-
Excel
The Export Requirements to Excel File form appears.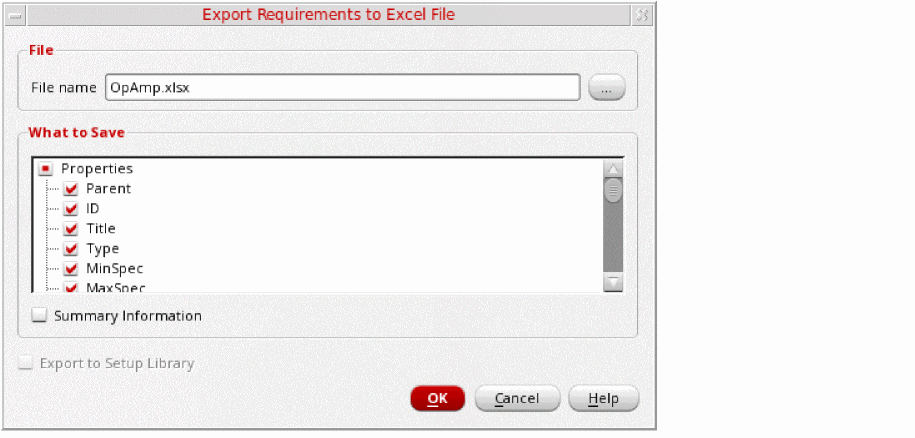
-
Imported File
The Export Mappings and Results for Requirements in Imported Files form appears.The available options let you export the same values as the Results page in the Verifier user interface.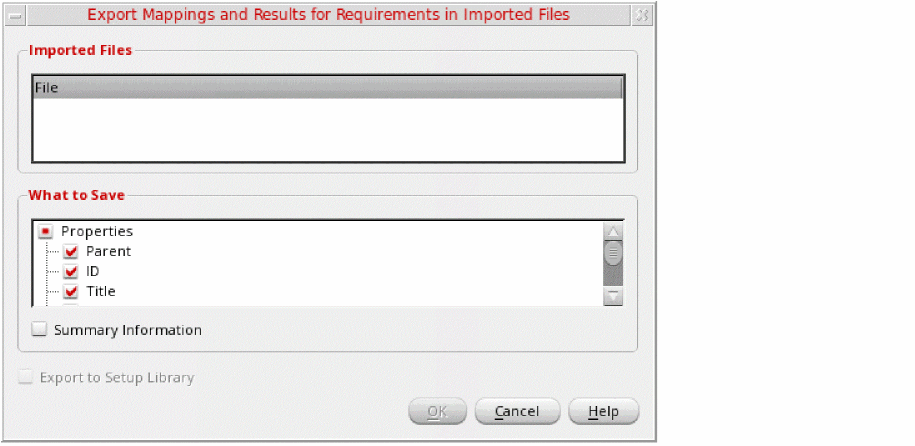
-
CSV
-
Specify the name and location of the destination file.
If the specified directory does not exist, it is created automatically.
Excel file names can only contain the following characters:a-z,A-Z,0-9,!,@,#,$,%,&,(,),-,_,+,=,[,],.,,, and space. -
Select from the What to Save options.
The form lets you reorder the exported fields. You can drag the What to Save options and drop them at the desired location in the displayed list. - Click OK.
The selected hierarchy is stored in the specified file.
Choosing Summary Information in these forms adds the following details in the exported file, as shown below. This information is added above the field information.
When you save your cellview after exporting requirements, the selected fields are saved under the customizedExportFields tag in the settings.v3 file. For any subsequent export operation using any of the Export forms, the fields are pre-filled with the settings saved in the settings.v3 file.
Additionally, you can set default settings for exporting a set of fields. For more information, see the environment variables fields and addSummaryInformation.
Deleting Requirements
You can delete the local requirements that are not needed in your verification plan. When you delete a requirement mapped to an implementation, the mapping is removed.
To delete a local requirement, do one of the following:
- Right-click the requirement and choose Delete Requirements.
-
Select the requirement and press
Delete.
You can select multiple requirements for deletion. Select a parent requirement if you want to delete it and its child requirements.
The selected requirements are removed.
When you choose to delete requirements, Verifier deletes the selected requirements and their associated mappings. It also updates the hierarchical number of the requirements to represent the new hierarchical structure.
Filters in the Requirements Hierarchy
It is possible that you have a large requirements hierarchy, where locating specific requirements is time-consuming. You can add a filter row in the requirements hierarchy to display only specific types of requirements. The filter row is applied to both, the requirements hierarchy and the implementations list.
You can also locate requirements using the filter functionality of Verifier.
Related Topics
Filtering Requirements Based on Text Criteria
Filtering Requirements Based on Status
Filtering Requirements Based on Text Criteria
To search requirements with specific text in the hierarchy:
-
Do one of the following:
- Click the Show Filter Row icon on the toolbar.
- Right-click anywhere on the column heading row hierarchy and choose Filter row.
The Filter row is displayed below the column headings in the Setup, Run and Results tab.

- Type the filter string or number in the required hierarchy column.
As you type, the filter functionality searches the selected field of the requirements or implementations and displays the results in the requirements pane. You can also use the shortcut menu options and choose criteria such as All of the words, Starts with, Case Insensitive, and more.
If you filter the requirements with the Deadline property, it is recommended that you specify the same deadline for a parent requirement and its child requirements. Specifying conflicting deadlines will display misleading filtered requirements.
To use the other features of the filter functionality:
- Enter a name for the filter and click Save Filter to store the search string for later use in the session.
- Click the Clear the contents of the filter icon on the toolbar, to remove all filters and show all requirements or implementations.
- Click Delete Filter to delete a saved filter.
Filtering Requirements Based on Status
To filter the requirements and implementations based on their status in the hierarchy:
-
Right-click the requirements area and choose Show.
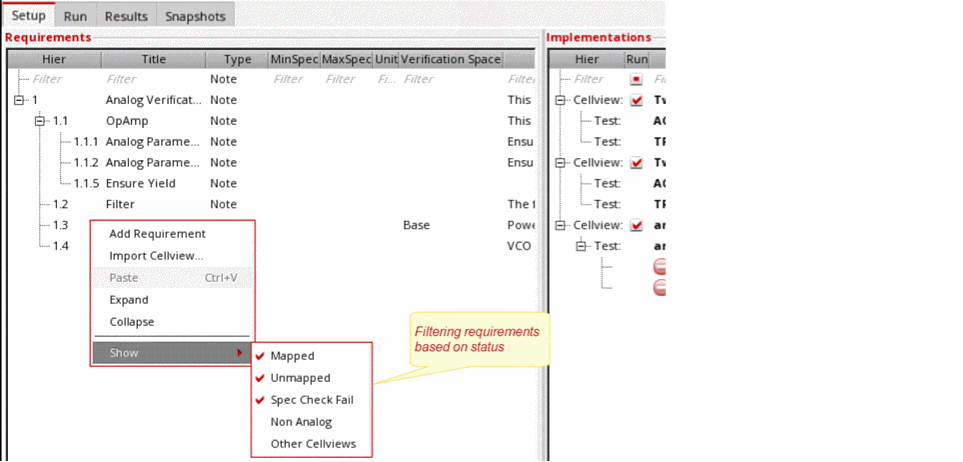
-
Set the filter.
The available filter options are:
Ensure that the requirement or implementation types you want to hide are not selected.
Verifier filters the requirements hierarchy according to the specified criteria.
Custom Fields
Verifier lets you include additional information for your design verification project, and for each requirement in the project. For example, you can include the name and e-mail address of the verification project manager. For each requirement in the project, you can include the name and e-mail address of the engineer.
Verifier only stores the custom field values for reference. It does not use the custom fields for any other purpose.
This section provides information on how you can use the custom fields functionality of Verifier.
Related Topics
Preparing ADE Verifier to Use Custom Fields
Specifying Values for Custom Fields
Preparing ADE Verifier to Use Custom Fields
To use custom fields in Verifier, you must define the fields in a CSV file and set the Verifier environment to include those fields.
To prepare Verifier for using custom fields:
-
Specify the custom field tags, names, and tool tips in the CSV files in the following format:
Field tag name, Field tag description, Field tool tip
See the following examples:The
infoReq.csvfile contains the following custom field details for the requirements:Engineer,The name of the lead engineer.
Email,The e-mail address of the engineer.
-
Set the Verifier environment variable csvfile (customFieldConfig) and csvfile (customReqFieldConfig) to indicate the CSV files of the custom project fields and the custom requirement fields, respectively.
You can set the variables in one of the.cdsenvfile,.cdsinitfile, or Virtuoso CIW. The following snippet illustrates how you set these variables in the.cdsinitfile stored in the root directory of your project.
The filename and location entry can contain the character~for user home directory, and$UNIX_environment_variable for the value of an environment variable.envSetVal("verifier.customFieldConfig" "csvfile" 'string "~/infoProject.csv")
envSetVal("verifier.customReqFieldConfig" "csvfile" 'string "~/infoReq.csv")
The custom fields become available to the Verifier sessions.
Specifying Values for Custom Fields
After you set up Verifier, the custom fields become available to the Verifier sessions. The custom project fields are available in the Custom Data tab of the Change Referenced Cellview Form. The custom requirement fields are available in the
You set the value of the custom fields in a Verifier session. These values are saved in the Verifier cellviews.
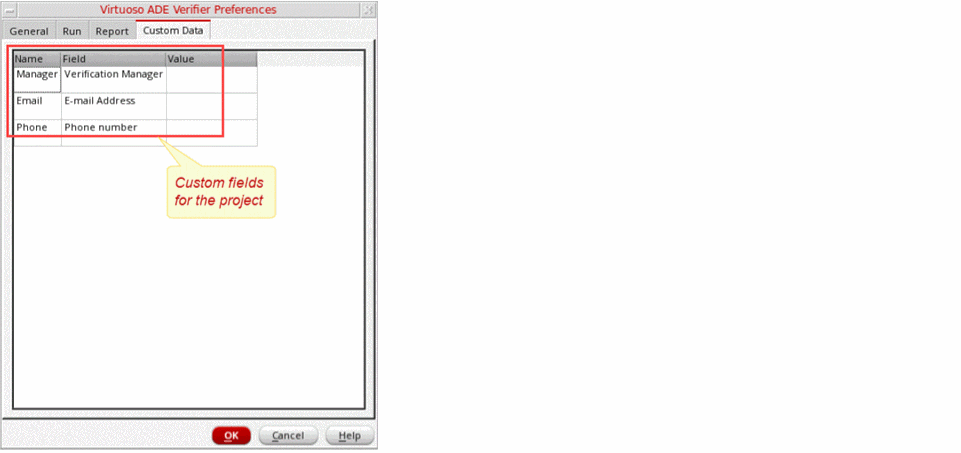
To set the values of the custom project fields
-
Choose Edit – Preferences.
The Preferences form displays. -
Click the Custom Data tab.
The custom fields display in a table.
The Custom Data tab becomes available when you set the Verifier environment variable customFieldConfig.
-
Double-click the Value cell of a custom field and type the value.
Repeat this step to specify the value of the remaining custom fields.

- Click OK.
You can save your changes in the cellview.
To set the values of the custom fields of a requirement
- Click the Setup tab, if it is not the current tab.
- Select the requirement.
-
Do one of the following:
The Requirement Editor assistant displays the custom fields in the Custom Requirement Data group box, as illustrated in the following figure.
The Custom Requirement Data group box becomes available when you set the Verifier environment variable customReqFieldConfig.
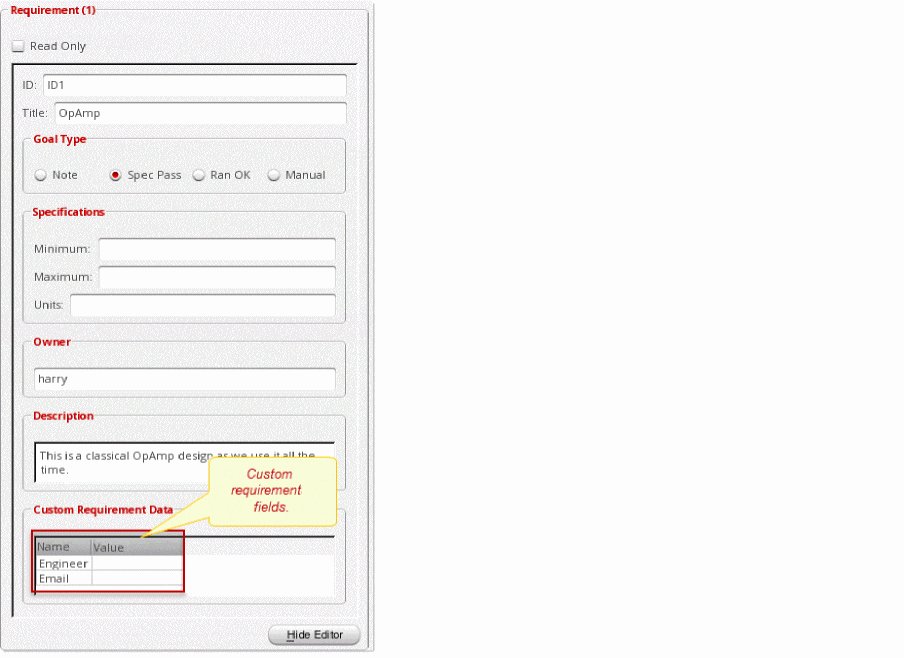
-
Double-click the Value cell of a custom field and type the value.
Repeat this step to specify the value of the remaining custom fields.

You can save your changes in the cellview.
Description Editor for Requirements
The description editor is a compact but powerful utility that is available in the Description column of the Requirements pane on the Setup page. Use this editor to edit your requirement descriptions. The edited description is saved to the requirement.
Using the description editor, you can add various HTML formats to text, add links to documents and cellviews, open the added documents and cellviews by clicking the links, as well as add images and display them inline. When you save the requirement description, the modifications are added to the requirement in the Verifier cellview. The documents, links, and formatting changes are saved in the documents directory and the images are saved in the images directory. These directories are available in the Verifier cellview directory structure. Therefore, when you use the SaveAs command from the Verifier toolbar, the documents and images included with the requirements are exported, and when you import a cellview, these documents and images are also imported.
To access the description editor, right click a requirement in the Requirements pane of the Setup page, and select Edit Description. The editor window appears and displays the name of the selected requirement as the window title in the format Requirement <name>.
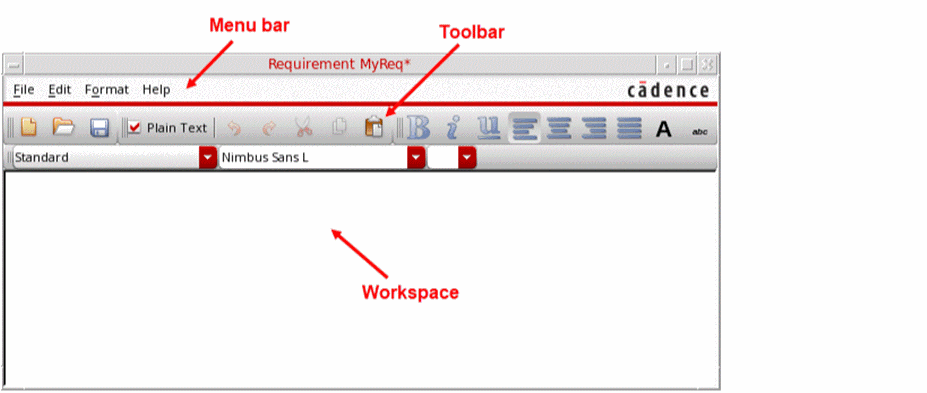
The editor window always displays the name of the selected requirement in the format Requirement <name>. The edited description is displayed in the Requirements Editor assistant as well as the Information assistant.
The following illustration shows the Requirements Editor assistant displaying the changes made to the requirement description.
The following table describes the main controls available on the description editor toolbar for a requirement.
The following table describes the additional shortcut menu commands available in the description editor that help you manage your requirement descriptions in a Verifier cellview.
Return to top