6
Managing Verification Results
This topic provides information on how you can access the verification status of your project managed through Virtuoso ADE Verifier (Verifier).
The status of your design verification project depends on various factors, such as the number of unmapped or missing requirements. For example, if your verification plan is incomplete, and the overall verification status is 100 percent, the verification project cannot be deemed as complete.
ADE Verifier lets you access the overall verification status of your project. You can drill down to the detailed status of each verification requirement in the project to generate various types of design verification reports.
It is possible to manually override failed requirements by signing them off. You can also sign off the requirements of the type Manual.
Related Topics
Factors that Impact Verification Status
Reviewing the Current Overall Verification Status
Verification Status of Requirements
Requirements Signoff in Virtuoso ADE Verifier
Factors that Impact Verification Status
The status of your design verification project depends on the following factors:
-
The number of mapped and unmapped requirements of the type Spec Pass or Ran OK.
To get a realistic verification status, map all the requirements of the type Spec Pass or Ran OK to their implementations. -
The implementation output fails with errors. This indicates that some of the simulation points could not be finished correctly due to some error in ADE Explorer or ADE Assembler, such as a simulation error. The min/max values consider only the finished simulations results. Therefore, these values with errors should be used cautiously.
-
The successful completion or failure of the implementation cellview runs.
If an implementation cellview run fails, the associated requirements of the type Ran OK also fail verification. Additionally, the requirements mapped to the outputs of the cellview do not have results for verification checks.
When you run an implementation cellview, only the enabled tests of that cellview are run. The disabled tests are not run. The overall status of the requirements mapped to a disabled test or its outputs is No Results, which impacts the verification project status. -
The results of the successful implementation cellview runs.
Verifier compares the simulation result of an implementation output with the specification used by the mapped requirements. If the result meets the specification, the mapped requirements pass verification. Otherwise, they fail verification.
The results of test or outputs are reported as failed when one of the following conditions are met:-
Number of canceled points for a mappable item is greater than
0. -
Number of failed points for an implementation, run, reliability, or test is greater than
0. Failed points can be a result of simulation errors, netlist errors, upload errors, or other errors. - The output or test for a statistical output fails.
All these errors, except for errors reported for canceled points, can be ignored by setting the environment variable ignoreError tot. The Results page displays the failed and canceled points for these tests or outputs using a tooltip. -
Number of canceled points for a mappable item is greater than
-
The manual sign-off status of the failed requirements and the requirements of the type Manual.
You can sign off the requirements of type Manual. Verifier also lets you sign off the requirements that failed verification, is not mapped to any implementation items or failed the specification check. Verifier considers signed off requirements as requirements that passed verification.
For details on the manual sign-off feature, see Requirements Signoff in Virtuoso ADE Verifier. -
The metric prefix from specification units during verification.
For details on metric prefix evaluation, see Evaluation of Metric Prefix. -
The output expressions for implementations. If an output has no expressions specified in ADE Assembler, the Overall Status shows
No Results.
Changes in these factors impact the overall design verification status. For example, if you sign off some failed requirements, the percentage of the overall verification progress increases.
The verification failures can include requirements that are not mapped, mapped implementations that are not simulated or do not have results, failed specification checks, and cases where simulation results did not match the specifications.
Location of Run Summary Data
Verifier stores the run summary data (PALS) file as .xml files in separate locations, based on whether the cellview is editable or read-only.
-
When the cellview is editable, Verifier stores the run summary data of a local or referenced implementation in the
resultsdirectory of the current cellview. -
When the cellview is read-only, Verifier stores the run summary data in the following locations:
- For a local implementation: <project directory>/<library>/<cell>/<view>/<results>
-
For a referenced implementation: <project directory>/<ref_library>/<ref_cell>/<ref_view>/<results>
For more information on project directories, see Project Directory Setup.
When you open an existing Verifier cellview or update a referenced cellview, Verifier loads the existing and last modified run summary data file from the default results directory in the current cellview or from these locations.
Evaluation of Metric Prefix
You can check for any mismatch in the implementation specifications with the requirement specifications mapped to that implementation. This happens when the Requirement specification and check to implementation option is set in the Preferences form.
However, by default this check only evaluates the specification numbers and the unit. It does not do any calculations to check if the value and unit combination matches.
Requirement: MaxSpec = 10m, unit = V;
Implementation: MaxSpec = 10, unit = mV;
This will be flagged as a mismatch.
To check for such matches or mismatches, enable the preference option Evaluate metric prefix on the General tab.
Enable Check unit, Evaluate metric prefix and use Requirement specification with check in the Preferences form. The metric prefix of the requirement specification unit is used for both specification check and evaluation. Assume that the values are as follows:
Requirement: MaxSpec = 10m, unit = V;
Implementation: MaxSpec = 10, unit = mV, Implementation results: minValue = 1.5, maxValue = 5.5;
When evaluation is done, the status is as follows:
Spec Check: Pass (10m V == 10 mV);
No specification error is reported. The unit of the requirements is used for the displayed results.
Result status shown: Verification: OverallStatus = Pass, MinValue = 1.5m, MaxValue = 5.5m , Unit = v.
In the above figure, the units are different in the requirement and implementation specifications. When you enable Evaluate metric prefix, the specification check is 'pass' as the numerical values are identical when the unit prefix is considered.
You can also enable the Evaluate metric prefix preference by using the environment variable evaluateMetricPrefix.
The Evaluate metric prefix preference only checks the first single prefix, such as:
Y|Z|E|P|T|G|M|K(?!elvin)|k(?!ilo)|%|m(?!il|persec)|u|µ|n|p|f|a|z|y
Here the supported prefix is K but not Kelvin; k but not kilo; m but not mil or mpersec. Except the above prefixes, complex combinations are not supported.
Reviewing the Current Overall Verification Status
Verifier displays the current overall design verification status of your project on the Overall Progress bar. You can view further details in the status tooltip.
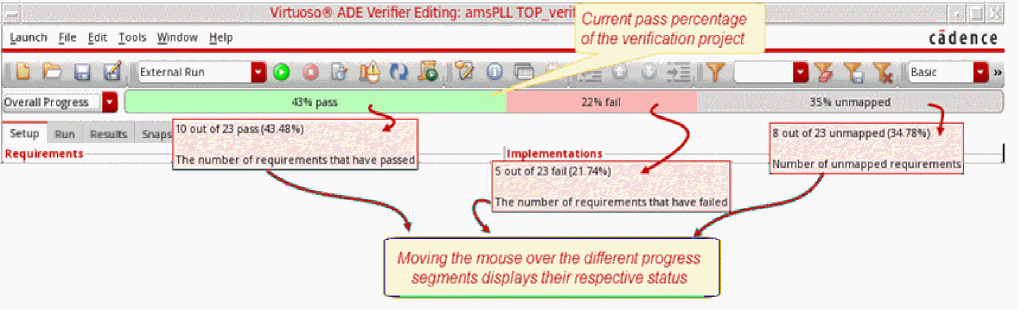
To display the overall verification status, if it is not already displayed:
-
Choose Overall Progress on the toolbar.
The current overall verification status displays with the pass, fail, and unmapped percentage.
To display the status snapshot tip:
The status snapshot tip includes the following information:
- Requirements information, including the total number of mapped, unmapped, and manual requirements.
- The status of the implementation runs.
- The percentage of requirements that passed verification, along with the number of failed and unmapped requirements, and requirements that do not have results for determining their verification status.
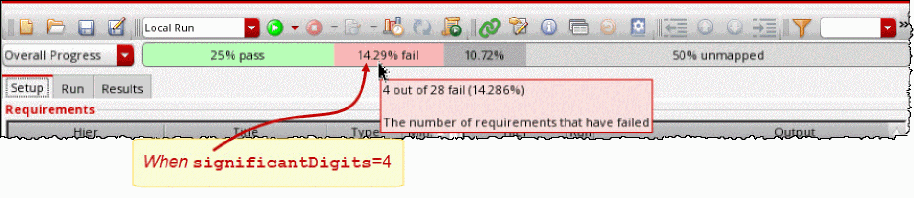
-
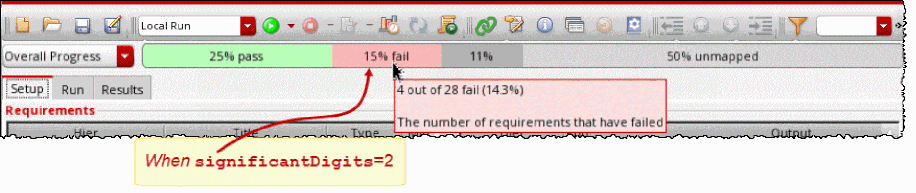
The percentage for pass rate is rounded down whereas the percentage for fail, unmapped, and no results is rounded up. This ensures that the rounding does not lead to overly optimistic view of the results.
For example:- 99.8% pass is not rounded off as 100% pass.
- Pass rate: 34.899%, fail rate: 64.1%, unmapped: 1.001% - Here, the rounded values are shown as pass: 34% and fail rate: 65% and unmapped: 2%.
As a result of the rounding schema used, the sum of all values may deviate from 100%, as shown in the above example. -
To specify the rounding schema for the calculation of Overall Progress, OverallStatus, MinValue, TypicalValue, and MaxValue on the Results tab, set the significantDigits environment variable.
The calculated values are shown as per the rounding schema selected in the Overall Progress bar. However, the values displayed in the tool tips are based on the calculation (significantDigits+1). For example, whensignificantDigitsis set to 2, the pass rate of 34.899% will be displayed as 34% in the Overall Progress bar and 34.8% in the corresponding tool tip.
You can observe the following illustrations to understand the calculation of values on the Overall Progress bar using the rounding schema: -
Referenced requirements owned by other owners, and not the current user, are excluded from the overall verification progress bar and tool tip. Manual requirements are excluded from the mapped and unmapped requirements count.
Overall Progress, Coverage, and Overall Coverage
There might be instances when you see a difference in the Pass and Fail percentages in the values shown for Overall Progress and Overall Coverage on the Verifier toolbar.
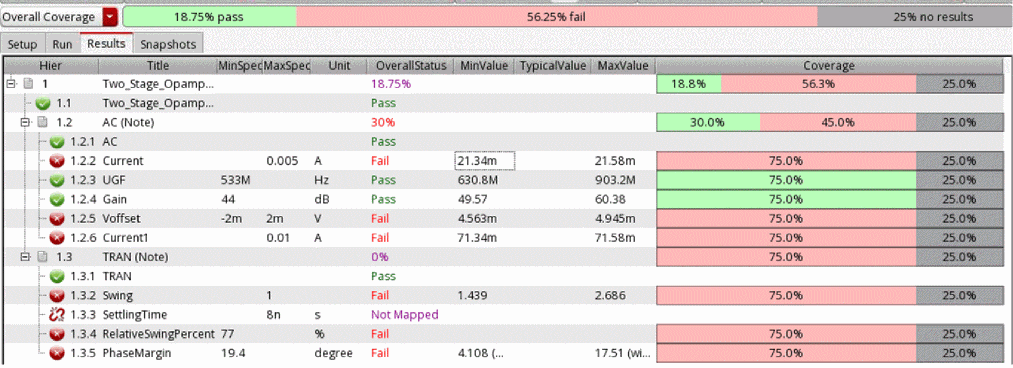
The calculation for Overall Progress is based on the number of requirements. For example, the following illustration shows the tooltip as "14 out of 23 pass".

In this example, the total number of requirements with results is 23, and the number of requirements that have passed is 14. The Overall Progress considers only the requirements that have passed or failed.
Coverage in Verifier is calculated by considering all the design point combinations that are added to verification spaces and available in the implementation history. The coverage values are reported as "x% passed, y% failed", which can be interpreted as:
x% design points from SPACE are pass -- Green
y% design points from SPACE are fail -- Red
(100%-(x+y)%) design points from SPACE are not covered -- Grey
The Overall Coverage value is calculated by considering all the design points specified in the verification spaces and reporting these points as Pass, Fail, or No Coverage.
Consider the following figure that shows the tooltip as "4 out of 45 pass".

In this example, the total number of design points is 45, and the number of points that have passed is 4. The 45 design points include points that are defined in the verification space, as well as those points that are not defined in verification spaces but simulated during a run. The 4 points that show as pass are those points that are successfully implemented or covered.
When you select the Overall Coverage progress bar, the OverallStatus, MinValue, and MaxValue values are updated. Calculation of these values is based only on the design points specified in the assigned verification space. All other design points are ignored.
For example, consider the following Setup Library shown in the following illustration:
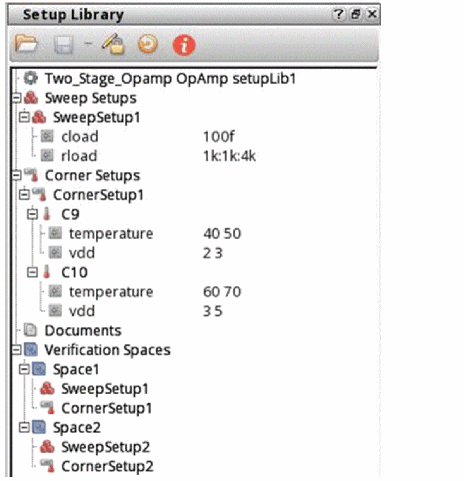
Based on the design points defined in this library, the OverallStatus, MinValue, and MaxValue are as follows:
Selecting the option Show results for Verification Space parameter conditions ensures that Verifier calculates the coverage based on design points from verification spaces for all subsequent simulations. Additionally, this preference ensures the following:
- The Verifier toolbar always shows the Overall Coverage progress bar when you close and reopen the Verifier cellview.
- Clicking the Update Coverage button on the Verifier toolbar updates the MinValue, MaxValue, TypicalValue, and OverallStatus values.
-
The TypicalValue column shows a value if a typical design point falls in the range of values specified in a verification space. If there are multiple typical design points, the column shows
various. If there is no typical design point, the cell is empty.
Verification Status of Requirements
In a requirements-driven verification flow, it is important to review the status of each requirement to identify the requirements that need attention. You can access the verification results of each requirements in Verifier. You can also filter the requirements hierarchy based on the verification results.
Typically, you investigate the failed requirements to determine the corrective actions. You can make appropriate changes to the design so that the results meet the specifications, and re-simulate the implementation cellview. Alternatively, if the specifications have scope for updates, you can change the specifications in the implementation cellview and the requirement so that the results are within the new specifications. To facilitate such actions, Verifier lets you view simulation results and edit the implementation cellview in the default application of that cellview.
When you investigate the verification status, you can also consider making appropriate changes to your verification plan to achieve your design verification goals and quality parameters. For example, you can choose to make the plan more granular by adding new requirements and mapping them with their implementations, or change the specifications of some requirements.
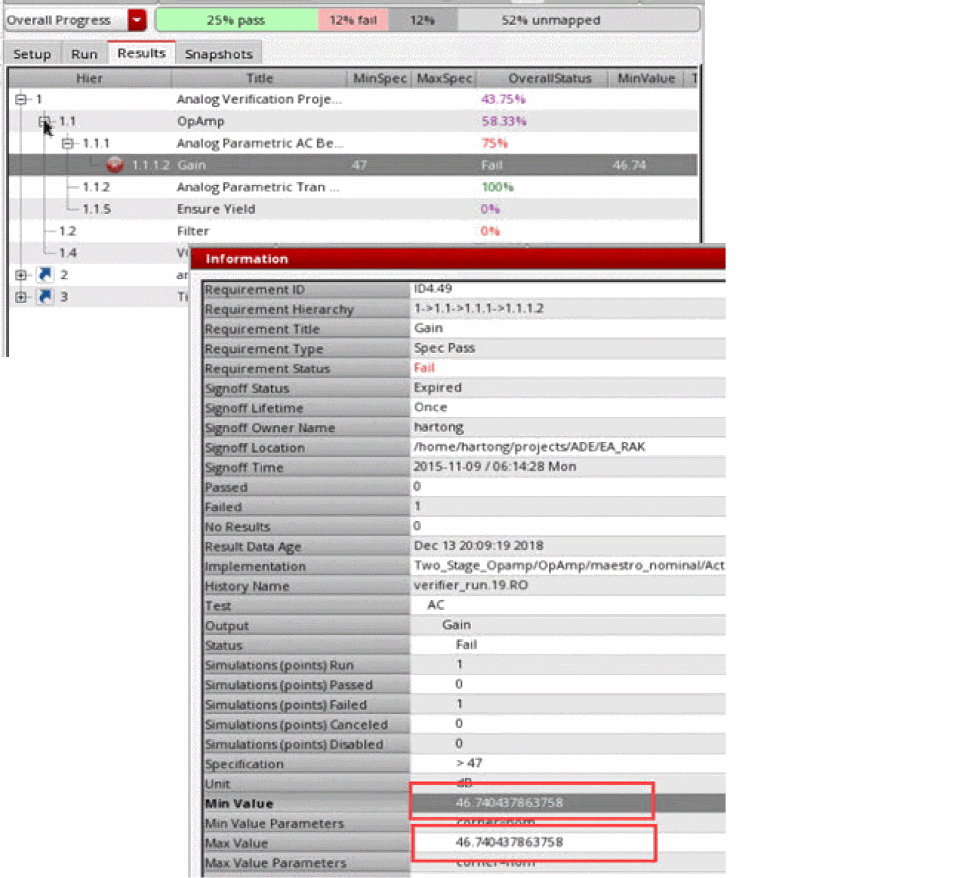
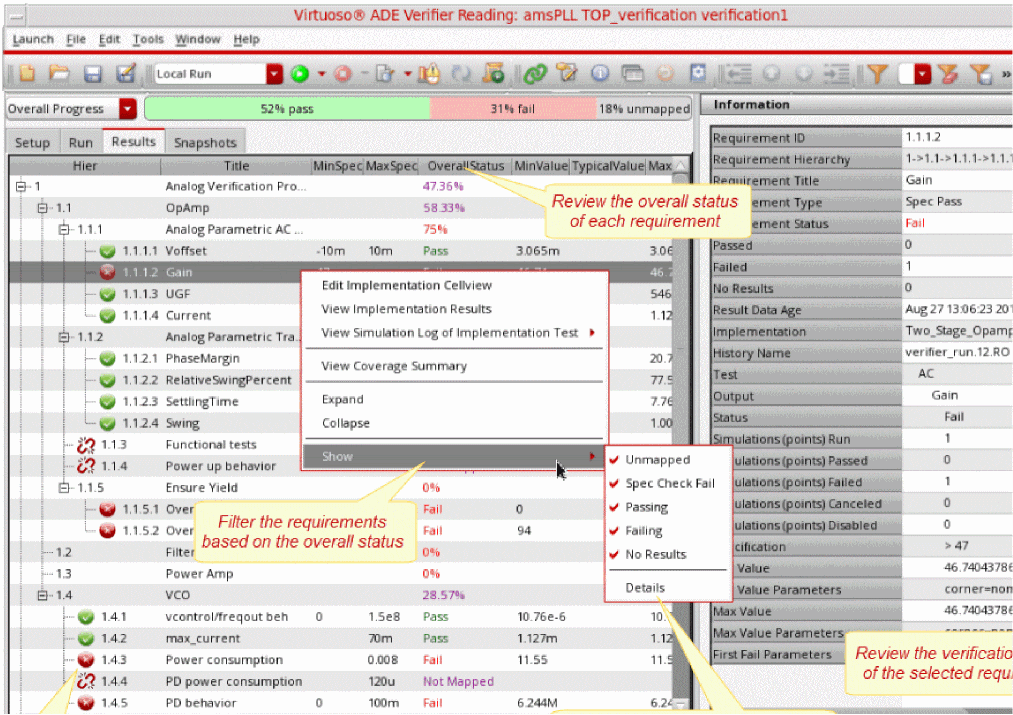
100% overall verification status. However, you can consider to tape out when your verification status is 95% after a careful analysis and a good understanding of the missing 5% of the verification objectives. By analyzing the verification status of the requirements in Verifier, you can achieve this understanding. If required, you can choose to manually override those 5% of requirements.The following figure illustrates how you can identify the verification status and get relevant details from the Results tab.
The Results tab contains the following columns:
- Hier
- Title
- MinSpec
- MaxSpec
- Unit
- Overall Status
- MinValue - Shows the overall minimum value for multiple mappings.
-
TypicalValue - Shows the typical value for the mapped output according to the typical settings in Tools – Typical Value Setup. A blank indicates no matched point is found or the requirement is not mapped to the output.
variousindicates there are multiple matched points or the mapped output has a different typical value.
Verifier allows you to set up the typical and get the value from unique matched point. The typical value is derived by selecting one value out of the matrix of corner and sweep values and matching the specified 'typical' parameters inside Verifier. For each mapped requirement, Verifier analyzes implementation results and chooses one result value from the corner or sweep values being specified. This value is used as the 'typical' value in Verifier. If matching sweep or corner parameter is not found, the TypicalValue column can be left blank. Similarly, the column is left blank if multiple values are found, which match the typical parameters. In this case, modify the typical setting accordingly so that a unique match is found. Typical values are not used for Monte Carlo implementations or when more than one implementations are mapped to one requirement.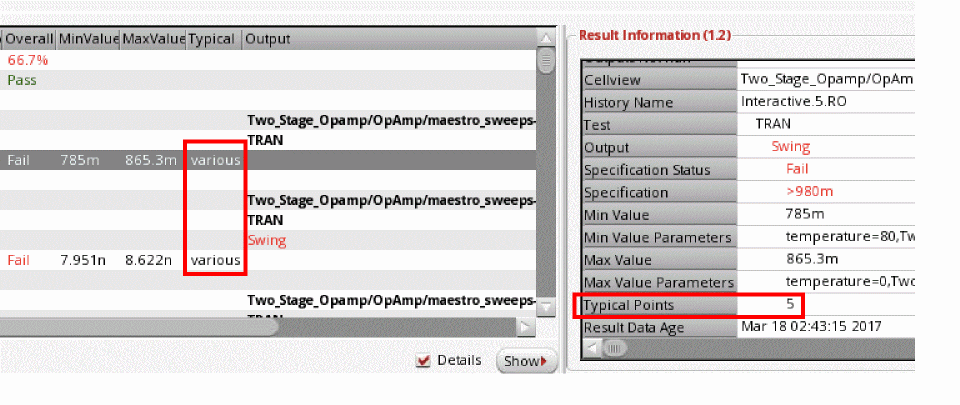
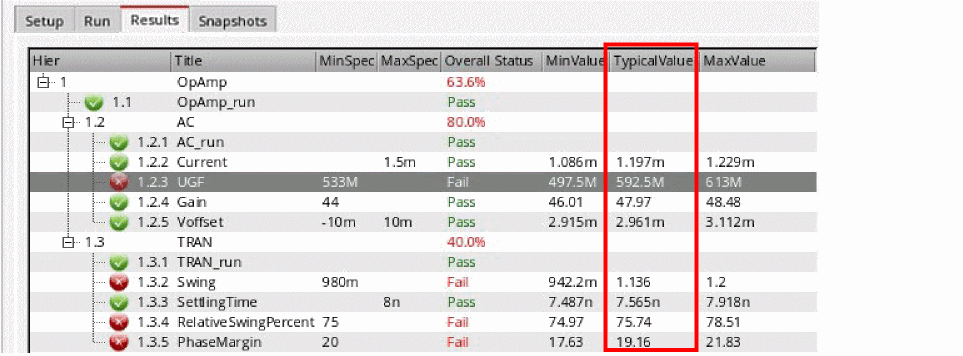
- MaxValue - Shows the overall maximum value for multiple mappings.
- Coverage
The Results tab can also display the following optional columns:
- ID
- Type
- VerificationSpace
- Owner
- CellviewHolder
- Scope
- Domain
- Description
- ReadOnly
- Mapped
- Signoff - Shows the comments that are added in the Sign Off form. A tooltip also displays the requirement ID with the signoff duration, the name of the person who has given the signoff, comments, name of the requirement owner, location of the verifier cellview, and time of signoff.
- Yield
- Min
- Max
- Mean
- StandardDeviation
- SigmaToTarget
-
Cpk
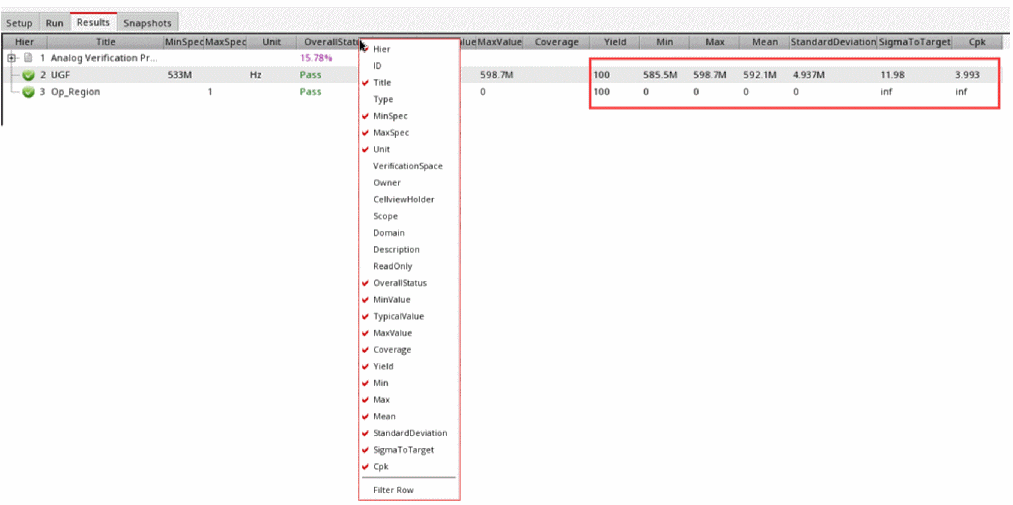
To view these optional columns, right-click anywhere in the Results tab header row, and select the required columns.
To view additional details related to the implementations mapped to the requirements, right-click anywhere in the Results tab, choose Show, and select the filter options as required.
In case of Monte Carlo runs with sweeps or SigmaToTarget values defined with range specifications, you can get different Min or Max values for each statistical value. In such scenarios, the values are displayed as <minValue>, <maxValue> values. In all other cases, the Min and Max values remain the same, and show a single value that uses the same notation as the requirement specifications. You can also use the calcStatisticsForNonMC environment variable to save or load the statistical values to or from the run summary data file. In case of Monte Carlo runs, the statistical values are always non-empty.
The Results tab also displays the detailed verification results of the selected requirement in the Information assistant, as well as the corresponding requirement details in the Requirement Editor Assistant.
You can show or hide the columns of the requirements list in the Results tab. For this, right-click anywhere on the column heading in the results area and select the columns you want to show. Verifier hides the columns that are not selected.
To sort columns, you can use the drag-and-drop method and change the display of columns. Additionally, you can specify the default column order and hidden columns by using the environment variables resColumnOrder and resHiddenColumns.
Viewing Verification Results in the Information Assistant and Requirements Editor
The following figure shows how you can review the verification results of a requirement in the Information assistant and Requirement Editor.
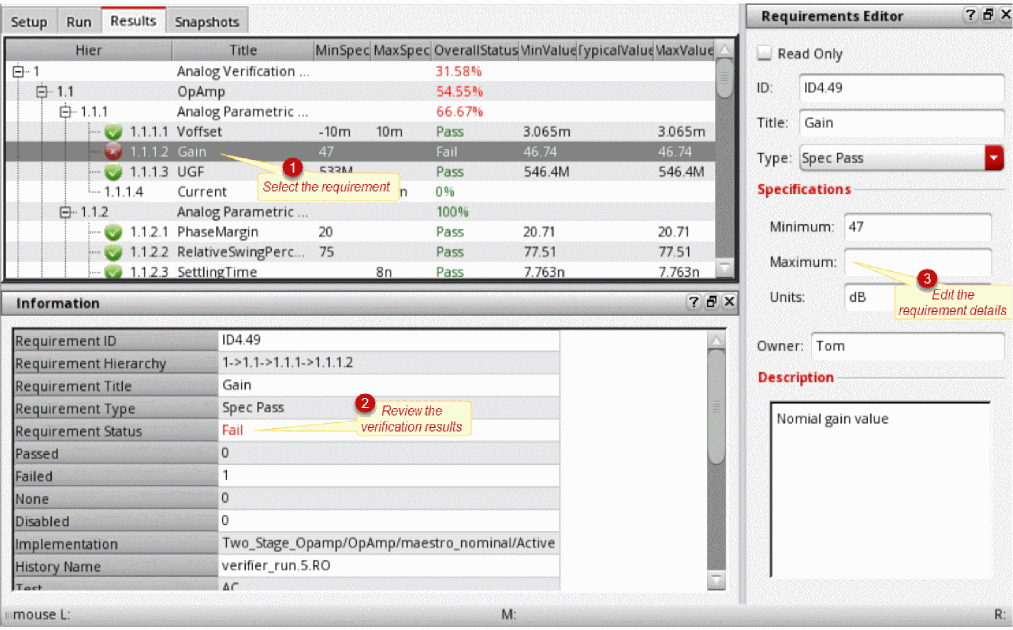
To review the verification results:
-
Select the requirement in the Results tab.
- The Information assistant displays the requirements hierarchy with the verification status and details such as type, status for the requirement, specifications, histories, minimum value, maximum value for the corresponding implementation. For more details, see Viewing Run Results Using the Information Assistant.
- The Requirement Editor displays the requirement currently selected in the Results tab. You can make required changes to your verification plan to achieve your design verification goals. These changes can be made to either one of requirements or implementations.
-
Select a requirement to view its verification details in the Information assistant.
You can copy the value of a field in the assistant. For this, right-click the result field and choose Copy String. You can also select the field and pressCtrl+Cto copy the text.
To view the mapped implementation, along with its specification and simulation status, select the Details check box.
For requirements that have passed verification, the results meet the specifications.
To filter the requirements based on overall status:
-
Click Show and select the filter options as required.
For example, if you want to hide the requirements that are not mapped, ensure that Unmapped is not selected. The hidden requirements are indicated next to the overall progress bar.
To open the implementation cellview mapped with a requirement:
-
Right-click the requirement and choose Edit Implementation Cellview.
The implementation cellview opens in edit mode in its default application.
Verification Status Indicators
The following table lists the keywords and icons used to indicate the verification status of requirements. The icons display with the hierarchical numbers, and the keywords display in the Overall Status column.
| Icon | Indicators | Description |
|---|---|---|
|
The requirement failed verification. A tooltip displays the failed and canceled points for the failed tests or outputs. |
||
|
The requirement is of the type Manual and it is not signed off. |
||
|
The implementation mapped to the requirement has not been run and must be run to capture simulation results. |
||
|
The specification checks failed for the requirement.
For details, see the corresponding |
||
|
The requirement of the type Ran OK or Spec Pass is not mapped to any implementation. It needs to be mapped to its corresponding implementation. |
||
|
Verifier does not have the simulation results of the implementations associated with the requirement. |
||
|
The test mapped to the requirement is disabled in the implementation cellview or the specified history, and cannot be run. |
Requirements Signoff in Virtuoso ADE Verifier
Verifier lets you sign off requirements of type Manual and requirements that have overall status of Fail, Not Mapped, Spec Check Fail, or Signed Off. Verifier considers signed off requirements as requirements that passed verification. Therefore, when you sign off a requirement, the overall verification progress percentage increases. However, requirements can be signed off only if the corresponding simulation points are covered in verification. Requirements mapped to implementations that have uncovered points are not signed off. For details, see Coverage Calculation in Virtuoso ADE Verifier.
The procedure to sign off the failed, unmapped, or spec check failed requirements is similar to signing off a requirement of the type Manual. After signing off a requirement, select it in the requirements hierarchy of the Results tab and review the signoff details in the Information assistant.
You can specify the validity period of a requirement signoff. For example, you can choose to retain the signoff indefinitely or for a specific period.
The signed off requirements are documented in the verification reports. For details on these reports, see Detailed Verification Report.
Signing off Requirements
To sign off a failed requirement:
-
In the Results tab, right-click the failed requirement and select Signoff.
The Sign Off Form form displays. - Type a name in the User Name field.
- Specify the valid period of the signoff from the Lifetime of Signoff drop-down list. The available options are:
- Specify if sign off information is stored after applying, or without applying the signoff to the requirement.
- Type details of the signoff, such as the reason, in the Comments field.
- Click OK.
The status of the requirement changes to Signed Off.
The following figure illustrates how you can sign off a failed requirement.
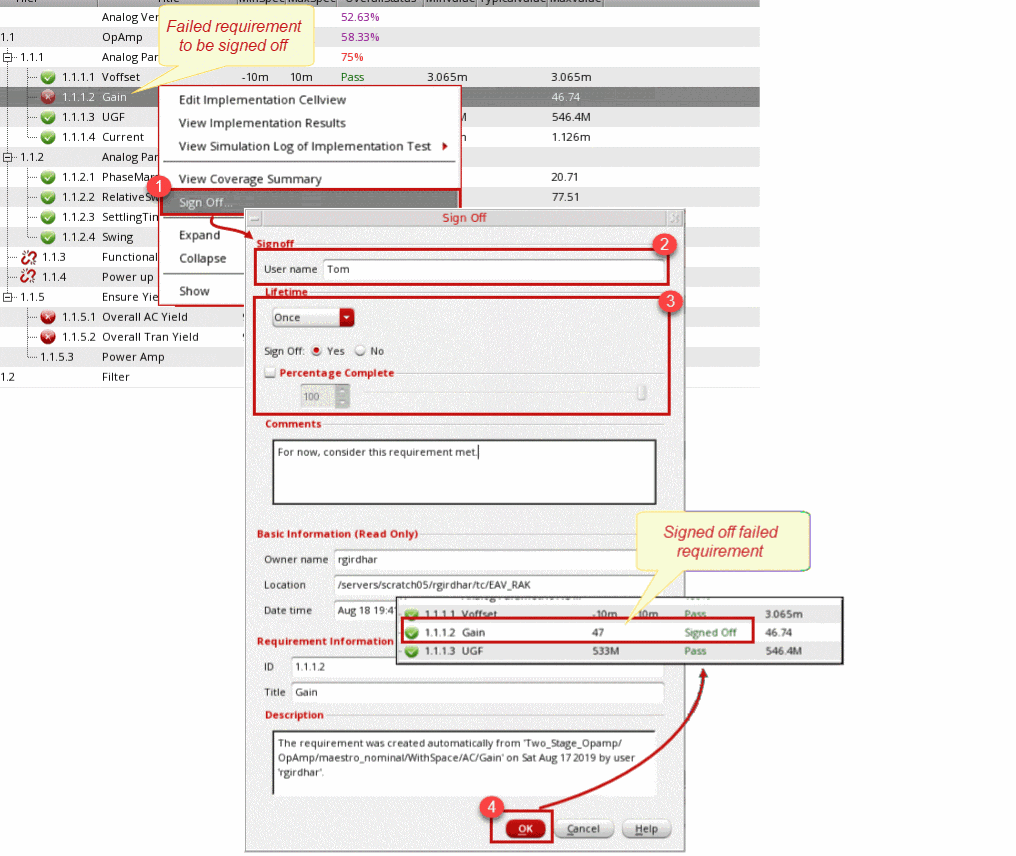
- In a multi-user verification setup, only the requirement owners can sign off their requirements in the owner cellviews. The project manager can review the sign-off details from the master cellview, but cannot sign off the requirements. See Synchronization Between the Master and Referenced Cellviews.
-
Specifying the sign off lifetime as
Oncefor a requirement essentially means that the signoff is valid only for the current simulation results. However, an unmapped requirement does not generate results. Therefore, the requirement with sign off set toOncemay continue to remain signed off unless it is mapped to an implementation. - When you copy or reference requirements from another Verifier cellview, these requirements include the signoff details that were added in the previous Verifier cellview. These details are also displayed in the Information assistant. You can only modify the signoff for copied requirements. For referenced requirements, the signoff details cannot be modified or deleted.'
Updating the Completion Progress of Requirements Manually
In the Sign Off form, you can add or update the completion percentage for requirements of type Manual. This indicates that verification is in progress, but not complete.
To add the completion percentage for a Manual requirement:
-
Select the Percentage Complete check box.
This enables a list box and a slider. - Do one of the following:
The specified percentage is used to calculate the status of Manual requirements and also impacts the status of Note requirements. Both these values are shown in the OverallStatus column. For example, if you specify the completion percentage as 50%, the requirement shows in the Results tab with 50% value for OverallStatus. If you specify the value as 100% then the requirement status shows Signed Off, and if you specify 0%, the status shows as Fail.
You can select either Sign Off or Percentage Complete to specify the sign off for your requirements. When you select the Percentage Complete check box, the Sign Off radio options are disabled. A percentage value less than 100% is still considered as a Fail for the overall status of the requirements. If you move the percentage to 100%, the requirement status automatically shows as Pass.
Viewing Plotted Results
The Results tab in Verifier helps you to view the results of your verification setup. Additionally you can also view the results with their waveforms in the Virtuoso Visualization & Analysis window when the Save Simulation Data option is set to All in the Save Options form.
To view the results in the Virtuoso Visualization & Analysis window:
The Virtuoso Visualization & Analysis window is displayed with the results.
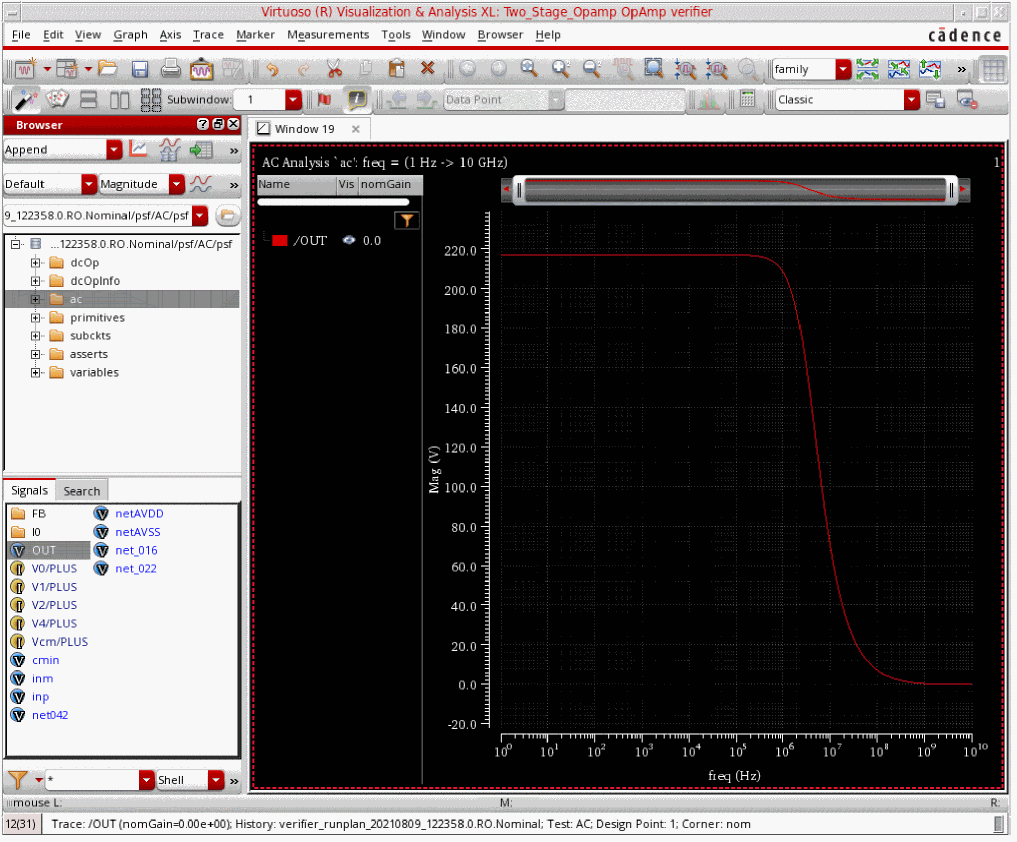
The Virtuoso Visualization & Analysis window title displays the name of the Verifier cellview. If the implementation has waveform data, the loaded results are displayed in the form of a waveform, and the Browser assistant in the window displays the results directory path in the following format:
RunDir/psf/list of tests/psf
If the implementation has no waveform data, only the results information is displayed in the Virtuoso Visualization & Analysis window. For Monte Carlo simulations, the results might not be displayed because by default the Save Simulation Data option is disabled.
Detailed Verification Report
Verifier creates HTML reports that contain the overall verification status and the verification details of each requirement, including the mapped implementations and verification results. These reports are available in the following formats:
You can only publish a report in one of these formats at once. By default, Verifier uses the default web browser to display the HTML report in basic format. You can specify the required settings in the Reporting tab of the Preferences form.
Related Topics
HTML Reports in Interactive Format
HTML Reports in Basic Format
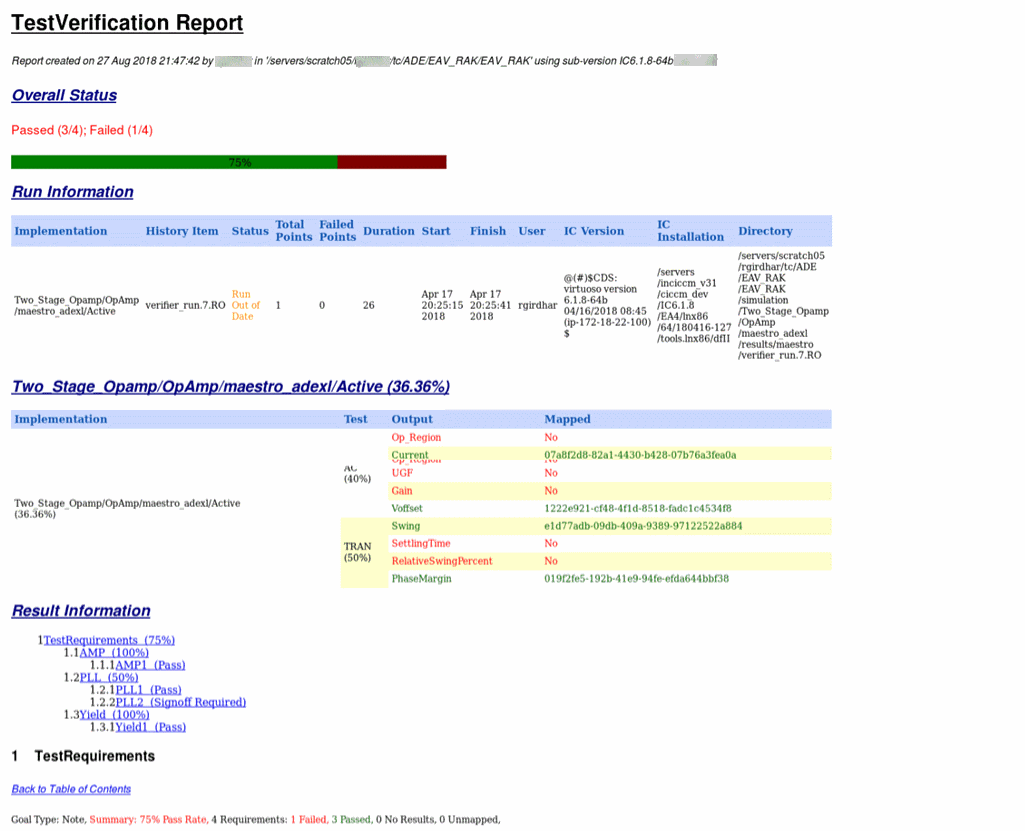
The HTML report in basic format lets you view the detailed verification status by including the overall verification and run status, requirement hierarchy with links and status, and the detailed verification status table of each requirement.
Verifier stores this report in the current directory using the naming format cell.html. For example, verification.html. If required, you can specify a custom name and location for the report.
The verification report in basic format includes the following elements:
-
Report header
The header information includes the report filename, location, creation time, and name of the creator. It also includes the overall verification status. -
Run information
The run information includes the implementation cellviews and their simulation details. -
Requirements-based verification details
These verification details include the requirements, their verification status, and the implementation details with status.
Viewing the HTML Report in Basic Format
To view the verification report:
-
In the CIW, set the following environment variable.
envSetVal("verifier.html" "useTemplate" 'boolean nil) - Choose Tools – Publish HTML Report.
The report is displayed in the browser window.
Typically, the requirement IDs are hidden in the HTML report. To display the requirement ID as shown in the following illustration, set the environment variable includeRequirementId to t.
In a Verifier setup with referenced cellviews, the default behavior of the basic HTML report is to hide the ExtRef ID from the beginning of referenced implementation LCVH. You can display the ExtRef ID as shown in the following illustration by setting the environment variable includeReferenceIDPrefix to t.

Related Topics
HTML Reports in Interactive Format
HTML Reports in Interactive Format
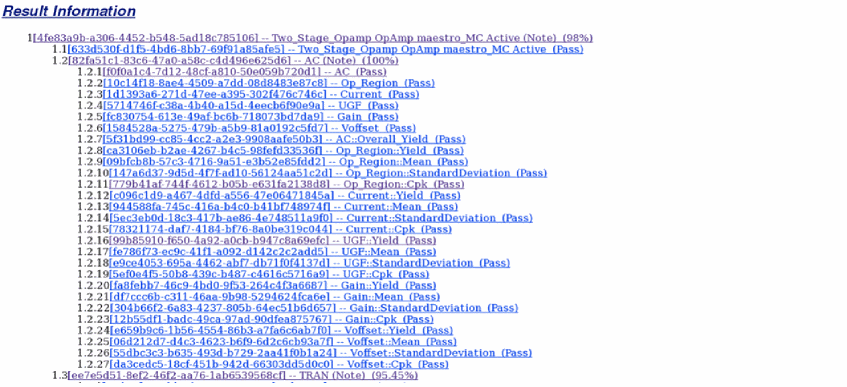
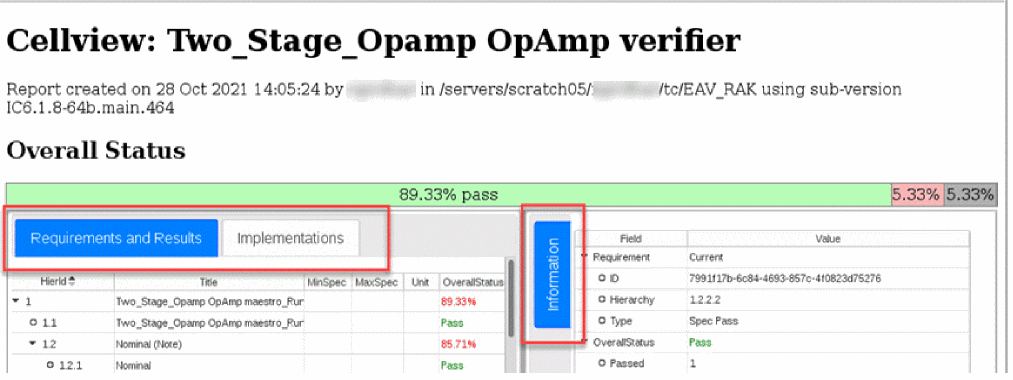
You can use the interactive format to display more structured HTML reports. In this format, the report contains two panes. The left pane displays two tabs, Requirements and Results and Implementations. When you click a requirement or implementation on the left pane, its corresponding verification information is displayed in the vertically placed Information tab on the right.
The verification report in interactive HTML layout includes the following elements:
-
Report header
The header information includes the report filename, location, creation time, and name of the creator. It also includes the overall verification status. -
Requirements, Results, and Implementations
The left pane of the verification report displays the setup details in two tabs. The Requirements and Results tab in the report displays a mix of requirements and results that are available on the Requirements pane of the Setup tab and the Results tab. The Implementations tab in the report displays the implementations with their test and outputs that are available on the Setup tab. -
Detailed Information
The Information tab on the right displays all the details of the selected item from the requirements, implementation cellviews and their simulation details, similar to the Information assistant.
Viewing HTML Reports in Interactive Format
To view the verification report:
-
In the CIW, set the following environment variable.
Setting this variable toenvSetVal("verifier.html" "useTemplate" 'boolean t)tupdates the Reporting preferences as follows:
-
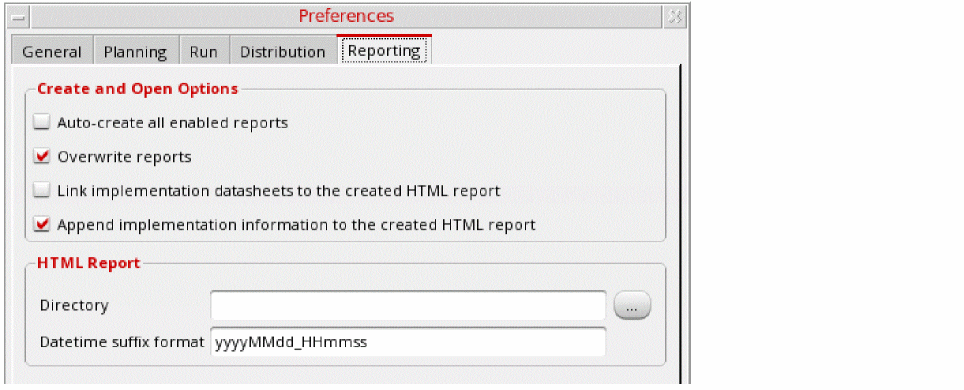
Specify a directory name for the HTML report in the Directory field.
If the specified directory does not exist, it is created automatically. -
Specify a datetime suffix format in the Datetime suffix format field.
The default format is yyyyMMdd_HHmmss. - Choose Tools – Publish HTML Report.
The report is displayed in the browser window.

Viewing Additional Columns in the Verification Report
By default, the HTML report displays the HierID, Title, Description, MinSpec, MaxSpec, Unit, OverallStatus, MinValue, TypicalValue, MaxValue, and Coverage.
To view additional columns in the HTML report:
-
Right-click anywhere on the column header area in the report.
A checklist is displayed with all columns. The visible columns are selected and the additional columns are unselected.
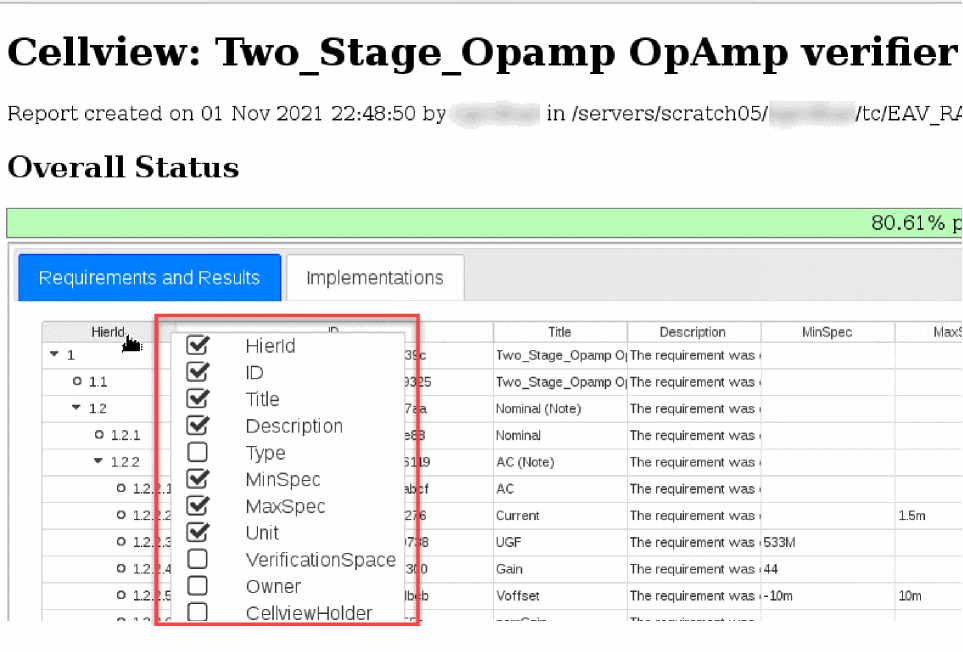
- Select the required columns from the checklist.
The additional columns are displayed.
You can sort the displayed columns by clicking the required column header. Additionally, you can drag a column header to the another column to reorder the displayed columns.
Related Topics
Customization of HTML Reports in Interactive Format
Customization of HTML Reports in Interactive Format
When you set the useTemplate environment variable to t, and run the Tools – Publish HTML command, Verifier generates a template-based interactive report by performing the following operations in the given order:
-
Creates a report directory where the published HTML report is saved. The directory name and location is determined by the Directory and Datetime suffix format fields in the Reporting tab of the Preferences form.
If the specified directory does not exist, it is created automatically. -
Exports a
.jsonfile for the session into the newly created report directory. For example, HTML_dir/export.json. -
Saves ADE Assembler datasheets into the same report directory. This is optional.
Use the Create ADE Assembler datasheet at run or reload time option to enable or disable the creation of these datasheets. - Copies any documents or images from the Verifier session into the report directory.
-
Copies and extracts the data from
/dfII/verifier/templates/located by the Cadence Search Framework (CSF) into the report directory.
This extracted data is customizable. The default data and any additional information, such as thestylesheet.cssor JavaScript used by the template, is available within install-path/share/cdssetup/dfII/verifier/templates.
If you have saved customized templates in a custom directory such as.cadence/dfII/verifier/templates, the data from this directory is also copied into the report directory. -
Runs the Python script file
publishHtml.py, which is available in/dfII/verifier/scripts/located by CSF. ThepublishHtml.pyfile is created using the Jinja scripting language.
You can customize a copy of the script by saving the script filepublishHtml.pyat a location such as.cadence/dfII/verifier/scripts/publishHtml.py.
ThepublishHtml.pyscript uses the HTML_dir/export.jsonand/dfII/verifier/templates/templateName identified by CSF. Here, the value of<templateName>is set using following environment variable.envSetVal("verifier.html" "templateName" 'string "index.html")
-
Applies the template defined by the script and uses the
export.jsonto expand the contents into the final output HTML_dir/index.html.
You can modify the HTML report name,index.html, by setting thetemplateNameenvironment variable with the new filename. The specified filename should exist in the template directory.
The architecture provided by the Jinja template language is highly flexible and can let you export your report to multiple formats, such as .txt, .csv, .pdf, and more. For example, the template contains the following source code to display the report header:
<h1>Cellview: {{ data["cellview"][0] }} {{ data["cellview"][1] }} {{data["cellview"][2]}}</h1>
<p>Report created on {{ data["export"]["date"] }} by {{ data["export"]["username"] }} in {{ data["export"]["cwd"] }} using {{ data["export"]["subVersion"] }}</p>
Here, {{}} indicates expressions defined in the Jinja template language and data indicates the contents of the export.json file. After the template is rendered, the final HTML output contains the following details:
<h1>Cellview: opamp090 full_diff_opamp_AC verification1</h1>
<p>Report created on 13 Oct 2021 13:29:16 by Tom in /projects/sco_ams/users/Tom/work/adexl/designs/verifier/V3_Examples using sub-version  IC6.1.8-xxx.xxxx.xxx </p>
The export.json file contains all your verification data and, with advanced usage of the template, can be used to display in-depth and highly accurate information in the final HTML report.
Related Topics
HTML Reports in Interactive Format
Customizing the Interactive HTML Report Template
To customize the template of your interactive HTML report:
-
Type the following commands in the terminal window:
cp –r $CDSHOME/share/cdssetup/dfII/verifier/templates ./.cadence/dfII/verifier
cp –r $CDSHOME/share/cdssetup/dfII/verifier/scripts ./.cadence/dfII/verifier
-
Create a copy of the default template file,
index.html, and save it asmyIndex.htmlin ./.cadence/dfII/verifier. -
Set the following variables in the Virtuoso CIW:
envSetVal("verifier.html" "useTemplate" 'boolean t)
envSetVal("verifier.html" "templateName" 'string "myIndex.html")
-
Open and edit the
myIndex.htmlfile.
The interactive HTML report is customized, as required.
Related Topics
HTML Reports in Interactive Format
Customization of HTML Reports in Interactive Format
Examples of Interactive HTML Report Customization
This section provides some examples of how you can customize your interactive HTML reports.
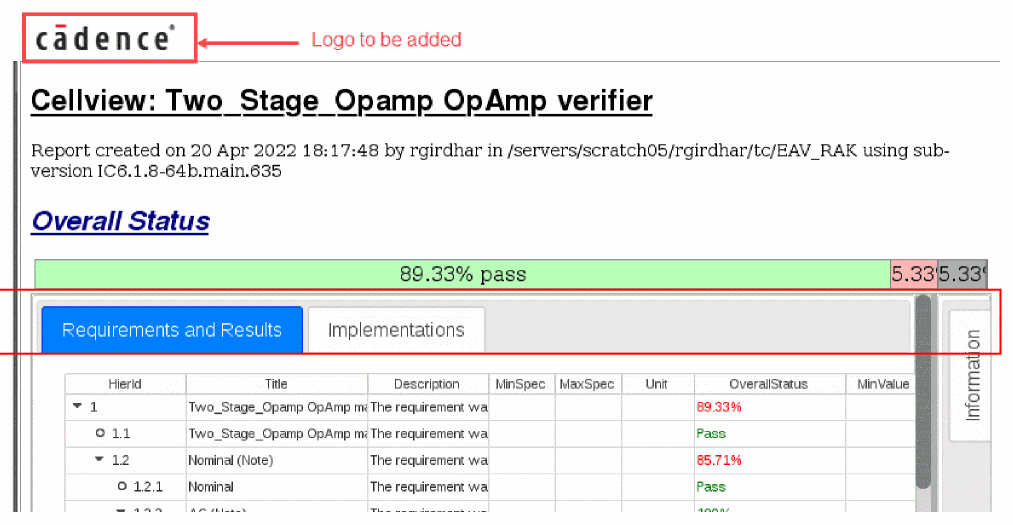
Example: How to add the Cadence logo above the header of an interactive HTML report
Consider that you want to add the Cadence logo to the HTML report by modifying the report template written in the
Jinja is a mix of the target language and some extra entries for data processing. Here, the target language in use is HTML.
<!DOCTYPE html>
<html>
...
<body>
<img src="https://www.cadence.com/content/dam/cadence-www/global/en_US/images/site-images/icons/navigation-icons/cadence-logo-black.png" alt="Home" title="" class="cq-image-placeholder">
        <h1>Cellview: {{ data["cellview"][0] }} {{ data["cellview"][1] }} {{data["cellview"][2]}}</h1>
        <p>Report created on {{ data["export"]["date"] }} by {{ data["export"]["username"] }} in {{ data["export"]["cwd"] }} using {{ data["export"]["subVersion"] }}</p>
In the above example, the code enclosed within the <img src> tag adds the Cadence logo to the HTML report.
Example: How to use the export functionality to create alternative outputs
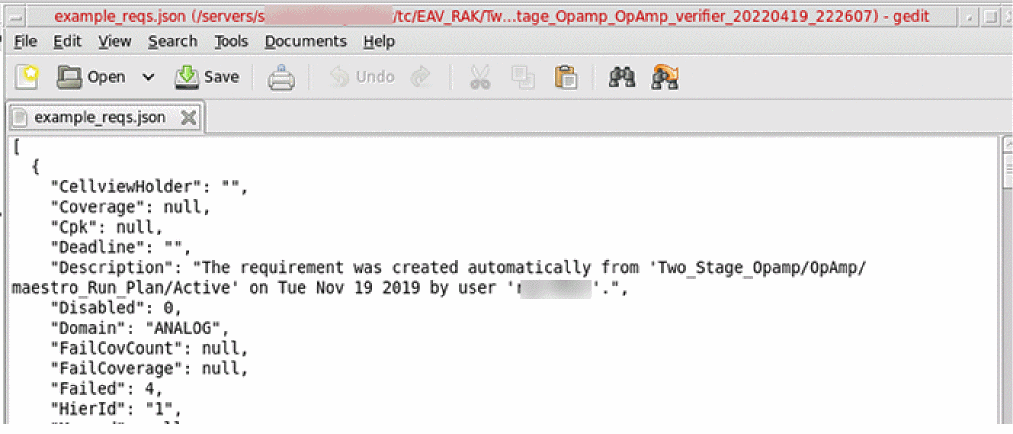
The template directory, install-path/share/cdssetup/dfII/verifier/templates, contains a few examples of alternative export formats, such as the example_reqs.txt and example_reqs.json template files.
Specify the following in the Virtuoso CIW:
envSetVal("verifier.html" "templateName" 'string "example_reqs.txt")
Now, when you create the report using the Publish HTML Report command, instead of an HTML report, the report is created in text format.

Similarly, if you set the templateName environment variable to example_reqs.json, the report is created in json format.
Example: How to use the template to create custom template and process languages
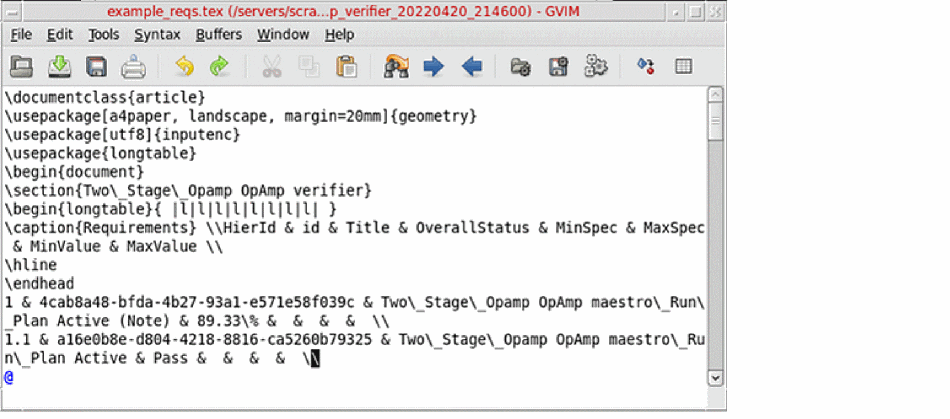
Consider that you want to create a PDF report. The creation of PDF using the HTML template involves a two-step process.
The following CIW command exports the template in the intermediary LaTex format.
envSetVal("verifier.html" "templateName" 'string "example_reqs.tex")
Clicking the Publish HTML Report command after this displays the LaTex report.
Now, you can specify the following command in the CIW to convert the LaTex report to PDF format.
envSetVal("verifier.html" "templateName" 'string "example_reqs.tex pdf")
This will save the report in the PDF format.

You can check the ./scripts/publishHTML.py file to observe the changes made by the conversion.

Similarly, you can create your custom report template using the Jinja template examples and change the environment variable settings accordingly.
Example: Post-processing of the custom template
Consider that you have created a custom template and now you want to define the post-processing steps. For this, you can overwrite the publishHTML.py file as follows:
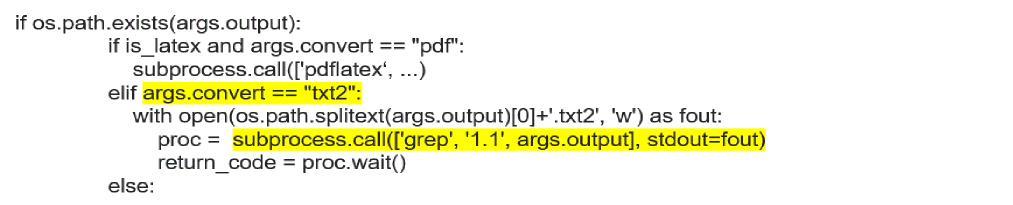
This example shows how to filter the text export using the string 1.1 and saves the results in a file with the extension .txt2.
Return to top