4
Getting Started
This chapter describes how to get started with Virtuoso Space-based Router by exploring the Graphical User Interface (GUI). The Virtuoso Space-based Router GUIs aids designers in using different routing features. It provides access to the options for various steps in a routing flow and also provides a template of Tcl code that will run the steps so that the user can customize it as they become more familiar with the routing commands.
This section discusses the following.
- Virtuoso Space-based Router Commands
- Behavior of Virtuoso Space-based Router Toolbar Icons
- Synchronized Route Menu and the Toolbar
- Routing Scripts
Virtuoso Space-based Router Commands
The Virtuoso Space-based Router commands are available in Virtuoso Layout Suite XL and higher tiers. You can access these commands by using either of the following methods:
Route Menu
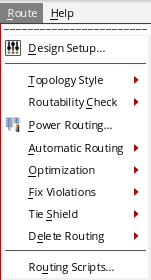
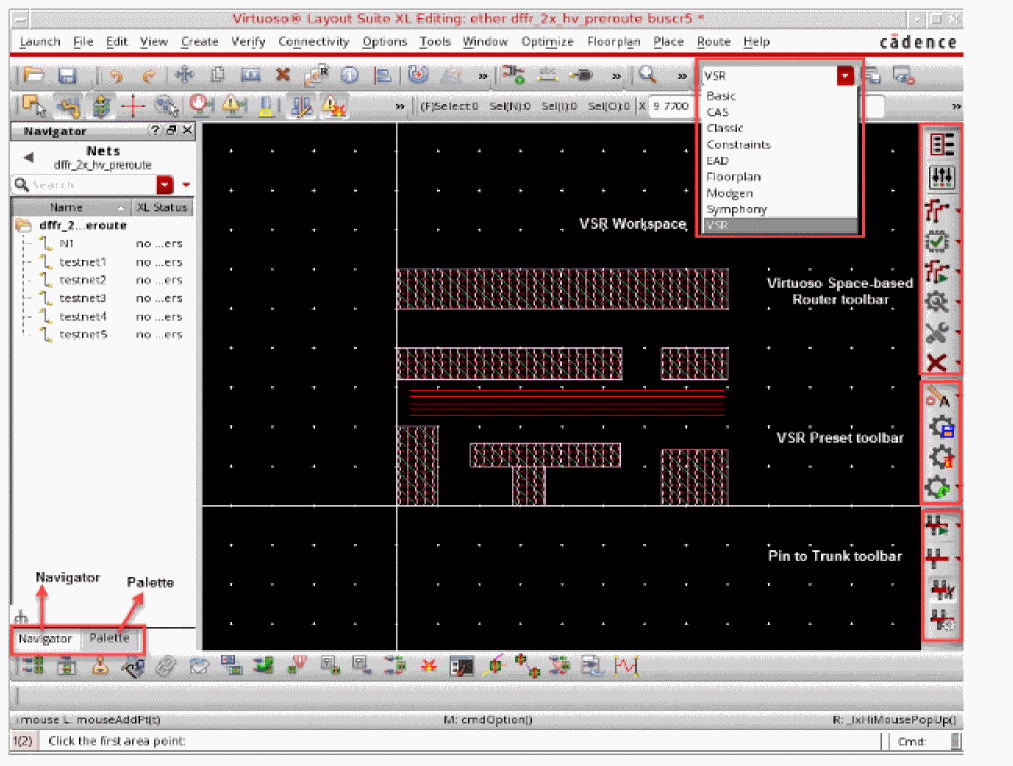
The Route menu is available by default in Layout Suite XL and higher tiers. It provides access to a set of commands that let you use the various available routing features. To view the routing commands, click the Route menu in the layout window. The Route commands are displayed as shown in the figure below.
In addition to the menu commands, there is a Virtuoso Space-based Router toolbar that you can use to run the same set of commands. For more information about the commands and the toolbar, see Virtuoso Space-based Router Toolbar.
Virtuoso Space-based Router Toolbar
The Virtuoso Space-based Router toolbar is not available by default in the layout window. To display the toolbar, choose Window – Toolbars – Virtuoso Space-based Router. The Virtuoso Space-based Router toolbar is displayed. You can use this toolbar to access the routing features shown below.
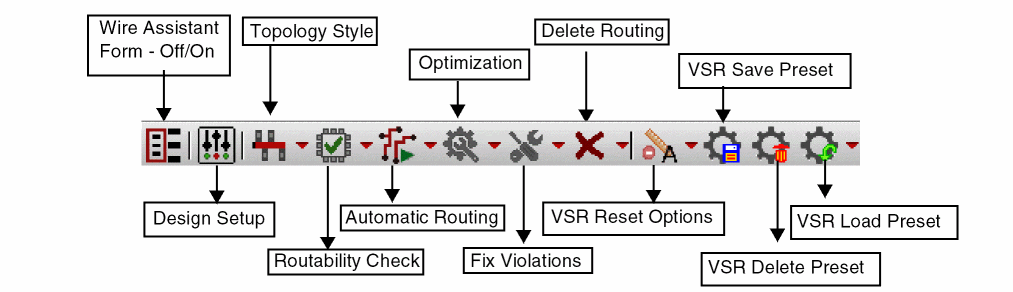
- Wire Assistant Form - Off/On
- Design Setup
- Route Flow
- Routability Check
- Automatic Routing
- Optimization
- Fix Violations
- Delete Routing
- VSR Reset Options
- VSR Save Preset
- VSR Delete Preset
- VSR Load Preset
The Virtuoso Space-based Router toolbar is by default available in the Routing Scripts.
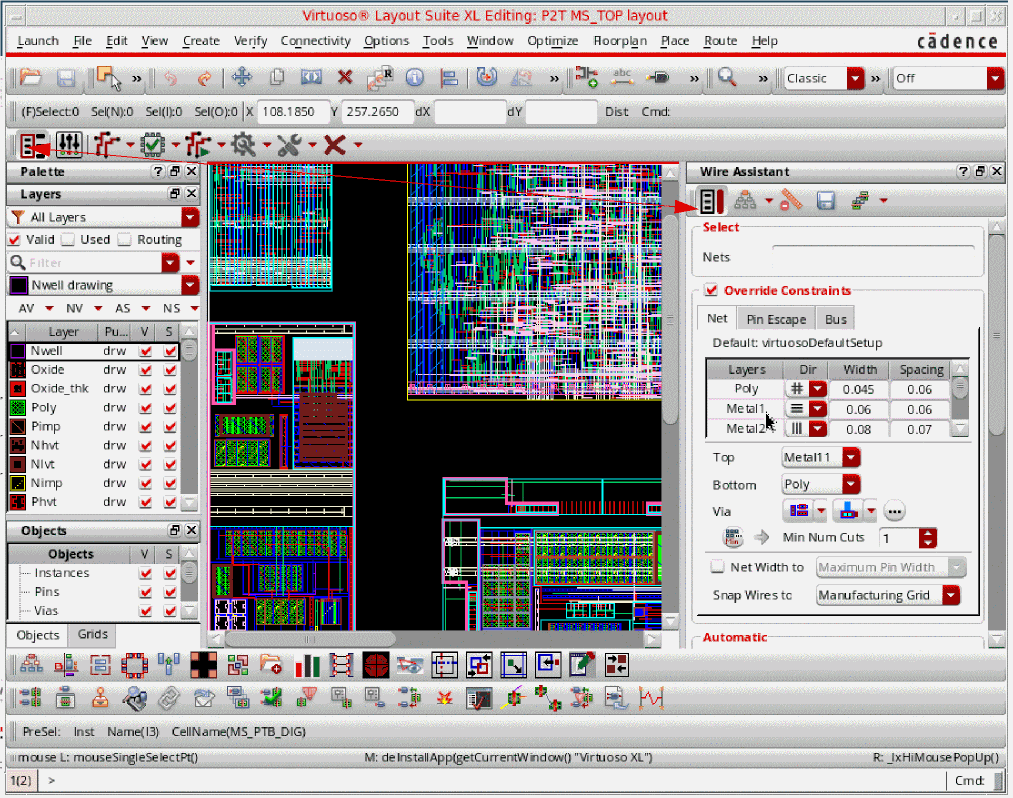
Wire Assistant Form - Off/On
The Wire Assistant Form icon turns on or off the display of the Wire Assistant. By default, the Wire Assistant is not displayed. Click the icon to turn on the display.
Design Setup
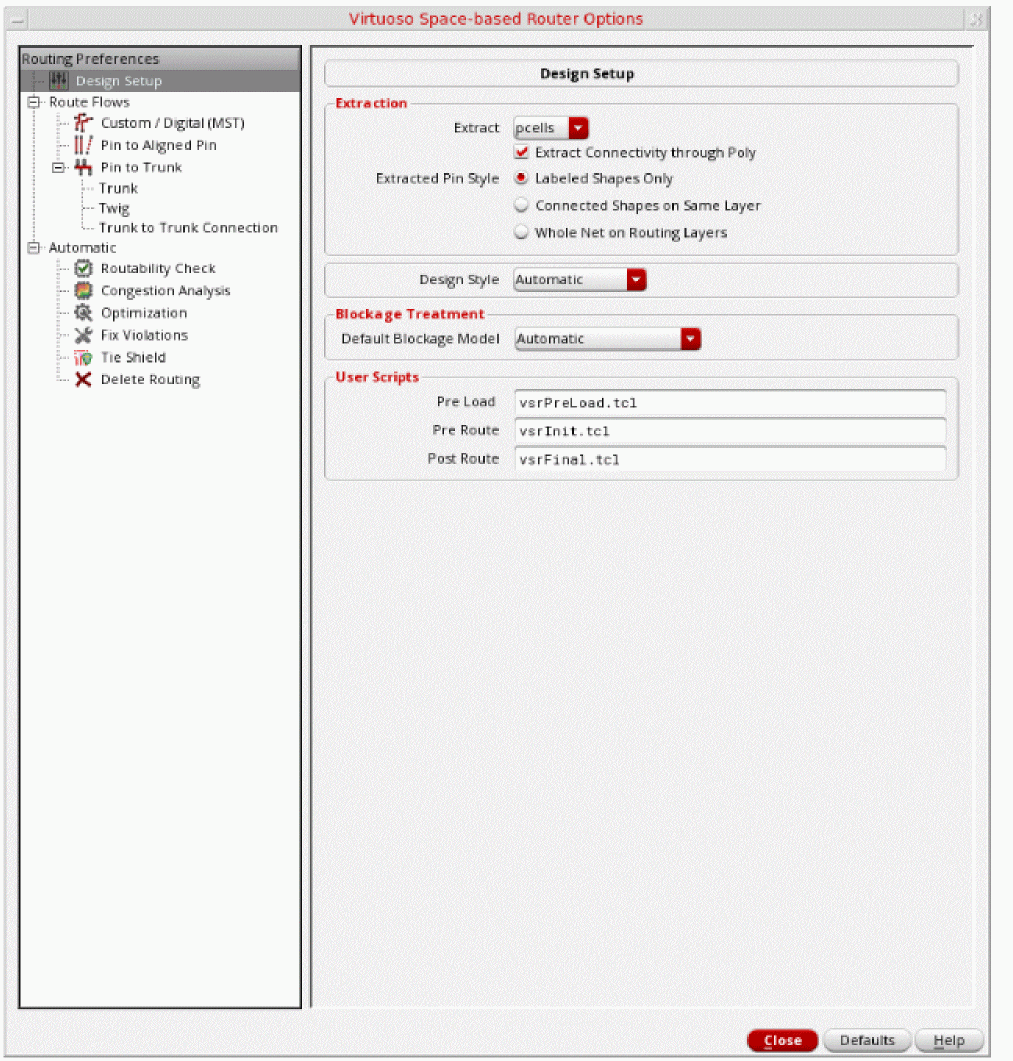
Click the Design Setup icon to view the Virtuoso Space-based Router Options form. Using the Virtuoso Space-based Router Options form you can access a set of hierarchically arranged collection of routing features and options. For more information, see Using the Virtuoso Space-based Router Options Form.
Route Flow
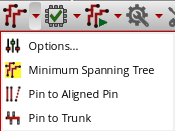
The Route Flow icon lets you select a routing style when running the automatic routing flow. Click the arrow next to the Route Flow icon to view the routing styles available on the drop-down menu associated with the icon.
-
Click Options to view in the Virtuoso Space-based Router Options form all choices related to the routing style that is currently set.
-
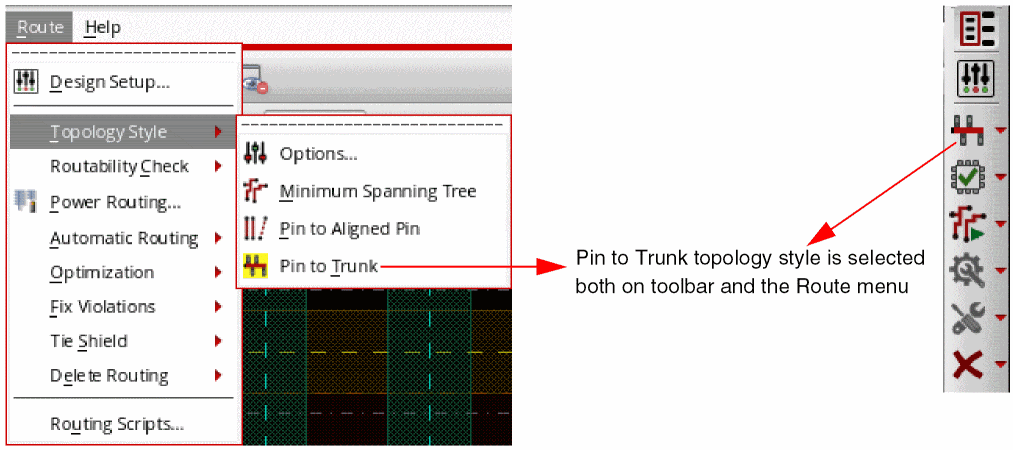
Click a routing style, Custom / Digital (MST), Pin to Aligned Pin, Pin to Trunk, or Tree to select a routing style for routing the design. You can choose only one routing style at any given time. A yellow highlight is displayed around the routing style that is selected, and the toolbar icon is updated to display the symbol and the tooltip associated with the selected routing style. For example in the following figure, the Pin to Trunk topology style is selected.

Routability Check
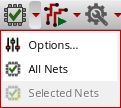
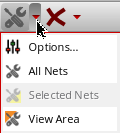
Click the Routability Check icon to perform a set of routability checks for determining potential routing issues that can prevent the router from achieving optimal results. Click the arrow next to the Routability Check icon to view the options available on the drop-down menu associated with the icon.
-
Options
Click Options to view in the Virtuoso Space-based Router Options form all choices related to the routability check feature. -
All Nets
Lets you run routability checks on all nets in the current layout. -
Selected Nets
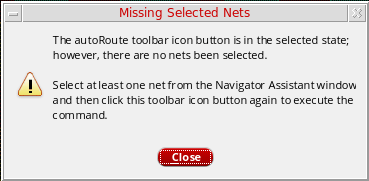
Lets you run routability checks on the selected nets in the current layout. This menu item is enabled only if at least one net is selected in the layout. This functionality is the same as the Selected button in the Automatic section of Wire Assistant. To select one or more nets, use the Navigator Assistant. As soon as a net is selected in the Navigator Assistant, the Selected Nets menu item is enabled.
Automatic Routing
Click the Automatic Routing icon to perform routing in the layout design. By default, automatic routing is performed on all nets in the layout design. Click the arrow next to the Automatic Routing icon to view the options available on the drop-down menu associated with the icon.
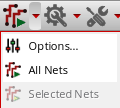
For information about Options, All Nets, and Selected Nets, see Routability CheckRoutability Check.
The router can operate on the current selected nets in the Navigator Assistant. The Navigator now supports user-defined sets that makes it easier to again select arbitrary sets of nets. For more information, see
Optimization
Click the Optimization icon to optimize the routing results in the layout design. By default, optimization is done on all nets in the layout design. Click the arrow next to the Optimization icon to view the options available on the drop-down menu associated with the icon.
For information about Options, All Nets, and Selected Nets, see Routability CheckRoutability Check.
Fix Violations
Click the Fix Violations icon to perform all spacing-related checks including checks on merged shapes and fix violations for all nets in the layout design. Click the arrow next to the Fix Violations icon to view the options available on the drop-down menu associated with the icon.
For information about Options, All Nets, and Selected Nets, see Routability CheckRoutability Check.
Delete Routing
Click the Delete Routing icon to delete all the existing routes in the design. However, the routes in the LOCKED constraint are not deleted. Click the arrow next to the Delete Routing icon to view the options available on the drop-down menu associated with the icon.
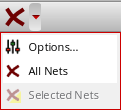
For information about Options, All Nets, and Selected Nets, see Routability CheckRoutability Check.
VSR Workspace
Virtuoso Space-based Router has its own workspace in Layout Suite XL and higher tiers. The VSR workspace shows the canvas, the toolbars (Virtuoso Space-based Router, VSR Preset, and Pin to Trunk). These toolbars are available by default, vertically docked to right of the layout window. The VSR workspace also shows the Navigator and Palette assistants.
Behavior of Virtuoso Space-based Router Toolbar Icons
In the Virtuoso Space-based Router toolbar, the behavior of the toolbar icon is based on the last action of either All Nets or Selected Nets. By default, the selection of all nets is considered and the associated icon is displayed on the toolbar. This means that if you click the toolbar icon, it automatically performs the action of the routing feature on all nets in the design.
If you want to perform the routing feature only on selected nets, select one or more nets from the Navigator Assistant. The Selected Nets menu item is now enabled in the drop-down menu. When you click the Selected Nets menu item, the corresponding routing feature is performed on selected nets. In addition, the toolbar icon of the corresponding routing feature automatically changes to the Selected Nets icon and the tooltip on the icon informs you that the last action of the routing feature was on the selected nets.
For example, the Automatic Routing icon in Fig A shows that the default action for Automatic Routing is All Nets. The Fig B displays the enabled Selected Nets option after you have selected one or more nets from the Navigator Assistant. In Fig C, the tooltip of the icon changes from Automatic Routing - All Nets to Automatic Routing - Selected Nets after automatic routing is completed on the selected nets. In addition, the Automatic Routing icon on the toolbar changes to the Selected Nets icon.
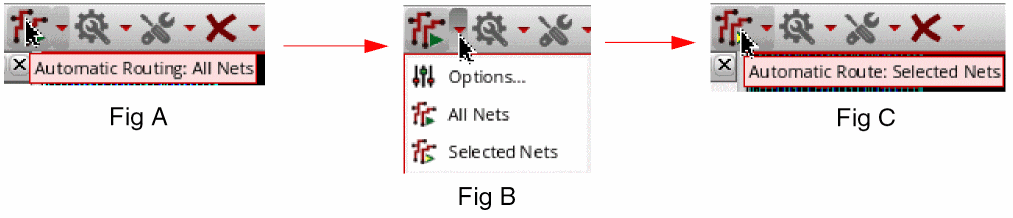
If you now deselect all nets in the Navigator Assistant, the toolbar icon is automatically disabled, as shown in the following figure. In addition, the tooltip displayed on the icon is updated to indicate that the last routing action was performed on the selected nets, but currently there is no net selected in the Navigator Assistant.

Now, if you click the disabled Automatic Routing icon, a warning message is displayed stating that you are trying to perform the routing operation without any nets having been selected in the Navigator Assistant.
Synchronized Route Menu and the Toolbar
The commands on the Route menu and the Virtuoso Space-based Router toolbar are synchronized at any given time. This means that if there are no nets selected in the Navigator Assistant, then the Selected Nets option in both the Virtuoso Space-based Router toolbar and the Route menu is disabled. This option is enabled only if there is at least one net selected in the Navigator Assistant.
Similarly, for the Topology Style option, the icon of the topology style is synchronized to reflect the topology style that is currently selected. For example, when the Virtuoso Space-based Router toolbar has Pin to Trunk selected as the topology style for routing, the Topology Style submenu displays Pin to Trunk as the active topology style, as shown in the following figure.
Routing Scripts
An existing routing flow can be captured in the form of Tcl routing commands within a Tcl script. You can run this Tcl script to view the routing results. To execute a Tcl script, perform the following steps.
-
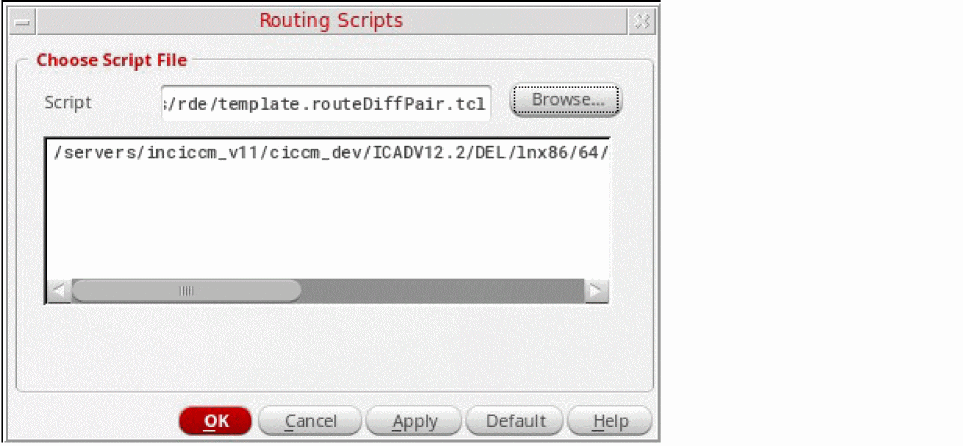
Choose the Route - Routing Scripts menu item. Alternatively, with the Route menu displayed, you can press the R key on your keyboard to display the Routing Scripts form. The Routing Script form is a routing script specification and execute form.
-
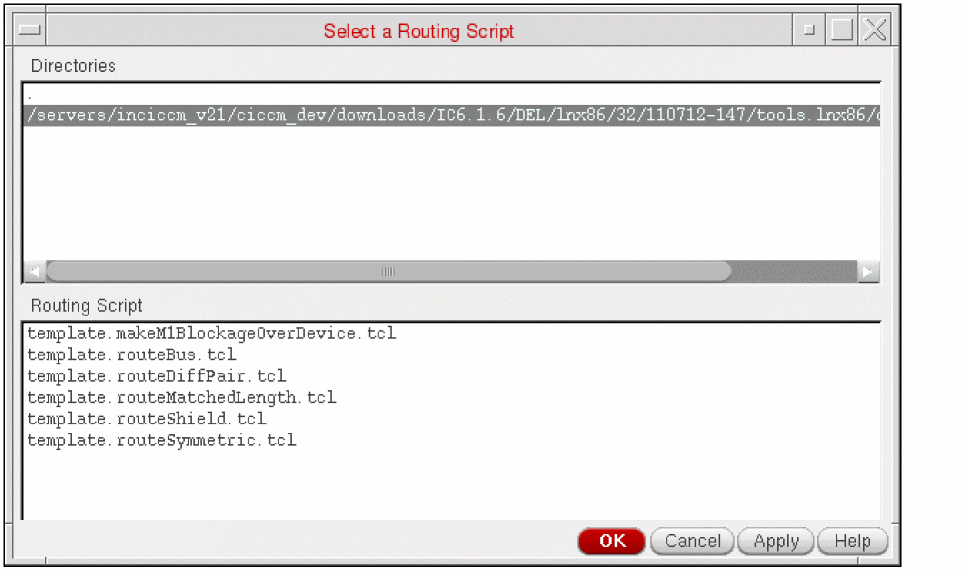
In the Routing Scripts form, specify the Tcl script name that you want to execute. You can select an existing Tcl script by clicking the Browse button. When you click the Browse button, the Select a Routing Script form is displayed. This form displays a list of directories that are set using the
routingScriptingDirenvironment variable.
-
Select a directory from the Directories box. All the
.tclfiles that exists in the selected directory are displayed in the Routing Script box. -
Select a
.tclscript from the Routing Script box. - Click OK. The selected script is displayed in the Script field and in the box below the field.
The Routing Scripts form supports a search path mechanism. After entering the script name and clicking OK or Apply, it will look for the script in the look-up hierarchy. The look-up will stop after finding the script. The look-up hierarchy is as follows:- Current Directory
- Current Directory /rde
- Current Directory /.cadence/dfII/rde
- Home Directory/rde
- $INSTALLDIR/samples/rde
When setting the INSTALLDIR environment variable, the INSTALLDIR environment variable must be defined as <Virtuoso software installation directory>/tools/dfII. The provided sample routing scripts are located in <path to the Virtuoso software installation>/tools/dfII/samples/rde directory. There are six sample scripts which are provided:- template.routeMatchedLength.tcl
- template.makeM1BlockageOverDevice.tcl
- template.routeBus.tcl
- template.routeShield.tcl
- template.routeDiffPair.tcl
- template.routeSymmetric.tcl.
The script names will not appear in the GUI. However, if the $INSTALLDIR is defined then by typing the script name into the Script field it will be found, executed, and the full path and script name will appear in the box below the Script field. -
Select a directory from the Directories box. All the
- Click OK. The routing commands contained within the specified routing script will be executed.
The Routing Scripts command also keep up with the values specified in the Override Constraints section of the Wire Assistant. For example, in the Wire Assistant, if you have specified the Bottom layer as M1, Top layer as M2, and have specified the Min Num Cuts value to 2, and then run the customized Tcl script using Route – Routing Scripts, the routing layers and minNumCuts values are overriden.
Return to top