15
The Navigator Assistant
This chapter contains the following topics on the Navigator:
- Introducing the Navigator
- Accessing the Navigator
- Hiding the Navigator
- Navigator Keyboard Shortcuts
- The Navigator User Interface
- Selection and Display in the Navigator
- The Navigator Options Form
Introducing the Navigator
The Navigator is a dockable/undockable assistant pane that provides facilities to view objects across the design hierarchy using a tree representation.
The Navigator Tree is a hierarchical expandable/collapsible navigation system, which is used to display large datasets, while utilizing icons to depict status information.
The Navigator also provides options to selectively view instances, pins, nets, FigGroups and categories, and allows you to sort this information by columns, for example, by Cell Name or View Name.
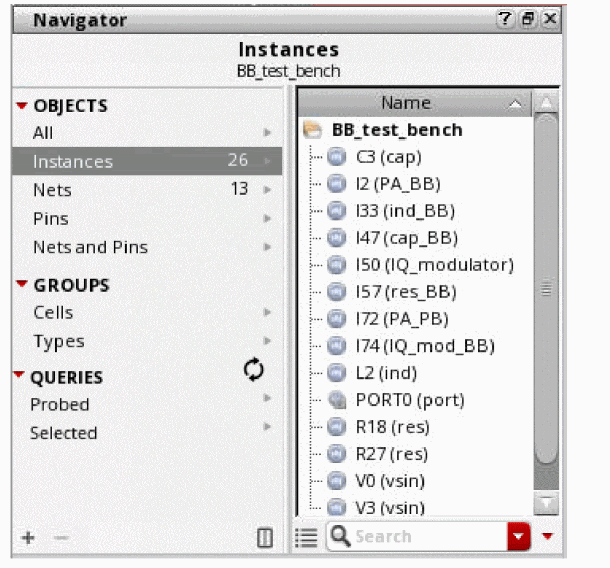
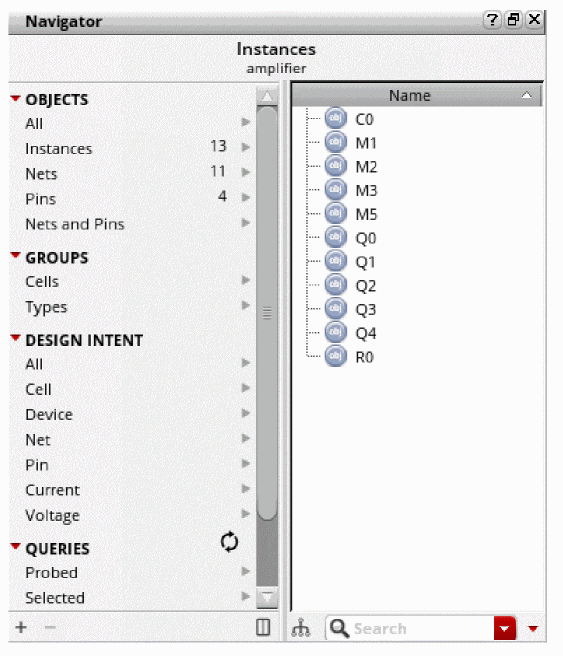
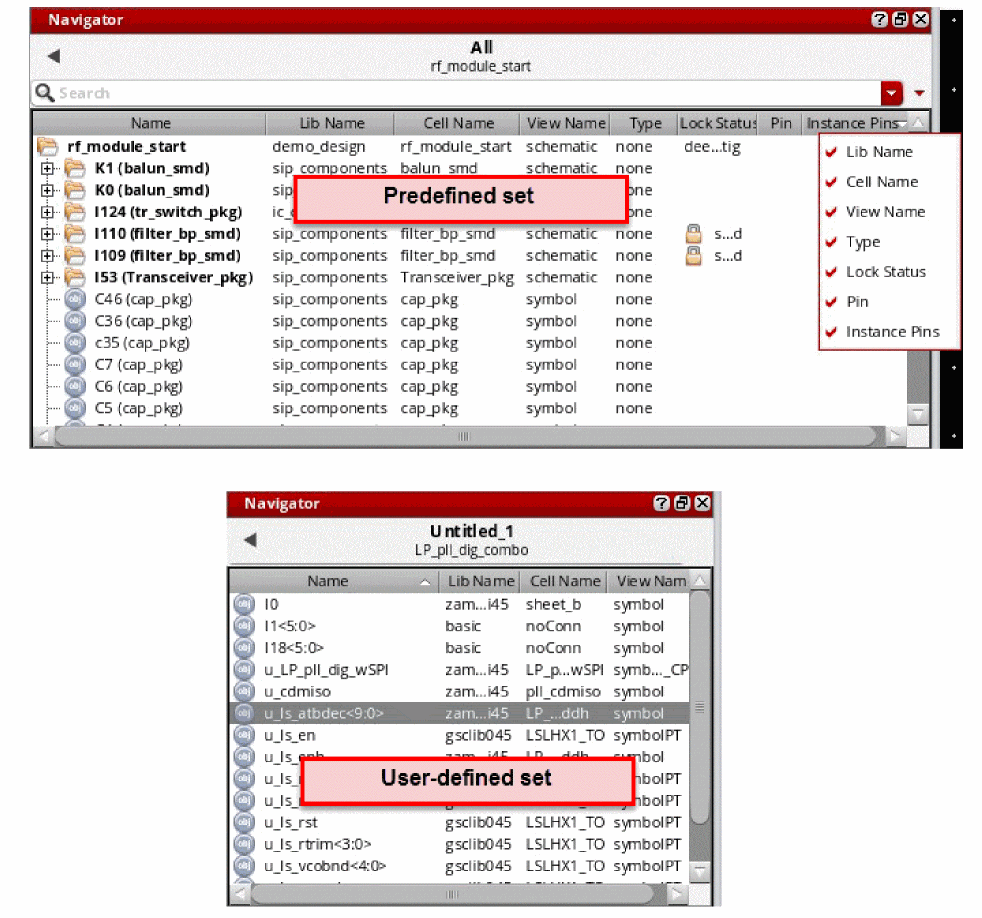
The Navigator displays the information about the complete design in the Summary and Details panes. It provides various categories, such as Objects, Groups, Design Intent, Queries, Miscellaneous, and so on. The categories consist of predefined and user-defined sets.
Predefined sets include Nets, Pins, and so on. The arrangement of various objects in these sets allows you to view and search through them conveniently.
User-defined sets can be created, saved, and reused based on a specific requirement. For example, you can choose to display only the unrouted nets in the Navigator, which represent a significantly smaller number as opposed to the total nets in the design. This is more effective than using search in the Navigator because selecting a specific number of nets from numerous nets in the design consumes considerable time and memory. The user-defined sets can be used in various ways, such as grouping the objects and performing multiple operations on them. Grouping the objects makes it convenient to use them repeatedly. It also helps in partitioning the design so that smaller parts can be searched faster, and grouped sets can also be refreshed together. You can use these sets while working on a small subset of the nets in the design containing a large number of nets. With the tighter integration of large digital designs, it is required to efficiently store, retrieve, and display the objects.
You can filter and control the type of object information that the Navigator displays in the Navigator Tree. For more information, see Controlling Object Display in the Navigator with Search and Controlling Object Display in the Navigator with Sets.
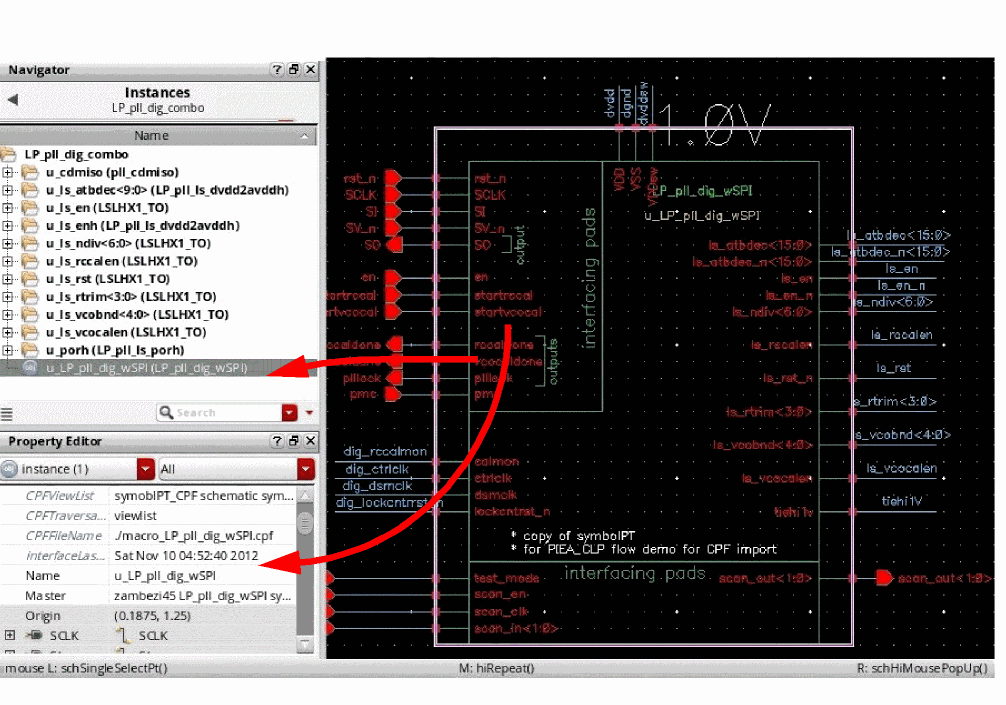
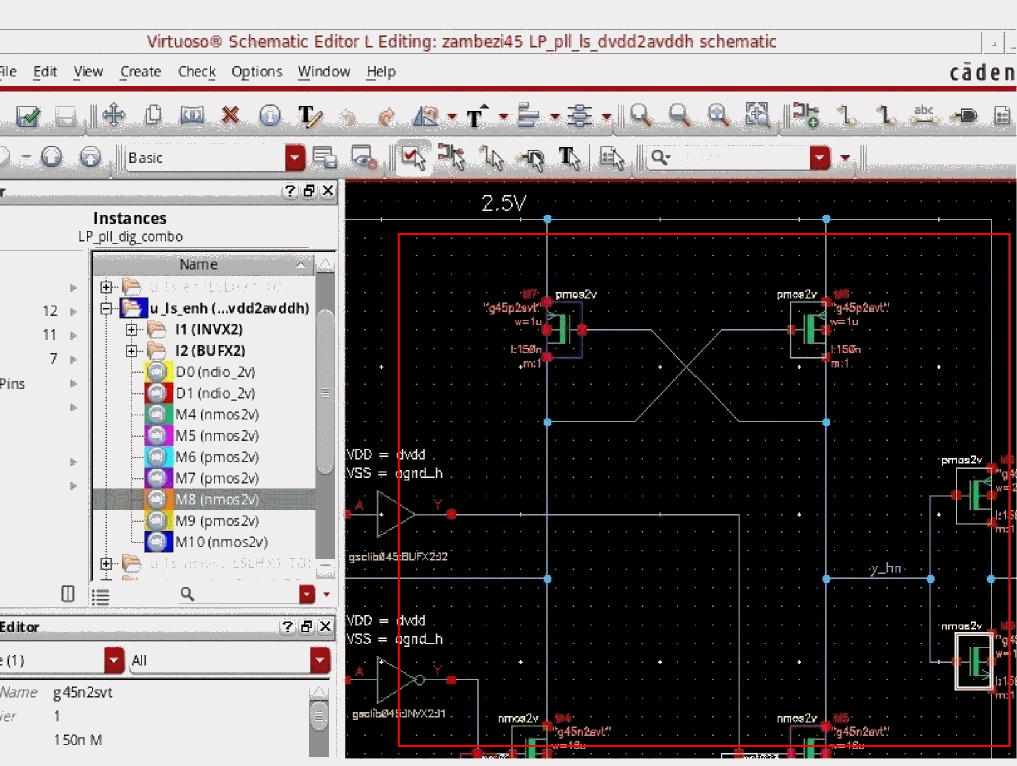
Cross-selection (see also Cross Selecting Between the Navigator and the Current Cellview) is also available from/to the Navigator, where selecting, for example, an instance in the Navigator will cause the same instance to be highlighted in the active cellview tab and in other assistants, such as the
You can undock the Navigator from the main canvas area, and relocate it as appropriate. It also has resizable columns that allow you to make the best use of the available screen space.
You can only have one Navigator per session window, and this ties the Navigator to that session window. That is, you cannot open multiple session windows, undock the Navigator, and then be able to use it in all session windows.
In summary, the main purposes of the Navigator are:
- To enable the display of a fully unfolded hierarchy (occurrence tree), which serves as a design navigator.
- To display the sets and the number of objects within them.
- To provide a convenient method of selecting sets, expanding, viewing, and interacting with the objects in it, such as instances, nets, and pins across a schematic hierarchy.
- To provide commands and menu entries or controls for editing or updating the user-defined set and its contents.
- To save the user-defined sets without the need to create full internal storage for the objects in the transient sets.
Accessing the Navigator
To access the Navigator in Schematic Editor, do one of the following:
- Select Window – Assistants – Navigator.
- Right-click the main Schematics menu or toolbar area, and select Navigator.
-
Access one of the following Schematic workspaces by selecting Window – Workspaces or by choosing one of them from the Workspace Configuration toolbar:
The Navigator is available as a default assistant in these Schematic workspaces.
Once the Navigator is selected, the schematic editor embeds the Navigator as a docked assistant pane within the current session window. By default, the Navigator will be positioned in the upper left area of the session window.
For more information on workspaces in Schematics, see
For more information on customizing your own workspaces, see
Hiding the Navigator
To hide the Navigator in the current session window:
- Right-click in the Schematics menu or toolbar area and deselect the Navigator option.
- Change to a workspace configuration that does not include the Navigator as part of its default configuration.
- Click the Hide button (X) in the Navigator assistant pane title bar.
Navigator Keyboard Shortcuts
You can use the following keyboard shortcuts to aid your interaction with the Navigator:
| Keyboard Shortcut | Action |
The following shortcut options are also available (the commands can be accessed through the Navigator context-menu):
The Navigator User Interface
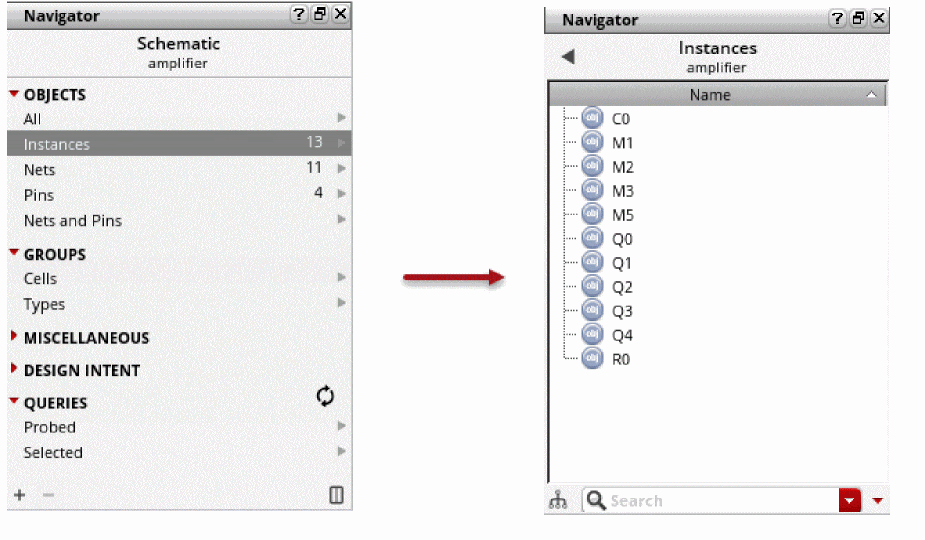
The Navigator GUI consists of a Summary pane and a Details pane.
The sets are displayed in the Summary pane under various categories. The set contents are displayed in the Details pane.
When a cellview is opened for the first time in a Virtuoso session, the Summary pane is displayed in the Navigator. You can control whether the Summary pane is displayed by default by using the showSummaryPage environment variable. When a cellview is subsequently opened, the Navigator displays the last set selected.
The Navigator comprises of the following user interface (UI) elements:
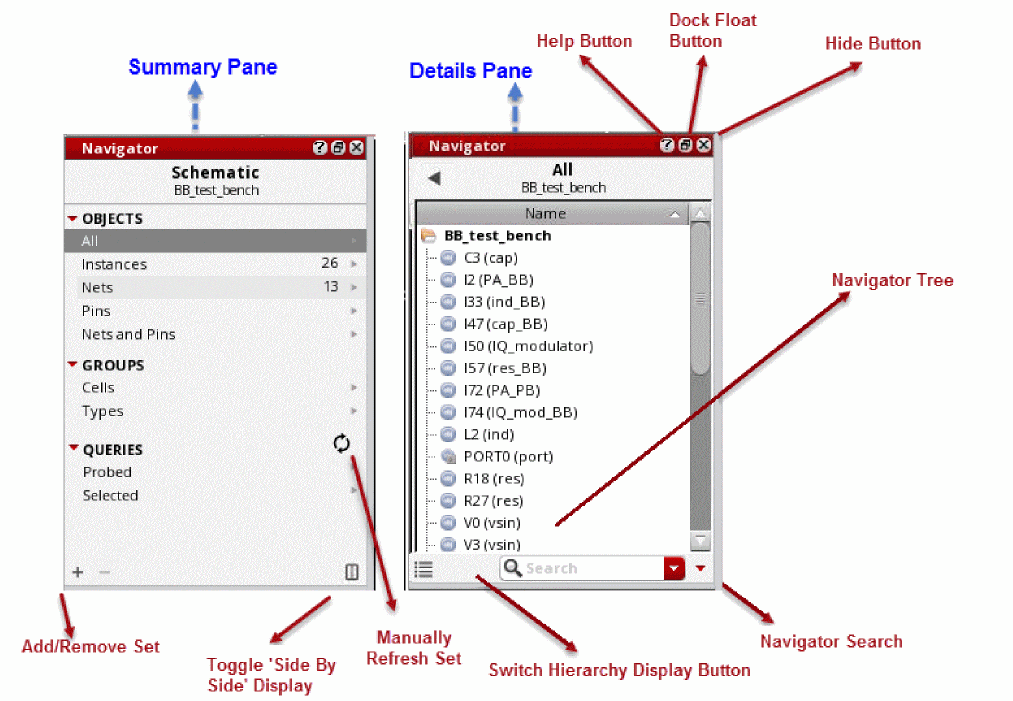
- The Navigator title bar buttons allow you to:
- The Summary pane shows the name of each set and the number of objects within the set, if any. When you click a set, the other assistants and the canvas display the related information and the context menus display operations that can be applied on the set.
- The Details pane shows the contents of the selected set. The predefined sets are not cellview-specific but user-defined sets are cellview-specific; therefore, only the ones for the current cellview are shown. All, one of the sets in the Summary pane, shows all the object types supported in the Navigator and this set allows you to display the complete design. You can choose to display only the specific parts of the design using the user-defined sets. To select which columns are displayed, right-click the header and select the columns that you want to display. This setting is persistent in the session window and across Virtuoso sessions.
-
The Navigator Search allows you to filter design objects displayed in the Navigator Tree.
For more information see Controlling Object Display in the Navigator with Search. -
Toggle ‘Side By Side’ Display is used to arrange the sets and their contents sideways as shown here.
- Switch Hierarchy Display button is used to control whether to display the design hierarchy along with the members of the set. This setting is persistent across Virtuoso sessions. If the hierarchy is displayed, double-clicking an item descends in the hierarchy. Also, searching takes into consideration the hierarchical content of the design.
-
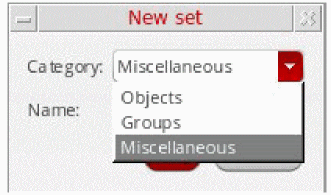
Add Set or Remove Set enables you to add a new set or delete an existing set, respectively. Click Add Set to open the New set dialog box, and select the category under which the new user-defined set is to be created, as shown below.
After the new set is created, you can use one of the following methods to add or remove the objects from the set:
-
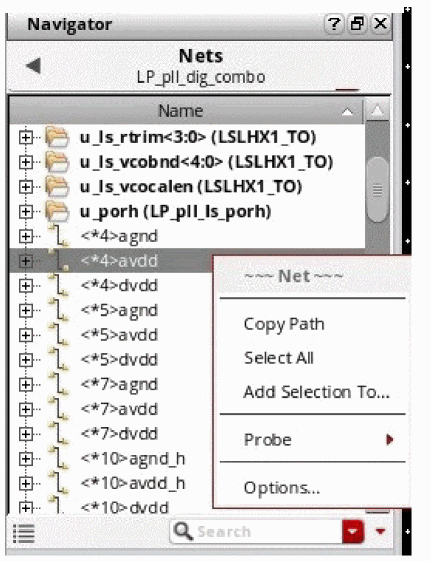
Right-click in the Summary pane to view the following context menu and select Add Selected Set.
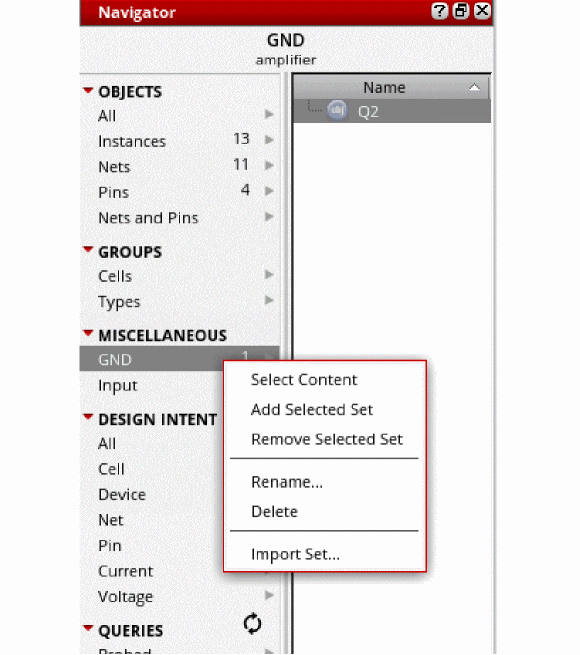
- Select Content: Selects all the members in a set.
- Add Selected Set: Adds the objects/sets, selected in Navigator, Schematic Editor, or Property Editor, to the current user-defined set.
- Remove Selected Set: Removes the objects/sets, selected in Navigator, Schematic Editor, or Property Editor.
-
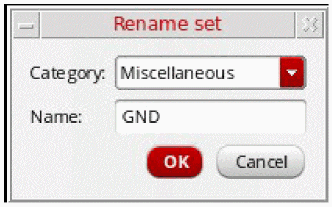
Rename: Renames the set.
- Delete: Deletes the set.
-
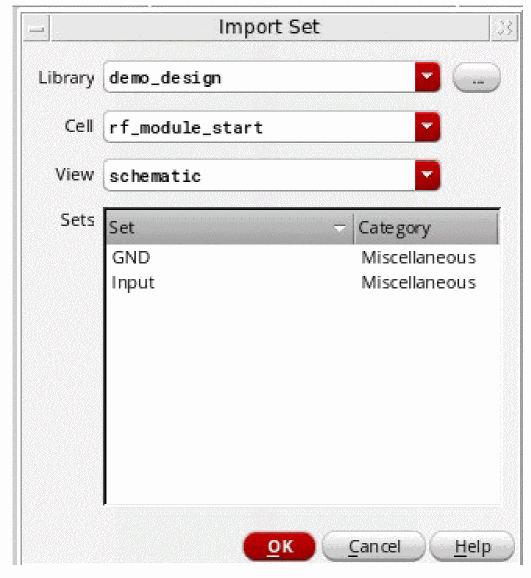
Import Set: Imports the set from another cellview. Imported sets get added to the same category as the category of the source set.
-
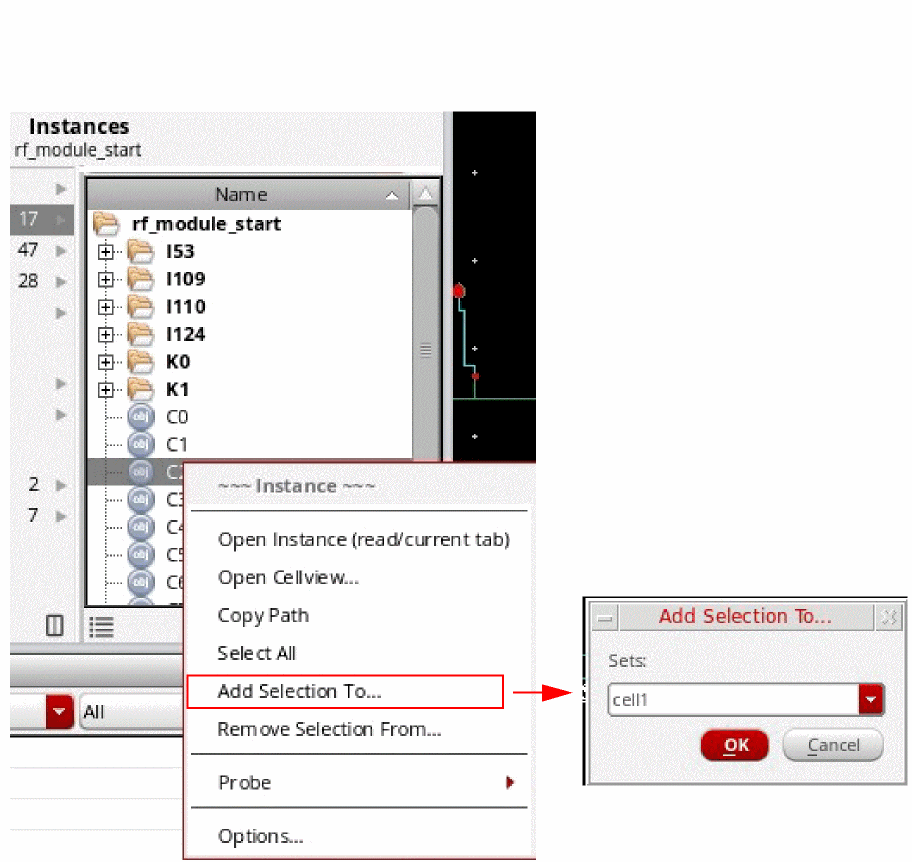
Click Add Selection To in the context menu of the Details pane to view the following dialog box. You can choose from the existing user-defined sets in the Sets drop-down list box or specify a new set in the text field where the selected objects are required to be added.
-
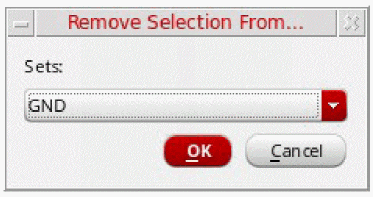
Click Remove Selection From in the context menu of the Details pane to remove the selected objects from the existing user-defined sets.
-
Select the objects and click
+to add them to a set as shown below.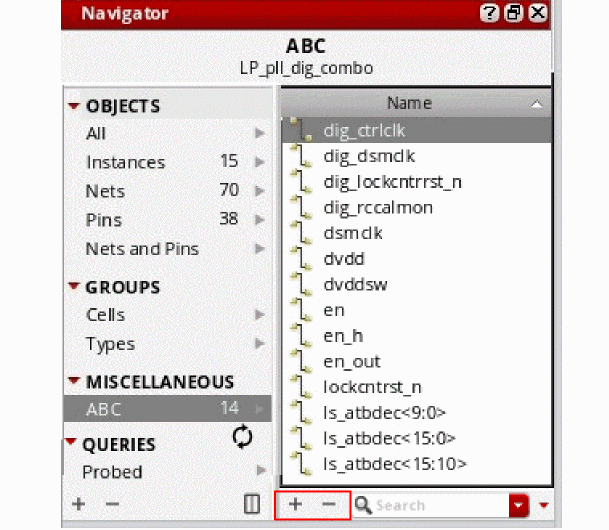
-
Right-click in the Summary pane to view the following context menu and select Add Selected Set.
-
Add Set or Remove Set enables you to add a new set or delete an existing set, respectively. Click Add Set to open the New set dialog box, and select the category under which the new user-defined set is to be created, as shown below.
-
Add Set and Remove Set enables you to add or delete a set or query, respectively. Use the Add Set to open the New set dialog box, and select the source as Current Selected Set or New Query to add queries using the New set form, as shown below.
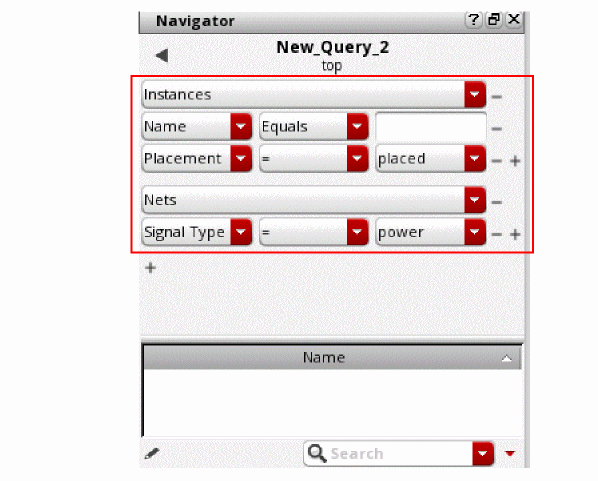
To create a new query, select New Query as the source.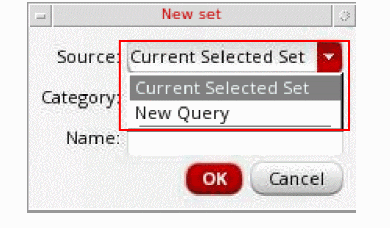
You can use queries in the Navigator assistant in many ways: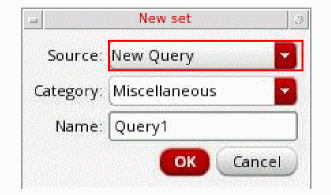
- To group design objects, such as nets to be routed together, into categories.
- To check design work stages, such as unplaced instances.
- To create a group of objects to be included in an operation, such as a set of clock nets when defining net priorities.
-
To maintain ‘To Do’ lists of objects that require an operation to be carried out, such as clock nets without net priority when defining net priorities.
You can select one of the available data sources, Instances, Nets, or Pins, from the drop-down list.

You can customize the selection by specifying the appropriate filters in the query editor. The query consists of expressions. An expression always has a data source, such as Instances, Nets, or Pins. Expressions can also have some conditions, such as Name Equals "N" or Name Ends With "4, 6, 8". Results are filtered based on the expressions specified in the query editor.
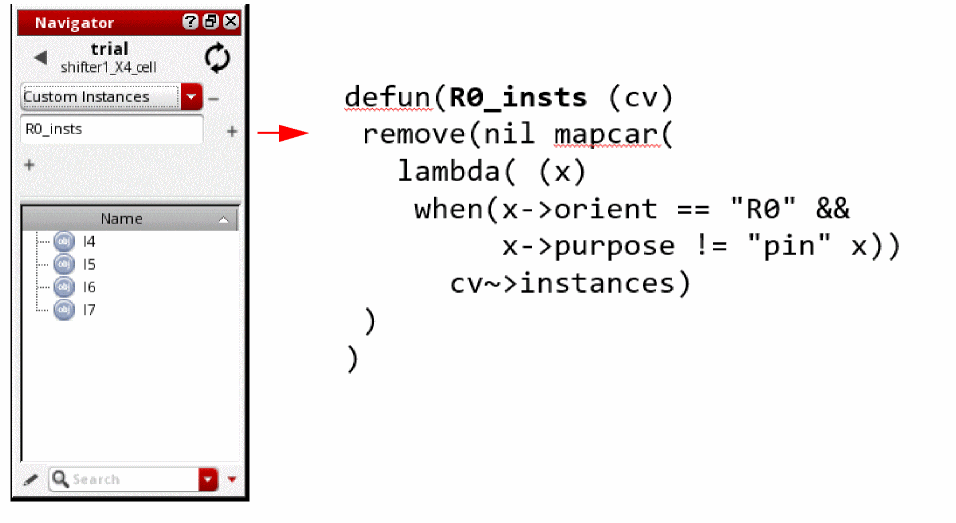
You can also specify a custom data source. For this, you need to specify the type of data source as Instances, Nets, or Pins. You must also specify the name of an existing SKILL function that is loaded in the .cdsinit file. This SKILL function must have a cellview as an argument and should return a list of objects of the specified type of data source.
You can add conditions to the queries that you create.
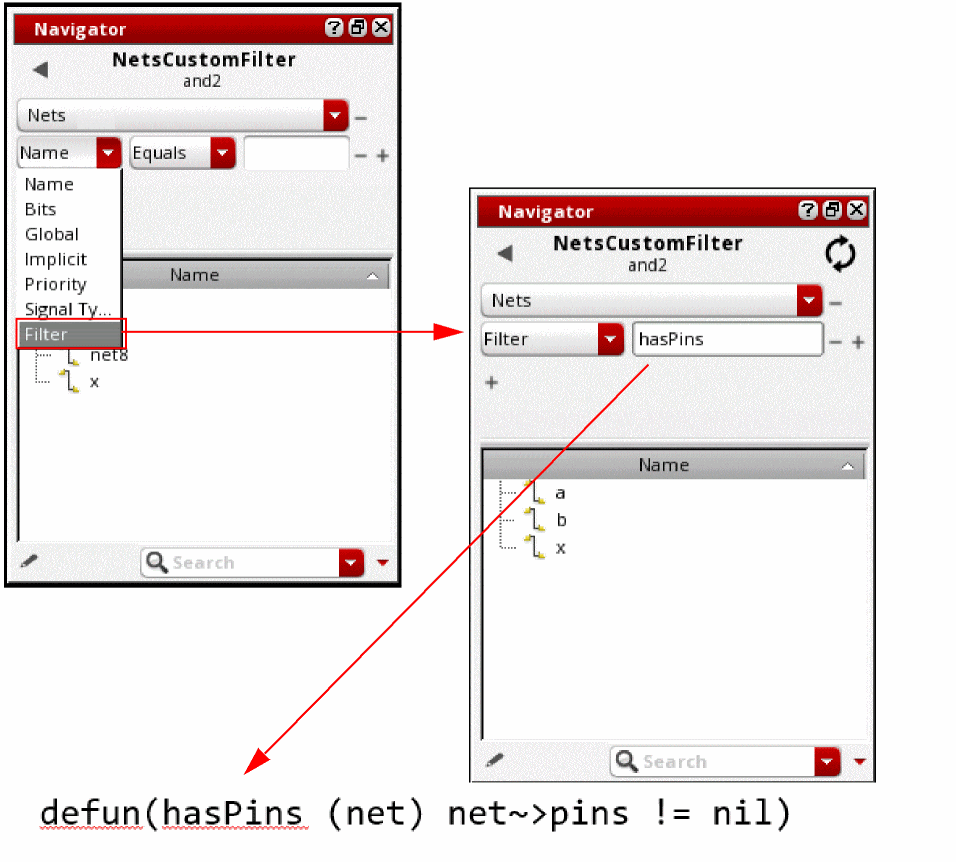
You can add a filter in the query editor. To specify a filter, you need to specify the name of an existing SKILL function that has a design object as an argument. This function returns t if the object is to be retained in the query.
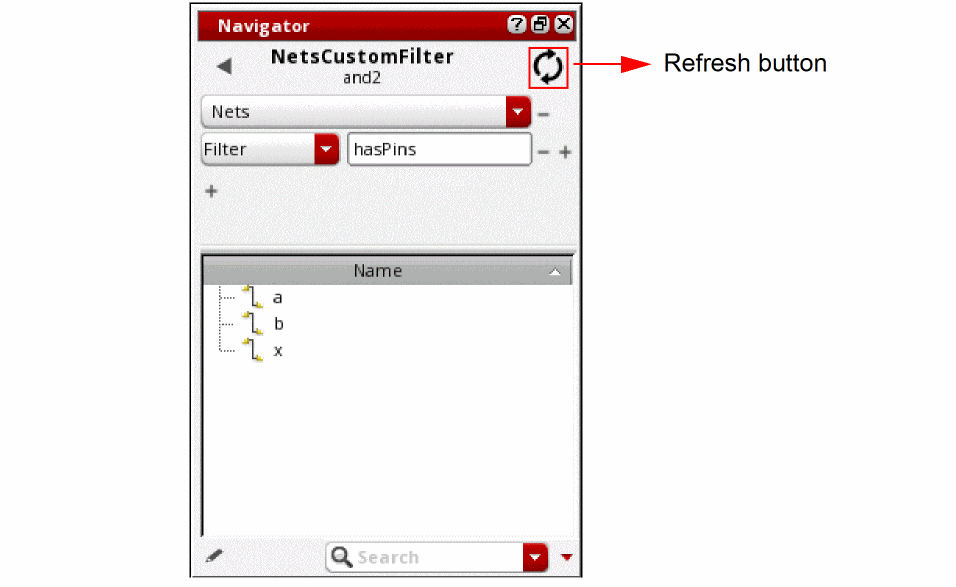
Sets or queries that do not have custom SKILL functions, custom sources or filter are updated automatically within the Navigator assistant. Sets that have custom SKILL functions have to be updated manually by pressing the refresh button.
Right-click the Summary pane and select one of the following options from the Delete sub-menu to delete the set or query:
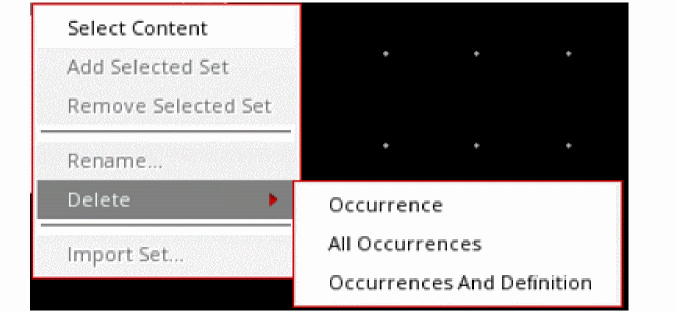
Occurrence: Deletes only the selected set
All Occurrences: Deletes all sets generated from the same query as the selected set
Occurrences And Definition: Deletes all sets and the query used to generated them
-
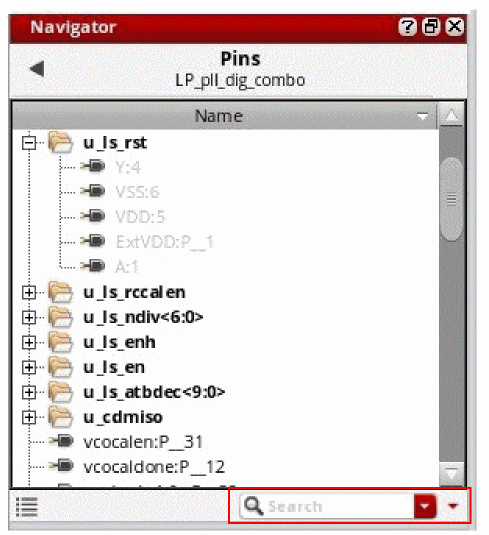
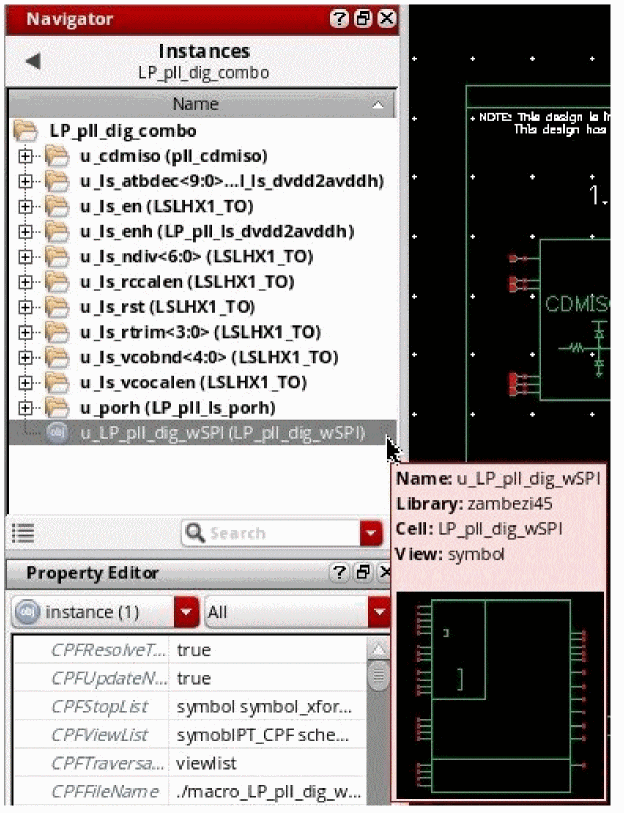
The Navigator Tree displays the Name of the instances, nets, and pins, in the current cellview tab, and allows you to scroll to and expand/collapse the objects that you are interested in viewing.To customize the information displayed in the Name column see The Navigator Options Form.
-
The Navigator has the following resizeable and sortable columns that are displayed by right-clicking over the column header area. The Lib Name, Cell Name, View Name, and XL Status columns are displayed for user-defined sets as well.
- Lib Name
- Cell Name
- View Name
-
TypeInformation on the signal type (sigType) is important in the areas of design verification, consistency checking for mixed-signal designs, and to also set routing constraints. Selecting to have this column displayed will, for example, provide information on whether signals and nets have a sigType, such as
signal,analog,power,ground, or any other type that is listed. -
Lock Status
- Pin
- Instance Pins
- Clone Family
- XL Status
- Abstract Status
After displaying the Column context-menu, select or deselect the Column heading of choice to add or remove it from the Navigator Tree.
-
The Navigator context-menu provides access to the Options form and alternative methods for opening a cellview, expanding and collapsing directory contents. It also provides options to add and remove probes from the selected set.If the display (expanding of) directory content is taking longer than expected, use theFor more information see The Navigator Options Form, Opening Instances and Cellviews from the Navigator and Adding and Removing Probes Using the Navigator respectively.
CTRL+Ckeys to abort the operation and display a partial result.
Selection and Display in the Navigator
The Navigator can display the complete instance design hierarchy associated with the current tab in the current session window. You can also list nets, pins, FigGroups, and categories at any hierarchical level in the current design.
Note:-
If you are in the Virtuoso Layout Suite, the design hierarchy displayed in the Navigator (and the Constraint Manager) is controlled by the CPH (Configure Physical Hierarchy).
The Navigator is synchronized with the design that is in memory and is automatically updated whenever you, for example, add, delete, or rename instances. It also maintains the current context whenever you change the configuration of a design (see Updating the Navigator Tree). - Iterated and array instances are displayed using a hierarchical placeholder which, when expanded, displays each instance and its associated children. When you select individual members of an iterated object in the Navigator, they are highlighted in the design canvas.
- Bundle, bus, and iterated nets are displayed using a hierarchical place holder, which can be expanded to view the individual members. If the multi-bit nets are present in the design canvas, then the objects representing all bits or the individual bits can be probed in the Navigator.
- All multiple-bit nets (bundles, <*>, buses) are shown as containers and their individual bits are listed as unique members in the Navigator assistant. If an explicit or implicit net is a member of a multi-bit net, its occurrence under the multi-bit net is shown as the copy of the original net. However, the individual bits under an implicit net (a bit with no wire shape on the canvas) can only be viewed by expanding the implicit net.
Navigator does not show the leaf-level ports and nets unless enabled through the Elaborate Through Leaf Level Instances option in the Options form.
Controlling Object Display in the Navigator with Sets
The Navigator displays the sets, for example, Instances, Nets, Pins, or Pcell, in the Summary pane. The Details pane shows only those object types that are associated with the selected set.
The following table lists the predefined sets in the Navigator. Not all of these sets are always visible. The visibility of sets depends on design data and other settings.
|
Shows all the design hierarchy objects for the current session window |
|
|
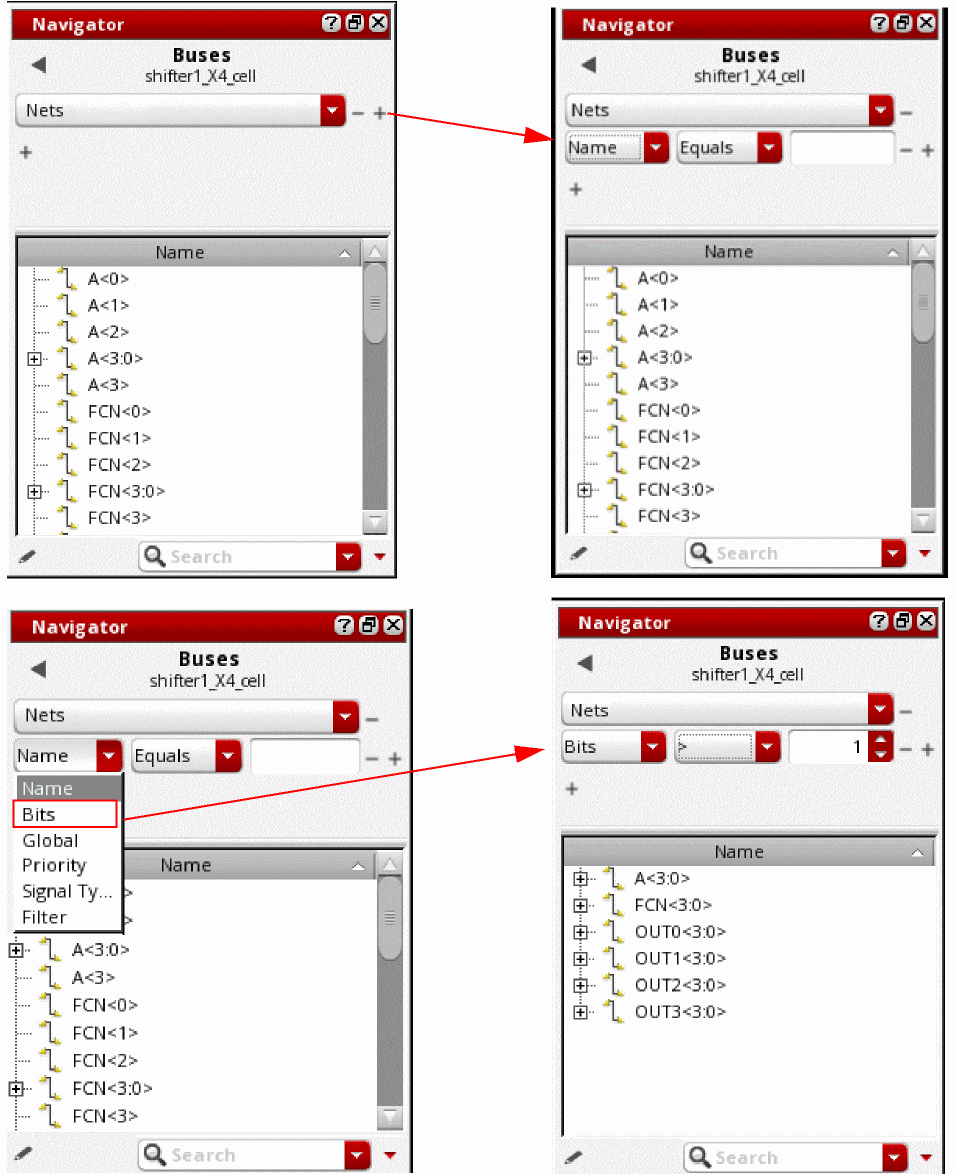
Shows each bus as a container, which, when expanded, lists the associated bits as unique members See compactBusDisplay for information on how to enable this set |
|
|
Shows common cells in the design such that the cells of the same type are grouped together and highlighted in the schematic |
|
|
Shows objects belonging to specific groups (more applicable to VLE) |
|
|
Shows instances, nets, and pins grouped by name (more applicable to VLE) |
|
|
Shows instances and pins that have not been generated in the corresponding layout (more applicable to VLE) |
You can also create and populate your own sets either by selecting and grouping objects directly from the assistant or by creating a custom SKILL query to extract and group the desired objects from the design. For more information, see The Navigator User Interface. Custom sets created in these ways are persistent across Virtuoso sessions.
Controlling Object Display in the Navigator with Search
You can also control the display of objects in the Navigator Tree using Navigator Search.
Once you begin to type your search criteria into the Navigator Search, the Navigator Tree automatically updates to display only the matching results below the top levels of the hierarchy.
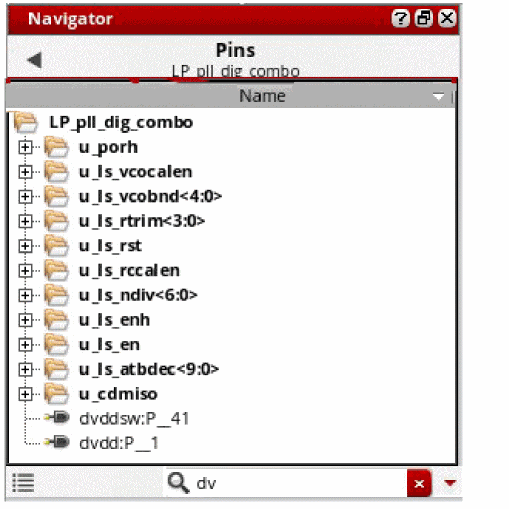
When searching in user-defined sets, the Navigator Tree automatically updates to display only the matching results. The unrelated hierarchical information is removed.
To the right of the Search entry field, there are two drop-down list boxes: one for search history and the other for specifying search criteria. For more information on these, see the
Updating the Navigator Tree
The Navigator Tree automatically updates its display if any of the following changes in the design environment occur:
- If you switch between cellview tabs in a session window.
- If you select specific design objects, for example, Pins or Nets.
- If another application (for example the Virtuoso® Layout Suite) is used to select an instance.
- If you ascend or descend through the design hierarchy.
- If you make any changes to the design hierarchy, for example deleting instances, or changing the configuration.
Being In-Context or Out-Of-Context
Being in-context refers to design information that is on display in the current view tab.
There are two main concepts to consider here:
Cross Selecting Between the Navigator and the Current Cellview
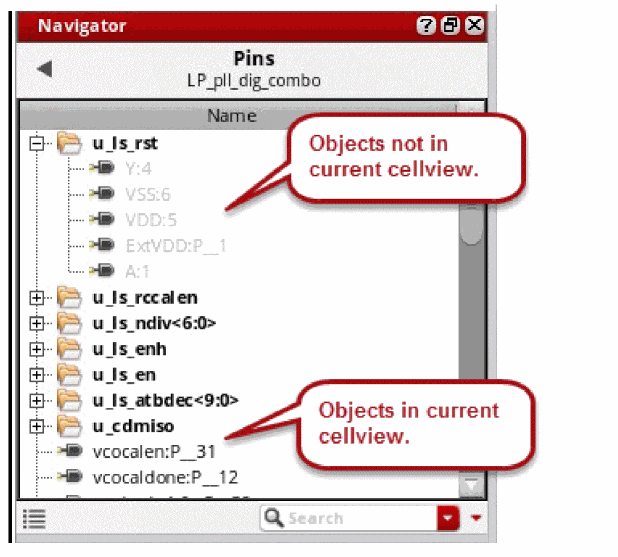
If you select, for example, an instance, pin, or net from the current cellview, that selection is reflected in the Navigator.
If a selected (in the canvas) object is not initially visible in the Navigator Tree display, the Navigator automatically scrolls and expands to display its location in the tree. Likewise, an object selection made in the Navigator Tree automatically highlights the chosen instance in the current cellview.
Selections made in the Navigator are reflected in the
Adding and Removing Probes Using the Navigator
You can use the Navigator assistant to add and remove probes from one or more selected objects.
- Select the object(s) that you want to probe (hilite) in the Navigator tree.
-
Right-click the Navigator tree and select the Probe option from the context menu displayed.
This displays a probes’ sub-context menu.

-
Select Add and the selected object(s) will be highlighted in probe color order.If the last color used to probe an object was hilite drawing4, then hilite drawing5 will automatically be used next in line. You can however, alternatively, directly select the highlight color that you want to apply.The probed objects are highlighted in the Navigator tree and shown on the design canvas in the selected highlighted color.
Net and Connected Instances Option
The Probe context-menu also provides a Net and Connected Instances option which can be used to probe a net, and all instances that are connected to that net, in a schematic hierarchy.
Adding and Removing Probes from Nets on the Canvas
To add or remove probes from a net (wire) in the design canvas:
- In the canvas, select the net that is to have a probe added or removed.
-
Right-click over the selected net.
The net (Wire) context-menu is displayed.
-
Select Probe – Add.
The wire connectivity probe will now be colored (displayed) on the canvas and the wire will be shown in the Navigator to have a probe currently applied. -
Select Probe – Remove or Remove All to clear any probes from the current wire.
Opening Instances and Cellviews from the Navigator
If you right-click a selected instance, the Navigator provides a number of options for opening an instance or cellview.
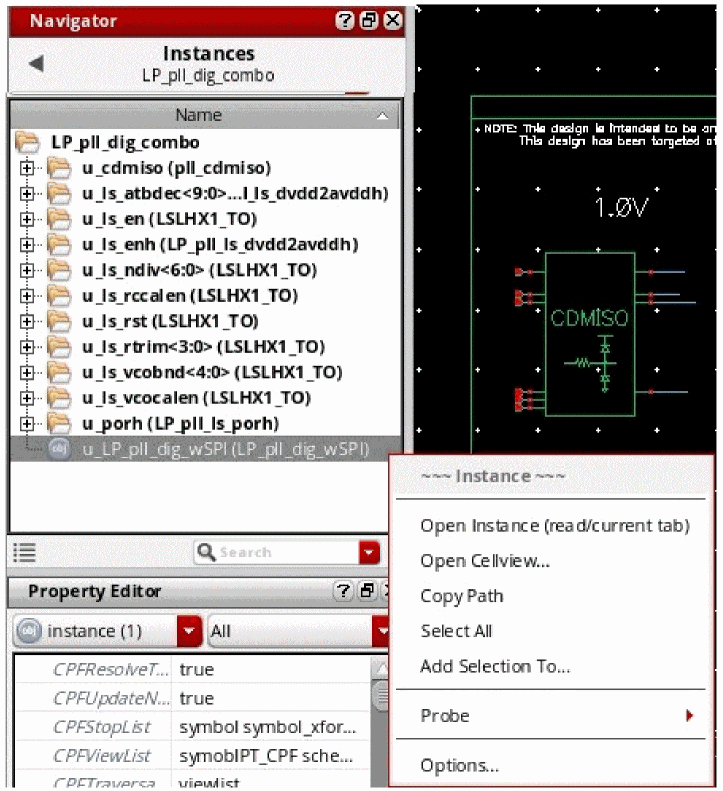
-
Open Instance (read/current tab)
Opens the selected instance view in the current session window tab (in read mode).This is configurable using The Navigator Options Form.You should use this option if you are working on a design and want to switch between different levels of the hierarchy. This option keeps the design at the top and allows you to traverse the hierarchy. -
Open Cellview
Displays the Open form from where you can select the open options of your choice.A thumbnail will also be displayed in the Open form if there is one available for the current cellview. For more information on the generation and use of thumbnails, see Thumbnail View Functions in the Cadence User Interface SKILL Reference.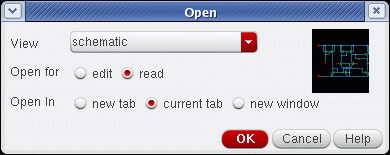
- View provides the details of all the available views that can be opened.
- Open for lets you open the selected view in edit or read (the default) mode.
- Open In enables you to open the selected view in a new tab, the current tab, or in a new window.
You should use this option if you are working on a cellview. The options available in the Open form are used to re-route the Navigator to base the design in the selected cellview.
You can alter the default open mechanisms in The Navigator Options Form using the Open in option.
The Navigator Options Form
The Navigator Options form can be used to customize the information displayed in the "Name" column of the Navigator Tree and also for setting defaults for cellview opening.
You can access the Options form by selecting Options from the Navigator context-menu.
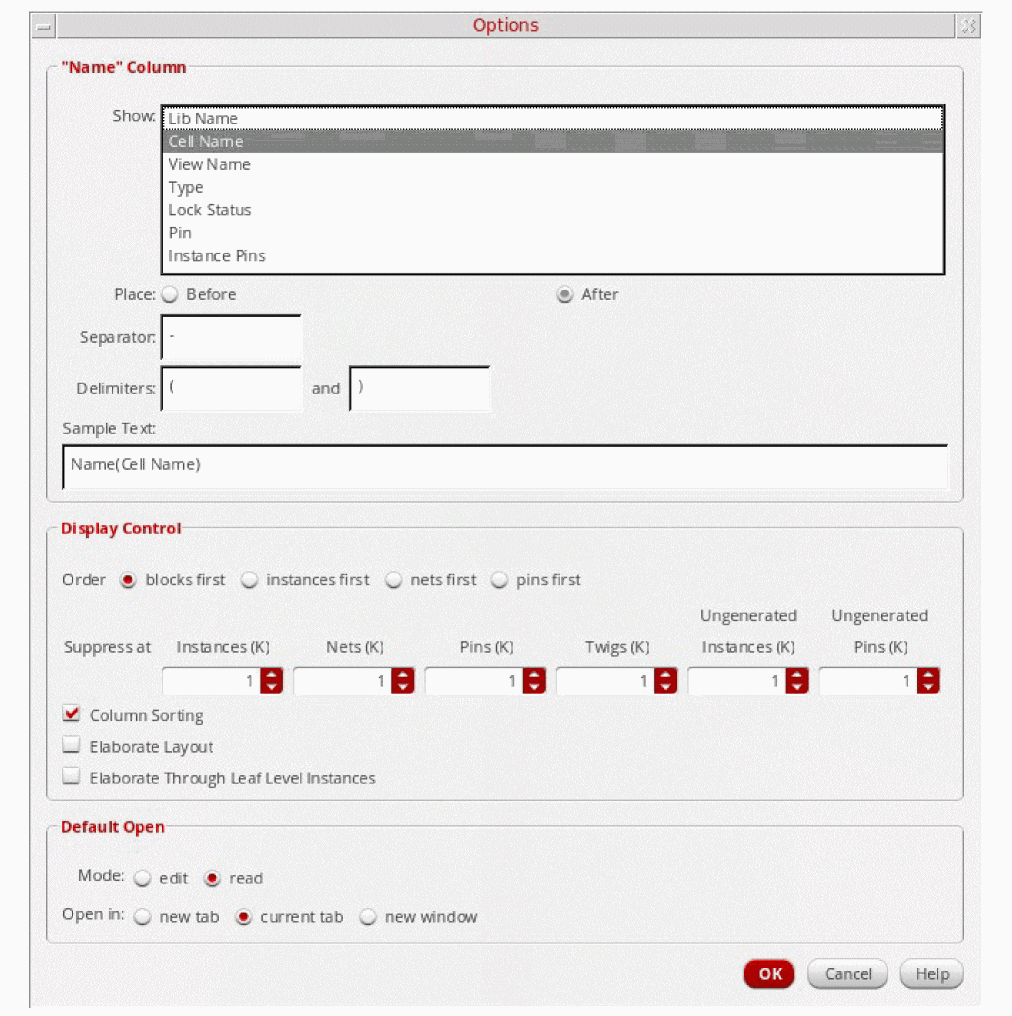
The table below describes the field options available in the Options form:
| Option | Description |
Show |
Specifies what column information is to be shown when generating the display content of the Name column. For example, if you choose to include Cell Name column information, the cell name will also be included when displaying the instance name. The information within parenthesis being the name of the cell where the instance can be found. |
Place |
Controls where the information from the Show selection is placed, either Before the object name or After. |
Separator |
Specifies the separator string to be used between each element of the Name column information. |
Delimiters |
Specifies the beginning and end strings to be used when representing Name column information. |
Sample Text |
You can determine the order in which columns are reused using the Up and Down buttons that are adjacent to the Add Columns option. The positional order of the Add Columns list represents the order in which information will be used when generating the content of the Name column.
For example, if you select both Cell Name and Instance Pins from the Add Columns option, using If the column information is not available for a given object it will be omitted. |
|
Manages the information content displayed in the Navigator Tree. |
|
Order |
Specifies which category of objects are to be shown first under the cell when it is expanded. Select one from: blocks first, instances first, nets first, pins first. You can use this option in association with the Navigator toolbar to control the visibility of object types. For example, you can focus on the creation of a net or pin centric Navigator Tree display. |
Suppress at |
Controls the upper threshold number of instances, nets, pins, twigs, and ungenerated instances and pins (in thousands - K) after which the Navigator should create a placeholder for a given object type (rather than elaborating and representing all possible objects).
If a placeholder is in place this will be represented on the Navigator Tree, for example as “
You can un-suppress selected object type information by right-clicking over the, for example, “ To suppress object type information again, right click again in the Navigator Tree and select the Suppress Leaves option which will activate the Suppress at field option settings. |
Column Sorting |
Specifies whether alphabetical column sorting is performed by default. |
Elaborate Layout |
Layout cellviews will be automatically elaborated if this option is checked. Elaboration determines the parent-child relationship between instances and identifies blocks (hierarchical instances). |
Elaborate Through Leaf Level Instances |
Elaborates nets and pins of the leaf instances. By default, the option is turned off. |
|
Controls the default open mechanisms used in the Open form (see Opening Instances and Cellviews from the Navigator). |
|
Mode |
Choose to open, by default, a selected instance cellview in either edit or read mode (default).
Environment variable: |
Open in |
Choose to open, by default, a cellview in a new tab, the current tab (default), or a new window.
Environment variable: |
Return to top