5
Layer Processing Concepts
This section describes the concepts and terminology used when discussing layers and shapes in Diva verification.
Layers
The three groups of layers used in Diva are as follows:
Original Graphics Layers
Layer names you specify in the graphics editor are called original graphics layers. You enter the layer name as a text string enclosed in double quotation marks. The following are some typical original graphics layer names:
"polysilicon" "metal" "diffusion"
Original graphics layers are subdivided into layer purposes such as drawing, pin, or text. Some commands handle specific layer purposes. You can find details of these capabilities in the command descriptions. If a command does not reference layer purposes, the command processes all layer purposes except boundary by default. The boundary purpose is excluded because it contains a single polygon per cell defining the boundary of that layer in that cell. If this polygon is processed in conjunction with the shapes on other purposes of that layer, those shapes would be eliminated by the boundary polygon.
Commands which accept an original graphics layer name will also accept a layer purpose pair specified as two text strings within parenthesis. The shapes processed will limited to those on the layer and purpose given. The following are examples of layer purpose pairs:
("metal1" "drawing") ("metal1" "pin")
Derived Layers
Many verification commands generate results that can be processed the same way as an original graphics layer. These results are called derived layers.
There are significant differences between original graphics layers and derived layers. A derived layer is really a symbolic name associated with the data that forms the layer. You can manipulate a derived layer the same way as a symbol.
For example, consider the simple command
gate = geomAnd( "polysilicon" "diffusion" )
This creates a derived layer called gate from original layers of polysilicon and diffusion.
x = gate
The symbol x and the symbol gate both refer to the same data generated by the geomAnd command. The symbol name and the layer name are separate, except that the name of the first symbol the layer is assigned to is used as the name of the layer.
The derived layer names must conform to SKILL naming syntax conventions. The most important convention is that a name starting with a numeric (0 though 9) must be preceded by a “\.”. For detailed information about SKILL naming conventions, refer to the SKILL Language User Guide.
Another difference between original and derived layers is that derived layers do not exist in the graphics database unless you specifically save them there.
Derived layers can be empty. Empty layers are processed the same way as any other derived layer. In some circumstances, Diva automatically creates empty layers. For example, if you define an if-then-else branch in the rules, create a layer in the if branch but not in the else branch, and do not create that layer anywhere else, Diva creates an empty version of that layer so that after exiting the if branch, it consistently has that layer. You can also generate empty layers for other uses by using the geomEmpty command.
Connected Layers
Layers processed with the geomConnect command are called connected layers. Diva assigns net numbers to the connected layers and uses these net numbers in various places in the system.
Normally, derived layers generated from connected layers do not retain net information. However, you can use Relational Selection commands to generate layers that retain net information. You can also use geomAnd and geomAndNot. Refer to these sections later in this chapter.
Shapes
A shape consists of edges linked together to form a closed area. All shapes have an inside and an outside. In Diva verification, a shape is the name given to any graphic entity, such as a polygon or rectangle. Shape and polygon are often used to mean the same thing.
The following figure illustrates three shapes and their types. You can refer to each shape as a shape or a polygon.

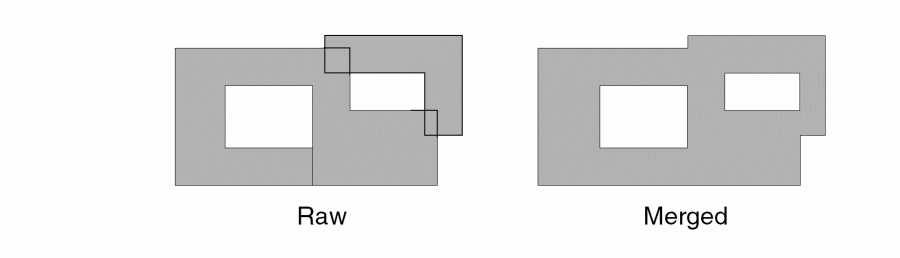
Raw and Merged Data Format
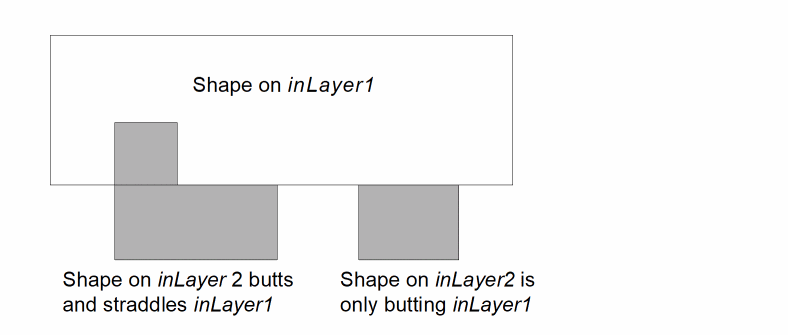
Layer data format can be described as either raw or merged. When Diva first reads a layer in the graphics editor database, the layer is in raw format. This means that individual shapes on the same layer can overlap and butt each other, and that the system retains internal construction edges such as the exit edges from donut holes.
Most layer processing commands generate merged data. This means that Diva merges overlapping and butting shapes on the same layer into single shapes and also removes construction edges. The resulting shapes have edges that form an interface between the inside and outside of the shape. If you use merged data during verification, processing is simplified and spurious errors are eliminated.
For some applications, you might want to process the data in raw format. To process data in raw format, you can use the DRC raw modifier.
The following figure illustrates the difference between raw and merged data format.
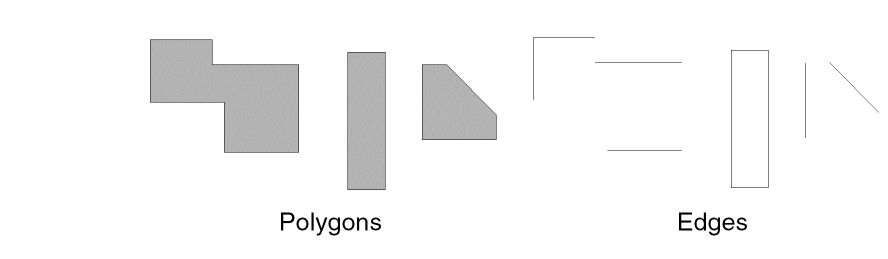
Polygon and Edge Data Format
With derived layers, the format of the layer data can be described as either polygon or edge. As discussed previously, polygon and shape are often used to mean the same thing. All original graphics layers are in polygon format.
Some layers can be in edge format. This means the data is a group of separate edges that originally belonged to a polygon. For example, you can direct DRC to flag errors as edges. DRC extracts only those segments of the original polygon edges that violate the design rule, and stores those segments on the output layer.
The edges on the edge layers retain all the information about the polygon from which they came, such as which side of the edge was the inside of the polygon and which side was the outside. You can use these edges in places where you would use polygons, such as DRC.
Although the edges for a polygon can appear on an edge layer, Diva treats the edges as separate edges and does not form a polygon. You cannot use edges to form polygons, although you can size edges using the edges option in the geomSize command.
There are some limitations to using edge format. For example, you cannot use edge layers with the geomEnclose command because an edge cannot enclose another shape.
The following figure illustrates the concepts of polygon and edge formats.
Conics and Paths
Conics and paths are any shapes you create that do not have a sequence of outside edges. The graphics editor recognizes conics as polygons and stores them as polygons in the database. However, the graphics editor does not store paths as polygons. Instead, Diva converts paths to polygons when they are brought up from the database.
Because of this, when Diva converts conics and paths to polygons, there might be inaccuracies during DRC checks. Regardless of how many edges you use to represent a conic, the spacing is always different from the edge spacing. The following figure illustrates the problem.
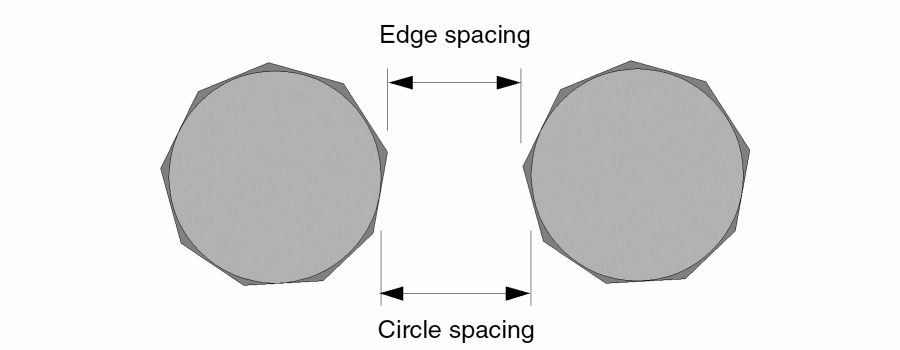
With paths, the angle of a path center line combined with its defined width might define polygon vertex points that lie off of the grid being used to represent the data.
Edge Boolean Commands
The results of logical operations on shapes are well defined. However the results of logical operations such as and and or on edges are not so clear as there are multiple possible interpretations. Following is the definition of how logical edge operations will be interpreted in Diva verification in version 4.4. This is a change from the previous definition (in versions 4.3.4 and earlier).
Wherever possible the results of edge boolean operations are based on the result of the equivalent shape boolean operations. For example, an and command between shapes will not have a result if the shapes do not overlap. Similarly, the and command between edges will not have a result if the edges came from shapes which did not overlap. An edge xor is considered to be the same as an edge or minus an edge and.
Edges resulting from boolean operation will carry the serial, node and direction of the original edges from which they were derived. Where both layers in a command contribute to a single resultant edge, this information will come from the first layer specified in the command.
The following graphic illustrates two-layer and single-layer boolean operations.
Invalid Graphics Data
There are some shapes that Diva might interpret different from what you want. These shapes are referred to as invalid graphics data. They include the following:
- Self-intersecting shapes
- Zero-width rectangles
- Zero-width polygons
- Lines, zero-width paths, and arcs
- Optionally, path start and end segement lengthless than or equal to half the path width
- Text
Self-Intersecting Shapes
Many shapes can be drawn that violate the concept of “inside” and “outside” of a shape. These shapes are called self-intersecting shapes. Diva accepts self-intersecting shapes and tries to generate valid shapes during the merging process. If you use the DRC raw modifier, Diva won’t try to merge the shapes.
The following figure illustrates five shapes, four of which are self-intersecting. Note that some edges are drawn close together rather than coincident, so that the point at which the edges cross is not hidden. Also, the shapes are not shaded, since shading depends upon the concept of “inside” and “outside.”
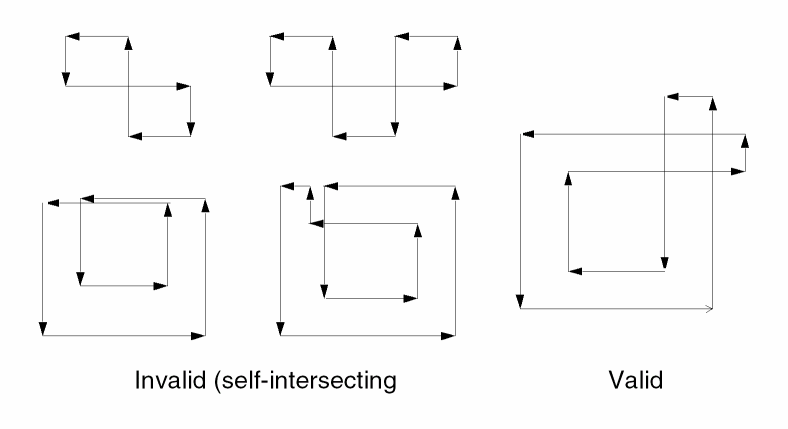
The self-intersecting shapes might be the shapes you want. You can use the dubiousData command to flag self-intersecting shapes so you can decide whether they are invalid or not.
Self-Intersecting Paths
Diva will detect, using the same rule as above, a path which has an outline which qualifies as a self-intersecting polygon. You should note that the path outline checked is the same as the outline displayed by the layout editor.
Zero-Width Rectangles
Diva processes zero-width rectangles as raw data but deletes them during the merging process. Use the dubiousData command to flag these shapes.
Zero-Width Polygons
Diva processes zero-width polygons as raw data. When the merging process is done, Diva verification deletes any sections of the polygon that have zero width, leaving valid polygon pieces.
Lines, Zero-Width Paths, and Arcs
Diva flags lines, zero-width paths, and arcs as warnings if you use the dubiousData command. They do not appear in raw or merged data.
Short path start and end segments
Diva flags paths when the length of the start or end segment is less than or equal to half the width of the path. This is optional and requires the rule writer to request the additional check. Diva renders the path outline the same as the layout editor does, but some other tools render these short end segments with unexpected notches or spikes that can cause problems.
Text
Diva flags text as warnings if you use the dubiousData command. Text does not appear in raw or merged data.
Exclusive Selection
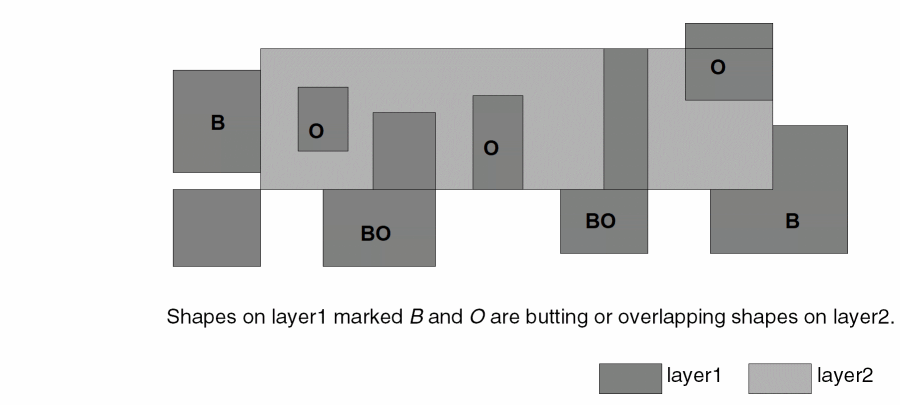
You can specify the “exclusive” option for most relational selection commands.
- If you don’t specify the “exclusive” option, a shape on the input layer is selected if it interacts with any shape on the related layer in the manner described by the selection command. It does not matter if there are other shapes on the related layer interacting in other ways with the input layer.
- If you specify the “exclusive” option, a shape on the input layer is selected only if every interaction with shapes on the related layer are in the manner described by the selection command.
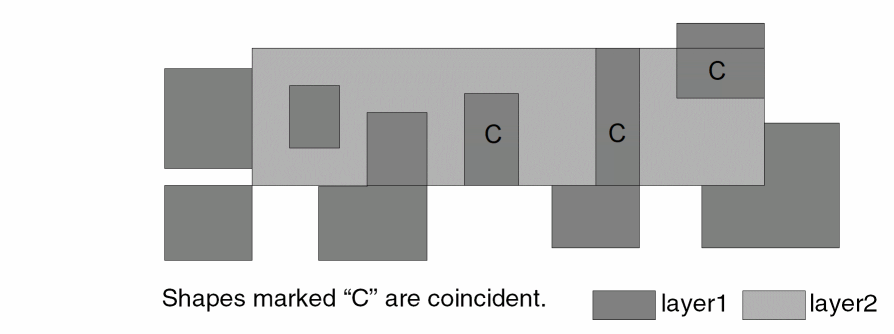
The relationship being checked for the selection includes both the relationship defined by the command keyword and the sameNet and diffNet options. For example, if you specify
geomCoincident( A B sameNet exclusive)
The shape on layer A is not selected because the second shape on layer B violates the exclusive requirement as it is on a different net.
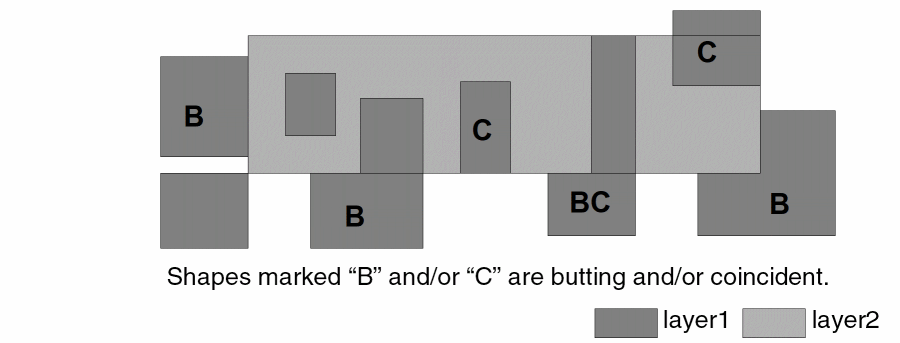
You might find the exclusive concept confusing when dealing with relationships that appear to be inherently exclusive, such as geomButtOnly. There is a significant difference between geomButtOnly with and without the exclusive option.
- The command geomButtOnly( A B ) selects any shape on layer A that interacts with one or more shapes on layer B with a butting-only relationship. The butting-only relationship refers to the way in which any individual shape on layer B relates to the shape on layer A. It does not matter if other shapes on layer B relate to the shape on layer A with some other relationship.
- The command geomButtOnly( A B exclusive ) selects a shape on layer A only if all shapes on layer B that interact with it have a butting-only relationship.
Data Integrity Checks
Data integrity checks let you evaluate the layout view for grid or shape errors.
dubiousData
dubiousData( inLayer [message] [limit] )
dubiousData( disable|enable [all] [halfWidth] [ignoreLabels] ... )
Description
The dubiousData command highlights improperly formed graphics layer shapes by copying each shape in error to the marker layer. The command highlights any shape that:
- is self-intersecting,
- is a path with a self-intersecting outline,
- has labels (on the selected layer),
- is a zero width rectangle,
- is a zero width path,
- is a path that have a short start or end segment (optional),
- has a section of zero width formed by two edges running coincident for a finite length. Shapes that have a zero width formed by a point contact are not flagged.
Fields
Input layer name. You can specify either a layer name in quotes, a layer purpose pair, or a list of layers and layer purpose pairs in a nested geomCat. Where a layer is given without a purpose, the all purpose is assumed. Examples of the supported forms are:
 "m1"
("m1" "drawing")
geomCat( "m1" "m2" )
geomCat( ("m1" "drawing") ("m1" "pin") )
geomCat( ("m1" "all") "m2" )
Optional text string that is used as the message associated with errors. You see this text string when you use the Explain Marker command. If you do not define this message, Diva uses the complete command as the message.
The optional modifier errorLimit allows the specification of a limit to the number of error markers which the check will produce. The keyword abort can be used to cause early termination of the entire run if the limit is reached. See errorLimit in the drc command for details.
Keyword which disables the following options for all dubiousData commands which follow this one. The standard checks cannot be disabled.
Keyword which enables the following options for all dubiousData commands which follow this one.
Option indicating all optional checks are to be disabled or enabled for the dubiousData commands which follow this one.
Option indicating halfWidth checking is to be disabled or enabled for the dubiousData commands which follow this one. When enabled, Diva will flag paths when the length of the start or end segment is less than or equal to half the width of the path.
Option indicating the ignoring of labels is to be disabled or enabled for the dubiousData commands which follow this one. When enabled, Diva will ignore labels on the layer. When disabled, Diva will report labels as an error.
Examples
The following example illustrates testing polysilicon shapes with the dubiousData command.
dubiousData( "poly" "badly formed poly polygons" )
The following examples illustrate testing metal shapes with the dubiousData command.
dubiousData(geomCat("metal1" "metal2" "metal3") "badly formed metal polygons")
dubiousData(("metal1" "drawing") "badly formed metal polygons")
The following example illustrates using the second syntax form to enable optional checks in the dubiousData command.
dubiousData( disable all enable halfWidth )
dubiousData(geomCat("metal1" "metal2" "metal3") "badly formed metal polygons")
dubiousData(("metal1" "drawing") "badly formed metal polygons")
offGrid
offGrid( inLayer grid [size] [raw] [message] [limit] )
Description
You can use the offGrid check to find vertices of original graphics layers that are not on a specified grid. Diva places crossover offgrid vertices on the marker layer in the layout view.
All vertices on all shapes are checked unless those shapes are invalid. Conics and paths are expanded into polygons prior to the off-grid checking.
Specifying a list of layers using the geomCat command is not the same as specifying a number of offGrid commands, unless the raw option is used. The raw option prevents the layers from being merged and internal vertices from being removed.
Fields
Input layer name. This layer can be either a derived layer or an original graphics layer.
Floating point number in user units that defines the size of the grid. For example, a value of 0.25 microns highlights all vertices not on a quarter-micron grid.
Floating point number that overrides the default size of the cross that the program uses to flag the position of any vertex not on grid. The default size of the cross is 1 user unit.
Optional keyword raw so the program does not merge an original graphics input layer before the check.
The raw option has no effect on derived layers because they are always merged by the program.
When the program merges data, some off-grid points move back onto the grid. Off-grid points in one shape that overlap another shape are removed by the program during merging.
You can specify a text string in quotes as the message associated with errors. You see this text string when you use the Explain Marker command. If message is not defined, the complete command is used as the message.
The optional modifier errorLimit allows the specification of a limit to the number of error markers which the check will produce. The keyword abort can be used to cause early termination of the entire run if the limit is reached. See errorLimit in the drc command for details.
Examples
The following example illustrates the offGrid command.
offGrid( "metal" 0.25 "off grid metal" )
offGrid( "poly" 0.10 raw )
Graphic Layer Access Commands
DFII graphic layer data can be accessed directly by using an original graphics layer name in place of a derived layer name in most commands. In addition, commands are available to collect graphic layer shapes. These commands are provided for compatibility with Assura rule decks or to apply special filters to the shapes gathered.
geomArrayShapes
[outLayer=] geomArrayShapes( bound cellview shape extent )
Description
The geomArrayShapes command generates a layer composed of an array of shapes on the shape layer in cellview. You determine the size of the array by the extent of shapes on the extent layer in cellview, and by the extent of the shapes on the bound layer.
When constructing a fill cell, care should be taken that any shape on the shape layer not touch both the bottom and top, or left and right, of the bounding box of the shapes on the extent layer. While the output is a raw layer, most commands that select shapes will merge the shapes before doing the selection. This can result in very poor fill.
Fields
Name for the geomArrayShapes output layer. This is a raw shape layer.
The name of the layer whose bounding box the tool uses as a rectangle to be covered by the array of shapes.
This is the name of the cellview that the tool uses to collect the shape and extent layers. The character string you use must define the cell name and can optionally define the view name and a library name. If you don’t specify the view name, the program defaults to the layout view.
Name of the layer in cellview from which shapes will be collected and replicated into the rows and columns of the array. This must be an original graphics layer name which has shapes in the cellview.
Name of the layer in the cellview which the tool uses to determine the row and column spacing of the array to be generated, and also to determine the position of the shapes from the shape layer in relation to each row and column. This must be an original graphics layer name which has shapes in the cellview.
Example
The following example illustrates the geomArrayShapes command in conjunction with the drc(coverage) command to do area fill for the m1 layer:
bkgnd = geomBkgnd()
; find area with density that is too low
lowdensity = drc(m1 bkgnd coverage < 0.4 windowSize(10) stepSize(2.5))
; keep fill shapes at least 0.1 from real m1
fillarea = geomAndNot(lowdensity geomSize(m1 0.1))
; get the fill shapes
filler = geomArrayShapes(fillarea "chevrons layout lib" ("m1" "drawing") ("m1" "boundary"))
; only use fill shapes that are completely inside fillarea
fill = geomInside(filler fillarea)
; add the fill shapes to the real m1
m1 = geomOr(m1 fill)
geomBkgnd
[outLayer=] geomBkgnd( [halo] [border] )
Description
The geomBkgnd command generates a layer composed of a single rectangle. The size of the rectangle is made up of these elements:
-
The cellview bounding box, the area you specify, or the incremental area.
For more information about incremental area, see the Incremental section in the Design Rule Checking chapter. - The halo calculated from the rules
- A small border two user units wide
The optional arguments lets you control the size of the rectangle.
Field
Name for the geomBkgnd output. This is a merged polygon layer.
The default option. Adds the halo.
Numeric value that specifies the number of user units to be added. The default for this option is 2.0.
Example
The following examples illustrate the geomBkgnd command.
; generate a background including the halo plus 3 user units
substrate = geomBkgnd( halo 3.0 )
; generate the default background: halo plus 2 user units
substrate = geomBkgnd( )
; generate a background without halo or border
substrate = geomBkgnd( 0 )
geomCellBoundary
[outLayer=] geomCellBoundary( [root | ""] [file( fileNames )] [cells] )
Description
Generates a layer of cell bounding boxes. The layer produced is raw since overlapping and butting cell boundaries will produce overlapping and butting shapes. A one layer geomOr should be used if a merged layer is desired.
Common uses are to apply a different set of rules to certain cells, or to exclude cells such as logos from being checked. Caution should be used when excluding areas from checks since more than the expected cells can be present.
While all fields are considered optional, one must be given.
Field
Name of the layer that will be generated.
Keyword used with geomCellBoundary that allows the rule file to be independent of the top level design name. An alternative to using geomCellBoundary(root) is geomCellBoundary(""), which specifies the bounding box of the top cell.
Keyword that introduces the list of files that contain the names of the cells from which to produce bounding boxes. You must enclose the filenames in quotation marks.
A list of one or more text files that each contain a list of the cells from which to produce bounding boxes. When a simple filename is given, the file will be looked for in the current directory, then the directory the rules came from.
In the fileNames you specify, each cell name must appear on a separate line. Lines starting with # or ; are comments. You can specify a complete cell, view and library name, a cell and view name, or just a cell name. You can use wildcard characters following the Diva conventions for wildcards as described in “Using Wildcards” in Chapter 4 of this manual.
One or more quoted strings specifying the cells from which to produce bounding boxes. The same format as allowed in non-comment lines in the fileNames described above.
Examples
This example produces a layer of shapes covering ct3, ct4, and any cells whose names begin with "block":
abr_layer = geomCellBoundary( "ct3" "ct4" "block*")
This example uses the file X to list cells to be processed. In addition, your design has cells block_met1, block_met2, and std_block, none of which are listed in file X.
# this is file X
ct1 layout stdLib
ct2 layout chipLib

# the next version of ct2 is from stdLib
ct2 layout stdLib

; any cells in cmosLib that start with b2 and have two
; or more characters in their name
b11 layout cmosLib
b2* layout cmosLib
In your rule deck you have the command:
abr_layer = geomCellBoundary( file("X") "block*")
The layer abr_layer now has shapes covering all of the cells listed in file X including any cells having a name beginning with b2 as well as block_met1 and block_met2. It does not include std_block.
geomGetByLayer
[outLayer=] geomGetByLayer( layer1 layer2 [size] )
Description
You use the geomGetByLayer command to improve performance when running design rule checks on a dense original graphics layer that is related to a sparse layer. The command assumes that layer1 is dense and that layer2 is sparse.
For example, consider a long distance spacing requirement between the metal and pad layers. In general, the metal layer is very dense with data covering the entire chip, and the pad layer is sparse with data only near the periphery. The check drc(metal pad sep<50) runs slowly for each piece of metal in the chip. Diva searches around the metal for any pad within the specified distance, and usually there is no pad anywhere near the metal other than on the chip boundary.
You can use the geomGetByLayer command to create a subset of the metal layer from the layout database based on proximity to the pad layer. The result is that only the metal near the pads is processed.
To make the selection, the sparse layer (layer 2) is grown by the specified distance with angled edges converted to manhattan edges. If this grown shape overlaps the bounding box of a shape on the dense layer (layer 1) that dense layer shape is selected.
This command is intended to act as a fast data filter. It is not intended to provide selection by exact dimension separation. It often gathers more shapes than is necessary, but never misses a shape that should be selected. If you want exact selection by dimensions, you can use other commands subsequent to this command.
Fields
Name for the geomGetByLayer output.
The name of the dense layer. The name can be a text string such as “metal1,” or a layer purpose pair, such as (“metal” “drawing”). This layer must be an original layer. It cannot be a derived layer.
The name of the sparse layer. The name can be any verification layer containing polygons. Edge layers are not valid.
Optional. You can specify how close a layer1 shape must be to a layer2 shape to be copied to the output layer. For example, if you specify a size value of 52 microns, the system searches for any layer1 within 52 microns of the layer2 shape. The value must be a positive number. The default is 0.0, meaning all shapes that overlap one of the shapes on the sparse layer are copied to the output layer.
Example
The following example illustrates the geomGetByLayer command.
out = geomGetByLayer( "L1" "L2" 1.0 )
geomGetMacro
[outLayer=] geomGetMacro( inLayer purpose [pinsOnly] )
Description
The geomGetMacro command selects shapes from macro cells and ignores other cells. The command selects shapes in macro cells from the input layer by their layer purpose.
Fields
Optional output layer for the unmerged polygon layer.
Polygon layer as an input layer. This layer must be an original graphics layer since only these layers have a purpose.
Single text string or list of text strings defining the graphics purpose of the layer selected by Diva. For example
 geomGetMacro ( "met1" "drawing" )
geomGetMacro( "met1" ("pin" "net"))
Optional keyword that specifies that geomGetMacro selects only pin shapes from the specified purpose.
Example
Here are some examples illustrating the geomGetMacro command.
The following example selects all shapes from metal pin purpose:
met_pins = geomGetMacro( "metal" "pin" )
The following example selects all shapes on the pin and net purposes:
mlp = geomGetMacro( "met1" ("pin" "net"))
The following example selects only pins on drawing purpose:
mlp = geomGetMacro( "met1" "drawing" pinsOnly)
The following example selects pins on all purposes:
mlp = geomGetMacro( "met1" "all" pinsOnly)
The following example selects only pins on pin and net purposes:
mlp = geomGetMacro( "met1" ("pin" "net") pinsOnly)
geomGetObject
[outLayer=] geomGetObject( object variant [top_level bottom_level] )
[outLayer=] geomGetObject( macro object variant [pinsOnly] )
Description
Available only when the underlying database is OpenAccess, the geomGetObject command selects objects which do not have a layer purpose pair. This command has options to control the hierarchical levels from which the data is selected, as well acting like the geomGetMacro command.
Fields
Optional polygon layer output name.
Optional keyword which enables behavior similar to the geomGetMacro command, but for OpenAccess objects. Requires the extraction mode to be macrocell or hierarchical.
A keyword describing the type of the object to collect. The available object types are: boundary and blockage.
A keyword describing the variant of the object type, followed by any selection values required by the variant.
The boundary object supports the following variants: area, pr and snap. The area variant requires a string value which is the name of the areaBoundary to collect, and may be a Diva wildcard pattern.
The blockage object supports the following variants: placement, routing, wiring, fill, slot, pin, feedthru and screen. Except for the placement variant, a string value containing a layer name is required.
You can optionally specify two integers defining the range of hierarchical levels from which shapes are selected. The current level of the circuit is level 0.
If you want data from a single level other than 0, set both values to that level. If you want data from all levels, you must specify the range “0 n,” where “n” is a value as large or larger than the highest level of hierarchy.
In flat mode, if a range is not specified, shapes are selected from the current level down, or all levels. In hierarchical mode, if a range is specified, each level of hierarchy being processed relative to that level is applied. If you don’t specify a range, shapes are selected in exactly the same way as for logical commands (for example, geomOr).
If the macro keyword has been used, start and stop levels are not available.
Optional keyword that specifies that geomGetObject selects only pin objects of the specified type. Requires the macro keyword to have been given.
Examples
The following examples illustrate the geomGetObject command.
met1_bnd = geomGetObject( boundary area "met1*" )
met2_bnd = geomGetObject( boundary area "met2*" 1 3 )
pr_bnd = geomGetObject( boundary pr 0 0 )
snap_bnd = geomGetObject( boundary snap )
met1_blk = geomGetObject( blockage routing "met1" )
met1_blk = geomGetObject( blockage routing "met1" 2 4 )
place_blk = geomGetObject( blockage placement )
place_blk = geomGetObject( blockage placement 0 0 )
geomGetPurpose
[outLayer=] geomGetPurpose( inlayer purpose [top_level bottom_level] )
Description
The geomGetPurpose command selects shapes from the input layer by their layer purpose. This command has options to control the hierarchical levels from which the data is selected.
Fields
Optional polygon layer output name.
A single text string, enclosed in quotes, or a SKILL symbol referring to a text string, that defines the graphic layer name to read shapes from.
A single text string or list of text strings, enclosed in quotes, that defines the graphics purpose, or purposes, of the inLayer to read shapes from. If not given, the default is to use all purposes defined for inLayer, except purpose boundary.
You can optionally specify two integers defining the range of hierarchical levels from which shapes are selected. The current level of the circuit is level 0.
If you want data from a single level other than 0, set both values to that level. If you want data from all levels, you must specify the range “0 n,” where “n” is a value as large or larger than the highest level of hierarchy.
In flat mode, if a range is not specified, shapes are selected from the current level down, or all levels. In hierarchical mode, if a range is specified, each level of hierarchy being processed relative to that level is applied. If you don’t specify a range, shapes are selected in exactly the same way as for logical commands (for example, geomOr).
Examples
The following examples illustrate the geomGetPurpose command.
met_pins = geomGetPurpose( "metal" "pin" )
all_poly = geomGetPurpose( "poly" ( "drawing" "pin" ) )
top_pins = geomGetPurpose( "metal" "pin" )
all_pins = geomGetPurpose( "metal" "pin" 0 20 )
low_pins = geomGetPurpose( "metal" "pin" 1 20 )
layerDefs
layerDefs( source
outLayer = layer( inLayer [type( purpose ... ) ... ] ... )
outLayer = fillLayer( inLayer [type( purpose ... ) ... ] ...)
outLayer = cellBoundary( bound )
outLayer = object( object )
)
Description
The layerDefs command is provided for compatibility with Assura rule decks. Only a subset of Assura functionality is currently available, as described below.
mode modifier. The geomStamp command updates the input layer instead of producing an output layer with nodal information.Fields
Indicates which data source this layerDefs command applies to. Must be the first parameter and be the quoted string "DF2" or "GDS2". Diva does not read GDS2 Stream files and a layerDefs command with "GDS2" as the source will be ignored.
Required derived layer output name. Will contain raw polygon shapes from the input graphic layers.
A single text string, enclosed in quotes, that defines the graphic layer name to read shapes from.
A single text string or list of text strings, enclosed in quotes, that defines the graphics purpose, or purposes, of the inLayer to read shapes from. If not given, the default is to use all purposes defined for inLayer, except purpose boundary.
Uses the same syntax as in the geomCellBoundary command.
Uses the same syntax as the geomGetObject command.
Logical Commands
Logical commands are used to generate layers using derived or original graphics layers.
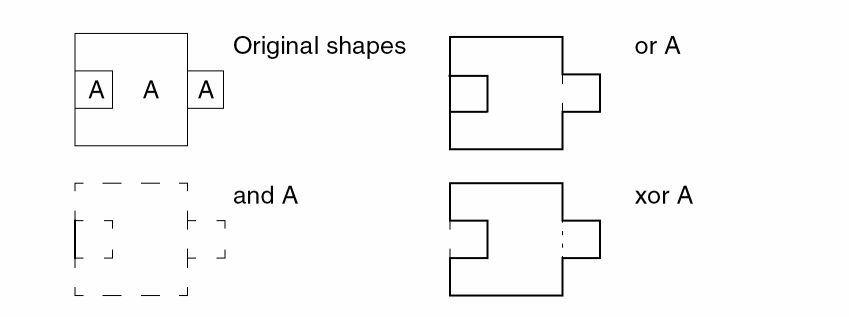
geomAnd
[outLayer=] geomAnd( inLayer1 [inLayer2] )
Description
This command generates new shapes from the overlap of original shapes on the input layers. geomAnd works with one or two input layers and with polygons or edges.
- For two-layer polygon input, it generates the areas common to both input layers.
- For one-layer polygon input, it generates the areas where two or more shapes on that layer overlap.
- For two-layer edge input, it generates new edge segments where original edges from both layers are coincident and in the same direction.
- For one-layer edge input, it generates the new edge segment where multiple input edges are coincident and in the same direction.
If the first layer referenced in the command is connected, its net numbers are propagated to the output layer. A layer is connected if it has allocated net numbers through a geomConnect command, or any command that propagates node numbers.
polsrc = geomAnd( poly srcd )
If poly is connected, the polsrc layer is allocated its node numbers.
The following figure illustrates a polygon and an edge geomAnd.
Fields
Layer name for the geomAnd result.
Input layer name(s). You can specify either a derived layer or a graphics layer. One or two layers can be specified.
Examples
The following example illustrates the geomAnd of two original layers.
gate = geomAnd( "poly" "diff" )
The following example illustrates the self and of an original layer.
b_error = geomAnd( "boundary" )
The following example illustrates the and of two derived layers.
well_c = geomAnd( well pplus )
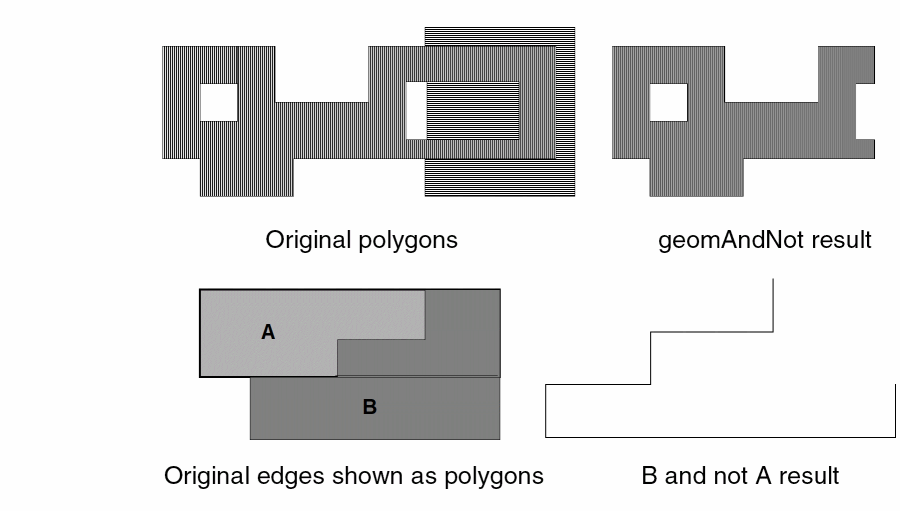
geomAndNot
[outLayer=] geomAndNot( inLayer1 inLayer2 )
Description
The geomAndNot command generates new shapes from areas of the first input layer that do not overlap any area of the second input layer. The geomAndNot command works on polygons or edge layers.
- When you specify polygon layer input, the program generates areas of the first layer not over the second layer.
- When one or more of the input layers is an edge layer, the program generates edge segments for edges of the first input layer except where original edges from both layers are coincident and in the same direction.
If the first layer referenced in the command is connected, its net numbers are propagated to the output layer. A layer is connected if it has allocated net numbers through a geomConnect command, or any command that propagates node numbers.
nminus = geomAndNot( diff, well )
If diff is connected, the nminus layer is allocated its node numbers.
The following figure illustrates polygon and edge geomAndNot commands.
Fields
Layer name for the geomAndNot result.
Input layer names. You can specify either a derived layer name or a graphics layer name. Two layers must be specified.
Examples
The following example illustrates the geomAndNot of two original layers.
diffn = geomAndNot( "diff" "poly" )
The following example illustrates the geomAndNot of two derived layers.
sub_c = geomAndNot( nplus well )
geomCat
[outLayer=] geomCat( inlayerN... )
Description
The geomCat command combines shapes on the input layers without merging those polygon shapes.
Serial and net numbers are preserved when copying shapes from inlayer to outLayer.
Fields
The resultant unmerged derived polygon layer. This layer consists of the unmerged shapes from all input layers.
Input layer name. You can specify any number and combination of derived layer names or graphics layer names.
Examples
The following example combines original layers without merging.
metal = geomCat( "metal1" "metal2" "metal3" )
The following example converts an original layer into an unmerged derived layer.
poly = geomCat( "poly" )
The following example combines derived layers. Note that the results are not merged.
gates = geomCat( ngate pgate )
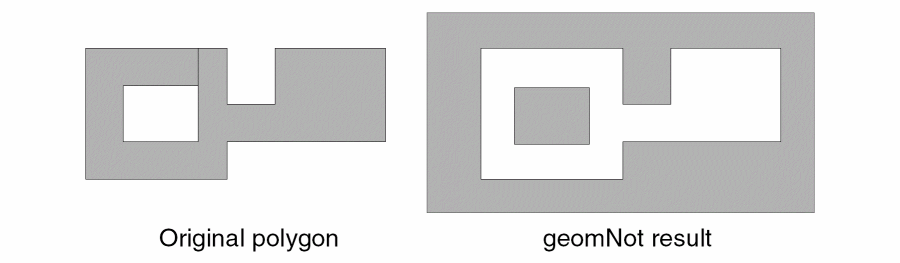
geomNot
[outLayer=] geomNot( inLayer )
Description
The geomNot command generates new shapes by inverting the original shapes. It is the equivalent of a geomAndNot between a layer and a single rectangle encompassing the area being processed. The geomNot command works on one polygon layer only.
The following figure illustrates a polygon geomNot.
Fields
Layer name for the geomNot result.
Input layer name. You can specify either a derived layer name or a graphics layer name.
Example
The following example illustrates the geomNot of an original layer.
ntub = geomNot( "pwell" )
geomOr
[outLayer=] geomOr( inLayer1 [inLayerN] )
[outLayer=] geomOr( inLayer [inLayer...] )
[outLayer=] geomOr( inLayerN... )
Description
Use the geomOr command to merge all shapes on polygon or edge input layers.
When you merge polygons, you can specify one or more input layers. For polygon layers, a merge generates polygons whose area encompasses all the areas from all the layers and removes all the edges internal to the polygons.
A one layer geomOr of an already merged layer will preserve net numbers and assign new serial numbers to the shapes in outLayer.
When one of the input layers is an edge layer, the resulting merged layer is an edge layer. For edge layers, a merge generates edges in which multiple segments having coincidence or colinearity are combined into single segments.
The following figure illustrates how polygon and edges merge.

Fields
Input layer names. You can specify any number and combination of derived layer names or graphics layer names.
Examples
The following example merges multiple original layers.
poly = geomOr( "poly1" "poly2" )
The following example merges a single input layer.
metal = geomOr( "metal" )
The following example performs a geomOr on derived layers.
pnpref = geomOr( emitosize collector )
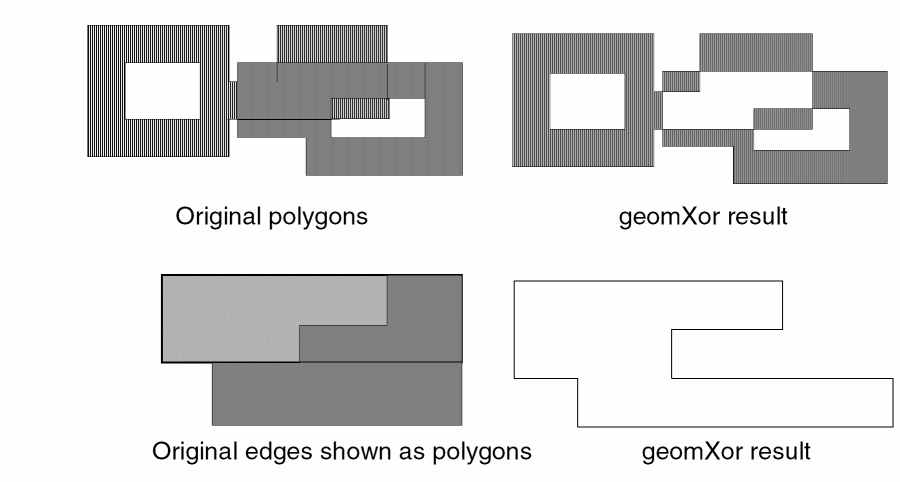
geomXor
[outLayer=] geomXor( inLayer1 [inLayer2] )
Description
The geomXor command generates new shapes from those portions of either input layer that do not overlap the other layer.
- When you specify one polygon input layer, the program generates areas of the layer that are not overlapping other areas of the same layer.
- When you specify two polygon input layers, the program generates areas of both layers that are not overlapping areas of the other layer.
- When you specify two input layers and one or more is an edge layer, the program generates edge segments for each of the input edges, except where original edges from both layers are coincident and in the same direction.
- When you specify a single edge layer input, the program generates edge segments for each of the input edges, except where multiple input edges are coincident and in the same direction.
The following figure illustrates a polygon or edge geomXor.
Fields
Layer name for the geomXor result.
Input layer name. You can specify either a derived layer name or a graphics layer name. One or two layers can be specified.
Examples
The following example illustrates the exclusive or of two original layers.
cap1 = geomXor( "metal1" "metal2" )
The following example illustrates the self-exclusive or of an original layer.
open_bound = geomXor( "boundary" )
The following example illustrates the exclusive or of two derived layers.
cap2 = geomXor( diffn1 diffn2 )
Relational Selection Commands
Relational selection commands select polygons from an input layer based on the relationship between that layer and another layer. Relational selection commands maintain net information.
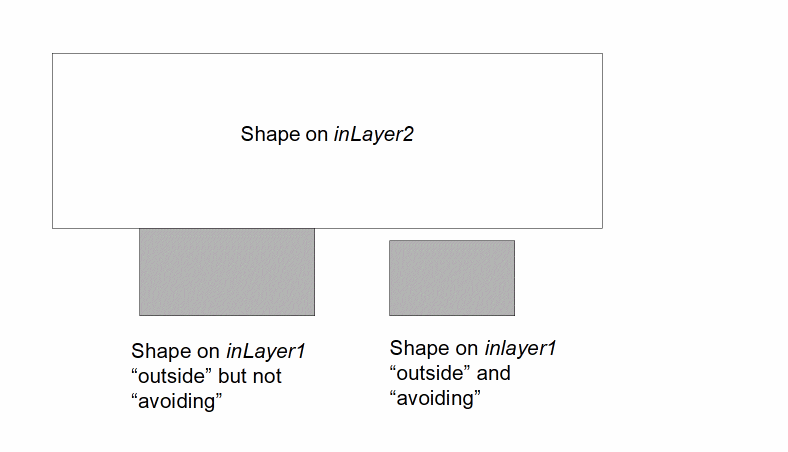
geomAvoiding
[outlayer=] geomAvoiding( inLayer1 inLayer2 [exclusive] [selected|unselected] )
Description
The geomAvoiding command selects shapes on inLayer1 that are completely outside and have no butting with shapes on inLayer2.
All select commands maintain serial and net numbers of shapes in the output layer.
Prerequisites
The following figure illustrates a geomAvoiding selection and its differences from geomOutside.
Fields
Name for the geomAvoiding output.
Input layer names. You can specify either derived layer names or graphics layer names. You must specify two layers.
Optional modifier you can use to select shapes on inLayer1 that conform to the required relationship but that do not have any other relationship with other shapes on inLayer2. This option is enabled by default, but allowed for compatibility with old rule decks.
Optional modifier you can use to indicate that the shapes normally selected by the command are to be output. This is the default.
Optional modifier you can use to indicate that the shapes not normally selected by the command are to be output.
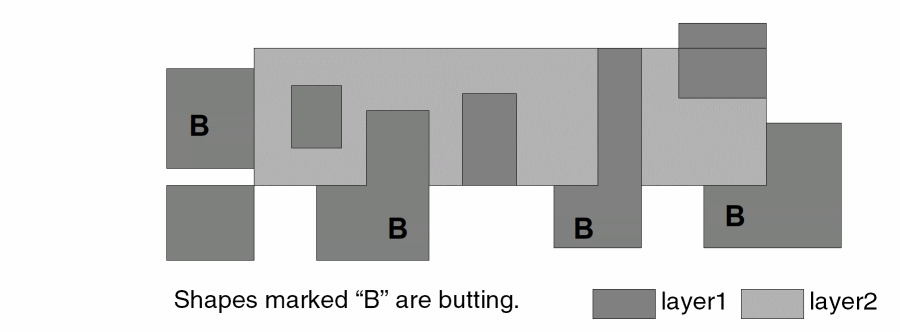
geomButting
[outLayer=] geomButting( inLayer1 inLayer2 [sameNet|diffNet] [limits] [includeZero|excludeZero] [onlyEven|onlyOdd] [exclusive] [selected|unselected] )
Description
The geomButting command selects shapes on inLayer1 that abut shapes on inLayer2.
Butting is edge coincidence when the areas of the shapes at the abutment do not overlap. An inLayer1 shape is butting if any of its edges abut edges of an inLayer2 shape. A butting shape is not affected by other geometric relationships. An inLayer1 shape can be butting, overlapping, and coincident with a single inLayer2 shape and still be classified as butting.
All select commands maintain serial and net numbers of shapes in the output layer.
Prerequisites
If you use the connection modifier when using geomButting, the input layers you specify must be connected layers. The following figure illustrates a geomButting selection.
Fields
Name for the geomButting output.
Input layer names. You can specify either a derived layer name or a graphics layer name. Two layers must be specified.
Optional keyword to count the required relationship only when the shapes are on the same electrical net. May not be used with the diffNet keyword.
Optional keyword to count the required relationship only when the shapes are on different electrical nets. May not be used with the sameNet keyword.
Optional qualifier you can use to specify the number of shapes on inLayer2 that a shape on inLayer1 must be have the relationship with in order for it to be selected. The number of inLayer2 shapes is specified using a limit or range containing one of the following keywords:
Operators you can use with the keywords are as follows:
You can specify limits by combining a keyword with one or more operators and numbers using normal mathematical conventions. Examples of these combinations are as follows
keep == 6
ignore < 2
2 < keep < 5
3 <= ignore <= 7
Optional qualifier you can use to control how a zero count is treated within a range limit. A shape on inLayer1 with no shape on inLayer2 having the required relationship is not selected, even if the limit range would be satisfied by a zero value. This is the default behavior.
Optional qualifier you can use to control how a zero count is treated within a range limit. A shape on inLayer1 with no shape on inLayer2 having the required relationship will be selected if the range limit is satisfied by a zero value.
Optional qualifier you can use to limit the number of separate shapes on inLayer2. If the program finds that the number of shapes on inLayer2 with the required relationship to inLayer1 is even, and meets any range limit given, then it selects the shape on inLayer1.
Optional qualifier you can use to limit the number of separate shapes on inLayer2. If the program finds that the number of shapes on inLayer2 with the required relationship to inLayer1 is odd, and meets any range limit given, then it selects the shape on inLayer1.
Optional modifier you can use to select shapes on inLayer1 that conform to the required relationship but that do not have any other relationship with other shapes on inLayer2.
When you specify the sameNet or diffNet options, the shape on inLayer1 is not selected if shapes on inLayer2 have the required relationship but do not have the required net connections.
Optional modifier you can use to indicate that the shapes normally selected by the command are to be output. This is the default.
Optional modifier you can use to indicate that the shapes not normally selected by the command are to be output.
Examples
The following examples illustrate how you can select shapes using geomButting with various options.
badgate = geomButting( gate diffn 2 < ignore < 4 )
pulldown = geomButting( poly diffn sameNet )
The following examples illustrate how connectivity information can be passed through derived layers.
geomConnect( via( a b c )
e = geomStraddle( b f )
g = geomButting( e c sameNet )
geomButtOnly
[outLayer=] geomButtOnly( inLayer1 inLayer2 [sameNet|diffNet] [limits] [includeZero|excludeZero] [onlyEven|onlyOdd] [exclusive] [selected|unselected] )
Description
The geomButtOnly command selects shapes on inLayer1 that butt shapes on inLayer2. To be considered, the shapes on inLayer2 must be completely outside the shape on inLayer1. The relationship between a shape on inLayer1 and a shape on inLayer2 must be butting only. Butting is edge-to-edge coincidence, where the shapes do not overlap at the coincident edge.
All select commands maintain serial and net numbers of shapes in the output layer.
Prerequisites
If you use the connection modifier when using geomButtOnly, the input layers you specify must be connected layers.
The following figure illustrates a geomButtOnly selection.
Fields
Name for the geomButtOnly output.
Input layer names. You can specify either derived layer names or graphics layer names. You must specify two layers.
Optional keyword to count the required relationship only when the shapes are on the same electrical net. May not be used with the diffNet keyword.
Optional keyword to count the required relationship only when the shapes are on different electrical nets. May not be used with the sameNet keyword.
Optional qualifier you can use to specify the number of shapes on inLayer2 that a shape on inLayer1 must be have the relationship with in order for it to be selected. The number of inLayer2 shapes is specified using a limit or range containing one of the following keywords:
Operators you can use with the keywords are as follows:
You can specify limits by combining a keyword with one or more operators and numbers using normal mathematical conventions. Examples of these combinations are as follows:
keep == 6
ignore < 2
2 < keep < 5
3 <= ignore <= 7
Optional qualifier you can use to control how a zero count is treated within a range limit. A shape on inLayer1 with no shape on inLayer2 having the required relationship is not selected, even if the limit range would be satisfied by a zero value. This is the default behavior.
Optional qualifier you can use to control how a zero count is treated within a range limit. A shape on inLayer1 with no shape on inLayer2 having the required relationship will be selected if the range limit is satisfied by a zero value.
Optional qualifier you can use to limit the number of separate shapes on inLayer2. If the program finds that the number of shapes on inLayer2 with the required relationship to inLayer1 is even, and meets any range limit given, then it selects the shape on inLayer1.
Optional qualifier you can use to limit the number of separate shapes on inLayer2. If the program finds that the number of shapes on inLayer2 with the required relationship to inLayer1 is odd, and meets any range limit given, then it selects the shape on inLayer1.
Optional modifier you can use to select shapes on inLayer1 that conform to the required relationship but that do not have any other relationship with other shapes on inLayer2.
When you specify the sameNet or diffNet options, the shape on inLayer1 is not selected if shapes on inLayer2 have the required relationship but do not have the required net connections.
Optional modifier you can use to indicate that the shapes normally selected by the command are to be output. This is the default.
Optional modifier you can use to indicate that the shapes not normally selected by the command are to be output.
geomButtOrCoin
[outLayer=] geomButtOrCoin( inLayer1 inLayer2 [sameNet|diffNet] [limits] [includeZero|excludeZero] [onlyEven|onlyOdd] [exclusive] [selected|unselected] )
Description
The geomButtOrCoin command selects shapes on inLayer1 that abut or are coincident with shapes on inLayer2.
Butting and coincidence are defined as any edge-to-edge coincidence, regardless of whether the shapes overlap at the point of coincidence.
All select commands maintain serial and net numbers of shapes in the output layer.
This is a combination of the commands geomButting and geomCoincident.
Prerequisites
If you use the connection modifier when using geomButtOrCoin, the input layers you specify must be connected layers. The following figure illustrates geomButtOrCoin selection.
Fields
Name for the geomButtOrCoin output
Input layer names. You can specify either a derived layer name or a graphics layer name. Two layers must be specified.
Optional keyword to count the required relationship only when the shapes are on the same electrical net. May not be used with the diffNet keyword.
Optional keyword to count the required relationship only when the shapes are on different electrical nets. May not be used with the sameNet keyword.
Optional qualifier you can use to specify the number of shapes on inLayer2 that a shape on inLayer1 must be have the relationship with in order for it to be selected. The number of inLayer2 shapes is specified using a limit or range containing one of the following keywords:
Operators you can use with the keywords are as follows:
You can specify limits by combining a keyword with one or more operators and numbers using normal mathematical conventions. Examples of these combinations are as follows:
 keep == 6
ignore < 2
2 < keep < 5
3 <= ignore <= 7
Optional qualifier you can use to control how a zero count is treated within a range limit. A shape on inLayer1 with no shape on inLayer2 having the required relationship is not selected, even if the limit range would be satisfied by a zero value. This is the default behavior.
Optional qualifier you can use to control how a zero count is treated within a range limit. A shape on inLayer1 with no shape on inLayer2 having the required relationship will be selected if the range limit is satisfied by a zero value.
Optional qualifier you can use to limit the number of separate shapes on inLayer2. If the program finds that the number of shapes on inLayer2 with the required relationship to inLayer1 is even, and meets any range limit given, then it selects the shape on inLayer1.
Optional qualifier you can use to limit the number of separate shapes on inLayer2. If the program finds that the number of shapes on inLayer2 with the required relationship to inLayer1 is odd, and meets any range limit given, then it selects the shape on inLayer1.
Optional modifier you can use to select shapes on inLayer1 that conform to the required relationship but that do not have any other relationship with other shapes on inLayer2.
When you specify the sameNet or diffNet options, the shape on inLayer1 is not selected if shapes on inLayer2 have the required relationship but do not have the required net connections.
Optional modifier you can use to indicate that the shapes normally selected by the command are to be output. This is the default.
Optional modifier you can use to indicate that the shapes not normally selected by the command are to be output.
Examples
The following examples illustrate how you can use various options to select shapes using geomButtOrCoin.
error1 = geomButtOrCoin( "poly" "diff" )
error2 = geomButtOrCoin( m1cut metal2 sameNet )
strap = geomButtOrCoin( m1cut metal1 sameNet keep > 2 )
geomButtOrOver
[outLayer=] geomButtOrOver ( inLayer1 inLayer2 [sameNet|diffNet] [limits] [includeZero|excludeZero] [onlyEven|onlyOdd] [exclusive] [selected|unselected] )
Description
The geomButtOrOver command selects shapes on inLayer1 that abut or overlap shapes on inLayer2. Butting is edge-to-edge coincidence where the shapes do not overlap at the point of coincidence. Overlap is defined as a common area between the shapes.
All select commands maintain serial and net numbers of shapes in the output layer.
Prerequisites
If you use the connection modifier when using geomButtOrOver, the input layers you specify must be connected layers.
The following figure illustrates a geomButtOrOver selection.
Fields
Name for the geomButtOrOver output.
Input layer names. You can specify either a derived layer name or a graphics layer name. Two layers must be specified.
Optional keyword to count the required relationship only when the shapes are on the same electrical net. May not be used with the diffNet keyword.
Optional keyword to count the required relationship only when the shapes are on different electrical nets. May not be used with the sameNet keyword.
Optional qualifier you can use to specify the number of shapes on inLayer2 that a shape on inLayer1 must be have the relationship with in order for it to be selected. The number of inLayer2 shapes is specified using a limit or range containing one of the following keywords:
Operators you can use with the keywords are as follows:
You can specify limits by combining a keyword with one or more operators and numbers using normal mathematical conventions. Examples of these combinations are as follows:
 keep == 6
ignore < 2
2 < keep < 5
3 <= ignore <= 7
Optional qualifier you can use to control how a zero count is treated within a range limit. A shape on inLayer1 with no shape on inLayer2 having the required relationship is not selected, even if the limit range would be satisfied by a zero value. This is the default behavior.
Optional qualifier you can use to control how a zero count is treated within a range limit. A shape on inLayer1 with no shape on inLayer2 having the required relationship will be selected if the range limit is satisfied by a zero value.
Optional qualifier you can use to limit the number of separate shapes on inLayer2. If the program finds that the number of shapes on inLayer2 with the required relationship to inLayer1 is even, and meets any range limit given, then it selects the shape on inLayer1.
Optional qualifier you can use to limit the number of separate shapes on inLayer2. If the program finds that the number of shapes on inLayer2 with the required relationship to inLayer1 is odd, and meets any range limit given, then it selects the shape on inLayer1.
Optional modifier you can use to select shapes on inLayer1 that conform to the required relationship but that do not have any other relationship with other shapes on inLayer2.
When you specify the sameNet or diffNet options, the shape on inLayer1 is not selected if shapes on inLayer2 have the required relationship but do not have the required net connections.
Optional modifier you can use to indicate that the shapes normally selected by the command are to be output. This is the default.
Optional modifier you can use to indicate that the shapes not normally selected by the command are to be output.
Examples
The following examples illustrate how you can select shapes using geomButtOrOver with various options.
error1 = geomButtOrOver( "cut" gate )
error2 = geomButtOrOver( abc def diffNet )
widget = geomButtOrOver( abc def sameNet 2 < ignore < 4 )
geomCoincident
[outLayer=] geomCoincident( inLayer1 inLayer2 [sameNet|diffNet] [limits] [includeZero|excludeZero] [onlyEven|onlyOdd] [exclusive] [selected|unselected] )
Description
The geomCoincident command selects shapes on inLayer1 that have edges coincident with shapes on inLayer2.
An inLayer1 shape is coincident if any of its edges are coincident with edges of an inLayer2 shape where areas of the shapes at those edges overlap. Shapes that are coincident are not affected by other geometric relationships. An inLayer1 shape can be coincident, overlapping, and butting with a single inLayer2 shape and still be evaluated as coincident.
All select commands maintain serial and net numbers of shapes in the output layer.
Prerequisites
If you use the connection modifier when using geomCoincident, the input layers you specify must be connected layers. The following figure illustrates a geomCoincident selection.
Fields
Name for the geomCoincident output.
Input layer names. You can specify either a derived layer name or a graphics layer name. Two layers must be specified.
Optional keyword to count the required relationship only when the shapes are on the same electrical net. May not be used with the diffNet keyword.
Optional keyword to count the required relationship only when the shapes are on different electrical nets. May not be used with the sameNet keyword.
Optional qualifier you can use to specify the number of shapes on inLayer2 that a shape on inLayer1 must be have the relationship with in order for it to be selected. The number of inLayer2 shapes is specified using a limit or range containing one of the following keywords:
Operators you can use with the keywords are as follows:
You can specify limits by combining a keyword with one or more operators and numbers using normal mathematical conventions. Examples of these combinations are as follows:
 keep == 6
ignore < 2
2 < keep < 5
3 <= ignore <= 7
Optional qualifier you can use to control how a zero count is treated within a range limit. A shape on inLayer1 with no shape on inLayer2 having the required relationship is not selected, even if the limit range would be satisfied by a zero value. This is the default behavior.
Optional qualifier you can use to control how a zero count is treated within a range limit. A shape on inLayer1 with no shape on inLayer2 having the required relationship will be selected if the range limit is satisfied by a zero value.
Optional qualifier you can use to limit the number of separate shapes on inLayer2. If the program finds that the number of shapes on inLayer2 with the required relationship to inLayer1 is even, and meets any range limit given, then it selects the shape on inLayer1.
Optional qualifier you can use to limit the number of separate shapes on inLayer2. If the program finds that the number of shapes on inLayer2 with the required relationship to inLayer1 is odd, and meets any range limit given, then it selects the shape on inLayer1.
Optional modifier you can use to select shapes on inLayer1 that conform to the required relationship but that do not have any other relationship with other shapes on inLayer2.
When you specify the sameNet or diffNet options, the shape on inLayer1 is not selected if shapes on inLayer2 have the required relationship but do not have the required net connections.
Optional modifier you can use to indicate that the shapes normally selected by the command are to be output. This is the default.
Optional modifier you can use to indicate that the shapes not normally selected by the command are to be output.
Examples
The following examples illustrate how you can select shapes using geomCoincident with various options.
closecut = geomCoincident( cut metal sameNet )
bridge = geomCoincident( metal cut sameNet keep > 2 )
geomCoinOnly
[outLayer=] geomCoinOnly( inLayer1 inLayer2 [sameNet|diffNet] [limits] [includeZero|excludeZero] [onlyEven|onlyOdd] [exclusive] [selected|unselected] )
Description
The geomCoinOnly command selects shapes on inLayer1 that are coincident with shapes on inLayer2. To be considered, a shape on inLayer1 must totally enclose a shape on inLayer2. The relationship between a shape on inLayer1 and a shape on inLayer2 must be coincident only. Coincidence is edge-to-edge coincidence where the shapes overlap at the coincident edge.
All select commands maintain serial and net numbers of shapes in the output layer.
Prerequisites
If you use the connection modifier when using geomCoinOnly, then the input layers you specify must be connected layers.
The following figure illustrates a geomCoinOnly selection.
Fields
Name for the geomCoinOnly output.
Input layer names. You can specify either derived layer names or graphics layer names. You must specify two layers.
Optional keyword to count the required relationship only when the shapes are on the same electrical net. May not be used with the diffNet keyword.
Optional keyword to count the required relationship only when the shapes are on different electrical nets. May not be used with the sameNet keyword.
Optional qualifier you can use to specify the number of shapes on inLayer2 that a shape on inLayer1 must have the relationship with in order for it to be selected. The number of inLayer2 shapes is specified using a limit or range containing one of the following keywords:
Operators you can use with the keywords are as follows:
You can specify limits by combining a keyword with one or more operators and numbers using normal mathematical conventions. Examples of these combinations are as follows:
 keep == 6
ignore < 2
2 < keep < 5
3 <= ignore <= 7
Optional qualifier you can use to control how a zero count is treated within a range limit. A shape on inLayer1 with no shape on inLayer2 having the required relationship is not selected, even if the limit range would be satisfied by a zero value. This is the default behavior.
Optional qualifier you can use to control how a zero count is treated within a range limit. A shape on inLayer1 with no shape on inLayer2 having the required relationship will be selected if the range limit is satisfied by a zero value.
Optional qualifier you can use to limit the number of separate shapes on inLayer2. If the program finds that the number of shapes on inLayer2 with the required relationship to inLayer1 is even, and meets any range limit given, then it selects the shape on inLayer1.
Optional qualifier you can use to limit the number of separate shapes on inLayer2. If the program finds that the number of shapes on inLayer2 with the required relationship to inLayer1 is odd, and meets any range limit given, then it selects the shape on inLayer1.
Optional modifier you can use to select shapes on inLayer1 that conform to the required relationship but that do not have any other relationship with other shapes on inLayer2.
When you specify the sameNet or diffNet options, the shape on inLayer1 is not selected if shapes on inLayer2 have the required relationship but do not have the required net connections.
Optional modifier you can use to indicate that the shapes normally selected by the command are to be output. This is the default.
Optional modifier you can use to indicate that the shapes not normally selected by the command are to be output.
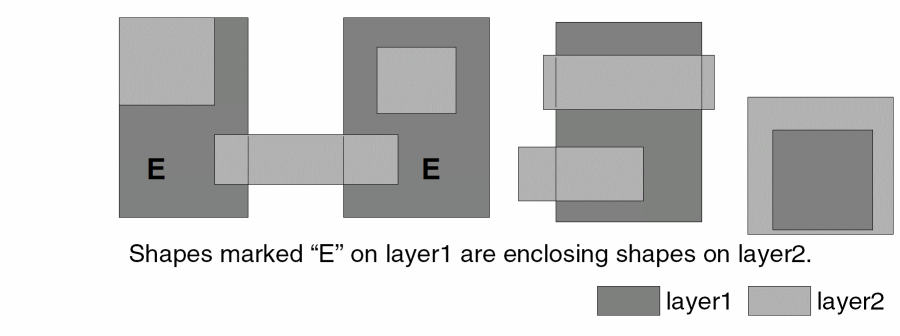
geomEnclose
[outLayer=] geomEnclose( inLayer1 inLayer2 [sameNet|diffNet] [limits] [includeZero|excludeZero] [onlyEven|onlyOdd] [exclusive] [selected|unselected] )
Description
The geomEnclose command selects shapes on inLayer1 that enclose shapes on inLayer2. An inLayer1 shape is enclosing if the entire area of an inLayer2 shape is covered by the inLayer1 shape. Other relationships for the same shape do not affect the selection. Coincidence of edges does not affect the selection.
You can use optional limits qualifiers to specify the number of shapes on inLayer2 that must be enclosed within a single shape on inLayer1 for that shape to be selected by geomEnclose.
All select commands maintain serial and net numbers of shapes in the output layer.
Prerequisites
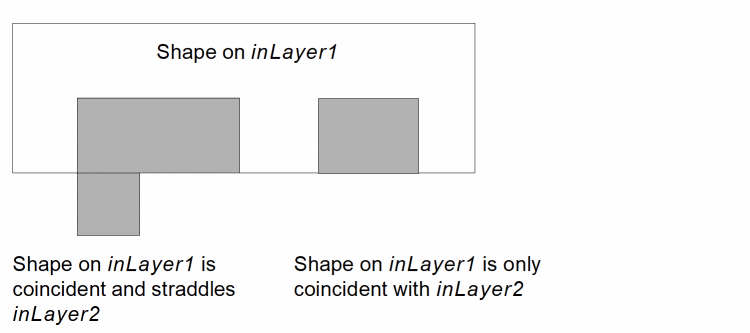
If you use the connection modifier when using geomEnclose, the input layers you specify must be connected layers. The following figure illustrates a geomEnclose selection.
Fields
Name for the geomEnclose output.
Input layer names. You can specify either a derived layer name or a graphics layer name. Two layers must be specified.
Optional keyword to count the required relationship only when the shapes are on the same electrical net. May not be used with the diffNet keyword.
Optional keyword to count the required relationship only when the shapes are on different electrical nets. May not be used with the sameNet keyword.
Optional qualifier you can use to specify the number of shapes on inLayer2 that a shape on inLayer1 must be have the relationship with in order for it to be selected. The number of inLayer2 shapes is specified using a limit or range containing one of the following keywords:
Operators you can use with the keywords are as follows:
You can use the following limit specifications:
 keep == 6
ignore < 2
2 < keep < 5
3 <= ignore <= 7
Optional qualifier you can use to control how a zero count is treated within a range limit. A shape on inLayer1 with no shape on inLayer2 having the required relationship is not selected, even if the limit range would be satisfied by a zero value. This is the default behavior.
Optional qualifier you can use to control how a zero count is treated within a range limit. A shape on inLayer1 with no shape on inLayer2 having the required relationship will be selected if the range limit is satisfied by a zero value.
Optional qualifier you can use to limit the number of separate shapes on inLayer2. If the program finds that the number of shapes on inLayer2 with the required relationship to inLayer1 is even, and meets any range limit given, then it selects the shape on inLayer1.
Optional qualifier you can use to limit the number of separate shapes on inLayer2. If the program finds that the number of shapes on inLayer2 with the required relationship to inLayer1 is odd, and meets any range limit given, then it selects the shape on inLayer1.
Optional modifier you can use to select shapes on inLayer1 that conform to the required relationship but that do not have any other relationship with other shapes on inLayer2.
When you specify the sameNet or diffNet options, the shape on inLayer1 is not selected if shapes on inLayer2 have the required relationship but do not have the required net connections.
Optional modifier you can use to indicate that the shapes normally selected by the command are to be output. This is the default.
Optional modifier you can use to indicate that the shapes not normally selected by the command are to be output.
Examples
The following examples select shapes using geomEnclose with various options.
collector = geomEnclose( "ndiff" c_cut )
tied_tub = geomEnclose( tub contact sameNet )
pass_tub = geomEnclose( tub contact sameNet keep > 1 )
multi_npn = geomEnclose( ntub npn_base 1 < keep < 3 )
error = geomEnclose( ntub npn_base 1 < ignore < 3 )
The following example illustrates how you can pass connectivity information through derived layers.
geomConnect( via( a b c )
e = geomStraddle( b f )
g = geomEnclose( e c sameNet )
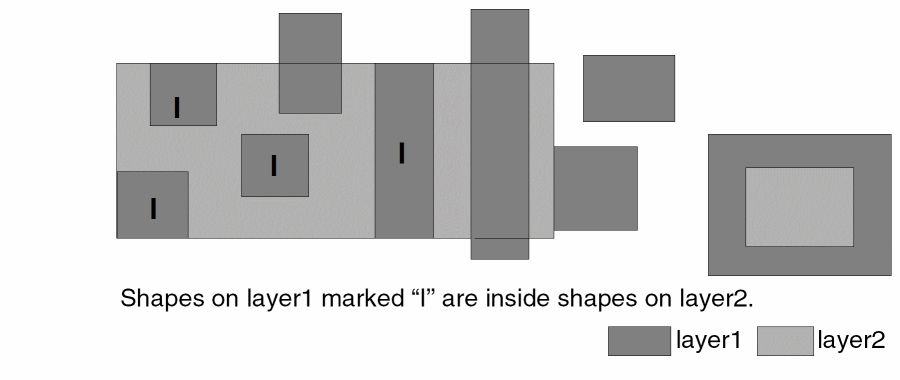
geomInside
[outLayer=] geomInside( inLayer1 inLayer2 [sameNet|diffNet] [exclusive] [selected|unselected] )
Description
The geomInside command selects shapes on inLayer1 that are totally inside shapes on inLayer2. An inLayer1 shape is inside if its entire area is covered by the area of an inLayer2 shape. Coincident shapes are considered inside in this check. If shapes on two layers are coincident on all sides, then each layer can be defined as being inside the other.
All select commands maintain serial and net numbers of shapes in the output layer.
Prerequisites
If you use the connection modifier with geomInside, you must specify connected layers as input.
The following figure illustrates a geomInside selection.
Fields
Name for the geomInside output.
Input layer names. You can specify either derived layer names or graphics layer names.
Optional keyword to count the required relationship only when the shapes are on the same electrical net. May not be used with the diffNet keyword.
Optional keyword to count the required relationship only when the shapes are on different electrical nets. May not be used with the sameNet keyword.
Optional modifier you can use to select shapes on inLayer1 that conform to the required relationship but that do not have any other relationship with other shapes on inLayer2.
When you specify the sameNet or diffNet options, the shape on inLayer1 is not selected if shapes on inLayer2 have the required relationship but do not have the required net connections.
Optional modifier you can use to indicate that the shapes normally selected by the command are to be output. This is the default.
Optional modifier you can use to indicate that the shapes not normally selected by the command are to be output.
Examples
The following example selects a derived layer inside an original layer.
ngate = geomInside( gate "pwell" )
The following example illustrates the sameNet option.
well_poly = geomInside( poly well sameNet )
The following example illustrates how connectivity information can be passed through derived layers.
geomConnect( via( a b c d ) )
e = geomStraddle( b f )
g = geomInside( e c sameNet )
geomLineEnd
outLayer= geomLineEnd(inLayermaxLength[minLength] [legs] [inBox] [outBox] )
Description
geomLineEnd selects edges at the end of a line. Line-ends are defined as horizontal, vertical or slanted edges at the end of polygonal lines. The adjacent lines must be perpendicular to the line end. A horizontal line-end is connected to two vertical legs. A vertical line-end is connected to two horizontal legs.
Arguments
Layer to which line edges are written
Layer whose line-ends are written to outLayer. inLayer may be a polygon layer or an edge layer. If inLayer is an edge layer, the adjacent leg edges are still required.
Value that specifies the longest possible edge that qualifies as a line-end. Line segments longer than this value are never line-ends.
Optional value that specifies the shortest possible edge that qualifies as a line-end. Line segments shorter than this value are never line-ends.
legs( { length | lengthmultiplier relative } )
A leg is an edge on the polygon that is adjacent to a line-end edge. Leg edges are used to determine if an edge is in an end-configuration or step-configuration. Typical step and line end configurations are shown below.

The legs length specifies the minimum length of the adjacent edges needed to make the line-end valid. Both adjacent edges must be at least that length before the line-end is selected. You can specify the legs length as an absolute length or as a relative length.
Keyword used to allow the qualifying legs length to vary according to the size of the line-end. For example, legs( 1.2 relative) means that the minimum legs length to qualify a 1 um edge as a line-end is 1.2 um. The minimum legs length for a .5 um edge is 0.6 um. This allows some degree of aspect ratio to be used in selecting end lines.
As shown below, both legs must be present and long enough for an edge to qualify as a line-end. Legs must be perpendicular to the end edge. If a legs option is not used, no leg length checking is done, but both legs must be present for an edge to qualify as a line-end.

inBox( { length [width] | lengthmultiplier [widthmultiplier ] relative } )
This checks a minimum penetration depth the edge has on the polygon. It is an alternative method for selecting end lines. For each end line candidate, a box of the specified length which penetrates into the polygon must lie inside the polygon.

A box is formed which penetrates into the polygon. The width of the box may be clipped by obscuring edges as shown above. When the box is not completely clipped and its width meets the width requirement, the whole edge is selected as a line-end edge.
You can specify the inBox length and width numbers as an absolute value or as a relative value to the length of the line-end. The relative keyword is used in a similar way as in the legs specification. The multiplier creates inBox length and width values based on the line-end length.
For example, geomLineEnd( inLayer 2 inBox( 1.2 0.9 relative) ) requires that a line-end that is 1 um long must have an unclipped inBox 1.2 in length and 0.9 in width to qualify as a line-end. A line-end that is 2 um long must have an inBox that is 2.4 in length and 1.8 in width to qualify as a line-end.
outBox( { length [extension] | lengthmultiplier [extensionmultiplier] relative } )
This checks whether the polygon edges are inside or coincident to the outbox edges. For each candidate edge, a box which is a little wider than the edge is constructed and a test made to see if the polygon is contained in the box. The only valid exit direction is opposite the edge.
In the figure example below, the line end on the left has an OutBox drawn to the right. Its length and extension are specified in the outBox argument list. Since the polygon exits the box on the right, it is taken as a line-end. If the polygon had exited on any other side, it would have been disqualified and the edge would not be copied to the outLayer.

inBox length is specified due to the extra work done in clipping the penetration box. Performance also decreases when outBox values are given since an extended search is done to see where the polygon exits.
If multiple requirements are specified, all must pass before the edge is copied to the outLayer. Thus if both legs and inBox are used, both must be satisfied.
Examples
Example 1
If all the edges in the figure below are less than 1000 um, geomLineEnd(layer 1000) copies 1, 2, 5, and 8 to outLayer. The decision is based solely on how the adjacent edges are oriented. A more reasonable maxLength would be smaller, say 2. In this case the very long edges are filtered but, the edges 1, 2, 5, and 8 are selected.

The fastest way to select edges 1 and 5 and reject edges 2 and 8 is with the legs specifier. Note that the two adjacent edges for 1 and 5 are long while edges 2 and 8 each have one short leg. By requiring two long legs 2 and 8 get rejected. geomLineEnd( layer 2.0 legs(1.5)) rejects edges 2 and 8 in its most efficient mode.
Other configurations may exist where legs may give inaccurate results.
Example 2
In the figure below, edges 1 and 2 are rejected because the legs are too small yet they could be considered to be ends. Although legs is fast, it doesn’t look at enough of the polygon to always make good decisions. To address this, the outBox specifier was created.
geomLineEnd( inLayer 2 outBox( 1.2 relative)) (more expensive than legs) selects edges 1 and 2. It also selects edges 1 and 5, and rejects 2 and 8. However, outBox by itself may still select too many edges.
Example 3
In the figure shown below, outBox selects edge 1 if it is shorter than maxLength. outBox is not sensitive to the nearby edge 2 of the polygon. For this reason, inBox was created. inBox projects a box into the polygon. In this case, edge 2 clips the inside box making the inBox too short to qualify edge 1 as a line-end. The command that ignores edge 1 is geomLineEnd( 1 0.2 inBox( 1 .5 relative) (outBox 1 0.2 relative) ).

geomNodeRelate
[outLayer=] geomNodeRelate( inLayer1 inLayer2 {conn|disc} )
Description
The geomNodeRelate command selects shapes or edges from inLayer1 based on nodal information on inLayer2. You must specify either the conn or disc keyword to select shapes or edges that have nodal information that is present, or is not present, on inLayer2.
All select commands maintain serial and net numbers of shapes in the output layer.
Fields
Name for the geomNodeRelate output.
Input layer names. Two layers must be specified and both must be connected.
Returns all shapes or edges on inLayer1 that have a node number present on inLayer2.
Returns all shapes or edges on inLayer1 that do not have a node number present on inLayer2.
padn = geomNodeRelate( nsd nbond conn )
geomOutside
[outLayer=] geomOutside( inLayer1 inLayer2 [selected|unselected] )
Description
The geomOutside command selects shapes on inLayer1 that are totally outside shapes on inLayer2. An inLayer1 shape is outside if none of its area is covered by area of an inLayer2 shape. Butting edges are considered outside.
All select commands maintain serial and net numbers of shapes in the output layer.
The following figure illustrates a geomOutside selection.
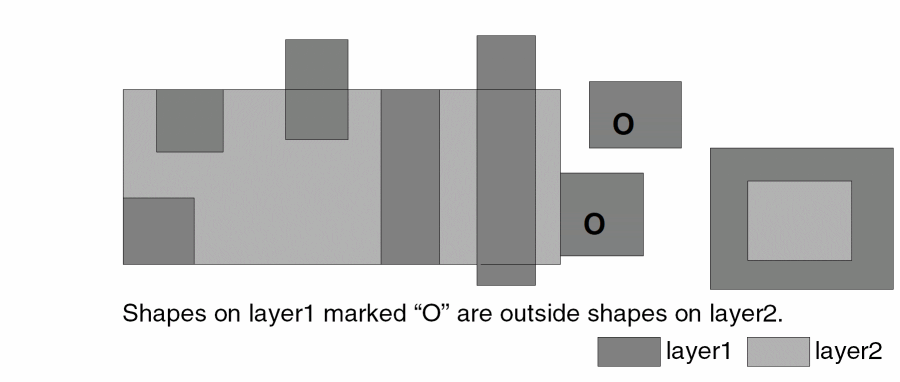
Fields
Name for the geomOutside output.
Input layer names. You can specify either a derived layer name or a graphics layer name. Two layers must be specified.
Optional modifier you can use to indicate that the shapes normally selected by the command are to be output. This is the default.
Optional modifier you can use to indicate that the shapes not normally selected by the command are to be output.
Example
The following example selects a derived layer outside an original layer.
pgate = geomOutside( gate "pwell" )
geomOverlap
[outLayer=] geomOverlap( inLayer1 inLayer2 [sameNet|diffNet] [limits] [includeZero|excludeZero] [onlyEven|onlyOdd] [exclusive] [selected|unselected] )
Description
The geomOverlap command selects shapes on inLayer1 that overlap shapes on inLayer2.
Overlap is any area common to shapes on both layers. An inLayer1 shape overlaps if it has any common area with an inLayer2 shape. Other relationships for the same shape do not affect the selection. An inLayer1 shape can be overlapping, butting, and coincident with a single inLayer2 shape and still be evaluated as overlapping.
All select commands maintain serial and net numbers of shapes in the output layer.
Prerequisites
If you use the connection modifier when using geomOverlap, the input layers you specify must be connected layers. The following figure illustrates a geomOverlap selection.
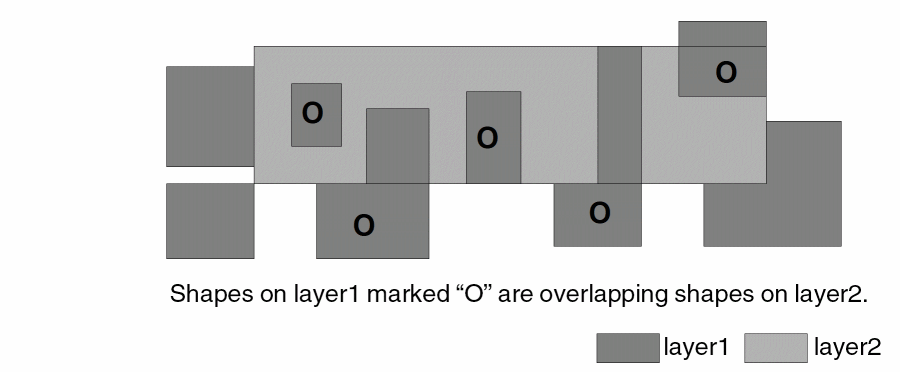
Fields
Name for the geomOverlap output.
Input layer names. You can specify either a derived layer name or a graphics layer name. Two layers must be specified.
Optional keyword to count the required relationship only when the shapes are on the same electrical net. May not be used with the diffNet keyword.
Optional keyword to count the required relationship only when the shapes are on different electrical nets. May not be used with the sameNet keyword.
Optional qualifier you can use to specify the number of shapes on inLayer2 that a shape on inLayer1 must be have the relationship with in order for it to be selected. The number of inLayer2 shapes is specified using a limit or range containing one of the following keywords:
Operators you can use with the keywords are as follows:
You can use the following limit specifications:
 keep == 6
ignore < 2
2 < keep < 5
3 <= ignore <= 7
Optional qualifier you can use to control how a zero count is treated within a range limit. A shape on inLayer1 with no shape on inLayer2 having the required relationship is not selected, even if the limit range would be satisfied by a zero value. This is the default behavior.
Optional qualifier you can use to control how a zero count is treated within a range limit. A shape on inLayer1 with no shape on inLayer2 having the required relationship will be selected if the range limit is satisfied by a zero value.
Optional qualifier you can use to limit the number of separate shapes on inLayer2. If the program finds that the number of shapes on inLayer2 with the required relationship to inLayer1 is even, and meets any range limit given, then it selects the shape on inLayer1.
Optional qualifier you can use to limit the number of separate shapes on inLayer2. If the program finds that the number of shapes on inLayer2 with the required relationship to inLayer1 is odd, and meets any range limit given, then it selects the shape on inLayer1.
Optional modifier you can use to select shapes on inLayer1 that conform to the required relationship but that do not have any other relationship with other shapes on inLayer2.
When you specify the sameNet or diffNet options, the shape on inLayer1 is not selected if shapes on inLayer2 have the required relationship but do not have the required net connections.
Shapes on inLayer2 that only butt the shape on inLayer1 do not prevent the selection of the shape on inLayer1.
This relational command is intrinsically exclusive. The only relationship the command does not cover is external butting, and the command ignores any butting shapes.
However, the exclusive modifier is meaningful when considering the sameNet and diffNet options. To satisfy the exclusive request, all interacting shapes must conform to the sameNet or diffNet relationship.
For example, consider what happens if you use the exclusive modifier in combination with the sameNet option. If the shape on inLayer1 is on net number 25, and multiple interacting shapes on inLayer2 are all on net number 25, the exclusive request is not violated. However, if one of the interacting shapes on inLayer2 is on net number 34, the shape has a relationship that does not conform to the sameNet requirement. The requested exclusive sameNet relationship is violated.
Optional modifier you can use to indicate that the shapes normally selected by the command are to be output. This is the default.
Optional modifier you can use to indicate that the shapes not normally selected by the command are to be output.
Examples
The following examples select shapes using geomOverlap with various options.
error1 = geomOverlap( "cut" gate )
error2 = geomOverlap( m1cut metal2 diffNet )
bridge = geomOverlap( lapcon metal sameNet ignore <= 2 )
geomStraddle
[outLayer=] geomStraddle( inLayer1 inLayer2 [sameNet|diffNet] [limits] [includeZero|excludeZero] [onlyEven|onlyOdd] [exclusive] [selected|unselected] )
Description
The geomStraddle command selects shapes on inLayer1 that straddle shapes on inLayer2. An inLayer1 shape is straddling if part of its area is covered by an inLayer2 and part is not. Butting and coincident edges do not affect this command.
All select commands maintain serial and net numbers of shapes in the output layer.
Prerequisites
If you use a connection modifier when using geomStraddle, then the input layers you specify must be connected layers.
The following figure illustrates a geomStraddle selection.
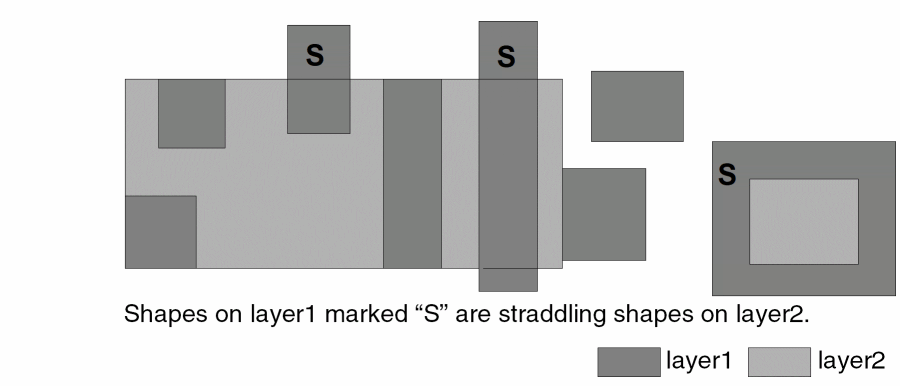
Fields
Name for the geomStraddle output.
Input layer names. You can specify either a derived layer name or a graphics layer name. Two layers must be specified.
Optional keyword to count the required relationship only when the shapes are on the same electrical net. May not be used with the diffNet keyword.
Optional keyword to count the required relationship only when the shapes are on different electrical nets. May not be used with the sameNet keyword.
Optional qualifier you can use to specify the number of shapes on inLayer2 that a shape on theinLayer1 must be have the relationship with in order for it to be selected. The number of inLayer2 shapes is specified using a limit or range containing one of the following keywords:
Operators you can use with the keywords are as follows:
You can specify limit or range as shown by the following examples:
 keep == 6
ignore < 2
2 < keep < 5
3 <= ignore <= 7
Optional qualifier you can use to control how a zero count is treated within a range limit. A shape on inLayer1 with no shape on inLayer2 having the required relationship is not selected, even if the limit range would be satisfied by a zero value. This is the default behavior.
Optional qualifier you can use to control how a zero count is treated within a range limit. A shape on inLayer1 with no shape on inLayer2 having the required relationship will be selected if the range limit is satisfied by a zero value.
Optional qualifier you can use to limit the number of separate shapes on inLayer2. If the program finds that the number of shapes on inLayer2 with the required relationship to inLayer1 is even, and meets any range limit given, then it selects the shape on inLayer1.
Optional qualifier you can use to limit the number of separate shapes on inLayer2. If the program finds that the number of shapes on inLayer2 with the required relationship to inLayer1 is odd, and meets any range limit given, then it selects the shape on inLayer1.
Optional modifier you can use to select shapes on inLayer1 that conform to the required relationship but that do not have any other relationship with other shapes on inLayer2.
When you specify the sameNet or diffNet options, the shape on inLayer1 is not selected if shapes on inLayer2 have the required relationship but do not have the required net connections.
Optional modifier you can use to indicate that the shapes normally selected by the command are to be output. This is the default.
Optional modifier you can use to indicate that the shapes not normally selected by the command are to be output.
Examples
The following examples select derived layers straddling original layers.
schottky = geomStraddle( collector "pbase" )
pulldown = geomStraddle( gate "implant" )
The following example illustrates the diffNet option.
error = geomStraddle( oscont metal diffNet )
The following example illustrates how connectivity information is passed through derived layers.
geomConnect( via( a b c ) )
e = geomStraddle( b f )
g = geomStraddle( e c sameNet )
Sizing Commands
You can change polygon or edge layers in these ways:
- For polygon input layers, you can use sizing commands to generate new polygons by oversizing or undersizing the layer. You can also oversize a layer while remaining within shapes on another layer.
- For edge input layers, you can use sizing commands to expand an edge into a rectangle, expand a chain of edges into a polygon, or make an edge longer or shorter.
geomGrow
[outlayer=] geomGrow( in_layer right top [left [bottom]] )
Description
The geomGrow command sizes a layer in one or more directions. Positive distances cause growth. Negative distances cause shrinkage. Zero can be used to prevent sizing in a direction. At least one direction must be non-zero. Grow and shrink cannot be used together. The left and right directions are parallel to the x axis, the top and bottom directions are parallel to the y axis.
Fields
Layer name for the geomGrow result.
Name for the layer to be sized. Only polygons are allowed.
The distance to size the shape in the right direction.
The distance to size the shape in the upward direction.
The optional distance to size the shape in the left direction. If left is not given, the value of right is used.
The optional distance to size the shape in the downward direction. If bottom is not given, the value of top is used.
Example
The following example illustrates the geomGrow command.
foo = geomGrow( cont 0.2 0.3 )
bar = geomGrow( cont 0.2 0.3 0.2 0.3 )
upright = geomGrow( cont 0.2 0.2 0 0 )
downleft = geomGrow( cont 0 0 0.2 0.3 )
oddshrink = geomGrow( cont -0.1 -0.2 -0.1 -0.4 )
geomGrowCorner
outLayer = geomGrowCorner( inLayer [size] [selector] [location] )
Description
The geomGrowCorner command creates squares at the corners defined by inLayer. One point of the square will be coincident with the corner. The opposing point of the square will be along the bisector of the angle. If the angle of the corner is less than 90 degrees, the square will be deformed by stretching the opposing point along the bisector until the edges touching the corner are coincident with the edges forming the corner. For non-manhattan corners, rounding may cause the square to deform and the edges to vary in length.
Fields
The layer to contain the generated squares. Since the squares may overlap, the layer is considered to be raw.
A layer generated by the geomGetCorner command.
An optional positive numeric value which defines the length of the edges of the square. If not given, a value of five times database resolution is used.
An optional keyword which selects the corners for which squares will be created. The inner keyword selects corners with an angle less than 180 degrees. The outer keyword selects corners with an angle greater than 180 degrees. The default is to select all corners in inLayer.
An optional keyword which controls the placement of the square. The inside keyword places the square inside the polygon the corner was selected from. The outside keyword places the square outside the polygon the corner was selected from. The default is to place a square both inside and outside.
Examples
a = geomGetCorner( m1 manhattanOnly )c = geomGrowCorner( a 0.01 inner inside )
b = geomGrowCorner( a 0.05 )
d = geomGrowCorner( a 0.01 outer outside )
geomSize
[outLayer=] geomSize( inLayer size [edges] [raw] [unmerged] [unmergedIn] [unmergedPut] [chain] [downUp] [{inside|outside}(layer)] )
Description
The geomSize command performs an over-size or under-size operation on the specified layer. A size operation consists of changing the absolute dimensions of shapes without altering their dimensions relative to each other. Shapes that grow into one another are merged together. Acute angles are truncated. Optionally, the growth can be limited to be within shapes on another layer.
The following figure illustrates the polygon size operations.

- Butting shapes cannot pull apart in a negative sizing operation since the layer has been previously merged, and construction lines (such as donut hole exit lines) are automatically removed. Similarly, shapes that were separate originally and extend into each other during a positive sizing operation are merged into a single shape.
- Polygons changed by geomSize maintain their original shape except when there are shape features that are less than or equal to twice the size value. Holes and notches disappear in a positive grow, and narrow sections disappear in a negative grow.
Acute-angle corners undergo special processing by the program. To avoid extension of an acute corner out of proportion in a positive sizing, the corner is truncated by the program.

Acute angle truncation is not performed during negative sizing.
The amount of truncation used by the program is the square root of 2 times the size value to match the maximum extension of the shape at a 90-degree corner.
You can use the edges option to size the edges of a shape. The following figure illustrates edge sizing.
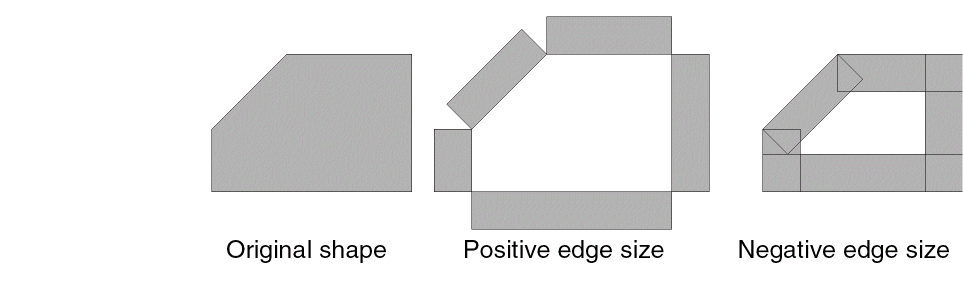
- Each edge is expanded out into a rectangle whose width is the size value. Positive sizing puts the rectangles on the outside of the original shape, and negative sizing puts the rectangles on the inside of the original shape. The resultant shapes are not merged together if they overlap.
- If the original layer is composed of edges, rather than shapes, this is the default sizing mode. Outside and inside is determined by the edge direction, which is determined by the shape from which the edge originated.
You can use the chain option with an edge input file to grow sequences of edges that will form some part of a polygon perimeter as if they were still a polygon. The following figure illustrates chain sizing.
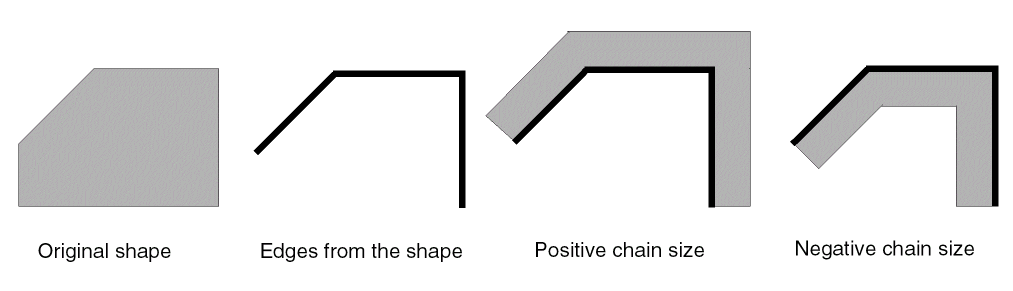
Fields
Name for the geomSize output. The program always generates a polygon layer for geomSize.
Input layer name. This layer can be either a derived layer name or a graphics layer name. It can be a polygon layer or an edge layer. Edge layers imply the edge option unless the chain option is given.
Integer or floating point number defining the amount of the size operation. It can be negative or positive. Zero is not allowed.
Optional keyword that expands edges into rectangles. This implies the unmergedOut option.
Optional keyword that performs chain sizing of edges. This implies the unmergedOut option.
Optional keyword that causes shapes to be undersized by the distance, then oversized by that same distance.
May be used with the raw option, but not with edge, chain, or an edge layer.
Equivalent to the unmergedIn with unmergedOut options.
Equivalent to the unmergedIn with unmergedOut options.
Optional keyword that specifies the shapes on the input layer are not merged together on input. Shapes in the input layer that overlap are sized separately. Has no effect if the input layer is already merged.
Optional keyword that specifies the shapes are not merged together on output. Shapes that overlap as a result of the sizing operation stay separate in the output layer. This is the default when the edges or chain options are used.
Functionally equivalent to a geomAnd of the sizing result with the specified layer. Only valid with polygon sizing options.
Functionally equivalent to a geomAndNot of the sizing result with the specified layer. Only valid with polygon sizing options.
Example 1
The following examples illustrate the geomSize command.
cblock = geomSize( "cut" 2 )
terms = geomSize( gate 1.25 edges )
widemet = geomSize( geomSize( met -1.5 ) 1.5 )
widemet = geomSize( met 1.5 downUp )
The first widemet example produces wide metal by first under-sizing the metal to remove any narrow sections, in this case less than or equal to 3 wide, and then over-sizing the result to return the remaining shapes to their original size. The second widemet example shows the same operation using the downUp option. Care should be taken with these two examples since angled edges of a shape may not grow as expected due to rounding.
Example 2
The following example works with the drc command to flag contacts that violate the line end requirement of having no two adjoining edges within a specified limit. This uses the behavior of the chain option that causes an edge without a shared endpoint to grow into a rectangle, but two edges that share an endpoint will grow into a polygon.
edge = drc( met1 cont enc < 2 edgeb )
mark = geomSize( edge 0.01 chain )
errs = geomGetVertex( mark keep > 4 )
geomSizeAnd
[outlayer=] geomSizeAnd( in_layer limit_layer increment distance )
Description
The geomSizeAnd command oversizes a layer while restricting the results to be within another layer. This command is effectively a series of geomSize and geomAnd command pairs where each geomSize command uses the increment value until the sum of the increments is equal to the distance value. If the last increment would cause the sum to be greater than distance, the value that will make the sum exactly distance is used.
Fields
Layer name for the geomSizeAnd result.
Name for the layer to be sized.
Name of the layer that constrains the sizing.
Size to grow in each step. The increment should be as large as possible to reduce the number of steps, but small enough that the result of the grow for each step cannot extend into another limit shape. Slightly less than the minimum sepNotch value for the limit layer is usually a good value to use.
The total distance to grow, using increment steps. The distance does not have to be a multiple of the increment.
Example
The following example illustrates the geomSizeAnd operation.
tubsize = geomSizeAnd( tubtie tub 5 18 )
This is effectively the same as:
a = geomAnd(tubtie tub)
b = geomSize(a 5) inside(tub))
c = geomSize(b 5) inside(tub))
d = geomSize(c 5) inside(tub))
tubsize = geomSize(d 3) inside(tub))
geomSizeAndNot
[outlayer=] geomSizeAndNot( in_layer limit_layer increment distance )
Description
The geomSizeAndNot command oversizes a layer while restricting the results to be outside another layer. This command is effectively a series of geomSize and geomAndNot command pairs where each geomSize command uses the increment value until the sum of the increments is equal to the distance value. If the last increment would cause the sum to be greater than distance, the value that will make the sum exactly distance is used.
Fields
Layer name for the geomSizeAndNot result.
Name for the layer to be sized.
Name of the layer that constrains the sizing.
Size to grow in each step. The increment should be as large as possible to reduce the number of steps, but small enough that the result of the grow for each step cannot extend across a limit shape. Slightly less than the minimum width value for the limit layer is usually a good value to use.
The total distance to grow, using increment steps. The distance does not have to be a multiple of the increment.
Example
The following example illustrates the geomSizeAndNot operation.
tubsize = geomSizeAndNot( tubtie tub 5 18 )
This is effectively the same as:
a = geomAndNot(tubtie tub)
b = geomSize(a 5) outside(tub))
c = geomSize(b 5) outside(tub))
d = geomSize(c 5) outside(tub))
tubsize = geomSize(d 3) outside(tub))
geomSizeInTub
[outlayer=] geomSizeInTub( contact_layer tub_layer size [sides] [edge] )
Description
The geomSizeInTub command can be used to check the electrical integrity of wells.
Tub-tie checks are based on the physics of how a MOSFET works. The following figure illustrates a MOSFET, 4-terminal device.

Electrical isolation between the source and the drain is maintained by keeping the junctions between them and the tub in a strong reversed bias state. Because the tub resistivity is not negligible, the voltage on the right can be lower than the voltage on the left, which is near the n+ tub-tie. Where the voltage is lower, the p-n junction becomes forward biased and turned on.
From left to right, there is a pnpn configuration. This is the configuration of a silicon controlled rectifier. Once turned on, it stays on and can only be turned off by disconnecting it from the voltage source.
The solution is to guarantee that all transistors are close to a tub-tie, the n+ region. The farther away the transistor from the tub-tie, the more likely the reverse bias voltage is low. Since this is a resistance effect, the measurement of close means how far current must flow through the tub to get to the transistor. A direct measurement of the distance from the transistor to the tub-tie is insufficient as is shown in the figure.
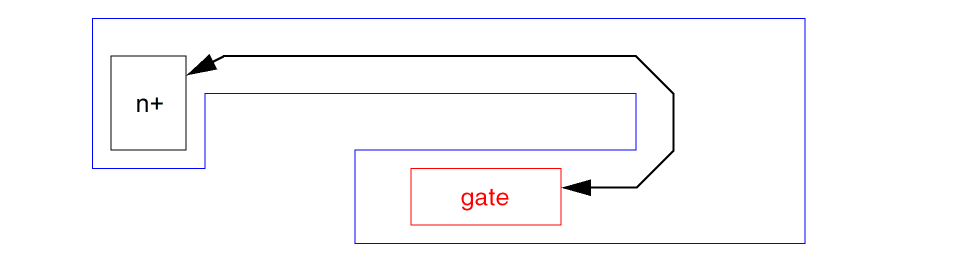
The current must flow around the corner to get to the diffusion area near the transistor gate. This distance is much longer than the direct distance from the gate to the tub-tie.
Measuring distances around bends is not a traditional operation of verification programs but is a necessary one. Diva approximates the exact measurement with simplified shapes.
Two methods are available. The first is referred to as Center Of Mass and is only useful when tub ties are relatively small squares or circle approximations. The second of From Edges and is more accurate when tub ties are large or more complex shapes.
Center of Mass Method
The first step is to approximate each tub-tie contact as a single point, called the apex. This is done by calculating the center of mass of each tub tie. The precise shape of the tub-tie is not considered. Each tub-tie is treated as a point. This point is the center from where distances are measured.
Around each tub tie center of mass point a regular polygon is formed as a collection of wedges. This polygon is an approximation to a circle.
Wedges are processed one at a time with the sequence of operations.
-
Each wedge is ANDed with the well. This removes any part of the wedge outside the well. It might also break the wedge into pieces if an obstruction is in the way.
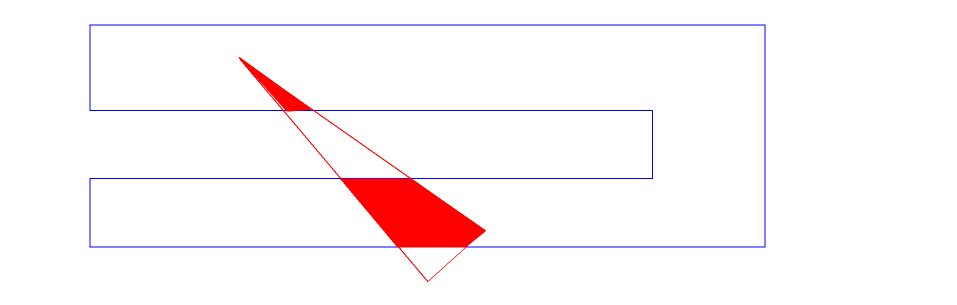
-
Select those wedge parts that touch the apex. This has the effect of rejecting the area that must be accessed by turning a corner. This leaves the area that is directly visible to the apex.
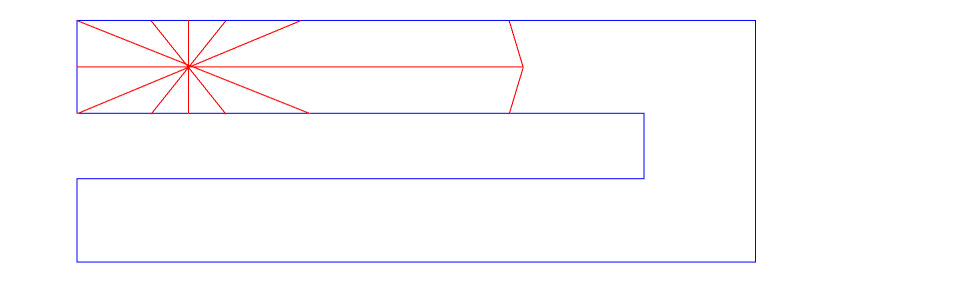
-
After the wedge is ANDed, a search is made to find vertices from the tub layer that face inward and are directly visible to the apex. A new collection of wedges, with a smaller radius, is centered on the new point and the process starts again. This allows the program to walk around corners.
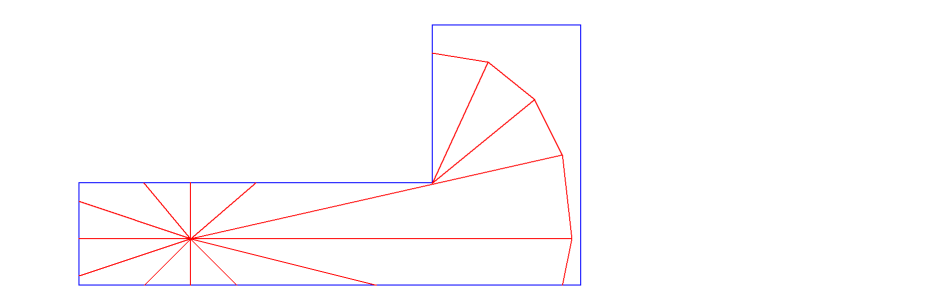
The following figure illustrates the final result on the original problem definition example (with the gate too far from the contact).
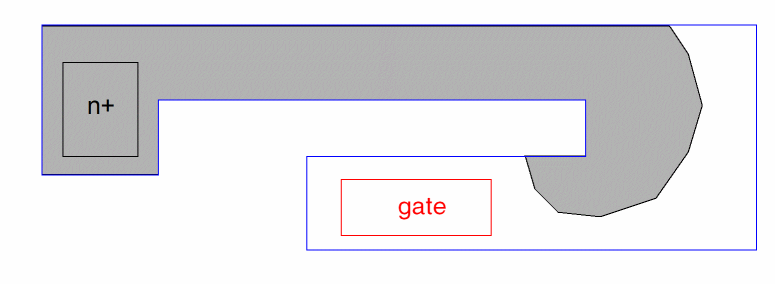
Wedges that totally encompass a corner, or a hole in the tub, are split at the corner into multiple wedges and the corner is used as a new starting (reflection) point.
Since the ends of the wedges are straight lines and not arcs, the circumference of an area encompassed by this check only approximates a circle. The higher the number of wedges used, the better the approximation. When two sets of wedges form different starting points (for example, reflection points intersect), there is not necessarily an exact match of the circumference edges. This results in small steps in the resultant shape. This is clarified using the illustration.
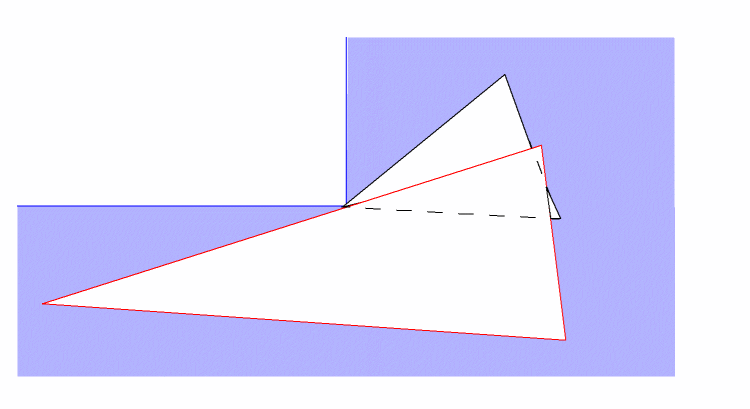
Because of this behavior, it is recommended that the output of this command not be used in any subsequent command that would be susceptible to these steps. An example would be a positive geomSize.
Side Count Limitations
The Diva internal algorithms are based on an integer grid. If you specify a side count of one million, the wedge would be so narrow that it would degenerate into a zero-area polygon when projected onto the integer grid.
The maximum number of sides allowed is limited by the integer grid and by the sizing value. The program checks the width of a wedge and adjusts the side count so that the width is at least 4 units. Even if one million edges are specified, you see much fewer edges in the output shape. Despite this automatic adjustment, it is not recommended that large side counts be used due to the non-linear increase in runtime associated with side count. Through experimentation, you will find that a side count of 32 or less is generally adequate.
This effect impacts reflection points whose resultant sizing value can be quite small. If the grow size for a reflection point gets so small that a wedge that meets the four unit width requirement cannot be made, then that reflection point is discarded.
From Edges Method
The From Edges method grows each edge of the contact as a rectangle, followed by growing the corners using wedges in the same way the Center Of Mass method does from the apex point. As shown in the figure below, rectangle shapes will grow into rectangles with round corners. When obstructions to the growth are found, the growth will wrap around the corners as described for the Center Of Mass method.

Fields
Layer name for the geomSizeInTub result.
Name for the layer to be treated as contacts.
Name of the tub layer that determines the bounds constraining the sizing.
Distance to grow, measured from the center of mass of the contact.
Optional number of wedges to create for each contact point. The minimum value allowed is 4. The larger the value, the better the resolution of the sizing, at the expense of run time. The default value is 8.
Optional keyword that causes growth to be from the edges of the shape instead of the center of mass.
Example
The following example illustrates the geomSizeInTub operation.
tubsize = geomSizeInTub(tubtie tub 10 16)
geomStretch
[outLayer=] geomStretch( inLayer stretch )
Description
The geomStretch command takes each edge of a polygon or edge layer and extends or reduces the edge by the amount you specify.
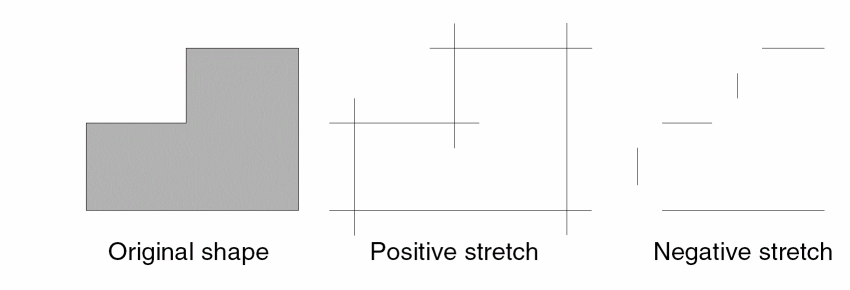
Fields
Name for the geomStretch output. The program always generates an edge layer.
Input layer name. This layer can be either a derived layer name or a graphics layer name. The layer name can be a polygon layer or an edge layer.
If the input is an edge layer, no consideration is made of the vertex points of the original polygons from which the edges were derived. If the input is a polygon layer, each edge is considered independently of the polygon from which it came. The output is always an edge layer.
Integer or floating point number you use to define the amount of the stretch operation. It can be negative or positive. A positive value of stretch extends each end of the edges by that stretch value. The edges do not change their absolute location. A negative value of stretch reduces the edge length at each end by the stretch value.
Examples
The following examples illustrate the geomStretch operation.
cut_range = geomStretch( "cut" 2 )
limits = geomStretch( close_poly 2.75 )
geomStretchCorner
outLayer = geomStretchCorner( inLayer size )
Description
The geomStretchCorner command modifies the corners produced by a geomGetCorner command. If the corners were output as triangles, the length of the legs coincident with the edges forming the corners is changed. If the corners were output as edges, the length of the edges is changed.
Fields
The layer to contain the modified corners. Since the triangles or edges may overlap, the layer is considered to be raw.
A layer generated by the geomGetCorner command.
A positive numeric value which defines the length of the edges or legs of the triangles to be produced.
Examples
a = geomGetCorner( m1 manhattanOnly )c = geomStretchCorner( a 0.01 )
b = geomStretchCorner( a 0.05 )
geomWidth
[outLayer=] geomWidth( inLayer keep {>|>=} width)
Description
The geomWidth command returns the portion of the input shapes which meet the width requirement of the size option. This is functionally equivalent to using the geomSize command to shrink, then grow, the shapes.
Note: When writing rules using the geomWidth command, it should be remembered that sizing operations are subject to integer grid roundoff. This is rarely an issue for Manhattan and 45 degree shapes, but can easily produce unexpected results for all angle data.
Fields
Name for the geomWidth output.
Input layer name. This layer can be either a derived layer name or a graphics layer name. The layer must be a polygon layer.
Integer or floating point number you use to define the minimum size of the resulting polygons. It must be positive and follow the keep keyword and a greater than relational operator. If the relational operator does not include equality, the input shapes must be wider than width to produce output.
Examples
The following example illustrates the geomWith operation.
wide = geomWidth( met1 keep > 2 )
narrow = geomAndNot( met1 wide )
General Selection Commands
General selection commands let you select specific kinds of shapes, or shapes with certain characteristics, such as angled edges or texted area. After selecting the shapes, you can use them in verification checking.
Most general selection commands maintain net numbers of shapes in the output layer. The only exceptions are geomGetMacro, geomGetPurpose, and geomGetByLayer, which select from original graphics data that could not have been connected.
geomContactCheck
[outLayer=] geomContactCheck( inLayer [length_limit] [width_limit] [ignore] [swap])
Description
The geomContactCheck command selects all rectangles on the input layer whose edges are not only parallel to the axes, but also satisfy the optional length and width limits; it then copies them to the output layer. Similar to geomGetRectangle, with the difference that the ignore keyword includes polygons in addition to rectangles outside the limits.
This command maintains the serial and net numbers of shapes in the output layer.
Fields
Output layer name. This is a polygon layer.
Input layer. This layer can be either a derived layer name or a graphics layer name.
Length of the long axis of the rectangle. If specified, only rectangles that have a length that satisfies the limit are selected. Specify the limit or inclusive range containing the keyword length and one or two constants with the following operators:
Width of the long axis of the rectangle. If specified, only rectangles that have a width that satisfies the limit are selected. Specify the limit or inclusive range containing the keyword width and one or two constants with the following operators:
An optional keyword that reverses the behavior of the command. Rectangles that would normally be selected are ignored and those that would be ignored are selected. All polygons are also selected. Use of this keyword requires one or both of length_limit and width_limit.
An optional keyword that causes rectangles which fail the limit test to be retested with the width and length values exchanged. Use of this keyword requires one or both of length_limit and width_limit.
Examples
The following examples illustrate the geomContactCheck selection.
rect_cuts = geomContactCheck( "cut" )
simple_gate = geomContactCheck( gate )
small_cuts = geomContactCheck( "cut" length < 2 )
large_cuts = geomContactCheck( "cut" length < 2 ignore )
geomEncloseRect
[outLayer=] geomEncloseRect( inLayer length width [manhattanOnly] [ignore] )
Description
The geomEncloseRect command selects input layer polygons which can enclose a rectangle of the specified length and width, where edges of the enclosed rectangle are horizontal and vertical, or at a 45 degree angle.
This command preserves serial numbers, if the input is merged, and net numbers if the input is connected.
Fields
Output layer name. This is a polygon layer.
Input layer name. This layer must be a polygon layer.
The length of the rectangle to be used for the enclosure check. Must resolve to a positive, non-zero, internal unit integer value.
The width of the rectangle to be used for the enclosure check. Must resolve to a positive, non-zero, internal unit integer value. If the width is greater than the length, the values will be exchanged internally.
Optional keyword that limits the enclosure test to rectangles that have only horizontal and vertical edges.
Optional keyword that causes the polygons that cannot enclose a rectangle of the specified length and width to be selected.
Example
result = geomEncloseRect( poly 0.90 0.180 )
result = geomEncloseRect( poly 0.90 0.180 manhattanOnly )
result = geomEncloseRect( poly 0.90 0.180 ignore )
result = geomEncloseRect( poly 0.180 0.90 manhattanOnly ignore )
geomGetAdjacentEdge
[outLayer=] geomGetAdjacentEdge( inLayer refLayer )
Description
The geomGetAdjacentEdge command selects input layer edges that are adjacent to the reference edges. More specifically, this command selects input layer edges that have a head-to-tail relationship with edges of the reference layer.
If all polygons are considered to be a sequence of connected edges, tracing around the polygon in a counterclockwise direction traverses each edge from its tail point to its head point. An edge of the input layer is selected if its head point touches a tail point of an edge on the reference layer, or its tail point touches a head point of an edge on the reference layer.
The following figure illustrates the geomGetAdjacentEdge command.
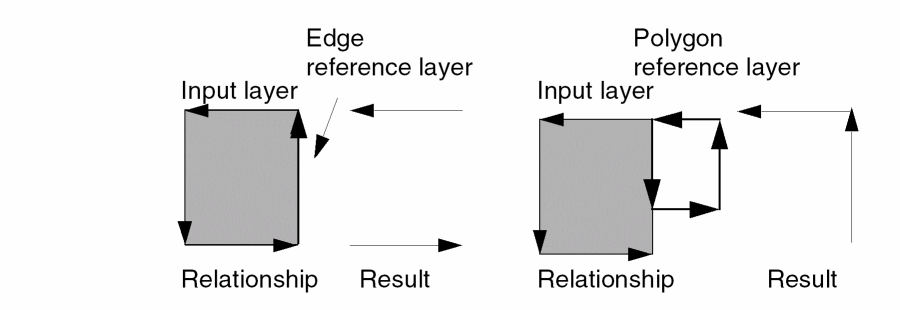
This command maintains the serial and net numbers of shapes in the output layer.
Fields
Output layer name. This is an edge layer.
Input layer name. This layer can be either a derived layer name or a graphics layer name. It can be either a polygon layer or an edge layer.
Edge or polygon layer that acts as a reference layer.
Example
The following example illustrates the geomGetAdjacentEdge selection. The metal at the end of a cut has a higher clearance than at the sides of the cut. The sides are found directly by a DRC enclosure check with the metal. This command then gets the cut ends, given those sides.
cut_end = geomGetAdjacentEdge( cut cut_side )
geomGetAngledEdge
[outLayer=] geomGetAngledEdge( inLayer angle [fig] [mode] )
Description
The geomGetAngledEdge command selects edges or shapes from the input layer by their angle relative to the X and Y axes.
This command maintains the serial and net numbers of shapes in the output layer.
Fields
Optional polygon or edge layer name as output.
Input layer name. This layer can be either a derived layer name or a graphics layer name. The layer you specify can be either a polygon layer or an edge layer unless you specify the fig option. If you specify the fig option, the input layer must be a polygon layer. If you specify a graphics layer name, Diva merges that layer prior to processing this command.
The angle an edge must have for it to be selected. The interpretation of the angle is dependent on the mode switch provided. Specify a value using a limit or inclusive range containing one of the following keywords:
You can use the following operators with the keywords:
The mode switch determines whether you can define a negative angle. Typical formats of the angle definition are
angle <= 45
 angle > 10
-45 < angle < +45
The angle of an edge is measured totally independently of the polygon from which the edge came. The inside or outside concepts applied to polygons and their edges are not considered when measuring angle.
This optional keyword defines the way in which the specified angle is interpreted by Diva. There are four mode switches, including mode1, mode2, mode3, and mode4. The default is mode1.
The following sections describe the four modes.
The angle or range of angles is specified as a positive value relative to the X or Y axis. All edges having a positive or negative angle conforming to this specification relative to the X axis are selected. This effectively specifies the angle in the first quadrant and mirrors it through X and Y into the other quadrants.
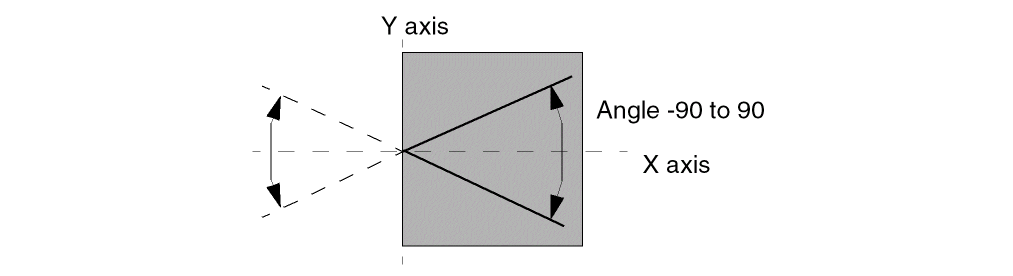
The angle or range of angles is specified as a positive or negative value relative to the X axis. All edges having a positive or negative angle conforming to this specification relative to the X axis are selected. This effectively specifies the angle in quadrants 1 and 4 and mirrors it through Y to quadrants 2 and 3.
-50 < angle < 55 -90 < angle < 0
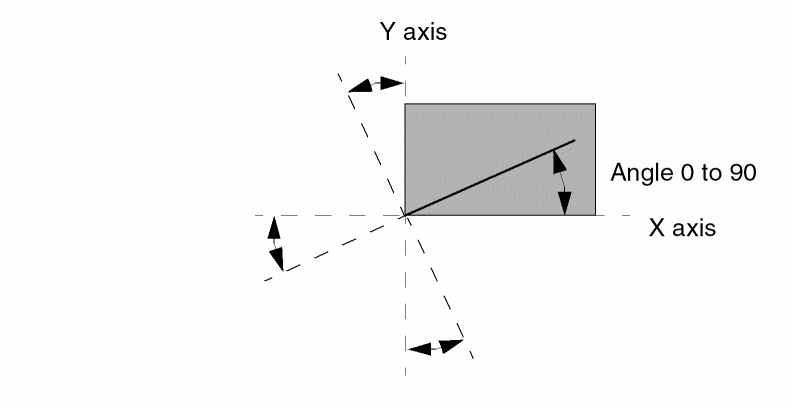
The angle or range of angles is specified as a positive value relative to the X axis. All edges having a positive angle conforming to this specification relative to the X axis or Y axis are selected. This effectively specifies the angle in quadrant 1 and rotates it through all other quadrants.
Specifies that the figure containing the selected edge is passed to the output rather than to the edge itself. This applies only to polygon input layers.
Examples
The following examples illustrate the geomGetAngledEdge selection.
fortyfives = geomGetAngledEdge( gate angle == 45 fig )
app45 = geomGetAngledEdge( gate 43 < angle < 47 fig )
negs = geomGetAngledEdge( "poly" -90 < angle < 0 mode2 )
orth1 = geomGetAngledEdge( metal 0 <= angle < 2 mode4 )
orth2 = geomGetAngledEdge( metal 88 < angle <= 90 mode4)
Note that slanted edges are converted to manhattan edges before being grown.
geomGetCorner
outLayer = geomGetCorner( inLayer {[angle] | [limit [increment]]} [edge])
Description
The geomGetCorner command finds polygon corners based on the angle formed by the edges that define the corner.
Fields
The layer to contain the corners selected. If the edge option is not given, small triangles are output using the corner point and a point five times the database resolution away from the corner along the edges that form the corner. The exact length may vary due to rounding when the edge is not manhattan. Since the triangles may overlap, the layer is considered to be raw.
A merged polygon layer from which corners are to be selected.
A keyword used to define the angle of the corners to be selected. The angle of a corner is measured from inside facing edge to inside facing edge. A rectangle has four 90 degree corners. A L shape has five 90 degree corners and one 270 degree corner.
The keyword manhattanOnly requires that the edges forming the corner be parallel to the X and Y axis. If no angle or limit is given, this is the default.
The keyword angleMulti90 requires that the edges forming the corner have an angle that is a multiple of 90 degrees.
The keyword angleMulti45 requires that the edges forming the corner have an angle that is a multiple of 45 degrees.
The keyword angleAll selects all corners.
The keyword convex requires that the edges forming the corner have an angle that is less than 180 degrees.
The keyword concave requires that the edges forming the corner have an angle that is greater than 180 degrees.
Option to select corners with an angle that meets the range given. The range has an upper and a lower limit, which must be positive and not greater than 360, though only one is required. If the lower limit is not given, zero is used. If the upper limit is not given, 360 is used. The range takes either of two forms:
lower operator keyword operator upper
== value
The allowed operators are <, <=, > and >=.
The keyword may be keep to select corners with an angle within the range or ignore to select corners with an angle outside the range.
An optional modify used with the limit to cause the range to be repeated by incrementing the lower and upper limits by the value given. The increment value must be positive. An illustrative example:
44.7 < keep < 45.8 increment = 90
will select corners with angles in the following ranges:
44.7 < keep < 45.81
34.7 < keep < 135.8
224.7 < keep < 225.8
314.7 < keep < 315.8
An optional output modifier that causes the edges forming the corner to be output. The edges will have one endpoint at the corner and the other five times the database resolution away from the corner along the edge. The exact length may vary due to rounding when the edge is not manhattan.
Examples
a = geomGetCorner( m1 manhattanOnly )
b = geomGetCorner( m1 44 < keep < 46 )
c = geomGetCorner( m1 ignore == 22.5 increment = 45 edge )
geomGetEdge
outLayer = geomGetEdge( inLayer [op opLayer ... ] [wholeEdge] )
Description
The geomGetEdge command selects edges or edge segments from the first input layer by their relationships to shapes on other layers. Those parts of the edges of the first layer that conform to the total relationship defined to other layers are selected.
The geomGetEdge command is intended for extraction of edges for DRC, data manipulation, and plotting. You cannot use geomGetEdge to generate data for parameter and parasitic extraction.
There is a limit of eight layers the program processes in a single geomGetEdge command. If you exceed this limit, the program aborts during rule compilation and displays an error message.
All operations you specify in a single geomGetEdge command are executed at the same time. The program does not preprocess data to extract a layer subset with the defined relationship. Also, the program processes multiple geomGetEdge commands using the same layers at the same time. The result is that additional complex commands can be added for a small increase in run time.
If the first layer referenced in the command is connected, its node numbers are propagated to the output layer. A layer is connected if it has been allocated node numbers with a geomConnect command, or any command that propagates node numbers.
pint = geomGetEdge( poly inside tub )
If poly is connected, the layer pint is allocated its node numbers.
Serial number are propagated to the output layer.
Fields
Edge layer name for the output.
Edge or polygon input layer name. This layer can be either a derived layer name or an original graphics layer name. This layer contains the edge segments that are selected and copied to the output layer.
A combination of operator and layer for the initial relationship between edges of inLayer and opLayer. The opLayer must be a polygon layer. Additional op opLayer pairs may be given.
You can use the following operators:
Edge coincidence between inLayer and opLayer at a point where the areas of the layers do not overlap.
Edge coincidence between inLayer and opLayer at a point where the areas of the layers do overlap.
Edges of inLayer that are outside the area of opLayer and are not butting.
Edges of inLayer that are inside the area of opLayer and are not coincident.
Edges of inLayer that are outside the area of opLayer, including those conforming to the butting operator.
Edges of inLayer that are inside the area of opLayer, including those conforming to the coincident operator.
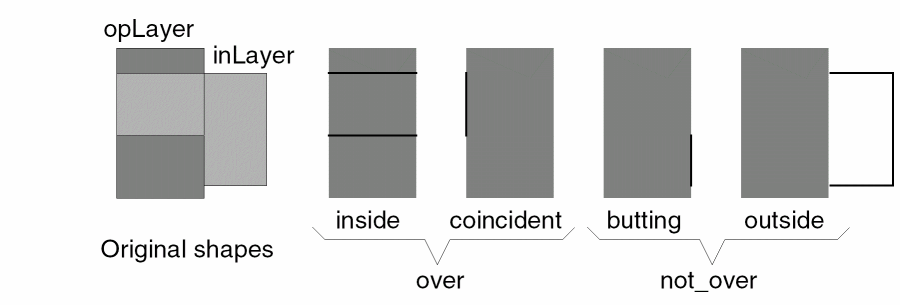
Optional keyword which causes the entire edge from inLayer to be output instead of the sub-edge which is in the specified relationship.
Examples
The following examples illustrate how you can use the geomGetEdge command to extract the sides of gates, possibly for gate length or some other parametric measurement.
gateside = geomGetEdge( gate coincident diff )
ngateside = geomGetEdge( gate coincident diff over nplus )
The following example illustrates extracting a specific edge of diffusion to enable more complex design rule analysis.
diffside = geomGetEdge( diff outside poly over
           pwell not_over welltap )
The following figure illustrates a complex layer relationship.
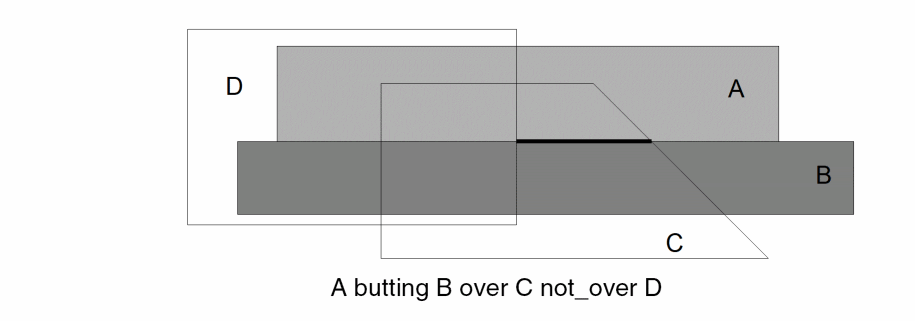
The following figure illustrates the same complex layer relationship with the wholeEdge keyword.
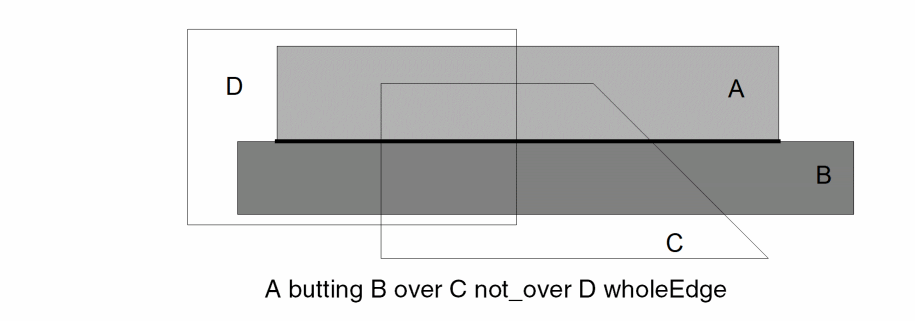
geomGetHoled
[outLayer=] geomGetHoled( inLayer )
Description
The geomGetHoled command selects all polygons from the input layer that contain holes.
A hole is an area created when the perimeter of a polygon touches itself, enclosing an area that is not the polygon. These holes are sometimes referred to as “donut holes.”
This command maintains the serial and net numbers of shapes in the output layer.
Fields
Input layer name. This layer can be either a derived layer name or a graphics layer name.
Examples
The following examples illustrate the geomGetHoled selection.
holed_metal = geomGetHoled( "aluminum" )
holed_diff = geomGetHoled( diffusion )
geomGetLength
[outLayer=] geomGetLength( inLayer length [contiguous] [fig]
[outLayer2 = unselectedEdges] )
Description
The geomGetLength command selects edges from the input layer by their individual length or by the summed length of a contiguous sequence of edges.
The following figure illustrates the geomGetLength command.
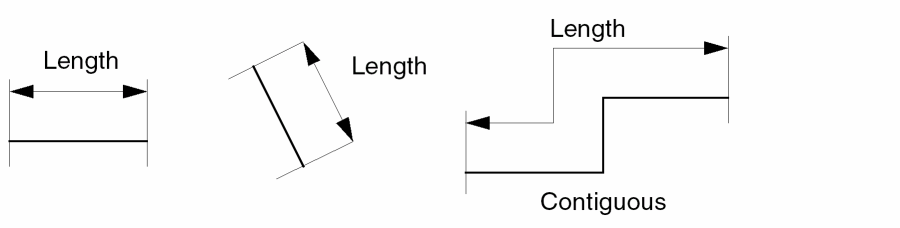
This command maintains the serial and net numbers of shapes in the output layer.
Fields
Edge layer name, or, if you use the fig option, a polygon layer name.
Polygon or edge layer as an input layer. This layer can be either a derived layer or graphics layer.
Length an edge or contiguous sequence of edges must have for it to be selected. Specify a value using a limit or inclusive range containing one of the following keywords:
You can use the following operators with the keywords:
Specifies that the check is not made on the length of individual edges, but on the sum of lengths of contiguous edges. Edges are contiguous if their ends meet at the same coordinate.
If you specify this option with a polygon input layer, the perimeter of each polygon is checked. If the polygon has holes, the outside perimeter and the hole perimeter are considered separately.
You can specify the optional fig keyword with polygon layer input and/or the contiguous option to generate figure (polygon) output rather than edge output. Without the fig keyword, the program generates individual edges as output regardless of the input format and contiguous option.
If the input is a polygon layer and you specify the contiguous option, the length includes the outside perimeter of the polygon plus the perimeter of any holes in the polygon.
Optional second output layer to receive the inLayer edges which are not written to outLayer. May not be used with the fig option.
Examples
The following examples illustrate the geomGetLength command.
long_poly_edge = geomGetLength( "poly" length > 50 )
long_gate_edge = geomGetLength( gate-side length > 10
                 contiguous )
mid_dfig = geomGetLength( diffn 8 < length < 30
           contiguous fig )
geomGetNet
[outLayer=] geomGetNet( inLayer text [text ...] )
Description
The geomGetNet command selects shapes from the input layer by the name of the electrical net to which they belong. The program copies from the input layer to the output layer any shape that is part of a net having one of the net names you provide.
This command maintains the serial and net numbers of shapes in the output layer.
Prerequisites
The input layer you specify must have been previously referenced in a geomConnect command to extract the circuit connectivity. The names of the nets you request with this command must have been defined by pins or text labels.
Fields
Optional polygon layer output name.
Polygon layer for an input layer. This must be a derived layer name since the layer must have been processed by a geomConnect command or be derived from layers processed in a geomConnect statement by commands that retain the net information.
Text strings in quotes. Each text string represents the name of a net and must correspond to a pin name or label in the circuit. You can use wildcard characters following Diva verification conventions for using wildcards. (See the “Using Wildcards” section in Chapter 4 of this manual.)
Examples
The following examples illustrate the geomGetNet command.
geomConnect(
   via( cont metal poly pplus nplus)
   label( "text" metal )
   )
power_met = geomGetNet( metal "vdd1" "vdd2" )
ground_tie = geomGetNet( nplus "gnd" )
geomGetNon45
[outLayer=] geomGetNon45( inLayer [fig] )
Description
The geomGetNon45 command selects edges from the input layer if they are not parallel to the x and y axes of the circuit and are not at an angle of 45 degrees to them. With the fig option, the shapes are selected if any of the edges conform to the criteria.
This command maintains the serial and net numbers of shapes in the output layer.
Fields
Optional polygon or edge layer name as output.
Input layer name. This layer can be either a derived layer name or a graphics layer name. The layer can be either a polygon layer or an edge layer unless the fig option is specified, in which case it must be a polygon layer.
Specifies that the figure containing the selected edge is passed to the output rather than the edge itself. This only applies to polygon input layers.
Examples
The following examples illustrate the geomGetNon45 selection.
badedge = geomGetNon45( "poly" )
badgate = geomGetNon45( gate fig )
geomGetNon90
[outLayer=] geomGetNon90( inLayer [fig] )
Description
The geomGetNon90 command selects edges from the input layer if they are not parallel to the x and y axes of the circuit. If you specify the fig option, the command selects complete shapes if any of their edges are not parallel to the x and y axes.
This command maintains the serial and net numbers of shapes in the output layer.
Fields
Optional output layer name. This is a polygon or edge layer.
Input layer name. This can be either a derived layer name or a graphics layer name. The layer can be either a polygon layer or an edge layer unless you specify the fig option, in which case the layer must be a polygon layer.
Specifies that the figure containing the selected edge is passed to the output rather than to the edge itself. This applies only to polygon input layers.
Examples
The following examples illustrate geomGetNon90 selection.
badedge = geomGetNon90( "poly" )
badgate = geomGetNon90( gate fig )
geomGetNonRectangle
[outLayer=] geomGetNonRectangle( inLayer [outLayer2 = unselectedShapes] )
Description
The geomGetNonRectangle command selects all shapes that are not rectangles. This is the reverse of geomGetRectangle. Equivalent to the geomGetPolygon command.
This command maintains the serial and net numbers of shapes in the output layer.
Fields
Input layer name. This layer can be either a derived layer name or a graphics layer name.
Optional second output layer name to contain the shapes not selected into outLayer. Must be followed by the assignment operator and the unselectedShapes keyword.
Examples
The following examples illustrate the geomGetNonRectangle selection.
non_rect_cuts = geomGetNonRectangle( "cut" )
complex_gate = geomGetNonRectangle( gate )
polys = geomGetNonRectangle( gate rects = unselectedShapes )
geomGetPolygon
[outLayer=] geomGetPolygon( inLayer [outLayer2 = unselectedSHapes] )
Description
The geomGetPolygon command selects all shapes that are not rectangles. This is the reverse of geomGetRectangle. Equivalent to the geomGetNonRectangle command.
This command maintains the serial and net numbers of shapes in the output layer.
Fields
Input layer name. This layer can be either a derived layer name or a graphics layer name.
Optional second output layer name to contain the shapes not selected into outLayer. Must be followed by the assignment operator and the unselectedShapes keyword.
Examples
The following examples illustrate the geomGetPolygon selection.
non_rect_cuts = geomGetPolygon( "cut" )
complex_gate = geomGetPolygon( gate )
polys = geomGetPolygon( gate rects = unselectedShapes )
geomGetRectangle
[outLayer=] geomGetRectangle( inLayer [length_limit] [width_limit] [ignore] [swap])
Description
The geomGetRectangle command selects all rectangles on the input layer whose edges are not only parallel to the axes, but also satisfy the optional length and width limits; it then copies them to the output layer.
This command maintains the serial and net numbers of shapes in the output layer.
Fields
Output layer name. This is a polygon layer.
Input layer. This layer can be either a derived layer name or a graphics layer name.
Length of the long axis of the rectangle. If specified, only rectangles that have a length that satisfies the limit are selected. Specify the limit or inclusive range containing the keyword length and one or two constants with the following operators:
Length of the short axis of the rectangle. If specified, only rectangles that have a width that satisfies the limit are selected. Specify the limit or inclusive range containing the keyword width and one or two constants with the following operators:
An optional keyword that reverses the behavior of the command. Rectangles that would normally be selected are ignored and those that would be ignored are selected. Use of this keyword requires one or both of length_limit and width_limit.
An optional keyword that causes rectangles which fail the limit test to be retested with the width and length values exchanged. Use of this keyword requires one or both of length_limit and width_limit.
Examples
The following examples illustrate the geomGetRectangle selection.
rect_cuts = geomGetRectangle( "cut" )
simple_gate = geomGetRectangle( gate )
small_cuts = geomGetRectangle( "cut" length < 2 )
large_cuts = geomGetRectangle( "cut" length < 2 ignore )
geomGetTexted
[outLayer=] geomGetTexted( inLayer textLayer text [text ...] )
Description
The geomGetTexted command selects shapes from the input layer by the value of labels placed on them. Shapes are selected by the program if the origin of the label is over the area of the shape.
The program selects polygons on inLayer for inclusion on outLayer if they contain within their boundaries the origin point of any label on textLayer with the text string specified. The command might miss a polygon that has the origin of a label on its boundary.
The following figure illustrates the geomGetTexted command.
Optimization is performed by processing in parallel all geomGetTexted and geomGetUnTexted commands having the same input and text layers.
This command maintains the serial and net numbers of shapes in the output layer.
Fields
Polygon input layer name. This layer can be either a derived layer name or a graphics layer name.
The original graphics layer containing the text strings to be used.
The layer definition can have two formats:
Text strings, each enclosed in quotes. If any one or more of the text strings you specify is the value of a label on the textLayer, and the label origin is on a shape of the input layer, that shape is selected by the program.
The characters you use in text strings can be any characters the graphics editor allows you to place in a label. You can use wildcard characters following the Diva verification conventions for wildcards. (See the section, “Using Wildcards” in Chapter 4 of this manual.)
Each string can have multiple instances; each instance of a string selects a different polygon for a single geomGetTexted command. Each instance of a string can be used by multiple geomGetTexted commands to select from different layers. A single shape on an input layer can be selected multiple times by different strings in multiple geomGetTexted commands.
Examples
The following examples illustrate the geomGetTexted command.
resistor = geomGetTexted( "polysilicon" "text" "res" )
all_res = geomGetTexted( "polysilicon" "text" "res1" "res2" )
diode = geomGetTexted( base "mytext" "d" )
metlab = geomGetTexted( ( "metal" "label" ) "clock*" )
geomGetUnHoled
[outLayer=] geomGetUnHoled( inLayer )
Description
The geomGetUnHoled command selects all shapes from the input layer that do not contain holes.
A hole is an area created when the perimeter of a polygon touches itself, enclosing an area that is not the polygon. You sometimes refer to these holes as “donut holes.”
This command maintains the serial and net number of those shapes which are copied from the input layer to the output layer.
Fields
Input layer name. This layer can be either a derived layer name or a graphics layer name.
Examples
The following examples illustrate the geomGetUnHoled command.
unholed_metal = geomGetUnHoled( "aluminum" )
unholed_diff = geomGetUnHoled( diffusion )
The following example illustrates finding the innermost empty hole:
innermostEmpty = geomGetUnHoled(geomHoles(m1 voids))
The following example illustrates finding the innermost hole which may, or may not, contain shapes:
innermost = geomGetUnHoled(geomHoles(geomGetHoled(m1) voids))
geomGetUnTexted
[outLayer=] geomGetUnTexted( inLayer textLayer text [text ...] )
Description
The geomGetUnTexted command selects input layer shapes that do not have certain text strings. Shapes are not selected if the origin of the text string is over the area of the shape or on any of its edges.
Polygons on inLayer are copied to outLayer if they do not contain within or on their boundaries the origin point of any text item or text layer consisting of text string.
The following figure illustrates the geomGetUnTexted command.
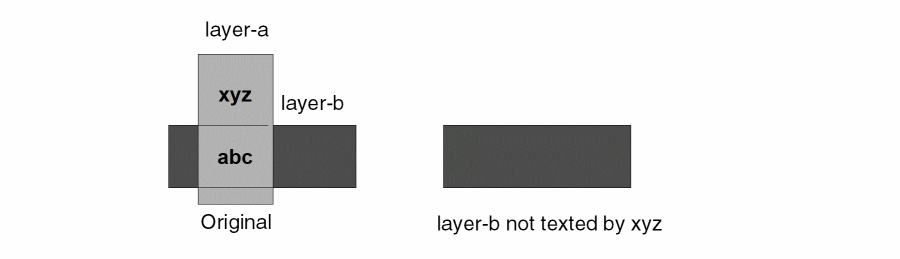
This command maintains the serial and net numbers of shapes in the output layer.
Fields
Optional polygon layer output name.
Polygon layer as an input layer name. This layer can be either a derived layer name or a graphics layer name.
Graphics layer containing the text strings.
Text strings, each enclosed in quotes. If any one or more of the text strings you specify is on the textLayer, and the text string origin is on a shape of the input layer, that shape is not selected by Diva.
The characters you use in text strings can be any characters that the graphics editor lets you place in a label. You can use wildcard characters following Diva verification conventions for using wildcards. (See the section, “Using Wildcards” in Chapter 4 of this manual.)
Examples
The following examples illustrate the geomGetUnTexted command.
non_PG = geomGetUnTexted( "metal" "text" "vdd" "vss" )
collector = geomGetUnTexted( ndiff "mytext" "e" )
geomGetVertex
[outLayer=] geomGetVertex( inLayer limits )
Description
The geomGetVertex command selects all shapes on the input layer that have a vertex count matching the limit or within the range you specify in the limits argument.
This command maintains the serial and net numbers of shapes in the output layer.
Fields
Output layer name. This is a polygon layer.
Input layer name. This layer can be either a derived layer name or a graphics layer name.
Limits specifies the number of vertices a shape must have before it is selected by Diva. Specify the value by using a limit or range containing one keyword. The options are as follows:
|
Select the shape if the number of vertices equals the limit or is within your specified range. |
|
|
Reject the shape if the number of vertices equals the limit or is within your specified range. |
You can use the following operators with the keywords:
You can use the following limit specifications:
 keep == 6
ignore < 4
6 < keep < 10
5 <= ignore <= 8
Examples
The following examples illustrate the geomGetVertex selection.
triangles = geomGetVertex( "poly" keep < 4 )
l_gates = geomGetVertex( gate keep == 6 )
geomSelectEdge
[outLayer =] geomSelectEdge( inLayer [length range] angle1(range [length range])
[angle2(range [length range])] )
Description
The geomSelectEdge command selects edges based on their characteristics and those of their adjacent edges. The primary characteristic is the inside angle formed between the edge and it’s adjacent edges. The length of the edge and the adjacent edges may also be considered.
For each input edge, the command finds the adjacent edges which form the smallest inside angle with the input edge. The angle1 and angle2 measurements are made using these edges. If length ranges are given for the adjacent edges, they are measured and associated with their respective angles. If an adjacent edge is not present, the angle and length are considered to be zero. The angles and lengths are compared against the angle1 and angle2 ranges given. If they do not meet the criteria, they are exchanged and compared again. If the first or second comparison succeeds, the edge is selected unless the edge itself does not meet the optional length range.
The output layer will be an edge layer. Serial and net numbers from inLayer are preserved.
Fields
Name of the layer to select edges from. This layer may be a shape or an edge layer.
A keyword introducing a range. The length of the edge must satisfy the condition of the range for the edge to be selected. When used within the angle1 or angle2 parameters, the length of the adjacent edge is used.
A standard range specification using keep or ignore. Angles are measured in degrees. Lengths are measured in user units.
Required keyword introducing the first adjacent edge relationship to be tested. The range is the inside angle between the edge and the adjacent edge.
Optional keyword introducing the second adjacent edge relationship to be tested. The range is the inside angle between the edge and the adjacent edge. If not given, any adjacent edge is considered to be in the proper relationship.
Examples
Select the edges greater than eight units in length which have obtuse angles at each end.
geomSelectEdge(data length keep > 8 angle1(keep > 90) angle2(keep > 90))
Select the edges which have an acute angle at either end.
geomSelectEdge(data angle1(keep < 90))
Select the edges of any length that have right angles at both ends where one of the adjacent edges is exactly one unit in length and the other is greater than one unit in length.
geomSelectEdge(data angle1(keep == 90 length keep == 1)
    angle2(keep == 90 length keep > 1))
Select the edges which lack one or more adjacent edges. This is only possible with an edge input layer. Note the use of the length range. Diva does not allow zero length edges, so even if the edge layer were produced in a way that created a top and a bottom edge forming an angle of zero, this would work as intended.
geomSelectEdge(rslt6 angle1(keep == 0 length keep == 0))
geomSepInside
[outLayer=] geomSepInside( device distance tie well [anyOutside|allOutside] )
Description
The geomSepInside command selects shapes, or portions of shapes, from the device layer that are more than the specified distance from shapes on the tie layer. Distance measurements are constrained to be within the well layer.
This command is effectively a geomSizeInTub followed by a geomOutside or geomAndNot, as determined by the optional keywords.
Serial and net numbers from the device layer are preserved.
Fields
Name of a layer to select shapes from. In a latch up check, this is the device recognition layer, sometimes with the source and drain diffusion regions included, depending on foundry requirements.
The distance within which every device layer shape must be of one or more tie layer shapes. This distance is measured within shapes on the well layer by wrapping around corners.
Name of a layer to measure distance to device layer shapes. In a latch up check, this is the layer used to connect the well to a power rail.
Name of a layer describing the area within which tie layer shapes are recognized and which bounds the distance measurement. In a latch up check, this is the well the device layer shapes are contained in.
Optional keyword causing selection of the portion of any device layer shape which is beyond the specified distance from all tie layer shapes. May not be used with the allOutside keyword. This is the default.
Optional keyword causing selection of any device layer shape with no portion of it’s area within the specified distance. May not be used with the anyOutside keyword.
Examples
The following examples illustrate the geomSepInside command.
err1 = geomSepInside(nmos 50 ptie pwell anyOutside)
err2 = geomSepInside(nmos 50 ptie pwell allOutside)
Which are equivalent to the following commands:
err1 = geomAndNot(nmos geomSizeInTub(ptie pwell 50 32 edge))
err2 = geomOutside(nmos geomSizeInTub(ptie pwell 50 32 edge))
geomSepOutside
[outLayer=] geomSepOutside( device distance tie well [anyOutside|allOutside] )
Description
The geomSepOutside command selects shapes, or portions of shapes, from the device layer that are more than the specified distance from shapes on the tie layer. Distance measurements are constrained to be outside the well layer.
This command is effectively a geomSizeInTub followed by a geomOutside or geomAndNot, as determined by the optional keywords.
Serial and net numbers from the device layer are preserved.
Fields
Name of a layer to select shapes from. In a latch up check, this is the device recognition layer, sometimes with the source and drain diffusion regions included, depending on foundry requirements.
The distance within which every device layer shape must be of one or more tie layer shapes. This distance is measured outside shapes on the well layer by wrapping around corners.
Name of a layer to measure distance to device layer shapes. In a latch up check, this is the layer used to connect the substrate to a power rail.
Name of a layer describing the area outside of which tie layer shapes are recognized and which bounds the distance measurement. In a latch up check, this is the well the device layer shapes are not contained in.
Optional keyword causing selection of the portion of any device layer shape which is beyond the specified distance from all tie layer shapes. May not be used with the allOutside keyword. This is the default.
Optional keyword causing selection of any device layer shape with no portion of it’s area within the specified distance. May not be used with the anyOutside option.
Examples
The following examples illustrate the geomSepOutside command.
err1 = geomSepOutside(pmos 50 ntie pwell anyOutside)
err2 = geomSepOutside(pmos 50 ntie pwell allOutside)
Which are equivalent to the following commands:
err1 = geomAndNot(pmos geomSizeInTub(ntie geomNot(pwell) 50 32 edge))
err2 = geomOutside(pmos geomSizeInTub(ntie geomNot(pwell) 50 32 edge))
Generation Commands
Generation commands let you generate geometric shapes from areas that are not drawn geometries. You can also supplement text labels on temporary layers for subsequent checking.
geomEmpty
[outLayer=] geomEmpty( )
Description
The geomEmpty command generates an empty derived polygon layer. You can use an empty layer in any command in which you can specify a normal derived polygon layer.
You can use this command to ensure that all branches in the flow of the rules file generate a specific layer so that subsequent rules do not fail because of a missing layer.
Field
Name for the geomEmpty output layer.
Example
In the following example, the lay1 layer is defined early in the rules and is used for various commands. The layer is redefined in ivIf branching. The then branch creates a new layer, and the else branch creates an empty layer.
If you do not define lay1 early in the rules, the geomEmpty command is not needed. Diva detects that lay1 is only generated in one branch of an ivIF switch, and Diva automatically generates an empty lay1 layer in the other branch.
lay1 = geomAnd( lay2, lay3 )
....
....
ivIf( switch( "A" )
   then
      lay1 = geomAnd( lay4, lay5 )
      ....
   else
      lay1 = geomEmpty()
      ....

)
geomExtent
[outlayer=] geomExtent( inLayer [fig] )
Description
The geomExtent command provides extent information about a layer. It generates a single rectangle that bounds all the shapes on the layer. Or, with the fig option, it generates a bounding rectangle for each shape.
Arguments
Layer name for the geomExtent output. outLayer contains a rectangle that is the bounding box around the data on inLayer.
Input layer name. This layer can be either a derived layer or a graphics layer.
A keyword to change the output from a single rectangle bounding all shapes on the input layer to bounding rectangles for each shape on the input layer.
Examples
The following examples show the basic use of the command.
m1e = geomExtent(m1)
m1se = geomExtent(m1 fig)
The following example shows how to use geomExtent in place of the geomBkgnd command when only certain layers should contribute to the background.
bkgnd = geomEmpty()
foreach( layer list( "well" "diff" "poly" "cont" "met1" "via1" "met2" )
sprintf(cmd "bkgnd = geomOr(bkgnd geomExtent(%s))" layer)
evalstring(cmd)
)
bkgnd = geomExtent(bkgnd)
bkgnd = geomSize(bkgnd 2)
geomGetBBox
[outlayer=] geomGetBBox( inLayer [length] [width] [outputInLayer|outputCenterMark] )
Description
The geomGetBBox command calculates the bounding box of the shapes on inLayer, compares the dimensions against the optional limits, then writes the selected shapes to outLayer.
Arguments
Layer name for the output. outLayer contains a shape for each shape selected from inLayer. By default, the bounding box of each selected shape is written.
Input layer name. This layer can be either a derived layer or a graphics layer.
Optional qualifiers you can use to select shapes from inLayer.
You can use the following operators with the length and width keywords:
You can use the following limit specifications:
 length == 6
width< 2
2 < length < 5
3 <= width <= 7
Optional keyword that copies the selected shapes to outLayer. If inLayer is connected, the nodal information will be copied to outLayer. If inLayer is raw, outLayer will be raw.
Optional keyword that creates a small rectangle on outLayer in the center of the bounding box for each shape selected from inLayer. The rectangle will be centered on the mathematical center of the bounding box.
The dimensions of the center marker will be determined by the on-grid state of the center point along each axis. If the center point is on-grid along an axis, the marker will be six Diva internal units along that axis. If the center point is off-grid along an axis, the marker will be five Diva internal units along that axis.
Examples
This example selects shapes that are very long, but narrow:
shapes = geomGetBBox(met1 length > 300 width < 10 outputInLayer)
This example checks that shapes on two layers are centered on each other:
cp1 = geomGetBBox(met1 outputCenterMark)
cp2 = geomGetBBox(met2 outputCenterMark)
err = geomEnclose(met2 geomXor(cp1 cp2))
saveDerived(err "met1 not centered on met2")
geomGetLayerBBox
[outlayer=] geomGetLayerBBox( [inLayer ...] )
Description
Creates a derived polygon layer containing a rectangle that represents the bounding box of all shapes on the input layers. Input layers can be original or derived, polygon or edge layers. geomGetLayerBBox differs from the geomGetBBox command, which outputs a bounding box for each shape of the input layer, instead of one bounding box for the layers as a whole.
If the bounding box length or width is less than 5 dbu (for example, an input of colinear horizontal edges), then the output dimension is extended to 5 dbu. If the input layer is empty, then the result is also an empty layer.
Arguments
Layer name for the geomGetLayerBBox output. outLayer contains a rectangle that is the bounding box around the data on the input layers.
Optional input layer name or names. This layer or list of layers can be either derived layer or graphics layers, or a combination of both.
Examples
The following example shows the basic uses of the command.
bkgnd = geomGetLayerBBox()
m1e = geomGetLayerBBox(m1)
mete = geomGetLayerBBox(m1 m2 m3)
geomHoles
[outLayer=] geomHoles( inLayer [voids|innermost|innermostEmpty]
[area] [length] [width] [extent(length width)] )
Description
The geomHoles command generates shapes consisting of all the holes in shapes of the input layer. A hole is an area created when the perimeter of a polygon touches itself, enclosing an area that is not the polygon. These are sometimes referred to as “donut holes.”
The command finds holes on a per shape basis. If a shape exists within the hole of another shape, there is no accounting for the enclosed shape. See the lower left hole in the figure below.To change this behavior, use the voids keyword.
The following figure illustrates geomHoles generation without the voids option.
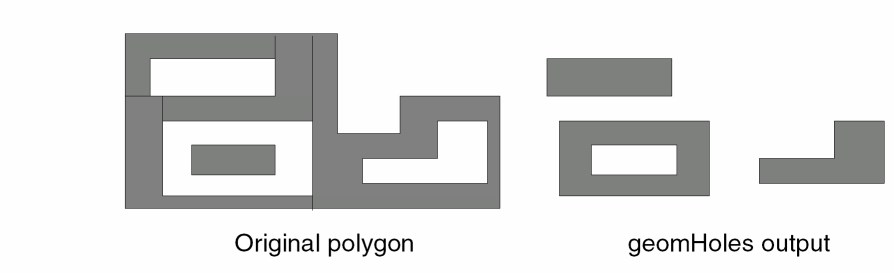
Fields
Layer name for the geomHoles output.
Input layer name. This layer can be either a derived layer or a graphics layer.
An optional keyword used to find holes which do not contain shapes with holes. The holes returned may contain shapes without holes. May not be used with innermostEmpty or voids.
An optional keyword used to find holes which do not contain any shapes. May not be used with innermost or voids.
With this optional keyword, a hole is defined as an area enclosed by a shape which is not covered by any shape. The following figure illustrates geomHoles generation when the voids keyword is used.
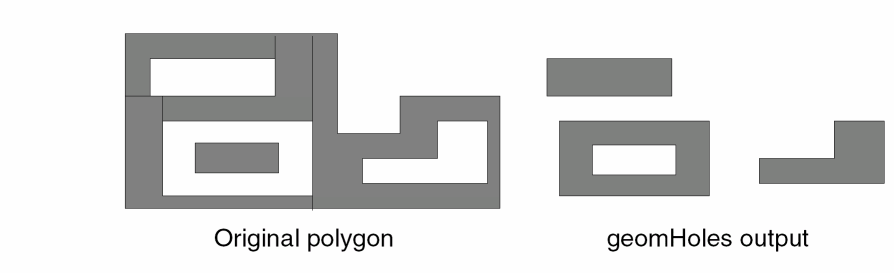
Length of the long axis of the bounding box of the hole. If specified, only holes that have a length that satisfies the limit are selected. Must be used when the width limit is used. May not be used with the area limit.
Specify the limit or inclusive range containing the keyword length and one or two constants with the following operators:
Length of the short axis of the bounding box of the hole. If specified, only holes that have a width that satisfies the limit are selected. Must be used when the length limit is used. May not be used with the area limit.
Specify the limit or inclusive range containing the keyword width and one or two constants with the following operators:
An optional format for specifying the length and width limits. Provided for compatibility with the Assura rule language.
Area of the hole. If specified, only holes that have an area that satisfies the limit are selected. May not be used with the length or width limit.
Specify the limit or inclusive range containing the keyword area and one or two constants with the following operators:
Examples
The following examples illustrate the geomHoles command.
tub = geomHoles( "guard_ring" )
diode = geomHoles( pbase )
voids = geomHoles( nbase voids )
innermost = geomHoles( m1 innermost )
bigSkinny = geomHoles( m2 extent(length > 10 width < 1) )
geomNoHoles
[outLayer=] geomNoHoles( inLayer )
Description
The geomNoHoles command generates new shapes consisting of all the original shapes of the input layer without the holes. A hole is an area created when the perimeter of a polygon touches itself, enclosing an area that is not the polygon. These are sometimes referred to as “donut holes.”
The following figure illustrates geomNoholes generation for a single original shape.
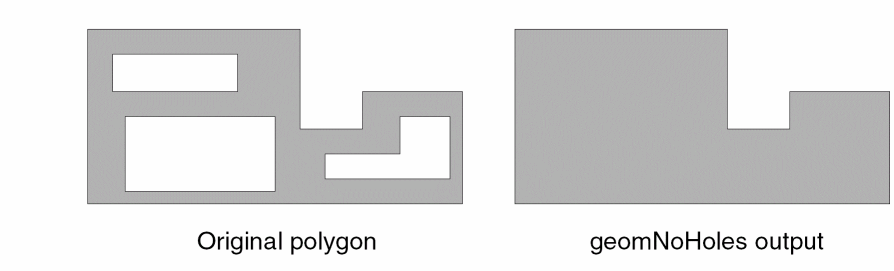
Fields
Name for the geomNoHoles output.
Input layer name. This layer can be either a derived layer name or a graphics layer name.
Examples
The following examples illustrate the geomNoHoles command.
barrier = geomNoHoles( "guard_ring" )
keepout = geomNoHoles( geomSize( diffn 5 ) )
Layer Storage and Removal
The Layer Storage and Removal commands let you save layers you have generated with other commands, or remove layers you no longer need in your database.
copyGraphics
copyGraphics( layer [all] [cell_view] )
Description
The copyGraphics command lets you copy data from the cellview being analyzed to another view.
Fields
Original graphics layer to be copied. If a purpose is specified, the layer and purpose must be enclosed in parenthesis and only that layer purpose pair will be copied to the output cellview. If no purpose is given, all purposes except boundary are copied to the output cellview. In both cases, the layer is copied to the drawing purpose, except if the boundary purpose is specified, in which case the output purpose will be boundary.
Keyword defining the levels of hierarchy from which data is to be copied. With the all option, data is copied from all levels of hierarchy. If you do not use this option, data is copied only from the top level of hierarchy.
Optional keyword that lets you copy data to the excell view during hierarchical extraction. If you do not specify the cell_view optional keyword, the default is:
Examples
The following example illustrates the copyGraphics command used to copy the text layer of drawing purpose from the top level of hierarchy.
copyGraphics( ( "text" "drawing" ) )
The following example illustrates the use of all the options.
copyGraphics( ( "label" "drawing" ) all cell_view )
errorLayer
errorLayer( inLayer [message] )
Description
The errorLayer command lets you save a layer into the graphics database as a marker. The errorLayer command can operate in the hierarchical mode, although you might get unexpected results. For more information about limitations for saving derived layers, refer to DRC Limitations of this manual.
Fields
Derived layer name or original graphics layer name in quotes, defining the layer to be saved. Any unmerged layer is merged when it is saved in the database.
Text string defining a message that Diva associates with any shape saved on the marker layer. Diva attaches the contents of the text string, exactly as specified, to each shape. You can view this message with the Explain Marker command.
The DRC program generates errors automatically on the marker layer with an associated text string. The message argument lets you supplement this error information with derived layers and still associate a text string with the shapes.
Examples
The following example illustrates the errorLayer command.
errorLayer( bad_via )
You can expand the previous example by adding a message to be associated with the error.
errorLayer( bad_via "Incorrectly formed vias" )
geomErase
geomErase( layer [purpose] )
geomErase( object variant )
Description
The geomErase command lets you delete shapes from a layer in the graphics database. It erases the shapes on the defined layer from the cellview you are verifying. Cellviews lower in the hierarchy are not affected. You can use this command at the beginning of a command file to erase layers stored during previous runs before they are saved again in the next run. The second syntax form is only available when the underlying database is OpenAccess and allows objects without a layer purpose pair to be erased.
When this command is used with incremental processing (as in DRC), erasure of layer data only occurs in your specified incremental processing area. Any shapes interacting with the area expanded by the maximum design rule dimension are removed. All shapes outside this area remain.
It is not necessary to erase the marker layer. Diva automatically removes any markers from previous runs. If you are running incrementally, or by area, only markers within the area being processed are erased. Similarly, the changed layer is automatically cleared during DRC processing.
?currentCell switch to prevent this by only executing the geomErase in the pass you generate the data in. See Improving Hierarchical DRC Performance, for more information about hierachical processing passes.Fields
Original graphics layer name, enclosed in quotes, defining the layer to be erased.
Layer purpose, enclosed in quotes. Only shapes on the specified layer with this purpose are erased by Diva. You can use any purpose defined in a layer purpose pair with the layer given. If you do not specify a purpose, the purpose drawing is used.
A keyword describing the type of the object to erase. The available object types are: boundary and blockage.
A keyword describing the variant of the object type, followed by any selection values required by the variant.
The boundary object supports the following variants: area, pr and snap. The area variant requires a string value which is the name of the areaBoundary to collect, and may be a Diva wildcard pattern.
The blockage object supports the following variants: placement, routing, wiring, fill, slot, pin, feedthru and screen. Except for the placement variant, a string value containing a layer name is required.
Examples
The following examples illustrate the geomErase command.
geomErase( "met1" )
geomErase( "met1" "boundary" )
geomErase( boundary area "met1*" )
geomErase( boundary pr )
geomErase( blockage placement )
geomErase( blockage routing "met1" )
saveDerived
saveDerived( inLayer [( layer purpose )] [object variant]
[view] [tile] [raw] [vertices n] [message] [limit] )
Description
The saveDerived command lets you save shapes to the graphics database. The saveDerived command can operate in the hierarchical mode, although you may see unexpected results. For more information about limitations for saving derived layers, refer to DRC Limitations of this manual.
Fields
Derived layer name or original graphics layer name in quotes, defining the layer to be saved.
Optional graphic layer consisting of a layer name and a purpose name to define which layer in the output cellview the input layer is to be saved on. You must specify the layer name and purpose name in quotes and enclose that pair in parentheses. The layer and purpose names must match a defined layer purpose pair. For example:
Optional argument to define which object and variant in the output cellview the input layer is to be saved on. The available object types are: boundary and blockage.
The boundary object supports the following variants: area, pr and snap. The area variant requires a string value which is the name of the areaBoundary to create. If the name includes the formatting characters "%d" multiple boundaries will be created, if needed, each with a unique number starting with 1. If no formatting characters are included, or the variant is pr or snap, only one boundary will be created and an error generated for any additional boundaries produced. For example:
 boundary area "met1"
boundary area "met1_%d"
boundary pr
The blockage object supports the following variants: placement, routing, wiring, fill, slot, pin, feedthru and screen. Except for the placement variant, a string value containing a layer name is required. For example:
blockage routing "met1"
blockage placement
If you do not specify a layer purpose argument, or an object variant argument, Diva defaults to the marker layer and error purpose. The default is equal to this definition:
Optional keyword to specify the view name in which you need to save the output data. The possible view names are as follows:
The keywords are useful only in their correct context. A saveDerived command with the abs_view keyword only functions during abstract generation. In any other context, such as the DRC or layout extraction, the abs_view keyword is ignored.
If you do not use the view keyword, Diva defaults to the layout view.
Optional keyword defining the format in which the output layer is to be saved.
When you use the tile option, the input shapes are sliced vertically into trapazoids and triangles (tiles).
If you do not use the tile option, Diva formats the output layer as polygons with a vertex count limit. Larger polygons are automatically broken up into smaller polygons within the vertex count limit.
Optional keyword to prevent merging of overlapping and butting input shapes when generating polygons. Without this keyword, overlapping and butting input shapes are merged.
Optional keyword to set a limit on the number of vertices that the generated shapes will have. An integer constant, or expression which evaluates to an integer value, follows this keyword. The value is limited to what is supported by the underlying database. The default is 200.
Text string defining a message that Diva associates with any shape saved on the marker layer. Diva attaches the contents of the text string, exactly as specified, to each shape. You can view this message with the Explain Marker command.
The DRC program generates errors automatically on the marker layer with an associated text string. The message argument lets you supplement this error information with derived layers and still associate a text string with the shapes.
The message is ignored if the outLayer is not the marker layer.
The optional modifier errorLimit allows the specification of a limit to the number of error markers which the command will produce. The keyword abort can be used to cause early termination of the entire run if the limit is reached. See errorLimit in the drc command for details. This modifier is only valid when saving to the marker layer of the input cellview.
Examples
The following example illustrates the saveDerived command with all its options set to the default mode. This example saves the data on the marker layer.
saveDerived( bad_via )
You can expand the previous example by adding a message to be associated with the error.
saveDerived( bad_via "Incorrectly formed vias" )
The following examples illustrate the saveDerived command using multiple options:
saveDerived( ref_layer ( "y0" "drawing" ) cell_view tile )
 saveDerived( wideMetal ( "marker" "warning" ) tile
             "metal wider than 5" )
saveDerived( bndLayer boundary area "met1_%d" ext_view )
Return to top