Run Settings for Verify Design
Following outlines the topics described in this section:
- Enable Dynamic Rule Filtering
- Customize Run options
- Set error browsing utility
- Snapshot Creation and Management
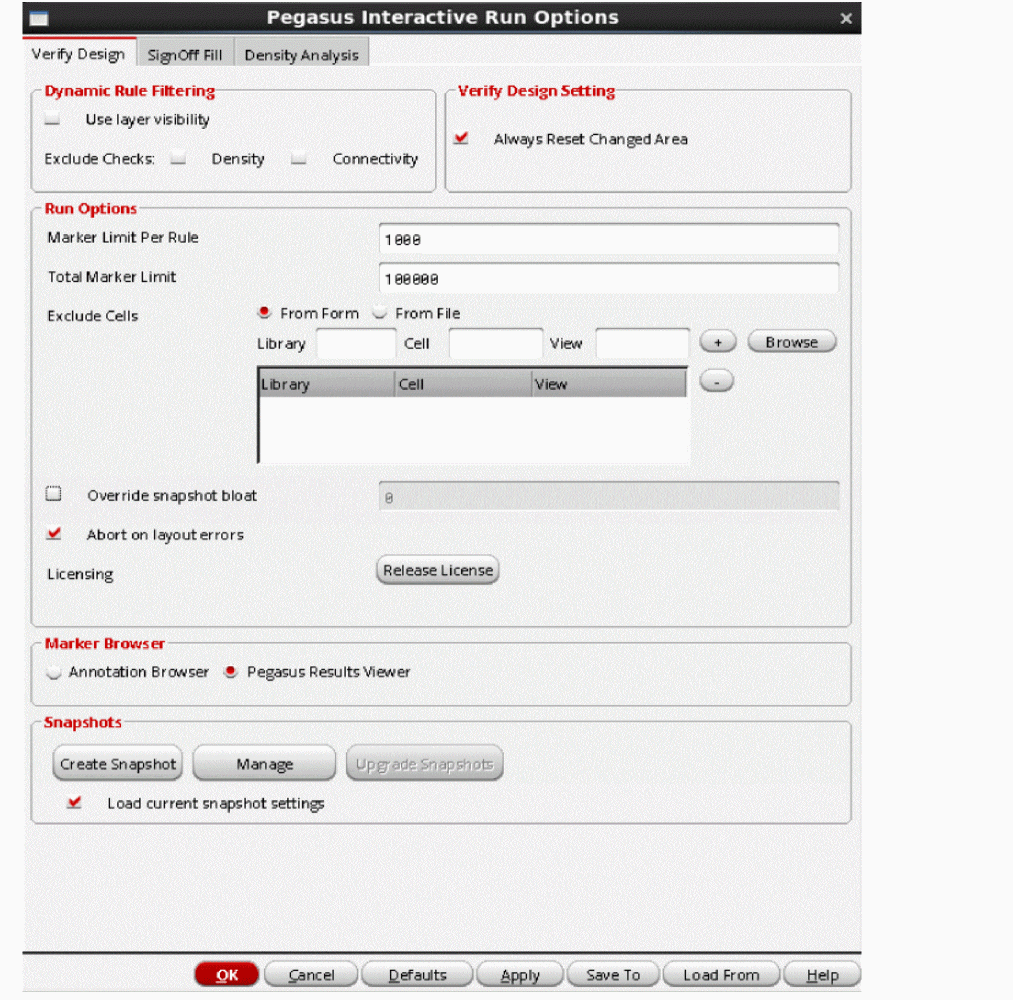
To interactively change current Pegasus Interactive behavior, you can invoke the Pegasus Interactive Run Options form by clicking on the Pegasus Interactive Run Options icon ![]() on the toolbar.
on the toolbar.
All options described in this section are applicable to entire Virtuoso session only, and are not window specific. If new layout is opened within the Virtuoso session, it will inherit settings set in the Pegasus Interactive Run Options form. Once Virtuoso session is closed, the options interactively set by you are not retained.
Dynamic Rule Filtering (DRF)
Pegasus Interactive has a built-in intelligence to select rules based on the layer visibility. In other words, you can ask Pegasus Interactive to select checks based on current visible layers displayed in the Palette. To effectively use this feature, this dynamic rule filtering capability should be paired up with Virtuoso valid LPP utility. Then, Pegasus Interactive further performs rule selection based on current visible layers display status in the Palette. Essentially, it becomes a What-You-See-Is-What-You-Check utility when they are paired up. Tool makes the assumption that for any visible layer displayed in the Palette that matters to you, you only want to ensure editing does not introduce any unforeseen DRC violations which are avoidable during layout editing and planning.
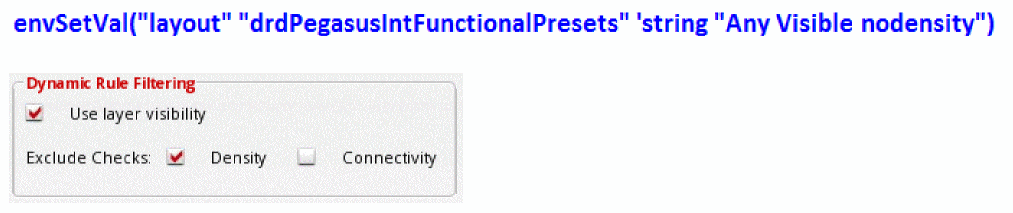
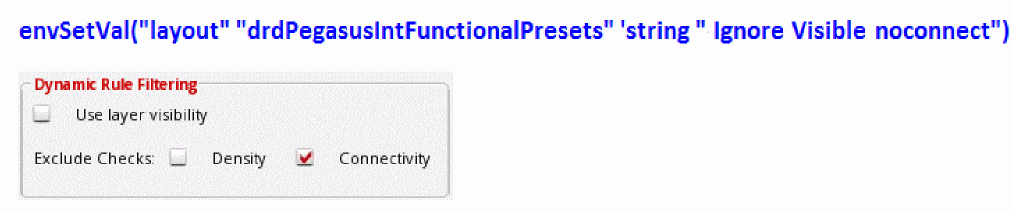
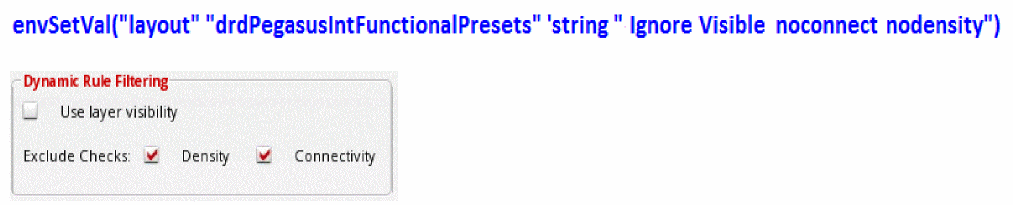
In Pegasus Interactive Run Options, you can enable the Use layer visibility option located in the Rules for Visible Layers field. Once it is enabled, rules are selected based on visible layers to its adjacent layers, which may or may not be visible in the Palette. For example, if Metal1 is visible in the Palette, rules for Metal1 itself checks, Metal1-Vias checks as well as Metal1-Metal2 checks will be selected.
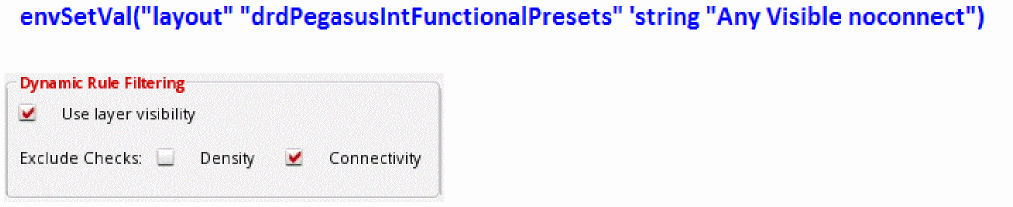
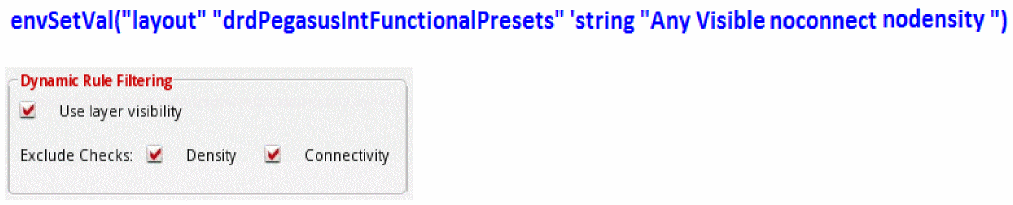
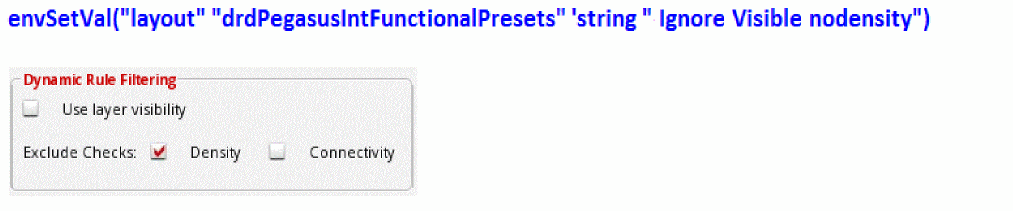
Furthermore, you can exclude density or connectivity checks by enabling Exclude Checks: density or Exclude Checks: connectivity options.

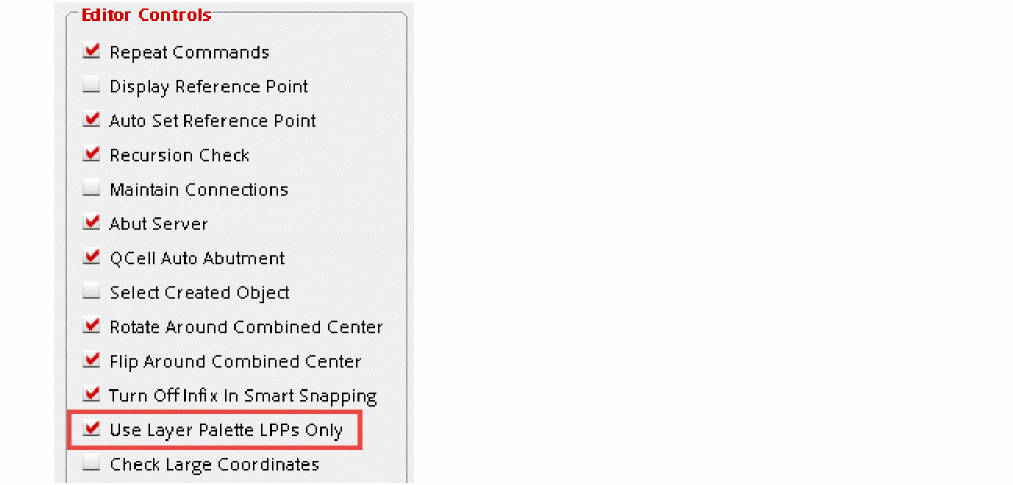
This option needs to be paired up with Virtuoso valid LPP utility. It can be set interactively through Layout Editor Options GUI. It is one of options under the Editor Controls field.
Its default option can also be set by using validLppFilterOn CDS environmental variable as following:
envSetVal("layout" "validLppFilterOn" 'boolean 't)
Furthermore, you can exclude density or connectivity checks by enabling Exclude checks: Density or Connectivity options. These options are independent of Use layer visibility.
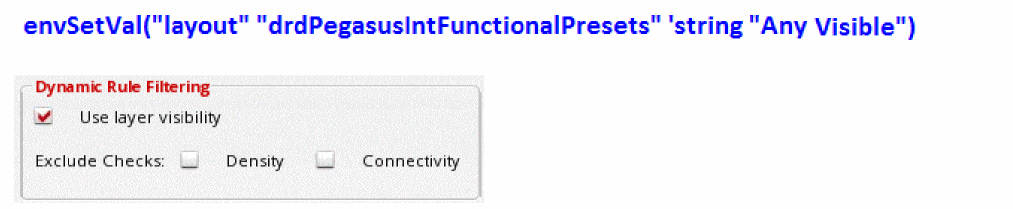
Similarly, DRF default behavior can be controlled using drdPegasusIntFunctionalPresets CDS environmental variable as following:
drdPegasusIntFunctionalPresets environment variable should be used. If you are using ICADV123/IC617 ISR20 or older then drdPVSFunctionalPresets environment variable should be used.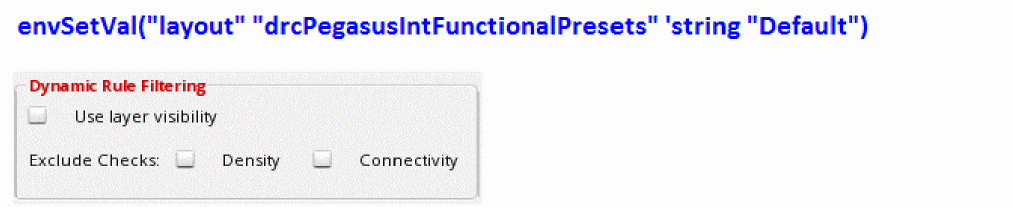
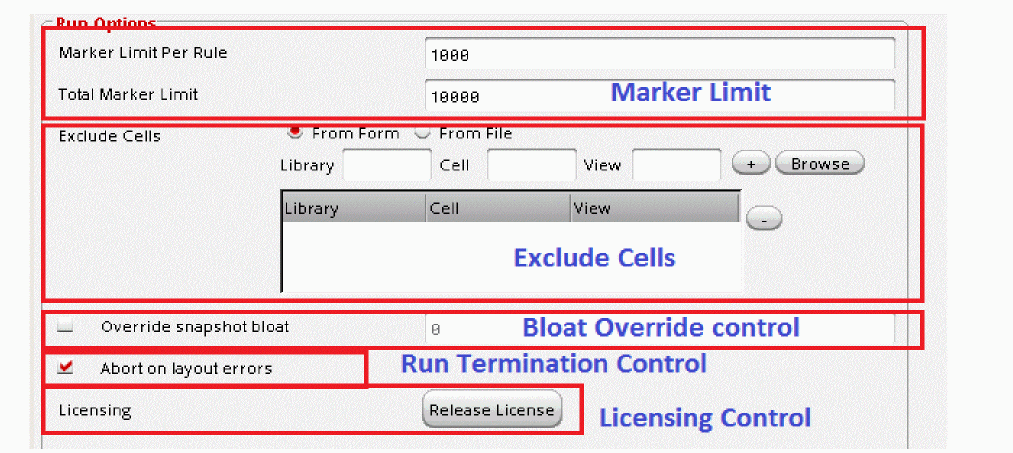
Run Options
Five elements are grouped under general run option field:
These elements are described in following sections:
Marker Limit
For a given run regardless of operate modes, you can set a limit on the total violation counts in the Total Marker Limit text box. Once total count of markers exceeds this threshold, only maximum amounts of markers are generated and displayed in the layout. Furthermore, you can define maximum marker counts per rule interactively in the Marker Limit Per Rule text box.
In addition to the interactive setting of these marker limits, you can set the default values through following CDS environment variables:
Exclude Cells
You can also choose to exclude certain cells from a given run. There are two ways of declaring excluded cell:
By selecting the From Form option, you can either fill cell information explicitly in the Library, Cell and View text boxes or through the Library Browser form. Latter automatically fills in the Library, Cell and View text boxes once you finalize selection in the library browser.
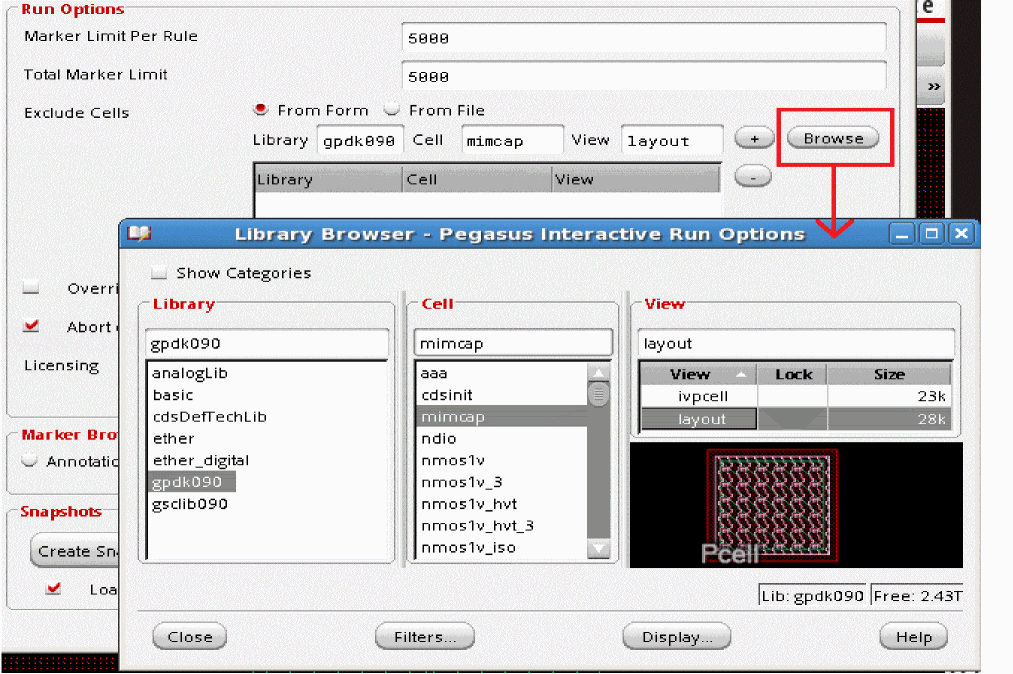
Also, if you would like to select a set of cells have similar naming convention, you can issue wildcard on any entry in Library, Cell and View fields.
Two types of wildcards are supported:
For example, you would like Pegasus Interactive to exclude all of cell has name starts with NANDFO in any library found, you can fill Library, Cell and View fields as following:
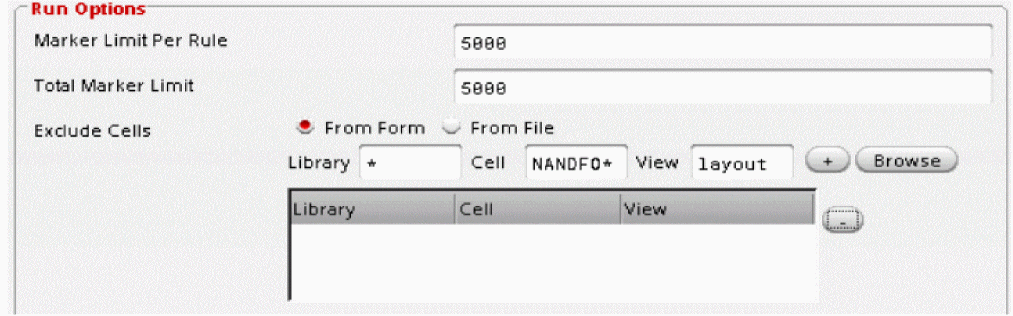
Commit the selection by clicking the plus sign (+) button. If the Information is insufficient, a warning message is issued in CIW. Following example shows entered cellview information is insufficient for Pegasus Interactive to process.
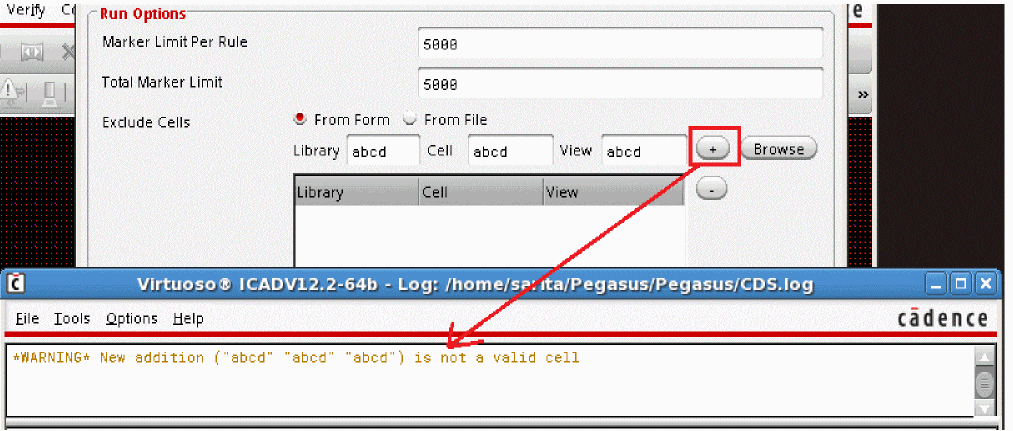
In general, Pegasus Interactive checks cellview information against libraries declared in cds.lib. If it is not in cds.lib, it is considered not accessible by Pegasus Interactive.
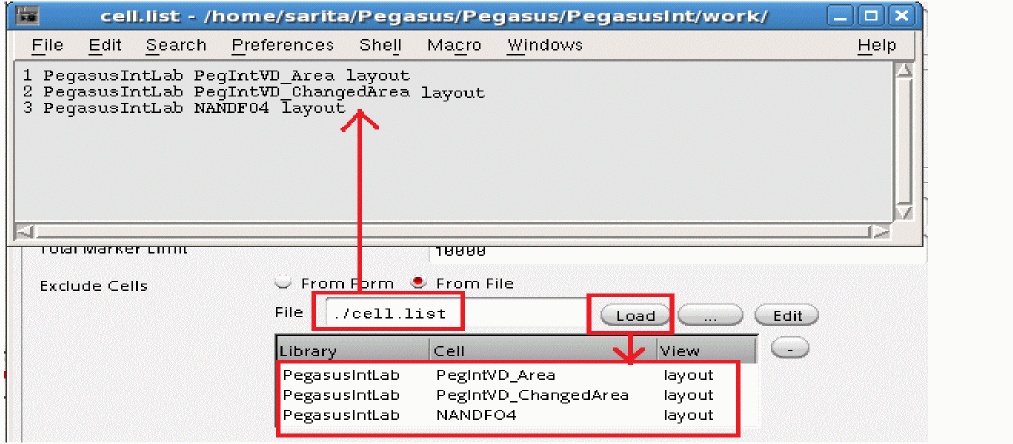
You can also declare a list of excluded cells in the file and then load the content through From File option. By clicking the "…" button. The Select Exclude cell File form is available for you to select the file interactively.
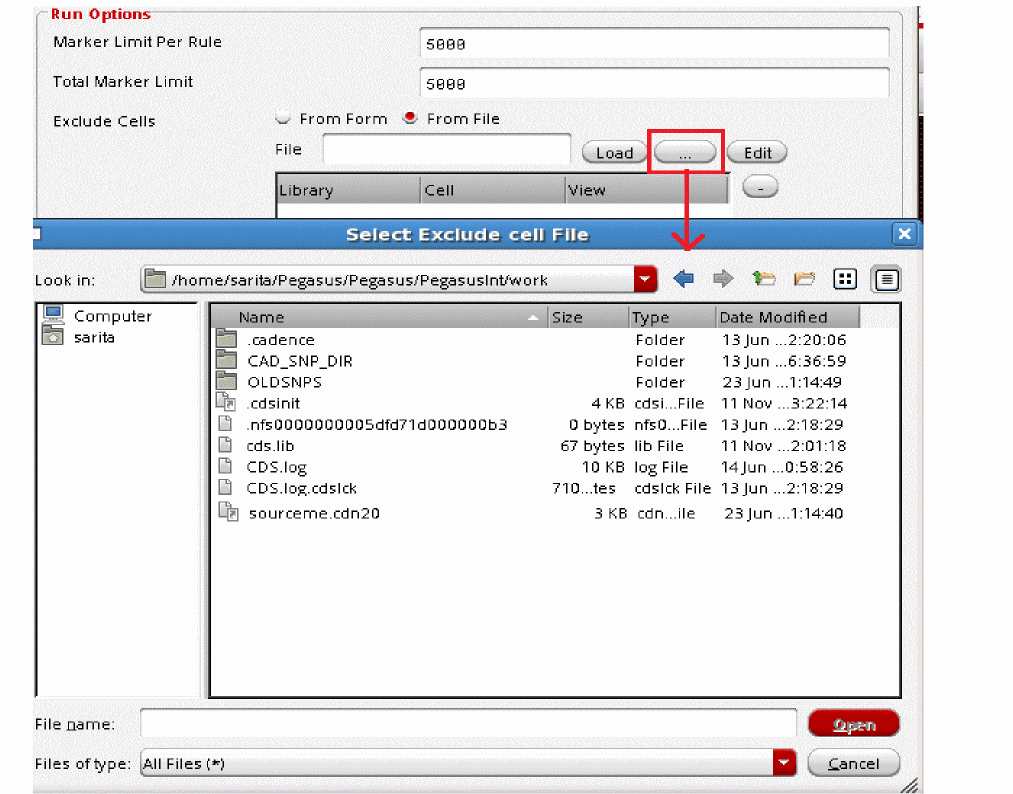
Once the file is selected, its path will be populated under File text box. To commit the cell selection via file, click Load. During the loading, Pegasus Interactive checks:
If any insufficient information is detected, warning messages are displayed in CIW.
Correct syntax for cell declaration in the file should be in the order of library, cell and view and they are delimited by space between declarations. Also, you can declare wildcard, either ? or *, to conduct batch cell selection. Following example shows correct syntax declared in cell.list. Complete cell information is loaded into exclude cell table after clicking Load.
You can sort column alphabetically in the Exclude Cells table by clicking the column header: Library, Cell or View.
To remove one or multiple cells from the Exclude Cells table, select one or more rows by clicking the minus sign (-) button.
You can declare default exclude cells file path through PegasusInt_ExcludeCellFile.
Bloat Override Control
Pegasus Interactive allows you to check DRC on certain area of the cellview. Basically the final area of checking is determined by the maximum bloat value found between the value stored in the snapshot.
However, you can override bloat value for current Pegasus Interactive session without re-generating of snapshot using Override snapshot bloat option of the Pegasus Interactive Run Option form:
By default, Override snapshot bloat is disabled. Once you enable it you can enter any positive float value including "0". If you enter "0" bloat value, it would mean that you want to check area "as-it-is".
If you specified override snapshot bloat value, then following message will be printed to Virtuoso CIW window prior Pegasus Interactive DRC run:
Pegasus Interactive: Bloat value for current snapshot (3.00) is now set to 5.00 (inspect Run Options form)
After Pegasus Interactive DRC run regardless operate modes, run complete message includes the bloat value used during the run. Example:
*INFO* Pegasus Interactive
Cellview Name: top
Snapshot: Default
Bloat Value: 5
Summary: 12 markers created
Also, enabling of Override snapshot bloat triggers the Verify Design icons update in the Pegasus Interactive toolbar for all of opened layout window:
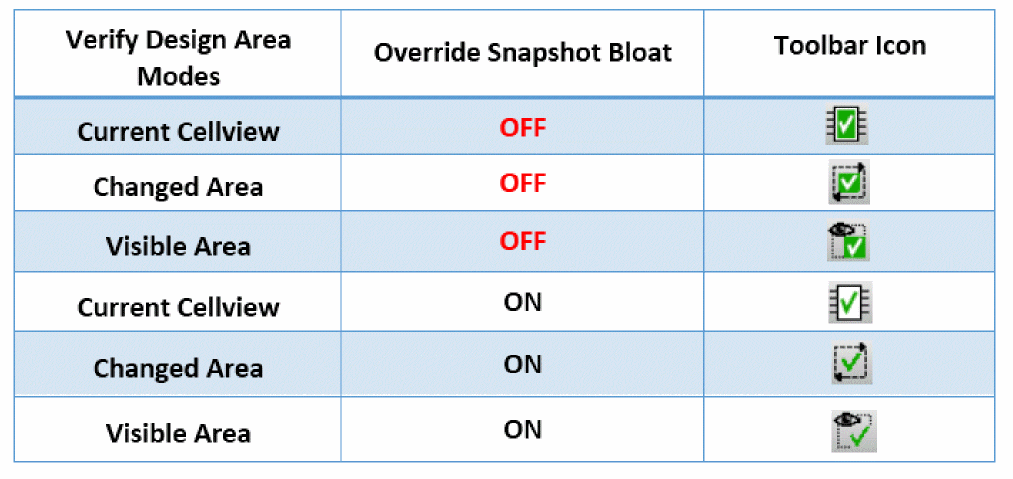
In addition, the bloat value is shown as tooltip of toolbar icon:

Run Termination Control
By default, Pegasus Interactive terminates the run if it detects following errors:
This default behavior can be altered through the Abort on Layout Error option.

To continue DRC despite of outcome of layout validity, deselect the check box. In this case, errors found during layout validity check will be treated as soft errors and run proceeds as it-is.
Licensing Control
As described in Licenses Requirements and Behaviors, Pegasus Interactive checks out licenses and holds them until termination condition is met. Within a Virtuoso session, you can release the license anytime through the Release License button. It terminates any existing Pegasus Interactive session. Only license(s) documented in snapshot header is released. License pertaining to Pegasus RV is controlled by its own activity process.

Marker Browser
This field allows you to switch between two different types of browsers. If there are any existing OA markers created by Pegasus Interactive or error highlighted on the layout, they are erased when you switch from Pegasus Results Viewer to Annotation Browsers or vice versa.
Since Pegasus Interactive retains last run result in an ascii format, you can reload this data any time by invoking Pegasus Results Viewer through the toolbar. On the contrary, you cannot view last run results via Annotation Browser on demand. For example, Pegasus Interactive’s latest run generates OA markers on the layout. You would like to first view results in Pegasus Results Viewer and then use Annotation Browser for DRC fixing afterward. In this case, error highlights are generated on the layout and errors are automatically reported in Pegasus Results Viewer when you toggle from Annotation Browser to Pegasus Results Viewer. However, OA markers are not restored once you toggle back to Annotation Browser from Pegasus Results Viewer.

For details on interactive setting browser preference and for details on each browser behavior and customization, refer to Error Viewing.
Snapshots
The content of snapshot setting field can be customized. The intent of this use model is to give CAD administrator control on the snapshot accessibility to target users. CAD administrator determines whether snapshot should be generated or maintained either globally or locally. Based on this decision, snapshot field content display can be controlled through following shell environmental variables:
Condition One: Global Snapshot Control by CAD Only
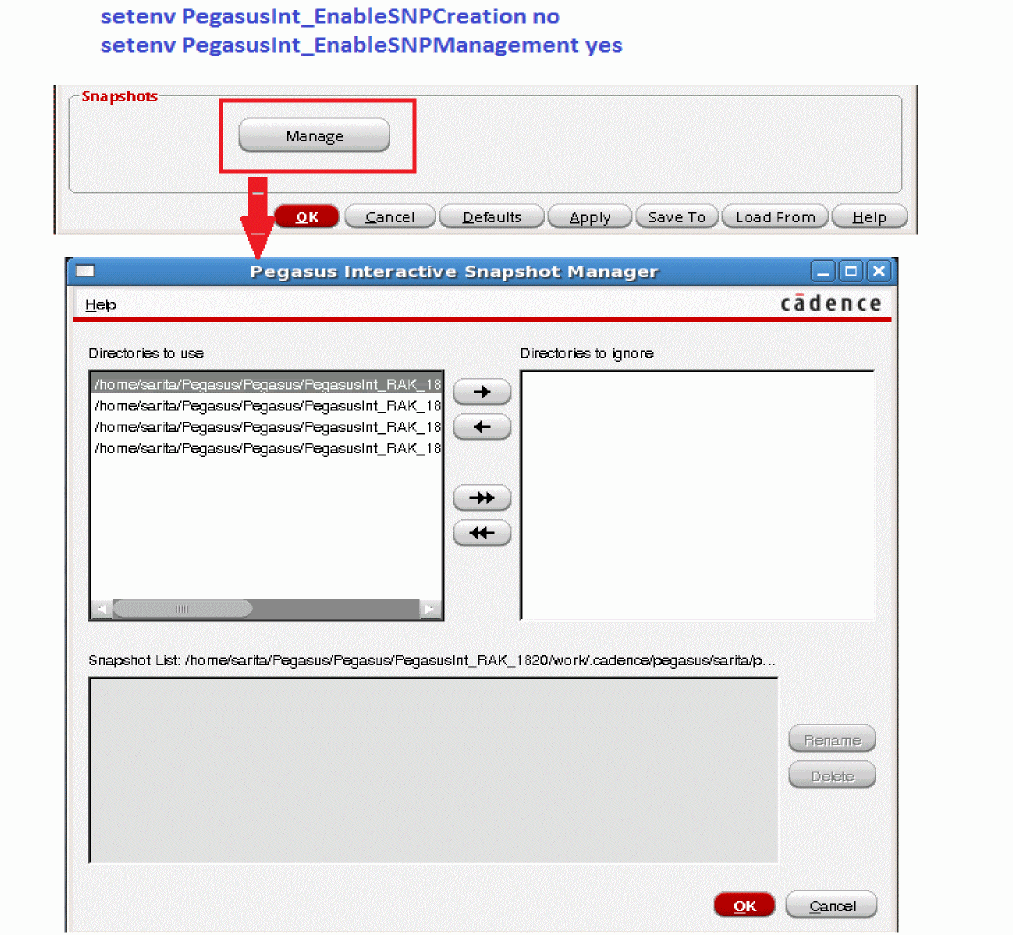
In this case, CAD wants a full control of snapshot creation and maintenance. Since users are not allowed to create local snapshot, snapshot creation trigger can be hidden through PegasusInt_EnableSNPCreation. Depending on the number of snapshot directories, CAD can decide whether to disable or enable Snapshots management field through PegasusInt_EnableSNPManagement.
Following example shows the complete removal of the Snapshots field by setting both shell environment variables to no.

If there are more than one snapshot directories maintained by CAD and end user can access them, the CAD can enable snapshot management utility as following:
For details of snapshot management, refer to Manage Snapshots.
Scenario Two: Local Snapshot Control by User Only
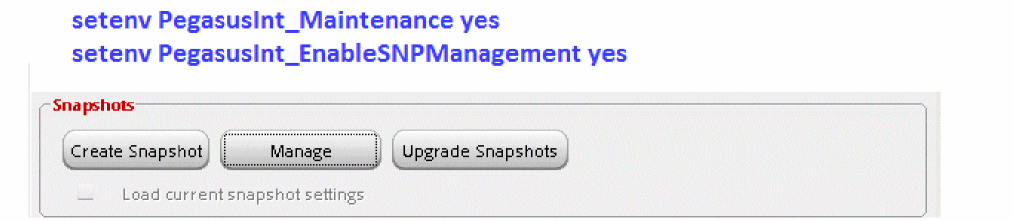
CAD only maintains technology setup and user is responsible of creating and maintaining local snapshots. Snapshot management utility needs to be available for you to upgrade any out of sync snapshots detected by Pegasus Interactive. This utility can be enabled through PegasusInt_Maintenance.

For details of creating snapshot, refer to Quick Start: Create Snapshot.
For details of upgrading snapshot, refer to Upgrading Snapshots.
Scenario Three: Global and Local Snapshot Control by User
For this use model, CAD provides a set of generic global snapshots and user can create custom snapshots that are derived from these global snapshots.
Return to top