3
CurvyCore Building Blocks
The CurvyCore data model is made up of three layers, the base layer, which has a mathematical core, the layer-purpose pair (LPP) aware layer, and the physical layer.
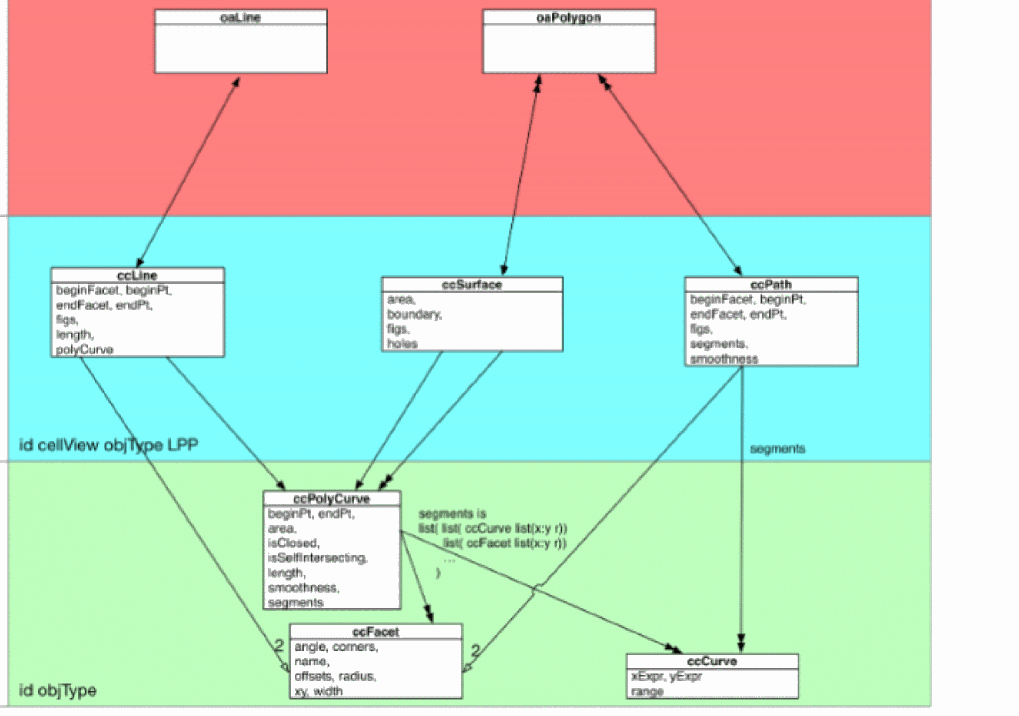
The base layer comprises three mathematical objects, ccCurve, ccFacet, and ccPolyCurve.
Objects in LPP layer are aware of the relevant grid, but are not limited in the number of vertexes. As a set of objects, they are ccFigs. When a ccFig is discretized (or when geometry for ccFig is generated), facets are subjected to a special treatment to reflect the fact that they represent interface vertexes between elements. Origin of each facet is automatically snapped to the closest point on the grid while angle of the facet is kept unchanged.
The physical layer or the OpenAccess level represents the manufactured polygons. These physical shapes have limitations in the number of vertexes. When a physical representation is generated for a ccFig, the algorithm takes into account the vertex number limitation and slices the figures appropriately, resulting in one (ccFig) to many (oaFigs) relationship.
There is a collection of pho and cc SKILL functions, above the base cc SKILL functions that provide higher-level functionality, such as a full-feature straight generator, including the interface for tapering, controlling modal property computation.
gopdk.
Photonics also has db-level SKILL functions that can be used to deal with the signal type for optical connection and the optical port definition.For more information regarding the db, cc and pho SKILL functions related to Photonics, see
This chapter discusses the following:
CurvyCore Mathematical Objects
This section discusses the mathematical base layer of the CurvyCore engine. The curvilinear shapes are represented in the curvilinear mathematical domain as parameterized curves. In mathematics, these curves are described by their Cartesian equation as:
f(x,y) = c
Here x and y are Cartesian coordinates and c is a constant.
A parameterized representation of a curve is the representation used in the mathematical domain of the CurvyCore engine. This means that the first step to create a curvy shape is to find its parametric representation.
According to implicit function theorem, if:

Then, a curve can be described around that point as y=f(x).

A curve can also be represented as a path traced by a point. This means that if x and y are Cartesian coordinates describing the position of a point of a curve, the curve is represented as:
where, ![]() specifies the location of the point at time t. The parameterized curve is described as:
specifies the location of the point at time t. The parameterized curve is described as:

Related Information
ccLayerOr
Curves
Curves are one of the primary data structures of a CurvyCore engine. Two main types of curves are ccCurve and ccPolyCurve.
ccCurve
ccCurve is one of the primary data structure of a CurvyCore engine. A ccCurve is a parametrized representation of a curve in a given interval. The following parametric equation is an example of the parametric equation that can be used to create a ccCurve representing a straight segment.
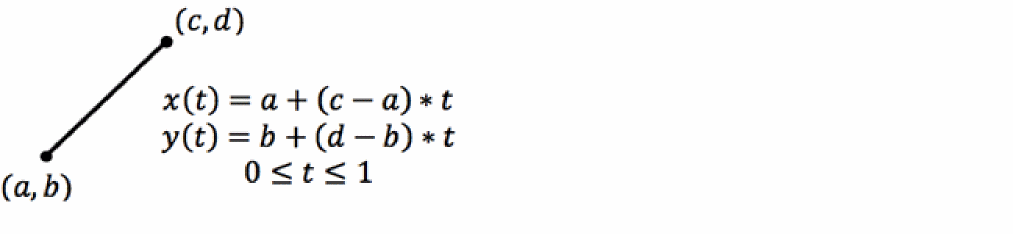
You can use the ccCreateCurve SKILL function to create a ccCurve object using its parametric representation. It retrieves the string representation of the Cartesian coordinates of the parameterized curve and the begin and end values of the parameter and returns a ccCurve object.
;ccCreateCurve(t_x t_y list(n_begin n_end))
;The following code creates a line segment between (0,0) and (2,4) and then
;displays the created ccCurve's attributes
LineSeg = ccCreateCurve("2*t" "4*t" 0:1)
cc00xb25fc433
LineSeg~>??
(cc00xb25fc433 objType "ccCurve" xExpr "(2*t)"
yExpr "(4*t)" range
(0.0 1.0)
)
The only parameter that can be used in the parametric representation of a curve is t, other parameters are numerical constants. This means that if you want to create a line segment whose endpoints need to be passed as a parameter, first you need to create the string representation using the numerical parameters and then create the ccCurve object.
ccPolyCurve
ccPolyCurve is a data structure that is used to stitch a sequence of ccCurves to create a more complicated curve. You can create a ccPolyCurve object using the ccCreatePolyCurve SKILL function.
To create a ccPolyCurve object from a rectangle shape, you need to consider that a rectangle is represented by line segments connecting its vertexes.
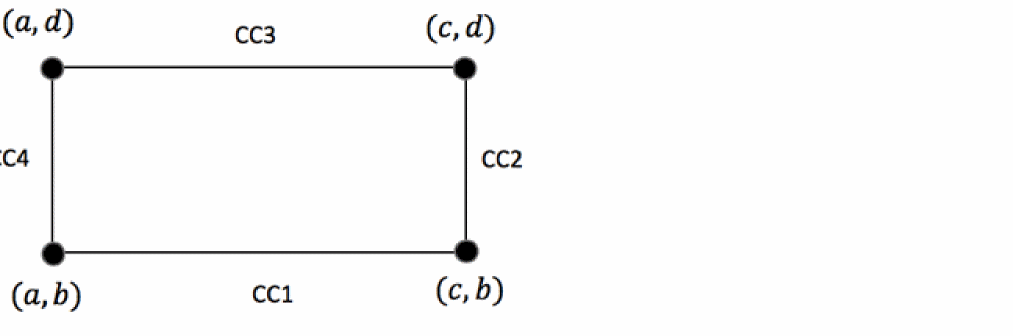
Here the bounding box of a rectangle, list(a:b c:d), generates ccCurve objects CC1, CC2, CC3, and CC4 representing the edges of the rectangle. You can use the ccCreatePolyCurve SKILL function to join these edges.
The ccCreatePolyCurve SKILL function checks if the polyCurve object is a simple closed polyCurve and what is the level of smoothness between the segments while the polyCurve object is being created. For example, when a rectangle is generated from line segments, you might want to check whether it is continuous. G0 enforces the continuity check and generates an error if the polyCurve object is not continuous.
In the following example, first the CCSCreateLineSegment function is defined to create and return a ccCurve object representing a line segment between two points.
procedure(CCSCreateLineSegment(point1 point2)
let((ParameterizedLine XcoordPoint1 YcoordPoint1 XcoordPoint2 YcoordPoint2)
XcoordPoint1 = xCoord(point1)
XcoordPoint1 = yCoord(point1)
XcoordPoint2 = xCoord(point2)
XcoordPoint2 = yCoord(point2)
ParameterizedLine.ParamX = lsprintf("%n + (%n-%n)*t", XcoordPoint1, XcoordPoint2,XcoordPoint1);X(t)=XcoordPoint1 + (XcoordPoint2-XcoordPoint1)*t
ParameterizedLine.ParamY = lsprintf("%n + (%n-%n)*t", YcoordPoint1, YcoordPoint2,YcoordPoint1);X(t)=YcoordPoint1 + (YcoordPoint2-YcoordPoint1)*t
ccCreateCurve(ParameterizedLine.ParamX ParameterizedLine.ParamY 0:1.)
);let
);procedure
Next, the CCSCreateRectangle function is defined to use CCSCreateLineSegment to create and return a polyCurve object representing a rectangle with positive area as shown below.
procedure(CCSCreateRectangle(bBox)
let((llx lly urx ury CC1 CC2 CC3 CC4)
ury = yCoord(upperRight(bBox))
urx = xCoord(upperRight(bBox))
lly = yCoord(lowerLeft(bBox))
llx = xCoord(lowerLeft(bBox))
CC1 = CCSCreateLineSegment(llx:lly urx:lly)
CC2 = CCSCreateLineSegment(urx:lly urx:ury)
CC3 = CCSCreateLineSegment(urx:ury llx:ury)
CC4 = CCSCreateLineSegment(llx:ury llx:lly)
ccCreatePolyCurve(list(CC1 CC2 CC3 CC4)
?close t
?smoothness 'G0)
);let
);procedure
The following example shows how to check the ccPolyCurve attributes associated with the created rectangle.
Rectangle = CCSCreateRectangle(list(0:0 10:10))
Rectangle~>??
;The segment property returns ccCurve segements of the rectangle
Rectangle~>segments
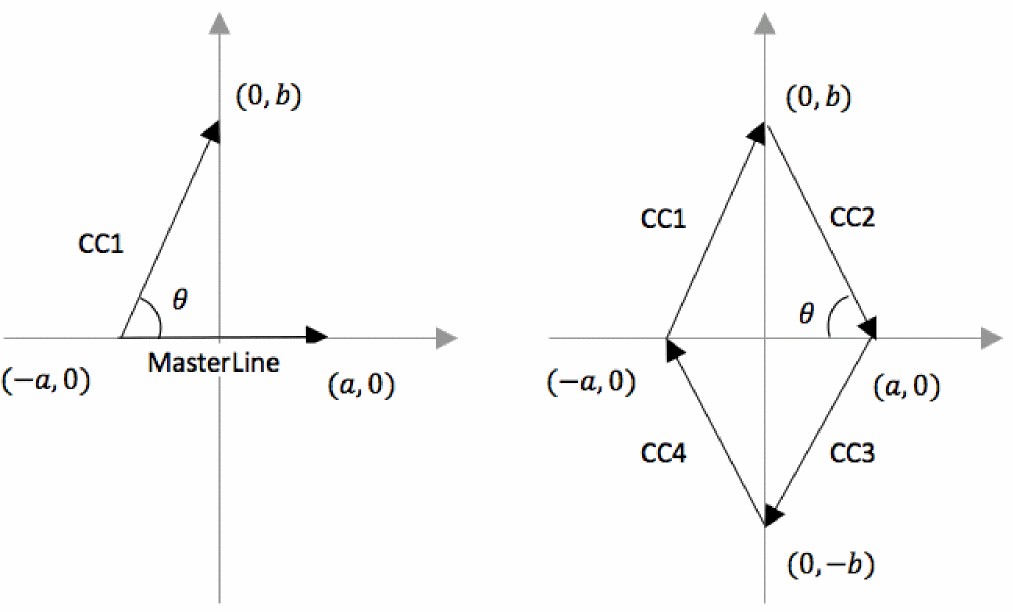
When a polyCurve object is created using segmented curves, it is possible to apply a transformation to them. You can use this technique to create rhombus shapes by applying a transformation to a line segment. Rhombus curve segments can be created by generating a masterLine curve and then applying a proper transformation to create CC1, CC2, CC3, and CC4 as shown below.
To create pie polyCurve shapes, you first need to create a ccCurve object representing a circular arc. A pie polyCurve is composed of two circular arcs and two line-segments connecting these circular arcs.
It is simpler to represent the above arcs in cylindrical coordinates.

Considering that the parameterized curve should have Cartesian coordinates, you can define a utility function that converts the parametric form from cylindrical to Cartesian. The following function gets a parametric polar coordinates of a curve and returns its Cartesian coordinates.
procedure(CCSPolartoCartesian(ParameterizedPolar)
let((Radius Theta ParamX ParamY)
Radius = car(ParameterizedPolar)
Theta = cadr(ParameterizedPolar)
ParamX = lsprintf("%s*cos(%s)" Radius Theta)
ParamY = lsprintf("%s*cos(%s)" Radius Theta)
list(ParamX ParamY)
);let
);procedure
The following example defines the CCSCreateArcSegment function to create an arc. The function uses CCSPolartoCartesian described above to convert polar coordinates to Cartesian coordinates. The example defines two functions CCSCreateArcSegment and CCSCreatePie.
CCSCreateArcSegment creates a ccCurve object representing an arc. The operands are radius of the circle where ArcLength is 0. If the symmetric parameter is not t, the function will create an ArcSegment starting from 0.
procedure(CCSCreateArcSegment(Radius ArcLength @key(Symmetric t))
let((ParameterizedArc ParameterizedPolar)
ParameterizedPolar = list(lsprint("%n" Radius) lsprintf("%s" t))
; (R(t) Theta(t)) = (Radius t)
ParameterizedArc.ParamX = car(CCSPolartoCartesian(ParameterizedPolar))
;(Radius t) --> (X(t), Y(t))
ParameterizedArc.ParamY = cadr(CCSPolartoCartesian(ParameterizedPolar))
if(Symmetric
then
ccCreateCurve(ParameterizedArc.ParamX ParameterizedArc.ParamY -ArcLength/2:ArcLength/2)e
else
ccCreateCurve(ParameterizedArc.ParamX ParameterizedArc.ParamY 0:ArcLength)
);if
);let
);procedure
CCSCreatePie creates a polyCurve object representing a pie shape with positive area.
procedure(CCSCreatePie(Radius1 ArcLength1 Radius2 ArcLength2)
let((ParameterizedPie ParameterizedArc1 LineSeg1 ParameterizedArc2 LineSeg2)
ParameterizedArc1 = CCSCreateArcSegment(Radius1 -ArcLength1)
ParameterizedArc2 = CCSCreateArcSegment(Radius2 ArcLength2)
LineSeg1 = CCSCreateLineSegment(
Radius1*cos(-ArcLength1/2):Radius1*sin(-ArcLength1/2)
Radius2*cos(-ArcLength2/2):Radius2*sin(-ArcLength2/2))
LineSeg2 = CCSCreateLineSegment(
Radius2*cos(ArcLength1/2):Radius2*sin(ArcLength1/2)
Radius1*cos(ArcLength2/2):Radius1*sin(ArcLength2/2))
ccCreatePolyCurve(
list(ParameterizedArc1 LineSeg1 ParameterizedArc2 LineSeg2)
?close t ?smoothness 'G0)
)let;
);procedure
Related Information
ccCreatePolyCurve
Paths and Facets
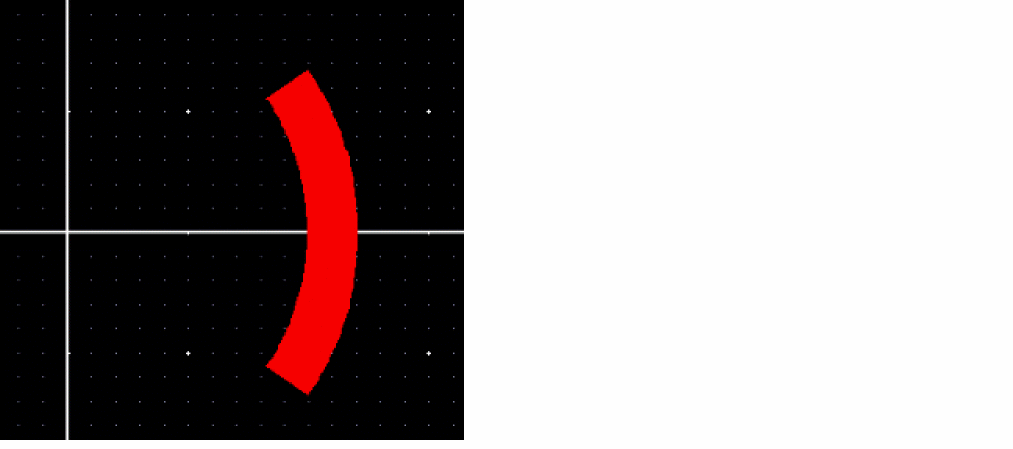
A path is a center curve that has parallel inner and outer curves. The center curve is defined as a ccCurve object. You can create a ccPath object using the ccCreatePath SKILL function. One of the uses of a ccPath object is to represent a photonics waveguide.
Consider that you want to create a 90° bend waveguide path with 0.5µm width and 15µm radius on a layer-purpose pair. The first step is to create the center ccCurve object of the path, as shown below.
BendCenterCurve = CCSCreateArcSegment(15 asin(1))
The path needs to be associated with a layer in a technology file, therefore, you need to create a layout cell where the path can be created.
To generate a path object in the currently opened Layout Editor window, you can run the following command.
BendPath = ccCreatePath(geGetEditCellView() list("waveguide" "drawing")
list(list(BendCenterCurve list(0:0 45) 0.5)))
;Generate the physical shape of BendPath
You should be able to see your 90° waveguide bend as shown below.
To generate physical shapes associated with a CurvyCore mathematical objects such as paths and surfaces, you need to use the ccGenFigs SKILL function.
Lets now create another ccPath object representing a straight waveguide with width 0.5µm.
StraightCenterCurve = CCSCreateLineSegment(0:0 10:0)
StraightPath = ccCreatePath(geGetEditCellView() list("waveguide" "drawing")
list(list(StraightCenterCurve list(0:0 0) 0.5)))
;Generate the physical shape of the path
ccGenFigs(StraightPath)
This example generates a straight path representing a straight photonic waveguide.

Attributes of ccPath Objects
A ccPath object consists of segments that are the center ccCurve objects with their associated inner and outer parallel curves. They also consists of two facets, beginFacet and endFacet.
StraightPath~>??
(cc:0x33874050 objType "ccPath" cellView db:0x20c7d39a
lpp
("waveguide" "drawing") figs
(db:0x20c78a9a) beginPt
(0.0 0.0) endPt
(10.0 0.0) beginFacet cc@0x68c1d0a6
endFacet cc@0x47be58d4 segments
((cc@0xb16d5f44
((0.0 0.0) 0.0) "0.5"
)
) smoothness
G1
)
Facets are essential when ccPath objects need to be joined together at different levels of the hierarchy.
A facet is a mathematical object in the CurvyCore engine with following attributes:
- During physical shape generation, the center-point of a facet is always snapped to the manufacturing grid. This means that if a facet is rotated and the center point is not on the grid then the whole facet will be parallelly shifted to the nearest grid point.
- After the facet is shifted, the end points of the facet are shifted to the nearest points on the manufacturing grid. If there is an ambiguity to which point it should be shifted to (that is, if there are two or more nearest points on the manufacturing grid), then the end point is shifted to the farthest point from the origin of the facet (among those nearest points on the manufacturing grid).
-
To avoid discontinuity, segments of boundary of the path or surface adjacent to the facet also need to be adjusted. Straight segments remain straight and are slightly transformed to connect to the new end point of the facet. Non-straight segments are adjusted by adding a nearly-zero fifth-degree polynomials to its
xandyequations in such a way that a new segment is connected to the new end point of the facet, and the tangents and curvatures of the segment remain unchanged at the end points.
Surfaces and Facets
Mathematically, any simple-closed curve or polyCurve can be used to represent a surface.
When you go counter-clockwise on a closed surface, the enclosed area on the left-side of the boundary represents the surface having a positive surface area associated with that boundary. If you go clockwise, the associated surface is the same but the associated area is negative. A negative surface represents a hole that can be subtracted from another surface.
You can create CurvyCore surfaces using the ccCreateSurface SKILL function.
The following example creates a rectangular surface:
Rectangle = CCSCreateRectangle(list(0:0 10:10))
RectangleSurface = ccCreateSurface(
geGetEditCellView()
list("waveguide"
"drawing")
Rectangle)
ccGenFigs(RectangleSurface)
RectangleSurface~>??
(cc:0x2a0d3bf0 objType "ccSurface" cellView db:0x20c3d91a
lpp
("waveguide" "drawing") figs
(db:0x20c3c99a) area
100.0 boundary cc@0x4e636b3f holes nil
)
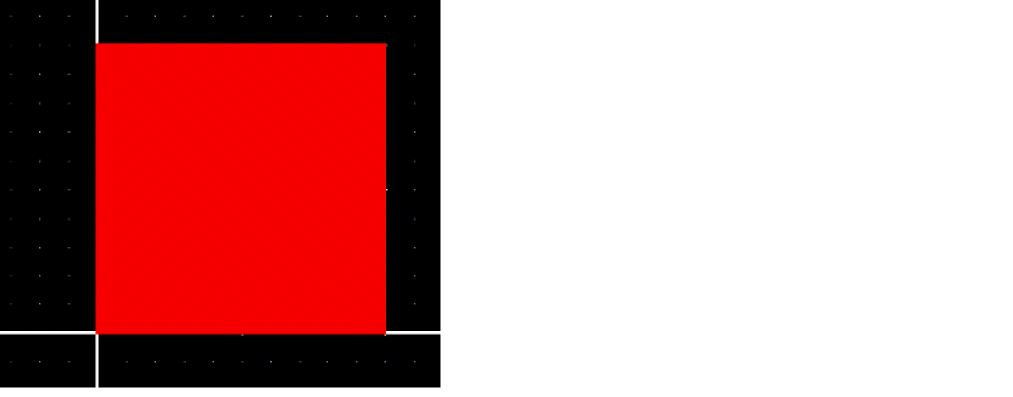
This following figures shows the rectangular surface created using the above example.
The following example shows how to create a polygon with N number of sides or an N-gon closed polyCurve that can be used to create a hexagon surface.
procedure(CCSCCreateNgon(Radius NumberofSides)
let((Vertices(pi2*asin(1)))
Vertices = tconc(nil Radius:0)
for(i 1 NumberofSides-1
tconc(
Vertices
Radius*cos(2*pi*i/NumberofSides):Radius*sin(2*pi*i/NumberofSides)
);tonc
);for
Vertices = car(Vertices)
CCSCreatePolygon(Vertices)
);let
);procedure
Next, you can use the N-gon polyCurve to create a hexagon surface as shown below.
Hexagon = CCSCreateNgon(15 6)
HexagonSurface = ccCreateSurface(geGetEditCellView() list("waveguide" "drawing")
Hexagon)
ccGenFigs(HexagonSurface)
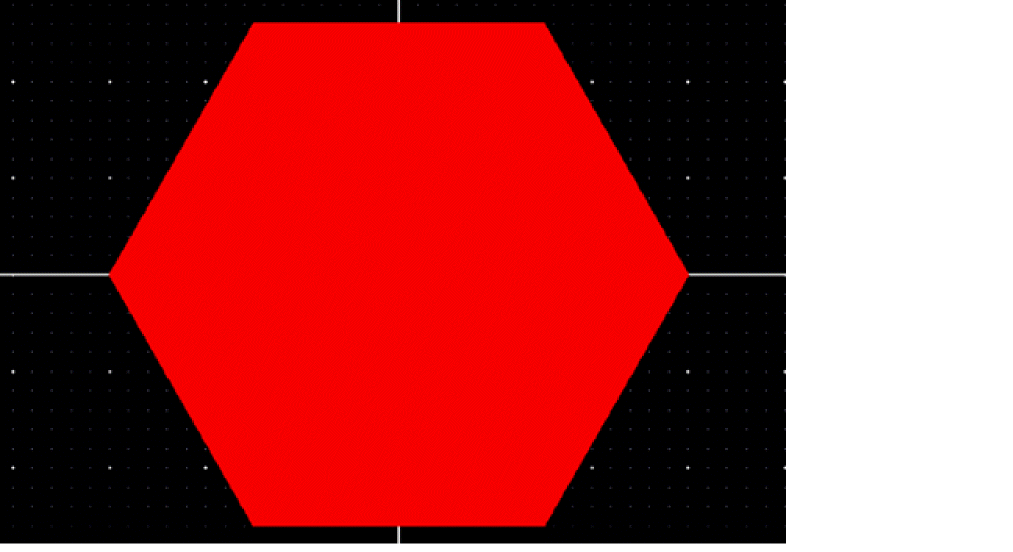
The figure shows the hexagon created using the above example.
The following procedure uses a closed pie polyCurve to create a pie surface.
PiePolyCurve = CCSCreatePie(10 asin(1)*3/4 12 asin(1)*3/4)
PieSurface = ccCreateSurface(geGetEditCellView() list("waveguide" "drawing")
PiePolyCurve)
ccGenFigs(PieSurface)
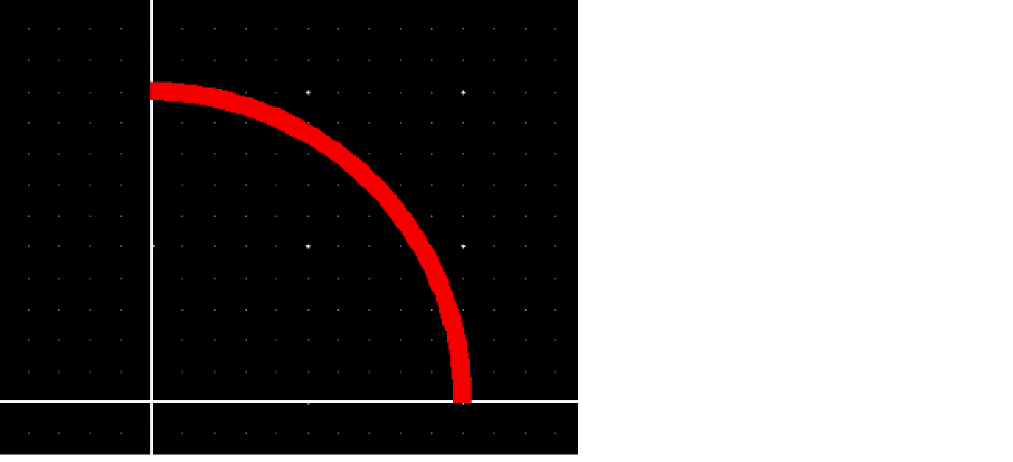
This figure shows pie surface created using a closed pie polyCurve.
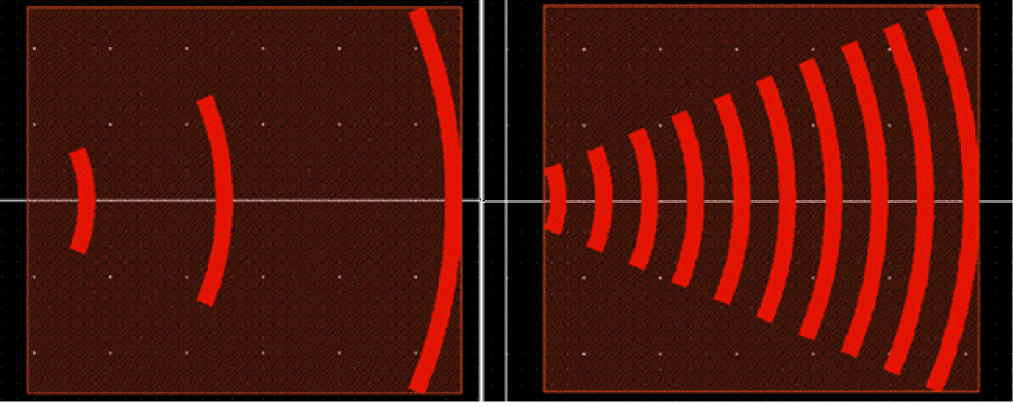
Lets now see how to create a grating coupler shape as an array of grating pie shapes.
procedure(GratingCoupler(cv @key(designIntentLayer "waveguide")
           (GratingNum 10)
        (GratingSpace 3.0)
        (GratingArcLength 2.0)
        (Gratingwidth 1.0)
        (GratingStartRadius 5.0)
        (roatation 0.0)
        (boundingBox t)
      )
let((ccPolyCurves ccSurfaces BoundingBox BoundingBoxSurface
urx ury llx lly(pi asin(1)))
GratingArcLength = pi/GratingArcLength
declare(ccPolyCurves[GratingNum])
declare(ccSurfaces[GratingNum])
for(i 0 GratingNum-1
ccPolyCurves[i] = CCSCreatePie(
GratingStartRadius+GratingSpace*i
GratingArcLength
GratingStartRadius+GratingSpace*i+Gratingwidth
GratingArcLength)
ccPolyCurves[i] = ccTransformPolyCurve(ccPolyCurves[i]
list(0:0 rotation))
ccSurfaces[i] = ccCreateSurface(cv
list(designIntentLayer "drawing")
ccPolyCurves[i})
);for
when(boundingBox
urx = GratingStartRadius+GratingSpace*(GratingNum-1) + Gratingwidth
ury = (GratingStartRadius+GratingSpace*(GratingNum-1)) + Gratingwidth*sin(GratingArcLength/2)
lly = -ury
llx = GratingStartRadius*cos(GratingArcLength/2)
BoundingBox = CSCCreateRectangle(list(llx:lly urx:ury))
  BoundingBoxSurface = ccCreateSurface(cv
                               list("SiEtch0" "drawing")                                        BoundingBox)
ccMoveFig(BoundingBoxSurface ?transform list(0:0 rotation))
);when
list(ccSurfaces BoundingBoxSurface)
);let
);procedure
After the GratingCoupler function is loaded, you can check the creation of a grating coupler.
ccGrating = GratingCoupler(geGetEditCellView())
Gratings = car(ccGrating)
BoundingBox = cadr(ccGrating)
ccGenFigs(BoundingBox)
ccGenFigs(Gratings[1])
ccGenFigs(Gratings[4])
ccGenFigs(Gratings[9])
The following figures show the grating coupler shape with grating number 1, 4, 9, and the complete grating coupler.
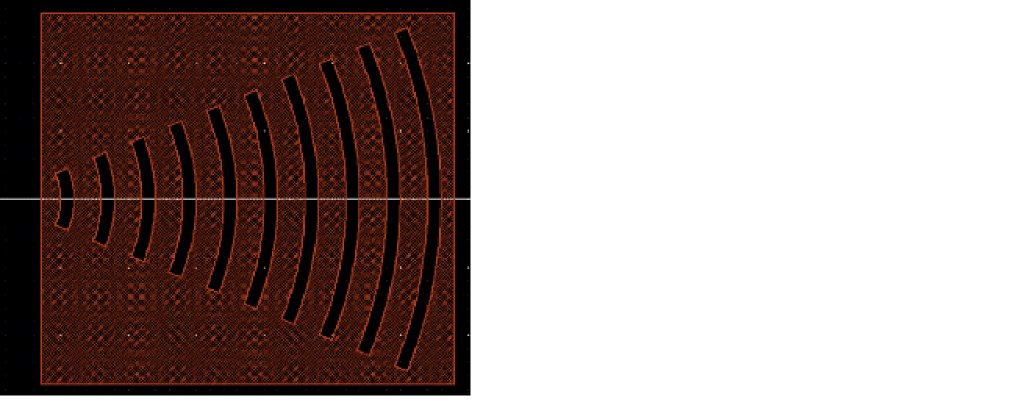
A surface with a negative area represents a hole. This means that it is possible to subtract some holes from a surface when using ccCreateSurface SKILL function.
The holes that are going to be subtracted from the original surface are passed as a list parameter to the ccCreateSurface function as shown below.
procedure(GratingCouplerInverted(cv @key(designIntentLayer "waveguide")
           (GratingNum 10)
        (GratingSpace 3.0)
        (GratingArcLength 2.0)
        (Gratingwidth 1.0)
        (GratingStartRadius 5.0)
        (roatation 0.0)
           )
let(
(ccPolyCurves ccSurfaces BoundingBox BoundingBoxSurface
 urx ury llx lly(pi asin(1)))
GratingArcLength = pi/GratingArcLength
;Create bounding box rectangle
urx = GratingStartRadius+GratingSpace*(GratingNum-1)+Gratingwidth+1
ury = (GratingStartRadius+GratingSpace*(GratingNum-1)+Gratingwidth)*sin(GratingArcLength/2)+1
lly= -ury
llx = GratingStartRadius*cos(GratingArcLength/2)-1
BoundingBox = CCSCreateRectangle(list(llx:lly urx:ury))
for(i0 GratingNum-1
;ccPolyCurves are simple closed curves with negative area that rerpesent ;the holes in the bounding box rectangle
ccPolyCurves=tconc(
ccPolyCurves
ccReverseCurve
(CCSCreatePie(
GratingStartRadius+GratingSpace*i
GratingArcLength
GratingStartRadius+GratingSpace*i+Gratingwidth
    GratingArcLength)
 )
);tconc
);for
ccPolyCurves = car(ccPolyCurves)
ccSurfaces = ccCreateSurface(cv
list("SiEtch0" "drawing")
BoundingBox
ccPolyCurves)
ccMoveFig(ccSurfaces ?transform list(0:0 rotation))
);let
);procedure
After defining and loading the GratingCouplerInverted function, you can create an instance where the gratings are subtracted from the bounding box.
ccGratingInverted = GratingCouplerInverted(geGetEditCellView())
ccGenFigs(ccGratingInverted)
Related Information
ccCreatePath
Boolean Operations of Surfaces
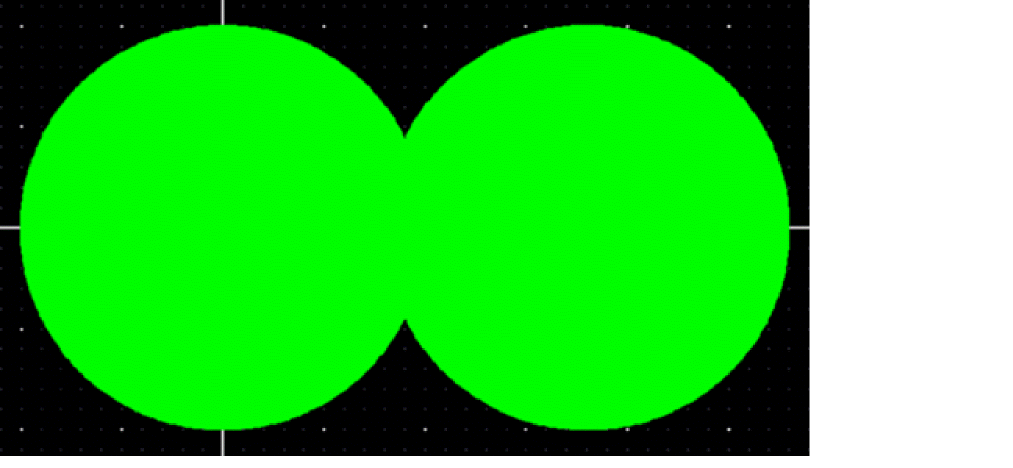
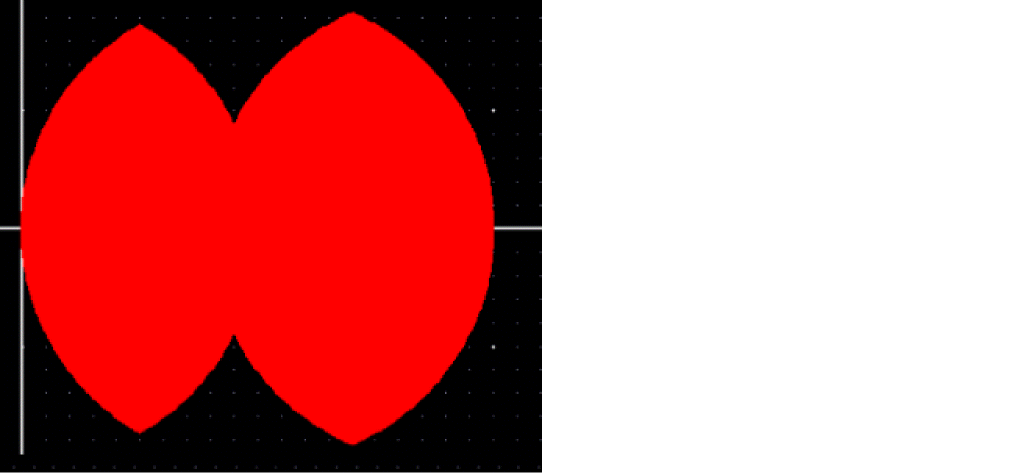
Boolean operator or can be applied using the ccLayerOr SKILL function to create two circular surfaces and combine them to create a larger surface. The surfaces that this function acts on can be on different layers and the generated surface can also be in a different layer.
Circle = ccCreateCurve("10*cos(t)" "10*sin(t)" 0:4*asin(1))
Surf1 = ccCreateSurface(geGetEditCellView() list("waveguide" "drawing")
CirclePoly)
Surf2 = ccCreateSurface(geGetEditCellView() list("SiEtch0" "drawing")
ccTransformPolyCurve(CirclePoly list(18:0 0)))
SurfOr = ccLayerOr(Surf1 Surf2)
ccGenFigs(car(SurfOr))
The following figure shows how two circular surfaces are combined to create a larger surface using the ccLayerOr function.
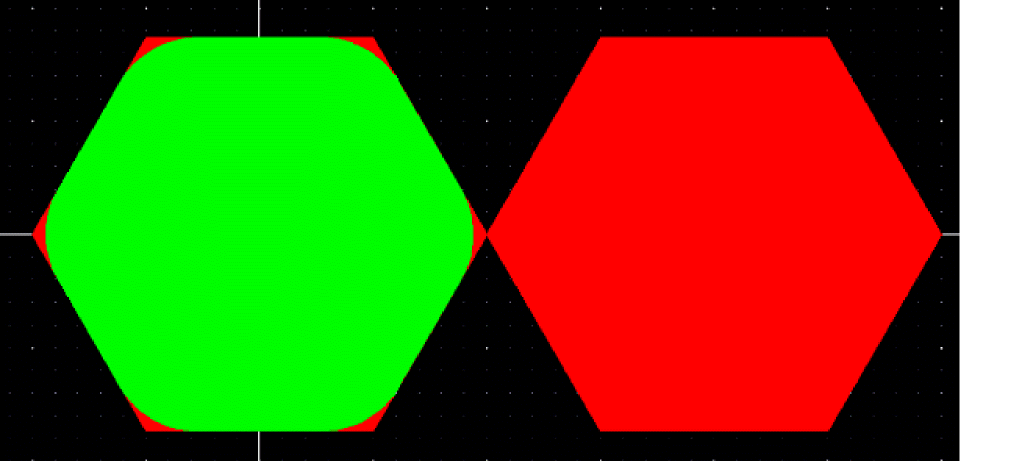
Boolean operator and can be an be applied using the ccLayerAnd SKILL function to extract the overlap area of the above shape with a transformed circle surface.
Surf3 = ccCreateSurface(geGetEditCellView() list("waveguide" "drawing")
ccTransformPolyCurve(CirclePoly list(10:0 0)))
SurfAnd = ccLayerAnd(SurfOr Surf3 ?lpp list("wavgeuide" "drawing"))
ccGenFigs(car(SurfAnd))
In this figure, you can see that the overlap area of the shape has been extracted from the shape.
Related Information
ccLayerOr
Smoothening of Surfaces
You can use the ccSmoothenFig SKILL function to smoothen a surface. Assume that you have a hexagonal surface, and that at the sharp corners of the hexagon, the bend radius is zero. Now assume that you want to smoothen the shape and specify the minimum radius of curvature for the shape to be 4.
In the example below you get similar results.
Hex = CCSCreateNgon(10 6)
HexSurf = ccCreateSurface(geGetEditCellView() list("waveguide" "drawing") Hex)
Hex2Surf = ccCreateSurface(geGetEditCellView() list("waveguide" "drawing")
ccTransformPolyCurve(Hex list(20:0 0)))
Hex3 = ccCreateSurface(geGetEditCellView() list("SiNWaveguide" "drawing") Hex)
HexSmooth = ccSmoothenFig(Hex3 -4)
ccGenFigs(HexSurf)
ccGenFigs(Hex2Surf)
ccGenFigs(HexSmooth)
In this figure, there are three hexagonal surfaces, the red surface on the right is the original hexagonal surface and the two overlapped surfaces are the same original hexagonal surface and its smoothened version.
Related Information
CurvyCore Pcells
There is no significant difference between a typical Pcell and a CurvyCore Pcell other than the fact that in a CurvyCore Pcell, you can use the CurvyCore and photonic functions to generate and manipulate your shapes. This means that all the concepts and best practices of creating a Pcell also work in this situation.
To understand how to work with CurvyCore Pcells, lets consider an S-bend connector Pcell. The parameterized equation and the shape of this connector is shown below.
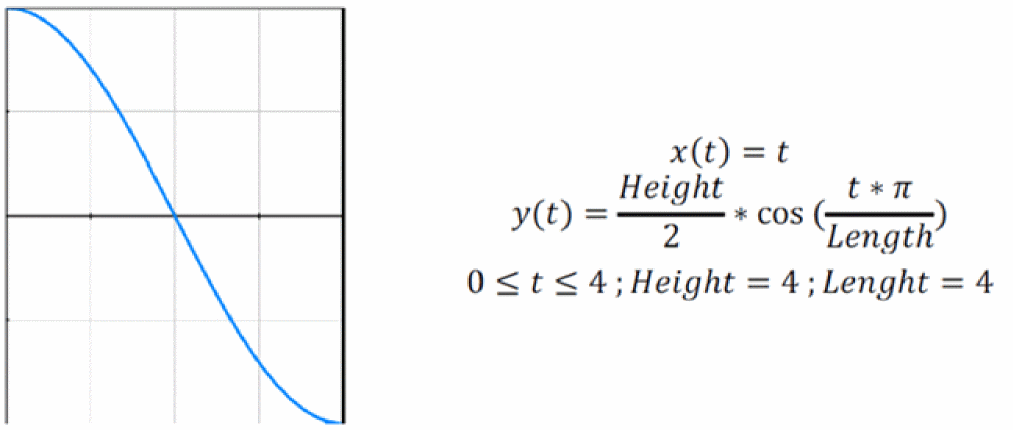
Lets see how to create a generator for the S-bend shape and then use that inside the Pcell code to create the ccPath object.
The following procedure creates a generator for cosine S-bend curve:
procedure(CCSCreateSBend(height length)
let((parameterizedArc)
parameterizedArc.ParamX = "t"
parameterizedArc.ParamY = lsprint("%n/2*cos(t*pi/%n)" height length)
ccCreateCurve(parameterizedArc.ParamX parameterizedArc.ParamY 0:length)
);let
);procedure
In the following Pcell code, width parameter specifies the width of the waveguide path and rotation parameter specifies the rotation applied to the final waveguide path. Next, S-bend generator is used to create the S-bend curve and build the waveguide path.
pcDefinePCell(
list(ddGetObj("gopdk") "CustomSBend" "layout")
;Pcell parameters
(
(designIntentLayer "string" "waveguide")
(rotation "string" "0.0")
(height "string" "10.0u")
(length "string" "40.0u")
(width "string" "0.5u")
);end of parameters
;Pcell body code
let((ccCurve ccPath ccWaveguide)
height = readstring(pcCellView~>parameters~>height)*1e6;
length = readstring(pcCellView~>parameters~>length)*1e6;
width = readstring(pcCellView~>parameters~>width)*1e6;
rotation = readstring(pcCellView~>parameters~>rotation);
);let
);pcDefinePCell
The following code adds three CDF parameters and sets how interpreted labels should be evaluated. Populate the CDF data after loading the file.
let((cellId cdfId)
cellId = ddGetObj("gopdk" "CustomSBend")
when(cdfId = cdfGetBaseCellCDF(cellId)
cdfDeleteCDF(cdfId)
);when
cdfId = cdfCreateBaseCellCDF(cellId)
cdfCreateParam(cdfId
          ?name   "width"
       ?prompt   "Waveguide Width(M)"
       ?defValue  "0.5u"
       ?type   "string"
       ?storeDefault "t")
cdfCreateParam(cdfId
          ?name   "length"
       ?prompt   "Bend Length(M)"
       ?defValue  "40.0u"
       ?type   "string"
       ?storeDefault    "t")
cdfCreateParam(cdfId
          ?name   "height"
       ?prompt   "Bend Height(M)"
       ?defValue  "10.0u"
       ?type   "string"
       ?storeDefault    "t")
;These are related to Cell/Instance Name(cdsName)
cdfId->instDisplayMOde = "instName"
cdfId->instNameType = "schematic"
;These are related to terminals(cdsTerm)
cdfId->termDisplayMode="natName"
cdfId->netNameType="schamatic"
;These are related to Parameters(cdsParam)
cdfId->paramDisplayMode="parameter"
cdfId->paramLabelSet="width length height"
cdfSaveCDF(cdfId)
);let
When waveguideTemplates are defined in the technology database, it is possible to use them to generate a waveguide from a ccPath object.
("Deep SOI Waveguide" ("waveguide" "drawing")
       'minWidth       0.5
    'minBendRadius 10.0
    'modeProperties(
'function "gopdkModePropWG
'namespace(("TE 0)("TM" 1))
)
'derivedShapeSpecs(
( "SiEtch0" 'type "enclosure" 'enclosure 0.05)
( "SiEtch2" 'type "enclosure" 'enclosure 2.0)
)
)
Next, call phoGenWaveguide to generate the required derived shapes.
cdfCreateParam(cdfId
         ?name        "generateWaveguide"
      ?prompt        "Generate Waveguide Derived Shapes"
      ?defValue        "t"
      ?parseAsCel   "no"
      ?type        "boolean"
      ?storeDefault  "t"
      :storeDefault  "yes"
      ?display               "t")
pcDefinePCell(
list(ddGetObj("gopdk")"CustomSBend""layout")
;Pcell parameters
(
(designIntentLayer "string" "waveguide")
(rotation "string" "0.0")
(height "string" "10.0u")
(length "string" "40.0u")
(width "string" "0.5u")
(generateWaveguide "boolean" t)
);end of parameters
;Pcell body code
let((ccCurve ccPath ccWaveguide)
height = readstring(pcCellView~>parameters~>height)*1e6;
length = readstring(pcCellView~>parameters~>length)*1e6;
width = readstring(pcCellView~>parameters~>width)*1e6;
rotation = readstring(pcCellView~>parameters~>rotation);
ccCurve = CCSCreateSBend(height length)
ccpath = ccCreatePath(
pcCellView
list(designIntentLayer "drawing")
list(list(ccCurve list(0:0 rotation)width)))
ccGenFigs(ccpath)
when(generateWaveguide
ccWaveguide=phoGenWaveguide(ccPath)
foreach(CCObj ccWaveguide
ccGenFigs(CCObj)
);foreach
);when
);let
);pcDefinePCell
The following figure shows the S-bend generated on the design intent layer (top shape) and the same S-bend when its associated derived waveguide layers are generated (bottom shape).

Related Information
Waveguide Connectors
CurvyCore building blocks include a set of waveguide connectors such as straight, bend, curve, sine, and waypoint connectors. These connectors are two-port optical waveguides that are used as connector between other optical devices.
CurvyCore building blocks have a set of common features and parameters. Two of these parameters are offset and rotation.
Straight Connectors
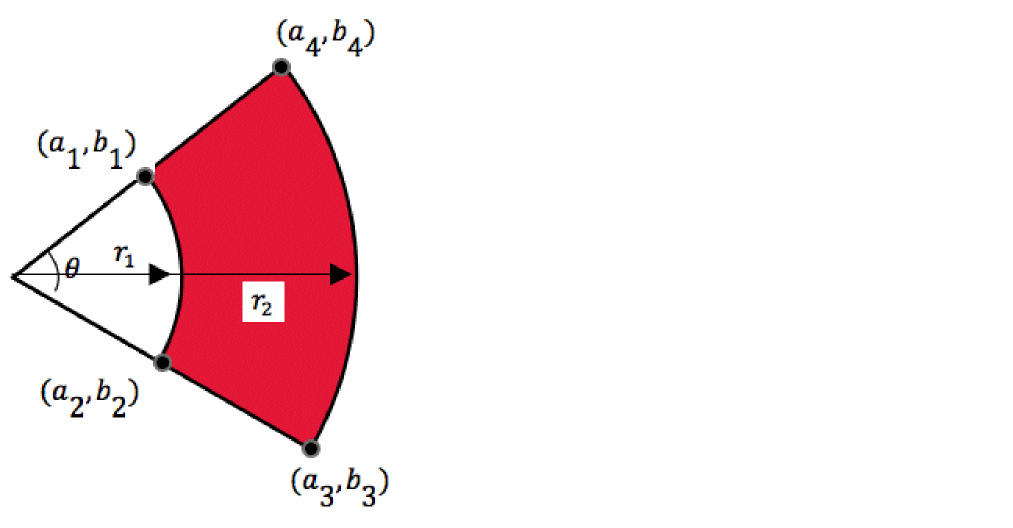
The general shape of a straight waveguide connector is shown in the following figure.
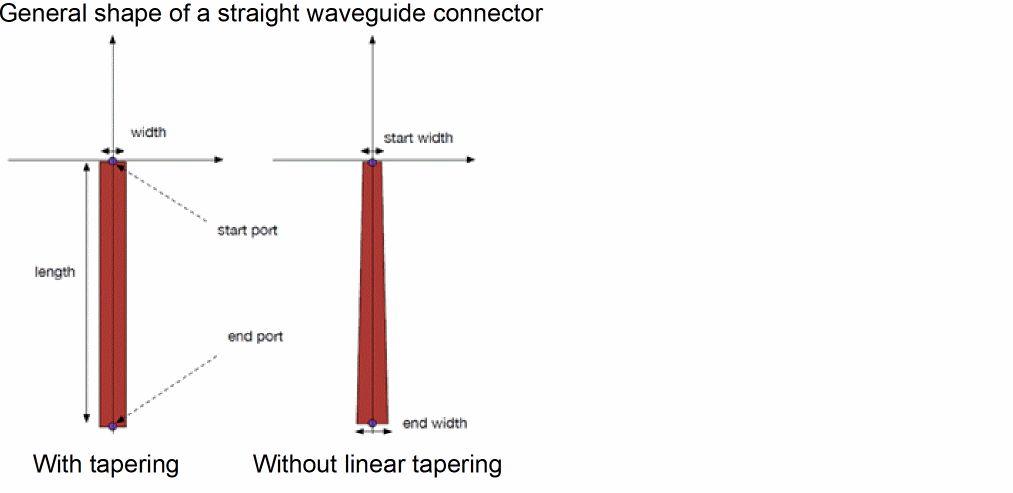
A straight waveguide connector supports two type of straight connections, with tapering and without tapering. It further supports four types of tapering, linear, exponential, logarithmic, and parabolic. If tapering is enabled, you need to set the start and end width and also type of taper when you call the generator, otherwise, width specifies the default width of the straight waveguide. It also supports parameters such as start port and end port names.
Related Information
Bend Connectors
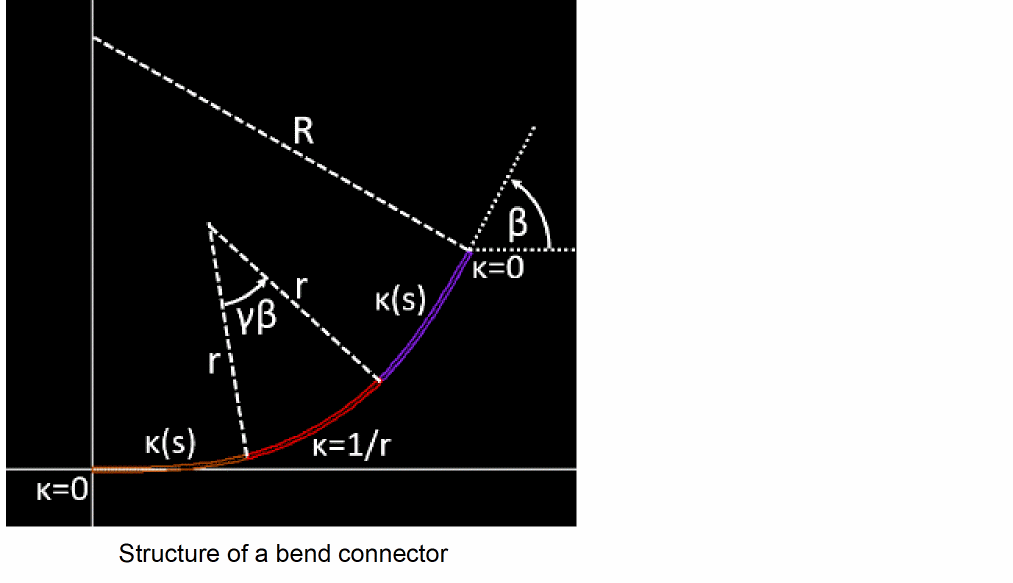
A bend connector connects two points on the same circle with angles equal to the angles of the tangents to that circle. The bend connector is described by the bend radius R of the circle and the bend angle of the arc of that circle. In its simplest form, a bend connector consists of a single circular arc segment. If the bend connector connects two straight waveguide segments with zero curvature k = 0, the curvature at the ports changes discontinuously, causing additional connection loss. This curvature discontinuity can be avoided if additional curve segments are inserted between the straight line segments and the circular arc segments so that the curvature becomes a continuous function k(s) of the arc length as shown in the following figure.
Related Information
Curve Connectors
A curve connector connects one port with the following specifications:
To another port with the following specifications:
Curve connectors connect two points with a set of constraints on the facet angles and curvature radius as shown in the following figure:
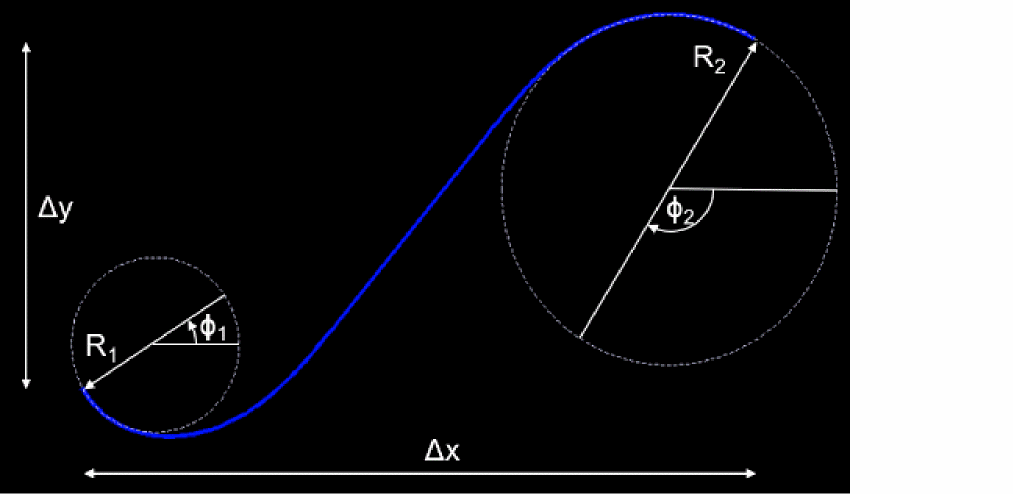
If the coordinate system is rotated and translated such that one port is at the origin and another port is on the x-axis, the curve connector is described in terms of the distance between the ports, the two facet angles with respect to the x-axis, and the two curvature radii. These five boundary conditions together with the minimum curvature radius Rmin represent six constraints for the calculation of the curve connector. With only six constraints, the calculation of curve connectors is an under-constrained issue. One additional constraint can be imposed by requiring that:
This limits the solution space to only three classes of curves, namely straight lines, circular arcs and clothoids. Curve connectors are thus a special case of clothoid splines.
Related Information
Waypoint Connectors
Waypoint connector connects the begin port with coordinates (xb, yb) to the end port with coordinates (xE, yE) by a sequence of straight line segments and bend connectors. The straight line segments are defined by a polygonal line through the series of waypoints with coordinates (xi, yi) as shown in the following figure:
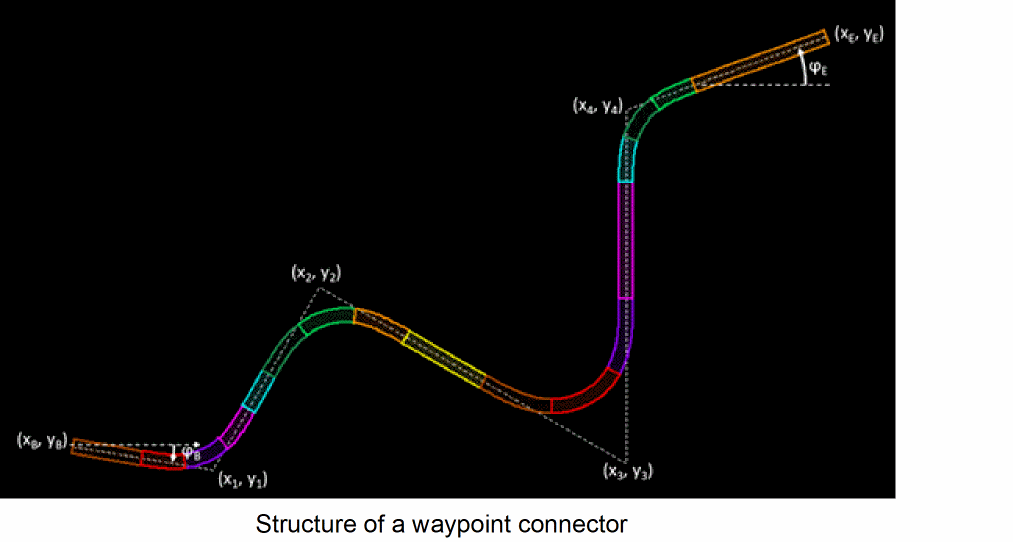
The facet angles at the ports are determined by the angles ϕb and ϕE of the lines connecting the begin point with the first waypoint and the end point with the last waypoint, respectively.
Similarly to a single bend connector, each bend connector in a waypoint connector can also consist of a circular arc connected to the straight lines at its ends by a pair of apex clothoids. This is also shown in the above figure, with the straight line segments, the circular arc segments, and the clothoid segments displayed in different colors. The waypoint connector can be calculated using the ccWaypointConnector SKILL function.
Related Information
Return to top