6
Design Translation Using LEF/DEF Translator
This chapter contains the following sections:
- Overview
- Methods of Design Translation
- Preparing a Template File
- Setting the Environment Variables in LEF In and LEF Out
- Setting the Environment Variables in DEF In and DEF Out
- Viewing Native OpenAccess Libraries in the Virtuoso Studio Design Environment
Overview
Library Exchange Format (LEF) defines the elements of IC process technology and the associated library of cell models. Design Exchange Format (DEF) defines the elements of an IC design relevant to physical layout, including the netlist and design constraints. The LEF and DEF files allow the exchange of placement and routing information with various databases by using the LEF/DEF translators. For more information on LEF and DEF, see
The placement and routing tools on the OpenAccess database read and write LEF and DEF files by using the core OpenAccess LEF/DEF translator. The CIC customized OpenAccess LEF/DEF translator has been written as a Virtuoso Studio design environment-specific application on these translators.
The extended functionality of the CIC customized OpenAccess LEF/DEF translator includes the creation of display.drf file, creation of layer-purpose pairs (LPPs), creation of pin labels, and so on.
The process of reading and writing the LEF and DEF files into OpenAccess is enabled by four executables: lefin, lefout, defin, and defout. These executables are described below.
This chapter describes the methods by which you can exchange design information between the LEF/DEF files and the OpenAccess database using the CIC customized OpenAccess LEF/DEF translators.
Methods of Design Translation
You can translate designs by using the LEF/DEF translators either from the command line or from the Graphical User Interface (GUI).
This section is divided into two parts. The first part describes the command line syntax using which you can run LEF In, LEF Out, DEF In, and DEF Out. The second part describes the GUI options using which you import and export LEF and DEF files.
Running LEF In and LEF Out from Command Line
You can import and export LEF files in the batch mode by running the lefin and lefout commands. Use the following syntax to run LEF In and LEF Out:
LEF In Command Line Syntax
lefin {-h | -lef lefFileNames
  -lib libName
  [-libPath libPath]
  [-tech techLibName]
  [-techPath techLibPath]
  [-techRefs libList]
  [-overwrite]
  [-shared]
  [-view viewName]
  [-log logfileName]
  [-layerMap layerMapFiles]
  [-commentChar char]
  [-templateFile templatefileName]
  [-pinPurp pinPurposeName]}
  [-textHeight height]
  [-textLayer layerName]
  [-compress [-compressLevel compressionLevel]]
  [-mapConflicts]
  [-pnrLibDataOnly]
  [-useFoundryInnovus]
  [-keepOriginalDisplayDrf]
  [-verilogStubFile verilogStubFiles]
  [-createFixedViaDefs]
  [-lockColors]
  [-suffix suffix ]
  [-antennaDiffAreaPropValueIsWidthAndRatio]
}
|
Input names of LEF files, seperated by space. |
|
|
Output library name. If the output library does not exist, a new library is created in the current directory and contains the translated technology database and macros. If the output library exists, it must contain a technology database or refer to the technology database of another library. In addition, any existing macros, if redefined in the LEF file, are overwritten and new cells are created for the new macros. |
|
|
Complete path where the technology library is to be created. |
|
|
Lists the parent technology databases that are referenced in the incremental technology database. |
|
|
Allow other applications to access the output library while the current application is running. |
|
|
Output view name for the translated macros. The default view name is |
|
|
Specifies the filename where the log messages would be stored. By default, the log messages are printed at |
|
|
Specifies the layer map file. You can specify multiple layer map file names separated by spaces during lef in. While creating layers, the layer numbers specified in these files are used.
For example, |
|
|
A layer map file contains a list of LEF layer names that maps to the corresponding OpenAccess layer numbers. The LEF layer names and OpenAccess layer numbers must be separated by a space. A sample layer map file is shown below:
|
|
|
A file that contains command options. The template file contains the list of LEF options and values separated by a space. |
|
|
A sample
|
|
|
Defines the text height to be used for pin labels. The height is specified in database units (DBU). If pin label text height is not specified, DBU value in the technology database for maskLayout views is considered as the default pin label text height. |
|
|
Allows libraries to be compressed and defines the compression level. Default compression level is 1. |
|
|
Maps conflicts between the incremental and base technologies to constraints and constraint parameter definitions. |
|
|
Filters the Place and Route information. The information can be stored only as incremental technology database on the top of existing referenced technology database. Therefore, the
This option cannot be specified along with |
|
|
Enables Innovus to see the same design rules that are described in LEF without impacting the Virtuoso tools. For more information, see General Processing Rules of useFoundryInnovus.
This option cannot be specified along with |
|
|
Specifies list of input Verilog files. The specified Verilog files are sent to the |
|
|
Locks color data of all shapes created using the PORT and PIN definitions and are associated with a MASK construct. |
|
|
Appends the specified suffix to the names of the standard constraint groups, |
|
|
Translates values specified for the LEF MACRO pin property LEF58_ANTENNADIFFAREA as width and ratio. |
|
-
lefincreates layer-purpose pairs and pin labels on pins. In addition, it creates thedisplay.drffile that consists of packet display information. Ifdisplay.drfalready exists in the current library, then a copy of the existingdisplay.drfis saved asdisplay.drf.origand new packet display information is appended to the existingdisplay.drffile in Virtuoso Studio design environment on OpenAccess 2.2. Thedisplay.drf.origis created once and is never overwritten.
In OpenAccess 2.0, ifdisplay.drfalready existed in the current library, a new file,display.drf.lefinwas created to store the packet display information. You had to manually merge the files if required. -
You can specify the
-cdsliboption to access thecds.libfile from any other directory.
-lefin -cdslib<cds.lib_file_path> -
lefincreates new layer-purpose pairs in the technology library and display packets to support the display of blockages and track patterns. For each layer defined in the lef file, lefin will create layer-purpose pairs only for the following purposes:drawing,fill,slot,gapfill,fillOPC,blockage,track,boundary,net, andpin. For example, if a layer L1 is defined in the lef file, following LPP’s will be created in technology:
L1 drawing
L1 fill
L1 slot
L1 gapFill
L1 fillOPC
L1 blockage
L1 track
L1 boundary
L1 pin
L1 net
This information is available in the techLayerPurposePriorities section of the layerDefinitions section in the technology library. Lefin also creates display packets for all these LPP’s in the technology library. This is available in the techDisplays section of layerDefinitions section of the technology library. In addition, lefin creates a display.drf file, which contains the complete information. -
During LEF In, via layers in the technology file now get populated.For a library that does not have a tech database, the attached technology data is used. In native OpenAccess, the tech.db in the library overrides an attached technology library. In Virtuoso Studio design environment on OpenAccess 2.2, however, the attached technology library overrides the tech.db in the library and
lefoutuses the technology information from the attached technology data. -
When any workbench is run, if
display.drfdoes not exist in the directory from which it is run, the defaultdisplay.drffile is loaded. During LEF In, ifdisplay.drfdoes not exist in the directory from which it is run, a newdisplay.drfis created. On subsequent LEF In runs, the new information is added to the existingdisplay.drf. When you exit a session, you are prompted to save the layer display information. On saving it, some extra sections, such asdrDefineColoranddrDefineStipple, are added to thedisplay.drffile. If you do not savedisplay.drf, the extra sectionsdrDefineColoranddrDefineStipple, are not added to the file. -
LEF in throws an error and skips the MACRO translation when macro name and foreign name are different and view specified is
layoutto avoid conflict. To workaround this issue, use same FOREIGN name or specify view asabstract.
General Processing Rules of -pnrLibDataOnly
Data processing rules for LEF LAYER statements:
- If the layer already exists in referenced technology database:
- If the layer does not exist in the referenced technology database, new layer is not created and all information is skipped.
Processing of LEF VIAS, MACROS, VIAS, and VIARULES:
- If the object with the same name does not exist in the referenced technology database, it is created in the referenced technology database.
- If the object with the same name exists in referenced technology database, it cannot be modified and all LEF information is skipped.
-pnrLibDataOnly option works for 20 nm and larger designs. Cadence recommends using the -useFoundryInnovus option, instead. General Processing Rules of useFoundryInnovus
Virtuoso and Innovus treat LEF files data differently but the -useFoundryInnovus option allows merging the Virtuoso and Innovus data. Here, Innovus-specific LEF file can be placed on the top of Virtuoso-specific referenced technology database. Most of the incompatibilities relate to the treatment of the Foundry group constraints. Therefore, the translator creates special constraint group foundry_innovus and uses it instead of Foundry constraints group to store the Innovus-specific information. Innovus also uses Innovus-specific layers, so unlike the -pnrLibDataOnly option, this option allows creation of new layers and modification of some existing layers properties. However, all changes are stored in the incremental technology database.
General data processing rules for LEF LAYER statement:
-
Data related to
LEFDefaultRouteSpecconstraint group constraints such asWIDTH,LENGTH, andPITCHis placed in theLEFDefaultRouteSpecconstraints group. -
Data related to
Foundryconstraint group constraints such asMINWIDTHandMINSTEPis placed in thefoundry_innovusconstraint group. -
LEF58_PROPERTY type properties information is stored in the
foundry_innovusconstraint grouplayerPropconstraints values. -
New
REGIONlayers are ignored and info messages are displayed. -
Layer-type information is stored in the
foundry_innovusconstraint group in thelefTypeconstraint value. -
Order of the LEF layers is preserved and is stored in the
foundry_innovusconstraint group in thelefLayerOrderconstraint value.
Processing of LEF VIAS, MACROS, VIAS, and VIARULES:
- If the object with the same name does not exist in the referenced technology database, it is created in referenced technology database.
If the object with the same name exists in referenced technology database, it cannot be modified and all LEF information is skipped.
Use of Suffix with useFoundryInnovus or pnrLibDataOnly
When using the useFoundryInnovus or pnrLibDataOnly options, you can add the information to the existing library by adding a suffix to the file names.
-
Base pdk is
base_pdk -
Two technology LEF files compatible with the
base_pdkaretechLef1.lefandtechLef2.lef
You can create a multi-technology rapid MSOA PDK in the following way:
lefin -lef techLef1.lef -suffix _techLef1 -lib rmsoa_pdk -techRefs base_pdk -useFoundryInnovus
lefin -lef techLef2.lef -suffix _techLef2 -lib rmsoa_pdk -useFoundryInnovus
The first lefin command creates the rmsoa_pdk library and adds the information from techLef1. The second lefin command adds the information from techLef2. The suffix prevents collisions between the two technology files.
The suffix affects the naming of the constraint group foundry_innovus (and any member constraint groups created with it), LEFDefaultRouteSpec, and LEFSpecialRouteSpec.
LEF Out Command Line Syntax
lefout {-h | -lef fileName
-lib libName
[-cells cellName[cellName...]]
[-cellList cellListFile]
[-views viewName [viewName...]]
[-log logfileName]
[-noTech]
[-ver <5.4|5.5|5.6|5.7|5.8|6.0>]
[-techOnly]
[-useFoundryInnovus]
[-templateFile templateFileName]
[-lockedColorsOnly]
[-suffix suffix ]
[-antennaDiffAreaPropValueIsWidthAndRatio]
}
-
The
-liboption outputs the information, which is present in the technology file in the LEF format. To do so, it follows certain set of rules: -
You can specify the
-cdsliboption to access thecds.libfile from any other directory.
-lefout -cdslib<cds.lib_file_path>
Running DEF In and DEF Out from Command Line
You can import and export DEF files in the batch mode by running the defin and defout commands. The syntax used to run DEF In and DEF Out is shown below:
DEF In Command Line Syntax
defin {-h | -def defFileName
-lib libName
[ -libpath libPath ]
[ -cell cellName ]
[ -view viewName ]
[ -masterLibs libList ]
[ -viewNameList viewNamesForComponents ]
[ -tech techLibName ]
[ -techRefs libList ]
[ -log logfileName ]
[ -useCustomVias ]
[ -overwrite ]
[ -createModHier ]
[ -commentChar char ]
[ -shared ]
[ -noRouting ]
[ -templateFile templateFileName ]
[ -pinPurp pinPurpose ]
[ -layerMap layerMapFile ]
[ -userSkillFile skillFile]
[ -compress [-compressLevel compressionLevel ]
[ -ignoreDrcFill ]
[ -lockColors ]
[ -oaMapFile mapfile ]
[ -alternateFoundry constraintGroupName ]
}
|
Output library name. If the output library does not exist, a new library is created in the current directory. In addition, the - If the output library exists, it must contain a technology database, or refer to the technology database of another library. |
|
|
List of reference libraries that contain master cells. You can specify multiple reference library names separated either by a comma, space, or a tab. The reference libraries are searched for the master cells in the order in which you list the libraries. |
|
|
Specifies view names for the master cells that are searched for a DEF |
|
|
Technology library that is to be attached to the output library. This option is useful only if the output library does not exist. |
|
|
Lists the parent technology databases that are referenced in the incremental technology database. |
|
|
Specifies the filename where the log messages are to be stored. By default, the log messages are printed at |
|
|
Creates module hierarchy from hierarchical names. Using this option can decrease DEF In speed. |
|
|
Allows other applications to access the output library while the application is running. |
|
|
Specifies the layer map file. You can specify multiple layer map file names separated by spaces during def in. While creating layers, the layer numbers specified in these files are used. |
|
|
For example, A layer map file contains a list of DEF layer names that maps to the corresponding OpenAccess layer numbers. The DEF layer names and OpenAccess layer numbers must be separated by a space. |
|
|
A sample layer map file is shown below:
#DEFLayerName OpenAccessLayerNumber |
|
|
Complete path where the technology library is to be created. |
|
|
Allows libraries to be compressed and defines the compression level. Default compression level is 1. |
|
|
Specifies a file that consists of user-defined SKILL routines. |
|
|
Maps all shapes specified with the |
|
|
Locks color data of all shapes created using the PORT and PIN definitions and are associated with a MASK construct. |
|
|
Uses the specified mapping file to post-process the design before it is saved. For more information, see Using the oaMapFile option for different OpenAccess Database Formats. |
|
|
Uses the specified constraint group instead of the default foundry constraint group. Constraint group specified using this option, overwrites the name specified in the .cdsenv file using the |
|
During lefin, the layerMap option creates a layer along with the corresponding layer number in the technology file. The layer entry created in the technology file maps with the entry in the layer map file. Unlike lefin, defin does not create a layer in the technology file. It only searches for the layer in the technology file using the layer number corresponding to the layer name in the layer map file.
-defin -cdslib <cds.lib_file_path>
DEF Out Command Line Syntax
defout {-h | [-def] defFileName
-lib libName
-cell cellName
-view viewName
[ -log logfileName ]
[ -skipNoneOrViaCellType ]
[ -mapDividerChar mapChar ]
[ -dividerChar dividerChar ]
[ -busbitChars busbitChars ]
[ -userSkillFile skillFile ]
[ -ver <5.4|5.5|5.6|5.7|5.8|6.0> ]
[ -templateFile templateFileName ]
[ -outputFloatingShapes ]
[ -warnOnNotPlacedInsts ]
[ -skipPhysOnlyInsts ]
[ -gdsCompatible ]
[ -noDefOnError ]
[ -lockedColorsOnly ]
[ -errorOnGrayShapes ]
[ -errorOnUnlockedShapes ]
[ -skipTrimShapes ]
[ -skipTrimProductShapes ]
[ -skipTrimmedShapes ]
[ -outputTrimmetalGapFill ]
[ -outputTrimSegsAsNets ]
[ -maskShiftLayers layerNames ]
[ -oaMapFile mapfile ]
}
All features of DEF version 5.7 are not supported in the 6.1.2 release.
|
Specifies the filename where the log messages are to be stored. By default, the log messages are printed at |
|
|
Specifies that the cells of type ‘none’ or ‘via’ are not written in the output def file. |
|
|
Specifies a single character to be replaced in instance and net names by the DEF DIVIDERCHAR. |
|
|
Specifies new busbit character pair to be used during output. |
|
|
Specifies a file that consists of user-defined SKILL routines. |
|
|
Outputs floating shapes into the
Floating shapes are shapes that do not have any connectivity information. All shapes on
When specified during DEF OUT translation, any drawing shape on a layer, which is not a member of a net is exported on a net in the SPECIALNETS section named |
|
|
Adds warnings in the log file for the instances in the DEF Out output that have no placement status. |
|
|
Prevents output of physical instances. If |
|
|
Generates a DEF file with limits that make it compatible with GDS. |
|
|
Prevents the DEF output file from being generated if there are errors during translation. |
|
|
Outputs colors for only those shapes that have their locked state set to true. This includes pathSegs in nets, rects and polygons, and fill shapes and vias in specialnets. |
|
|
Displays errors if gray or uncolored shapes or vias are found during translation.
When the technology library contains preColoredLayers constraint in the
VirtuosoMPTSetup constraint group, the layer-purpose pairs (LPPs), or, the layers list, or both from the first preColoredLayers constraint are not considered for error checking. Additionally, colorless layers and colorless LPPs are not considered for error checking. (Virtuoso Advanced Node for Layout Only) |
|
|
Displays errors if any colored shapes or vias with unlocked status are found during translation.
When the technology library contains preColoredLayers constraint in the
VirtuosoMPTSetup constraint group, the LPPs, or the layers list, or both from the first preColoredLayers constraint are not considered for error checking. Additionally, colorless layers and colorless LPPs are not considered for error checking. (Virtuoso Advanced Node for Layout Only) |
|
|
Prevents output of trim layers shapes into the |
|
|
Prevents output of trim product shapes into the |
|
|
Prevents output of trim layers shapes into the |
|
|
Output the trim gap fill shapes (bridge metal shapes) into the |
|
|
Output trim product shapes into NETS section.
The following options cannot not be specified together: |
|
|
Specifies list of layers used in COMPONENTMASKSHIFT statement. |
|
|
Uses the specified mapping file to pre-process the design before it is exported to DEF. For more information, see Using the oaMapFile option for different OpenAccess Database Formats. |
|
-defout -cdslib <cds.lib_file_path>
Using the oaMapFile option for different OpenAccess Database Formats
Some technologies use alternative OpenAccess database formats that differ from the conventional OpenAccess formats because they use non-standard OpenAccess layers, purposes, and color masks to store technology components properties.
The DEF In and DEF Out translators are designed to work only with conventional OpenAccess databases and cannot be customized to work with alternative representations. You can use the DEF translator for alternative technologies only after converting such databases into the conventional format.
The oaMapFile option controls the conversion between alternative and conventional OpenAccess database formats. When this option is specified:
- The DEF In translator creates the OpenAccess database in conventional format for translation.
- After the translation is complete, the DEF Out translator converts the conventional database to an alternative database and then generates the DEF output file.
- The changes in the database format are saved in memory only. No updates are made to the source OpenAccess alternative format database after translation.
-
Properties for this conversion are defined in a configuration text file called
map.
The conversion operation searches for oaShape objects with specific properties, such as assigned layers, purposes, or color masks and changes these properties according to the configuration stored in the configuration map file.
Format of the OpenAccess mapping configuration file
The OpenAccess mapping configuration file is in text format and can contain the following types of lines:
-
Title line. This is a mandatory line and it containing information regarding the file type and version as shown below:
When DEF translation reads the configuration file, it controls its type and version. Translation cannot continue if the mapping file version is newer than the version supported by the translator.## OA2OA_CONFIG <config_version> - Empty lines.
-
Comments, which start with a
#. -
Commands, which start with a mapping file command name. These commands are in upper case. Currently, commands
CHANGE_SHAPE_LPPandCREATE_PURPOSEare supported.
Mapping file commands
CHANGE_SHAPE_LPPfromLayerfromPurposefromColorMaskTOtoLayertoPurposetoColorMask
This command transforms all shapes on the layer fromLayer with purpose fromPurpose and color mask fromColorMask to layer toLayer and sets the purpose to toPurpose purpose, and the color mask toColorMask.
- The mapping format is reversible. Direct mapping is used during DEF In translation and is reversed during DEF Out translation. In reversed transformation, information in the from argument is treated as the to argument and the to argument is treated as the from argument.
-
You can use the wildcard
*instead of specifying all layer, purpose, and color mask names to be mapped. The mapping statement depends on where the wildcard is used:-
You can use multiple
CHANGE_SHAPE_LPPlines in the configuration map file. The mapping commands are run sequentially, which in some configurations can result in several transformations. This is why, ifCHANGE_SHAPE_LPPuses the*wildcard for a property in the from argument of the statement, it also has to have*for the same property in the to argument of the statement. Otherwise, the information will be lost during transformation and the mapping cannot be used for format conversion operations. - If the from argument is replaced with *, it specifies that all applicable layers, purposes, and color masks are mapped.
- If the to argument is replaced with *, it specifies that the property for the shape should be preserved during transformation from one database format to another.
-
The
fromColorMaskandtoColorMaskparameters should have IOTA mask color namesgrayColor,mask1Color,mask2Color, andmask3Color.
-
You can use multiple
CREATE_PURPOSE <purposeName> <purposeNumber>
This command lets you create an oaPurpose property. Alternative database formats depend on custom purposes that do not exist in conventional OpenAccess technology databases. The CREATE_PURPOSE command creates an oaPurpose property with a name, purposeName, and assigns to it a number, purposeNumber. The new oaPupose is placed in the technology library, which must be editable. The command is active only in direct DEF In translation and is skipped during DEF Out translation because custom purposes are already defined in the alternative technology databases. The CREATE_PURPOSE command is mostly used for testing.
Examples of mapping configuration files
## OA2OA_CONFIG 1.0
CHANGE_SHAPE_LPP M1 drawing grayColor TO M2 fill grayColor
Converts all non-colored shapes on M1 layer with oaPurpose drawing to M2 layer with oaPurpose fill.
Example 2: Mapping shapes with different color masks to different layers
## OA2OA_CONFIG 1.0
CHANGE_SHAPE_LPP M1 drawing mask1Color TO M1_1 * grayColor
CHANGE_SHAPE_LPP M1 drawing mask2Color TO M1_2 * grayColor
CHANGE_SHAPE_LPP M1 drawing mask3Color TO M1_3 * grayColor
Converts colored shapes on M1 layer with oaPurpose drawing to non-colored shapes on M1_1, M1_2, and M1_3 layers.
The shapes are placed according their color masks. For instance, shapes with mask3Color are placed on M1_3. All the resulting shapes are specified as non-colored shapes and the purpose drawing is preserved.
Example 3. oaPurpose transformation of all database shapes
## OA2OA_CONFIG 1.0
CREATE_PURPOSE dummy 1
CHANGE_SHAPE_LPP * gapFill * TO * dummy *
Converts all shapes with purpose gapFill, to shapes with purpose as dummy. All color information is preserved. If oaPurpose dummy does not exist in the technology database, it is created by the CREATE_PURPOSE command.
Example 4. General conversion of color masks to purposes.
## OA2OA_CONFIG 1.0
CREATE_PURPOSE dummy 1
CREATE_PURPOSE dummy_a 2
CREATE_PURPOSE dummy_b 3
CREATE_PURPOSE dummy_c 4
CHANGE_SHAPE_LPP * gapFill mask1Color TO * dummy_a grayColor
CHANGE_SHAPE_LPP * gapFill mask2Color TO * dummy_b grayColor
CHANGE_SHAPE_LPP * gapFill mask3Color TO * dummy_c grayColor
Converts all colored shapes with purpose gapFill to dummy_a, dummy_b, and dummy_c non-colored shapes. Purposes dummy_a, dummy_b, are dummy_c are created if required.
If you use * only in the to argument of the command:
## OA2OA_CONFIG 1.0
CHANGE_SHAPE_LPP M1 drawing grayColor TO M2 * *
Then the command moves all non-colored drawing purpose shapes from M1 layer to M2 layer, preserving their color state (grayColor) and oaPurpose (drawing). This command is equivalent to:
## OA2OA_CONFIG 1.0
CHANGE_SHAPE_LPP M1 drawing grayColor TO M2 drawing grayColor
Colorless Layers and Colorless LPPs (Virtuoso Advanced Node for Layout Only)
Colorless layers are those colorable layers that are in the technology file but are not present in the validLayers constraint list of the constraint virtuosoMPTSetup.
Color checking for the errorOnGrayShapes and errorOnUnlockedShapes options is performed for all shapes on the colored layers and layer-purpose pairs (LPP). However, it is skipped for the shapes on colorless and pre-colored layers or LPPs.
DEF Out considers the following constraints to identify colorless layers:
- validLayers: Lets you specify a set of only those layers, LPPs, or both that can be colored, will be colored, and should be color-checked.
-
validPurposes (when
'includeis specified): Lets you specify a set of only those purposes that should be included for color-checking on the LPPs. -
preColoredLayers
:Lets you specify a set of layers that can be colored but need not have every shape colored. Coloring on these layers or LPPs should not be checked.
Following examples illustrate the use of these constraints while color-checking in DEF Out.
Consider that the technology has the following colorable layers: M0, M1, M2, M3, M4, M5, M6, VIA0, VIA1, VIA2
If the virtuosoMPTSetup constraint group in the technology defined as:
;( group [override] [definition] [operator] )
;( ----- ---------- ------------ ---------- )
( "virtuosoDefaultMPTSetup" nil "virtuosoMPTSetup"
interconnect(
( validLayers (M0 VIA0 M1 VIA1 M2 VIA2 M3 M4 ) )
( validPurposes 'include ("drawing") )
) ;interconnect
spacings(
( preColoredLayers "VIA0" "VIA1" "VIA2")
) ;spacings
) ;virtuosoDefaultMPTSetup
-
Colorlable layers are
(M0, M1, M2, M3, M4, M5, M6, VIA0, VIA1, VIA2) -
Valid layers are
(M0, VIA0, M1, VIA1, M2, VIA2, M3, M4). -
Colorless layers are all colorlable layers that are not valid layers. These layers are
(M5, M6). -
Precolored layers are
(VIA0, VIA1, VIA2). -
Exclusion layers, which are layers excluded from DEF Out error-checking, include both precolored layers and colorless layers. This layers are
(VIA0, VIA1, VIA2, M5, M6).
Example 2: When validPurposes with the include list and preColoredLayers with layers and LPPs is specified
Consider that the technology has the following colorable layers: M1, M2, M3
LPPs on these colorable layers are: ((M1 pin) (M1 drawing) (M1 net) (M2 pin) (M2 drawing) (M2 net) (M3 pin) (M3 drawing) (M3 net))
If the virtuosoMPTSetup constraint group in the technology defined as:
;( group [override] [definition] [operator] )
;( ----- ---------- ------------ ---------- )
( "virtuosoDefaultMPTSetup" nil "virtuosoMPTSetup"
interconnect(
( validLayers (M1 M2) )
( validPurposes 'include ("pin" "drawing") )
) ;interconnect
spacings(
( preColoredLayers "M1" ("M3" "drawing") )
) ;spacings
) ;virtuosoDefaultMPTSetup
In this case, although color-checking should be performed for all shapes on the colored layers, M1, M2 and M3, it is restricted to only certain layers and LPPs. This is because considering the above constraints, some layers and LPPs are excluded from color-checking.
-
Colorless layers or LPPs are
((M1 net) (M2 net) M3) -
Pre-colored layers or LPPs are
(M1 (M3 drawing)) -
Exclusion layers and LPPs, which are layers and LPPs that
errorOnGrayShapesanderrorOnUnlockedShapesoptions will exclude from DEF Out error-checking, include both precolored and colorless layers and LPPs. These are(M1 (M2 net) M3) -
Color-checking will be done only for layers and LPPs
((M2 pin) (M2 drawing))
Example 3: validLayers with LPPs and preColoredLayers with layers and LPPs:
Consider that the technology has the following colorable layers: M1, M2, M3
LPPs on these colorable layers are: ((M1 pin) (M1 drawing) (M1 net) (M2 pin) (M2 drawing) (M2 net) (M3 pin) (M3 drawing) (M3 net))
If the virtuosoMPTSetup constraint group in the technology is specified as:
;( group [override] [definition] [operator] )
;( ----- ---------- ------------ ---------- )
( "virtuosoDefaultMPTSetup" nil "virtuosoMPTSetup"
interconnect(
( validLayers ( ( M1 pin) ( M1 drawing) ( M2 pin) ( M2 drawing) ) )
) ;interconnect
spacings(
( preColoredLayers "M1" ("M3" "drawing") )
) ;spacings
) ;virtuosoDefaultMPTSetup
In this case, although color-checking should be performed for all shapes on the colored layers, M1, M2 and M3, it is restricted to only certain layers and LPPs. This is because considering the above constraints, some layers and LPPs are excluded from color-checking.
-
Colorless layers and LPPs are
((M1 net) (M2 net) M3) -
Pre-colored layers and LPPs are
(M1 (M3 drawing)) -
Exclusion layers and LPPs, which are layers and LPPs that
errorOnGrayShapesanderrorOnUnlockedShapesoptions will exclude from DEF Out error-checking, include both precolored and colorless layers and LPPs. These are(M1 (M2 net) M3) -
Color-checking will be done only for layers and LPPs
((M2 drawing) (M2 pin))
Running LEF In and LEF Out from GUI
In addition to using the LEF/DEF translator from the command line, you can also run it from the GUI. This can be done by choosing the File – Import – LEF and File – Export – LEF commands from CIW.
This section provides description on the interactive graphical user interface forms used for running LEF In and LEF Out.
File – Import – LEF
Reads a LEF file and stores information in the OpenAccess library. When you run this command from the CIW, the LEF In form is displayed.
LEF In Form
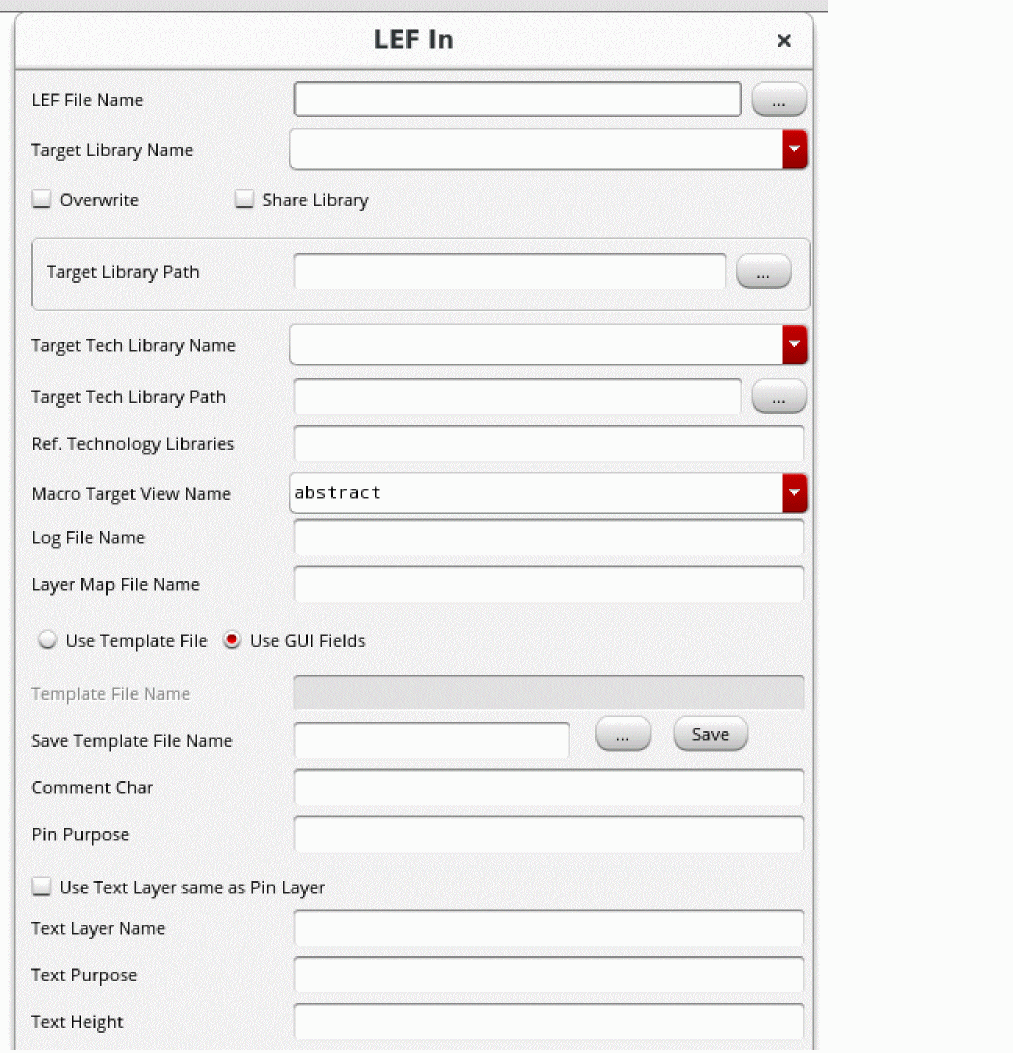
LEF File Name
Use the LEF File Name field to specify a name for the input LEF file. Alternatively, click the ellipses (...) button to locate the LEF file on your machine.
Target Library Name
Use the Target Library Name field to specify a name for the target library.
If a target library does not exist, it is created in the current directory and contains the translated technology database. If the target library exists, it must have a technology database or refer to the technology database of another library.
In addition, existing macros, if redefined in the LEF file, are overwritten and new cells are created for the new macros.
Overwrite
Use the overwrite option to overwrite an existing design in the target library with the translated data. By default, this option is deselected. If this option is deselected, the default behavior is to update the existing library.
Share Library
Use the Share Library option to share the input-output library with other applications while the current application is running.
Target Library Path
Use the Target Library Path field for specifying the complete path where the target library is to be created. The path must be valid because the translator does not interpret the path and stores it in the cds.lib file. Alternatively, click the ellipses (...) button to locate the target library on your machine.
Target Tech Library Name
Use the Target Tech Library Name field to specify a name of the technology library to be used when creating a new cell library. If the specified technology library does not exist, the library is created using the technology information in the LEF file.
Target Tech Library Path
Use the Target Tech Library Path field to specify the path where the technology library is to be created. The path must be valid because the translator does not interpret the path and stores it in the cds.lib file. Alternatively, click the ellipses (...) button to locate the target technology library on your machine.
Ref. Technology Libraries
Use the Ref. Technology Libraries field to specify the parent technology databases that will be referenced by the incremental technology database. You can specify multiple parent technology databases in this field. If there are conflicts in the parent technology databases that you specify in this field, the tool generates the following error and stops.
ERROR: (OALEFDEF-90033): LefIn created a technology file that has conflicts. The created technology file is corrupt. Remove the file manually and run LefIn after resolving the conflicts.
Macro Target View Name
Use the Macro Target View Name field to select a view name for the translated macros. This option stores LEF macros with the specified view name. The two possible values for this field are abstract and layout. If you do not provide any name in this field, then abstract is accepted as the default view name.
Log File Name
Use the Log File Name field to specify the filename where the log messages are to be stored. By default, the log messages are printed at stderr.
Layer Map File Name
Use the Layer Map File Name field to specify a layer map file. You can specify multiple layer map file names separated by spaces in this field. While creating layers, the layer numbers specified in these files are used.
A layer map file contains a list of LEF layer names that map to the corresponding OpenAccess layer numbers. The LEF layer names and OpenAccess layer numbers must be separated by a space.
A sample layer map file is shown below:
#LEFLayerName    OpenAccessLayerNumber
  POLYS                0
  CUT01                1
  RX                   2
  CUT12                3
  M1                   4
In the above file, LEF layer POLYS is mapped to OpenAccess layer number 0. Similarly, CUT01 is mapped to OpenAccess layer number 1, and so on.
Use Template File
You can choose to specify the values for LEF In using either a template file or through the GUI fields. When you select the Use Template File option, you are expected to provide a template file in the Template File Name field as the other GUI fields become disabled.
Use the Template File Name field to specify the template file that contains all the command options. This field is enabled only if you select the Use Template File option.
Use the Save Template File Name field to specify the name of the template file you want to save. You can either specify a name for the template file or click the ellipses (...) button to locate the template file on your machine. To save the file, click the Save button.
Save
Click the Save button, to save the file.
Use GUI Fields
Use this option to specify the LEF In options through the GUI form. This is the default option.
Comment Char
Use the Comment Char field to specify the special character that identifies comments.
Pin Purpose
Use the Pin Purpose field to specify the purpose for pin geometries.
Use Text Layer same as Pin Layer
Use the Use text Layer same as Pin Layer option to specify the text layer name from pin.
Text Layer Name
Use the Text Layer Name field to specify the layer on which the text for pin label should be created. If the specified layer does not exist in the technology database, it is added. However, if the text layer name is not specified, text is considered as the default pin label text layer.
Text Purpose
Use the Text Purpose option to specify the text purpose name.
Text Height
Use the Text Height field to specify an integer value for the height on which the text for pin label should be created. The height is specified in database units (DBU). If pin label text height is not specified, DBU value in the technology database for maskLayout views is considered as the default pin label text height.
For example, your techlib defines 1 micron as 2000 DBU, and the textHeight value should be 0.1 micron, which is equal to 200 DBU. Since textHeight must be in DBU, specify the textHeight as 200.
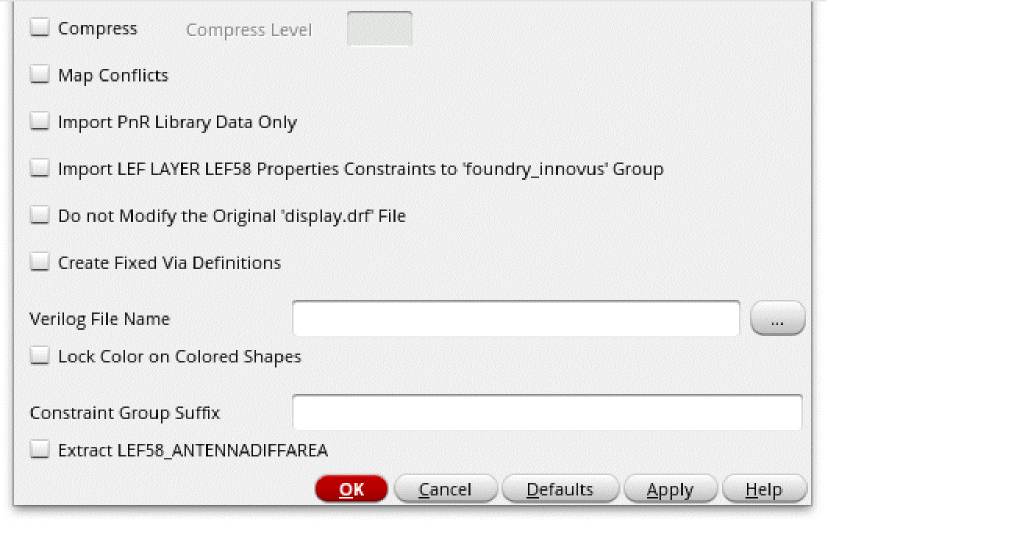
Compress
Use the Compress option to enable compression during LEF In.
Compress Level
Use the Compress Level option to specify the level of compression to be applied during LEF In. You can specify a value from 1 to 9 for this option. Value 1 signifies the lowest level of compression and 9 signifies the highest level of compression. If you do not specify any value in the Compress Level option, value 1 is considered as the compression level during LEF In. This option is enabled only if the Compress option is selected.
Map Conflicts
Use the Map Conflicts field to map conflicts between the incremental and base technologies to constraints and constraint parameter definitions.
Import PnR Library Data Only
Use the Import PnR Library Data Only option to filter the Place and Route information. The information can be stored only as incremental technology database on the top of existing referenced technology database. Therefore, the Ref. Technology Libraries option needs to be specified. For more information, see General Processing Rules of -pnrLibDataOnly.
This option cannot be specified along with
Import LEF LAYER LEF58 Properties Constraints to 'foundry_innovus' Group
Use the Import LEF LAYER LEF58 Properties Constraints to 'foundry_innovus' Group option to enables Innovus to see the same design rules that are described in LEF without impacting the Virtuoso tools. For more information, see General Processing Rules of useFoundryInnovus.
This option cannot be specified along with
Do Not Modify the Original ‘display.drf’ File
Use the Do Not Modify the Original ‘display.drf’ File option to specify whether the original display.drf file is retained.
Create Fixed Via Definitions
Use the Create Fixed Via Definitions option to enable creation of fixed via definitions.
Verilog File Name
Use Verilog File Name field to specify list of input Verilog files. The specified Verilog files are sent to the verilogAnnotate utility as a post process to set the isInterface property and specify the terminal order of the bus terminals.An additional log file verilogAnnotate.log is also generated..
Lock Color on Colored Shapes
Use the Lock Color on Colored Shapes option to enable locking color on colored shapes during LEF In.
Constraint Group Suffix
Use the Constraint Group Suffix option to append the specified suffix to the names of the standard constraint groups, LEFDefaultRouteSpec, LEFSpecialRouteSpec, and foundry_innovus. These suffixed constraint groups are then used during LEF In translation, instead of the standard constraint groups.
Extract LEF58_ANTENNADIFFAREA
Use the Extract LEF58_ANTENNADIFFAREA option to specify whether the values specified for the LEF MACRO pin property LEF58_ANTENNADIFFAREA should be translated as width and ratio.
File – Export – LEF
Creates a LEF format library description file from an OpenAccess library. When you run this command from the CIW, the LEF Out form is displayed.
LEF Out Form
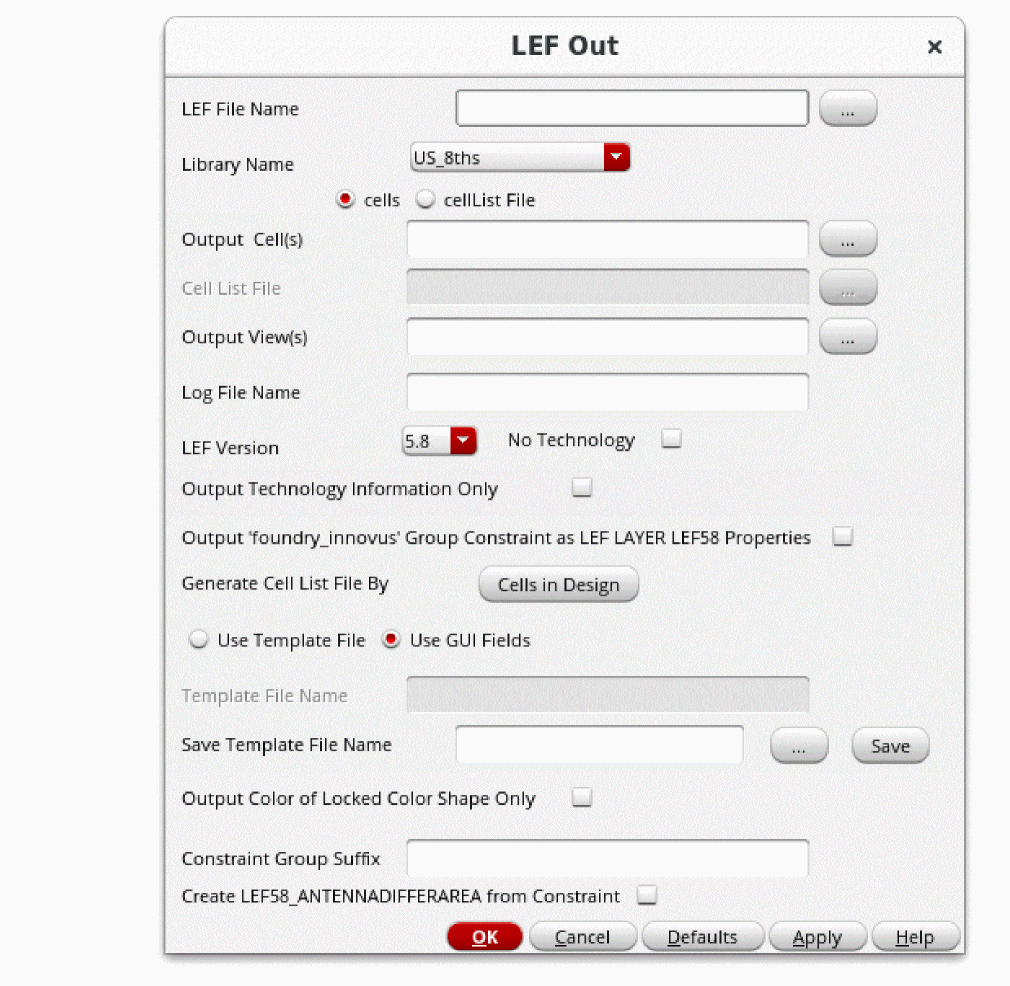
LEF File Name
Use the LEF File Name field to specify a name for the output LEF file. Alternatively, click the ellipses (...) button to locate the LEF file on your machine.
Library Name
Use the Library Name option to select the OpenAccess database library name. The OpenAccess database library contains the technology database and the designs represented in the technology. The library must be defined in the library definition file.
cells
Use the cells option to specify a cell name that is to be translated as a macro. You can specify more than one cell name.
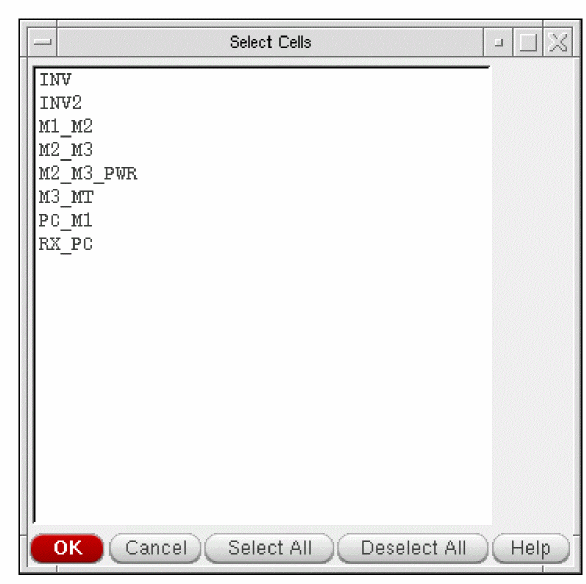
Use the Output Cell(s) field to specify the cell names. This option becomes disabled if you select the cellListFile option. You can also select the cells from the browser by clicking the ellipses button (...).
This browser does not display hidden cells.
cellListFile
Select the cellListFile option if you want to specify a file containing a list of cell names that are to be translated as macros.
Use the Cell List File field to specify a file containing a list of cell names that are to be translated as macros. This option is enabled only if you select the cellList File option. You can also select a file containing a list of cell names from the browser by clicking the ellipses button (...).
<libName> <cellName>Output View(s)
Use the Output View(s) field to a specify view name for the input cell name. Alternatively, click the ellipses button (...) to select the view name from the browser. There can be more than one view name and input cell name.
The default is abstract. When you specify other view names, ensure that the content of these views is the same as the abstract views.
Log File Name
Use the Log File Name field to specify the filename where the log messages are to be stored. By default, the log messages are printed at stderr.
LEF Version
Use the LEF Version option to select the version of LEF. The default version is 5.8 while other supported versions are 5.4, 5.5, 5.6, 5.7, and 6.0.
No Technology
Use the No Technology option if you do not want to output the technology information. If you select this option the Output Technology Information Only option is disabled.
Output Technology Information Only
The Output Technology Information Only option outputs the technology information only. If you select this option, then you cannot specify cell, cell lists, and cell views for output. Also, if you select this option, No Technology option is disabled.
Output 'foundry_innovus' Group Constraints as LEF Layer Properties
Use the Output 'foundry_innovus' Group Constraints as LEF Layer Properties option to export the foundry_innovus group constraints as a LEF LAYER LEF58 property.
Generate Cell List File By
The Generate Cell List File By option specifies the cell list file generation utility for building the cell list.
The Cells in Design button lets you generate a cell list from all the master cells used in the design specified in the Generate Cell List File From Cells in Design form.
When you click OK, a cell list file with the name lefout.list is generated by default. However, if a cell list name file is specified in the LEF Out form, then the cell list file is created with the specified name.
A cell list file has the following format:
libName cellName
If more than one view of the cell exists, then you can specify the view name in the parent LEF Out form.
Use Template File
You can choose to specify the values for LEF Out using either a template file or through the GUI fields. When you select the Use Template File option, you are expected to provide a template file in the Template File Name field.
Use the Template File Name field to specify the template file that contains all the command options. This option is enabled only if you select the Use Template File option.
Save Template File Name
Use the Save Template File Name field to specify the name of the template file you want to save. You can either specify a name for the template file or click the ellipses (...) button to locate the template file on your machine. To save the file, click the Save button.
Use GUI Fields
The Use GUI Fields option allows you to specify the LEF Out options in the GUI form. This is the default option.
Output Color of Locked Shape Only
Use the Output Color of Locked Shape Only option to output colors for only those shapes that have their locked state set to true. This includes pathSegs in nets, rects and polygons, and fill shapes and vias in specialnets.
Constraint Group Suffix
Use the Constraint Group Suffix option to append the specified suffix to the names of the standard constraint groups, LEFDefaultRouteSpec, LEFSpecialRouteSpec, and foundry_innovus when searching for the standard constraint groups.
Create LEF58_ANTENNADIFFAREA from Constraint
Use the Create Extract LEF58_ANTENNADIFFAREA from Constraint option to specify whether values specified for the LEF MACRO pin property LEF58_ANTENNADIFFAREA should be created as width and ratio from constraint.
OpenAccess LEF Translators
LEF In and LEF Out translators support 32 nm constraint data interoperability between Cadence applications. It contains the functionality to parse LEF58 property strings that refers to the 32nm constraint and create the corresponding constraints on the associated objects in a technology database.
- The LEF In supports recognizing and parsing LEF58 property strings and mapping them to the corresponding constraint data.
- The LEF Out supports recognizing the 32nm constraint or 32nm parameters on a constraint and generate the corresponding LEF58 property string.
Running DEF In and DEF Out from GUI
You can run DEF In and DEF Out from the GUI by choosing the File – Import – DEF and File – Export – DEF commands from CIW. This section provides description on the interactive GUI forms used for running DEF In and DEF Out.
File – Import – DEF
Reads a DEF file into the OpenAccess database. When you run this command from the CIW, the DEF In form is displayed.
DEF In Form

DEFIn File Name
Use the DEFIn File Name field to specify a name for the input DEF file. Alternatively, click the ellipses (...) button to locate the DEF file on your machine.
Target Library Name
Use the Target Library Name field to specify a name for the target library.
If a target library does not exist, it is created in the current directory and contains the translated technology database. If the target library exists, it must have a technology database or refer to the technology database of another library.
In addition, existing macros, if redefined in the DEF file, are overwritten and new cells are created for the new macros.
Target Library Path
Use the Target Library Path field for specifying the complete path where the target library is to be created. The path must be valid because the translator does not interpret the path and stores it in the cds.lib file. Alternatively, click the ellipses (...) button to locate the target library on your machine.
Ref. Technology Libraries
Use the Ref. Technology Libraries field to specify the parent technology databases that will be referenced by the incremental technology database. You can specify multiple parent technology databases in this field. If there are conflicts in the parent technology databases that you specify in this field, the tool generates the following error and stops:
ERROR: (OALEFDEF-90032): DefIn has detected a conflict in the technology database graph. The specified reference technology libraries have conflict among themselves or with the technology of the target library. The conflicts need to be resolved manually before running the DefIn application.
Create a module hierarchy from hierarchical names
Use the Create a module hierarchy from hierarchical names option to create a module hierarchy based on hierarchical names of instances and nets. By default, this option is deselected. When this option is not selected, only the physical data is created and no module hierarchy is derived from the DEF hierarchical names. Also, the translator escapes hierarchy delimiters in the names of instances and nets in the OpenAccess database.
Share Library
Use the Share Library option to share the input-output library with other applications while the current application is running.
New Library
Use the New Library option if you want to create a new target library.
Use the Technology from Library field to specify the technology library name to attach to the output library. You can use this option only when you create a new target library by selecting the New Library option.
Target Cell Name
Use the Target Cell Name field to specify a name for the destination cell.
Target View Name
Use the Target View Name field to specify a name for the destination view.
Use the Browse button to select a library, cell, and view name from the library browser.
Component View List
Use the Component View List field to specify view names for the master cells that are searched for a DEF COMPONENTS construct record. The view names must be separated by a comma, space, or a tab. The view names are searched in the order you specify. For example, if the Component View List field contains layout abstract abstractNew as the view names, then layout gets first priority.
If you do not specify any view name in the Component View List field, DEF In searches for the abstract and autoAbstract views. If none of these views are found, an error message is displayed.
Master Library List
Use the Master Library List field to specify all the reference libraries that contain master cells.
Overwrite Design
Use the Overwrite Design option to overwrite an existing design in the target library with the translated data. By default, this option is deselected. If this option is deselected, the default behavior is to update the existing library
Create CustomVias only
Use the Create CustomVias only option if you want to create vias using custom viaDefs instead of existing standard viaDefs for all vias in the def file.
Log File Name
Use the Log File Name field to specify the filename where the log messages are to be stored. By default, the log messages are printed at stderr.
Use Template File
You can choose to specify the values for DEF In using either a template file or through the GUI fields. When you select the Use Template File option, you are expected to provide a template file in the Template File Name field as the other GUI fields become disabled.
Use the Template File Name field to specify the template file that contains all the command options. This field is enabled only if you select the Use Template File option.
Save Template File Name
Use the Save Template File Name field to specify the name of the template file you want to save. You can either specify a name for the template file or click the ellipses (...) button to locate the template file on your machine. To save the file, click the Save button.
Use GUI Fields
Use this option to specify the DEF In options through the GUI form. This is the default option.
Comment Char
Use the Comment Char field to specify the special character that identifies comments.
Pin Purpose
Use the Pin Purpose field to specify the purpose for pin geometries.
Do not create any routing data
Use the Do not create any routing data option if you want DEF In to ignore any routing data during translation including the vias section. Using this option can save processing time and space.
Layer Map File Name
Use the Layer Map File Name field to specify a layer map file. You can specify multiple layer map file names separated by spaces in this field. While creating layers, the layer numbers specified in these files are used.
A layer map file contains a list of LEF layer names that map to the corresponding OpenAccess layer numbers. The LEF layer names and OpenAccess layer numbers must be separated by a space.
A sample layer map file is shown below:
#LEFLayerName    OpenAccessLayerNumber
  POLYS                0
  CUT01                1
  RX                   2
  CUT12                3
  M1                   4
In the above file, LEF layer POLYS is mapped to OpenAccess layer number 0. Similarly, CUT01 is mapped to OpenAccess layer number 1, and so on.
User Skill File
Use the User SKILL File field to specify a file that consists of user-defined SKILL routines. You can specify mapping mechanism for cell names, layers, and fonts through the use of programming routines written in SKILL in the SKILL file.
In order to load all the required SKILL procedures in a single file, use only one SKILL file during translation. The SKILL file is searched with respect to the run directory if the complete path of the SKILL file is not specified.
UserSkillFile will always be loaded before the libInit.il file. The libInit.il file is usually present in the technology file.
Compress
Use the Compress option to enable compression during DEF In.
Compress Level
Use the Compress Level option to specify the level of compression to be applied during DEF In. You can specify a value from 1 to 9 for this option. Value 1 signifies the lowest level of compression and 9 signifies the highest level of compression. If you do not specify any value in the Compress Level option, value 1 is considered as the compression level during DEF In. This option is enabled only if the Compress option is selected.
Ignore DRCFILL Shape Tag & Translate on Drawing Purp
Use Ignore DRCFILL Shape Tag & Translate on Drawing Purp to map all shapes specified with the +SHAPE DRCFILL tag in the SPECIALNETS section to the drawing purpose. If this option is not specified, these shapes are mapped to the gapFill purpose.
Lock Color on Colored Shapes
Use the Lock Color on Colored Shapes option to enable locking color on colored shapes during DEF In.
OpenAccess Map File
Use the OpenAccess Map File option to use the specified mapping file to post process the design before it is saved.
For more information, see Using the oaMapFile option for different OpenAccess Database Formats.
Alternate Foundry Name
Use the Alternate Foundry Name option to use the specified constraint group instead of the default foundry constraint group. Constraint group specified using this option, overwrites the name specified in the .cdsenv file using the
File – Export – DEF
Creates a DEF file from an OpenAccess design cellview. When you run this command from the CIW, the Virtuoso is displayed.
DEF Out Form
DEF File Name
Use the DEF File Name field to specify a name for the output DEF file. Alternatively, click the ellipses (...) button to locate the DEF file on your machine.
Source Library Name
Use the Source Library Name field to specify a name for the library that is to be used as a source library.
Source Cell Name
Use the Source Cell Name field to specify a name for the cell that is to be translated.
Source View Name
Use the Source View Name field to specify a name for the view of the cell that is to be translated.
Use the Browse button to select the source library, cell, and view name from the library browser.
maskLayout, source library, cell, and view names are automatically filled in the DEF Out form.DEF Version
Use the DEF Version option to select the version of DEF. The default version is 5.8 while other supported versions are 5.4, 5.5, 5.6, 5.7, and 6.0.
Log File Name
Use the Log File Name field to specify the filename where the log messages are to be stored. By default, the log messages are printed at stderr.
Use Template Fi le
You can choose to specify the values for DEF Out using either a template file or through the GUI fields. When you select the Use Template File option you are expected to provide a template file in the Template File Name field as the other GUI fields become disabled.
Use the Template File Name field to specify the template file that contains all the command options. This field is enabled only if you select the Use Template File option.
Save Template File Name
Use the Save Template File Name field to specify the name of the template file you want to save. You can either specify a name for the template file or click the ellipses (...) button to locate the template file on your machine. To save the file, click the Save button.
Use GUI Fields
Use the Use GUI Fields option to specify the DEF Out options through the GUI form. This is the default option.
Skip Cells of type via and non e
Use the Skip Cells of type via and none option to prevent the cells with type none and via from being written to the output def file. By default, this option is deselected.
Table 6-1 Common Options in the LEF/DEF Forms
Map DIVIDERCHAR
Use the Map DIVIDERCHAR option to specify a single character to be replaced in instance and net names by the DEF.
DIVIDERCHAR
Use the DIVIDERCHAR option specifies a new divider character to be used during output.
Busbit Character Pair
Use the Busbit Character Pair option to specify new busbit character pair to be used during output.
User Skill File
The User SKILL File field lets you specify a file that consists of user-defined SKILL routines. Using this file, you can specify a mapping mechanism for cell names, layers, and fonts through the use of programming routines written in SKILL.
In order to load all the required SKILL procedures in a single file, use only one SKILL file during translation. The SKILL file is searched with respect to the run directory if complete path of the SKILL file is not specified.
Output ‘Floating Shapes’ into SPECIALNETS Section
Use the Output ‘Floating Shapes’ into SPECIALNETS Section to allow the output of trim layer shapes into the SPECIALNETS section. When specified during DEF OUT translation, any drawing shape on a layer that is not a member of a net is exported on a net in the SPECIALNETS section named _FLOATING_DRAWING_SHAPES_RESERVED.
Output Warnings for Instances with No Placement Status
Use the Output Warnings for Instances with no Placement Status option to add warnings in the log file for the instances in the DEF Out output that have no placement status.
Do Not Output Physical Only Instances
Use the Do Not Output Physical Only Instances option
to prevent the output of physical instances. If this option is not specified, physical instances are placed in the DEF COMPONENTS section and have the + SOURCE DIST statement added to them.
Generate GDS Compatible File
Use the Generate GDS Compatible File option to generate a DEF file with limits that make it compatible with GDS. When this option is specified DEF Out automatically chops all polygons and blockages so that a valid GDS file is generated from the DEF file. Chopping of these polygons and blockages occurs when the number of vertexes for the respective polygon or blockage reach a specified limit value.
Do Not Output DEF on Errors
Use the Do Not Output DEF on Errors option to prevent the DEF output file from being generated if there are errors during translation.
Output Color of Locked Shape Only
Use the Output Color of Locked Shape Only option to output colors for only those shapes that have their locked state set to true. This includes pathSegs in nets, rects and polygons, and fill shapes and vias in specialnets.
Output Errors for Gray Shapes
Use the Output Errors for Gray Shapes option to display errors if gray or uncolored shapes or vias are found during translation.
VirtuosoMPTSetup constraint group, the layers list from the first preColoredLayers constraint is not considered for error checking. Additionally, colorless layers and colorless LPPs are not considered for error checking. (Virtuoso Advanced Node for Layout Only)Output Errors for Unlocked Color Shapes
Use the Output Errors for Unlocked Color Shapes option to display errors if any colored shapes or vias with unlocked status are found during translation.
VirtuosoMPTSetup constraint group, the layers list from the first preColoredLayers constraint is not considered for error checking. Additionally, colorless layers and colorless LPPs are not considered for error checking. (Virtuoso Advanced Node for Layout Only)Do Not Output Trim Layers Shapes into FILLS Section
Use the Do Not Output Trim Layers Shapes into FILLS Section to prevent the output of trim layer shapes into the FILLS section.
Do Not Output Trim Product Shapes into SPECIALNETS Section
Use the Do Not Output Trim Product Shapes into SPECIALNETS Section to prevent the output of trim layer shapes into the SPECIALNETS section.
Do not Output Trimmed Floating Shapes into SPECIALNETS Section
Use the Do not Output Trimmed Floating Shapes into SPECIALNETS Section to prevent trimmed floating shapes from being imported to the SPECIALNETS section. This option is valid only when the Output ‘Floating Shapes’ into SPECIALNETS Section option is specified.
Output Trim Gap Fill Shapes (Bridge Metal Shapes) into SPECIALNETS Section
Use the Output Trim Gap Fill Shapes (Bridge Metal Shapes) into SPECIALNETS Section to allow output of the trim gap fill shapes for the bridge metal shapes into the SPECIALNETS section.
Output Trim Product Shapes into NETS Section
Use the Output Trim Product Shapes into NETS Section to allow output of the trim product shapes into the NETS section.
Mask Shift Layer(s)
Use the Mask Shift Layer(s) option to specify list of layers used inCOMPONENTMASKSHIFT statement. The list should be separated by a white space.
OpenAccess Map File
Use the OpenAccess Map File option to use the specified mapping file to pre-process the design before exported to DEF.
For more information, see Using the oaMapFile option for different OpenAccess Database Formats.
Preparing a Template File
A template file is a collection of file names and option values that reflects the same information given in the LEF-DEF forms. You use the template file to load previously saved information to the LEF-DEF forms or to load the arguments that are required in the forms. You create a template file in the following ways:
- Use the Template File Name command in the LEF In. LEF Out, DEF In or DEF Out forms to save the information currently entered in the form. The information is saved to the file you specify as the template file.
- Create a text file. You can specify the command line option names and value pairs on every newline.
Following is a sample LEF In template file:
#lefin test.leflibmylibtechmytechLiboverwrite
shared
loglefInlog.txtpinPurp net
Similarly you can create template files for LEF Out, DEF In, and DEF Out.
Setting the Environment Variables in LEF In and LEF Out
You can set the default values of the LEF Out and LEF In GUI options by using the LEF_OUT and LEF_IN environment variables, respectively. These variables contain the path to the LEF Out or LEF In template files that consist the values of the LEF Out and LEF In GUI options.
Therefore, each time you run LEF Out or LEF In from the GUI, the following happens:
-
First, the path of the respective template file is taken from the
LEF_OUTorLEF_INenvironment variable. -
Next, the values of the GUI options are populated from the template file.
For example, set LEF_IN and invoke LEF In by using the following command:
setenv LEF_IN /home/user1/templateIn.txt
Here, LEF In is invoked in the interactive mode and the values of LEF In options are taken from the templateIn.txt template file specified in the LEF_IN environment variable.
Setting the Environment Variables in DEF In and DEF Out
You can set the default values of the DEF Out and DEF In GUI options by using the DEF_OUT and DEF_IN environment variables, respectively. These variables contain the path to the DEF Out or DEF In template files that consist the values of the DEF Out and DEF In GUI options.
Therefore, each time you run DEF Out or DEF In from the GUI, the following happens:
-
First, the path of the respective template file is taken from the
DEF_OUTorDEF_INenvironment variable. -
Next, the values of the GUI options are populated from the template file.
For example, set DEF_IN and invoke DEF In by using the following command:
setenv DEF_IN /home/user1/templateIn.txt
Here, DEF In is invoked in the interactive mode and the values of DEF In options are taken from the templateIn.txt template file specified in the DEF_IN environment variable.
Viewing Native OpenAccess Libraries in the Virtuoso Studio Design Environment
Native OpenAccess libraries need the LPP information in the technology file and the Display.drf file to work in the Virtuoso Studio design environment. The Virtuoso Studio design environment oa2dfII utility takes a native library as input to create the LPP information in the technology file and the Display.drf file.
oa2dfII Command Line Syntax
oa2dfII {-h | -lib <libName> [-force]}
|
Writes the display packets even though corresponding LPPs already exist. |
-force option to forcefully write the display packets.
For example, to run the oa2dfII utility by using myNativeOALib as input library, use the following command:
oa2dfII -lib myNativeOALib
Before running the utility, ensure that the myNativeOALib input library must be writable for the updation.
The oa2dfII utility creates the required Display.drf file which contains the display information for viewing the data in Virtuoso Studio design environment applications. The utility does the tech uprev and automatically creates the system layers/purposes and LPPs. Next, the tool sets the required default display attributes such as validity, visibility, selectability, and dragability for the LPPs.
oa2dfII utility, the input native OpenAccess library gets updated with additional information for the Virtuoso Studio design environment and might not work as expected in the native OpenAccess environment.
The oa2dfII utility creates new layer-purpose pairs in the technology library and display packets to support the display of blockages and track patterns. For each layer defined in the OpenAccess database, oa2dfII will create layer-purpose pairs only for the following purposes: drawing, fill, slot, gapfill, fillOPC, blockage,track, boundary, net, and pin. For example, if a layer L1 is defined in the OpenAccess database, following LPP’s will be created in technology:
L1 drawing
L1 fill
L1 slot
L1 gapFill
L1 fillOPC
L1 blockage
L1 track
L1 boundary
L1 pin
L1 net
For information about LEF/DEF SKILL functions, see the Design Data Translator’s SKILL Reference.
Return to top