|
Field
|
Description
|
|
Type
|
Lets you specify the display type of the ruler.
-
Ruler: Displays the ruler in the design window.
-
Distance: Displays the distance between two points on the canvas.
-
Both: Displays both the ruler and the distance between two points on the canvas.
Environment variable: rulerDisplayType
|
|
Segment Mode
|
Lets you select the type of the ruler created by the measurement.
-
Single: Lets you create a single-segment ruler. This is the measurement between points on the canvas.
-
Multiple: Lets you create a multiple-segment ruler. In this mode, you can view the measurement between consecutive points specified by the user.
-
Auto: Creates a multiple-segment ruler. In this mode, points are automatically calculated. There are two ways in which the ruler is created in the auto mode. The first way is an auto ruler is created between two specified points on the canvas. The second way is when you press the
Shift key in the auto mode. In this case, an orthogonal ruler is created with all edges visible on the canvas in vertical or horizontal direction. In this case, the direction of the ruler is based on the edge closest to the pointer. -
The Mid Point of Distance, Dynamic Measurement, and Edge Measurement options are not available when the segment mode is auto.
Environment variable: rulerSegmentModeType
|
|
Mid Point of Distance
|
Lets you select the ruler point as a mid-point of the two points that you specify.
-
Snap Mode: Controls how the ruler snaps to the grid.
-
anyAngle: Creates the ruler segment at any angle to the X or Y axis.
-
diagonal: Creates the ruler parallel to the X or Y axis or at a 45-degree angle to the axes.
-
orthogonal: Creates the ruler parallel to the X or Y axis.
-
L90XFirst: Creates orthogonal two-segment rulers and creates the first segment in the X direction.
-
L90YFirst: Creates orthogonal two-segment rulers and creates the first segment in the Y direction.
-
L90YFirst: Creates orthogonal two-segment rulers and creates the first segment in the Y direction.
|
|
Snap Target
|
Lets you select the snap target.
-
None: Does not snap to the target.
-
Edges: Snaps the ruler to only the edges.
-
Points: Snaps the ruler to vertices, midpoint of edges, nexus, end points, and origin point of objects.
-
Edges and Points: Snaps the ruler to edges, centerlines, vertices, nexus, and end points of objects.
|
|
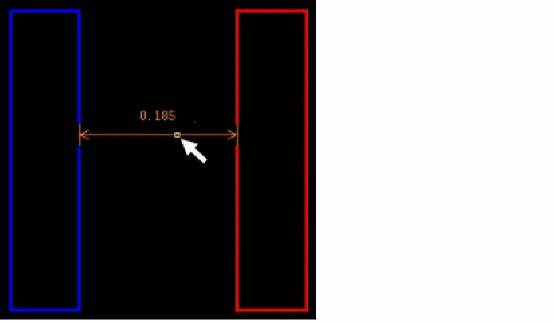
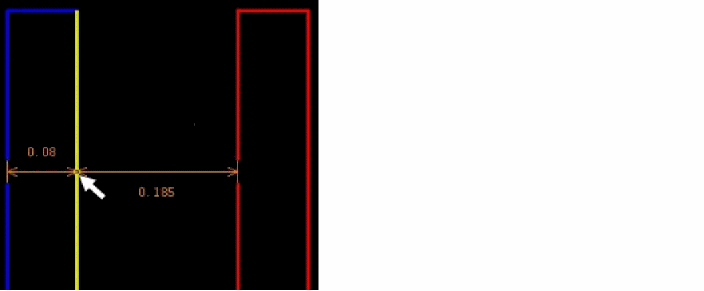
Dynamic Measurement
|
Enables you to dynamically display measurement between the pointer and the closest edges.
If you move the pointer between two shapes, the distance between the two edges is displayed, as shown in the figure below.
If you move the pointer on an edge of a shape, the edge is highlighted in yellow. Also, the distances between the highlighted edge and the two closest edges are displayed.
|
|
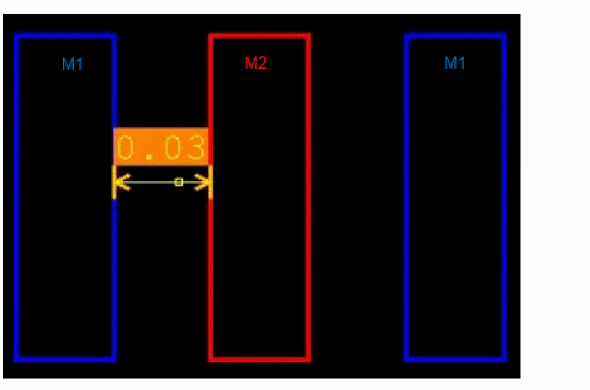
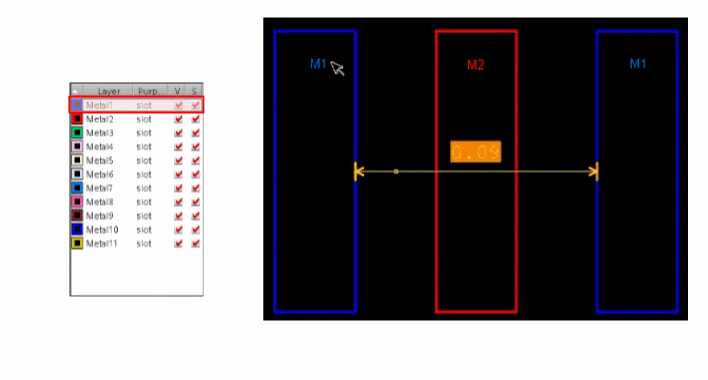
Layer Scope
|
Lets you select the layers to be considered for dynamic measurement. You can select All, Active, Edge, Palette, or Selectable layers.
-
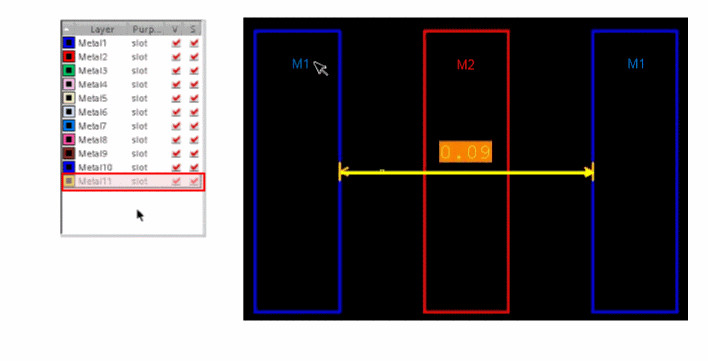
If you select All, all the layers are considered for dynamic measurement. M1and M2 are considered for Dynamic measurement, as shown in the figure below.
-
If you select Active, only M1 is considered for dynamic measurement because M1 is the active layer. M2 is ignored.
|
|
|
-
If you select Edge, M1 is considered for dynamic measurement because the pointer is on an edge of M1, even though it is not the active layer.
-
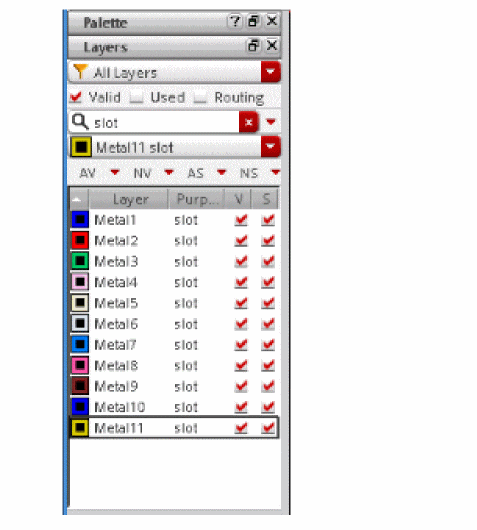
If you select Palette, all the layers on the Palette are considered for dynamic measurement (M1 to M11/slot). This option is available only if the Use Layer Palette LPPs Only option is selected in the Layout Editor Options form.
.
|
|
|
-
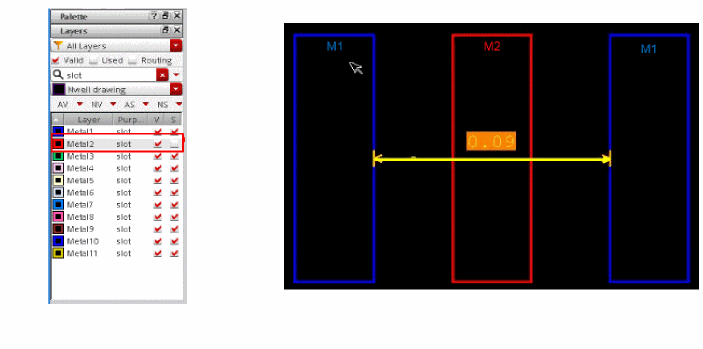
If you select Selectable, only the selectable layers on the Palette are considered for dynamic measurement. In the figure below, M2 is not considered for dynamic measurement because it is not selectable.
-
If you select the Highlight Aligned Edges On option on the Dynamic Display form, the edges of the shapes aligned to the pointer are highlighted, as shown in the figure below.
|
|
Edge Measurement
|
Lets you enable the edge measurement mode for rulers. Edge measurement mode allows you to click the edge of an object and a measurement is drawn with the two vertices as the two ends. The first click lets you select the edge and the second click lets you place the measurement on the canvas.
Environment variable: rulerEdgeMode
The Edge Measurement check box is disabled when the Snap Mode is none or when the Segment Mode is Multiple or Auto.
|
|
Savable Measurement
|
Saves the persistent rulers in a cellview when you save the cellview. It is on by default. If this option is off, all the rulers existing in the cellview are deleted when you save the cellview.
Environment variable: saveRulerssaveRulers
|
|
Display Options
|
This section lets you define the ruler and snap target visualization settings.
|
|
Font Size
|
Lets you select the font size of the ruler labels. You can choose from Small, Medium, or Large.
Environment variable: rulerFontSize
|
|
Color
|
Lets you select the font color of the ruler labels.
|
|
Background Color
|
Lets you select the background color of the ruler labels.
Environment variable: rulerLabelBackgroundColor
|
|
Bold
|
Displays the ruler labels in bold face.
Environment variable: rulerFontBold
|
|
Snap Target Width
|
Enables you to specify the width of the snap target highlight. The default is 0.
Environment variable: targetWidth
|
|
Snap Target Color
|
Enables you to select the color of the snap target highlight. The default is yellow.
Environment variable: targetColor
|
|
Snap Target Line Style
|
Enables you to select the type of snap target highlight. The default is thickline.
Environment variable: targetLineStyle
|