Display Options Form
Use the Display Options form to control the appearance of objects and the behavior of commands in this cellview.
The form comprises the following sections:
Display Controls
The following table describes the fields available on the Display Controls tab of the Display Options form:
| Field | Description |
|---|---|
|
Sets the display level to the Display Levels Stop level.
Environment variable: |
|
|
Shows flight lines between objects on the same net. It also shows outlines over pins. If your design contains many nets, your screen may turn white, causing the
Environment variable: |
|
|
Displays the cellview X and Y axes.
Environment variable: |
|
|
Environment variable: |
|
|
Shows origin of the instances.
Environment variable: |
|
|
When the Instance Pins option is selected, even if the virtual hierarchy is opaque you can view the virtual pins.
Environment variable: |
|
|
Environment variable: |
|
|
Shows orientation of the instances.
Environment variable: |
|
|
Shows outlines of array cells when Display Levels suppresses cell details.
Environment variable: |
|
|
Displays the surrounding design when you edit a cell in place.
Environment variable: |
|
|
Marks the origins of labels with diamond markers.
Environment variable: |
|
|
Shows terminal names of pins that have pin name text displays or labels.
Environment variable: |
|
|
Displays the instance master bounding box when turned on.When off, displays the cellview bounding box, which can cause large designs to open faster because masters are opened down to the display stop level only.
Environment variable: |
|
|
Displays via origins with diamond markers when you set Display Levels to show instance content.
Environment variable: |
|
|
Displays the cursor as dot shaped or as dotted-line cross shaped.
Environment variable: |
|
|
Displays the net expression instead of the terminal name of a pin. When there are net expressions in instances, the terminal name is displayed, not the net expression, even when Net Expressions is set on.
Environment variable: |
|
|
Displays the names of placed rows, which are displayed on the rows in the horizontal or vertical direction depending upon the rotation of the rows. Environment variable: displayRowName |
|
|
Displays the handles on a Relative Object Design parameterized cell (Pcell) that indicate that the Pcell can be stretched. A stretch handle is a named set of coordinates assigned to a specific parameter of the Pcell. Stretch handles look like small diamonds.
For more information, see Environment variable: displayStretchHandles |
|
|
Displays the position of row sites, which are represented by a cross marker on the row.
Environment variable: |
|
|
Displays via attributes. When Via Shapes is set to off (the default), vias are displayed as the bounding box of each via. When set to on via attributes are graphically displayed, resulting in detailed images. For large designs, setting via shapes to on will increase the amount of time it takes to render a design.
Environment variable: |
|
|
Marks the edge, object, or the point that is selected if you enter a point selection. In addition, it also marks the label of the object. When Dynamic Highlight is on and your cellview contains a large number of objects, pointer motion may slow down. You can increase the pointer motion speed by turning this off.
Environment variable: |
|
|
Enables editing a group without the need for EIP in that group. This setting is applicable only for the current window. By default, it is off.
Environment variable: |
|
|
Enables you to view the ghost of the original object when it is being moved or stretched. This option is useful while working with instances. The example below shows an instance being moved. In the first figure, the Dragged Object Ghost check box is selected, whereas in the second, the check box is not selected. The check box is selected by default. Environment variable: ghostOfDraggedObjects 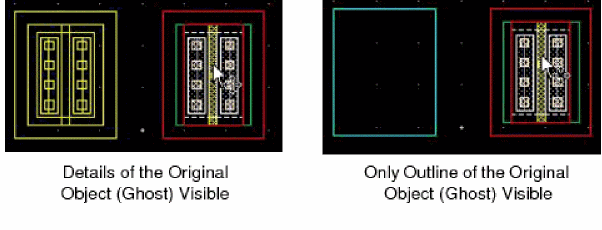 |
|
|
Lets you display only the group name for a figure group when Display Levels, Start and Stop, are set to Environment variable: displayFigGroupName |
|
|
Enables displaying selection information when an object is selected by clicking on it. The information is displayed next to the pointer and it lets the you know which object was selected. You can select an object from several overlapping objects. If you want to display selection hint for a wire or via stack, ensure that selection options for Spine and Via Stack are enabled. 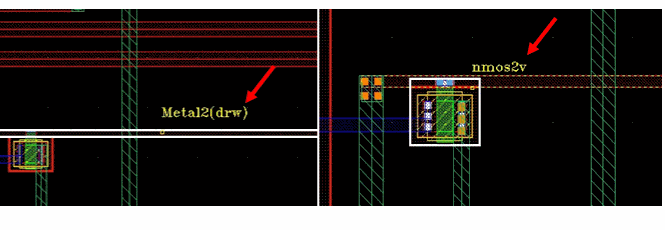 |
|
|
Draws a bounding box around a traversed instance. A traversed instance has size greater than the Size set in the Filter section. If this check box is selected and the Stop display level is greater than zero, the bounding box of the instance displays even if you continue to zoom out of the design, as shown below.  If you zoom out when this check box is not selected, the instance becomes invisible and can be detected or selected only by hovering the pointer over the instance. Select the check box before zooming out.The bounding box does not appear if you select the check box after the instance becomes invisible. This check box is off by default. Environment variable: drawTraversedInstBbox |
|
|
Displays the name of the instance for a traversed instance. This option is enabled only when the Traversed instance BBox option is selected. Environment variable: drawTraversedInstName  |
|
|
Enables you to specify or change the scroll percentage for a window. The default value is Environment variable: scrollPercent |
|
|
Determines the type of boundary displayed in the top-level cellview. By default, the BBox displays. You can set P&R Boundary or Snap Boundary to display. Environment variable: instanceDrawingMode |
|
|
Determines whether you see path borders and centerlines, path borders only, or path centerlines only. Environment variable: pathCL |
|
|
Controls the display of snap patterns.
Environment variable: snapPatternDrawingStyle |
|
|
Enables you to control the visibility of a layer purpose pair (LPP) based on its visibility and validity. By default, this option is set to Do not check validity. With this setting, only the Visibility attribute of the LPP is used to determine the visibility of a shape on that LPP; the validity of the LPP is ignored. If you set this option to Check validity, only the shapes on valid and visible LPPs are displayed in the design window. Environment variable: lppVisibilityMode |
|
|
When Display Levels is set to show only instance outlines, sets whether the instance name (for example: Environment variable: instLabel |
|
Environment variable: |
|
|
Sets the first (Start) and last (Stop) levels in the design hierarchy that can be seen in detail. The hierarchy levels are numbered 0 to 32. The top cellview is level 0, instances inside of it are level 1, and so forth.
Environment variables: |
|
|
Controls the transparency level of the glyph. You can choose a value from 0 to 100 using the slider.
Environment variable: |
Zoom/Pan Controls
The following table describes the fields available on the Zoom/Pan Controls tab of the Display Options form:
| Field | Description |
|---|---|
|
Activates dynamic zoom (View - Dynamic Zoom) to objects on the design canvas. The default for this option is on.
Environment variable: |
|
|
Specifies the dynamic zoom setting to be used. You can choose from:
Environment variable: |
|
|
Lets you set the scale of zoom in percentage. The default is
Environment variable: |
Grid Controls
The following table describes the fields available on the Grid Controls tab of the Display Options form:
| Field | Description |
|---|---|
Environment variable: |
|
|
Controls the dimming of dots of the major grid. When this option is not selected, the major grid dots are visible in bold face. This is a window-specific option and is available only when Type is set to dots. Environment variable: dotStyleMajorGrid |
|
|
Sets the number of user units between the visible grid. Minor grid points are white, major grid points are green by default. Environment variables: gridSpacing and gridMultiple |
|
|
Sets the distance at which the pointer can snap between grid points along the X axis and the Y axis. This is your drawing grid. The layout default is 0.1 user units and the graphic default is 1.0 user units.
Environment variables: |
Resolution
The following table describes the fields available on the Resolution tab of the Display Options form:
| Field | Description |
|---|---|
|
Controls the level of detail of the design displayed in the cellview. The resolution options are Low, Medium, High, and Very High. The default value is Medium. Using the Resolution slider, the performance gets enhanced to display the design with a Very High resolution.
Environment variables: |
|
|
Enables to use a filter size for objects that is bigger or equal to the filter size used for shapes. This check box is available when the resolution is set to High or Very High. When this option is not selected, smallest objects are not drawn, which improves the redraw time.
Environment variable: |
Snap Modes
The following table describes the fields available on the Snap Modes tab of the Display Options form:
| Field | Description |
|---|---|
|
Controls how line segments snap to the grid as you create objects.
Environment variable: |
|
|
Controls how line segments of objects snap to the grid as you move or copy them and how edges or corners move as you stretch them.
Environment variable: |
Display Abstraction Controls
The following table describes the fields available on the Display Abstraction Controls tab of the Display Options form:
| Field | Description |
|---|---|
|
Makes the display more readable by hiding all the extra edges in the design.
Environment variable: |
|
|
Lets you select the hierarchies for which the Enable Merge command applies. The choices are Pcells, Except current, and All.
Environment variable: |
|
|
Hides the layer that is cut using the
Environment variable: |
|
|
Lets you create holes in wires. You overlap the shape to slot with another shape in slot purpose that is displayed as a hole in the shape.
Environment variable: |
Dimming
The following table describes the fields available on the Dimming tab of the Display Options form:
| Field | Description |
|---|---|
|
Lets you change the luminosity of the virtual hierarchy.
Environment variable: When the Dim Virtual Hierarchy option is selected, the Enable Dimming and Dim Selected Object Content options are selected automatically and cannot be changed. Also, the Automatic Dimming option is disabled. |
|
|
Lets you change the color luminosity of objects in the cellview. Environment variable: dimmingOn |
|
|
|
Environment variable:
Environment variable:
Environment variable:
Environment variable: dimmingIntensity
Environment variable: |
|
|
Specifies that you want to store, load, or delete the display settings to or from the cellview. |
|
|
Specifies that you want to store, load, or delete the display settings to or from the library of the edit cellview. |
|
|
Specifies that you want to store, load, or delete the display settings to or from the technology library of the edit cellview. |
|
|
Specifies the file to which you want to store or from which you want to load the settings. When you select the file radio button the path field is editable so that you can enter the correct directory where you want to save the file. If you do not remember the name of the directory use the Browse button. Environment variable: displayOptionsFile |
|
|
Saves the current settings to either the cellview, library of the cellview, technology library of the cellview, or a specified file. If you are saving to a file, the settings from both the Layout Editor Options and Display Options forms are saved.The selections do not take effect until you click Apply on the Display Options form. |
Related Topics
Return to top