Hierarchy Configuration Instances Table
The Instances tree shows a hierarchical representation of the design – that is, the schematic top-level cell – and how each instance in the logical design is mapped to a layout view.
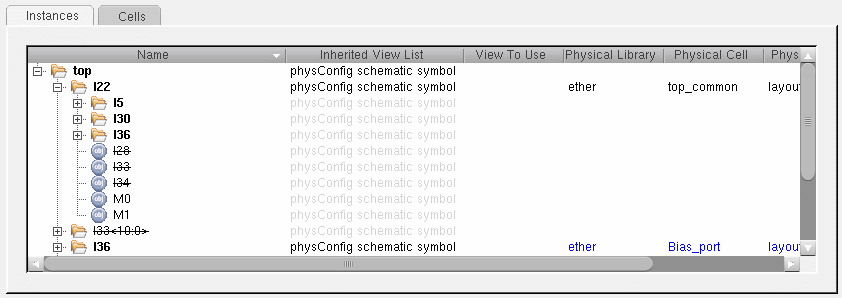
For each instance in the design, the table shows the view list used to reach the schematic instance and the corresponding layout cellview found. The table also supports display of vector instances.
There are a number of operations you can perform directly in the table view.
- Sort the tree alphabetically by column within each hierarchical node, click the header of the column you want to sort. Alternate clicks sort in ascending and descending order.
- Edit an entry in a table field directly, double-click the text you want to change and choose a value from the drop-down list or type in the new setting manually.
-
Edit multiple entries for a particular column,
- Select the rows you want to edit.
- Right-click the column you want to change and choose Edit multiple <fieldName>.
-
Choose a value from the drop-down list or type in the new setting manually and press
Return.
The value is updated for all the selected rows. - To make an instance a stop point in the hierarchy traversal, click the right mouse button and choose Set/clear stop point. A 'STOP' icon against the schematic instance indicates that it is to be regarded as a leaf instance. To clear the stop point, select the instance and choose Set/clear stop point again.
- To force hierarchy traversal to proceed beyond a leaf instance, click the right mouse button and choose Set/remove force descend. A 'go' icon indicates that the selected instance will now be traversed even if it would normally be a leaf instance. To clear the force descend, select the instance and choose Set/remove force descend again.
-
To force hierarchy traversal to proceed down until the physical view from the physical stop library list is reached, right-click and choose Set/remove hierarchical force descend. A 'go' icon with inverted arrow indicates that the selected instance will be traversed until the physical view from the specified physical stop library list is reached. To clear the force descend, select the instance and choose Set/remove hierarchical force descend again.To set the hierarchical force descend on an instance, there must be at least one library specified in the Physical stop library list. See Global Bindings: The settings in the Global Bindings pane control how the logical design is traversed and how the logical to physical correspondence for leaf cells (stop points) is made. It is a dockable window, which you can dock on either side of the main Configure Physical Hierarchy window, or leave undocked as a floating window..
Instance Mode and Occurrence Mode
The Instances table has two modes: Instance mode and Occurrence mode.
- Use Instance mode to change a particular setting (for example, the physical binding) or attribute for all identical instances by changing the setting on just one of the instances.
- Use Occurrence mode to change a setting or attribute for only a single occurrence of a particular instance; for example, to use a specific variant of a cellview in a particular area of your design.
You switch between them using the toggle button ![]() . When the button is pressed, you are working in Occurrence mode. When it is not, you are working in Instance mode. You can check the current mode by hovering over the button to display a tooltip.
. When the button is pressed, you are working in Occurrence mode. When it is not, you are working in Instance mode. You can check the current mode by hovering over the button to display a tooltip.
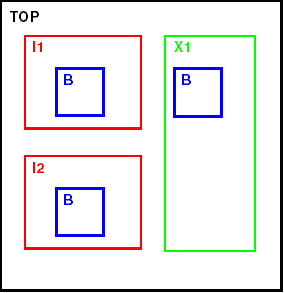
Consider the following simple example.
-
In Instance mode, any changes you make to the table values or attributes for a particular instance are replicated in all other identical instances in the design.
For example, if you specify a physical binding for instance I1:B, the same physical binding is applied to instance I2:B because the two instances of B are identical and are contained in identical instances one level up.
The physical binding is not applied to instance X1:B because B is contained inside an instance of a different cellview and is therefore considered different to the other two.
To make the same change to all three instances of B, edit the setting for the master cellview in the Cells table. -
In Occurrence mode, any changes you make to the table value or attributes are applied only to the specific occurrence of the instance that you edited.
In the example above, if you specify a physical binding for instance I1:B, that physical binding is applied only to I1:B.
The physical binding is not applied to either I2:B or to X1:B because these are different occurrences of instance B.
Inheritance of Settings
All settings are inherited from the higher level unless overridden at the lower level. Settings made in Occurrence mode override prior or subsequent settings made in either Instance mode or in the Cells table. Settings made in Instance mode override prior or subsequent settings made in the Cells table.
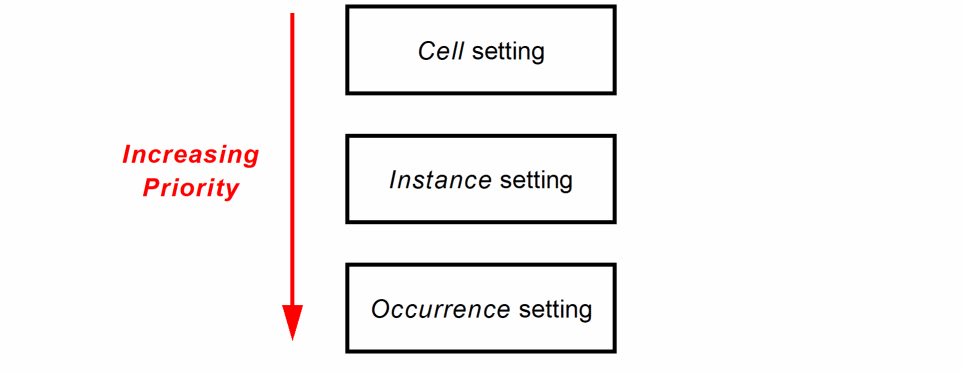
If you delete a higher priority setting, the item in question inherits the setting from the next level up the chain.
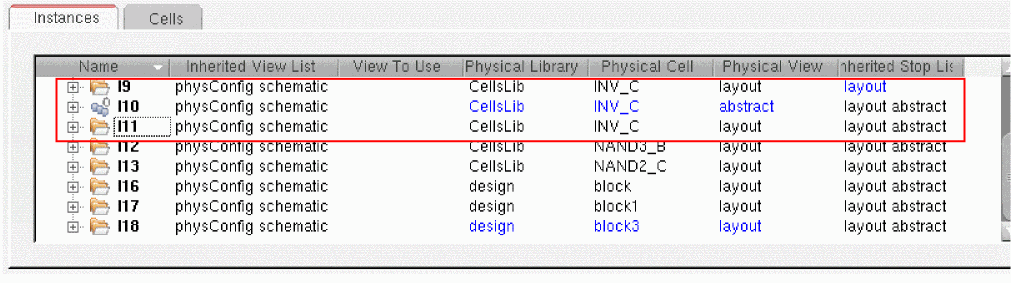
Instances with occurrence-based settings are indicated using the Occurrence mode icon in the table. For example, in the picture below, instance I10 has had its Physical View set in Occurrence mode. The occurrence icon replaces the normal directory icon for that entry, and the text is colored blue to indicate that it was set manually by the user.
Related Topics
Hierarchy Configuration Mode in the CPH Window
Color Coding in the Hierarchy Configuration Instances and Cells Tables
Shortcut menu for the Hierarchy Configuration Instances and Cells Tables
Hierarchy Configuration Cells Table
Return to top