A
Forms Reference
This chapter describes the forms in the Virtuoso Space-based Router.
Power Routing Form
The Power Routing form has tabs enabling you to set up options for each power routing operation.
Name - the scheme name for the power routing operation.
Edit - enables you to view or change the scheme definition.
Manager- displays the Power Routing Scheme Manager form.
Route - executes power routing with the options in the scheme.
Power Routing - Pad Ring tab
Pad Ring routing adds a ring between pad instances on the periphery of the design.
Related Topics
Power Routing Options - Pad Ring tab
Power Routing - Core Ring tab
Core Ring routing adds a ring around the core of a design that is surrounded by pad instances.
Selected Nets - adds the select nets to the Nets Ordering section.
Related Topics
Power Routing Options - Core Ring tab
Power Routing - Block Ring tab
Block Ring routing adds rings around block instances.
Nets Ordering - order the nets for the core rings.
Selected Nets - adds the selected nets to the Nets Ordering section.
Power Routing Options - Block Ring tab
Power Routing - Stripes tab
Stripes routing adds net stripes at regular intervals.
Nets Ordering - order the nets for the stripes.
Selected Nets - adds the selected nets to the Nets Ordering section.
Region - the region in which to add the stripes.
Entire Cell View - uses the current place and route boundary (prBoundary) for the design. If no routing regions are given, and core rings exist, the core rings become the bounds for the stripes. If no routing regions are given, and core rings do not exist, stripes will cover the entire design. More than one routing region can be given.
View Area Only - uses the current zoom area for routing. If the zoom area is outside the prBoundary, a warning is issued.
A Selected Boundary - uses a selected boundary for routing. The boundary can be either a cluster boundary or an area boundary. However, you can select only one boundary at a time for routing. If you select more than one boundary, a warning is issued. If the selected boundary is outside the prBoundary, a warning is issued.
Custom Area - allows you to specify the region by doing one of the following.
Enter the values using the spin boxes for the lower-left (xLo, yLo) and the upper-right (xHi, yHi) coordinates for the region.
Click Create. Then draw the region in the workspace by dragging a rectangle from a lower-left coordinate to an upper-right coordinate. The coordinate positions are automatically entered in the form.
Related Topics
Power Routing Options - Stripes tab
Power Routing - Cell Rows tab
Cell Row routing adds straps along aligned pins of standard cells.
Region - area in which to add the standard cell straps.
Entire Cell View - use the current place and route boundary (prBoundary) for the design.
If no routing regions are given, and core rings exist, the core rings become the bounds for the cell rows. If no routing regions are given, and core rings do not exist, cell rows will cover the entire design. More than one routing region can be given.
View Area Only - use the current zoom area for routing. If the zoom area is outside the prBoundary, a warning is issued.
Selected Boundary - use a selected boundary for routing. The boundary can be either a cluster boundary or an area boundary. However, you can select only one boundary at a time for routing. If you select more than one boundary, a warning is issued.
If the selected boundary is outside the prBoundary, a warning is issued.
Custom Area - allows you to specify the region by doing one of the following.
Enter the values using the spin boxes for the lower-left (xLo, yLo) and the upper-right (xHi, yHi) coordinates for the region.
Create - enables you to draw the region in the workspace by dragging a rectangle from a lower-left coordinate to an upper-right coordinate. The coordinate positions are automatically entered in the form.
Related Topics
Power Routing Options - Cell Rows tab
Power Routing - Pin To Trunk tab
Pin-To-Trunk routing allows you to add connections from the power pins of pad or macro instances to existing rings and rails. A macro instance is defined as any instance whose area is greater then 90 percent of the entire cell view area.
Related Topics
Power Routing Options - Pin To Trunk tab
Power Routing - Vias tab
Vias routing adds vias for interlayer connection at intersections of rings, rails, stripes, straps, and cell rows, or between instance pins and stripes.
Via Locations - inter-layer connections can take place at one of the following.
Intersection of All Rings, Stripes, and Cell Rows - adds vias at the intersections of all rings, stripes and cell rows.
Selected Instances - adds vias between stripes and the pins of selected block instances.
Pin Layer - determines the layer to which the via should be inserted.
Related Topics
Power Routing Options - Vias tab
Power Routing - Tie Shield tab
Ties shield wires to shield nets in the design.
Tie Frequency- distance between the ties.
Shield - the distance between the shield ties.
Coax - the distance between the coax shield ties.
Route - executes the tie shield operation.
Related Topics
Power Routing Options Form
The Power Routing Options form has tabs enabling you to set up options for changing the scheme definition of each power routing operation.
Name - the scheme name you want to define.
Manager- displays the Power Routing Scheme Manager form.
Rename - renames the scheme to the name entered in Name field.
Copy - copies the scheme to a new name. The default name is the original scheme name with _n, where n is a number, automatically appended.
Delete - deletes the current scheme. You cannot delete the Default scheme.
Power Routing Options - Pad Ring tab
The Pad Ring tab of the Power Routing Options form lets you specify pin layers and pin types to which to connect pad rings for the scheme.
Specified Pin Layers - the pin layers you want to connect.
Deselecting the check box routes pad rings on all layers in the list. Environment variable: proutePadRingAllLayers
Selecting the check box routes pad rings on the layers you highlight in the list box. Environment variable: proutePadRingLayers
Pin Types - pin types to which you want the pad rings to connect.
Rail Pins - pins that traverse a pad. Environment variable: proutePadRingRailPins
Edge Pins - pins on the edge of the pads. Environment variable: proutePadRingEdgePins
Related Topics
Power Routing Options - Core Ring tab
The Core Ring section of the Power Routing Options form lets you specify the core ring location and configuration for the scheme.
Centered Between Core and Pads - creates a ring between the core area of the design and the surrounding pad instances. Environment variable: prouteCoreRingRingAtCenter
Relative To - route the core ring relative to one of the following. Environment variable: prouteCoreRingRelativeTo
Core (outside) places the core ring relative to the outside the core of the design. Environment variable: prouteCoreRingCoreClearance
I/O Pads (inside) places the core ring relative to the inside of the pads. Environment variable: prouteCoreRingPadClearance
Specified Region (inside) places the core ring inside the region. Environment variable: prouteCoreRingInAreaClearance
Specified Region (outside) places the core ring outside the region. Environment variable: prouteCoreRingOutAreaClearance
Coordinates - allows you to specify the region by either using the spin boxes for the lower-left (xLo, yLo) and the upper-right (xHi, yHi) coordinates for the region or dragging a rectangle around the region. Environment variables: prouteCoreRingRTXLo, prouteCoreRingRTYLo, prouteCoreRingRTXHi, prouteCoreRingRTYHi
Clearance - the clearance between the core ring and the boundary.
Horizontal Routing Layer - the horizontal routing layer for the core ring. Environment variable: prouteCoreRingHorizLayer
Vertical Routing Layer - the vertical routing layer for the core ring. Environment variable: prouteCoreRingVertLayer
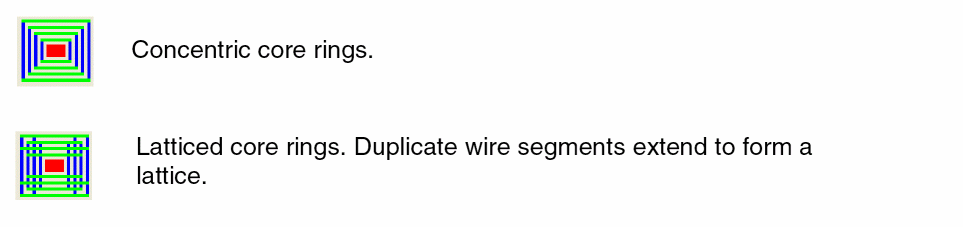
Routing Style for multiple core rings. Environment variable: prouteBlockRingLattice
Ring Clearance - the minimum spacing between the power/ground nets in the core ring. Environment variable: prouteBlockRingNetClearance
Ring Width - the total width for each power/ground net. Environment variable: prouteBlockRingNetWidth
Related Topics
Core Ring Environment Variables
Power Routing Options - Block Ring tab
The Block Ring section of the Power Routing Options form lets you specify the ring and routing configuration for block rings.
Routing Style for Single Ring Around Multiple Blocks Environment variables: prouteBlockRingContour, prouteBlockRingChannels
Block Clearance - clearance of the block rings to the prBoundary of the block. Environment variable: prouteBlockRingBlockClearance
Horizontal Routing Layer - for the block ring. Environment variable: prouteBlockRingHorizLayer
Vertical Routing Layer - for the block ring. Environment variable: prouteBlockRingVertLayer
Routing Style - the style for multiple block rings. Environment variable: prouteBlockRingLattice

Ring Clearance - the minimum spacing between the power/ground nets in the ring. If the specified Ring Clearance value is greater than the indicated label, the label color is black; otherwise, the color is red. Environment variable: prouteBlockRingNetClearance
Ring Width - the total width for each power/ground net. If the specified Ring Clearance value is greater than the indicated label, the label color is black; otherwise, the color is red. Environment variable: prouteBlockRingNetWidth
Related Topics
Block Ring Environment Variables
Power Routing - Block Ring tab
Power Routing Options - Stripes tab
The Stripes section of the Power Routing Options form lets you specify the placement and configuration of the horizontal and vertical stripes.
Horizontal Stripes - choose to create horizontal stripes.
Environment variable: prouteStripesHorizDir
Step Increment - value to separate the horizontal stripes. Environment variable: prouteStripesYStep
Routing Layers - horizontal stripes are routed on the highlighted layers. Environment variable: prouteStripesHorizLayers
Vertical Stripes - choose to create vertical stripes.
Environment variable: prouteStripesVertDir
Step Increment - value to separate the vertical stripes. Environment variable: prouteStripesXStep
Routing Layers - vertical stripes are routed on the highlighted layers. Environment variable: prouteStripesVertLayers
Pin Clearance - the clearance required between signal pins and stripes. Environment variable: prouteStripesPinClearance
Net Clearance - the minimum spacing required between the power/ground nets within a stripe. Environment variable: prouteStripesNetClearance
Net Width - the total width for each routed net. Environment variable: prouteStripesNetWidth
Minimum Stripe Length - minimum length for the stripe. Environment variable: prouteStripesMinLength
Offset from either the Design Boundary, the design Origin, or the Routing Area (the Routing Regions given in the Power Router Stripes form). Environment variable: prouteStripesOffsetFrom
Left - the X location of the first vertical stripe.
Environment variable: prouteStripesLeftOffset
Bottom - the Y location of the first horizontal stripe.
Environment variable: prouteStripesBottomOffset
Relative To - stripes are measured relative to the Edge of Stripe (left edge for vertical stripes and bottom edge for horizontal stripes), or the Center Line of Stripe. Environment variable: prouteStripesCenterLine
Related Topics
Power Routing Options - Cell Rows tab
The Cell Rows section of the Power Routing Options form lets you specify routing layers, the cell row strap boundary, and whether the cell row straps should be extended to the nearest power rail.
Specified Routing Layers - the routing layers you want to connect.
Deselecting the check box routes pad rings on all layers in the list.
Selecting the check box routes pad rings on the layers you highlight in the list box. Environment variable: prouteCellRowLayers
End of Row - routes cell row straps to the end of the defined rows. Environment variable: prouteCellRowRowEnd
Last Cell in Row - routes cell row straps to the last cell in the row.
Extend Straps to Rails - extends the cell row straps to the nearest power rail.
Environment variable: prouteCellRowExtend
Related Topics
Cell Row Environment Variables
Power Routing Options - Pin To Trunk tab
The Pin To Trunk section of the Power Routing Options form lets you specify pin layers, trunk layers and connection rules.
Specified Pin Layers - the pin layers you want to connect.
Deselecting the check box routes pad rings on all layers in the list. Environment variable: proutePinToTrunkAllLayers
Selecting the check box routes pad rings on the layers you highlight in the list box. Environment variable: proutePinToTrunkLayers
Deselecting the check box connects all trunk layers. Environment variable: proutePinToTrunkSpecTLayer
Selecting the check box restricts pin-to-trunk connections to the trunk layer you choose in the pull down layer list. Environment variable: proutePinToTrunkTrunkLayer
Minimum Trunk Width - specifies the minimum trunk width for a trunk to be connected to a pin. Environment variable: proutePinToTrunkMinTrunkWidth
Minimum Wire Width - specifies the minimum wire width for a wire to connect from a pin to a trunk. Environment variable: proutePinToTrunkMinWireWidth
If you did not specify a trunk layer, the numbers to the right of the spin boxes are the largest minWidth of all the Specified Pin Layers. If you then set a Minimum Wire Width value that is smaller than the number to the right of the spin box, you are likely to violate the minWidth on layers with smaller minimums. Best practice is to set a value greater than or equal to this number, in which case the number is black.
Maximum Wire Width - specifies the maximum wire width for a wire to connect from a pin to a trunk. Environment variable: proutePinToTrunkMaxWireWidth
Pin-to-Trunk uses the largest wire width that does not exceed the Maximum Wire Width or the width of the pin.
If you did not specify a trunk layer, the number to the right of the spin box is the smallest maxWidth of all the Specified Pin Layers. If you then set a Maximum Wire Width that is larger than this number, you are likely to violate the maxWidth on layers with smaller maximums. Best practice is to set a value less than or equal to this number, in which case the number is black.
Related Topics
Pin To Trunk Environment Variables
Power Routing - Pin To Trunk tab
Power Routing Options - Vias tab
The Vias section of the Power Routing Options form lets you specify layers and cut array types.
Layers - that you want to connect.
Layer Range - deselecting the check box inserts vias to connect all layers.
Selecting the check box inserts vias to connect a range of metal layers. Environment variable: prouteViaInsertionLayerRange
Minimum and Maximum - pull down menus enable you to choose the bottom and top layers, respectively, to connect. Environment variables: prouteViaInsertionMinLayer, prouteViaInsertionMaxLayer
Cut Array - the type of cut array.
Square - specifies a square cut array for each via, with an equal number of rows and the number of columns. However, the cut array might not be square in size, depending on spacing rules. If the minAdjacentViaSpacing rule is set, then the spacing of the cuts can be different in the X and Y directions, producing a cut array that is rectangular in dimension.
Rectangular - specifies that the maximum number of rows and columns for the cuts be used for the available space.
Specified Array Size - inserts vias with cut arrays of a specific dimension. If the cut array with these dimensions cannot fit within a via area, no via is created for that metal intersection.
Environment variable: prouteViaInsertionCutArray
Rows and Columns - for the specified array size. Environment variables: prouteViaInsertionRows, prouteViaInsertionColumns
Related Topics
Power Routing Options - Setup tab
Determines the packages available in the scheme.
Scheme Packages - the packages included in the named scheme.
Related Topics
Power Routing Scheme Manager
The Power Routing Scheme Manager enables you to load, save, and compare schemes.
Power Routing Scheme Manager - File tab
Name - the name of the file containing the schemes in the Name field.
Browse - alternatively, you can use this button to select the file containing the schemes.
Load - loads all the schemes in the file into the power routing scheme database
Save - saves the selected schemes to the given file name. If you save schemes to an existing file, the original contents of the file are removed and replaced by the newly saved schemes.
Power Routing Scheme Manager - Compare tab
Schemes - the schemes you select to compare from the drop down boxes. Click to compare specific packages within the schemes.
Compare - displays the Power Routing Compare Result form.
Power Routing Schemes Compare Result
The first column lists the package options that have different values in the two packages. The Total number of Differences for the two packages also displays.
The second column lists the option data for the indicated scheme.
The third column lists the option data for the indicated scheme, so you can compare the two schemes side by side.
Related Topics
VSR Preset Forms
This section describes the field descriptions of the following VSR Preset forms:
VSR Save Preset Form
-
Label in Toolbar
Lets you specify a label for the preset file. You can also select a preset file from the drop-down list. When a preset file is selected, all other fields of the VSR Save Preset form are automatically populated with the keywords information available in the selected preset file. This is a mandatory field. -
File Name
Lets you specify a name for the preset file to save all override constraints and environment variable values to a single file. This is also a mandatory field. -
Directory
Lets you select the location where you want to save the preset file. You can select one of the following locations: -
Create Toolbar Icon
Adds an icon on the Virtuoso Space-based Router Preset toolbar when the Create Toolbar Icon is selected. When deselected, the preset is added as a menu item in the VSR Load Preset drop-down menu. -
Optional Settings
Hides or displays all the optional settings in the VSR Save Preset form. These optional settings are not mandatory and can be left blank. -
Icon File Name
Uses the icon from the specified file name and associates it with the preset file. The associated icon is then displayed on the VSR Preset toolbar. This option is relevant only when the Create Toolbar Icon check box is selected. -
Icon Text
Lets you specify the text that gets displayed on the toolbar icon. If icon text is not provided, the first five characters of the Label in Toolbar field are used as the text that gets displayed on the created icon. -
Tooltip
Lets you specify the text that appears as a tooltip when the mouse pointer is placed on the preset icon on the toolbar. -
Save
Saves the current settings to a preset file for future use. -
Clear
Clears all the fields in the VSR Save Preset form.
Related Topics
The Routing Scripts command also keep up with the values specified in the Override Constraints section of the Wire Assistant. For example, in the Wire Assistant, if you have specified the Bottom layer as M1, Top layer as M2, and have specified the Min Num Cuts value to 2, and then run the customized Tcl script using Route – Routing Scripts, the routing layers and minNumCuts values are overriden.
VSR Delete Preset Form
-
Preset Label
Lists all the presets that are currently loaded. The presets listed in the Preset Label drop-down list correspond to the values that you specify for the preset files in the Label in Toolbar field in the VSR Save Preset form. -
File
Displays the filename of the selected preset. -
Directory
Displays the path to the location where the selected preset is saved. -
Active
DisplaysYesif the selected preset file is the one that was loaded last; otherwise, displaysNo.You can only delete a preset file for which the value in the Active field isYes. A warning message is displayed stating that a deleted preset file cannot be restored in the current Virtuoso session.However, if you do not have the appropriate permissions to delete the selected preset file, the value in the Active field is shown as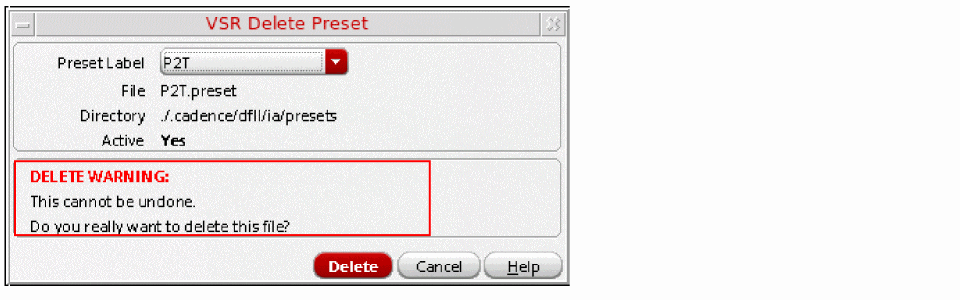
No. Also, a message is displayed stating that the preset file cannot be deleted and the Delete button is disabled, as shown in the following figure.

Related Topics
Return to top