14
Verify Menu Commands
Introduction
This chapter describes each command on the Verify menu in alphabetical order. Each command description provides detailed information about the command and the forms associated with the command. Each command description also tells you how to use the command and lists the associated SKILL commands.
DRC Command
Checks a layout for design rule violations. DRC puts any errors found on the marker layer. You can highlight and display information about errors using the Markers commands.
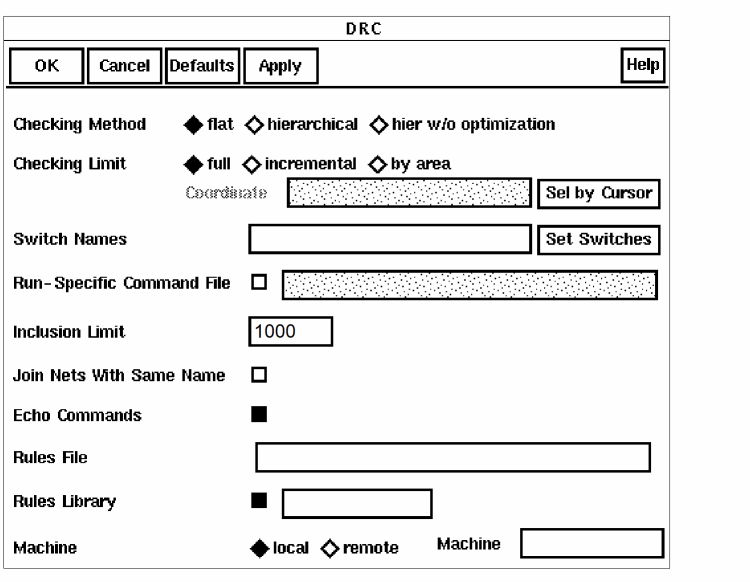
Checking Method sets the type of circuit check you want to use.
Checking Limit describes the part of the layout to be checked.
Coordinate lists the coordinates of the area to be checked. After you select by area for the checking limit, you can type the coordinates in the Coordinate field or use the mouse to define a rectangular checking area.
When you type the coordinates in the Coordinate field, you enter a value for a single rectangle with two pairs of coordinates defining the bottom left and top right. You must type at least one space between each set of coordinates, for example
12599:98991 115682:194485
The checking area you define in the Coordinate field takes precedence over coordinates specified in a run-specific command file.
Sel by Cursor lets you select the area you want to check by clicking on it with the mouse.
Switch Names identifies the section of statements in the technology file that you want to use for a specific DRC or extraction to control the command stream. The technology file sections you enter in this field are addition to the sections normally used to control DRC or extraction. You must type one space between multiple switch names, for example
drc1 substrateck
Set Switches brings up a list box showing all the switches in the DRC/Extract rules. You can then select the needed switches and click OK in ths list box. The switches you select are entered into the switch names field.

If you want a single switch, click on it. If you want multiple switches, hold the control key while clicking on the second and subsequent switches.
The default switches ?drc and ?extract are not shown. If you are running DRC, any switches contained in a ?extract branch of the rules file are not shown. If you are running extraction, any switches contained in a ?drc branch of the rules are not shown. The only exception to this is when the ?drc or ?extract switches are part of more complex switch expressions. All switches within both branches are then shown.
Run-Specific Command File specifies either a file in the current directory or a path to the file that contains verification commands relevant to a specific run of the program. For more information about the run-specific command file, see Chapter 4, “Writing Diva Verification Rules.”
Inclusion Limit is an integer for including or excluding cells in a DRC run. An inclusion limit tells DRC to check all cellviews with an ivIncludeValue property less than or equal to this number. Diva assigns an inclusion property of zero to each cell unless you define ivIncludeValue as a cell property. The default value is 1,000. For more information about inclusion limits, see Chapter 2, “Including and Excluding Cells”.
Join Nets With Same Name causes each group of electrical nets having the same name to be considered as a single net. This option connects the nets in the extracted cellview only, not in the physical layout.
Echo Commands displays the technology file DRC rules in the CIW as they are processed. Echo is not active during hierarchical processing because the rules are executed multiple times.
Limit Rule Errors allows the specification of a maximum number of errors any rule can generate during the run.
Limit Run Errors allows the specification of a maximum number of errors that can be generated during the run. When the limit is reached, the run terminates early.
Rules File specifies either the UNIX location of a rules file or, if you specify a rules library, the name of the rules file within the library.
Rules Library specifies the library from which the rules file is referenced. If you do not select this option, Diva gets the rules from a UNIX location.
Machine specifies the machine on which to run the verification checks. This field appears only if you have a Diva remote verification license.
Remote Machine Name specifies the workstation or server that contains the Diva verification software and where the job is run. See the Chapter 2, “Remote Mode” for details on running Diva remote verification.
Use EDB causes error markers to be written to the given ivEDB error database instead of to the marker layer.
Ignore Missing Masters causes Diva to report and ignore missing masters when reading the design data. Normally, missing masters cause Diva to abort after reporting all missing masters.
Using DRC
-
Select DRC from the Verify menu.
The DRC form appears. - Select the checking method.
- Select the checking limit.
-
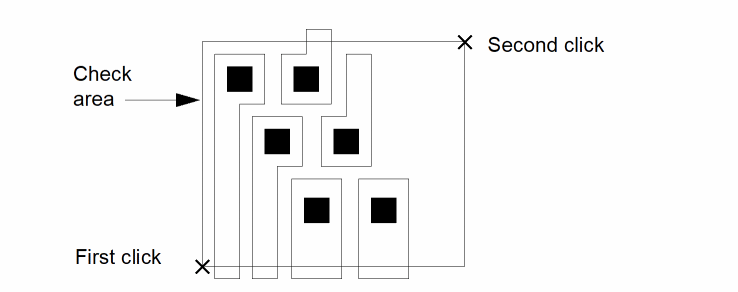
If you select by area as the checking limit, you can type the coordinates for a check area, or you can draw a rectangle to define the area with the mouse.
- To type in the coordinates, click in the Coordinate field and start typing.
-
To select the area by clicking on it with the mouse, click on Sel by Cursor, then click once in the bottom left corner and once in the upper right corner of the area you want to check.
.
- To process nets that have the same name as though they are connected, select Join Nets With Same Name.
- To see the DRC rules in the CIW, select Echo Commands.
- To control if-then-else statements in the command stream, either type the switch names (with a space between each name) or select the set switches button to bring up a list box from which you can select the required switches. Click on a switch from the list box to select it. To select multiple switches, hold the control key while clicking on additional switches.
- To identify a file containing run-specific verification commands, type the name of the file for Run-Specific Command File.
- To specify an inclusion limit, type an integer.
For the inclusion limit to take effect, you must have added an ivIncludeValue property to each cellview you want to exclude. For more information about inclusion limits, see Chapter 2, “Including and Excluding Cells.”
- To specify the rules file, click in the RulesFile field and type the name of the file.
- To read the rules from a library, select the Rules Library button and type the name of the library in the field.
- If you have an Diva remote verification license and want to run DRC on a remote machine, follow these steps:
- To run DRC on the local machine, click on local for machine.
- Click on OK to start DRC.
You cannot perform any other functions while DRC is running.
If the Echo Commands option is turned on, you can check the progress of the job by viewing the DRC rules displayed in the CIW as they are executed.
To get information about DRC errors, use the Marker commands. See the
Extract Command
Extracts devices and connectivity to prepare a layout for ERC and LVS verification checks. Extract puts any errors found on the marker layer. You can highlight and display information about errors using the Markers commands.
Prerequisites
Your technology file must contain extract rules.
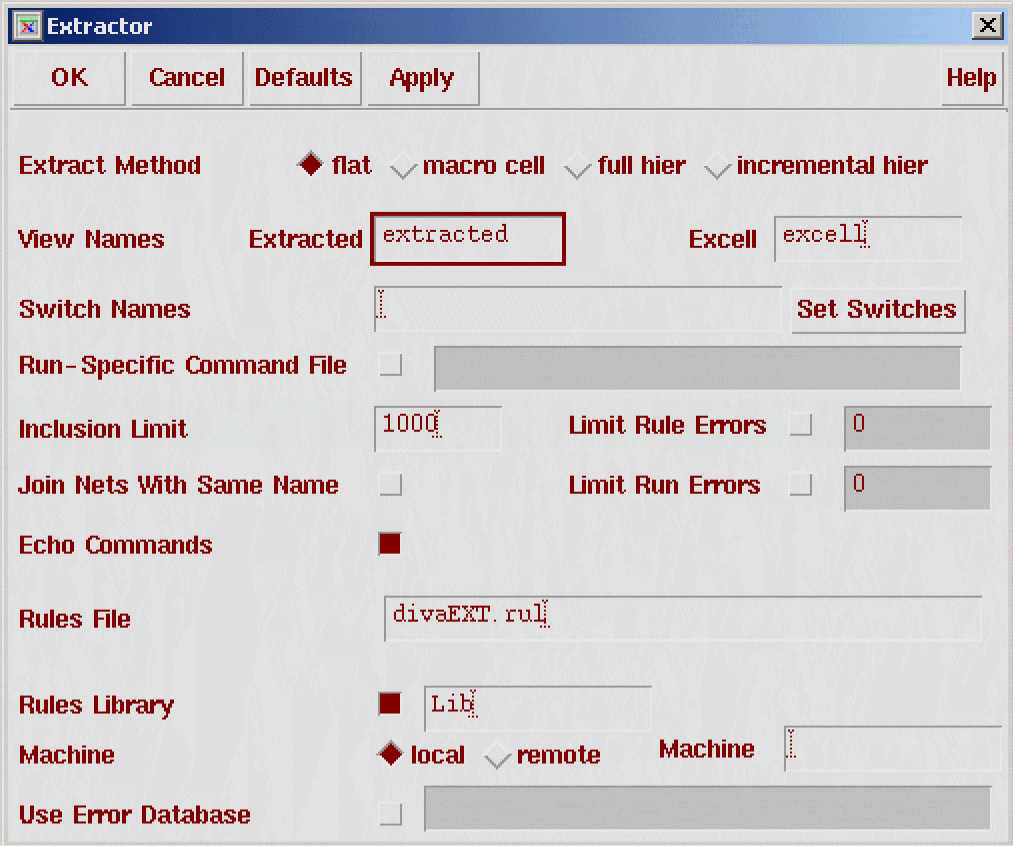
Extract Method sets the method for extracting connectivity.
Join Nets With Same Name causes each group of electrical nets having the same name to be considered as a single net. This option connects nets only in the extracted cellview, not in the physical layout.
Echo Commands displays the technology file extract rules in the CIW as they are processed. Echo is not active during hierarchical processing because the rules are executed multiple times.
Switch Names identifies the section of statements in the technology file that you want to use for a specific extraction run to control the command stream. The technology file sections you identify here are in addition to the sections normally used to control extraction.
Run-Specific Command File specifies either a file in the current directory or a path to the file that contains verification commands relevant to a specific design. For more information about the run-specific command file, see Chapter 4, “Writing Diva Verification Rules.”
Set Switches brings up a list box showing all the switches in the DRC/Extract rules. You can then select the needed switches and click OK in the listbox. The switches you select are entered into the switch names field.
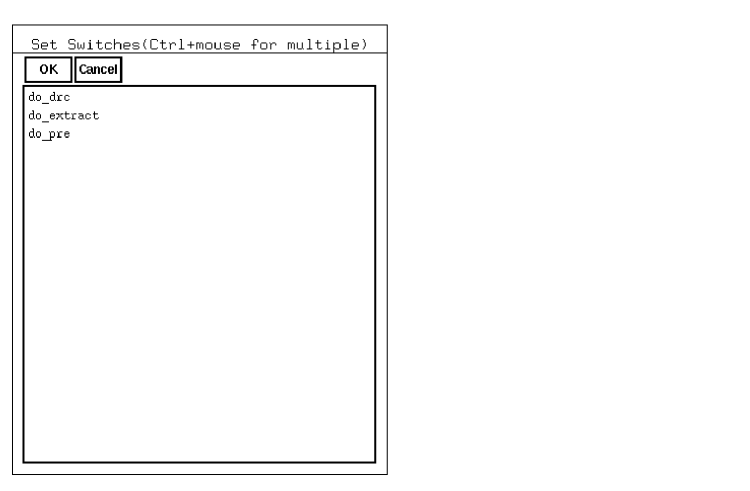
If you want a single switch, click on it. If you want multiple switches, hold the control key while clicking on the second and subsequent switches.
The default switches ?drc and ?extract are not shown. If you are running DRC, any switches contained in a ?extract branch of the rules file are not shown. If you are running extraction, any switches contained in a ?drc branch of the rules are not shown. The only exception to this is when the ?drc or ?extract switches are part of more complex switch expressions. All switches within both branches are then shown.
Inclusion Limit is an integer for including or excluding cells in an extraction run. An inclusion limit tells the extractor to check all cellviews with an ivIncludeValue property less than or equal to this number. Diva verification assigns an inclusion property of zero to each cell unless you define an ivIncludeValue as a cell property. The default value is 1,000. For more information about inclusion limits, see Chapter 2, “Including and Excluding Cells”.
View Names lets you override the default extracted and excell cellview names:
Extracted specifies the name of the extracted view. The default name is extracted.
Excell specifies the name of the excell view. The default name is excell.
Limit Rule Errors allows the specification of a maximum number of errors any rule can generate during the run.
Limit Run Errors allows the specification of a maximum number of errors that can be generated during the run. When the limit is reached, the run terminates early.
Rules File specifies either the UNIX location of a rules file or, if you specified a rules library, the name of the rules file within the library.
Rules Library specifies the library from which the rules file is referenced. If you do not select this option, Diva verification gets the rules from a UNIX location.
Machine specifies the machine on which to run the verification checks. This field appears only if you have a Diva remote verification license.
Remote Machine Name specifies the workstation or server that contains the Diva verification software and where the job is run. See Chapter 2, “Running Diva Verification” for details on running Diva remote verification.
Use EDB causes error markers to be written to the given ivEDB error database instead of to the marker layer.
Ignore Missing Masters causes Diva to report and ignore missing masters when reading the design data. Normally, missing masters cause Diva to abort after reporting all missing masters.
- Select Extract from the Verify menu.
- Select the method of extraction.
- To process nets that have the same name as though they are connected, select Join Nets With Same Name.
- To see the extraction rules in the CIW, select Echo Commands.
- To control if-then-else statements in the command stream, either type the switch names (with a space between each name) or select the set switches button to display a list box from which you can select switches. Click on a switch from the list box to select it. To select multiple switches, hold down the control key while clicking on additional switches.
- To identify a file containing run-specific verification commands, select the Run-Specific Command File option and type the name of the file in the text field. To inactivate the Run-Specific Command File option, deselect it.
-
To specify an inclusion limit, type an integer.
For the inclusion limit to take effect, you must add an ivIncludeValue property to each cellview you want to exclude. For more information about inclusion limits, see the Chapter 2, “Including and Excluding Cells.” - To specify the rules file, click in the RulesFile field and type the name of the file.
- To read the rules from a library, select the Rules Library button and type the name of the library in the field.
- If you have an Diva remote verification license and want to run Extract on a remote machine, follow these steps:
- To run Extract on the local machine, click local for machine.
- Click OK to start the extraction.
If the Echo Commands option is turned on, you can check the progress of the job by viewing the extraction rules displayed in the CIW as they are executed.
Diva generates an extracted cellview from the layout and places it in the same cell as the layout cellview. Diva automatically saves the extracted cellview to disk when the cellview is not displayed in a window. Otherwise, Diva simply redisplays the new extracted cellview. If an extracted cellview already exists, the output of this command overwrites the previous version.
To highlight information about extraction errors, you use the Marker commands. See the
ConcICe Command
Reduces your large RC network to a smaller, electrically equivalent network, the Cadence® RC network reducer option (ConcICe) view. You can use this view with any tool that can take an extracted view, such as interconnect analysis tools. For more information see the
Prerequisites
You must have an extracted view of your layout created by Diva.
ConcICe in Diva ignores parasitic capacitance measured by measureResistance. Use measureFringe and multiLevelParasitic to measure parasitic capacitance.
The ConcICe command does not support parasitic capacitances with multiple value properties on them. Use a separate saveParasitic command for each separate capacitance instance.
The multiLevelParasitic command is usually used to make adjustments to values generated by measureFringe, which can create negative capacitors. To prevent this problem, combine all measurements from measureFringe and multiLevelParasitic in a calcParasitic statement and save the results with saveParasitic.
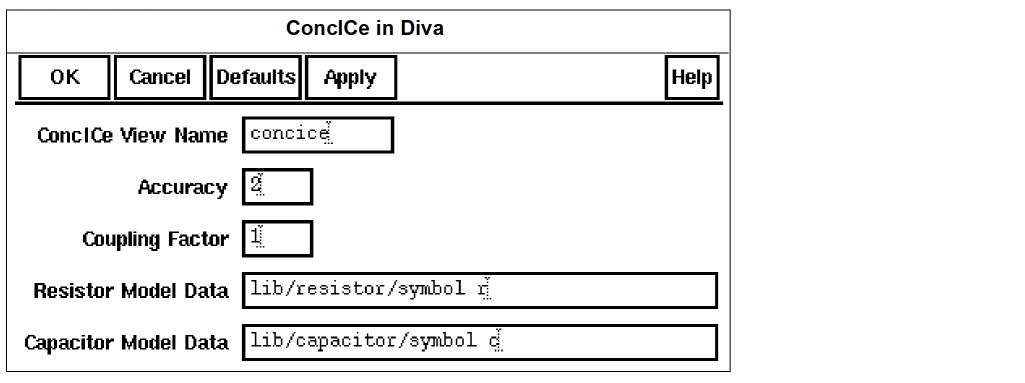
ConcICe View Name sets the name of the extracted view. If you iterate reductions using different accuracy levels and coupling factors, you can apply a different view name to each iteration.
Accuracy is an integer representing the number of capacitors left between the two end points of a wire segment after reduction. The default is 2. An end point can be an instance pin, a pin on a pad, or a branch node. The number of capacitors does not include the junction capacitors on the two end points. The number of resistors left on the segment will generally be one more than the number of capacitors. For details, see the “About Reduction Accuracy” section in the ConcICe Help.
Coupling Factor is a floating-point number between 0 and 2 that is used as a multiplier to model the effects of coupling capacitance, even though it is lumped to ground in the reduced circuit. You set one factor that applies to all the coupling capacitance in the circuit you are reducing. The default is 0. For details, see the section, “How Coupled Capacitance is Lumped to Ground” in the ConcICe Help.
Resistor Model Data displays the library, model type, view type, and property name (r for resistor) of parasitic resistors for which measureResistance has stored parasitic resistance values. Models listed here will be reduced. You can delete a resistor type if you do not want that type reduced, or add a resistor type that you do want reduced.
Capacitor Model Data displays the library, model type, view type, and property name (c for capacitor) of parasitic capacitors for which saveParasitic has stored parasitic capacitance values. Models listed here will be reduced. You can delete a capacitor type if you do not want that type reduced, or add a capacitor type that you do want reduced.
Using ConcICe
To run ConcICe on your extracted view, see the
Viewing Reduction Results
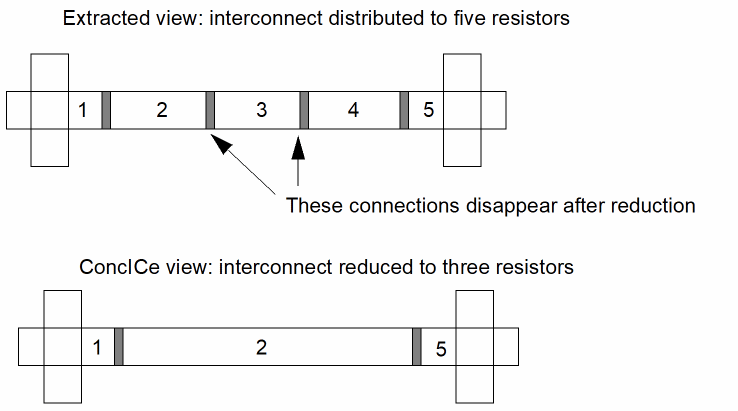
When you graphically display the ConcICe view of your network, it looks approximately the same as the extracted view. During probing, you might see some slight differences due to the reduced number of resistors. For example, the resistance of the interconnect shown in the following figure was distributed to five sections. Each section represented a resistor. When the interconnect is reduced to three resistors, two of the connectors disappear.
ERC Command
Checks an extracted cellview of a layout or schematic for electrical violations. ERC lets you highlight and display information about any errors found.
Prerequisites
You must have an extracted cellview. Use the Extract command to extract a layout and commands from the Schematics menu to extract a schematic.
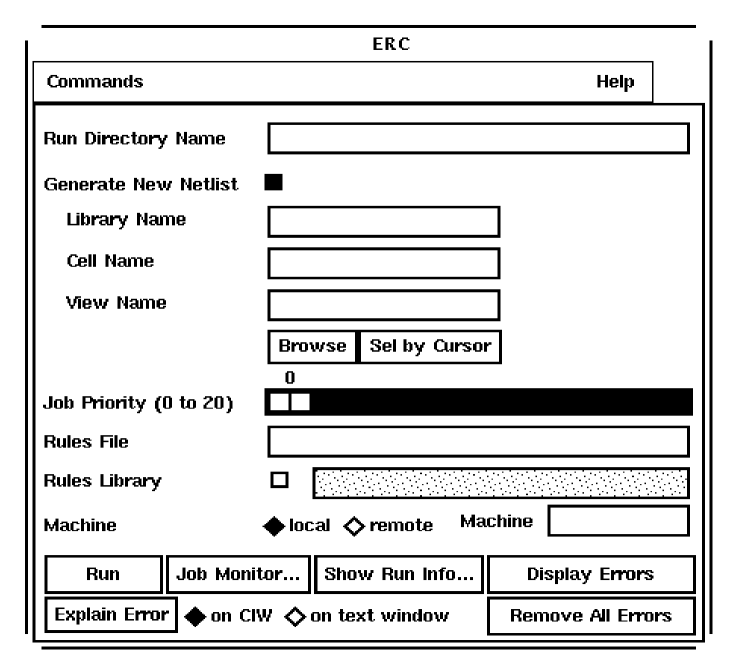
Run Directory Name sets the full or relative path to your run directory. Diva creates the run directory you specify if the run directory does not exist.
Generate New Netlist creates a new netlist when the ERC program is running. A new netlist must be generated when you first run ERC or when you make changes to the cellview. When you set this option to on, you activate the Library Name, Cell Name, and View Name fields.
Library Name is the library where the cellview resides.
Cell Name is the input cell name.
View Name is the view name, either extracted or schematic.
Browse displays the Library Browser, which you can use to select the library, cell, and view you want. When you select a cellview using the Library Browser, Diva automatically enters the cellview information in the form.
Sel by Cursor lets you use the mouse to select the library, cell, and view by clicking in a cellview window.
Job Priority (0 to 20) lets you specify the precedence of your ERC job you are running with other background jobs. The highest priority is 0, and the lowest is 20.
Rules File specifies either the UNIX location of a rules file or, if you specified a rules library, the name of the rules file within the library.
Rules Library specifies the library from which the rules file is referenced. If you do not select this option, Diva gets the rules from a UNIX location.
Machine specifies the machine on which to run the verification checks. This field appears only if you have an Diva remote verification license.
Remote Machine Name specifies the workstation or server that contains this verification software and where the job is run. See Chapter 2, “Remote Mode” for details on running Diva remote verification.
Run starts an ERC job that runs in the background. If you turned on the Generate New Netlist option, Diva generates a new netlist before running the ERC simulator.
Job Monitor displays the Analysis Job Monitor form, which lets you see information about the current status of verification jobs, including the start time, host, status, and priority. You can also suspend, remove, or change the priority of jobs in process. See the Analysis Job Monitor Form for information about this form.
Show Run Info displays the Show Run Information form, which lets you see the log file, output file, netlist file, and error report by using this form. See the “Show Run Information Form” section for information about this form.
Display Errors highlights the net and device errors that Diva identified in an ERC run on the current cellview. You must specify a run directory on the ERC form before you use this command.
Explain Error explains the ERC error you select with the mouse. You must have already displayed errors with the Display Errors command.
|
on CIW displays the error information in the Command Interpreter Window. |
|
|
on text window displays the error information in a text window. |
Remove All Errors unhighlights the net and device errors that Diva identified in an ERC run on the current cellview.
Using ERC
When you set the ERC environment, the default cellview is the cellview from which you invoked ERC. You might want to select a cellview that is not on the screen. The following steps tell you how to select a cellview.
-
Select ERC from the Verify menu.
The ERC form appears. - Type in the path to the run directory.
-
Click on Generate New Netlist.
The name fields show the default values for the current cellview. -
To select a different cellview, you can do one of the following:
- If the cellview is already open, click on Sel by Cursor and then click on the cell.
-
If the cellview is not open, follow these steps:
Click on Browse in the ERC form.
Click on the library name and select Expand Cells from the Library Browser menu.
Click on the cell name you want and select Expand Cellviews from the Library Browser menu. - To find the most recent version of the cellview, click on the cellview and select Expand Versions.
- Click on the version you want and select Select from the Library Browser menu.
- If you do not want to generate a new netlist for this cellview, turn off the Generate New Netlist option.
- To set the processing priority, click and drag the number bar until the priority you want shows above the bar.
- To specify the rules file, click in the RulesFile field and type the name of the file.
- To read the rules from a library, select the Rules Library button and type the name of the library in the field.
- If you have an Diva remote verification license and want to run ERC on a remote machine, follow these steps:
- To run ERC on the local machine, click on local for machine.
-
Click Run in the ERC form to start the job.
For more information about your job, select from the following options:- To display and control job execution status, click on Job Monitor. See the “Using Explain Error” section for detailed information.
- To see the ERC run file information, click on Show Run Info. See the “Using Show Run Info” section for detailed information.
- To display errors on the cellview, click on Display Errors.
- To get more information about the error, click on Explain Error. See the “Using Show Run Info” section for detailed information.
- To unhighlight the net and device errors, click on Remove All Errors.
- To highlight and query devices or nets, use the Probe command from the Verify menu. See the Probe command description for more information.
Analysis Job Monitor Form
If you click on Job Monitor in the ERC form, the Analysis Job Monitor form appears.
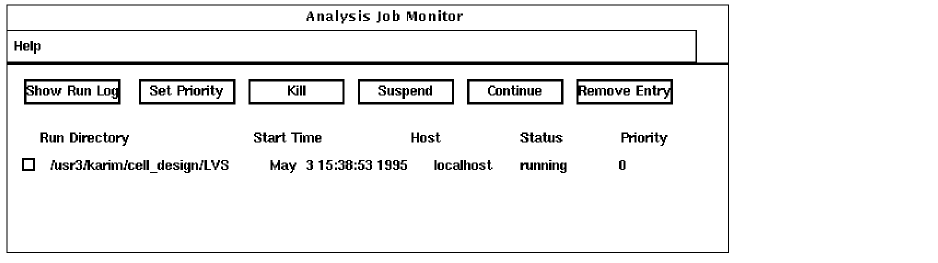
Show Run Log displays the log file for the verification run you specify.
Set Priority lets you reset the processing priority for a job. The highest priority is 0, and the lowest is 20.
Kill terminates the selected job that is running.
Suspend temporarily discontinues a job that is running.
Continue restarts a suspended job that has finished running.
Remove Entry removes the selected job that has finished running.
Using Job Monitor
-
Select Job Monitor from the ERC form.
ERC displays the Job Monitor form, which lists all active and completed jobs. You can keep this form visible to see changes in the status of completed or currently running jobs. - Click on the name of the job for which you want to take action.
-
To display the run log for the selected job, click on Show Run Log.
Diva displays the log file. -
To change the priority of the selected job, click on Set Priority.
The Set Priority form appears.
The highest job priority is 0, and the lowest is 20. - To stop processing the selected job, click on Kill.
- To temporarily suspend the processing of the selected job, click on Suspend.
- To resume processing the selected suspended job, click on Continue.
- To delete a job from the Job Monitor listing, click on Delete.
Show Run Information Form
If you click on Show Run Info in the ERC form, the Show Run Information form appears.
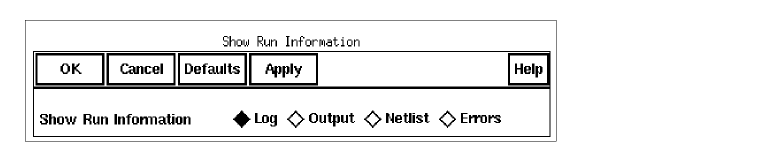
Show Run Information displays information about the ERC run directory.
Using Show Run Info
- To see the run information for the ERC job, click Show Run Info on the ERC form.
- Click Log, Output, Netlist, or Errors, then click Apply or OK to view the information file.
Using Explain Error
-
To see the reason for the error, select Explain Error from the Display Error form.
Diva prompts you to point at the ERC error you want to explain. -
Click on the ERC error.
Diva displays the object name, the object type, and the ERC errors associated with the error you selected.
LVS Command
Compares two versions of a circuit. You can compare two layouts, two schematics, or a layout and a schematic. You can highlight and display information about any differences found.
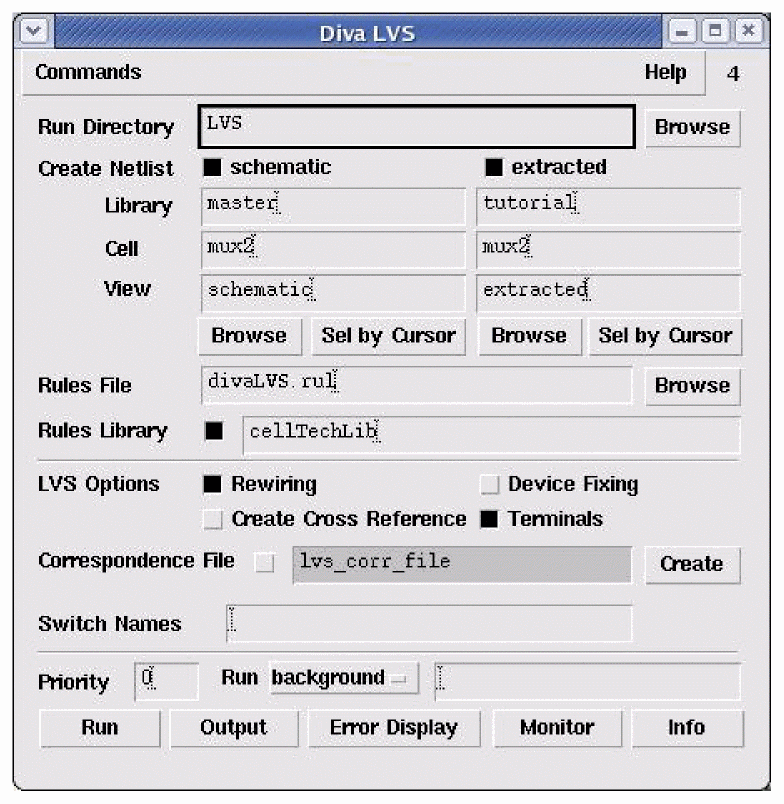
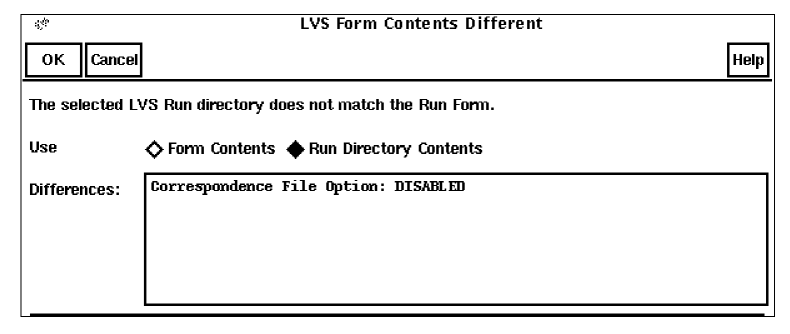
Run Directory defines the full or relative path to the run directory. If the directory you specify does not exist, LVS creates the directory. If the environment of the directory you select is different from that in the LVS run form, the following form is displayed.
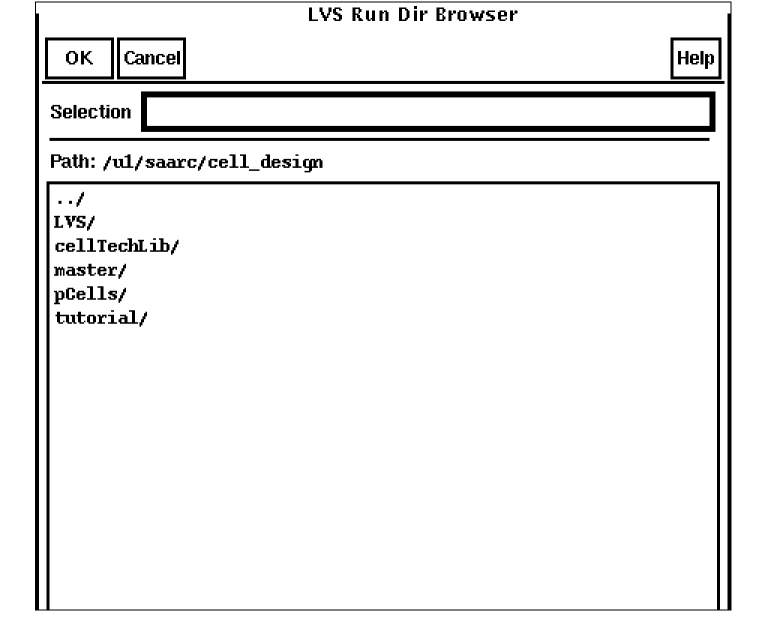
Browse selects the LVS Run Directory browser. It contains a Selection field that displays the current path. When OK is selected, the path in the selection field is displayed in the Run Directory field in the LVS run form. There is also a Path field that displays the current context. A list box shows selectable directories and lowest level files. If necessary, you can manually enter a file specification into the Selection field, rather than traverse the hierarchy.
Create Netlist creates netlists for the schematic and extracted cellviews. The first time you run LVS, you must generate netlists for both cellviews. Any time you change cellviews, you must generate a new netlist for each cellview.
|
schematic creates a netlist for the schematic cellview and enables or disables the schematic cellview column. |
The schematic option defines a working schematic cellview. If you have a schematic cellview open, or if you use the defaults from the run directory, the library name, cell name, and view name are filled in automatically.
Library is the library name for the schematic cellview.
Cell is the cell name for the schematic cellview.
View is the view name for the schematic cellview.
Browse displays the Library Browser. When you select the library, cell name, and view name you want, Diva automatically enters the cellview information in the form.
Sel by Cursor fills in the rest of the fields with information from the extracted cellview window you select with the mouse.
|
extracted creates a netlist for the extracted cellview and enables or disables the extracted cellview column. |
The extracted option defines a working extracted cellview. If you have an extracted cellview open, or if you use the defaults from the run directory, the library name, cell name, and view name fields are filled in automatically.
Library is the library name for the extracted cellview.
Cell is the cell name for the extracted cellview.
View is the view name for the extracted cellview.
Browse displays the Library Browser, which lets you select the library, cell name, and view name you want. When you select a cellview using the Library Browser, Diva automatically enters the cell view information in the form.
Sel by Cursor fills in the rest of the fields with information from the extracted cellview window you select with the mouse.
Rules File specifies either the UNIX location of a rules file or, if you specified a rules library, the name of the rules file within the library.
Browse selects the LVS Rules File browser. It contains a Selection field that displays the current path. When OK is selected, the path in the selection field is displayed in the Rules Library field in the LVS run form. There is also a Path field that displays the current context.A list box displays all selectable files. If necessary, you can manually enter a file specification into the Selection field, rather than traverse the hierarchy.

Rules Library specifies the library from which the rules are referenced. If this option is not selected, Diva gets the rules from a UNIX location.
LVS Options generates a cross reference text file, fix devices, and bypass errors.
Correspondence File uses the file displayed in the Correspondence File field.
Create displays the Correspondence Point form. This form lets you create a file containing the correspondence points for the LVS run. The default is the file name in the Correspondence File field. For information about this form, see the “Correspondence Points Form” section.
Switch Names specifies the list of switches to be passed to the LVS tool. Switches are separated by spaces. These switches can be tested using the avSwitch special procedure to control conditional execution in the LVS rule deck.
Priority (0 to 20) specifies the job priority of the LVS run. The highest priority is 0, and the lowest is 20.
Run specifies how the job is to be run:
Output displays the LVS output report. If none exists, Diva displays the Display Run Info form.
Error Display displays the LVS Error Display form. For a description of this form, see the Virtuoso Schematic Composer User Guide to learn about connectivity and naming conventions for inherited connections and how to add and edit net expressions in a schematic or symbol cellview.
Monitor displays the Analysis Job Monitor form, which displays information about the current status of verification jobs, including the start time, host, status, and priority. You can also suspend, remove, or change the priority of jobs in process. For information about this form, see the “Analysis Job Monitor Form” section.
Info shows the Display Run Information form, which displays the log file, output file, netlist file, and error report. For information about this form, see the “Display Run Information Form” section.
Using LVS
-
Select LVS from the Verify menu.
The LVS form appears.
If both extracted and schematic views are open, the LVS form is already filled out for both views. If one view is open, only part of the form is filled out. -
Type in the run directory name.
If this directory does not exist, Diva creates it.
If this directory exists and the setup from an earlier run conflicts with the contents of the LVS form, Diva displays a dialog box that lets you choose whether to use the run directory defaults or the LVS form information.
To use the run directory defaults, click OK.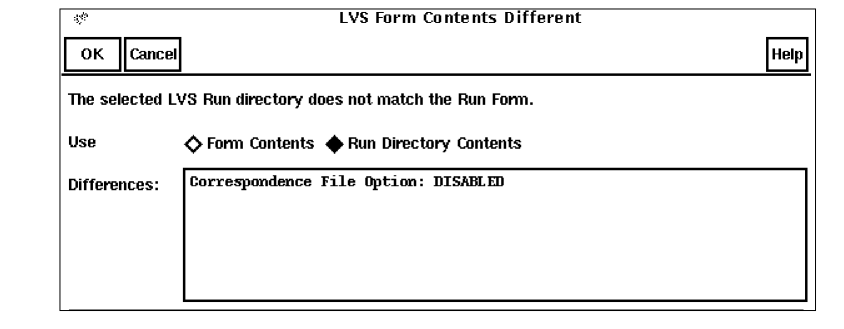
Diva updates the LVS form to reflect the contents of the run directory. -
To choose a schematic if the schematic cellview column is grayed out, click on schematic in the Create Netlist field. If you do not want LVS to generate a new netlist for the schematic cellview, you can click schematic again.
You can define the schematic you want in one of the following ways:-
To point to the schematic you want, click Sel by Cursor.
Diva prompts you to point at the window containing the schematic you want. -
To use the Library Browser to find the cellview you want, click Browse and select the library, cell, and view, you want.
If you use either of these options, Diva automatically fills in the form with information about the cellview you selected. - To enter the cellview information manually, type in the names.
-
To point to the schematic you want, click Sel by Cursor.
-
To choose an extracted cellview, when the extracted cellview column is grayed out, click extracted in the Create Netlist field. If you do not want LVS to generate a new netlist for the extracted cellview, you can click extracted again.
You can define the extracted cellview you want in one of the following ways:- To point to the extracted cellview, click Sel by Cursor.
- To use the Library Browser to find the cellview you want, click Browse.
If you use either of these two options, Diva automatically fills in the form with information about the cellview you selected. - To define the correspondence points file, first click the Correspondence File field option, then type a file name in the field. Click the Create button and the Correspondence Points form appears.
- If you do not want to generate a new netlist for these cellviews, turn off the Create Netlist (schematic or extracted) option.
- To set the processing priority, click and drag the number bar until the priority you want shows above the bar.
- To specify the rules file, click in the RulesFile field and type the name of the file.
- To have the rules read from a library, select the Rules Library button and type the name of the library in the field.
- If you have an Diva remote verification license and want to run LVS on a remote machine, follow these steps:
- Click Run in the LVS form to start an LVS job.
When the job is finished, a message is displayed in a dialog box.
For more information about your job, select from the following options:
- To display and control job execution status, click Monitor.
- To see the LVS run file information, click Info.
- To display errors on the cellview, click Error Display.
Diva updates the run directory to reflect the definition of the schematic and extracted cellviews and the options you selected.
To highlight and query devices or nets, use the Probe command from the Verify menu. See the Probe command description for more information.
If your system is running the Analog verification package, you can backannotate a schematic or simulate a schematic with parasitics after LVS has completed successfully.
Conflicting Paths
If the library search path set in the run directory and the system library search path set in Design Manager do not match, the Initialize Environment form appears. You use this form to choose a path.

Current Library Path shows the search path set in the Design Manager.
Library Path from si.env is the search path set in the run directory.
Use Library Path from si.env? selects which path to use.
Correspondence Points Form
If you click Create in the LVS form, the Correspondence Points form appears.

Working File identifies the file to use for correspondence points. This file contains the net and device correspondence points. If the file does not already exist, Diva creates it when you select correspondence points to add.
Add displays the Add Correspondence Points form.
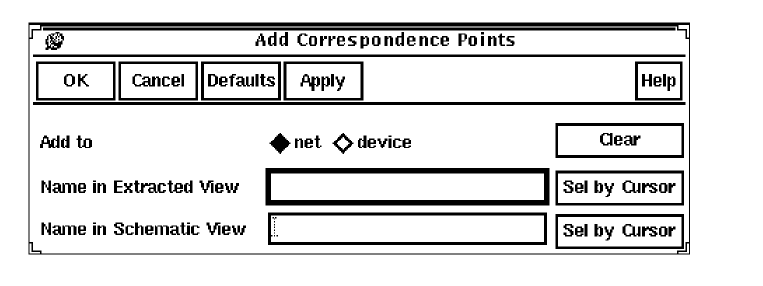
Add to
Clear deletes the entries in the Name in Extracted View field or in the Name in Schematic View field.
Name in Extracted View is the name of the net or device in the extracted cellview. You can type in the name or use the mouse to select a net or device from the cellview.
Sel by Cursor fills in the Name in Extracted View field with the net or device name when you select the net or device with the mouse.
Name in Schematic View is the name of the net or device in the schematic cellview. You can type in the name or use the mouse to select a net or device from the cellview.
Sel by Cursor fills in the Name in Schematic View field with the net or device name when you select the net or device with the mouse.
Remove displays the Remove Correspondence Points form.

Remove from removes the correspondence points from the working file.
Identify in View specifies the cellviews from which you want to delete correspondence points.
Name of Point is the name of the net or device to remove. You can type in the name or use the mouse to select a net or device.
Sel by Cursor fills in the Name of Point field with the net or device name when you select the net or device with the mouse.
Display displays the Display Specific Correspondence Points form.
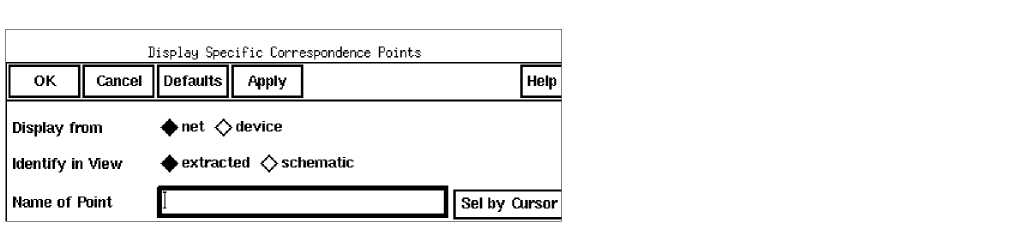
Display from
Identify in View
|
extracted displays the correspondence points in the extracted cellview window. |
|
|
schematic displays the correspondence points in the schematic cellview window. |
Name of Point is the name of the net or device to display. You can type in the name or use the mouse to select a net or device from the cellview.
Sel by Cursor fills in the Name of Point field with the net or device name when you select the net or device with the mouse.
Display All Pts displays all the correspondence points in the working file.
Clear All Pts clears all highlighted correspondence points.
LVS Error Display Form
If you click Error Display in the LVS form, the LVS Error Display form appears.
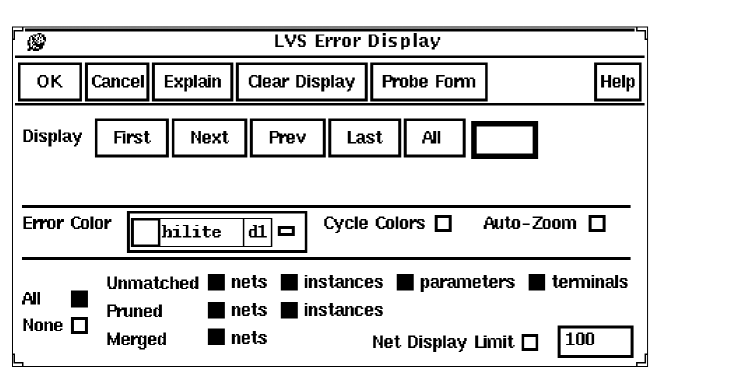
Explain explains the error you select. You must have already displayed the error with one of the Display buttons below.
Clear Display unhighlights the net and device errors that Diva identified in the LVS run on the current cellview.
Probe Form brings up the Probing form.
Display allows you to examine individual net and device errors that Diva identified in the LVS run on the current cellview.
First displays the first error.
Prev goes back to the previous error.
All shows you all net and device errors.
Error Color allows you to choose the error highlighting color.
|
Auto-Zoom zooms the current window into the area surrounding the highlighted error. |
Unmatched highlights the unmatched nets, instances, parameters, or terminals in the source window.
|
parameters highlights the instances that match in the schematic and the layout, but whose parameters do not pass your parameter check. |
||
Pruned highlights inactive instances or nets, that are ignored by LVS.
Merged highlights nets that LVS merges because the nets have the same net name.
|
nets highlights not only the net with the error but also the net with which it is merged when you use the First, Next, Prev, and Last buttons. The All button highlights only the error nets. |
|
Net Display Limit limits the displayed errors by the number of connections the net makes. This helps viewing by eliminating large shorted nets, making misconnections more visible. |
Analysis Job Monitor Form
If you click Monitor in the LVS form, the Analysis Job Monitor form appears.

Command displays a list of the following options:
Show Run Log displays the log file for the run you specify.
Set Priority resets the processing priority for a job. The highest priority is 0, and the lowest is 20.
Kill terminates the selected job that is running.
Suspend temporarily discontinues a job that is running.
Continue restarts a suspended job that has finished running.
Delete removes the selected job that has finished running.
Display Run Information Form
If you click Info in the LVS form, the Display Run Information form appears.
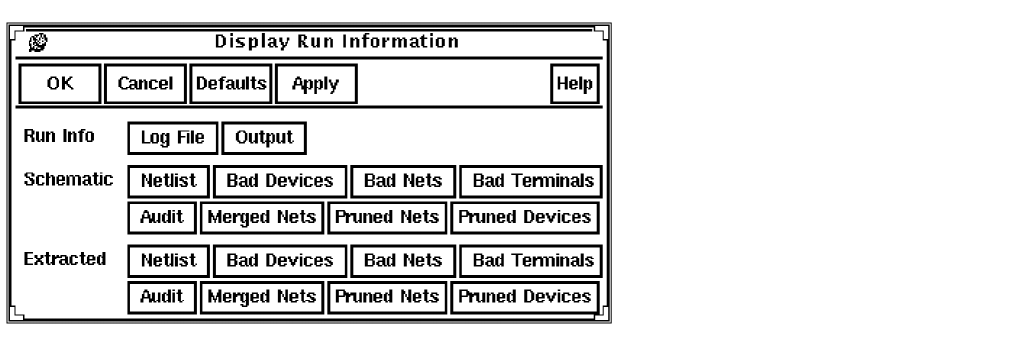
Log File displays a running summary of progress (the si.log) from the run.
Output displays the contents of the si.out file from the run. The si.out file states the software version, tells whether the job has finished successfully, and lists warning messages.
Netlist displays the netlist of the Schematic and Extracted cellview.
To display an internal report file you can click on any of the following buttons in the Schematic field or the Extracted field: Bad Devices, Bad Nets, Bad Terminals, Audit, Merged Nets, Pruned Nets, Pruned Devices.
Inherited Connections for LVS in Diva Verification
Inherited connections is an extension to the connectivity model that allows you to create global signals and override their names for selected branches of the design hierarchy. This flexibility allows you to use
- Multiple power supplies in a design
- Overridable substrate connections
- Parameterized power and ground symbols
To learn about using inherited connections and net expressions with various Cadence® tools in the design flow, refer to the
To learn about connectivity and naming conventions for inherited connections and how to add and edit net expressions in a schematic or symbol cellview, refer to the Virtuoso Schematic Composer User Guide.
Probe Command
Lets you highlight and display information about devices and nets in a layout following an ERC or LVS run. Net and device information is supplied by the extracted versions of cellviews you generate. When you probe a net or device, the object is highlighted and you can request information about it. Single-probing lets you highlight a net or device in a single cellview. Cross-probing lets you highlight a net or device in two different cellviews that have been compared using LVS.
Prerequisites
You must have run circuit extraction on the cellview you want to probe. For cross-probing, you must also have run LVS to match a selected net or device between extracted and schematic cellviews.
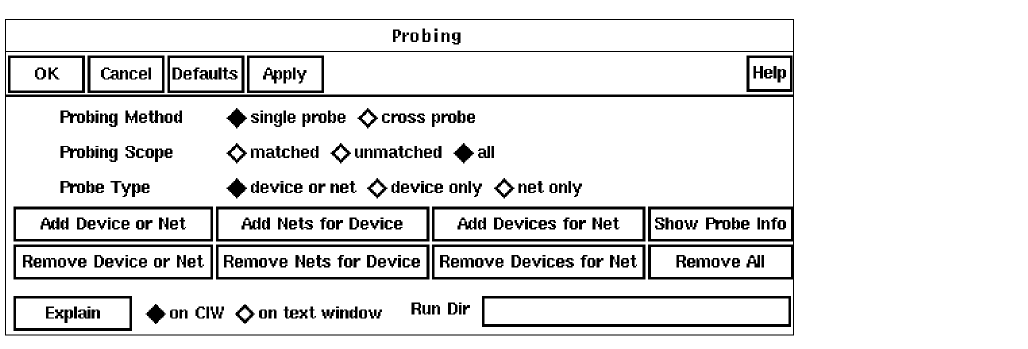
Probing Method determines whether you want to probe in a single cellview or cross-probe correlated cellviews.
|
cross probe highlights the net or device in the extracted and schematic cellviews at the same time. |
Probing Scope indicates the way you want to match nets for a device or devices for a net.
Probe Type indicates the type of net or device you want to probe.
Add Device or Net highlights a single net or device.
Add Nets for Device highlights all nets connected to a device.
Add Devices for Net highlights all devices connected to a net.
Show Probe Info displays information about all nets and devices currently highlighted.
Remove Device or Net eliminates a specific probe from a cellview.
Remove Nets for Device eliminates a specific net probe for a device.
Remove Devices for Net eliminates a specific device probe for a net.
Remove All removes probes from the current cellview and the cross-probes, if any, from the alternate cellview.
Explain explains the probe you select with the mouse.
|
on CIW explains the probe in the Command Interpreter Window. |
|
Run Dir specifies the name of the run directory used by the probing. You can type the name of the run directory used for ERC or LVS in this field. For both ERC and LVS, the probing program uses this directory to get information on the netlisting switching and stopping lists so the hierarchy is processed correctly. For LVS, the probing program also uses this directory to get data for cross probing and highlighting of matched and unmatched devices and instances.
Using Add Device or Net
-
Select Add Device or Net from the Probing form.
The CIW prompts you to point to the device or net or enter the name. - Do one of the following:
- Select the probing method.
- Select the type of net or device you want highlighted.
Using Add Nets for Device
-
Select Add Nets for Device from the Probing form.
The CIW prompts you to point to a device or enter the name. - Do one of the following:
- Select the probing method.
-
Select the probing scope.
Using Add Devices for Net
-
Select Add Devices for Net from the Probing form.
The CIW prompts you to point to the net or enter the name. - Do one of the following:
- Select the probing method.
Using Show Probe Info
-
Select Show Probe Information from the Probing form.
The object type, object name, and the ERC or LVS errors (if any) associated with all probes in the cellview are displayed. - To close the view window
Using Remove Device or Net
-
Select Remove Device or Net from the Probing form.
The CIW prompts you to point to the device or net or enter the name. - Do one of the following:
Using Remove Nets for Device
-
Select Remove Nets for Device from the Probing form.
The CIW prompts you to point to the device or net or enter the name. - Do one of the following:
Using Remove Devices for Net
-
Select Remove Devices for Net from the Probing form.
The CIW prompts you to point to the net or enter the name. - Do one of the following:
Using Explain
You must highlight the net or device with Probing “add” options before you can request information about it.
- Select Explain from the Probing form.
-
Select the net or device for which you want information.
The object type, object name, and the ERC or LVS errors (if any) associated with the probe are displayed.
Remove All
Select Remove All from the Probing form.
All probes and cross-probes of devices and nets from the cellview are removed.
Markers Command
When the results of a verification command produce errors or warnings on the marker layer, the Virtuoso layout editor provides information about the errors through the Marker commands. These commands help you find errors and get information about them. These commands appear under the Verify menu. When the Use EDB option is selected, markers are not written to the marker layer and must be accessed using the ivEDB browser available under the Tools menu in the CIW.

- Verify – Marker – Explain displays the reason for the error or warning marker in a text window. For more information, see the “Explaining Markers” section in the Virtuoso Layout Editor User Guide.
- Verify – Marker – Find searches for and highlights each error or warning marker. For more information, see the “Finding Markers” section in the Virtuoso Layout Editor User Guide.
After you get error information you need, you can delete the marker.
- Verify – Marker – Delete removes a specific marker. For more information, see the “Deleting Individual or Multiple Markers” section in the Virtuoso Layout Editor User Guide.
- Verify – Marker – Delete All removes all markers. For more information, see the “Deleting All Markers” section in the Virtuoso Layout Editor User Guide.
Return to top