3
LVS Commands
This chapter discusses the LVS Menu commands.
LVS Menu
The LVS menu lets you display layout versus schematic errors.
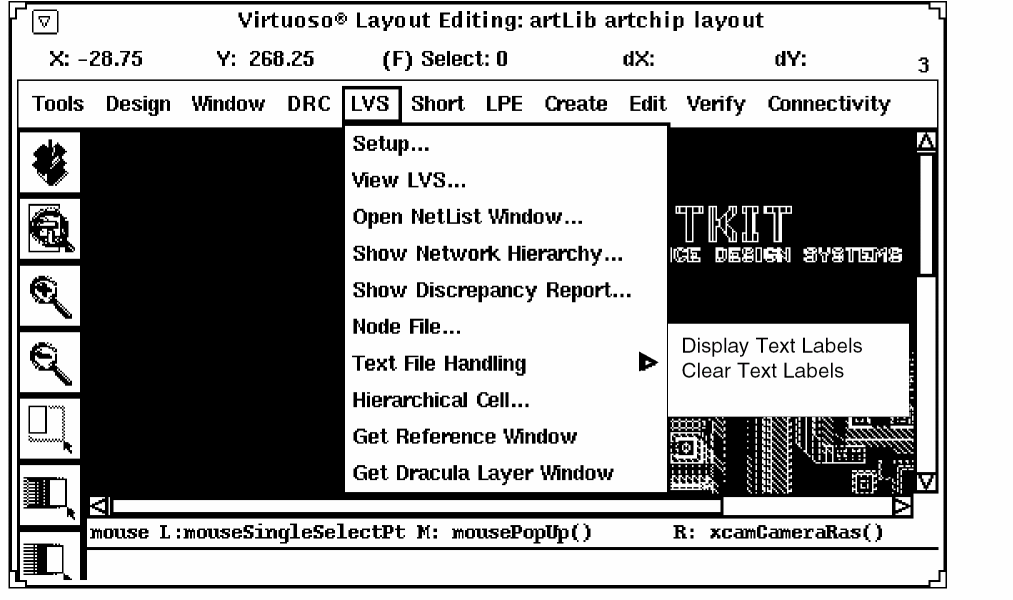
Setup defines a Dracula directory and sets parameters.
View LVS... lets you set display options and get information about nets, devices, and errors.
Open Netlist Window opens a new window containing netlist information.
Show Network Hierarchy displays the circuit hierarchy.
Show Discrepancy Report displays the LVS discrepancy report.
Node File... displays the Node File form.
Text File Handling lets you display text layers.
Hierarchical Cell lets you choose which Hcells to display and how to display them.
Get Reference Window displays the reference window.
Setup
Lets you define the path to the Dracula directory containing the data you want to query. Setup also lets you select display options for the analysis.
LVS Setup Form
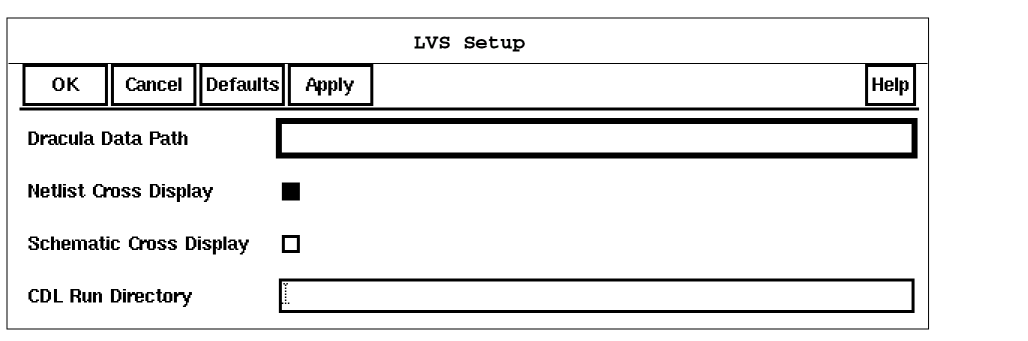
Dracula Data Path specifies the path to the directory containing Dracula data. You can enter a relative path or a full path.
Default: current directory
Netlist Cross Display allows corresponding nets or devices in the netlist window to be highlighted when you highlight nets or devices in the layout window. When you highlight nets or devices in the netlist window, the graphical user interface highlights the corresponding nets or devices in the layout window.
Schematic Cross Display allows corresponding devices or nets in the Cadence Composer schematic window to be highlighted when you highlight nets or devices in the layout window. When you highlight nets or devices in the schematic window, the graphical user interface highlights corresponding nets or devices in the layout window.
CDL Run Directory specifies the run directory used in a previous CDLOUT translator run to generate a netlist from a Cadence schematic. This directory contains cross-reference information and other data needed to cross-probe between the graphical user interface and the Cadence environment. Specify a CDL run directory only if you used CDLOUT to generate the netlist for LVS and you want to perform schematic cross-probing.
draculaInteractive to perform cross probing between the layout and schematic, or vice-versa.Using LVS Setup
You can change the setup options any time while you are running the graphical user interface.
-
Select Setup from the LVS menu.
The Setup form appears. - Type in the path to the Dracula directory.
- To highlight a net or device in both the layout and netlist windows, click on Netlist Cross Display.
- To highlight a net, device, or error in both the layout and schematic windows, click on Schematic Cross Display.
- To cross-reference the schematic, type in the name of the CDL Run Directory, which was created when you ran the CDLOUT program to create the netlist.
- Click on OK.
View LVS
Lets you set display options and get information about nets, devices, and errors. This command is also available on the LPE menu.
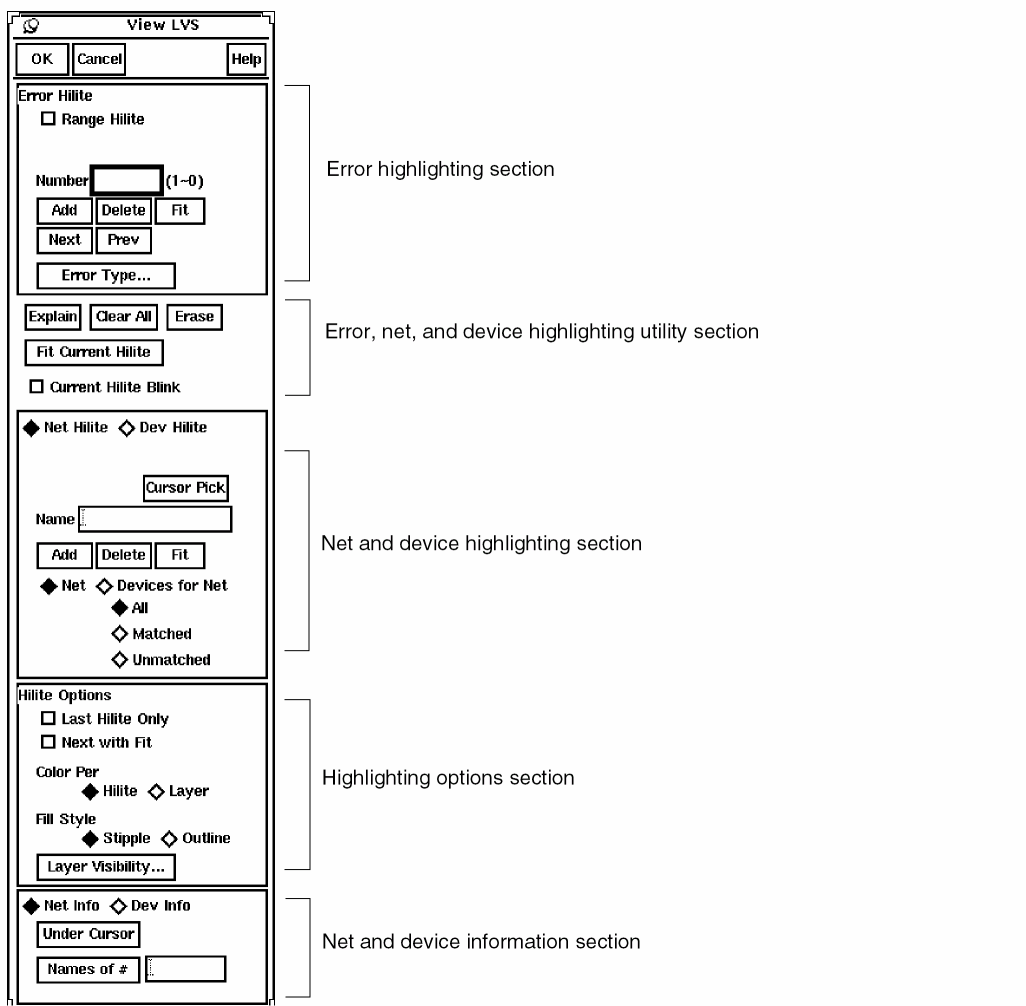
Error Highlighting Section
Number lets you specify one or more errors to display. The valid range of numbers for your LVS job is listed to the left of the Number field. Separate the error numbers with a space. The graphical user interface highlights the selected errors.
If you selected the Setup – Netlist Cross Display option, the graphical user interface also highlights the errors in the netlist window. If you selected the Setup – Schematic Cross Display option, the graphical user interface also highlights the errors in the schematic window.
Add highlights the error specified with Number.
Delete unhighlights the error specified with Number.
Fit zooms in or out to encompass the last displayed error.
Next highlights the next error.
Prev highlights the previous error.
Error Type opens the Hilite LVS Error Types form in which you select one or more error types to highlight. For each type that contains an error, the graphical user interface lists a Dracula error type number and a brief description. Select the error types you want to display and click OK. To reset the Hilite LVS Error Types form to its default state, click Defaults.
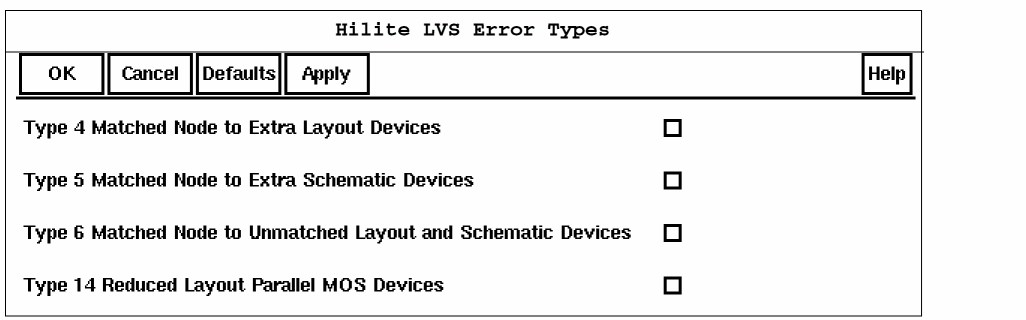
The graphical user interface treats errors displayed by number and errors displayed by type separately. If you selected an error by number and that error is part of an error type also being displayed, when you clear the error type, the error selected by number is not affected.
Highlighting Utility Section
Options in this section apply to the error, net, or device highlighted with the error highlighting section or the net and device highlighting section.
Explain displays the message associated with a highlighted net or device.
To get information about a net or device, follow these steps.
-
Click Explain on the View LVS menu.
The graphical user interface debugging tool prompts you to point to an item. -
Click on the net or device you want.
The graphical user interface displays a text message like this one in a viewfile window.LVS error type 2 (Device 3, MOSXP8G, hd2)
Clear All removes any highlighting from the view and the netlist.
Erase erases the highlighted item you click on. The item is not removed from the database.
Fit Current Hilite zooms in or out to encompass the last highlighted item.
|
Current Hilite Blink makes the last item you highlighted blink. |
Net and Device Highlighting Section
This section lets you highlight nets and devices in the layout window. If you display the device or net in a netlist window, and you selected the Setup – Netlist Cross Display option, the graphical user interface also highlights the nets or devices in the netlist window. If you selected the Setup – Schematic Cross Display option, the graphical user interface also highlights the nets or devices in the schematic window.
|
Net Hilite customizes the net and device highlighting section for net highlighting. |
|
|
Dev Hilite customizes the net and device highlighting section for device highlighting. |
Cursor Pick lets you point to the net or device you want to highlight. If there are multiple items under the cursor, a list box appears. When you choose an item, the graphical user interface displays the item name in the Name field.
Name specifies the schematic name of the net or device you want to highlight. You can also type a layout net number preceded with a question mark (?o for original nets or ?p for subnets) or a layout device number preceded with ?dev.
Add highlights the net or device you specified with Name, Cursor Pick, or All/Matched/Unmatched.
Delete unhighlights the net or device you specified with Name, Cursor Pick, or All/Matched/Unmatched.
Fit zooms in or out to encompass the last highlighted item.
Highlighting Options Section
Color Per determines whether the layers are displayed in different colors.
Fill Style determines how the error shapes are to be displayed.
|
Stipple displays the highlighted object with a solid fill and no outline. |
|
|
Outline displays the highlighted object with an unfilled outline. |
Layer Visibility lists all the layers that are part of a net or device on the Set LVS Visibility for Connectivity and Device Layers form. You can turn the display on or off for any of these layers. If you turn off a layer for a net, you affect only its visibility. The graphical user interface still recognizes the connectivity through that layer.
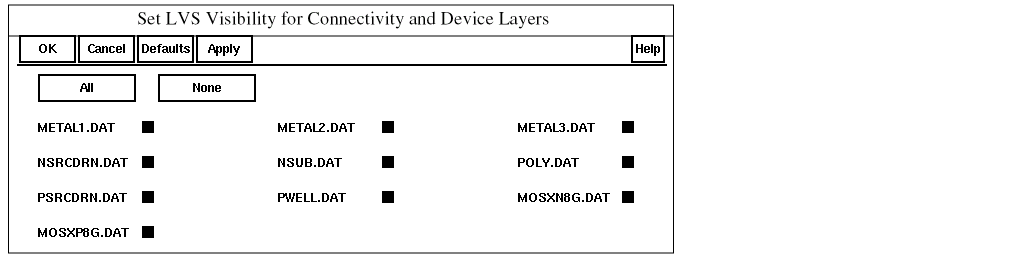
Use the Set LVS Visibility for Connectivity and Devices Layers form to set layer visibility as follows:
-
To see selected layers, click on the layer names to turn them off or on.
You can use this option to improve visibility by turning off global layers, such as PWELL.DAT, that obscure the highlighting of other layers. - To see all layers, click All. To turn off all layers, click None.
- To reset layer visibility to the default, click Defaults.
- Click on OK.
When you run Dracula LVS, you must save all layers forming nets and devices using the Dracula KEEPDATA command. KEEPDATA=YES is the Dracula default, which saves the device and interconnect layers for the graphical user interface.
The visibility defaults can be set by defining the iqSetVisibilityDefaults variable in the .cdsinit as follows:
iqSetVisibilityDefaults = '( ( "METAL.DAT" t )
         ( "POLY.DAT" t )
         ( "NSD.DAT" nil ) )
Layers not listed in the iqSetVisibilityDefaults variable are turned on. If you do not define the variable in .cdsinit, all layers are turned on. After LVS Setup, you can change the value of iqSetVisibilityDefaults by typing iqSetVisibility in the CIW. For example
iqSetVisibility('(("CMET.DAT" t) ("POLY.DAT" nil)))
Net and Device Information Section
This section displays the number, layer, and name of the net or device you select.
Under Cursor selects the net or device you point to with the cursor. When you click on Under Cursor, the graphical user interface prompts you to point to the net or device you want.
The graphical user interface displays a view window with the number, layer, and names of the specified nets or devices. If more than one net or device appears under the cursor, the graphical user interface displays the information for all the nets or devices under the cursor.
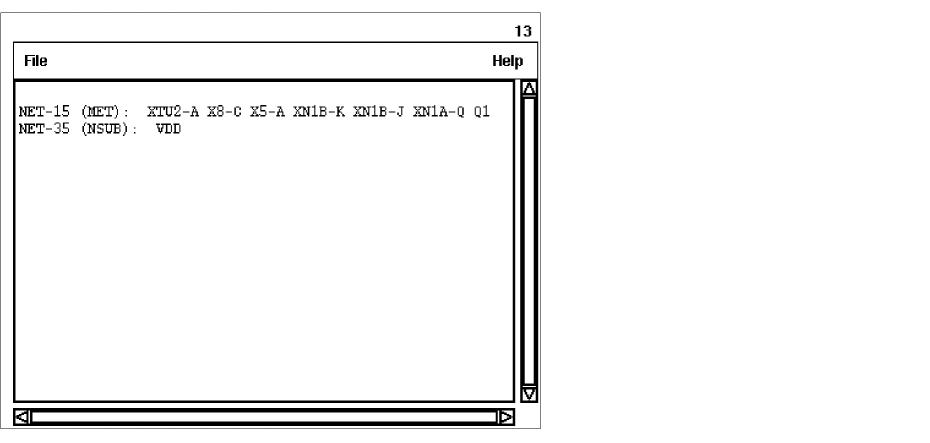
Names of # selects nets or devices by number. Click on Names of # and type in the number.
The graphical user interface displays a view window with the number, layer, and names of the specified nets or devices.
Open Netlist Window
Opens a new window containing the circuit netlist. This command is also available on the LPE menu.
Open Netlist Window Form
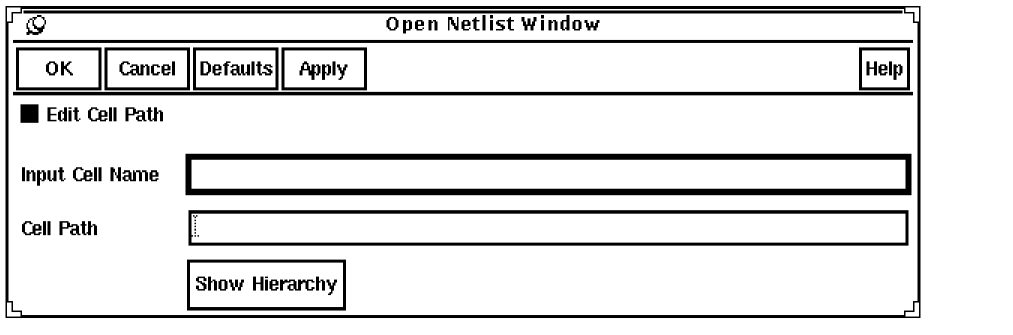
Input Cell Name is the name of the cell whose netlist you want to see.
Edit Cell Path allows users to edit the cell path of the input cell name to be viewed. If the Edit Cell Path checkbox is disabled, the default path is used to search for the specified cell.
Show Hierarchy displays a browser window that shows the cell hierarchy. For more information about how to about how to display the cell hierarchy, see “Show Network Hierarchy”.
Using Open Netlist Window
To open the netlist window, follow these steps.
- Select Open Netlist Window from the LVS menu.
-
Select the netlist you want to view using one of the following methods:
- To enter the name manually, type in the name of the cell netlist you want to view.
- To see the cells in the hierarchy, click on Show Hierarchy. (For more information about how to display the cell hierarchy, see the “Show Network Hierarchy”.)
The graphical user interface opens a browser window or uses an existing browser window to display the hierarchy of the circuit you selected. - To find the cell you want, expand the hierarchy.
-
To select the cell name, choose Select from the pop-up menu.
The graphical user interface enters the cell name into the Input Cell Name field. -
Click on OK.
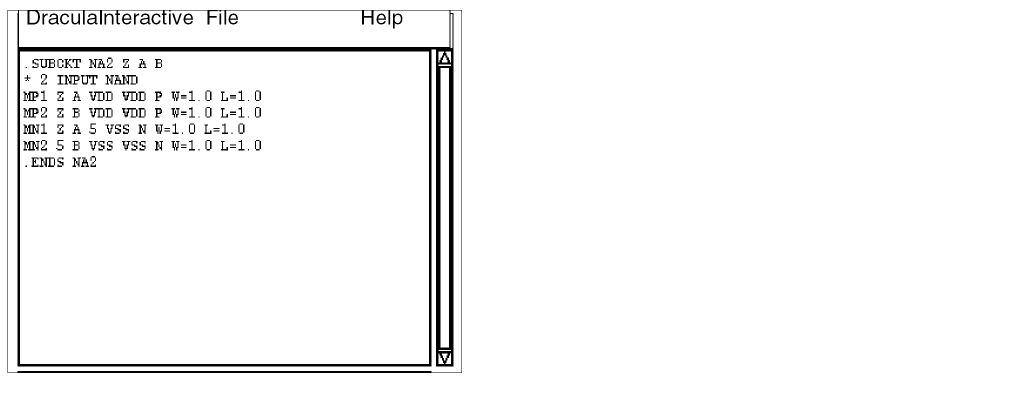
The graphical user interface opens a view window and displays the netlist for the selected cell.
If you selected the Netlist Cross Display option of the Setup command and you highlight a net or device in the layout window, the graphical user interface highlights the corresponding net or device (if any) in the netlist window.
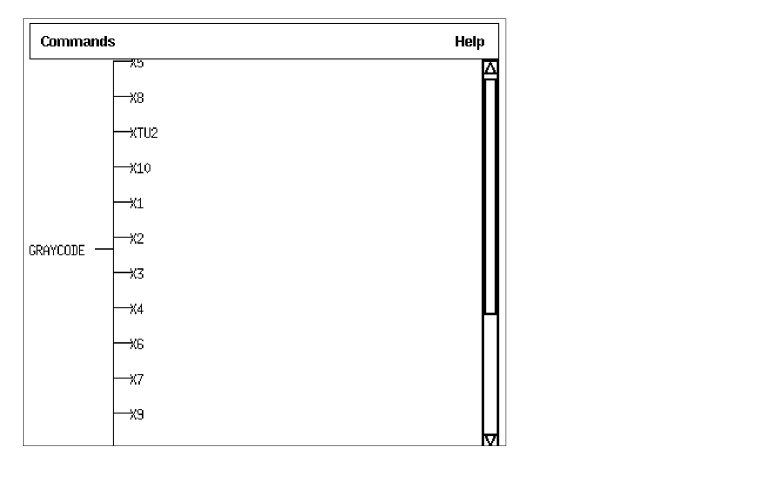
Show Network Hierarchy
Opens a browser window that displays the hierarchy of the circuit netlist so you can select the cell name for the netlist you want. The browser hierarchy contains only references to cells, not references to nets and devices. This command is also available on the LPE menu.
Prerequisites
You need a Dracula netlist and a hierarchy.
Using Show Network Hierarchy
To display the network hierarchy, follow these steps.
-
Select Show Network Hierarchy from the LVS menu.
The graphical user interface opens a browser window or uses an existing browser window to display the hierarchy of the circuit in the current window. - To find the cell you want, expand the hierarchy so you can see all of the cell names.
-
Display a netlist for a subcircuit using either of the following methods:
- To display a netlist in a new window, click on the cell name and choose Open Netlist from the pop-up menu.
The graphical user interface opens a view window containing the netlist for the circuit you chose. - To exit from the hierarchy browser window, select Close Browser from the Commands menu in the window.
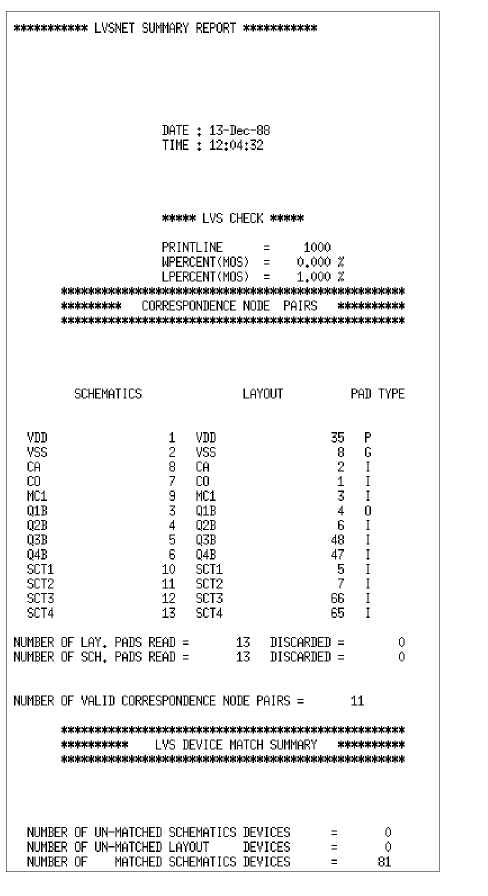
Show Discrepancy Report
Opens a new window displaying the LVS discrepancy report. This command is also available on the LPE menu.
Show Discrepancy Report Form

Discrepancy Report File Name is the LVS discrepancy report you want to display.
Node File

Creates and edits the TARGET.DAT file or other text files containing lines of node names. This feature can be used to generate the list of target nets used by the LVS View Parasitic form.
See the section on Node File for more information.
Display Text Labels
Displays text labels associated with the view.
For details, see the
Clear Text Labels
Removes the text labels from the current window.
Hierarchical Cell
Lets you control which Hcells to display in the graphical user interface design window.
For details, see the
Get Reference Window
Displays the Reference window.
Get Dracula Layer Window

Displays the DLW (Dracula Layer Window).
Return to top