A
Fluid Guard Ring Form Descriptions
This appendix covers detailed information about the following forms of Layout L that help you in creating and managing FGRs:
- Clean Overlapping Contacts Form
- Create Fluid Guard Ring Form (New GUI)
- Create Guard Ring Form (Old GUI)
- Edit Instance Properties Form
- Chop Fluid Objects Form
- Create Tunnel in Fluid Object Form
- Heal Fluid Object Form
- Install Guard Ring Form
For details about the other forms, refer to the
Clean Overlapping Contacts Form
See Cleaning Overlapped Contacts from Fluid Guard Rings for related information.
guard ring removes the overlapping contacts from the guard ring selected using the mouse click.
rectangle removes the overlapping contacts from the specific area on the canvas that you draw by dragging the mouse over it.
Clean contacts hierarchically, if selected, cleans overlapping contacts from the active guard ring while considering the guard rings in the current and lower levels of the hierarchy. If deselected, cleans overlapping contacts from the active guard ring while considering only the current level of the hierarchy.
Create Fluid Guard Ring Form (New GUI)
See Creating Fluid Guard Rings (New GUI) for related information.
Wrap automatically creates a guard ring around the selected objects.
Interactive lets you interactively enclose an object with a fluid guard ring by defining the enclosing points on the canvas.
Rectangular creates a rectangular fluid guard ring around the selected shape.
Rectilinear creates a rectilinear fluid guard ring around the selected shape.
Rectangle creates a rectangular fluid guard ring.
Polygon Ring creates a ring using the entered polygon points.
Polygon Fill covers the space between objects using the fluid guard ring device material.
Path creates a path guard ring.
Choose Device Automatically is enabled and creates a fluid guard ring automatically if the vfoAssociatedDevices or vfoAssociatedRings property has been defined for the FGR device.
Environment variables: creationMethod, shape, autoChooseDevice
Device lets you select one of the installed FGR devices in the displayed technology library and its referenced technology libraries (ITDB). For more information about ITDB, see the Virtuoso Technology Data User Guide.
The names of the FGR devices displayed in the Device list box are sorted alphanumerically.
Environment variables: device
Contact Rows specifies the number of via rows. Contact Rows and Path Width are inter-dependent fields. Modifying the value in one updates the value in the other field.
Path Width enables you to specify the width of the guard ring. Path Width and Contact Rows are inter-dependent fields. Modifying the value in one updates the value in the other field.
Net Name specifies the container cellview’s net with which you want to connect the terminal of the guard ring master.
Wrap Common creates a common guard ring around the selected objects. When off, individual guard rings are created around each of the selected objects.
Environment variables: wrapCommon
Place at Minimum Distance, if selected, uses the minSpacing rule defined for the object layer around which the FGR is created to compute the spacing between the guard ring and the object layer.
The object layer includes both original and derived layers.
Reference Layer enables the Reference Layer Settings section.
Enclose By specifies the distance from the object at which the fluid guard ring should be placed. If you select this option, the Distance field is enabled.
Environment variables: encloseByDistance
Distance is the positive or negative value for calculating the distance from the outermost layer of the fluid guard ring to the outermost layer of the enclosed device. This option is enabled if you select Enclose By.
Environment variables: wrapType
Reference Layer Settings section is enabled if the Wrap Type is set to Reference Layer.
FGR Layer displays the FGR layer.
Reference Layer displays the reference layer.
Spacing displays the spacing value.
Implant Layer Settings lists all the implant and well layers defined in the installed guard ring device.
Use enables you to specify whether to use the implant layer in the guard ring you create.
Lpp displays the implant or well layer.
The number and type of enclosure columns displayed depends on the type of device, symmetric or asymmetric, and shape type selected. One or more of the following enclosure columns are displayed based on your selections.
Enclosure enables you to specify the implant layer enclosure around vias. The number and type of enclosure columns displayed depends on the type of device, symmetric or asymmetric, and shape type selected.
Enclosure I/T/R enables you to specify the inside, top, and right implant layer enclosures around vias.
Enclosure O/B/L enables you to specify the outside, bottom, and left implant layer enclosures around vias.
End of Line enables you to specify the end of line enclosure value.
Pin, if selected, draws the implant layer in the guard ring with a pin-like shape. The implant layer then has the same connectivity as the metal layer of the guard ring. For example, if you have a MOS device with a VDD bulk connection, then while creating a fluid guard ring with an implant layer that matches the MOS bulk layer, the fluid guard ring is automatically connected to the VDD.
Cove Interior , if selected, fills the interior of the guard ring with the implant or well layer. This field is available only for ring type of guard rings. Therefore, this column is not applicable in the Path mode.
Outer Rings
Number of Outer Rings specifies the number of concentric rings of the guard ring to create around the selected objects.
Environment variables: numOuterRings
Enclose By specifies a distance from the object at which the fluid guard ring should be placed. When you specify an Enclose by value, positive or negative, the distance is calculated from the outermost layer of the fluid guard ring to the outermost layer of the enclosed device.
Environment variables: outerRingsEncloseBy
Ring Number specifies the guard ring device to use for the concentric rings. You can create a guard ring with a maximum of six concentric rings. If you specify a number greater than 6 in the Number of Outer Rings field, the number is reset to the previous specified value.
Fields for the concentric rings are added to the form only when the specified value in the Number of Outer Rings field is greater than 1. The number of Ring <n> fields added to the form depend on the value specified in the Number of Outer Rings field. For example, if you specify 4 in the Number of Outer Rings field, three fields – Ring 2, Ring 3, and Ring 4 – are added to the form.
The guard ring device selected from the Device list at the top of the form is used to create the innermost ring.
Device enables you to select one of the installed FGR devices in the displayed technology library and its referenced technology libraries (ITDB).
For more information about ITDB, see the Virtuoso Technology Data User Guide.
Rows lets you specify the number of contact rows in the ring.
Distance lets you specify the distance between two consecutive rings.
Net Name lets you specify the name of the net to which the outer ring should be connected.
Main Layer displays the layer used to calculate width. This field is not editable. To edit the value of the main layer, use the Install Guard Ring form.
Contact Spacing indicates the spacing between vias. The pre-populated value is derived from the contactLayer Spacing value in the Rule section in the Install Guard Ring Form. The value of this field is automatically computed using the constraints in the technology file and is based on the value you specify in the Contact Rows field. The order of precedence for contact spacing is honored as listed in the table, Technology Rules Applied During Installation.
Contact Dimension enables you to specify the via dimension to use. The via is assumed to be rectangular. The pre-populated value is derived from the contactLayer Dimensions value in the Rule section in the Install Guard Ring Form.
Match Contact Enclosures lets you to make the enclosure value of the Main Layer control the enclosure value of the other (non-main) layer. If you select this check box, you can keep both enclosure values the same. When you deselect this check box to disable the feature, you need to set the Metal Enclosures and Diffusion Enclosures values independently.
Inside/Top/Right specifies the inside, top, and right diffusion layer enclosure value.
Outside/Bottom/Left specifies the outside, bottom, and left diffusion layer enclosure value.
End of Line specifies the end of the line enclosure value.
Inside/Top/Right specifies the inside, top, and right metal layer enclosure value.
Outside/Bottom/Left specifies the outside, bottom, and left metal layer enclosure value.
End of Line specifies the end of the line enclosure value.
Create Guard Ring Form (Old GUI)
See Creating Fluid Guard Rings (Old GUI) for related information.
The form comprises the following tabs:
The subtabs on these tabbed pages include:
Wrap Tab
This mode automatically creates a guard ring around the selected objects.
Technology displays the technology library in which the guard ring device is installed. This field is not editable.
Device enables you to select one of the installed FGR devices in the displayed technology library and its referenced technology libraries (ITDB). For more information about ITDB, see the Virtuoso Technology Data User Guide.
Contact Rows enables you to specify the number of via rows. Contact Rows and Path Width are inter-dependent fields. Modifying the value in one updates the value in the other field.
Path Width enables you to specify the width of the guard ring. Path Width and Contact Rows are inter-dependent fields. Modifying the value in one updates the value in the other field.
Net Name enables you to specify the container cellview’s net with which you want to connect the terminal of the guard ring master.
Main Layer displays the layer that will be used for calculating the path width. This field is not editable. To edit the value of the main layer, use the Install Guard Ring form.
You can select one of the following shapes for the wrap-around guard ring to be created: Rectangular or Rectilinear.
Wrap common enables you to create a common guard ring around the selected objects. When off, individual guard rings are created around each of the selected objects.
Place at Minimum Distance, if selected, uses the minSpacing rule defined for the object layer around which the FGR is created to compute the spacing between the guard ring and the object layer.
The Place at Minimum Distance check box is selected by default. If you deselect this check box, you can specify the guard ring distance from the object in the Enclose by field.
Environment variables: fgrWrapPlaceAtMinimumDistance and disableDerivedLayersInWrap
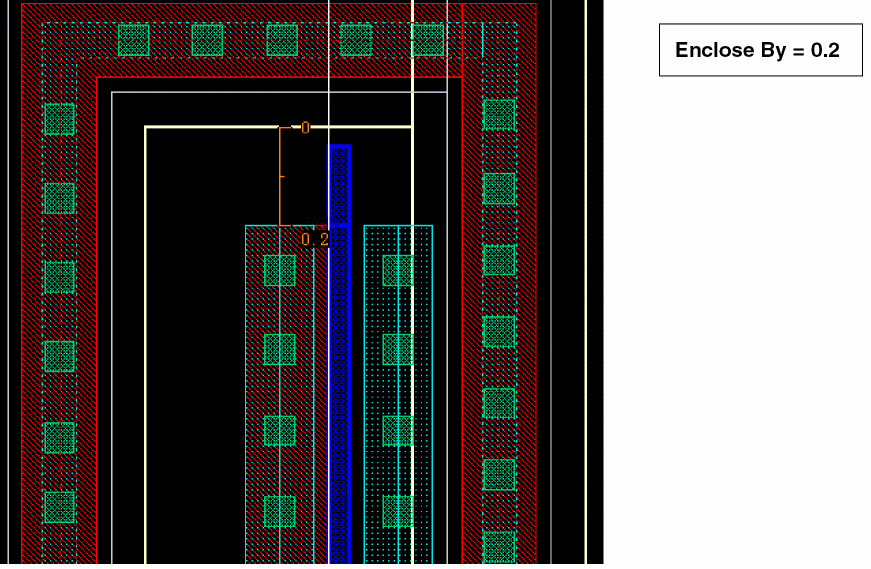
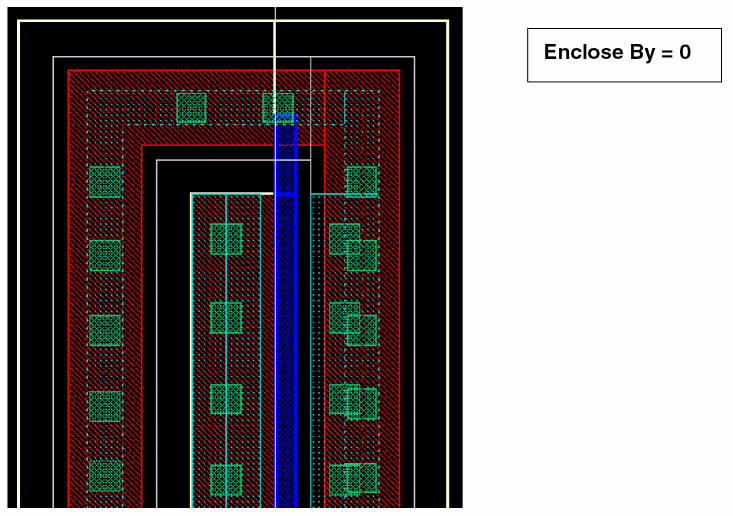
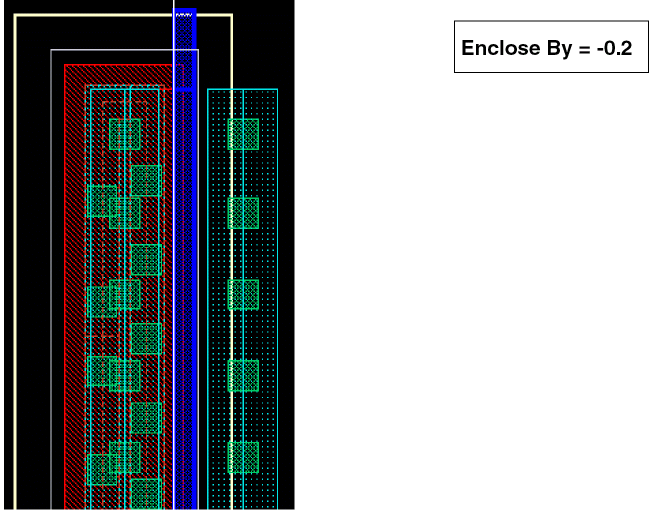
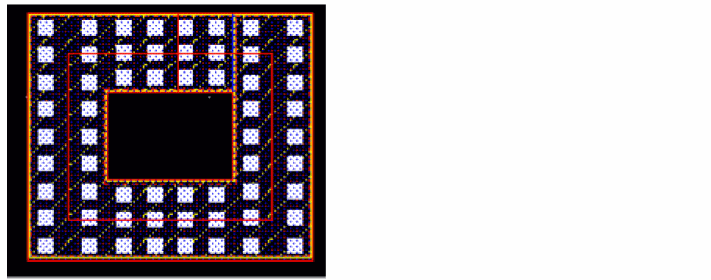
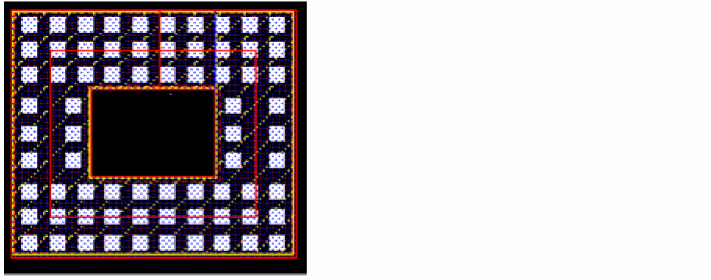
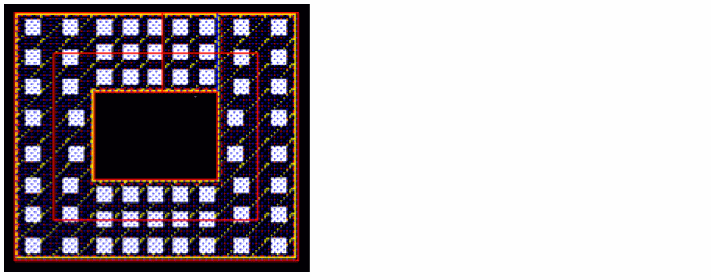
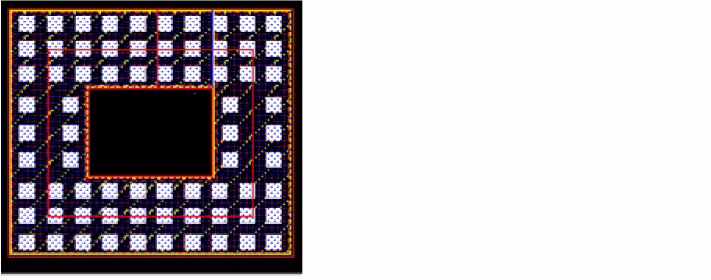
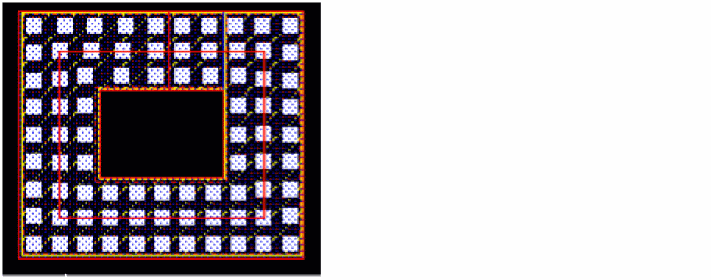
Enclose by enables you to specify a distance from the object at which the fluid guard ring should be placed. When you specify an Enclose by value, positive or negative, the distance is calculated from the outermost layer of the fluid guard ring to the outermost layer of the enclosed device.
The following figures show a preview of FGRs with Enclose By value as 0.2 (positive), 0, and -0.2 (negative).
For options on the subtabs, see Contact Settings, Implant Layers, and Outer Rings.
Path Tab
This mode creates a path guard ring.
Technology displays the technology library in which the guard ring device is installed. This field is not editable.
Device enables you to select one of the installed FGR devices in the displayed technology library and its referenced technology libraries (ITDB). For more information about ITDB, see the Virtuoso Technology Data User Guide.
Contact Rows enables you to specify the number of via rows. Contact Rows and Path Width are inter-dependent fields. Modifying the value in one updates the value in the other field.
Path Width enables you to specify the width of the guard ring. Path Width and Contact Rows are inter-dependent fields. Modifying the value in one updates the value in the other field.
Net Name enables you to specify the container cellview’s net with which you want to connect the terminal of the guard ring device master.
Main Layer displays the layer that will be used for calculating the path width. This field is not editable. To edit the value of the main layer, use the Install Guard Ring form.
Snap Mode enables you to control how path segments snap to the grid.
For options on the subtabs, see Contact Settings and Implant Layers. You cannot create concentric rings for a path guard ring.
Rect Tab
This mode creates a rectangular guard ring.
Technology displays the technology library in which the guard ring device is installed. This field is not editable.
Device enables you to select one of the installed FGR devices in the displayed technology library and its referenced technology libraries (ITDB). For more information about ITDB, see the Virtuoso Technology Data User Guide.
Contact Rows enables you to specify the number of via rows. Contact Rows and Path Width are inter-dependent fields. Modifying the value in one updates the value in the other field.
Path Width enables you to specify the width of the guard ring. Path Width and Contact Rows are inter-dependent fields. Modifying the value in one updates the value in the other field.
Net Name enables you to specify the container cellview’s net with which you want to connect the terminal of the guard ring master.
Main Layer displays the layer that will be used for calculating the path width. This field is not editable. To edit the value of the main layer, use the Install Guard Ring form.
Automatically adjust to surround overlaps allows the created guard ring to shrink or grow automatically to surround the overlapped object layers, which include both original and derived layers, provided the relevant rules exist in the technology library.
For options on the subtabs, see Contact Settings, Implant Layers, and Outer Rings.
Polygon Tab
This mode creates a polygon guard ring.
Technology displays the technology library in which the guard ring device is installed. This field is not editable.
Device enables you to select one of the installed FGR devices in the displayed technology library and its referenced technology libraries (ITDB). For more information about ITDB, see the Virtuoso Technology Data User Guide.
Contact Rows enables you to specify the number of via rows. Contact Rows and Path Width are inter-dependent fields. Modifying the value in one updates the value in the other field.
Path Width enables you to specify the width of the guard ring. Path Width and Contact Rows are inter-dependent fields. Modifying the value in one updates the value in the other field.
Net Name lets you specify the container cellview’s net with which you want to connect the terminal of the guard ring master.
Main Layer displays the layer that will be used for calculating the path width. This field is not editable. To edit the value of the main layer, use the Install Guard Ring form.
You can create the polygon guard ring to achieve one of the following:
Create Fill covers up the space between objects using the guard ring device material. When this radio button is selected, the Contact Rows and Path Width fields are disabled.
Create Ring creates a ring using the entered polygon points.
Snap Mode enables you to control how polygon snaps to the grid.
For options on the subtabs, see Contact Settings and Implant Layers. You cannot create concentric rings for a polygon guard ring.
Contact Settings
Calculated Parameter enables you to specify whether a change in the contact settings should impact the Path Width or Contact Rows.
Contact Spacing indicates the spacing between vias. The pre-populated value is derived from the contactLayer Spacing value in the Rule section in the Install Guard Ring Form. The value in this field is automatically computed using the viaSpacing rule, based on the value you specify in the Contact Rows field. If the viaSpacing rule for the specified number of Contact Rows is not found, then the lookup for the next applicable viaSpacing rule is performed. If no applicable viaSpacing rule is found, the minSpacing rule value is used to compute the contact spacing. If no applicable minSpacing rule is found, the minViaSpacing rule value is used to compute the contact spacing. However, the minViaSpacing value is used only if the Shell environment variable, FGR_MIN_VIA_SPACING_ENABLED, is set to 1/t/T/true/TRUE. When the minViaSpacing rule is used, all the constraint parameters are ignored and the spacing value is always considered from edge to edge.
Contact Dimension enables you to specify the via dimension to use. The via is assumed to be rectangular. The pre-populated value is derived from the contactLayer Dimensions value in the Rule section in the Install Guard Ring Form.
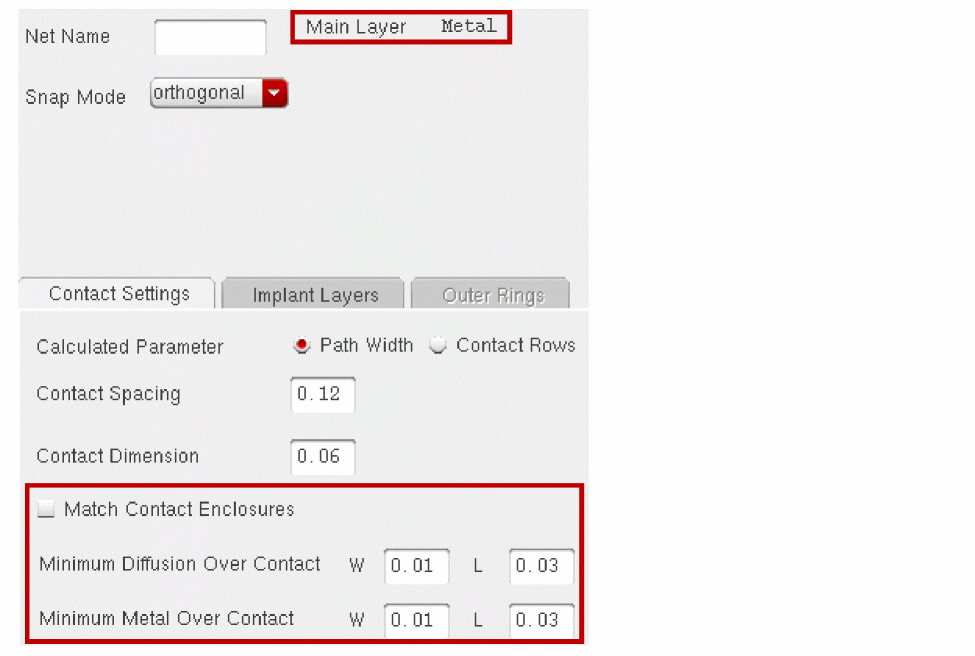
Match Contact Enclosures allows you to make the enclosure value of the Main Layer control the enclosure value of the other (non-main) layer. If you select this check box, you can keep both enclosure values the same. When you deselect this check box to disable the feature, you can set the Minimum Metal over Contact and Minimum Metal over Diffusion values independently.
For example, in the following image when the Main Layer is Metal and the Match Contact Enclosures check box is selected, the Minimum Diffusion Over Contact (W and L) field becomes disabled:
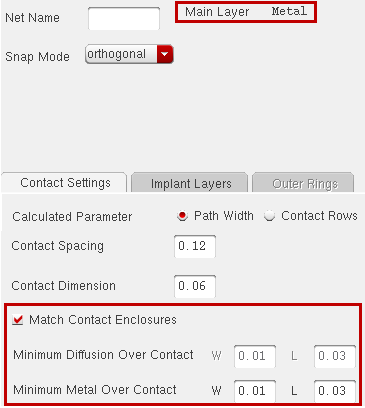
However, when the Match Contact Enclosures check box is not selected, the Minimum Diffusion Over Contact (W and L) field remains enabled for editing:
Minimum Diffusion Over Contact enables you to change the diffusion layer enclosure around vias in the W and L direction. The pre-populated value is derived from the diffusionLayer over contactLayer value in the Rule section in the Install Guard Ring Form.
Minimum Metal Over Contact enables you to change the metal layer enclosure around vias in the W and L direction. The pre-populated value is derived from the metalLayer over contactLayer value in the Rule section in the Install Guard Ring Form.
Implant Layers
This tab lists all the implant and well layers defined in the installed guard ring device.
Adjust Implant/Well Layers table
Use enables you to specify whether or not to use the implant layer in the guard ring you create.
Lpp displays the implant or well layer.
Encl enables you to specify the implant layer enclosure around vias.
Pin, if selected, draws the implant layer in the guard ring with a pin-like shape. The implant layer then has the same connectivity as the metal layer of the guard ring. For example, if you have an MOS device with VDD bulk connection, then while creating a fluid guard ring with an implant layer that matches the MOS bulk layer, the fluid guard ring is automatically connected to the VDD.
Cover , if selected, fills the interior of the guard ring with the implant or well layer. This field is available only for ring type of guard rings. Therefore, this column is not applicable in the Path mode.
Outer Rings
Number of Rings enables you to specify the number of concentric rings of the guard ring to create around the selected objects.
Distance outer rings at minimum
, if selected, uses the minSpacing rules to compute the spacing between the concentric rings. If you deselect this check box, you can specify the distance between the consecutive guard rings in the Encl field.
Ring <n> enables you to specify the guard ring device to use for the concentric rings. You can create a guard ring with a maximum of six concentric rings. If you specify a number greater than 6 in the Number of Rings field, the number is reset to the previous specified value.
Fields for the concentric rings are added to the form only when the specified value in the Number of Rings field is greater than 1. The number of Ring <n> fields added to the form depend on the value specified in the Number of Rings field. For example, if you specify 4 in the Number of Rings field, three fields – Ring 2, Ring 3, and Ring 4 – are added to the form.
The guard ring device selected from the Device list at the top of the form is used to create the innermost ring. The rings listed in the Outer Rings tab comprise the inner to outer rings.
Rows lets you specify the number of contact rows in the ring.
Encl lets you specify the distance between two consecutive rings. The Encl field is grayed out if the Distance outer rings at minimum check box is selected.
Net Name lets you specify the name of the net to which the outer ring should be connected.
Defaults resets the values in the Contact Rows field and the Contact Spacing Method list to the values specified in the Number of contact rows and Contact Spacing Method fields in the Parameter Defaults section in the Install Guard Ring Form.
Edit Instance Properties Form
To display the Edit Instance Properties form, select Properties from the context-sensitive Instance menu displayed by a right-click a selected FGR instance. The displayed form has the tabs, fields, and buttons explained below.
The Previous button (![]() ) highlights the previous object in the group of selected objects and updates the form to show that object’s properties.
) highlights the previous object in the group of selected objects and updates the form to show that object’s properties.
The Next button (![]() ) highlights the next object in the group of selected objects and updates the form to show that object’s properties.
) highlights the next object in the group of selected objects and updates the form to show that object’s properties.
Common lets you edit properties common to a group of selected objects.
Layer shows the layer of a common property if it is the same for all objects. If the layer is not the same for all objects, AS IS appears in the field.
Left, Right, Bottom, and Top show the value of a common property if it is the same for all objects. If the value of a common property is not the same for all objects, the words AS IS appears in the fields.
Attribute tab shows the attributes of the currently selected object. It provides the following fields for an FGR instance:
Library, Cell, and View set the library, cell, and view names of the master cell for this instance.
Origin: X and Y set the X and Y coordinates of the origin of the instance.
Name sets the name assigned to this instance. The layout editor automatically assigns instance names that begin with the letter I, followed by a number.
Rotation sets whether the instance is rotated or mirrored.
Cell Type read only field displays the master cell type used to describe the nature of a physical block or cell. Layout L does not support any level one editing on any of these design objects. These cell types are used in Virtuoso Layout Suite XL and Virtuoso Floorplanning. See Cell Type Valid Values.
Placement Status drop-down list box displays the placement status of the instance. The selections are none, unplaced, suggested, placed, locked, and firm. See Chop Fluid Objects Form.
Connectivity tab shows routing and net information for selected pins and shapes on a net. I/O Type and Access Direction are shown only for pins.
Net Name displays the name of the net to which the pin is connected. You can use this to rename or delete the net.
Terminal Name sets the name of the terminal associated with this pin. The terminal name should always be the same as the net name.
Net Expression assigns a net expression of the terminal listed in the Terminal Name field.
Property sets the override property name to the net expression.
Default defines the net to be used if no override property is defined in the hierarchy above this point (in the schematic view). Unless a different signal name is entered, the terminal name is used.
I/O Type assigns a property used by routers to identify the direction of the signal into or out of this cellview. The signal can be input, output, inputOutput (bidirectional), switch (carries data either in or out, but not simultaneously), or jumper (passes data through this cellview).
Net Criticality sets a weighting factor that determines the priority for this net for the Cadence place-and-route tools.
Access Direction assigns a property used to identify the part of the pin to which the routers can connect routing. Applies only to rectangle pins. The selections are: top, left, bottom, right, any, and none.
Parameter enables you to edit the properties of the selected fluid guard ring.
Show Which Params? enables to choose the type of parameters you want to edit. The available options are all, shape, style, dimensions, and debug. Based on the selection, only parameters associated to the selected type are displayed.
Formal Version displays the version number of the selected fluid guard ring.
Main Layer displays the layer that defines the path width of the fluid guard ring, that is Diffusion or Metal.
Cache Create Version displays the create version of the cache.
Shape Data displays the different dimensions of the fluid guard ring.
Center Line enables to change the dimensions of the fluid guard ring.
Path Width enables you to change the width of the path you draw.
Num Contact Rows enables you to change the number of rows of contacts in the fluid guard ring.
Calculated Parameter enables you to specify whether a change in the contact settings should impact the Path Width or Contact Rows.
Contact Width enables to change the value describing the current width of the contacts.
Contact Space enables to change the value describing the current spacing between the contacts.
Match Contact Enclosures enables to make the enclosure value of the Main Layer control the enclosure value of the other (non-main) layer. It allows you to keep both enclosure values the same. When you disable this option by deselecting the check box, you can set the Minimum Metal over Contact and Minimum Metal over Diffusion values independently.
Minimum Metal Over Contact enables you to change the metal layer enclosure around the contacts in the width (W) and length (L) directions. The pre-populated value is derived from the metalLayer over contactLayer value in the Rule section in the Install Guard Ring Form.
Minimum Diffusion Over Contact enables you to change the diffusion layer enclosure around the contacts in the width (W) and length (L) directions. The pre-populated value is derived from the diffusionLayer over contactLayer value in the Rule section in the Install Guard Ring Form.
Inside/Top/Right Metal Enclosure enables you to specify the inside, top, and right metal layer enclosure around contacts.
Outside/Bottom/Left Metal Enclosure enables you to specify the outside, bottom, and left metal layer enclosure around contacts.
End of Line Metal Enclosure enables you to specify the end of the line enclosure around contacts. This field is available for path-type fluid guard rings.
Inside/Top/Right Diffusion Enclosure enables you to specify the inside, top, and right diffusion layer enclosure around contacts.
Outside/Bottom/Left Diffusion Enclosure enables you to specify the outside, bottom, and left diffusion layer enclosure around contacts.
.End of Line Diffusion Enclosure enables you to specify the end of the line enclosure around contacts. This field is available for path-type fluid guard rings.
<Implant/Well Layer name> Use? check box is displayed as selected only if you defined an implant or well layer while installing the fluid guard ring. If you deselect this check box, the other related fields of the Edit Instance Properties form, that is, Enclosure, Cover Interior, and Create Pin, are automatically removed.
Enclosure enables you to specify the implant layer enclosure around the diffusion layer.
Inside/Top/Right Enclosure enables you to specify the inside, top, and right implant layer enclosure around the diffusion layer.
Outside/Bottom/Left Enclosure enables you to specify the outside, bottom, and left implant layer enclosure around the diffusion layer.
End of Line Enclosure enables you to specify the end of the line implant layer enclosure around the diffusion layer. This field is available for path-type fluid guard rings.
Cover Interior, if selected, fills the interior of the guard ring with the implant layer. This field is available only for ring type of fluid guard rings. Therefore, this check box is not available in Path mode.
Create Pin, if selected, draws the implant layer in the fluid guard ring with a pin-like shape. The implant layer then has the same connectivity as the metal layer of the fluid guard ring.
Hide Keepouts?, if deselected, enables you to see the keepout shapes.
Contact Spacing Method enables you to change the method of adding spaces between the contacts placed within the fluid guard ring, that is, distributed or minimum.
Contact Placement Method enables you to change the way the contacts should be placed within the fluid guard ring. You can choose one of the following ways:

Chop Fluid Objects Form
See Chopping a Fluid Guard Ring for related information.
rectangle specifies a rectangle as the chop shape. The chop area is determined by the exact points clicked to define the rectangle. The default chop shape is rectangle.
line specifies a line as the chop shape. The total chop area is calculated as a sum of the spacing on both sides of a line.
Spacing enables you to specify the spacing around the line chop shape. The line along with the spacing around the line is chopped from a guard ring. By default, the minSpacing of the current active layer is used. If the specified value is less than minSpacing, the value in the field is reset to the minSpacing value.
Default enables you to revert the specified value to the technology file default.
overlapping shape enables you to use a shape that overlaps a guard ring to chop the guard ring. The total chop area is calculated as a sum of the overlap area and the specified spacing around the overlapping shape.
Spacing enables you to specify the spacing around the overlapping shape that, along with the overlap region, is chopped from a guard ring. By default, the minSpacing of the current active layer is used. If the specified value is less than minSpacing, the value in the field is reset to the minSpacing value.
Default enables you to revert the specified value to the technology file defaults.
polygon specifies a polygon as the chop shape. The chop area is determined by the exact points clicked to define the polygon.
Create Tunnel in Fluid Object Form
See Creating a Tunnel Through a Fluid Guard Ring for related information.
Path enables you to draw a path to define a tunnel. The total area of the created tunnel is calculated as a sum of the Path Width on both edges of the path. When you select this option, the following columns with editable fields are displayed:
Layer Purpose enables you to select the layer-purpose through which the tunnel can be created. It represents the layer-purpose that is removed from the guard ring to create a tunnel. A check box in front of each layer-purpose field enables you to specify more than one layer-purpose at a time though which the tunnel can be created. By default, a row is added for each maskable layer purpose comprising the guard ring.
Width enables you to specify a value for the width of the path you draw. The default value is the minimum width of the layer-purpose selected from the Layer Purpose list. If you enable multiple layer-purposes for creating the tunnel, the width defined for each layer-purpose is used to create the tunnel on that layer-purpose.
Rectangle enables you to draw a rectangle to define a tunnel. The total area of the created tunnel is calculated as a sum of the area of the drawn rectangle and Spacing. When you select this option, the following columns with editable fields are displayed:
Layer Purpose enables you to select the layer-purpose through which the tunnel can be created. It represents the layer-purpose that is removed from the guard ring to create a tunnel. A check box in front of each layer-purpose field enables you to specify more than one layer-purpose at a time though which the tunnel can be created. By default, a row is added for each layer comprising the guard ring.
Margin
enables you to specify the value that defines the margin that should be applied around the rectangle that is used for creating the tunnel. For example, the Oxide in an FGR might be 0.02um wider than the Metal. You might want to apply this amount of overlap through the tunnel. Therefore, you can increase the Margin of the Metal keepout by 0.02. By default, the Margin values for all Layer Purposes in the form are set to 0. If you enable multiple layer-purposes for creating the tunnel, the margin defined for each layer-purpose is used to create the tunnel on that layer-purpose.
Polygon enables you to draw a polygon to define a tunnel. The total area of the created tunnel is calculated as a sum of the area of the drawn polygon and Spacing. When you select this option, the following columns with editable fields are displayed:
Layer Purpose enables you to select the layer-purpose through which the tunnel can be created. It represents the layer-purpose that is removed from the guard ring to create a tunnel. A check box in front of each layer-purpose field enables you to specify more than one layer-purpose at a time though which the tunnel can be created. By default, a row is added for each layer comprising the guard ring.
Margin enables you to specify the value that defines the margin that should be applied around the polygon point list that is used for creating the tunnel. If you enable multiple layer-purposes for creating the tunnel, the margin defined for each layer-purpose is used to create the tunnel on that layer-purpose.
Overlapping Shape enables you to use a shape that overlaps a guard ring to define a tunnel. Overlapping Shape is the default shape used for creating a tunnel in a guard ring. The total area of the tunnel created is calculated as a sum of the overlap area and the specified spacing around the overlapping shape. When you select this option, the following fields are displayed:
Use Layer-Purpose of the Shape
-
If selected, the layer-purpose of the overlapping shape is used to create the tunnel.
Use Spacing is the distance around the overlapping shape that is used for creating the tunnel.
Minimum represents the minimum spacing of the layer-purpose of the overlapping shape. This is the default spacing if the Use Layer-Purpose of the Shape check box is selected.
User Defined enables you to specify a value for the spacing around the overlapping shape to use for creating the tunnel. -
If not selected, you can specify the layer-purpose of the guard ring through which to create the tunnel by using the overlapping shape as the tunnel shape.
Layer Purpose enables you to select the layer-purpose through which the tunnel can be created. It represents the layer-purpose that is removed from the guard ring to create a tunnel. For the selected layer-purpose to be removed, the overlapping shape should have overlap region with the selected layer-purpose. A check box in front of each layer-purpose field enables you to specify more than one layer-purpose at a time though which the tunnel can be created. By default, a row is added for each layer comprising the guard ring.
Spacing enables you to specify the spacing around the overlapping shape that is used for creating the tunnel. The default value is the minimum spacing of the layer-purpose selected from the Layer Purpose list. In case of table-basedminSpacingrule, the maximum value defined in the table is used as the default. If you enable multiple layer-purposes for creating the tunnel, the spacing defined for each layer-purpose is used to create the tunnel on that layer-purpose.
-
If selected, the layer-purpose of the overlapping shape is used to create the tunnel.
Reset To Defaults button allows to reset the spacing and width value to defaults. This button is enabled only when you select the Path, Rectangle, or Polygon tunnel shape, or when you choose Overlapping Shape tunnel shape and deselect the Use Layer-Purpose of the Shape check box.
Heal Fluid Object Form
See Healing a Fluid Guard Ring for related information.
point removes tunnels that exist at the point of click. This is the default selection.
overlapping shape enables you to use a shape that overlaps a guard ring, to remove the tunnels overlapping the shape.
rectangle removes all existing tunnels enclosed within the rectangle you draw.
guard ring removes all tunnels from the guard ring you select.
Install Guard Ring Form
See Installing Fluid Guard Rings for related information.
Technology Library enables you to select a library in which you want to install the guard ring device as a device class.
Name enables you to specify a name for the guard ring device you are installing. The new guard ring device is saved in a copy of the selected technology library in virtual memory. Alternatively, you can select an existing guard ring device defined in your technology library from the Name list and update its definition as required. By selecting an existing guard ring device, you can also update its device class definition.
View Device Configuration displays the View Device Configuration window, which shows the guard ring as it would appear with the current selected layers. This helps you preview the guard ring device without creating one. The button is grayed out until the mandatory layers for a guard ring — diffusion, contact, and metal layers — are defined in the Layers section. The View toolbar in the View Device Configuration window enables you to zoom in, zoom out, or zoom a selected part of the guard ring.
Delete enables you to remove the guard ring device selected in the Name cyclic field from the technology library in virtual memory.
The display of the remaining portion of the form depends on which of the following you select:
Layers
If you select the Layers check box, the lower portion of the form updates to display the fields of the Layers section. Layers is selected by default when you first open the Install Guard Ring form. If you are creating a guard ring device, the lower portion of the form shows the Main Layer radio buttons, Diffusion, Contact, Metal, and Fluid Shape cyclic fields that you need to set up for a new guard ring. These are the mandatory layers to define a guard ring device. You can optionally set up the implant and well layers.
If you select an existing guard ring from the Name list, the lower portion of the form shows the layers defined for the selected device.
Main Layer enables you to select the layer that defines the Path Width in the Create Guard Ring and Edit Instance Properties forms. The options available for selection are Diffusion and Metal. By default, the Diffusion radio button is selected.
Diffusion enables you to view or select the layer for the diffusion layer of guard ring. You can define the diffusion layer enclosure value around the contact layer in the Rule section.
Contact enables you to view or select the layer for the via layer of guard ring. You can define the dimensions and spacing of the vias in the Rule section.
Metal enables you to view or select the layer for the metal layer that surrounds the vias. You can define the metal layer enclosure value around the contact layer in the Rule section.
Fluid Shape enables you to define the LPP that Virtuoso uses to represent the fluid shape of the guard ring instances and controls the selectability of the fluid shapes within a guard ring for level-1 editing. For example, when you stretch a guard ring, you interact with the fluid shape. The list contains the predefined y[0-9] LPPs. When the LPPs being used for the fluid shape has a solid fill, you cannot see any other layers in the guard rings. Where this is the case, change the LPP of the Fluid Shape to an LPP that does not have a solid fill.
Add Implant/Well Layers expands the form to display another section at the bottom of the form.
Layer1 enables you to view or select an implant or well layer to enclose the diffusion layer. Defining an implant or well layer is optional. You can set up multiple implant/well layers. Ensure that you select a valid layer. Click the Add Implant/Well Layers button as many times as the number of implant or well layers required. You might need to define an implant/well layer around the diffusion, depending on the material you chose for the diffusion layer. For example, if your technology library does not contain n-diffusion or p-diffusion layers, you will need an implant or well layer. You can define the implant/well layer enclosure value around the metal layer in the Rule section.
Pin, if selected, draws the implant or well layer in the guard ring with a pin-like shape and assigns it the same connectivity as the metal layer of the guard ring.
Cover Interiors fills up the interior of the guard ring with the implant or well layer.
Delete enables you to delete the implant or well layer for the current guard ring. Ensure that you delete the non-required layers.
While creating the guard ring, you can enable or disable the implant or well layers in the installed guard ring device by using the Implant Layers subtab in the Create Guard Ring Form (Old GUI).
Rule
If you select the Rule check box, the lower portion of the form updates to display the options of the Rule section of the form. This section displays the process design rules for the layers set up in the Layers section.
Rule Browser Color specifies the color of the arrow that indicates a dimension in the Rule Browser window.
Show Rules opens the Rule Browser window, which displays a graphical representation of a generic guard ring device and an arrow indicating the physical area where a dimension selected in the Rule section applies. The View toolbar in the Rule Browser window enables you to zoom in, zoom out, or zoom a selected part of the guard ring.
Use Techfile Default indicates whether the current values in the via parameter fields match the default values in the technology library. If the Use Techfile Default check box is on, the values match; if it is off, the values do not match the defaults in the technology library. If the fields are blank, it indicates that there are no default values defined in the technology library. For the already installed devices, the values are populated from the device class.
If you specify or change the value such that it does not match the default value in the technology library, and click anywhere else in the form, the Use Techfile Default check box gets deselected to indicate that the value no longer matches the default value in the technology library. To restore the default values from the technology library in the fields, select the Use Techfile Default check box. Barring the implant layers, you cannot change the value in fields for other layers to less than the technology library default value. If you change it to a value less than the default, a message displays in the CIW and the value resets to the default. In the case of implant layers, if you update the value to less than the default, a message displays in the CIW but the value is not reset.
contactLayer Dimensions specifies the dimensions of the via on the layerName selected in the Contact list in the Layers section. The default value is the minWidth value of the contact layer in the technology library. If you specify a value less than the technology library default, the value gets reset to the technology library default and a message is displayed in the CIW. Only square vias are supported. If required, you can update this value later while creating the guard ring by using the Contact Dimension field in the Contact Settings subtab in the Create Guard Ring Form (Old GUI).
contactLayer Spacing specifies the space between the vias on the layerName selected in the Contact list in the Layers section. The default value is the minSpacing value of the contact layer in the technology library. If you specify a value less than the technology library default, the value gets reset to the technology library default and a message is displayed in the CIW. The same spacing value is set in the X and Y directions while installing the device. If required, you can update this value later while creating the guard ring by using the Contact Spacing field in the Contact Settings subtab in the Create Guard Ring Form (Old GUI).
This portion of the Rules section displays the names of Diffusion or Metal layers enclosing the Contact layer.
diffusionLayer over contactLayer specifies the Diffusion layer enclosure of the Contact layer in the W and L direction, that is the width and length. The default value is the minOppExtension / minExtensionDistance value of the diffusion layer over contact layer in the technology library. If you specify a value less than the technology library default, the value gets reset to the technology library default and a message is displayed in the CIW. If required, you can update this value later while creating the guard ring by using the Minimum Diffusion Over Contact field in the Contact Settings subtab in the Create Guard Ring Form (Old GUI).
metalLayer over contactLayer specifies the Metal layer enclosure of the Contact layer in the W and L direction. The default value is the minOppExtension / minExtensionDistance value of the metal over contact layer in the technology library. If you specify a value less than the technology library default, the value gets reset to the technology library default and a message is displayed in the CIW. If required, you can update this value later while creating the guard ring by using the Minimum Metal Over Contact field in the Contact Settings subtab in the Create Guard Ring Form (Old GUI).
implantLayer/wellLayer Enclosing diffusionLayer specifies the Implant/Well layer enclosure of the Diffusion layer. The default value is the minOppExtension / minExtensionDistance value of the implant/well layer over diffusion in the technology library. If you specify a value less than the technology library default, it is not reset but a message is displayed in the CIW. If required, you can update this value later while creating the guard ring by using the Encl field in the Implant Layers subtab in the Create Guard Ring Form (Old GUI).
Parameter Defaults
If you select the Parameter Defaults check box, the lower portion of the form updates to display the options of the Parameter Defaults section of the form. This section displays the default parameter values for the guard ring.
Number of contact rows enables you to specify the number of rows of vias. The default is 1.
Terminal Name enables you to specify the terminal to which you want to associate the guard ring. If you leave the field blank, the default terminal name, <deviceName>Term, is assigned.
Pin Name enables you to specify the net on which you want to place the guard ring. If you leave the field blank, the default pin name, <deviceName>Pin, is assigned.
Return to top