|
Field
|
Description
|
|
Multi-Layer Bus Selection
|
Provides support to create and digitize the bits of a bus on different metal layers.
For more information, see Supporting Multi-Layer Bus.
|
|
Use Color Mode
|
Controls the color mode of the bus.
For more information, see Specifying the Bus Color Mode
|
|
Cycle Control Wire
|
Cycles the control wire function among the extreme and middle wires of a bus.
For more information, see Using the Control Wire.
|
|
Via Up To <layer_name>
|
Changes the layer to the next layer up and places the corresponding default via. A layer can now connect to several layers in the layers stack:
-
When current layer connects to two or more upper layers in the layer stack, a slider is created with the connected layers.
-
When current layer connects to a single upper layer in the layers stack, the layer name appears in the Create Bus Context Sensitive menu.
-
When current layer is unable to connect to any upper layer in the layers stack, the Via Up field appears disabled in the Create Bus Context Sensitive menu.
|
|
Via Down To <layer_name>
|
Changes the layer to the next layer down and places the corresponding default via. A layer can now connect to several layers in the layers stack:
-
When current layer connects to two or more lower layers in the layer stack, a slider is created with the connected layers.
-
When current layer connects to a single lower layer in the layers stack, the layer name appears in the Create Bus Context Sensitive menu.
-
When current layer is unable to connect to any lower layer in the layers stack, the Via Up field appears disabled in the Create Bus Context Sensitive menu.
|
|
Via To Target Layers
|
Adds via stacks to the layer of the target objects. The target objects are all the objects that are pointed to by the flightlines when the Create Bus command is run. However, if the flightline option in the Wire Assistant is off, then vias are not added.
If a bus bit is already on the same layer as its respective target object, then a via is not added and a message is displayed in CIW as follows:
"WARNING* (LE-105035): Already on specified layer."
|
|
Via
|
Let’s you select the via options.
|
|
How to define custom transitions
|
Lets you define customized SKILL procedures to create complex multi-layer bus transition patterns.
For more information, see Customizing Multi-Layer Bus Transition.
|
|
Select Via
|
Opens the Select Via form. Use the Select Via form to change the bus layer. You can rotate the via by using the Select Via form or by using the Rotate Via Cut Pattern command on this shortcut menu.
|
|
Revert To Multi-Layer Bus
|
Enables you to switch to a multi-layer bus configuration from the bus bits on the same metal layer.
For more information, see Switching Bus Bits to the Same Layer.
|
|
Rotate Via Cut Pattern
|
Rotates the via cuts and swaps the rows and columns, if any, while rotating the via shape by 90 degrees as you place or drag the via. You can also rotate pending vias by clicking the middle mouse button. This command is available only while you are adding a via. You can also rotate a via by using the Rotate Via(s) Cut Pattern button on the Select Via Form.
|
|
Cut Color
|
Enables cut coloring and cycles the color of each cut when a via is inserted. The color of the cut is based on information set by the mptSetLayerDefaultColor SKILL API. The Cycle option in the submenu is enabled when a via is being dragged.
To use cut coloring patterns applicable for the Create Bus command, see the weWACmdCalculatedColor
|
|
Via Alignment
|
Provides options to align vias while adding them to the layout. You can choose to align a via automatically or by selecting a custom alignment option. You can also align a via by using the Via Alignment options on the Select Via form. The Override options on the Via Alignment shortcut command are available while you are adding a via.
|
|
Via Pattern
|
Provides predefined via patterns to choose from to add multiple vias simultaneously while you are routing multiple wires. For more information about the available patterns, see the Select Via Form.
|
|
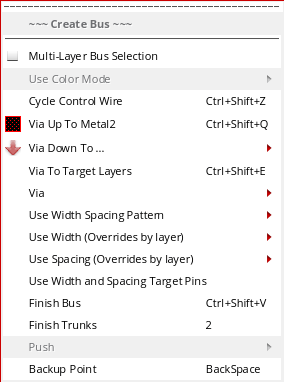
Use Width Spacing Pattern
|
Use Width Spacing Pattern has been introduced in the Create Bus context-sensitive menu to work with various width spacing patterns.
For more information on this, refer to Working with Width Spacing Patterns During Wire Editing.
|
|
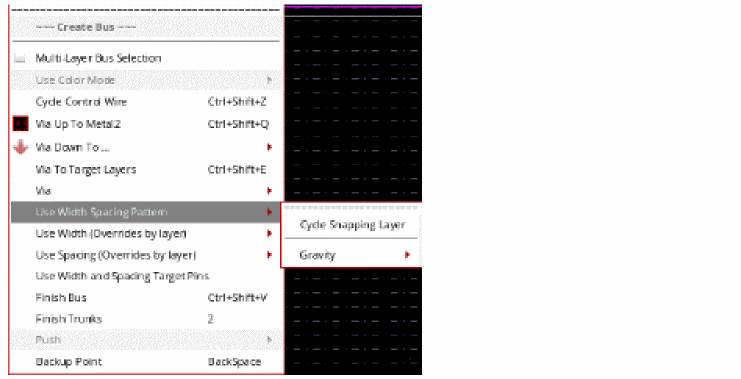
Use Width (Overrides by Layer)
|
The following options are available to specify the bus width.
-
Same for all layers: Specifies to use the same bus wire width for all layers. The width value is determined by the value specified in the Width field of the Create Wire form.
-
Overrides by layer: Sets the bus wire width the same as the result of the constraint lookup for
minWidth in the technology file when the layer is not used. Else, the width is determined by the last width used for the layer. The width value from the Wire Assistant table can also be used for the bus wires on each layer. You can also use the value specified in the Width field for the bus wires on each layer. -
Default Constraints: Sets the bus wire width same as the result of the constraint lookup for
minWidth value in the technology file or in any applicable constraint group defined at the design or object level.
|
|
|
-
Source Objects: Specified to use the width determined by the width of the tapped object. This is the default option. The source object can be pins or wires. Selecting the Source Objects option for the first segment of a bus wire ensures that Tap Wires Width or Tap Pins Width is selected, depending on the source object. You can also select Source Objects even if the first segments of the wires does not have the source object width. In such a case, the Tap Wires Width and Tap Pins Width option does not change.
-
Target Objects: Sets each bus wire to match the width of the same edge of each respective target pin. If the pins are vertically aligned to bus wires, the bus wire widths match the width of the vertical edges of the respective target pins. Similarly, if the pins are horizontally aligned to bus wires, the bus wire widths match the width of the horizontal edges of the respective target pins. The horizontal and vertical edges might correspond to narrow edges for some target pins and wide edges for other target pins. This option cannot be selected and you need to use the Target Pin Narrow Edge or Target Pin Wide Edge options depending on the edge whose width you want. The narrow and wide edges for target pins is only applicable in case of single wire creation.
-
Tap Wires Width: When selected, enables tapping the width on the starting object for new wire when the starting object is a wire. The Tap Wires Width option is disabled when the Auto Tap Wire option is deselected in the Layout Editor Options form. To enable the Tap Wires Width option in the Use Width menu, select the Auto Tap Wire option in the Layout Editor Options form.
-
Tap Vias Width: When selected, enables tapping the width on the starting object for new wire when the starting object is a via. The edge of the via determines the width of the started wire.
|
|
|
-
Tap Shapes and Pins Width: When selected, automatically taps a top-level shape, a top-level pin, or a level-1 instance layer and width attributes. The objects type is either a rectangle, a polygon, or a path. All valid routing layers can be tapped. The Tap Shapes and Pins Width option is disabled when the Auto Tap Wire option is deselected in the Layout Editor Options form. To enable the Tap Shapes and Pins Width option in the Use Width menu, select the Auto Tap Wire option in the Layout Editor Options form.
Environment variables: weTapWidthOnPins, weTapWidthOnWires
|
|
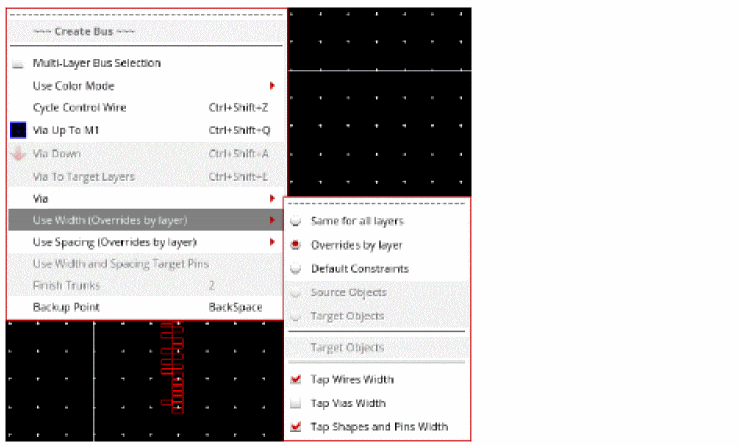
Use Spacing (Overrides by Layer)
|
The following options are available to specify the spacing between the bus bits.
-
Same for all layers: Specifies to use the same bus wire spacing on all the layers. The value specified in the Bit Spacing field is used for the bus wires on all layers. The constraint overrides for all layers are available in the Wire Assistant table.
-
Overrides by layer: Sets the bus wire spacing same as the spacing value from the Wire Assistant table on each layer. By default, the result of the constraint lookup for
minSpacing is used.You can also use the value specified in the Bit Spacing field for the bus wires on each layer. -
Default Constraints: Sets the bus wire spacing the same as the result of the constraint lookup for
minSpacing in the technology file or in any applicable constraint group defined at the design or object level.
|
|
|
-
Source Objects: This is the default option when starting from pins or wires and not when staring from space. The spacing of the wires is adjusted to keep the centerlines of the wires aligned with the pins center.
-
Target Objects: Sets the same spacing between the centerlines of bus wires as the spacing between the centers of the target pins. You can also set the spacing between the pins which belong to the same instance or different instances.
-
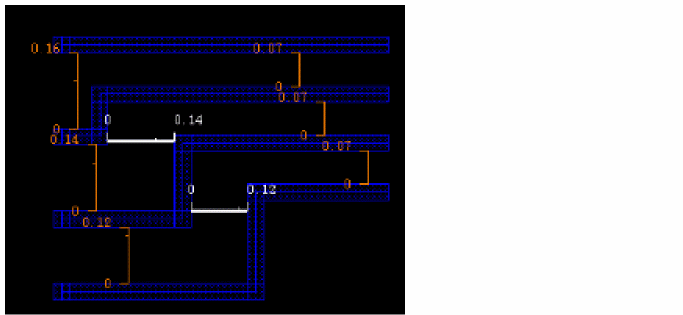
Gather/Spread: Gathers or spreads bus wires before the next digitized point. It toggles to the Cancel Gather/Spread command. When spreading or gathering a bus, you can control the spacing of a bus.
The following figure shows the spacing in a bus while gathering or spreading a bus.
The following figure displays the spacing on the middle segment when the gatherAndSpreadSpacing environment variable is set to largest.
|
|
|
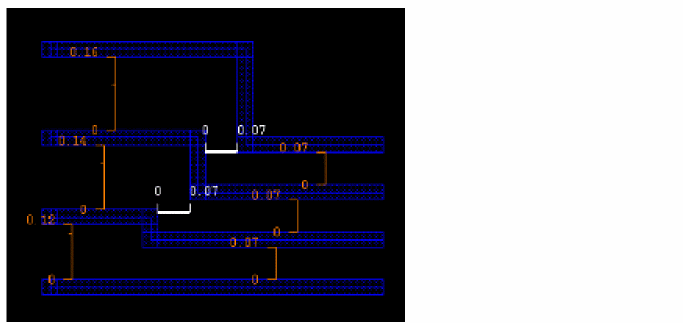
The following figure displays the spacing on the middle segment when the gatherAndSpreadSpacing environment variable is set to smallest.
Environment variable: gatherAndSpreadSpacing
|
|
Fan Out To Vias
|
Spreads bus wires for via placement. When wires are at the minimum wire spacing but the via spacings are larger, the wires can either be fanned out to connect to the vias in the pattern or can be back tracked to intersect the previous segment in the wire. When the Fan Out to Vias check box is selected, jogs are created near the vias to respect the minimum spacing between the vias and wires. Else, the via spacing that respect the minimum spacing is propagated until the previous bend or vias. The fanout checkbox has an effect only if the spacing that would be used to place the vias in the previous segment alignment is smaller than minSpacing.
Environment variable: fanOutToVias
|
|
Use Width and Spacing Target Pins
|
Sets both Use Width: Target Pins and Use Spacing: Target Pins.
|
|
Finish Trunk
|
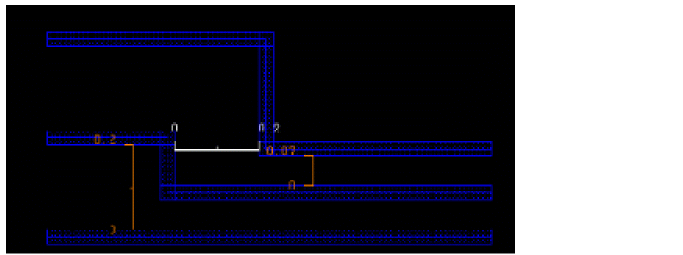
The Finish Trunks option automatically converts the pathSegs that are being created using the Create Wire or Create Bus command into trunks. Also, it then runs Pin To Trunk routing in the same step. The default bindkey is 2. The following figure shows a layout design on which the Finish Trunk command has successfully completed.
|
|
Backup Point
|
Removes the last digitized point. If a via was added to the last digitized point, that via is also removed.
|