10
Interactive Colored Routing
As technology advances and allows smaller transistors, layout designers want to create more complex circuits with an increasing number of geometries on the same silicon die. As a result, double- or triple- (and soon n-tuple) patterning techniques that rely on coloring information are being widely used for processes below 20nm. These techniques allow a layout designer to place geometries as close as possible to each other. Interactive colored routing is an enhancement that Virtuoso offers in this direction.
This chapter describes how to set options for interactive colored routing.
- Interactive Coloring for Create Wire
- Interactive Coloring for Create Bus
- Interactive Coloring for Create Stranded Wire
- Supporting End-to-End Spacing for Colored Shapes
- Interactive Coloring for the Stretch Command with Colored WSPs
- Color Locks While Editing a Wire
- Inserting TrimMetal Layers in Interactive Colored Routing
Interactive Coloring for Create Wire
Interactive wire editing supports Palette MPT (Multi-Patterning Technology) feature and lets you create wires with layer, color, and lock state information.
Creating a Colored Wire
The steps to create a colored wire are as follows:
- Enable MPT Support in the Palette assistant. For more information, see MPT Support in the Virtuoso Layout Suite documentation.
- (Optional) Select the MPT checkbox.
-
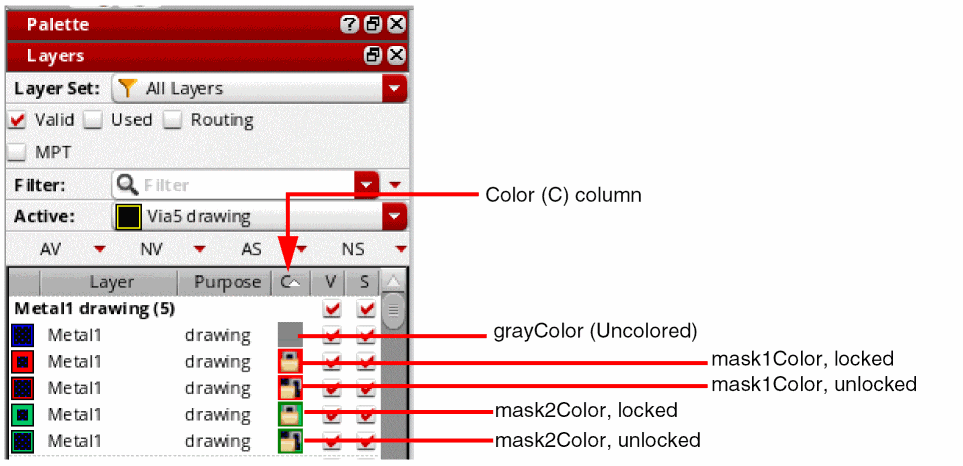
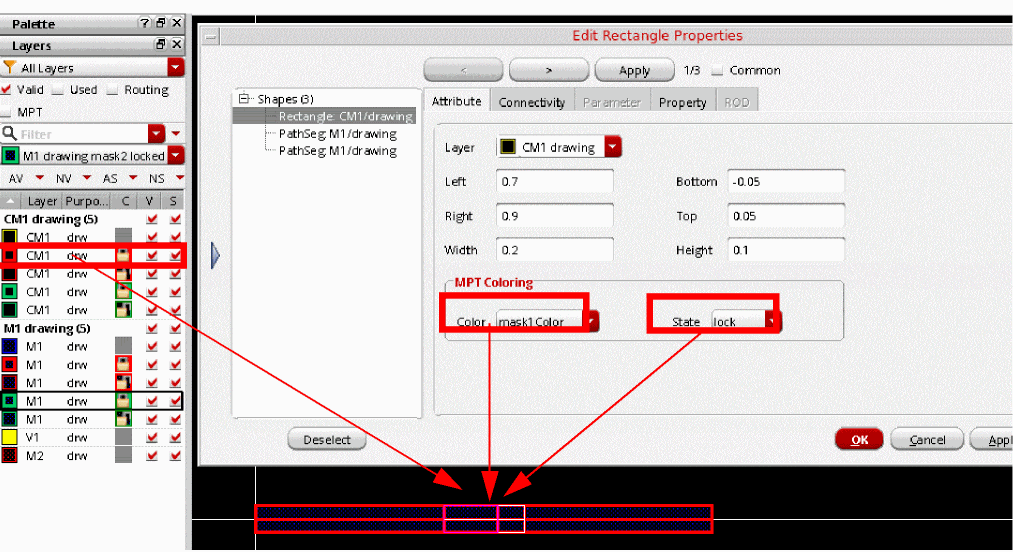
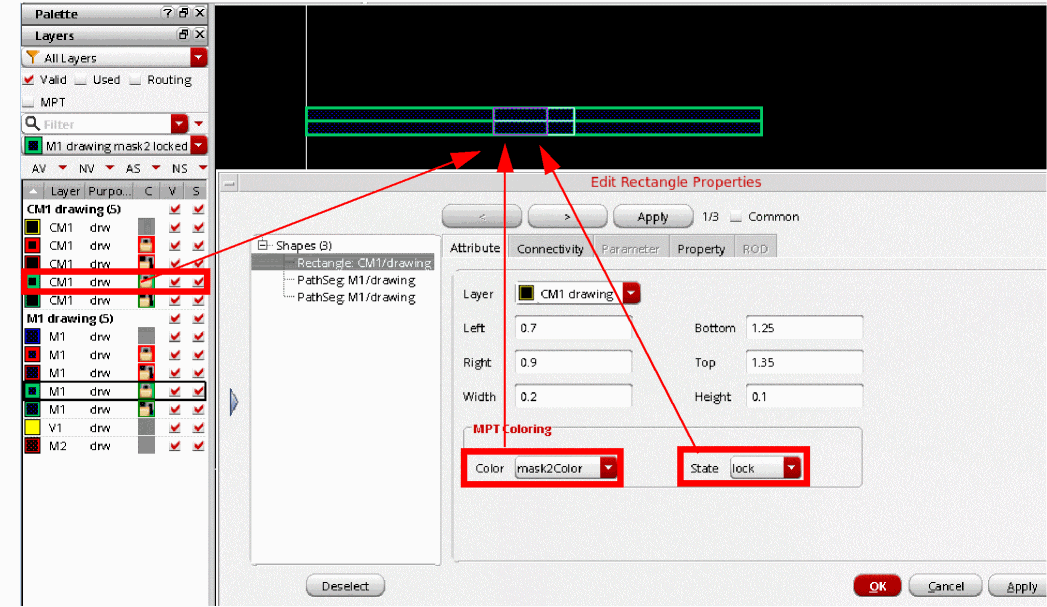
Set as active a layer-purpose pair with the required color and lock status.
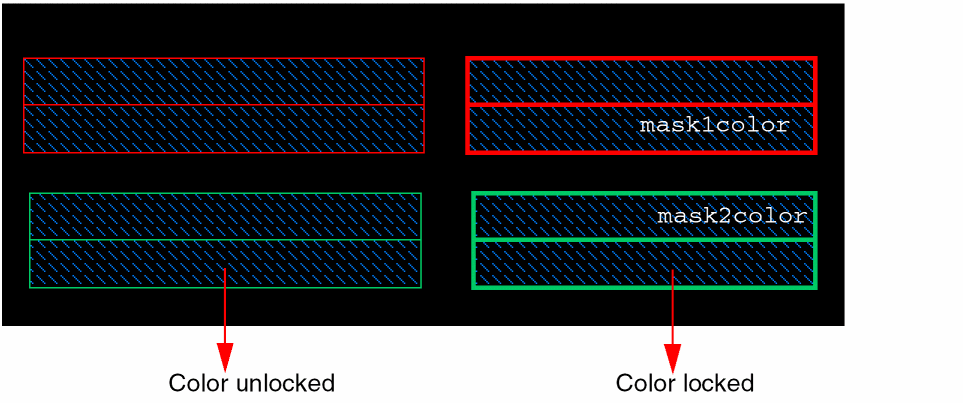
Notice that the icons listed in the Color (C) column for each layer-purpose pair provide color as well as lock information.
-
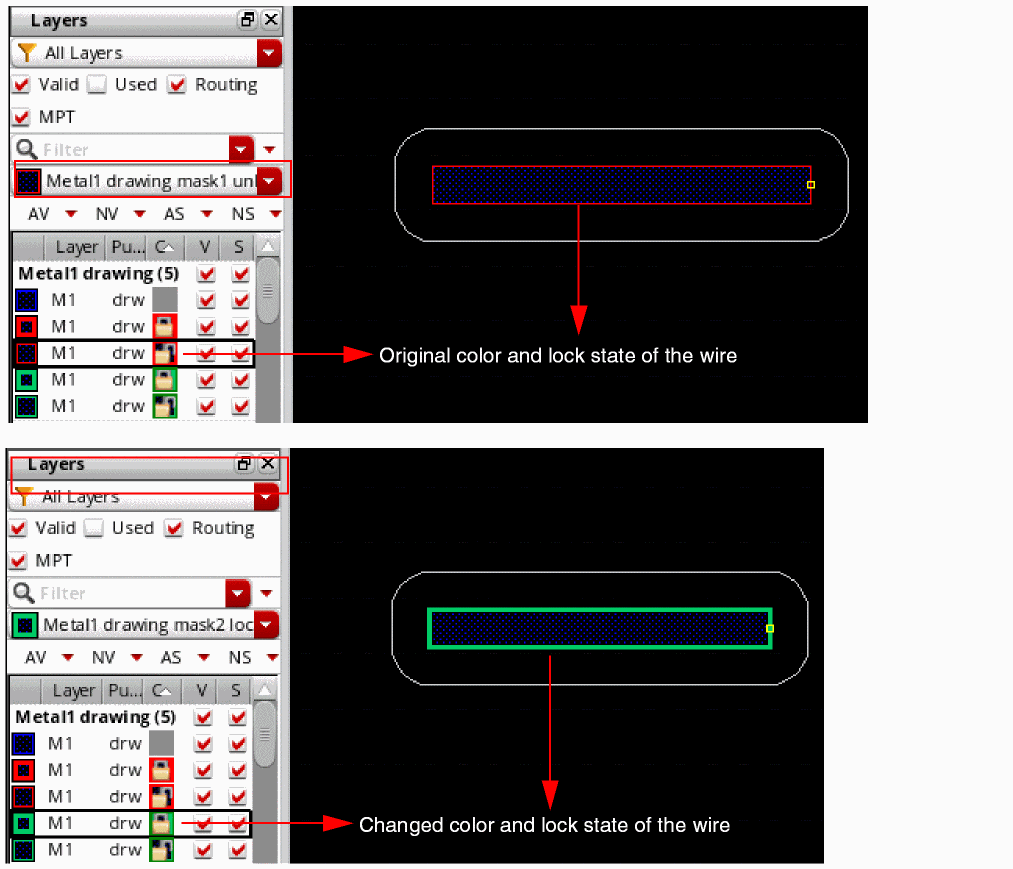
Create a wire. The color and lock state are automatically set for the shape, as shown in the following figure.
While creating a wire, you can reset the color and lock state of the wire by selecting a layer-purpose pair with another maskColor and lock state from the Palette, as shown in the following figure.
When you create a wire with the shape color as gray, the default mask color defined for the layer is used for the created wire. To do this:
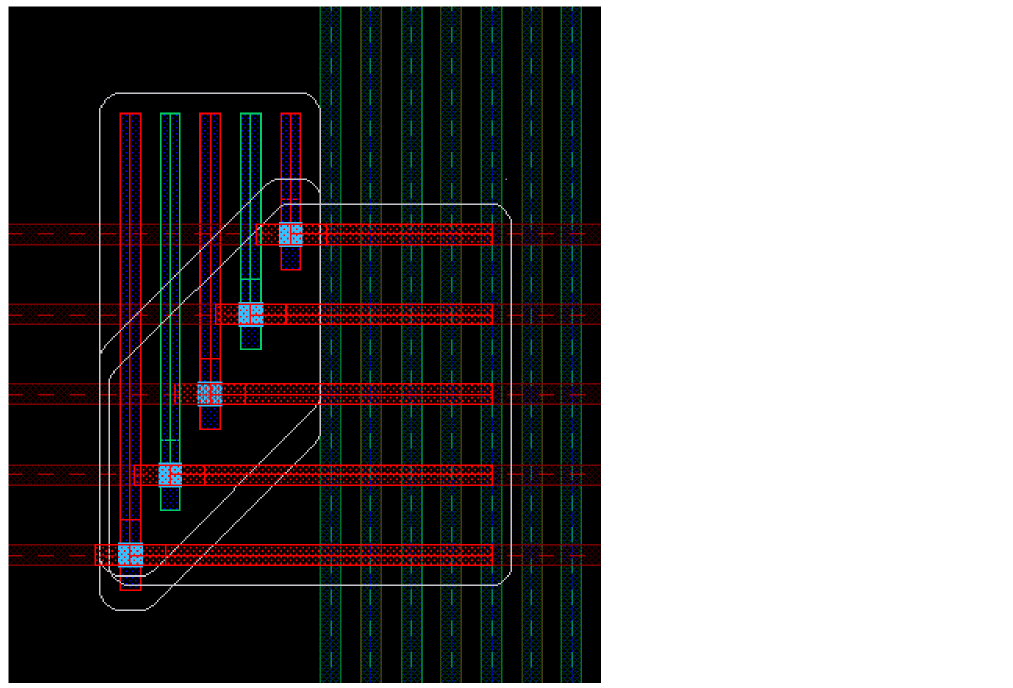
Inserting Via on Colored Wires
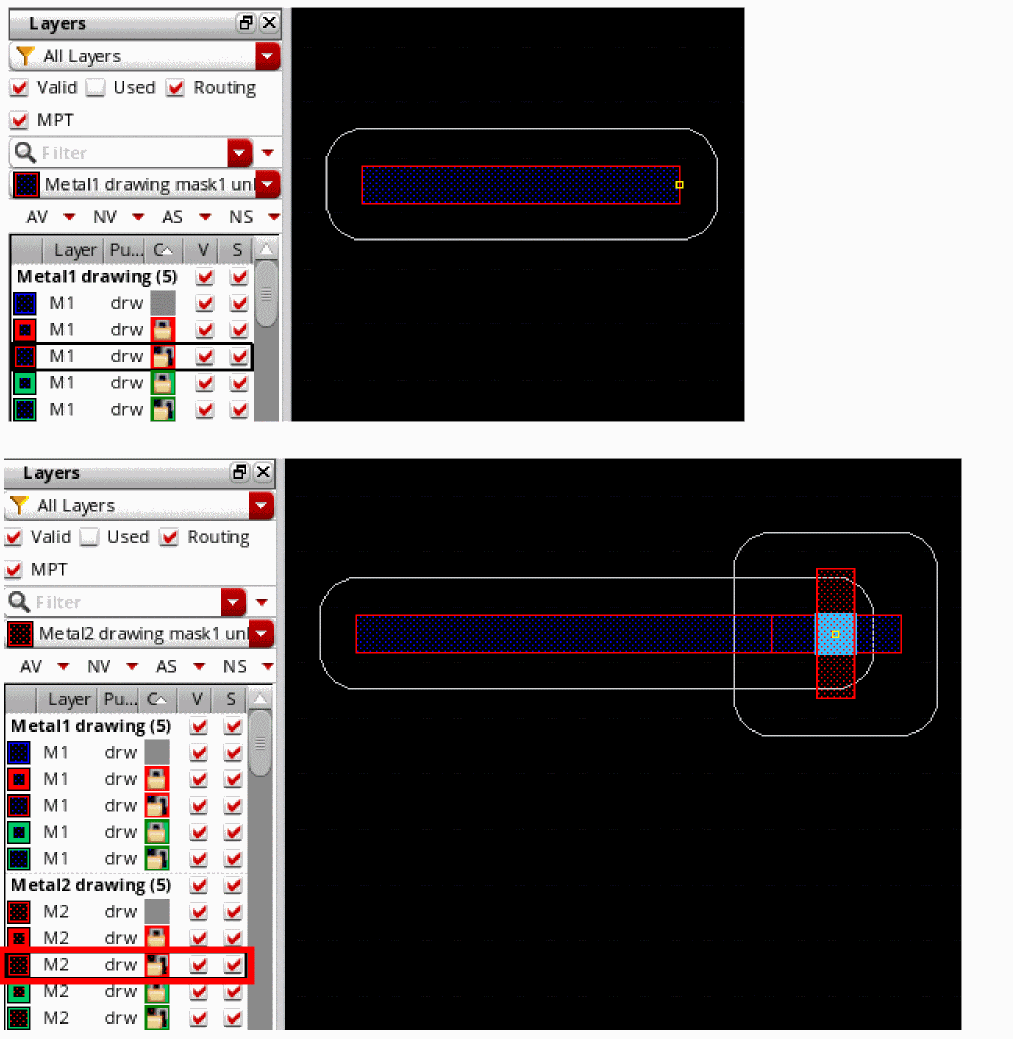
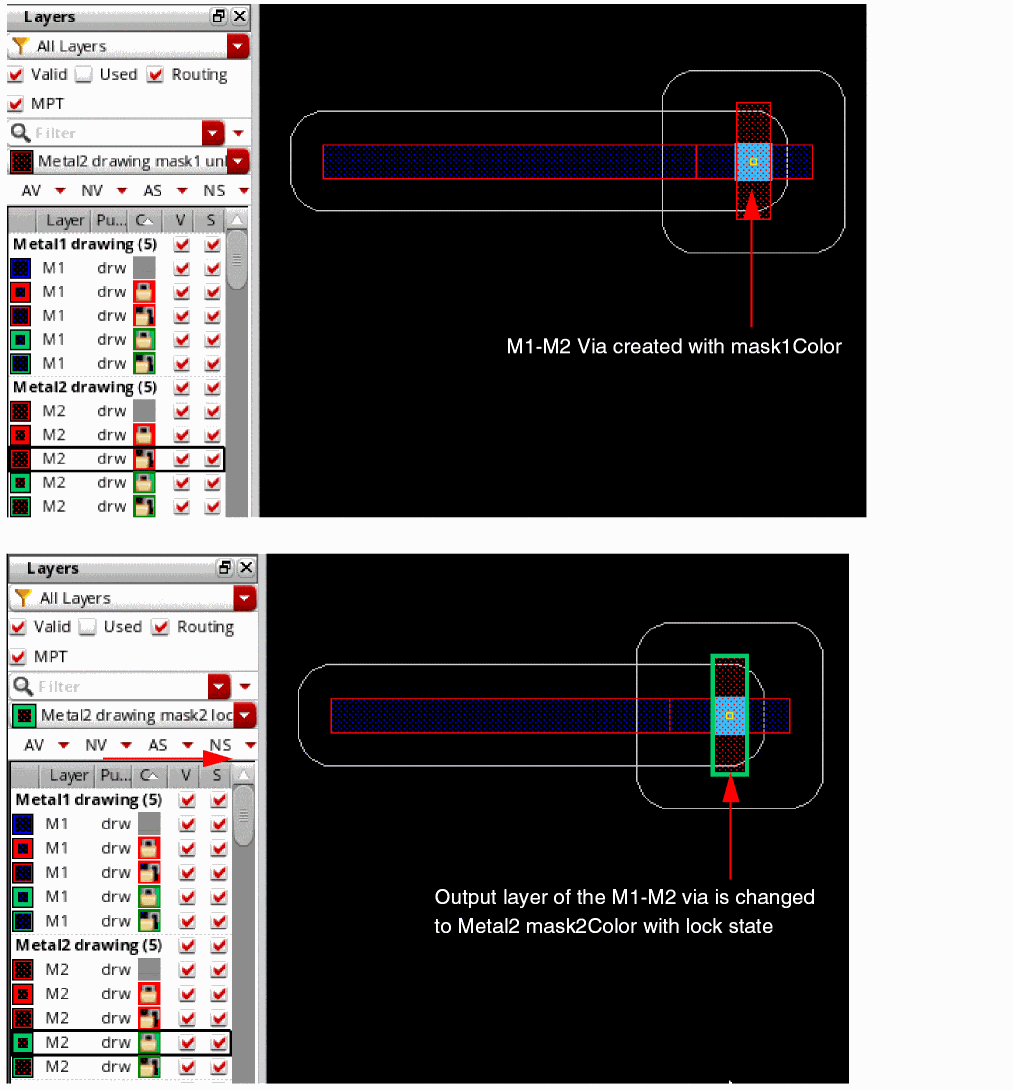
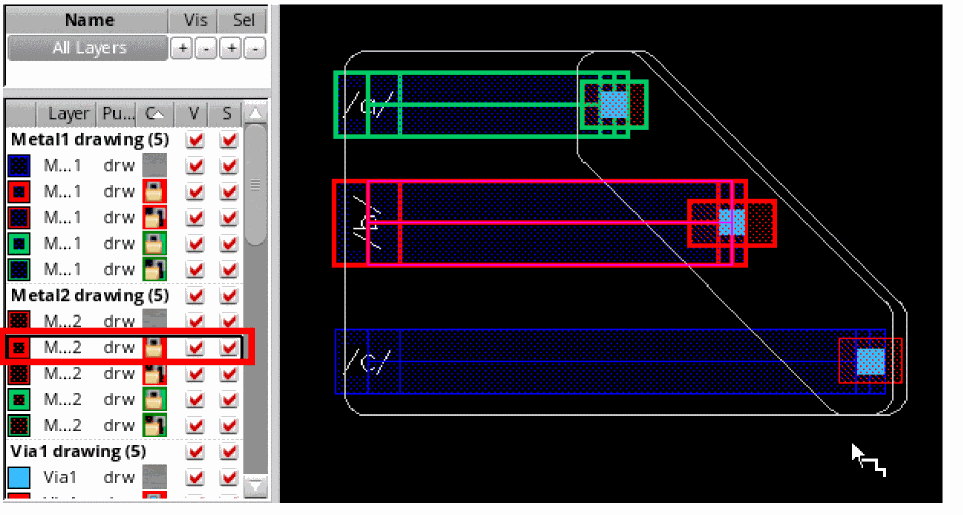
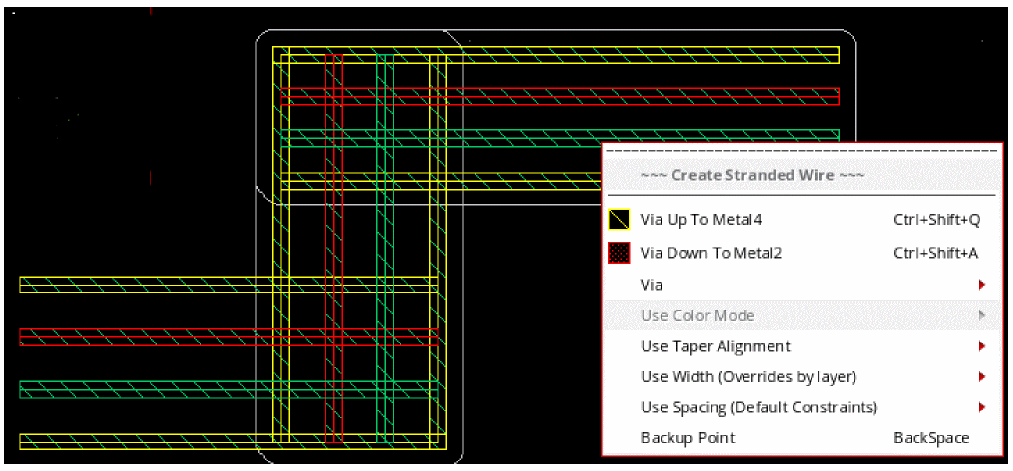
You can insert a via while creating a colored wire by selecting Via up to < layer name> from the Create Single Wire context-sensitive menu. By default, the via top and bottom shapes inherit the color information from the wire being drawn. Similarly, the via inherits the color lock status from the wire being drawn.
The following figure shows an example where you create a wire on M1 metal layer with mask1Color, and then insert an M1-M2 via by selecting Via Up To M2. The M2 via shape and the wire on M2 both have mask1Color color set. The active layer in the Palette is reset to Metal2 drawing, which is the output layer of the inserting via.
By using the Palette MPT options, you can change the color and lock status of a via before you place it. This changes the color and lock information of the output layer of the via enclosure. The following figures show that the active layer in the Palette is reset to Metal2 drawing, which is the output layer of the inserting via. It also shows a change in the via color and lock state from mask1Color unlock to mask2Color lock.
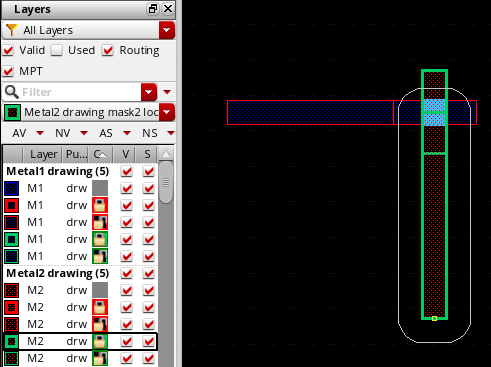
After placing the via, you can continue to create a wire starting from the via on the changed metal layer. The wire inherits the color of the output layer of the via. You can see that the new wire is created in mask2Color with lock state in the following figure.
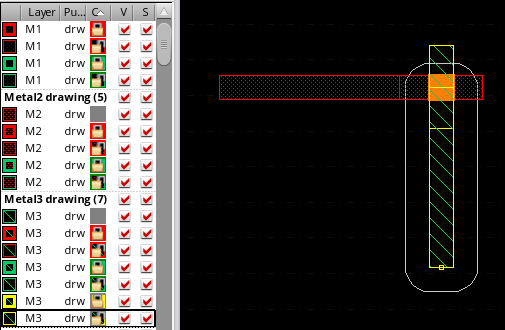
Similarly, after the via has been placed, you can change the color and lock information from the Palette for both the output layer via enclosure and the wire currently being drawn. The following figure shows that the color information of the output layer via enclosure and the new pathSeg on the M3 layer has changed from mask2Color to mask3Color.
Tapping Colored Objects
The tapping behavior of an object is dependent on the Auto Tap Wire option in the Layout Editor Options form. If the Auto Tap Wire option is deselected, the wire inherits the color and lock status of the active layer in the palette, independent of the locked status of the starting shape. However, if the Auto Tap Wire option is selected, the wire inherits the color and lock status from the starting shape. There is no precedence of the locked status from the palette anymore. In addition, if you want to change the color or the lock status of the wire that you have started from an existing object, you can do it after clicking the starting object and then choose another color or locked status from the palette.
This section covers the tapping behavior of various colored objects.
- Tapping from Colored Wires
- Tapping from Colored Pins
- Tapping from Colored Width Spacing Patterns (WSPs)
Tapping from Colored Wires
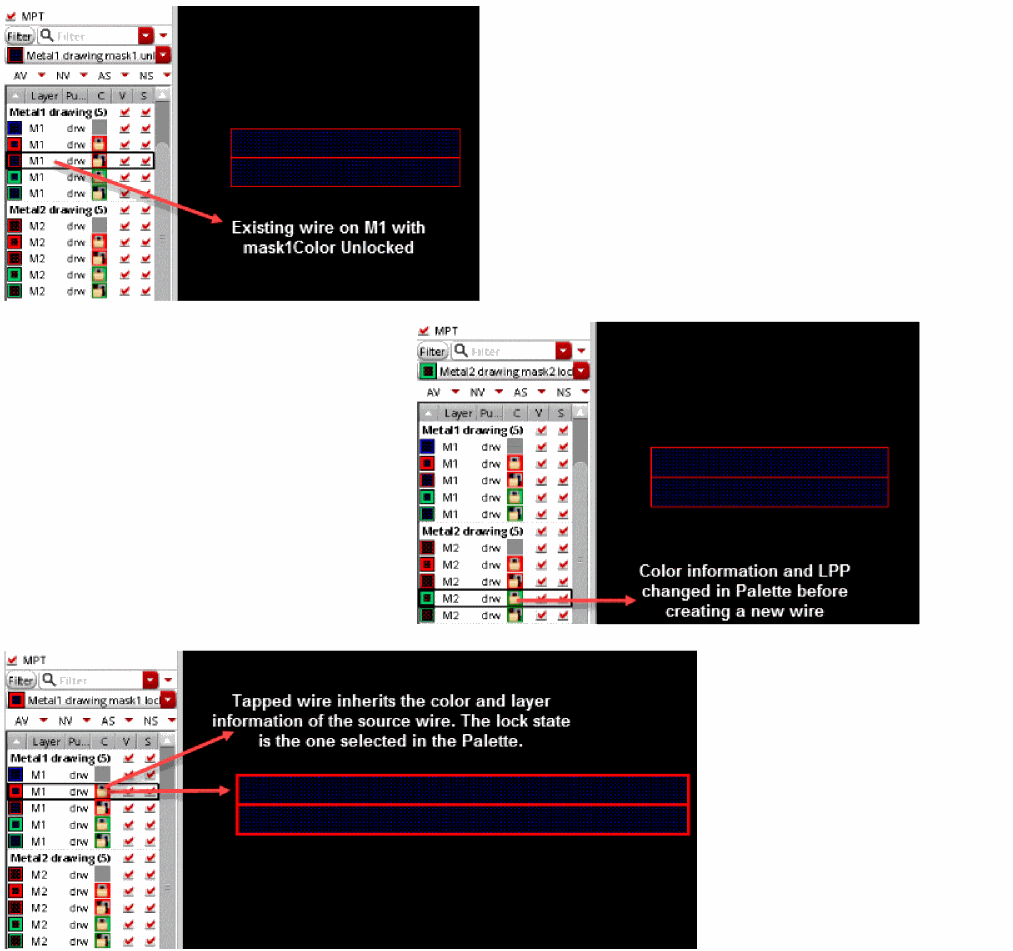
Interactive wire editing supports automatic tapping from colored wires. When you create a wire from an existing wire, the new wire taps and inherits the width, color information, layer-purpose pair, and net information of the source wire. The lock status of the new wire is inherited from the existing wire if it is in the locked state.
The following figure displays an example where a new wire is created from an existing wire where the lock state of the existing wire is unlocked but the lock state in the Palette is locked. In this case, the tapped wire inherits the lock state from the Palette.
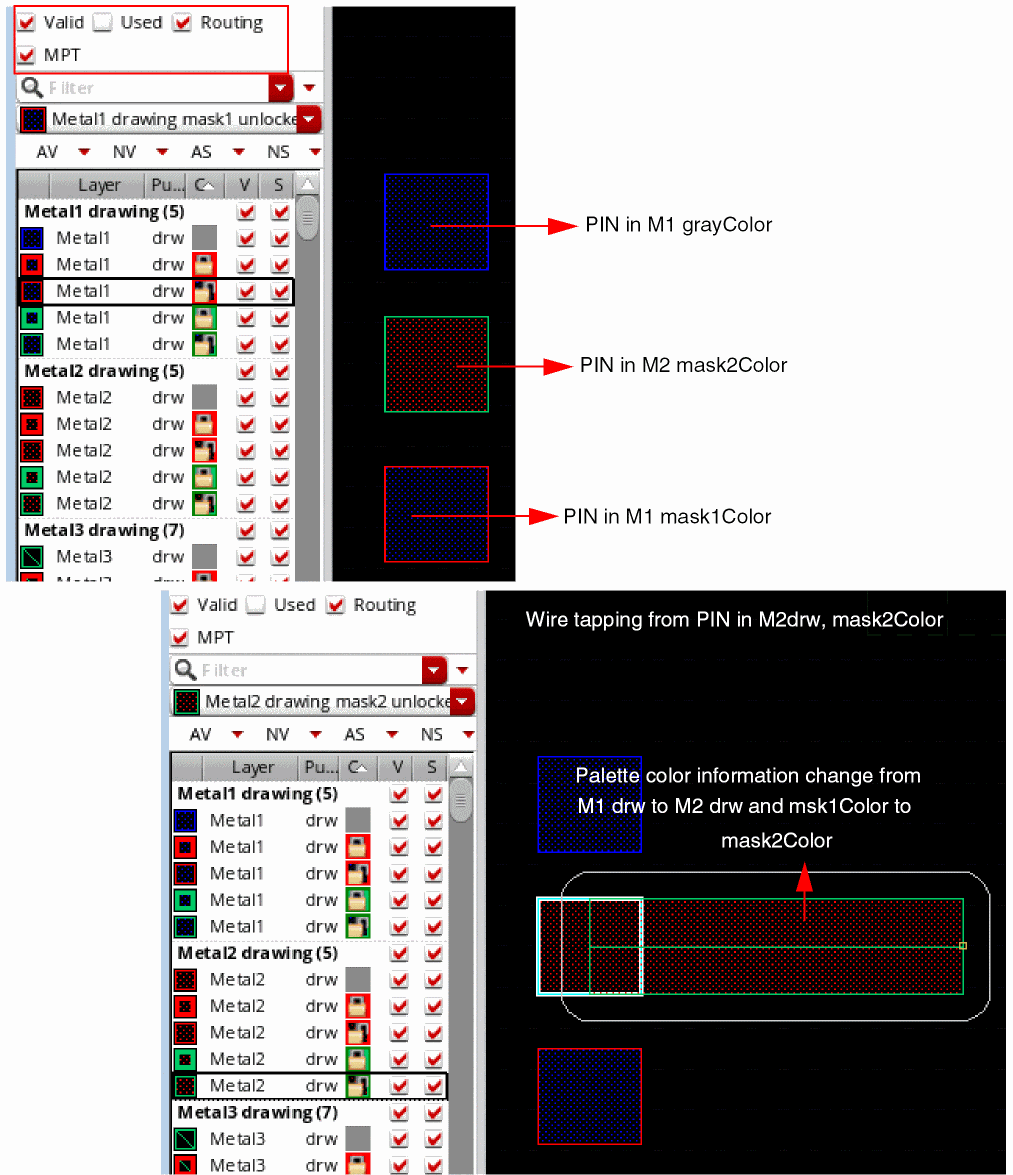
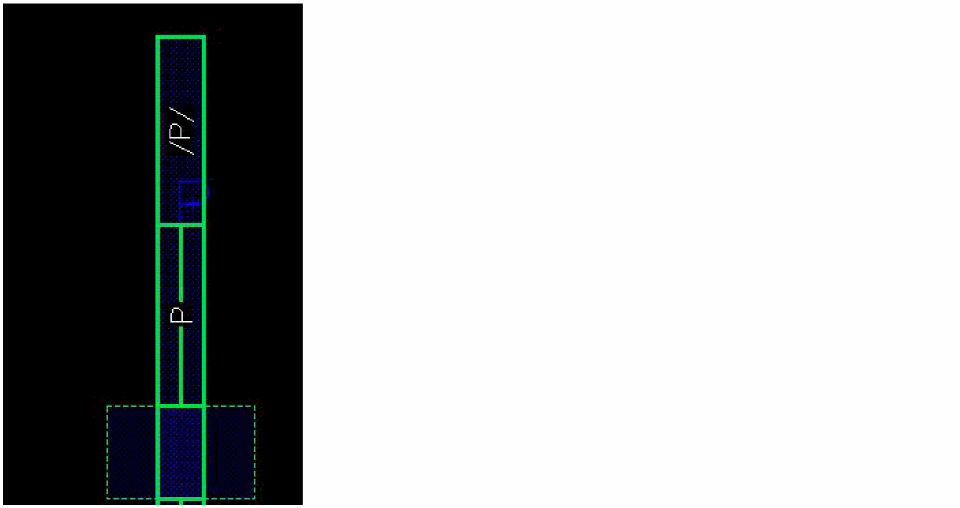
Tapping from Colored Pins
Interactive wire editing supports automatic tapping from colored pins. When you create a wire from an existing pin that has a color assigned to it, the wire automatically inherits the width, color information, layer-purpose pair, and net information of the source pin. The lock information that is selected in the Palette is considered.
The following figure displays an example where a wire is created by tapping an existing pin (M2 drw, mask2Color). In this case, the wire is created on M2 drw and has mask2Color. You can see that the Palette layer information has changed from M1 drw to M2 drw and the color has changed from mask1Color to mask2Color.
If you now create a wire from a pin on M1 drw with mask1Color, the wire automatically inherits the layer and color information from the pin and the color information in the Palette changes, as shown in the following figure.
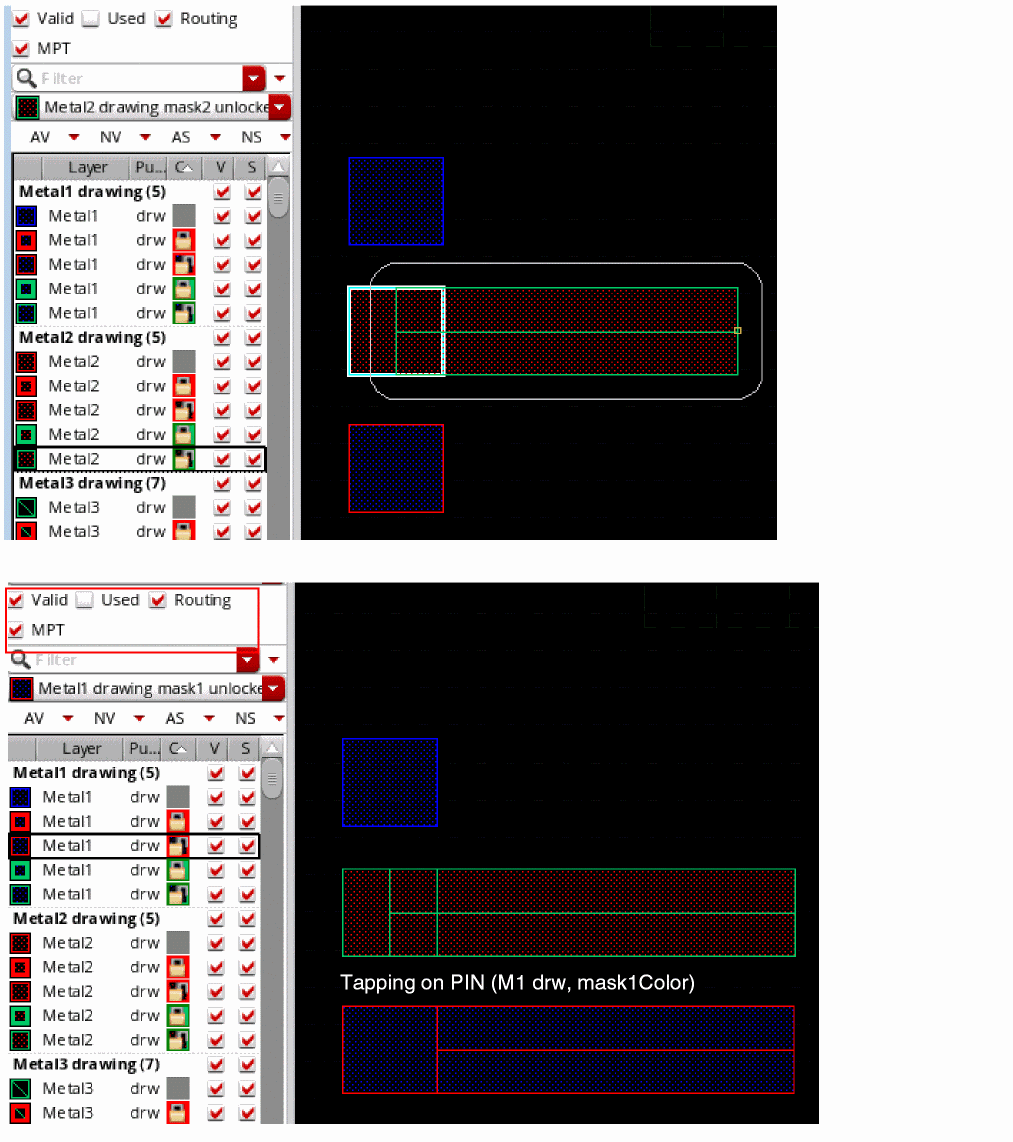
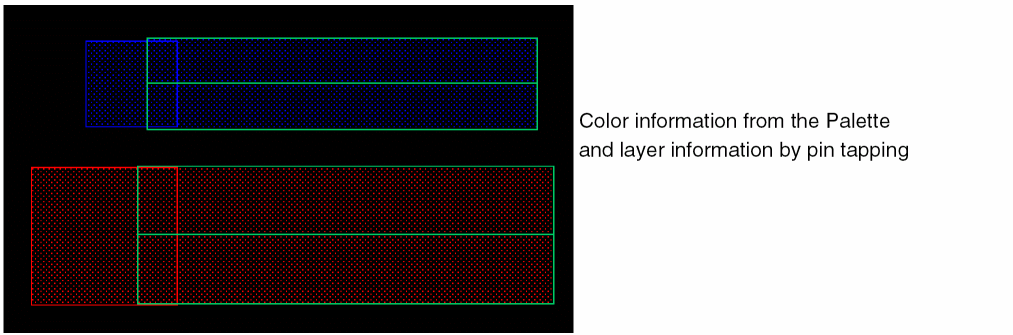
However, when you create a wire from a pin with color set to gray, it is created with the color that is currently set as active in the Palette, but on the same layer as the pin, that is, the wire inherits only the layer information from the pin. The following figure shows wires created from the two pins that are on different metal layers when the pin color is set to gray.
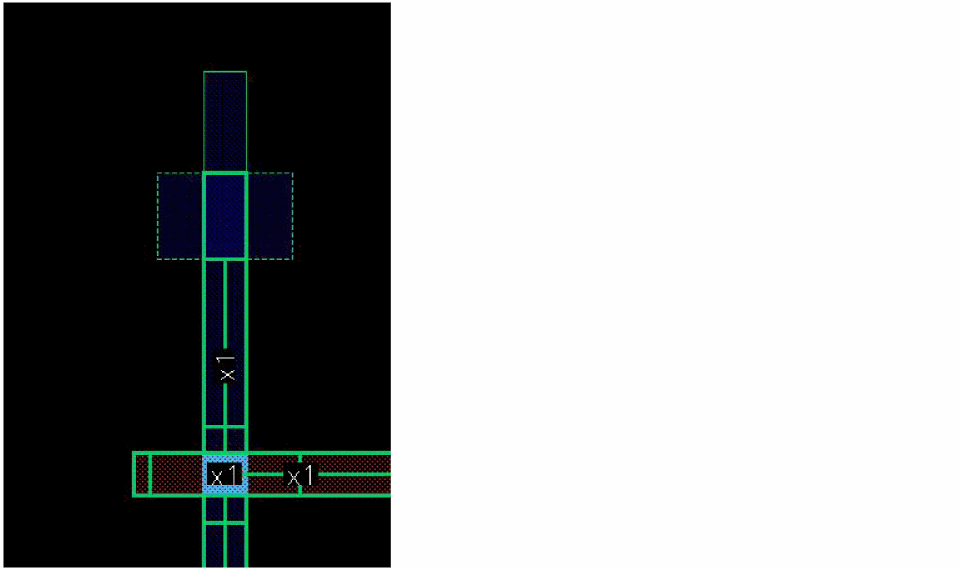
Tapping from Colored Width Spacing Patterns (WSPs)
When you create a wire from a WSP that has a color assigned to it, the wire taps and inherits the width, color information, and layer-purpose pair from the WSP, as shown in the following figure.
In this scenario, you cannot change the color of the wire from the Palette; the color of the WSP overrides the color that is currently set as active in the Palette. However, if the WSP does not have a color assigned to it, the wire is created with the color information from the Palette. In addition, the wire does not inherit the unlock state of the colored WSP. It inherits the color lock status from the Palette. For example, if the color lock state is changed in the Palette, the wire automatically inherits the new lock state from the Palette, as shown in the following figure.

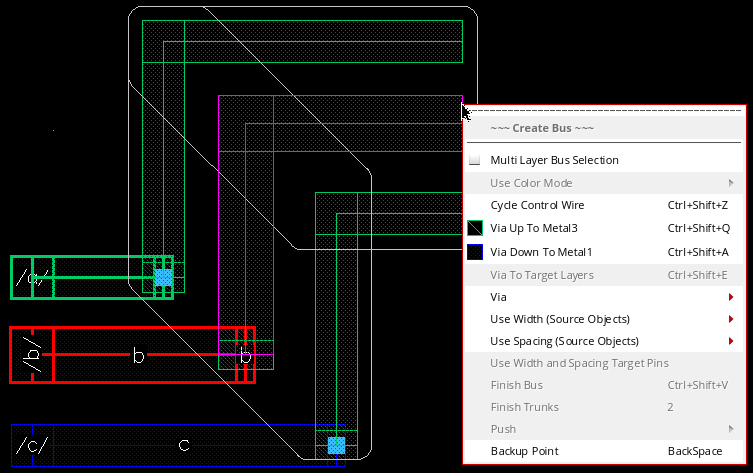
Interactive Coloring for Create Bus
The Create Bus command supports interactive coloring and lets you create a single layer bus with color and lock state information. You can create a colored bus starting in an empty space or by tapping the objects, such as pins, pathSegs and buses, and colored WSPs.
- Creating a Bus in an Empty Space
- Creating a Bus by Tapping Pins
- Creating a Bus While Working with Colored WSPs
Creating a Bus in an Empty Space
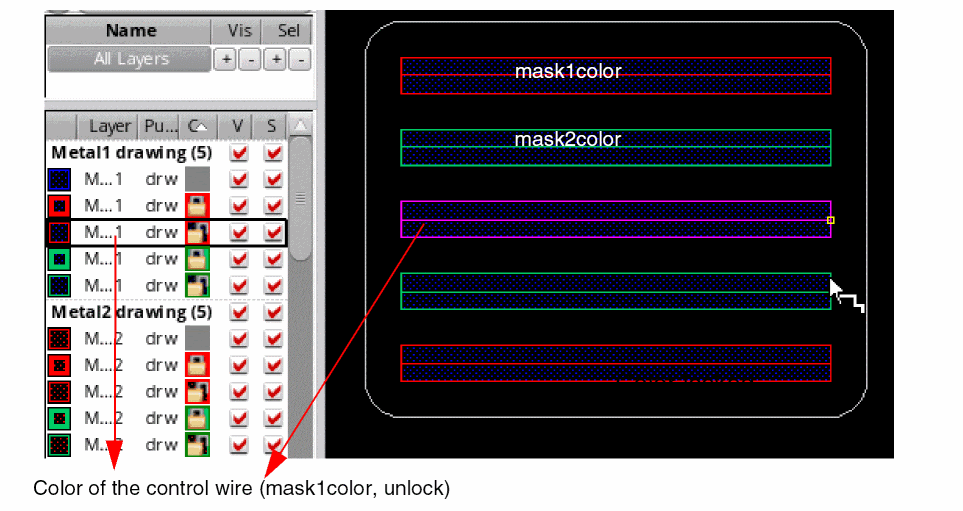
To create a bus with color in an empty space in the layout:
- Enable MPT Support in the Palette assistant. For more information, see MPT Support in the Virtuoso Layout Suite documentation.
- Set as active a layer-purpose pair with the required color and lock status.
- Choose Create – Wiring – Bus to run the Create Bus command.
-
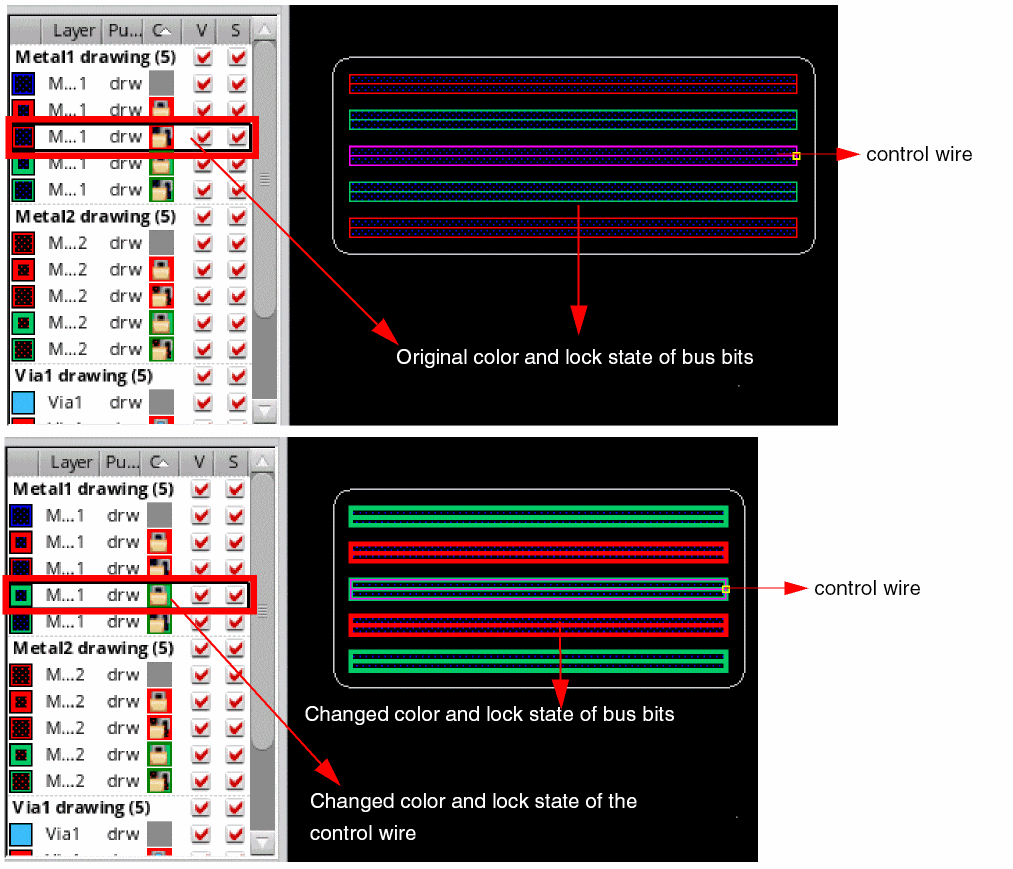
Click in an empty space in the canvas to start creating the bus. The control wire acquires the color and lock state from the active layer in the Palette. The color of the other bus bits depends on the bus color mode, which can be set to uniform or optimized. For more information about bus color mode, see Specifying the Bus Color Mode. In the figure below, the bus is colored based on the optimized mode, starting from a control wire with
mask1Color, Unlock.
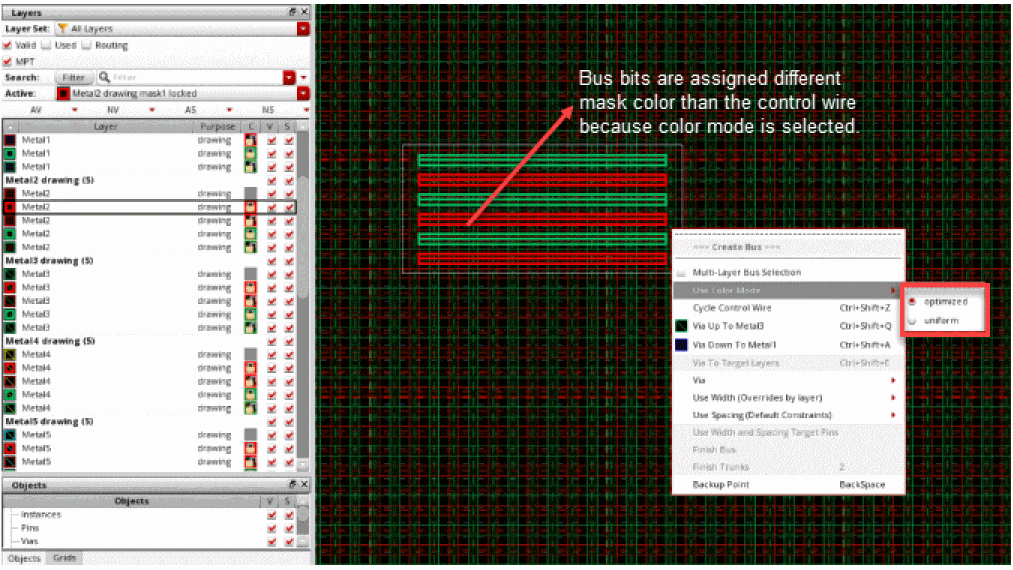
Specifying the Bus Color Mode
You can use the options available on the Use Color Mode menu to control the color mode of the bus. To access the color mode options, right-click the bus being created and point to Use Color Mode. You can either select the optimized or the uniform color mode.
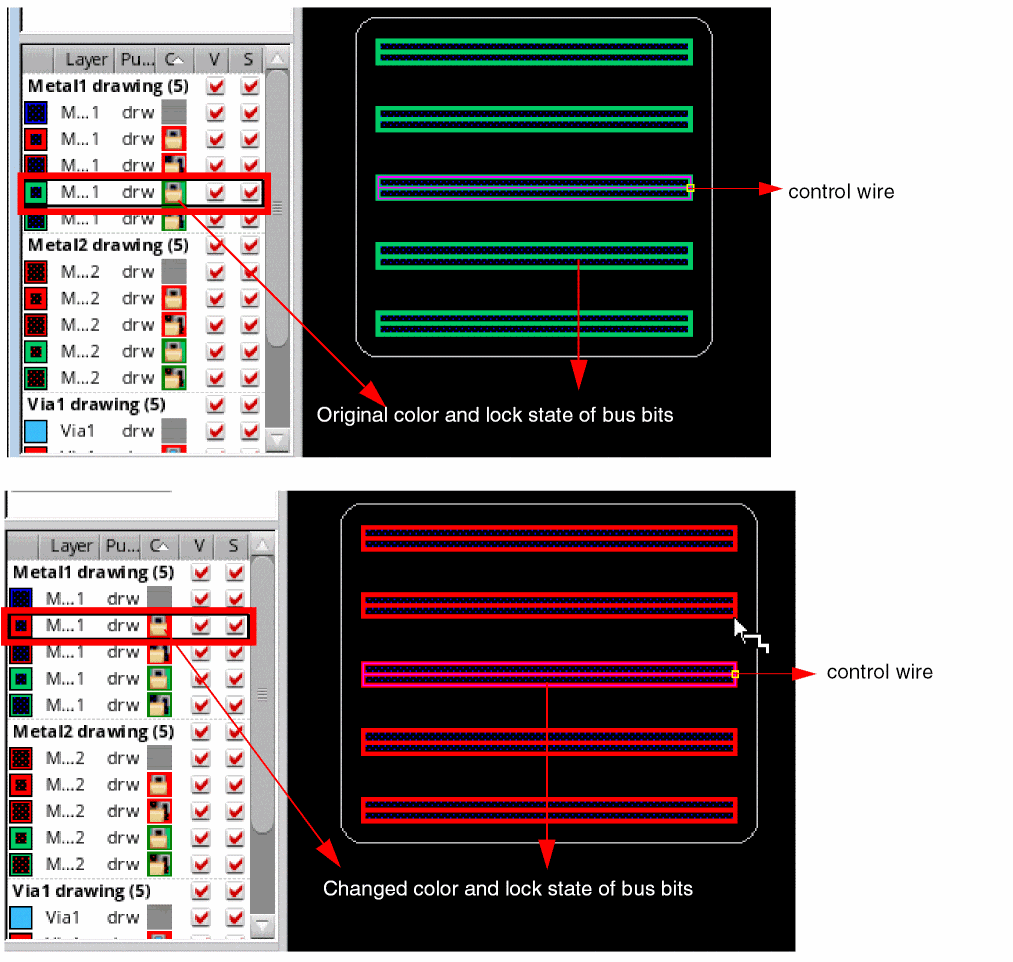
Uniform Color Mode
When uniform is selected, all bus bits are assigned the same mask color as that of the control wire. The mask color assigned to the control wire and other bus bits is the same as the active layer in the Palette. The spacing between two adjacent bus bits on the same mask is determined by minSpacing(sameMask). The following figure shows the bus bits in the uniform color mode.
Optimized Color Mode
When you select optimized color mode, the control wire acquires the same mask color as that specified for the active layer in the Palette. The other bus bits acquire the following coloring pattern:
-
The bus bits above the control wire acquire the mask color as
maskColor(controlWire)+1,maskColor(contorlWire)+2, and so on. This pattern continues until the highest mask color available for the selected layer-purpose pair is assigned to a bus bit. The pattern is then repeated starting at the mask color of control wire. -
The bus bits below the control wire acquire the mask color as
maskColor(controlWire)-1,maskColor(contorlWire)-2, and so on. If the control wire has the lowest available mask color assigned to it, then the bus bits below the control wire are colored starting with the highest mask color available for the layer on which the bus is being placed. The pattern is then repeated for the remaining bus bits.
In optimized color mode, the spacing between two adjacent bus bits on different masks is determined by minSpacing(diffMask). The optimized is the default color mode.
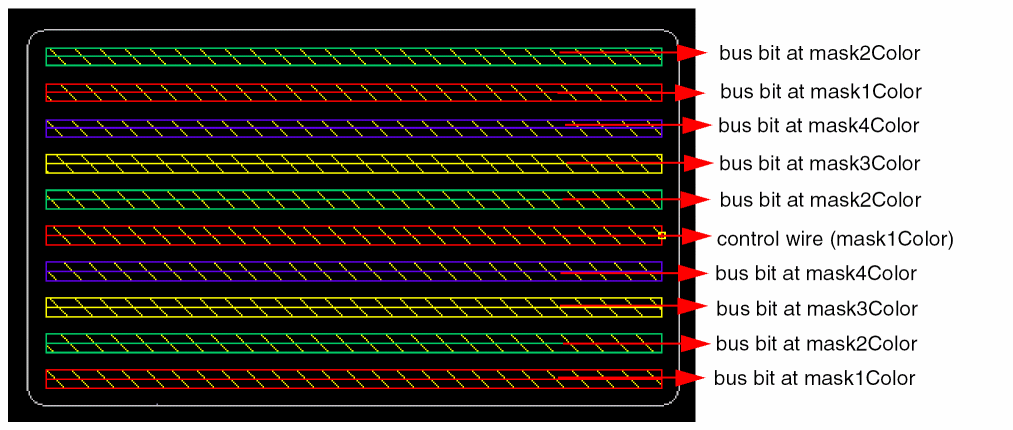
Let us consider an example where the active layer-purpose pair is Metal4 Drawing and the control wire is assigned mask1Color. The highest available mask color for Metal4 Drawing is mask4Color.
The following figure shows the color pattern that is assigned to the bus bits in a bus with 10 bits.
Changing Bus Color Mode
When the bus color mode is changed, the bus bits are recolored. The spacing between the bus bits is recomputed based on the bus color mode that is set. The following figure shows how the color and the spacing of bus bits changes when the color mode is changed from optimized to uniform.

Changing Color of Bus Bits
While creating a bus, you can apply a different mask color to the control wire, which, in turn, resets the color of the remaining bits in the bus. You can do this by resetting the active layer-purpose pair in the Palette to a different mask color, which resets the color and lock information of the control wire and also of the remaining bus bits. You can also reapply the color mode, if required.
The following figure shows the change in color and lock state in the optimized bus color mode. You can see here that the control wire has acquired the color and lock state of the layer-purpose pair that is now set as active in the Palette.
The following figure shows the change in color and lock state when uniform bus color mode is selected:
Creating a Bus by Tapping Pins
Interactive bus coloring supports automatic tapping when you start creating a bus from a set of existing pins. To create a bus starting from a set of pins:
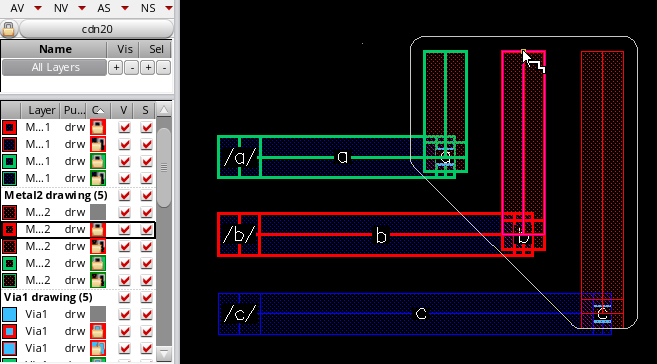
When you create a bus starting from an existing set of pins that have color assigned to them, each bus bit automatically inherits the width, color information, layer-purpose pair information, and net information from the tapped pins. As shown in the following example, the bus bits inherit the color and lock state information from the tapped pins and the spacing between bus bits. The layer-purpose pair in the Palette is reset with the color and lock state information of the control wire.

Changing Color of Bus Bits by Tapping from Pins
When you start creating a bus by tapping existing colored pins, you cannot change the color of the control wire and other bus bits by selecting another layer-purpose pair with a different mask color. You can however switch between locked and unlocked states of the same mask color.
To change the mask color of the control wire and other bus bits while creating a bus by tapping pins, you need to first insert a via. To change the mask color of the control wire and bus bits:
-
Insert a via by selecting Via up to < layer name> from the Create Bus context-sensitive menu.
By default, the via and the via top and bottom shapes inherit the color and lock information from the control wire of the bus being drawn. The active layer in the Palette is reset toMetal2 drawing,lockwhich is the output layer of the via that is inserted on the control wire, as shown in the following figure.
-
To change the mask color of the control wire and other bus bits, select another layer-purpose pair with a different mask color from the Palette.
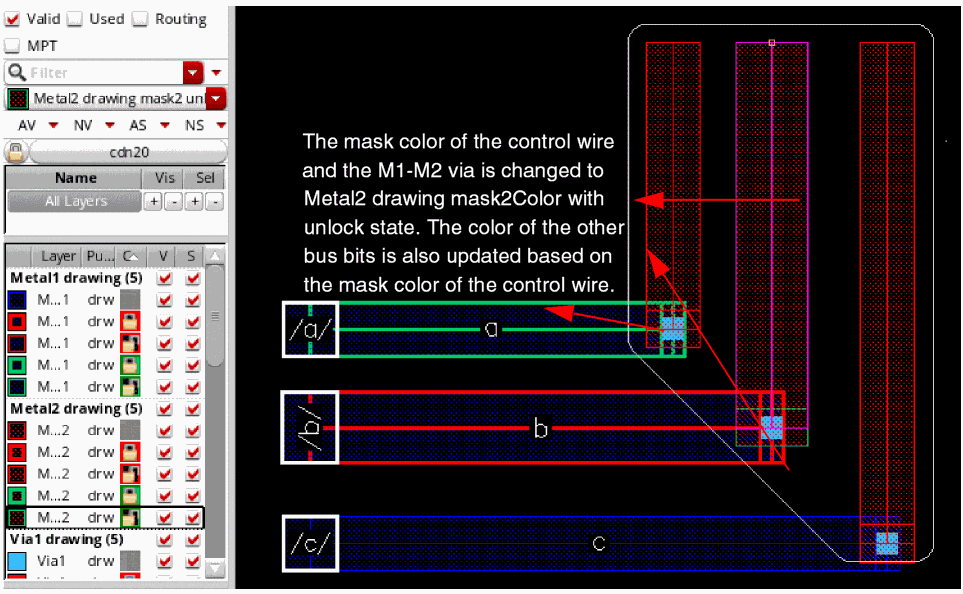
If you change the mask color of the bus bits before placing a via, the color and lock information of the output layer of the via enclosure is accordingly updated. The following figures show that when you selectMetal2 drawing mask2Coloras the active layer from the Palette, the output layer of the via on the control wire is automatically reset tomask2Color. It also shows a change in the via color and lock state frommask1Color,locktomask2Color,unlock.
You can also change the mask color of the control wire and the other bus bits after placing the via by resetting another layer-purpose pair as active in the Palette. The following figure shows how the mask color of the control wire and the via placed on it is updated when you change the active layer-purpose pair to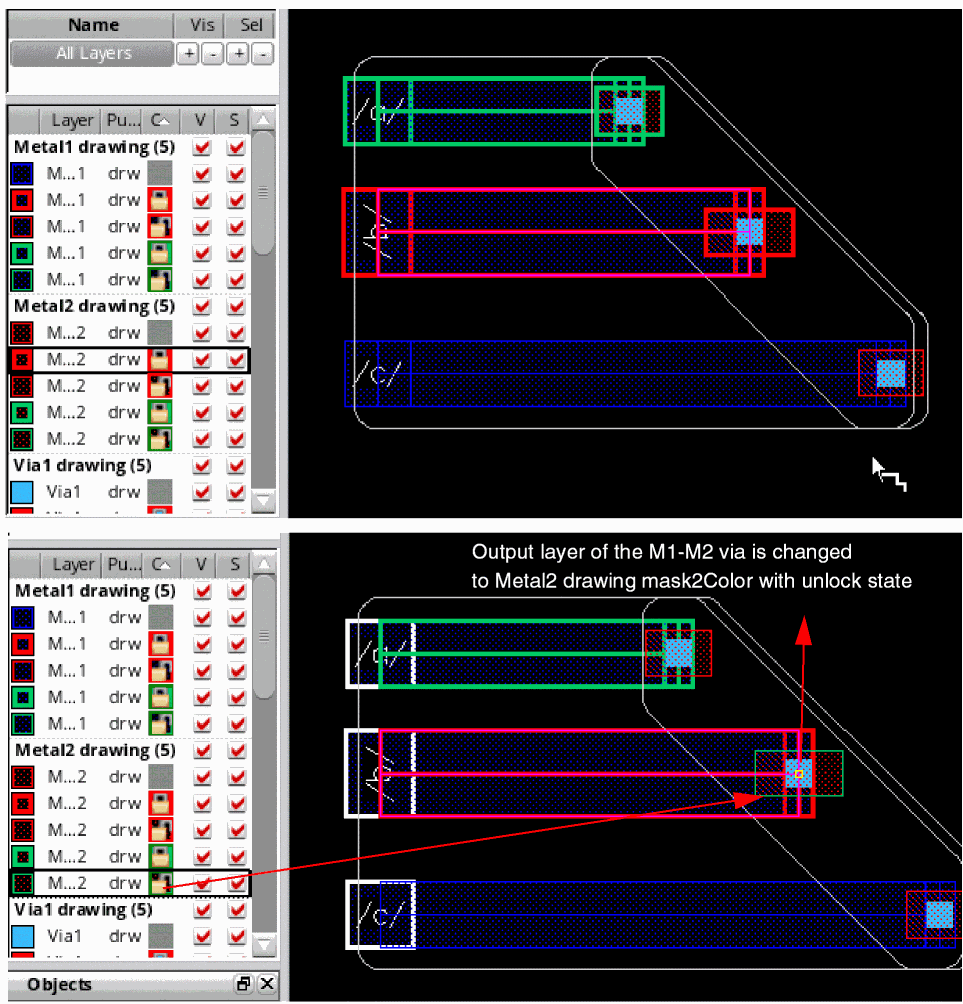
mask2Color, unlock. The color of the other bus bits is also updated based on the mask color of the control wire and the color mode.
Changing Bus Color Mode from Tapped Pins
To change the color mode of the bus bits that are created from the tapped pins or objects, use the Use Color Mode option available on the Create Bus context-sensitive menu. The Use Color Mode option is disabled until the first via is inserted. The via insertion ensures a change in the layer-purpose pair and enables the Use Color Mode option. To change the bus color mode and color of the bus starting from the existing pins:
- Choose Create – Wiring – Bus.
- Select the required pins or objects.
- Right-click the bus that is being created. The Create Bus context-sensitive menu is displayed.
-
Select Via Up to <layer_name> to insert the via.
- The Use Color Mode option is now enabled.
-
Right-click the bus being created and point to Use Color Mode. Then, select optimized or uniform. For more information on color mode, see Specifying the Bus Color Mode.
The following figure shows how the bus bits get displayed when the color mode is selected as uniform.
When you again change the bus color mode from uniform to optimized, the bus bits get displayed as shown in the following figure.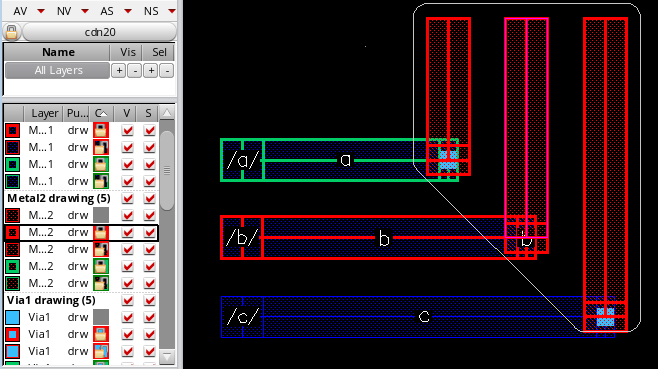
The Use Color Mode option is disabled after a bend is created in the bus, as shown in the following figure.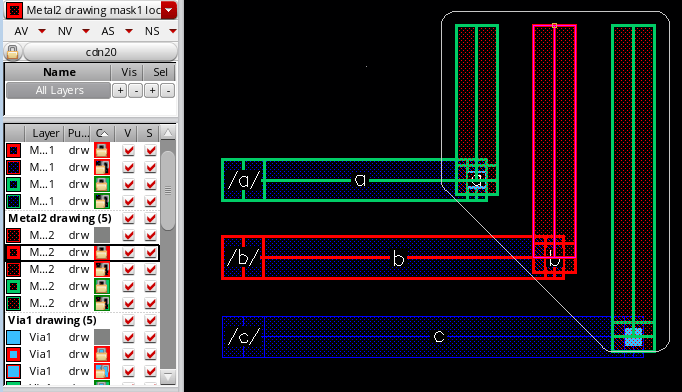
Creating a Bus While Working with Colored WSPs
When you create a bus by tapping a Width Spacing Pattern (WSP) that has a color assigned to it, the bus bits inherit the color from the colored routing pattern, as shown in the following figure. The spacing between adjacent bus bits is also inherited from the routing pattern. The layer-purpose pair in the Palette is updated based on the layer and the direction in which the bus is created.
When you start creating a bus from an existing routing pattern, the bus bits inherit the color of the colored track under them. As a result, you cannot change the color of the bus bits by selecting another layer with a different mask color from the Palette. You can however switch between locked and unlocked states of the same mask color. For more information on color change of bus bits, see Changing Color of Bus Bits by Tapping from Pins.
You can change the bus color mode of bus bits while creating a bus from an existing WSP. Changing the bus color mode allows bus bits to be created on the closest track according to their color. The following figure shows how the bus bits get displayed when the color mode is changed to uniform.
The following figure displays the bus bits when the color mode is changed to optimized.

For more information about how to change the color mode of bus bits, see Changing Bus Color Mode from Tapped Pins.
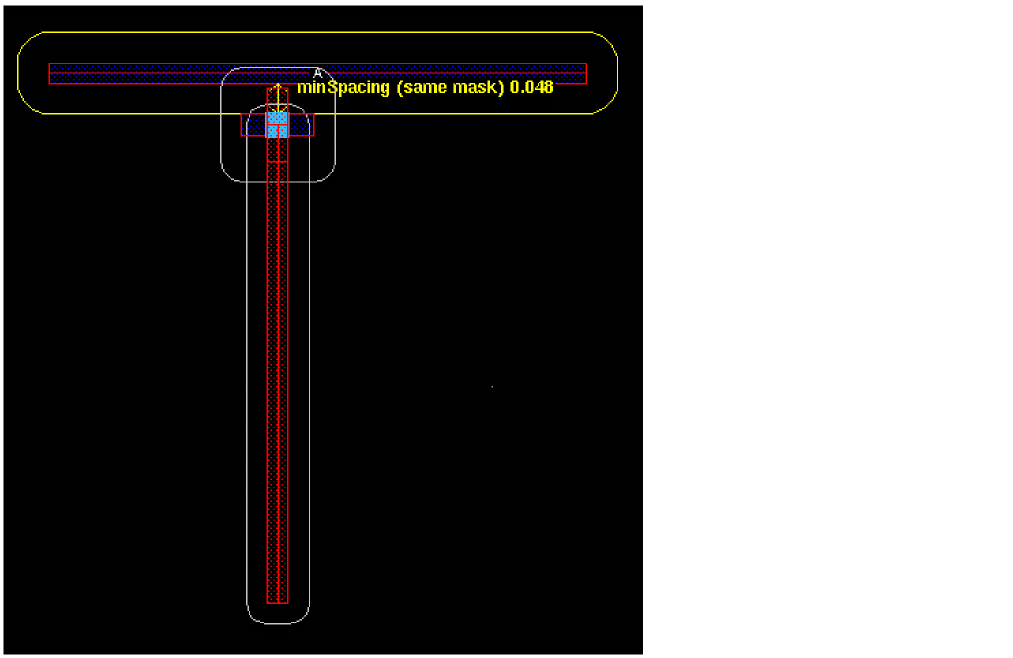
Performing DRC Colored Checks
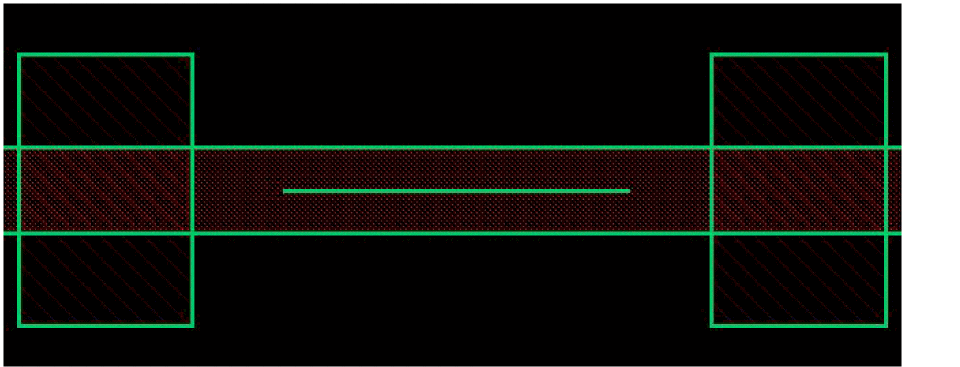
Using DRD Notify and Enforce, you can perform interactive DRC colored checks on wires and that carry dynamic coloring information. This helps check for violations between two wires or via enclosures with same or different color information. For example, the following figure shows a minSpacing (same mask) violation between the top horizontal wire and the via enclosure, both of which have mask1Color.
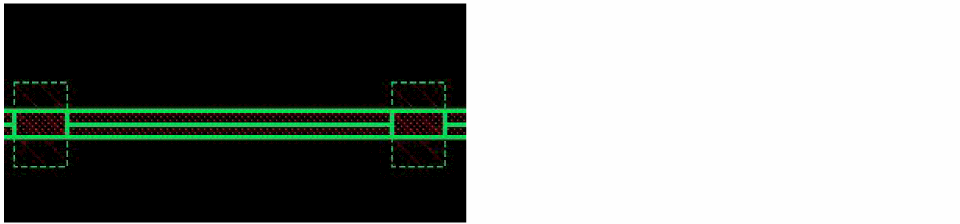
Similarly, the following figure shows a minSpacing (diff mask) violation between the top horizontal wire with mask1Color and the via enclosure with mask2Color.
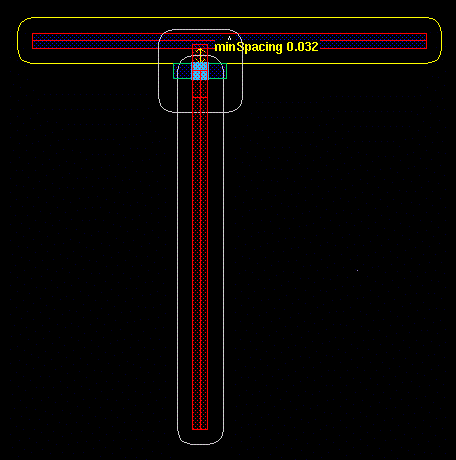
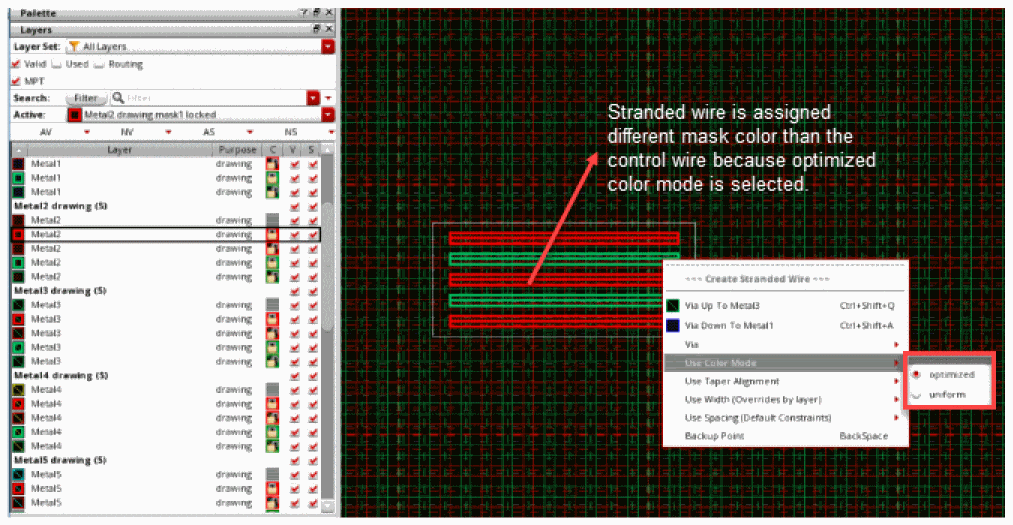
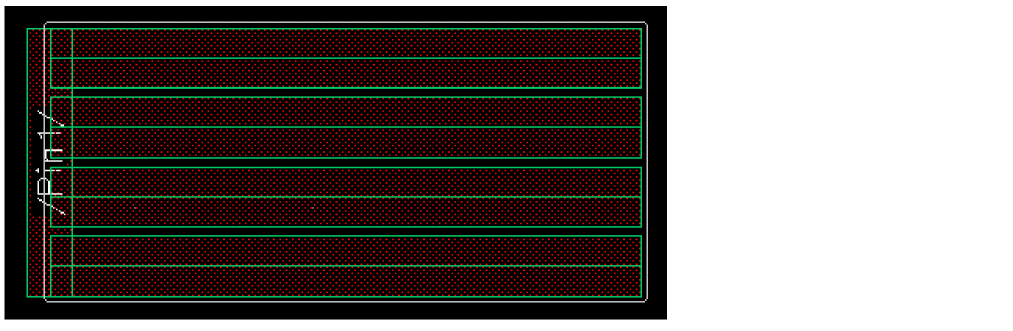
Interactive Coloring for Create Stranded Wire
The Create Stranded Wire command supports interactive coloring and lets you create a stranded wire with color and lock state information. The control wire acquires the color and lock state from the active layer in the Palette. The color of the other strands in the stranded wire depends on the color mode, which can be set to uniform or optimized.
Specifying the Color Mode in Stranded Wire
You can use the options available on the Use Color Mode menu to control the color mode of the stranded wire. To access the color mode options, right-click the stranded wire being created and point to Use Color Mode. You can either select the optimized or the uniform color mode.
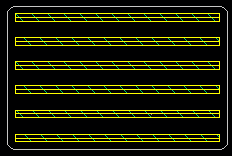
Uniform Color Mode
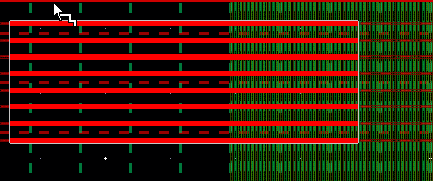
When uniform is selected, all stranded wires are assigned the same mask color as that of the control wire. The mask color assigned to the control wire and other stranded wires is the same as the active layer in the Palette. The spacing between stranded wires on the same mask color is determined by minSpacing(sameMask). The default color mode is uniform. The following figure shows the stranded wires in the uniform color mode with minSpacing (sameMask).
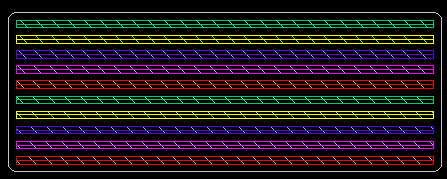
Optimized Color Mode
When you select optimized color mode, the control wire acquires the same mask color as that specified for the active layer in the Palette. The other stranded wires acquire the following coloring pattern:
-
The stranded wires above the control wire acquire the mask color as
maskColor(controlWire)+1,maskColor(contorlWire)+2, and so on. This pattern continues until the highest mask color available for the selected layer-purpose pair is assigned to the stranded wire. The pattern is then repeated starting at the mask color of control wire. -
The stranded wires below the control wire acquire the mask color as
maskColor(controlWire)-1,maskColor(contorlWire)-2, and so on. If the control wire has the lowest available mask color assigned to it, then the stranded wires below the control wire are colored starting with the highest mask color available for the layer on which the stranded wire is being placed. The pattern is then repeated for the remaining stranded wires.
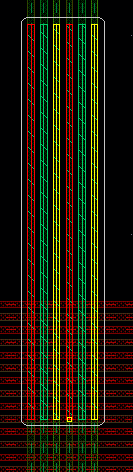
In optimized color mode, the spacing between two adjacent stranded wires on different masks is determined by minSpacing(diffMask). This color mode is more compact than the uniform color mode as the diffmask spacing is always smaller than the samemask spacing.
Let us consider an example where the active layer-purpose pair is Metal4 Drawing and the control wire is assigned mask1Color. The highest available mask color for Metal4 Drawing is mask4Color.
Changing the Color of Stranded Wire
While creating a stranded wire, you can apply a different mask color to the control wire, which, in turn, resets the color of the stranded wire. When you change the mask color of the stranded wire before placing a via, the color and lock information of the complete stranded wire is updated as there is no layer change.
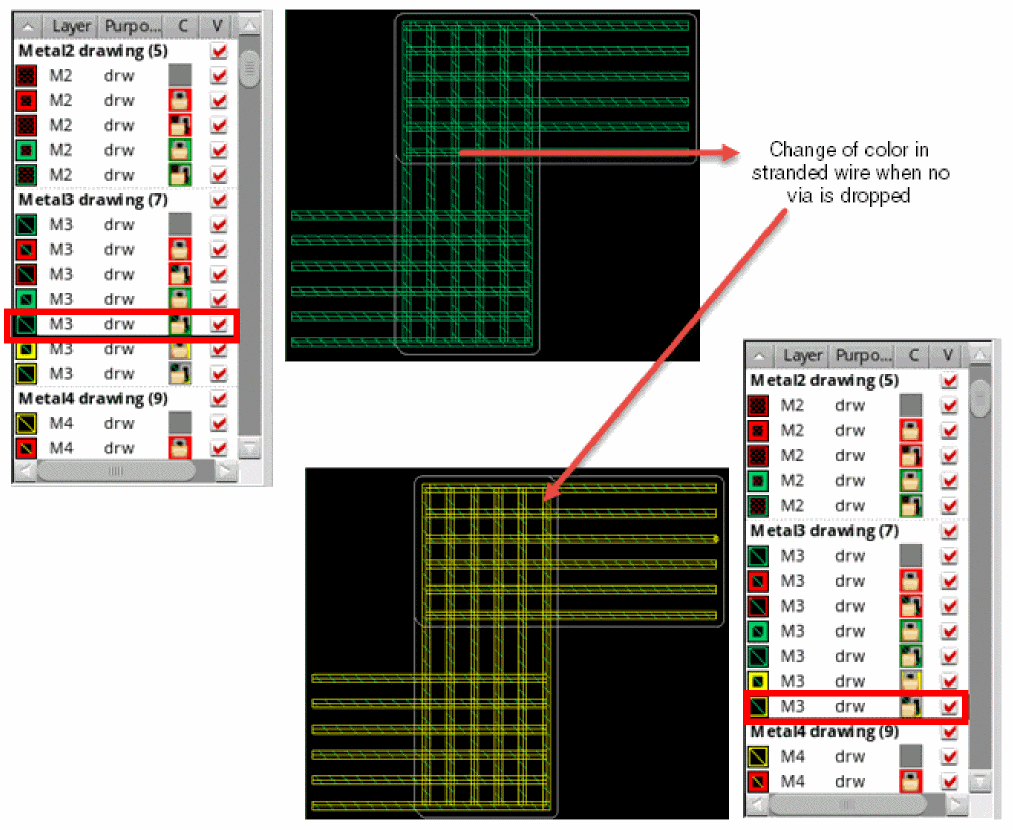
You can also change the mask color of the control wire and the stranded wire after placing the via by resetting another layer-purpose pair as active in the Palette. In this case the change of the active colored layer is applied only in the last section of stranded wire on the same layer.
The following figure shows how the mask color of the control wire and the last section of the stranded wire is updated when you change the active layer-purpose pair to mask3Color, lock.
Changing the Stranded Wire Color Mode
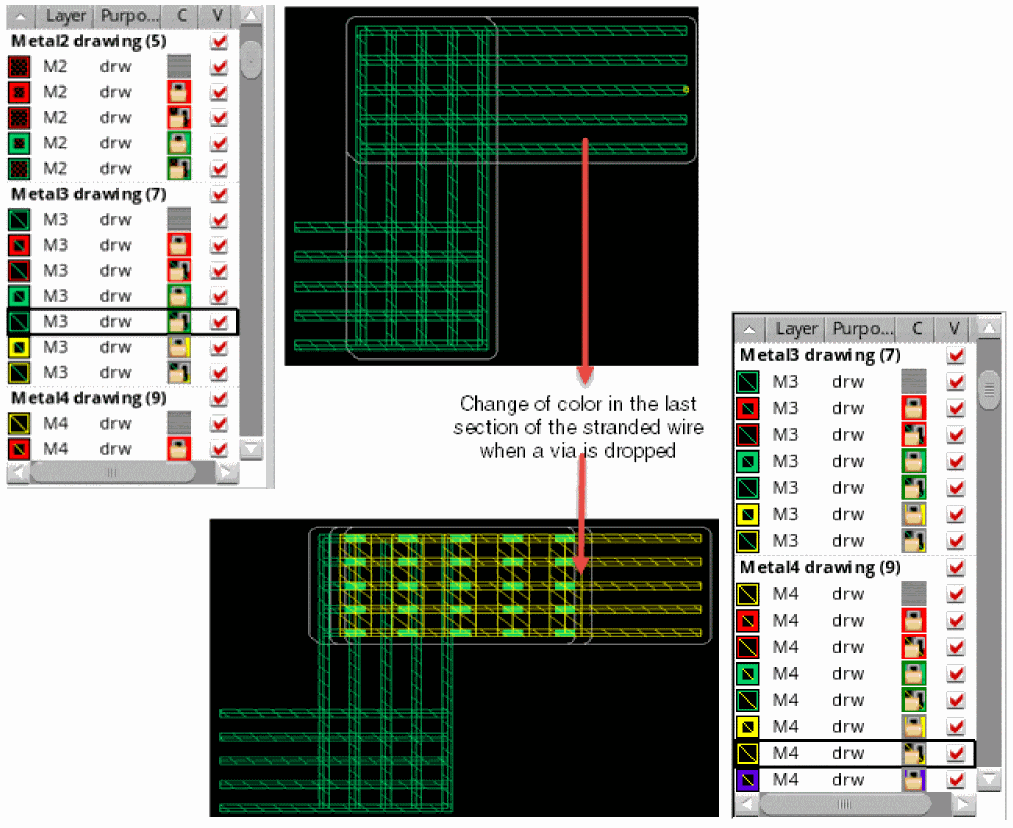
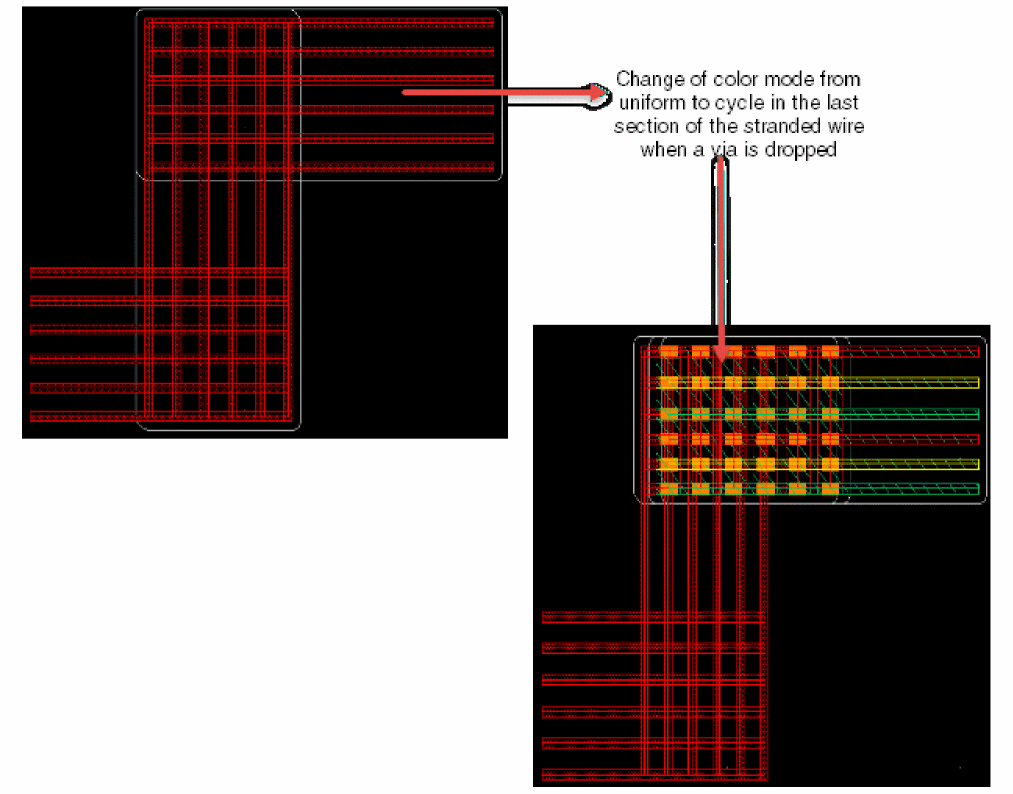
When the color mode is changed, the stranded wire is recolored. The spacing between the stranded wire is recomputed based on the color mode that is set. In stranded wire, the color mode can only be changed only when a via is dropped. The change of the color mode is applied only in the last section of stranded wires (parallels pathSegs between a bend), as shown in the following figure.
You cannot change the color mode in a stranded wire after a bend if there is no layer change, as shown in the following figure.
Creating a Stranded Wire by Tapping Pins
Interactive coloring supports automatic tapping when you start creating a stranded wire from an existing pin. To create a stranded wire starting from a pin:
When you create a stranded wire starting from an existing pin that has color assigned to it, each stranded wire automatically inherits the width, color information, layer-purpose pair information, and net information from the tapped pin. As shown in the following example, each stranded wire inherits the color and lock state information from the tapped pin.
To change the color mode of the stranded wire that is created from the tapped pin, insert a via and then use the Use Color Mode option available on the Create Stranded Wire context-sensitive menu. The Use Color Mode option is disabled until the first via is inserted, as shown in the following figure.
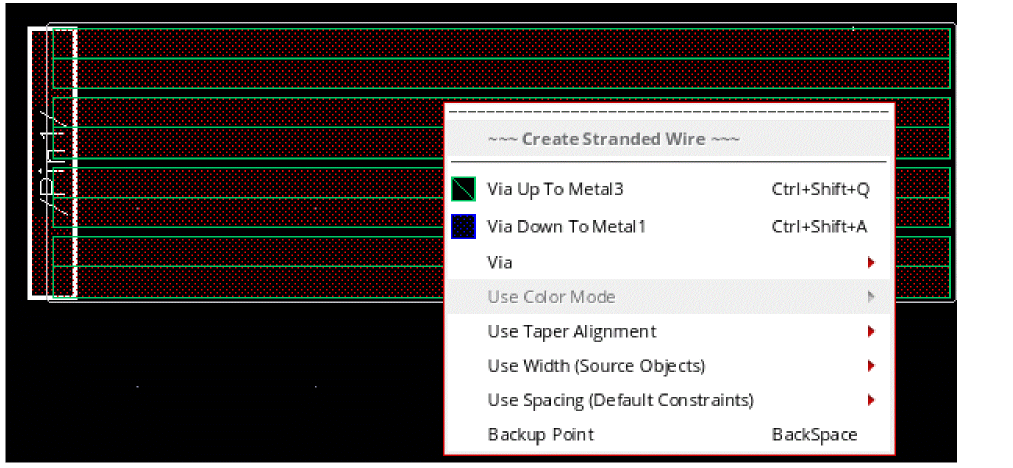
The via insertion ensures a change in the layer-purpose pair and enables the Use Color Mode option. To change the color mode and color of the stranded wire starting from the existing pin:
- Choose Create – Wiring – Stranded Wire.
- Select the required pins or objects.
- Right-click the stranded wire that is being created. The Create Stranded Wire context-sensitive menu is displayed.
- Select Via Up/Down to <layer_name> to insert the via. The Use Color Mode option is now enabled.
-
Place the mouse pointer on Use Color Mode. Then, select optimized or uniform. For more information on color mode, see Specifying the Color Mode in Stranded Wire.
The following figure shows how the stranded wire get displayed when the color mode is set to optimized. The layer-purpose pair in the Palette is reset with the color and lock state information of the control wire.
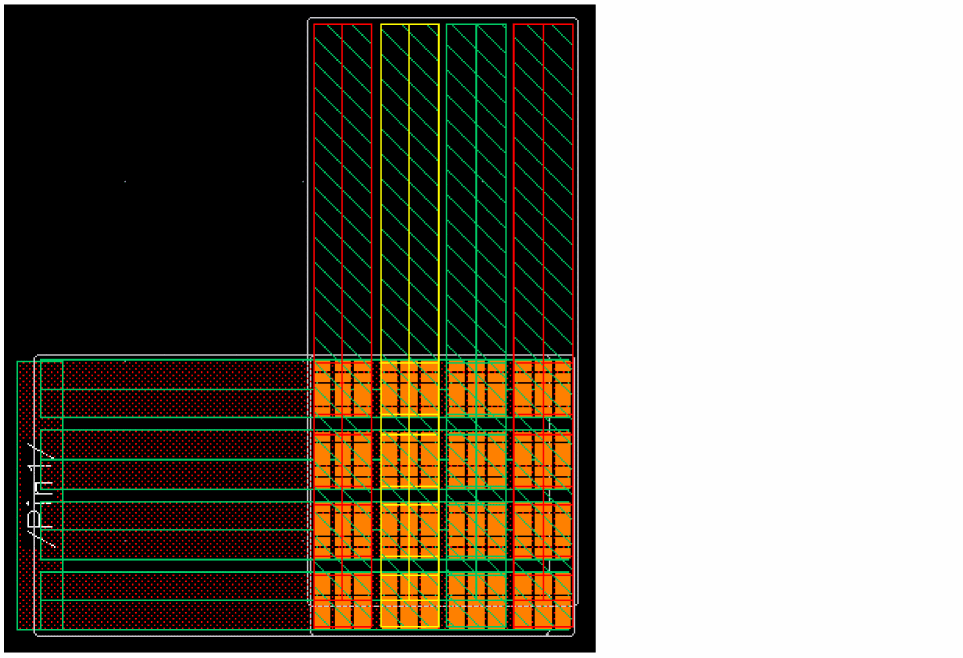
Creating a Stranded Wire While Working with Colored WSPs
When you create a stranded wire by tapping a Width Spacing Pattern (WSP) that has a color assigned to it, the stranded wire inherits the color from the colored routing pattern, as shown in the following figure. The spacing between each strand is also inherited from the routing pattern. The layer-purpose pair in the Palette is updated based on the layer and the direction in which the stranded wire is created.
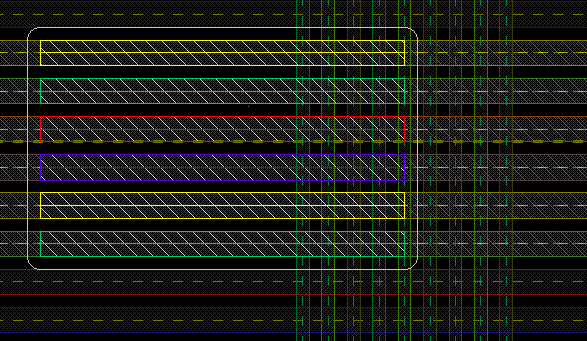
When you start creating a stranded wire from an existing routing pattern, each stranded wire inherits the color of the colored track on which it sits. As a result, you cannot change the color of the stranded wire by selecting another layer with a different mask color from the Palette. You can, however, switch between locked and unlocked states of the same mask color. For more information on changing the color of a stranded wire, see Creating a Stranded Wire by Tapping Pins.
You can change the color mode of the stranded wire while creating a stranded wire from an existing WSP. Changing the color mode allows the stranded wire to be created on the closest track based on color. The following figure shows how the stranded wire is displayed when the color mode is changed to uniform.
The following figure displays the stranded wire when the color mode is changed to optimized. The stranded wire inherits the nearest track spacing.
For more information about how to change the color mode of stranded wire, see Creating a Stranded Wire by Tapping Pins.
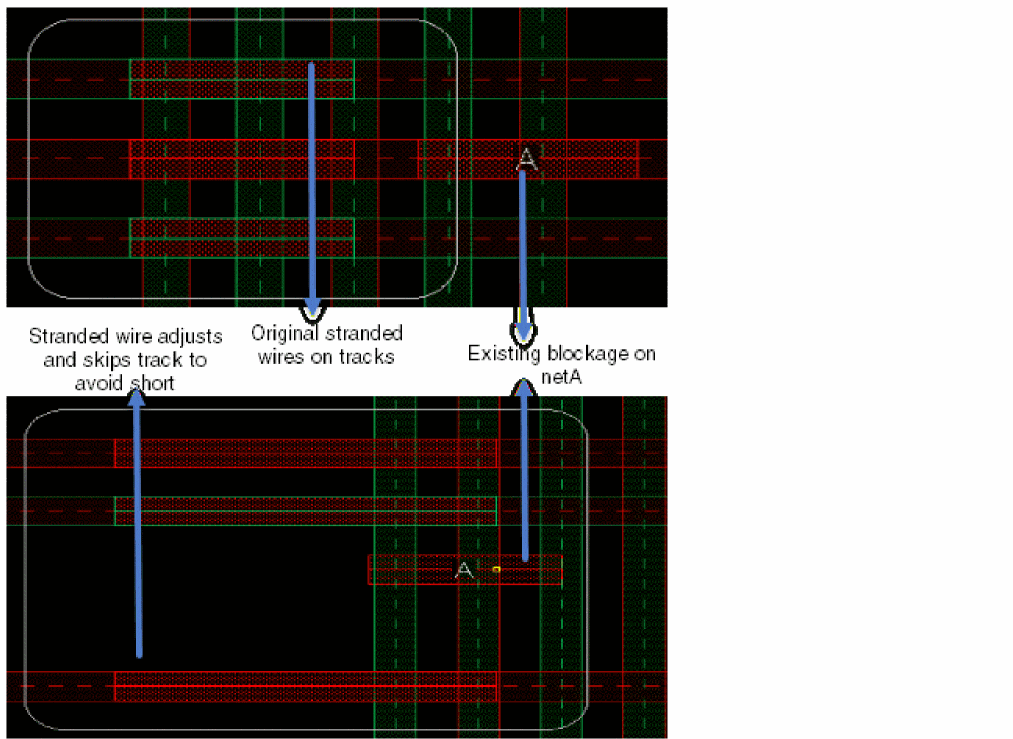
Avoiding Shorts with Existing Blockages on Colored WSPs
The stranded routing skips tracks to avoid creating a short with an existing blockage on colored WSPs.
Example Scenarios for Avoiding Shorts with Existing Blockages on Colored WSPs
This section illustrates some of the possible scenarios, with different requirements, on how a stranded wire skips the track on which a blockage appears and accordingly adjusts to the next nearest track that does not have any blockage when MPT is enabled and stranded wires are colored.
Scenario 1
Blockage exists on layer Metal2 with net name A, and the color mode is optimized.
- Enable MPT Support in the Palette assistant. For more information, see MPT Support in the Virtuoso Layout Suite documentation.
- (Optional) Select the MPT check box.
- Set a layer-purpose pair with the required color and lock status as active.
-
Choose Create – Wiring – Stranded Wire and press
F3. -
Specify
Bin the Net Name field. - Use the options available on the Use Color Mode menu to control the color mode of the stranded wire. To access the color mode options, right-click the stranded wire being created and point to Use Color Mode.
- Choose the optimized color mode.
-
Move the stranded wire being created in the direction in which a blockage with net name
Aappears.
The stranded wire with net name B skips the track that has blockage with net name A and accordingly adjusts to the next nearest colored track, which follows the optimized color mode.
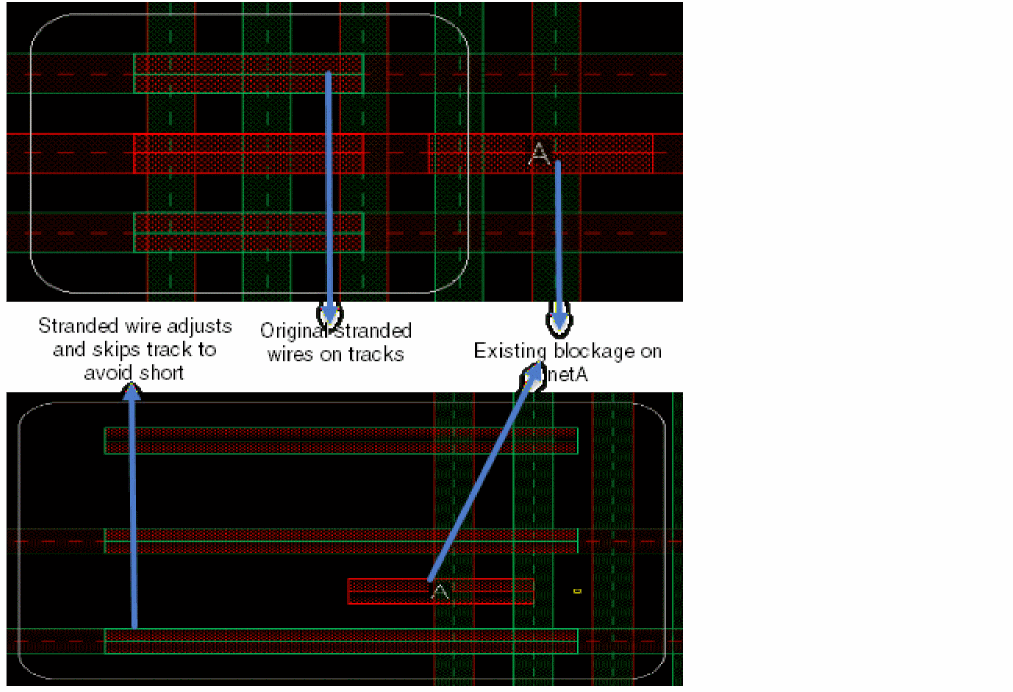
Scenario 2
Blockage exists on Metal2 layer with net name A, and the color mode is changed from optimized to uniform or conversely, from uniform to optimized.
- Perform steps 1 through 7 in Scenario 1.
- Select the uniform color mode.
-
Move the stranded wire being created in the direction in which a blockage with net name
Aappears.
In this case, the stranded wire with net name B skips the track that has blockage with net name A and accordingly adjusts to the next nearest colored track, which follows the uniform color mode.
Let us now see some scenarios when the colored stranded wires along with the vias are slided. The behavior of the stranded wire depends on the color mode that is selected.
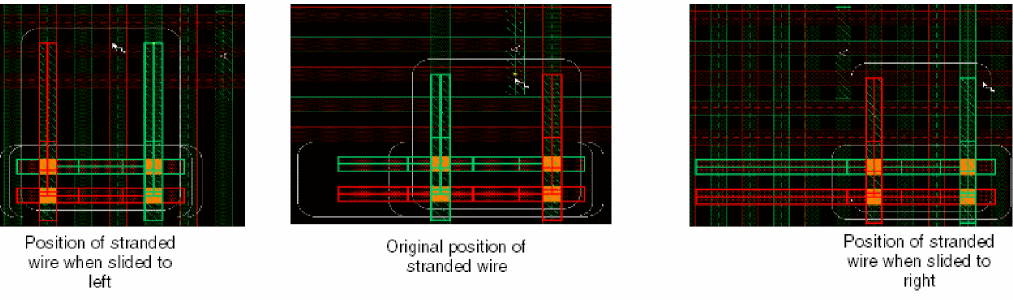
Scenario 3
When the color mode is optimized and the blockage with net name A exists on the Metal3 layer. The stranded wire is created from an empty space on the Metal2 layer and changes the direction by inserting vias.
- Perform steps 1 through 7 in Scenario 1.
-
Choose the Via Up or Via Down option from the Create Stranded Wire context-sensitive menu to insert a via on the stranded wire.
When the via is inserted, the direction of the stranded wire is changed. -
Move the stranded wire in the direction in which
Metal3blockage with net nameAappears. -
To slide the current section of the stranded wire, hold the
Ctrl+Shiftkeys and move the mouse pointer to the right or left of the current position.
In this case, the stranded wire with net name B skips the track that has a blockage with net name A and accordingly adjusts to the next nearest colored track, which follows the optimized color mode.
In the same scenario, you can also increase the spacing between the stranded wires and slide the wires. Use the Ctrl+3 bindkey to increase the spacing between the stranded wires. The stranded wire with net name B skips the track that has a blockage with net name A and accordingly adjusts to the next nearest colored track, which follows the optimized color mode.
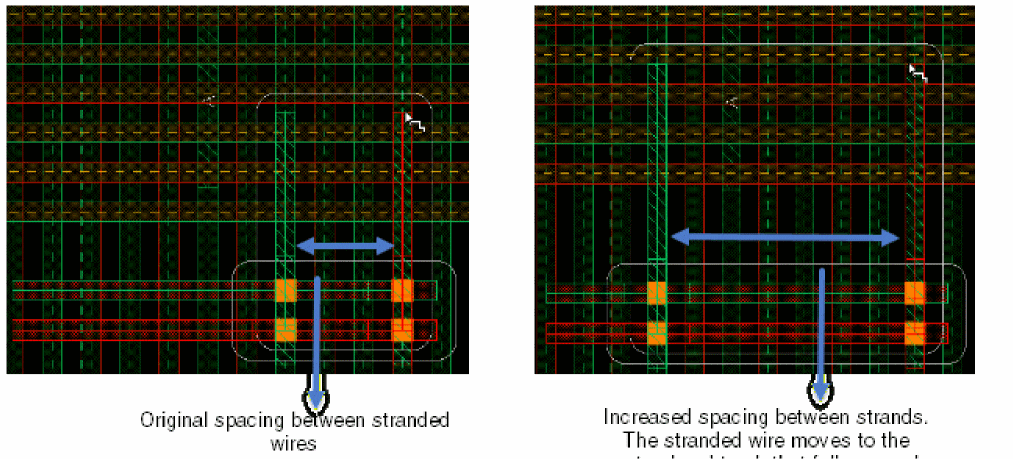
Similarly, use the Ctrl+4 bindkey to decrease the spacing between the stranded wires. The decreased spacing snaps the stranded wires to adjacent WSP track. However, after decreasing the spacing between stranded wires, the stranded wires create shorts with other shapes. To avoid short violations and the blockage, again increase the spacing between the stranded wires. This can be done by resetting the spacing value in the Create Stranded Wire form and then use the slider to enhance results of the stranded wires.
Scenario 4
When the color mode changes from optimized to uniform and the blockage with net name A exists on the Metal3 layer. The stranded wire is created from an empty space on Metal2 layer and changes the direction by inserting vias.
- Perform steps 1 through 6 in Scenario 1.
- Select the uniform color mode.
-
Choose the Via Up or Via Down option from the Create Stranded Wire context-sensitive menu to insert a via on the stranded wire.
When the via is inserted, the direction of the stranded wire is changed. -
Move the stranded wire in the direction in which
Metal3blockage with net nameAappears. -
To slide the current section of the stranded wire, hold the
Ctrl+Shiftkeys and move the mouse pointer to the right or left of the current position.
In this case, the stranded wire with net name B skips the track that has a blockage with net name A and accordingly adjusts to the next nearest colored track, which follows the uniform color mode.
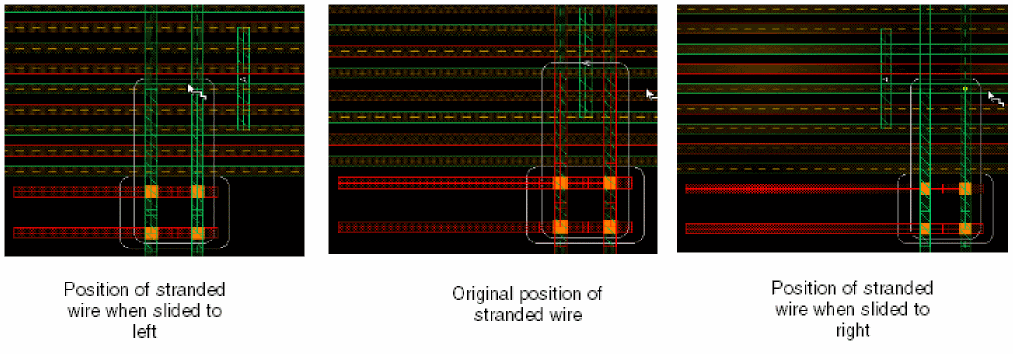
In the same scenario, you can also increase the spacing between the stranded wires and slide the wires. Use the Ctrl+3 bindkey to increase the spacing between the stranded wires. The stranded wire with net name B skips the track that has a blockage with net name A and accordingly adjusts to the next nearest colored track, which follows the uniform color mode.

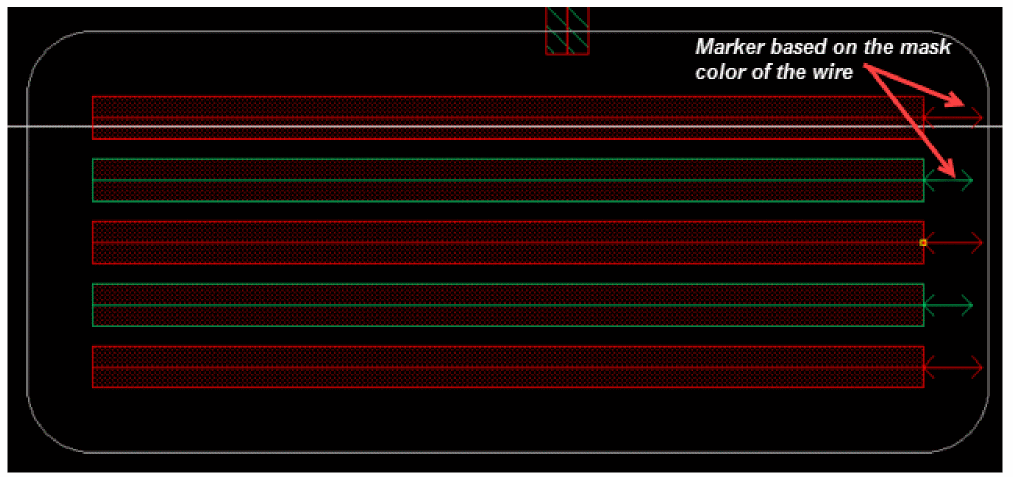
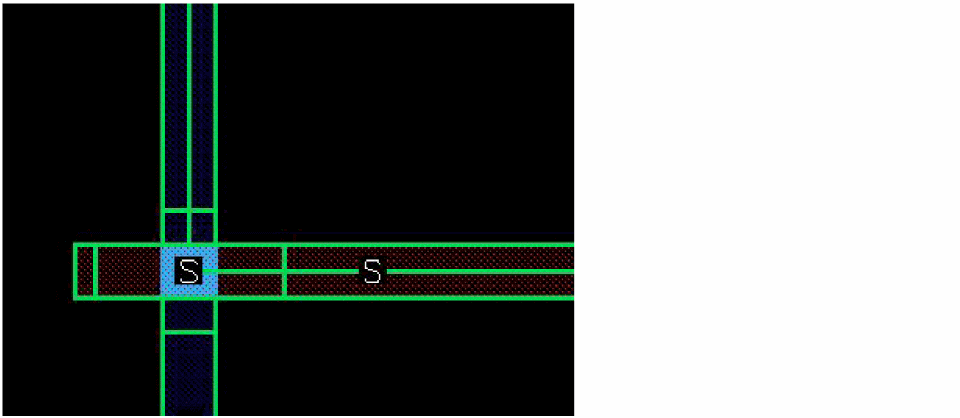
Supporting End-to-End Spacing for Colored Shapes
The minEndOfLineSpacing constraint provides the capability to define the end-of-line spacing for sameMask and diffMask. However, a color-specific sameMask spacing is not defined in the minEndOfLineSpacing constraint. To describe the color-specific sameMask spacing, the minSideSpacing constraint is considered and for this spacing to correspond to minEndOfLineSpacing, use the mask1, mask2, and mask3 parameters with samemask in the minSideSpacing constraint.
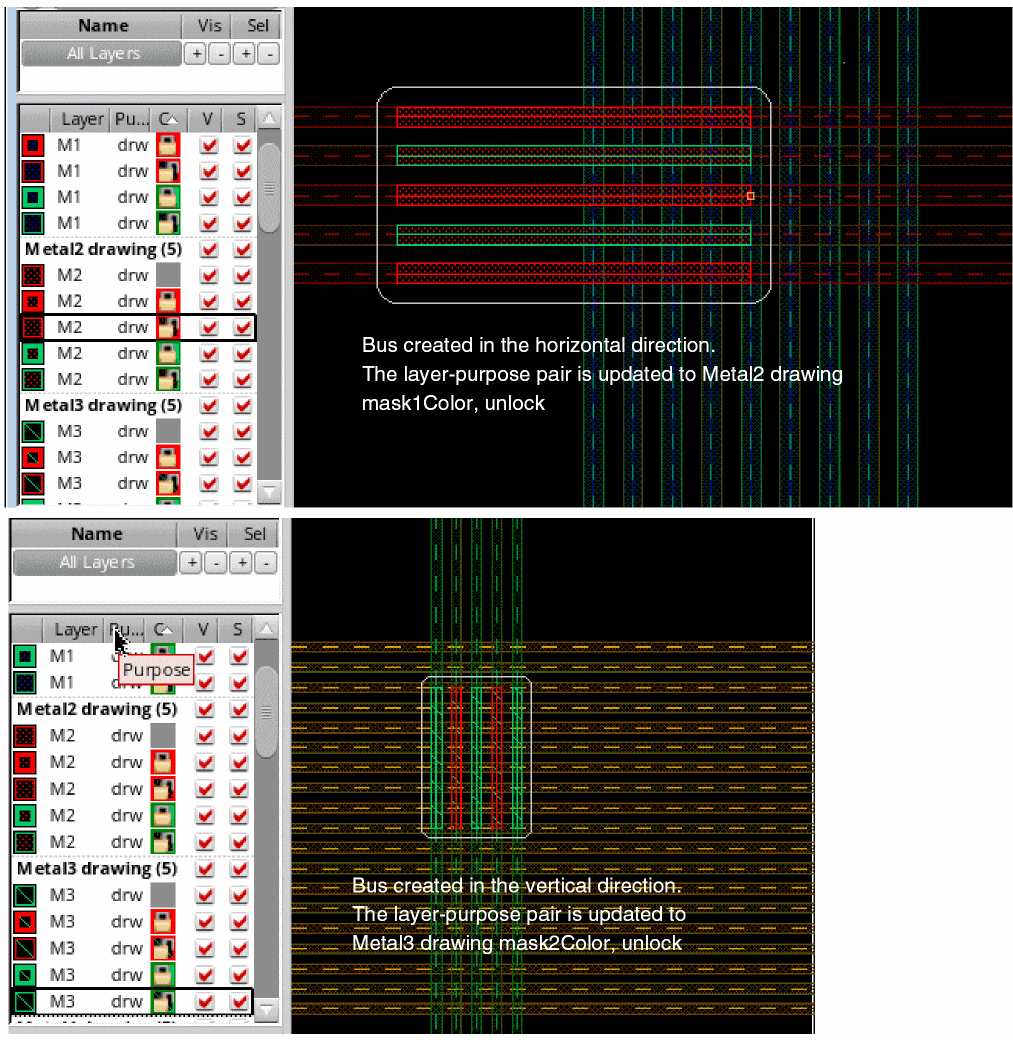
When the Create Wire, Create Stranded Wire, or the Create Bus command is run, a white halo surrounding the active wires displays. This halo determines minSpacing, minEndOfLineSpacing, and some other violations. In order to show the samemask spacing for mask1, mask2, and mask3 separately, additional markers appear according to the mask color of the wire. If the wire is of mask1 color, a mask1 arrow appears at the end of active wire. Similarly, if the wire is of mask2 or mask3 color, a mask2 or a mask3 arrow appear sat the end of the active wire. The existing white halo determines the spacing for different mask colors. The following figure shows an example when a bus is created on the Metal2 layer, which is in the horizontal direction.
Interactive Coloring for the Stretch Command with Colored WSPs
The Stretch command supports interactive coloring and lets you edit a wire and via with color and lock state information that has been earlier created by tapping objects, such as pins, pathSegs and buses, or colored WSPs. As the wire or via is dragged interactively, its color is inherited from the colored track the stretch command snaps the wire or via to. However, the lock state of the wire or via remains unchanged.
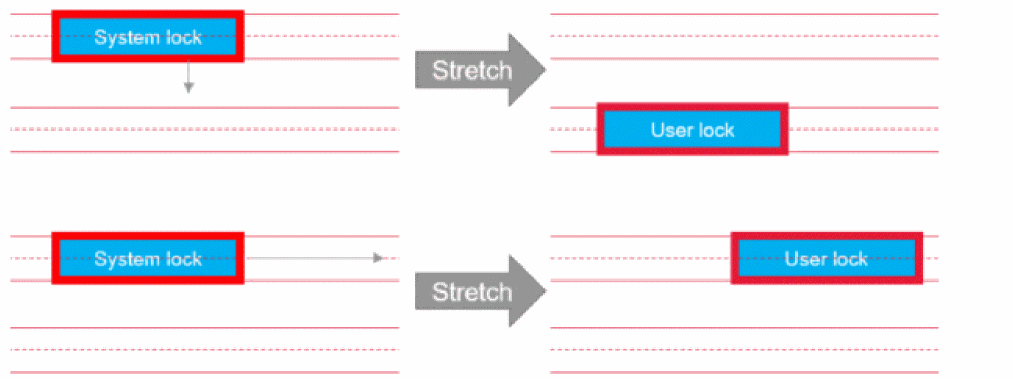
Color Locks While Editing a Wire
While editing an existing wire by either create wire or moving or stretching, the system lock is automatically set to a user lock.
When merging an existing wire, which has system lock, by either create wire or by stretching, merges with a wire having user lock, the resultant merged wire is considered as a new wire and sets the system lock to user lock.

Similarly, editing an existing wire by create wire or stretch, which has system lock, results in a wire having user lock.

Again, stretching or moving a whole pathSeg that has system lock results in a pathSeg with user lock.
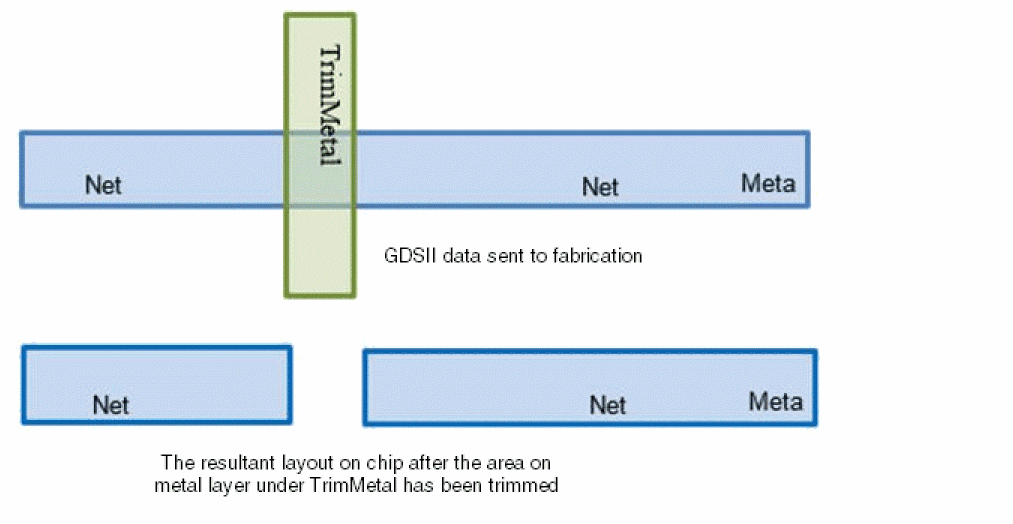
Inserting TrimMetal Layers in Interactive Colored Routing
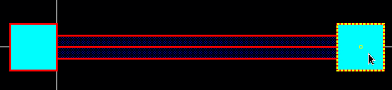
TrimMetal is a physical layer where trim shapes are inserted. In some process technologies, these metal layers are used to trim portions of a metal layer. This enables routing with much smaller end-of-line spacing that would otherwise be impossible. This is denoted in the GDSII data that is sent to the fabrication and checked by DRC, as shown in the following figure.
Interactive colored routing supports automatic insertion of trim metal layers when the trimShape constraint is present in the technology file. In such case, DRD checks the trimShape constraint and transmits the trim shape information to the Wire Editor. In addition, interactive routing commands supports trim insertion only when MPT Support in the Palette assistant is enabled. For more information, see trimShape in Virtuoso® Technology Data Constraint Reference.
The Wire Editor then creates and modifies the wires and inserts the trim shapes, as follows:
- At the end of wires when two wires are precisely aligned.
- On a layer-purpose pair, which depends on the layer and color of the wire for advanced nodes.
-
Only if the distance between the two wires is less than or equal to the
exceptSpacingvalue given in thetrimShapeconstraint defined in the technology file.
In addition, prBoundary also impacts trim creation and insertion. If there is a prBoundary at the top-level, the trim shapes are inserted between pathSegs if the pathSegs are within the PR boundary. No trim shape is inserted between pathSeg out of the prBoundary, Whe n the prBoundary is deleted, the Stretch and Create Wire commands create trim shapes between the pathSegs. However, if there is no prBoundary at the top-level, there is no restriction for trim creation at the top-level.
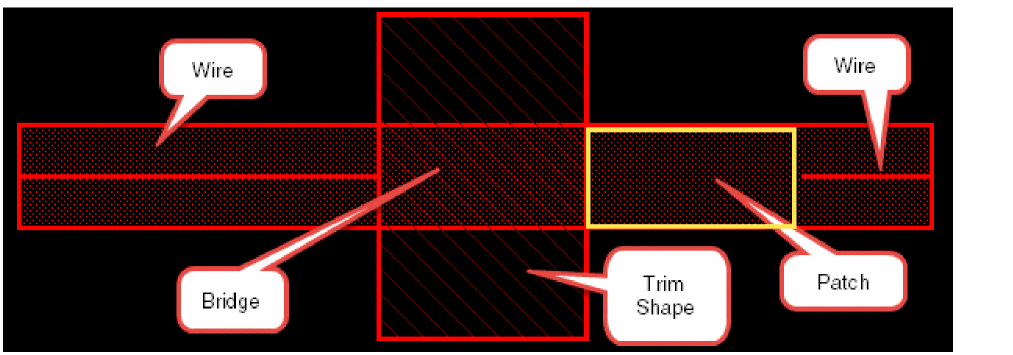
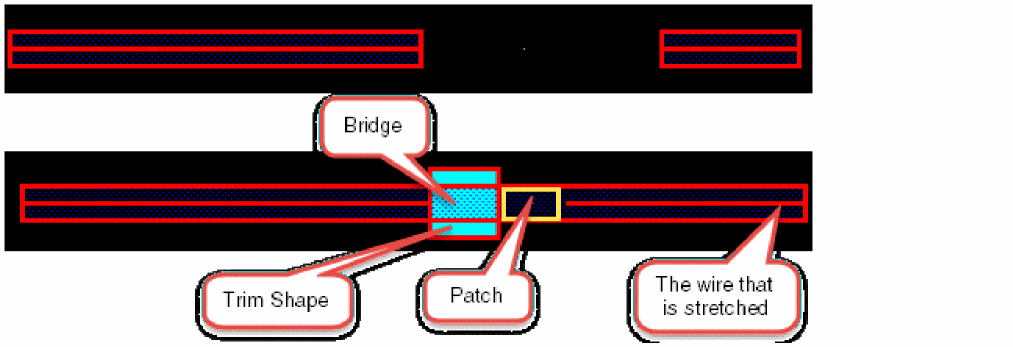
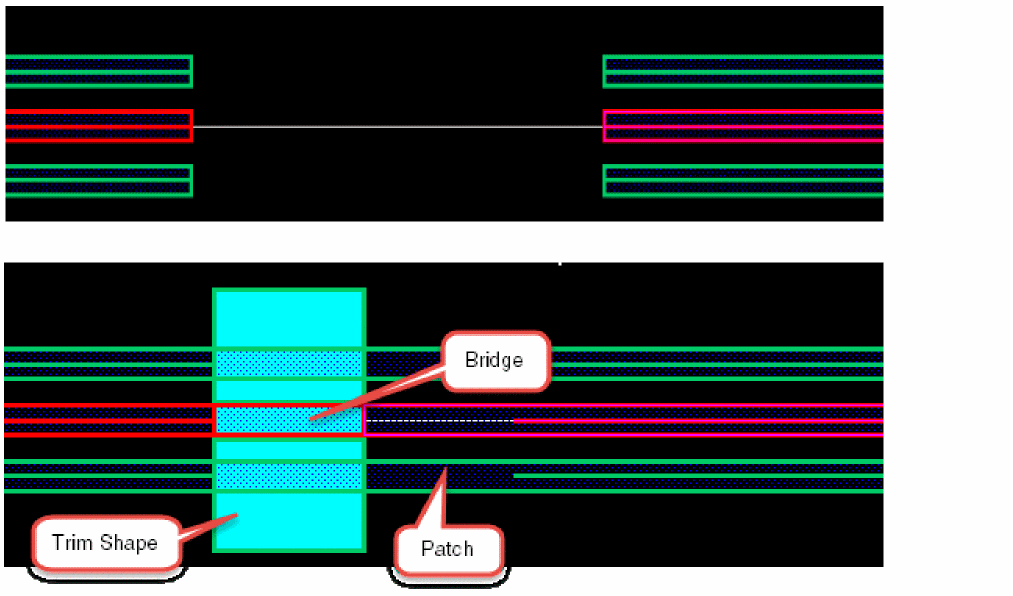
The trim, bridge, and patch shapes are inserted interactively when the wire is created. Under the trim shape, there is a bridge shape on the metal layer. The width of the bridge shape is the same as that of the wire. There is also a patch shape on the metal layer that extends to already existing wires to the trim shape. The patch shape is inserted between the trim shape and the far end of the already existing wire.
The following figure shows an already existing wire and the new wire being created. After the new wire is placed, it results in inserting trim, bridge, and patch shapes. The patch shapes are represented by extensions on wires.
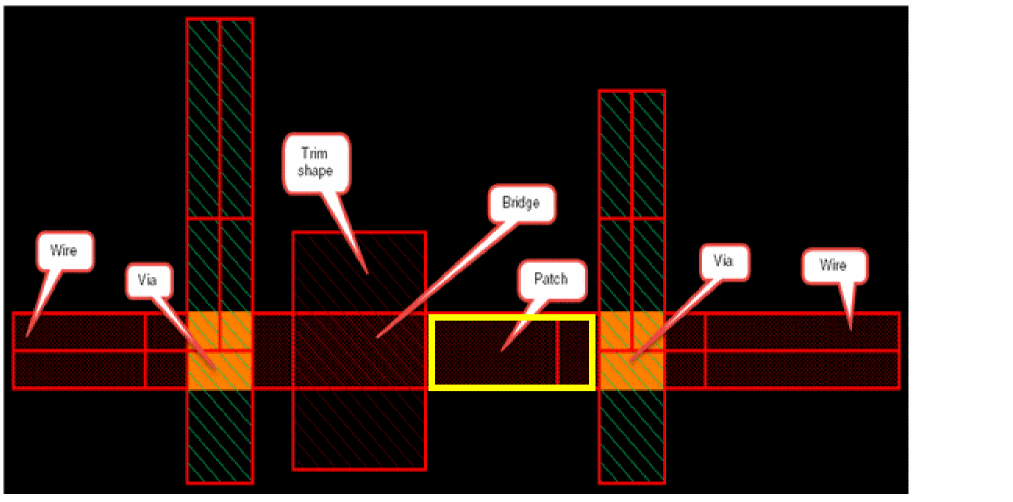
Similarly, the following figure shows an example where a wire with inserted vias already exists and a new wire with inserted vias is being created.The trim, bridge, and patch shapes get inserted after the new wire along with the inserted vias is placed, as shown in the following figure.
Another example, which is a special case, is when the exceptSpacing value is set to 0, then trim and bridge shapes are inserted at all wire ends, as shown in the following figure.
If you create another wire next to the existing wire with trim shapes at the wire end, the middle trim shape is merged and we get three trim shapes for the two wires that are created next to each other.

Supporting Colored TrimMetal Layers
The trim layer can be defined in the technology file. You can assign color to a trim layer and specify that a trim layer with a given color should cut a routing layer with that color. As a result, trim shapes are automatically assigned the correct color when they are added during interactive routing. For more information, see
For example, CM1 layer with mask1 color cuts Metal1 with mask1color. Similarly, CM1 layer with mask2 color cuts Metal1 with mask2 color, as shown in the following figures.
Supporting Colored TrimMetal Layers for the Stretch Command
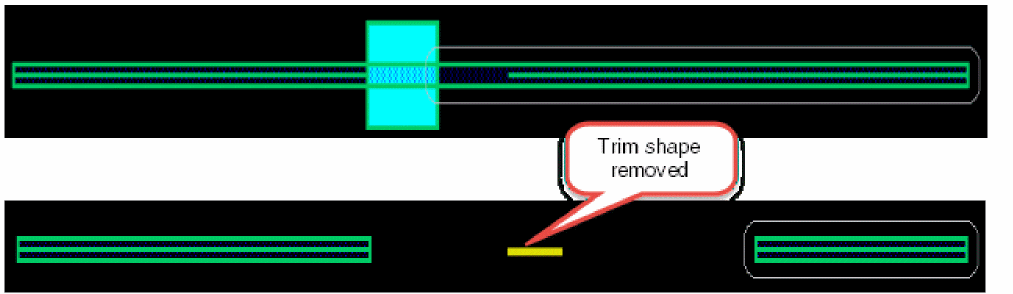
The Stretch command supports automatic insertion of trim metal layers between two existing wires when one of them is being stretched. After the new wire is stretched, it results in insertion of trim, bridge, and patch shapes. The patch shapes are represented by extensions on wires, as shown in the following figure.
For more information, see Inserting TrimMetal Layers in Interactive Colored Routing.
When you retract the stretched wire, the trim shape is removed, as shown in the following figure
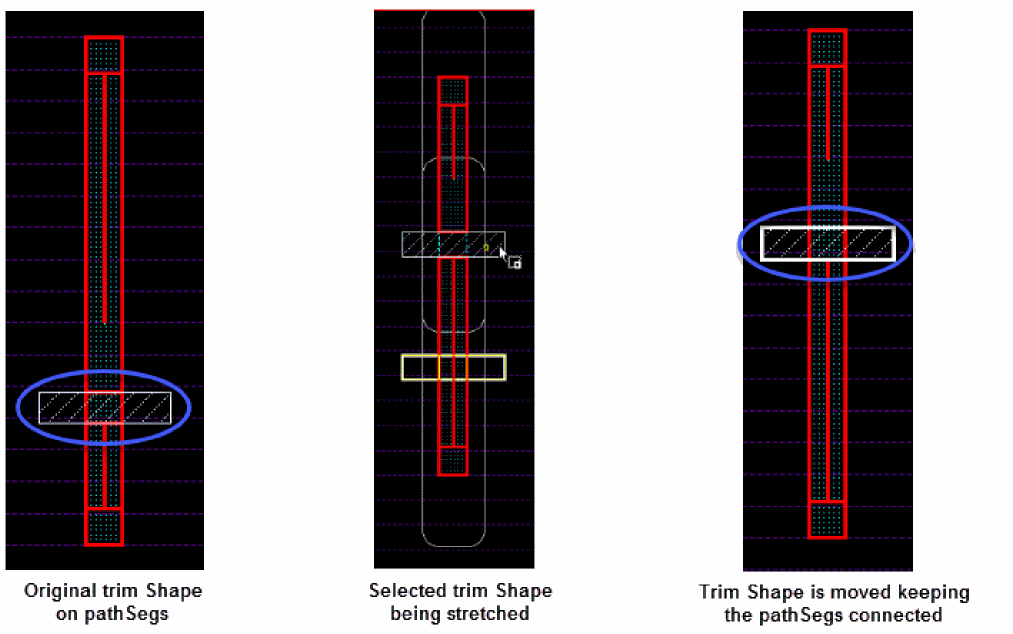
Selecting and Stretching a Trim Shape
When a trim shape is fully selected and there is only one selected trim shape, the trim insertion is deactivated to allow the Stretch command to move the trim shape and keep the abutted pathSegs connected. This is possible only if the weTrimInsertion environment variable is enabled. The following figure displays how the trim shape keeps the pathSeg connected when the trim shape is selected and stretched.
Supporting Colored TrimMetal Layers for Create Bus
The Create Bus command supports automatic insertion of trim metal layers between an already existing bus and the new bus being created. After the new bus is placed, it results in insertion of trim, bridge, and patch shapes. The patch shapes are represented by extensions on buses, as shown in the following figure.
For more information, see Inserting TrimMetal Layers in Interactive Colored Routing.
Supporting Patch Metal Shapes
In Virtuoso, interactive routing represents the patch as an extension to the pathSeg that abuts the trim shape. The created and modified pathSegs, which are abutted to the inserted trims are flagged. This allows Innovus to quickly translate the oaDataBase to its internal database. However, If the abutted pathseg to a trim is not correctly flagged, Innovus does not generate the trim in its internal database and the trim does not appear in Innovus window.
For a given pathSeg, a patch is represented by two end styles (begin and end), both, none, or by any one of the ends. The patch type can be any of the following: notPatch, beginStyle, endStyle, bothStyle, beginFull, endFull, bothFull.
The following scenarios illustrate the different patch types that can be inserted on a pathSeg.
-
The patch type is
beginStyle.
In this case, the trim shape exists at the begining with a variable extension of pathSeg.

-
The patch type is
endStyle.
In this case, the trim shape exists at the end with a variable extension of pathSeg.
-
The patch type is
beginFull.
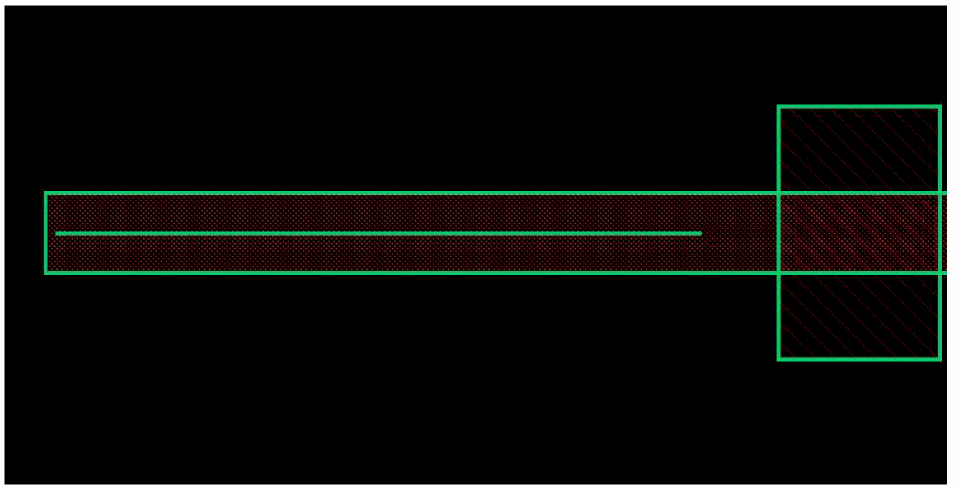
In this case, the trim shape exists at the begining of the pathSeg with no variable extension (truncate style). The space between a trim shape on one end and the pathSeg in Figure A is filled with a patch shape (pathSeg2), as shown in Figure B below.
-
The patch type is
endFull.
In this case, the trim shape exists at the end of the pathSeg with no variable extension (truncate style). The space between a trim shape on one end and the pathSeg in Figure A is filled with a patch shape (pathSeg2), as shown in Figure B below.
-
The patch type is
bothStyle.
In this case, the trim shape exists both at the begin and at the end of the pathSeg. The space between the trim shape at the begin and end of the pathSeg in Figure A is filled with patch shapes (pathSeg2 and pathSeg3), as shown in Figure B. The patch shapes are added with variable extension.
-
The patch type is
bothFull.
In this case, the trim shape exists both at the begin and at the end of the pathSeg. The space between the trim shape at the begin and end of the pathSeg in Figure A is filled with patch shapes (pathSeg2 and pathSeg3), as shown in Figure B. The patch shapes are added with truncate style at both ends.
-
When the patch type is
notPatch
In this case, the pathSeg line ends and does not have trim shapes. The following figure shows the noPatch patch type.
Return to top