16
Performing Reliability Analysis
Reliability analysis can be performed using two modes: Spectre native and RelXpert. The reliability analysis analyzes the effect of time on circuit performance drift and predicts the reliability of designs in terms of performance. In ADE Assembler, you can run the reliability simulation for fresh test (when time is zero), stress test (to generate degradation data), and aged test (at specific intervals, such as 1 yr, 3 yrs, or 10 yrs). In the stress test, extreme environmental conditions are used to stress devices before aging analysis.
This chapter describes how to set up and run reliability simulation in ADE Assembler.
See the following topics for more information:
- Simulator Modes for Reliability Analysis
- Specifying the Reliability Analysis Setup
- Reliability Options Form
- Creating Outputs for Reliability Analysis
- Running the Reliability Simulation
- Working with Reliability Data
- Viewing Reliability Report
- Annotating Simulation Results to Schematic View
Important Points to Note
- Currently, reliability analysis is run with Sweeps and Corners and Monte Carlo run modes.
- Reliability analysis with Monte Carlo is supported for Spectre and AMS simulators.
Simulator Modes for Reliability Analysis
You can run reliability analysis in two simulator modes:
-
Spectre native: The Spectre native mode runs simulations using the Spectre simulator. The is the default simulator mode and gives higher performance for large circuits. Starting from MMSIM10.1.1 ISR6, Spectre native reliability analysis supports the BSIM3V3, BSIM4, BSIMSOI and PSP102 models.
-
RelXpert: The RelXpert mode runs simulations using the RelXpert simulator. This mode accepts agemos parameters for BSIM3v3 and BSIM4 and supports the agemos method for aged
.modelcard generation. To enable the RelXpert simulator mode, set the following environment variable in CIW:envSetVal("spectre.relxOpts" "nativeMode" 'string "RelXpert")
See also: Specifying Simulator Mode for Reliability Analysis
Specifying the Reliability Analysis Setup
Before you specify the reliability analysis setup, ensure that you do the following:
-
In the Data View assistant pane, select the tests on which you want to run the reliability simulation (fresh, stress, and aged). This is required because only the tests you select in the Data View assistant pane are visible in the setup form.
-
Ensure that one or more of the following analyses are enabled for the tests in your setup:
tran,ac,sp,dc,envlphb,hbac,hbsp,hbnoise,pss,pnoise,stb,noise,pac, andpxf - On the Run toolbar, in the Select a Run Mode drop-down list, select either Single Run, Sweeps and Corners or Monte Carlo Sampling. Reliability analysis is supported only for these run modes.
Follow these steps to set up reliability analysis:
-
In the Data View assistant pane, expand the Reliability Analyses node and click where it says Click to add reliability analysis setup.
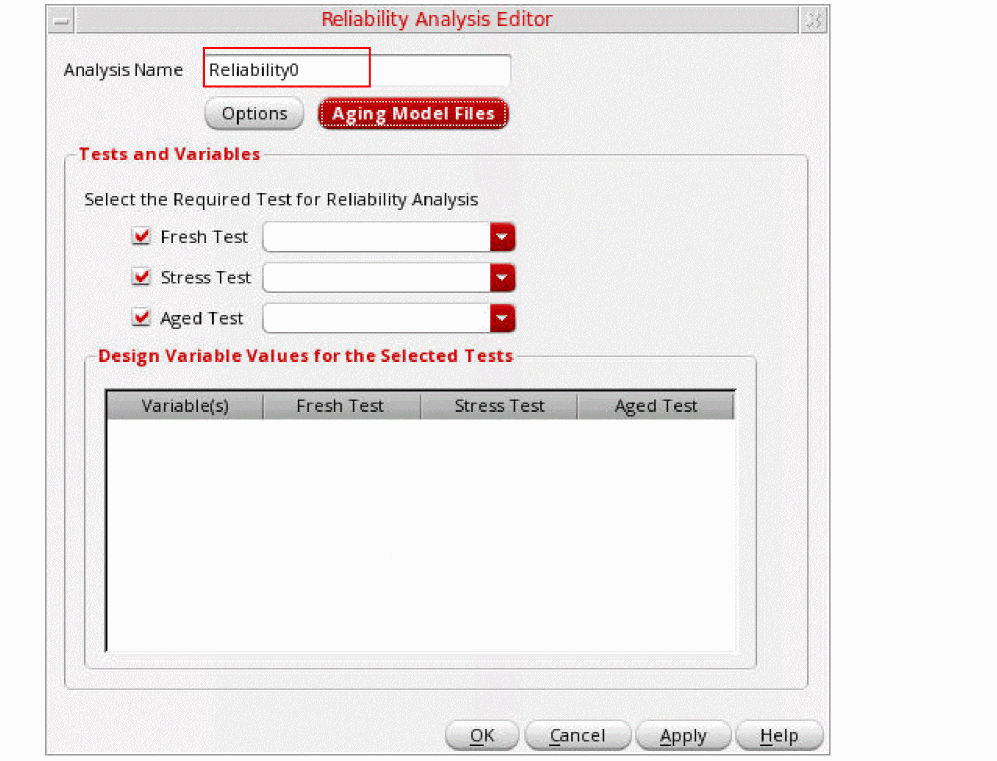
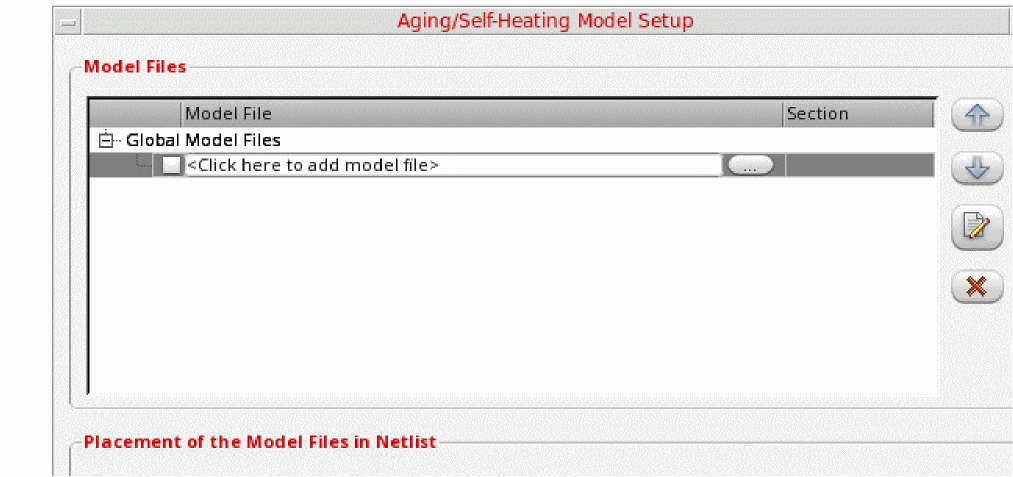
The Reliability Analysis Editor form appears.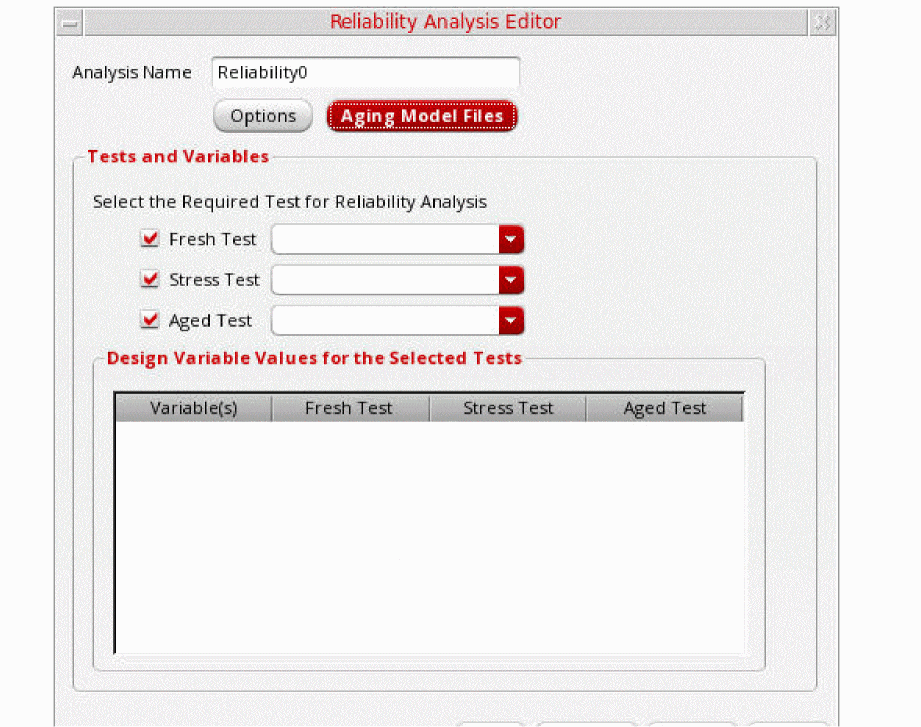 The Aging Model Files command is displayed in the Reliability Analysis Editor form only if the defaultAgingModelFiles environment variable is set to true. You can click Aging Model Files to open the Aging/Self-Heating Model Setup form. In this form, you can specify the model files to be used for the stress and aged tests. Paths to the model files are added to the netlist used for simulation.
 -
The Analysis Name field is a read-only field. The default analysis name is
Reliability0.You can edit the name of a reliability setup only after saving it. To rename a reliability setup, double-click its name in the Data View assistant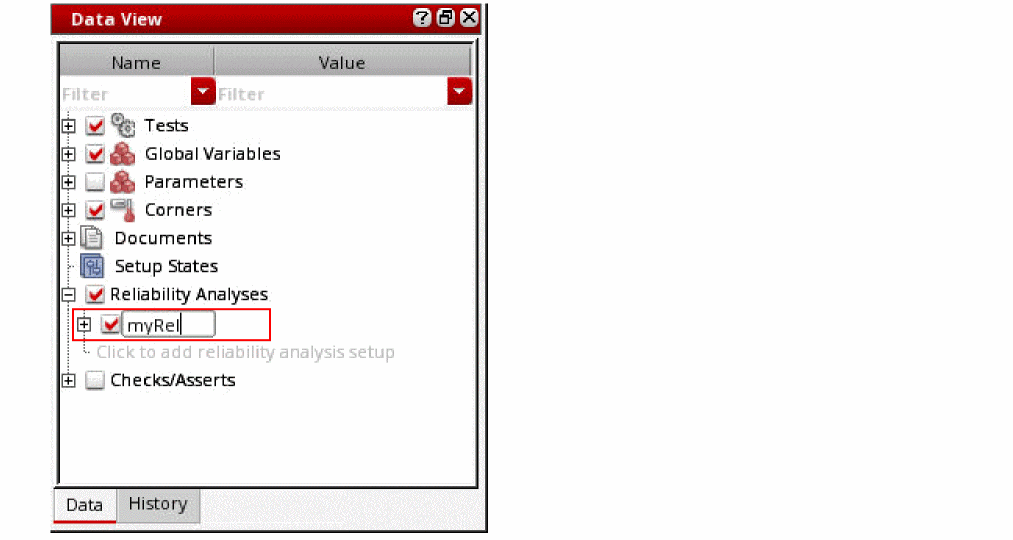
-
In the Tests and Variables section, specify the following:
- From the Fresh Test drop-down list, select the name of the test you want to use for running fresh simulation.
-
From the Stress Test drop-down list, select the name of the test you want to use for running stress simulation.The stress simulation generates a stress file. You can reuse the stress file if you do not want to run the stress test again. See the Reusing the Stress File section for more information.
- From the Aged Test drop-down list, select the name of the test you want to use for running an aging simulation.
Note the following important points with respect to the selection of tests for the fresh, stress, and aged test:- It is possible to specify different test names for fresh, stress, and aged tests.
- Simulation for an aged test uses the simulation data generated by the stress test. Therefore, a stress simulation must be run before an aging simulation is run.
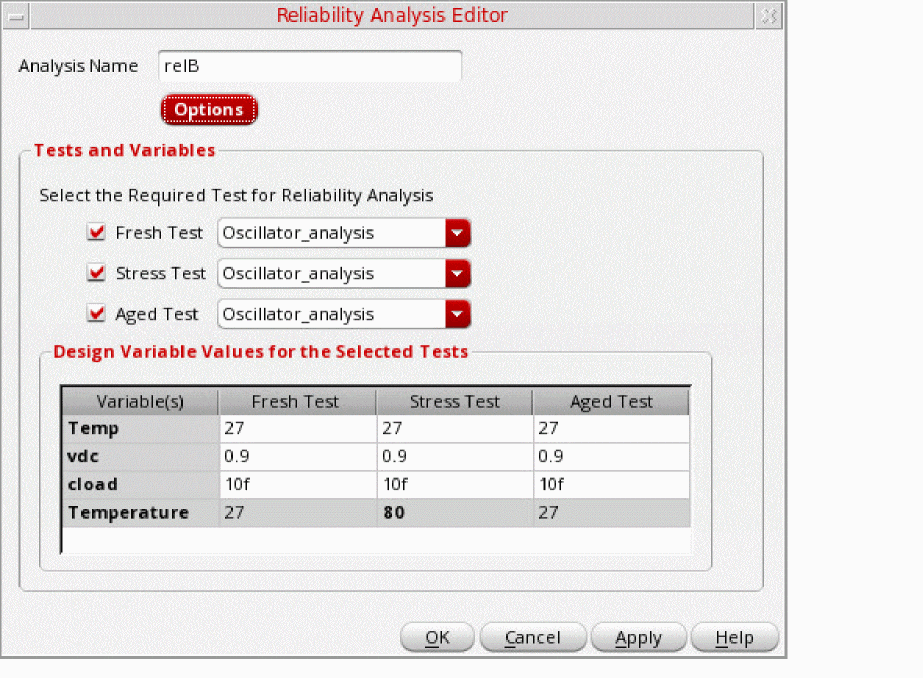
The table displayed at the bottom of the form shows the values of global and local variables to be used for fresh, stress, and aged tests. -
If required, you can modify the values of variables in this table. A variable can be set to a static value, as shown in the figure below, or to the name of a sweep variable whose values are substituted at the run time.
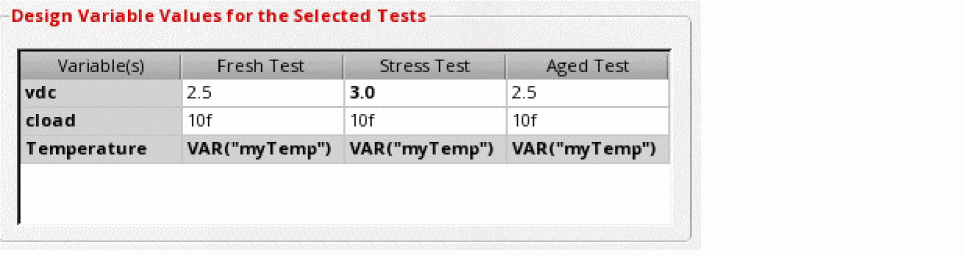
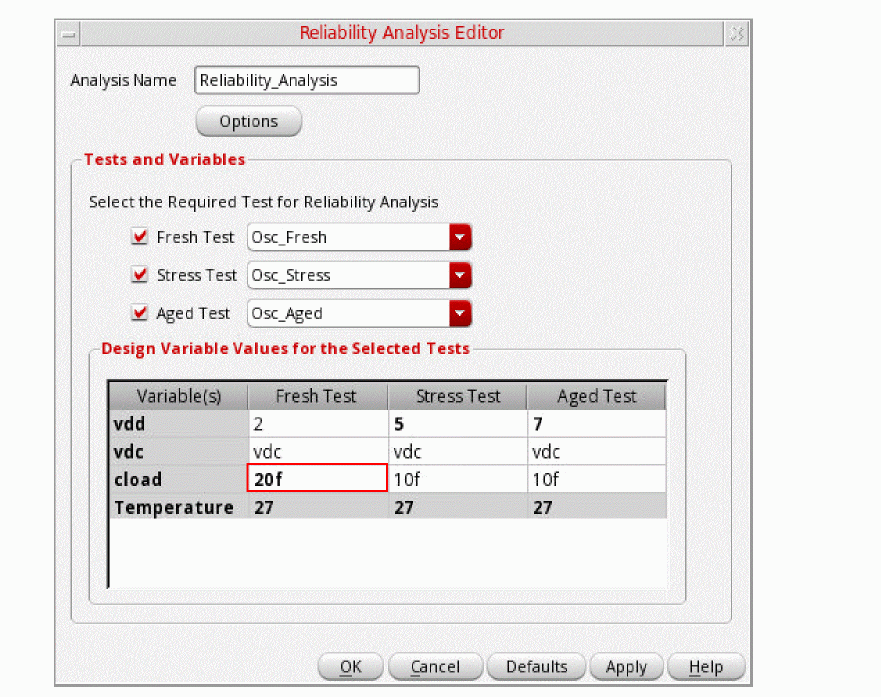 The values of the design variables that are displayed in bold indicates that they have been used in the corner setup or in the testbench. Note that the values set in the reliability setup are used in simulation.You can also use the
VAR()expression to specify design variables. In the following example, value of the variablemyTempis assigned to the design variableTemperature.
- Click Defaults to reset design variables to their original values.
-
Click Options.
The Reliability Options form appears.
-
In the Reliability form, specify options for the simulation.
These options for reliability analysis are saved in maestro.sdb setup database.
For details of the Reliability form, refer to Reliability Options Form. - After specifying the reliability options, close the Reliability form.
-
Click OK to close the form.
The reliability setup appears under the Reliability Analysis tree on the Data View assistant pane.
If required, you can add notes to the reliability analysis setup you have created. For this, right-click the reliability analysis setup name on the Data View assistant pane and click Notes to open the Add/Edit Notes form. Add notes in the Notes field and click OK. These notes are displayed in the tooltip for the setup and saved in the setup database.
For related information, see Adding Notes to a Test.
Variables and Temperature in the Reliability Setup
When you select fresh, stress, and aged tests in the Reliability Analysis Editor, the Design Variable Values for the Selected Tests section displays the default values of design variables and the simulation temperature for the selected tests.
These values are the same as defined for these tests in the Data View assistant and in the Setting Temperature form.
If you edit the values of the design variables and temperature in the Reliability Analysis Editor, these edited values are displayed in bold. When you hover over an edited value, a tooltip is displayed, indicating that the edited value is overriding the value defined in the test.
The following table shows how the values of cload and temperature are used in the fresh, stress, and aged simulations.
| Corner | Stress Simulation | Fresh and Aged Simulation |
Note that the values defined and edited on Reliability Analysis Editor take priority over the values defined in the active setup.
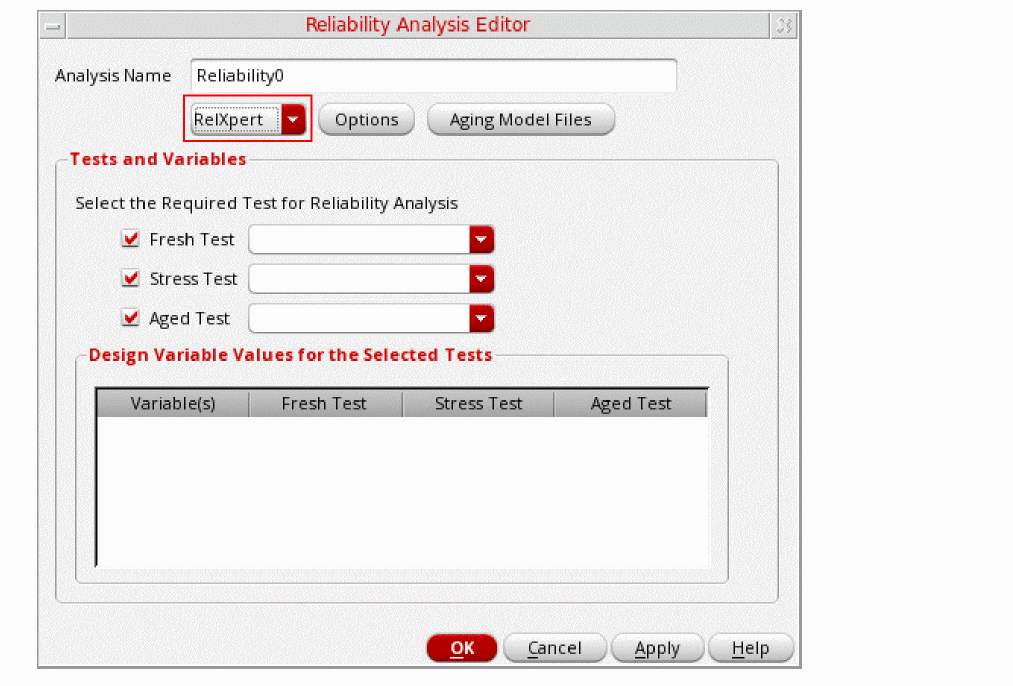
Specifying Simulator Mode for Reliability Analysis
envSetVal("maestro.gui" "showNativeRelxpertSwitch" 'boolean t)
The default simulator mode to perform reliability analysis is Spectre native. However, you can choose RelXpert mode by selecting RelXpert from the drop-down list shown in the following figure.
Specifying Aging Model Files
envSetVal("maestro.gui" "displayAgingModelFiles" 'boolean t)
Perform the following steps to specify the model files to be used for aging or self-heating analysis for the stress or aged tests:
-
In the Reliability Analysis Editor form, click Aging Model Files, as shown in the following figure.The the Aging/Self-Heating Model Setup form appears.
-
In the Model File column, type the path and file name of the model file you want to use.
Alternatively, you can click the ellipsis button (...) to open the Choose Model File form. Select a valid model file and click Open. -
In the Section column, select a section from the drop-down list.
A model file can have zero or more sections. If a model file contains no sections, there is no drop-down list available. The section you select determines which model definition the simulator uses. -
In the Placement of the Model Files in Netlist section, select one of the following options to define whether you want to print the aging-specific model file before or after the standard model files in the netlist:
- Before Standard Model: Prints the aging model file before the standard model file in the netlist
-
After Standard Model: Prints the aging model file after the standard model file in the netlistYou can also specify these options by setting the defaultAgingPlacementType environment variable.
Reusing the Stress File
To reuse a stress file from one reliability setup to another:
-
From the Reliability Analyses node, right-click a setup in which you want to reuse the stress file, and select Open Setup.
The Reliability Analysis Editor form opens the selected reliability setup.
-
In the Reliability Analysis Editor form, clear the Stress Test check box.
Note that the Stress Test column does not display any variables because no stress test is currently selected.
-
To specify the stress file that you want to reuse, do one of the following:
- Select Open file and click Stress File to select the stress file.
-
Select Configure and then click Stress File.The Configure Stress File form appears.
 Specify the following fields to configure the stress file that you want to reuse:
- In the History Name field, select a history name.
-
In the Reliability Setup Name field, select the name of the reliability setup from which you want to reuse the stress file.
You must have at least two reliability setups in the active setup to reuse the stress file. If you have only one reliability setup, an empty string is displayed in the Reliability Setup Name field. - In the Run Name field, select a run name used in the run plan from which you want to reuse the stress file.
- In the Corner Name field, select a corner name.
-
In the Match Parameters field, enter a list of lists containing the name-value pairs of the sweep variables to identify the design point from which you want to reuse the stress file.
For example,list(list("cload" "2f") list("vdc" "1.8")).
See the maeGetStressFile function for more information. - Click OK to close the Configure Stress File form.
- Click Apply to save the changes.
- Click OK to close the Reliability Analysis Editor form.
Reliability Options Form
In the Reliability Options form, you can specify the options for reliability analysis. The Reliability Options form contains the following four tabs:
For detailed information about the fields on all four tabs of the Reliability Options form, see
Basic
Using the Basic tab, you can specify analysis type, aging options, start and stop time of reliability analysis, device masking options, and various other options.
The options on the Basic tab are grouped in the following sections:
- Analysis
- Aging Options
- Stress Test
- Device Masking
- Degradation Ratio
- Lifetime Calculation
- Other Options
Analysis
This section is not available in the RelXpert simulator mode if AgeMOS model is selected as the Aging Model Type on the Modeling tab.
Select the following options to specify the type of analysis to be used for obtaining the reliability values of the devices.The following table describes the options available in the Analysis section of the Basic tab.
| Field | Description |
|
Select this check box to use the aging flow to obtain the reliability values. |
|
|
Select this check box to use the self-heating flow to obtain the reliability values. Environment variable: enableSelfheating |
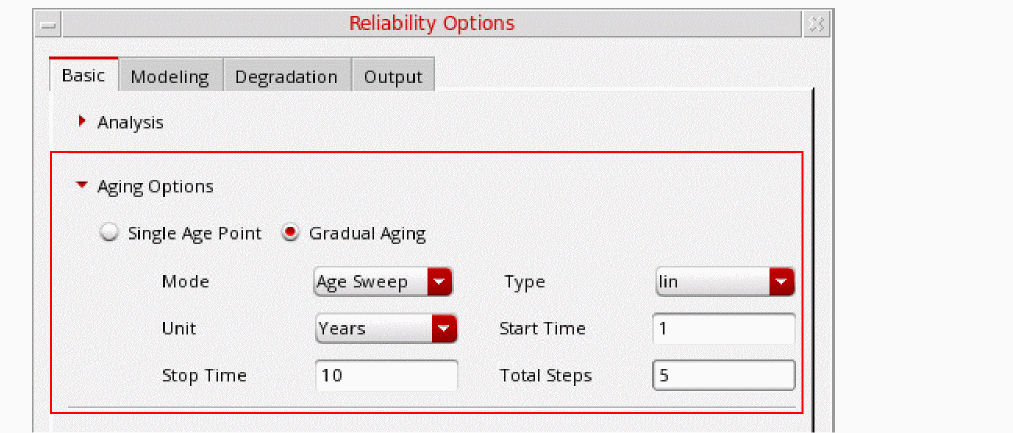
Aging Options
This section is available only if the Aging analysis is selected in the Analysis section of the Basic tab.
| Field | Description |
|---|---|
|
Select this option to specify a single age point. Environment variable: agingPointsType |
|
|
Select this option to enable gradual aging flow. The gradual aging flow is not supported for self-heating analysis if Spectre native mode is selected. Environment variable: agingPointsType |
|
|
Specify the time (age points) at which the device degradation is calculated.
If the aging option is set to Gradual Aging and mode is set to Age Points, you can specify more than one age points in a list of space-separated values. For example, Environment variables: mosAgingTime and gaAgePoints |
|
|
Select the unit for the age points.
Possible values are: Environment variables: mosAgingTimeUnit and gaAgePointsUnit |
|
|
Select one of the following Gradual Aging modes:
Environment variable: gaMode |
|
|
Select this check box to set different values of a design variable for different age points. After selecting this check box, double-click in the Variables cell to select a design variable, and then set the values in the <Age Points> columns. If you do not select this check box, the same value of the design variable is used for all the age points.
This check box is available only when Spectre 18.1 ISR6 or a later version is installed and the |
|
Environment variable: gaSaveResults |
|
|
Select this check box to pass the URI instance state to the next gradual aging step. |
|
|
Enables profile gradual aging. In profile gradual aging, the age is calculated independently of the age points because all age points are run with reference to |
|
|
Select one of the following options to specify the age step method for the
Environment variable: gaAgeStepType |
|
|
Select the unit to measure the start and stop time for each step:
Possible values are: Environment variable: gaAgeStepUnit |
|
|
Specify the start time of the age step in gradual aging flow. Environment variable: gaAgeStepStart |
|
|
Specify the stop time of the age step in gradual aging flow. Environment variable: gaAgeStepStop |
|
|
Specify the total number of steps to perform the reliability analysis. Environment variable: gaAgeStepTotalStep |
|
|
Select this check box to pass the data structure of a URI instance state from a previous aging step to the next gradual aging step. This option is available when you set up reliability options in the RelXpert mode. |
Stress Test
The following table describes the options available in the Stress Test section of the Basic tab.
| Field | Description |
|
Select this check box if you want to define the start and stop time for reliability analysis during transient simulation. Environment variable: enableRelXTran |
|
|
Lets you specify a single time window for the stress test. You can then specify the time window in the Start Time and Stop Time fields |
|
Start Time |
Specify the start time of reliability analysis during transient simulation. Environment variable: relxTranStart |
Stop Time |
Specify the stop time of reliability analysis during transient simulation. Environment variable: relxTranStop |
|
Lets you specify multiple time windows for the stress test. You must then specify space-separated value pairs for start and stop times in the Multiple Windows text field.
For example, if you want to specify three time windows in which the start and stop times of the first time window are |
Device Masking
The following table describes the options available in the Device Masking section of the Basic tab.
| Field | Description |
|---|---|
|
Select this check box if you want to include or exclude:
Environment variable: mosMaskDev |
|
|
Select one of the following options:
Environment variable: mosMaskDevInclude |
|
|
Specify the name of the models for which the related devices are included or excluded when performing reliability analysis. |
|
|
Select a subcircuit from the schematic and then click Add to add the selected subcircuit to Subcircuit List. You can click Refresh to get the latest subcircuit list from the schematic. The time taken to refresh the subcircuit list depends upon the size of the schematic. |
|
|
Specify the subcircuits for which the related models are included or excluded when performing the reliability analysis. |
|
|
Select to specify the instances that you want to include or exclude when performing the reliability analysis. Environment variable: mosMaskDevInstance |
See the Masking Devices section for more information.
Degradation Ratio
The following table describes the options available in the Degradation Ratio section of the Basic tab.
Lifetime Calculation
The following table describes the options available in the Lifetime Calculation section of the Basic tab.
| Field | Description |
|---|---|
|
Select this check box if you want to calculate the lifetime of the devices. Environment variable: mosCalcLifetime |
|
|
Specify the name-value pairs of the device names and threshold degradation values of the electrical properties ( You can separate the name-value pairs of different devices by using either a comma or a semicolon.
If you set the
Environment variable: mosDeltad |
Other Options
The following table describes the options available in the Other Options section of the Basic tab.
| Field | Description |
|---|---|
|
Specifies the name of the file to which mapping information between the sub-block and the larger block of a design is saved. Using this mapping information, stress file generated from the stress simulation on the larger block or the full chip can be served as an input for the aging simulation of the sub-block. The information of the mapping file is also printed in the aged netlist when you run reliability simulation:
rel reliability {
enable_ade_process value=yes age time=[10.0000y] deltad value=0.1 accuracy level=1 simmode type=aging file="../OSC_TEST/input.bs0" mapping="mapping_file" tran tran stop=10u errpreset=conservative write="spectre.ic" \ writefinal="spectre.fc" annotate=status maxiters=5 finalTimeOP_aged info what=oppoint where=rawfile } |
|
|
Specify the additional arguments to be considered during reliability simulation. Use either a semicolon or a comma to specify more than one arguments.
For example, Environment variable: otherRXOptions |
|
|
Specify the command-line options that you want to send to the simulator. |
Modeling
Using the Modeling tab, you can specify the path to the Unified Reliability Interface (URI) libraries and methods to perform aging simulations.
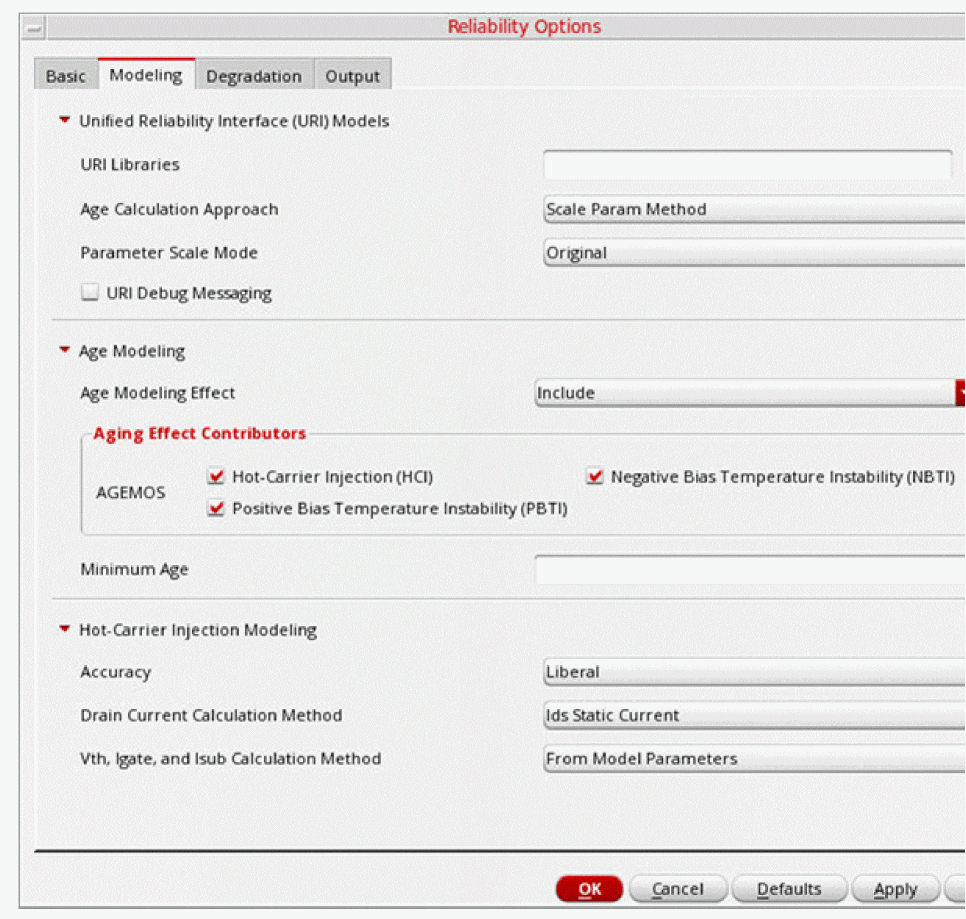
The options on the Modeling tab are grouped in the following sections:
- Aging Model Type
- Unified Reliability Interface (URI) Models
- Age Modeling
- Hot-Carrier Injection Modeling
Aging Model Type
Unified Reliability Interface (URI) Models
The following table describes the options available in the Unified Reliability Interface (URI) Models section of the Modeling tab.
| Field | Description |
|---|---|
|
Specify the full path to load the URI libraries or click the Browse (...) button to select the libraries.
Environment variable: uriLibs |
|
|
This option is available in the RelXpert mode only if the Append Age Method is selected as the Age Calculation Approach.
Select one of the following options to specify the type of circuit elements to which aging results are to be appended:
|
|
|
Specifies the source on which the aging model is dependent. Possible values are All, Voltage, and None. The following code shows an example of the statement printed in the netlist when you set this option to voltage.
|
|
|
Select this check box to print the debug information. Environment variable: uriDebugMode |
Age Modeling
The following table describes the options available in the Age Modeling section of the Modeling tab.
| Field | Description |
|---|---|
|
Select one of the following options:
|
|
See the Different Configurations of AGEMOS and URI Contributors section for more information. |
|
|
Specify the smallest Age value for which degraded SPICE model parameters are calculated. Use either decimal notation ( Environment variable: mosMinAge |
|
|
These options are available only for the RelXpert simulator mode if AgeMOS (Spectre Internal) is selected as the Aging Model Type.
Options in this group enables you to specify one of the following methods for calculating degraded SPICE model parameters for aged circuit simulation:
|
|
Environment variables: mosAgeDomain and mosAgeMethod |
|
|
Select this check box to append age value in the definition statements of all degraded devices in the netlist file. This option is available only for the RelXpert simulator mode if AgeMOS (Spectre Internal) is selected as the Aging Model Type. |
|
|
Select this check box to enable the user to review and edit the netlist before the aging simulation is run. This option is available only for the RelXpert simulator mode if AgeMOS (Spectre Internal) is selected as the Aging Model Type. |
|
|
Select this check box to specify the maximum number of aged models to be generated. This check box is available only for the RelXpert simulator mode. |
|
|
Specify the maximum number of models (excluding the fresh model) to be generated based on the selected grouping method. If the device degraded more than the last aged model, additional models will be generated using extrapolation from the last two aged model. This options appears dimmed and becomes available when the Enable Maximum Number of Aged Models check box is selected. This option is available only for the RelXpert simulator mode if AgeMOS (Spectre Internal) is selected as the Aging Model Type. |
|
|
These options are available only for the RelXpert simulator mode if AgeMOS (Spectre Internal) is selected as the Aging Model Type.
Select one of the following methods to group devices with similar degradations. If the number of degraded devices is large, grouping devices with similar degradation reduces the size of degraded netlist file. |
|
|
Select one of the following options to specify whether to list the unaged devices in the output: |
|
|
Specify the filename whose contents you want to include in the input netlist file. You can also click the ellipsis (...) button to select the file. |
|
|
These options are available only for the RelXpert simulator mode if AgeMOS (Spectre Internal) is selected as the Aging Model Type.
In RelXpert, a subcircuit is expanded if a model name is changed to an aged model name. If the subcircuit definition is large, it causes the netlist size to become huge after expansion and it becomes extremely difficult to open the netlist.
You can use the
You can also use the Select one of the following options to specify which Spectre feature you want to use to reduce the size of aged netlist file:
|
Different Configurations of AGEMOS and URI Contributors
The following table describes some examples of how you can include or exclude the aging effect contributors of the AGEMOS and URI models when calculating the device degradation results.
| Age Modeling Effect | Aging Effect Contributors | Description | ||
|---|---|---|---|---|
| AGEMOS | URI Models | |||
|
Includes all the contributors of the AGEMOS and URI models when calculating the device degradation results. |
||||
Hot-Carrier Injection Modeling
The following table describes the options available in the Hot-Carrier Injection Modeling section of the Modeling tab.
| Field | Description |
|---|---|
|
Select one of the following options to specify the method used in the reliability analysis when performing integration and substrate current calculation.
Environment variable: mosHciAccuracy |
|
|
Select one of the following options to specify how the simulator obtains the drain current to perform reliability analysis.
Environment variable: mosHciIdMethod |
|
|
Select one of the following options to specify the method used for obtaining the gate terminal current or substrate terminal current:
Environment variable: mosHciOpMethod |
|
|
Select one of the following options to specify the method used for obtaining lifetime parameters for MOSFET Hot-Carrier simulation:
|
|
|
This field is available only when you select the From Table File option from the Lifetime Parameter Calculation Method drop-down list.
Specify the filename relative to the directory from which the reliability simulator is invoked. |
Degradation
Using the Degradation tab, you can specify the device degradation and subcircuit degradation options.
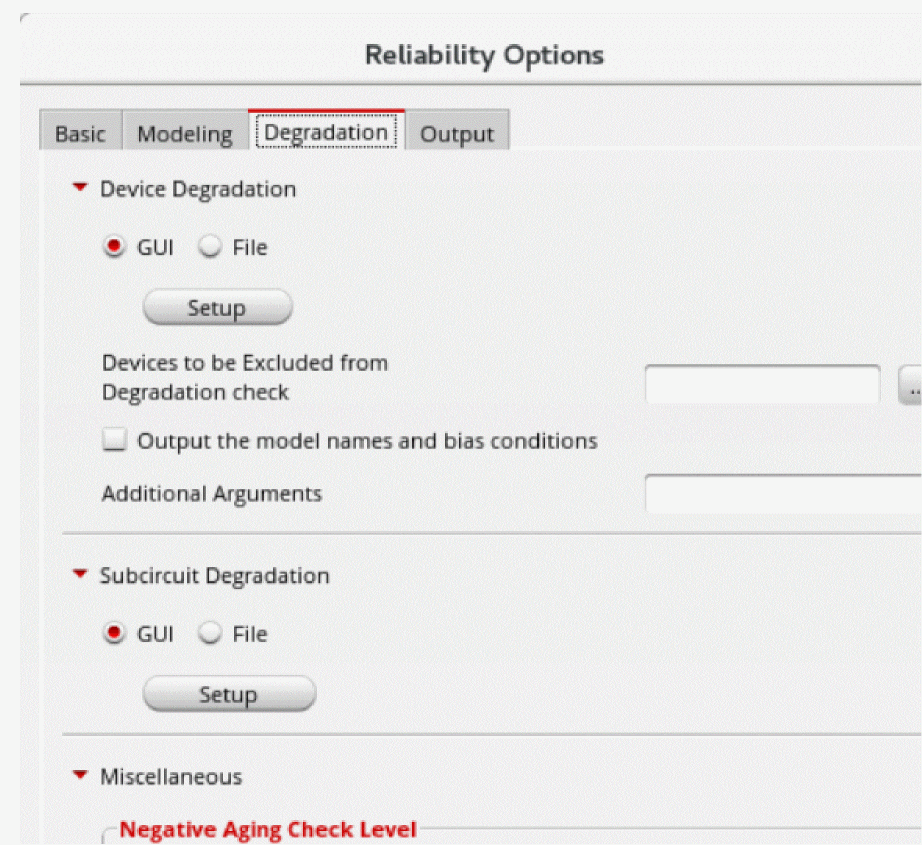
The options on the Degradation tab are grouped in the following sections:
Device Degradation
The following table describes the options available in the Device Degradation section of the Degradation tab.
| Field | Description |
|
Specify these options to print device degradation ( Refer to the Specifying Device Degradation Values section for more information. Environment variable: enableOutputDevDegInFile |
|
|
Specify the models for which the related devices are included or excluded when performing reliability analysis. Environment variable: degCheckException |
|
|
Select this check box if you want to print the model names and bias conditions in the |
|
|
Specifies additional arguments for output device degradation. You can specify multiple space-separated arguments.
For example, Environment variable: otherODDOptions |
Subcircuit Degradation
The following table describes the options available in the Subcircuit Degradation section of the Degradation tab.
| Field | Description |
|
Specify these options to print the subcircuit degradation ( Refer to the Specifying Subcircuit Degradation Values section for more information. |
Miscellaneous
The following table describes the options grouped in the Miscellaneous section on the Degradation tab.
| Field | Description |
|---|---|
|
Specify the type of message to be generated when negative aging occurs:
Environment variable: checknegagingtype |
|
|
Select this check box if you want Spectre to clamp the degradation values to be the same as fresh values and generates a warning message for negative aging. Environment variable: checknegagingclamp |
|
|
Select this check box to print |
|
|
Select one of the following options to specify the degradation calculation method to calculate the degradation results for a MOSFET. The degradation results are generated in the bt# file.:
|
Preset
The following table describes the options grouped in the Miscellaneous section on the Degradation tab.

Output
Using the Output tab, you can specify the degradation reports that you want to generate and methods to filter degradation results in the reports.
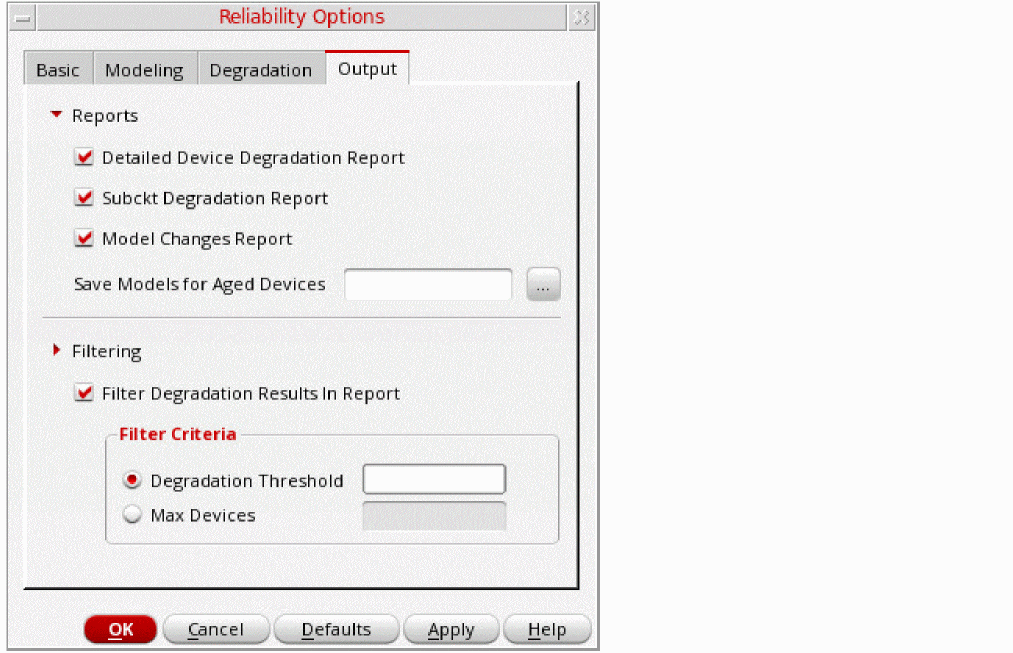
The options on the Output tab are grouped in the following sections:
Reports
The following table describes the options available in the Reports section on the Output tab.
| Field | Description |
|---|---|
|
Select this check box if you want to view the detailed device degradation report. |
|
|
Select this check box if you want to view the subcircuit degradation report. |
|
|
Select this check box if you want to print the fresh, effective, and aged parameter values to the Environment variable: reportModelParamChanged |
|
|
Specify the name of the file in which you want the degraded models to be dumped. Alternatively, you can click the ellipses (...) button to select an existing file. You can also create a new file by specifying its name in the File name field on the Choose a File form. Environment variable: mosAgeModelFilePath |
Filtering
The following table describes the options available in the Filtering section on the Output tab.
| Field | Description |
|---|---|
|
Select this check box if you want to filter the degradation results in the report. Environment variable: enableDegSort |
|
|
Select one of the following options to specify the method by which output of all MOS transistors is sorted in the order of descending degradation:
Environment variables: degSortType and degSortValue |
Specifying Device Degradation Values
The device degradation calculation is based on following fixed bias conditions:
-
NMOSFET
-
Idsat:
Vds=Vdd,Vgs=Vgsat, ifVgsatis specified for the target model, otherwiseVgs=Vdd. -
Idlin:
Vds=Vdlin, ifVdlinis specified for the target model, otherwiseVds=0.05V;Vgs=Vglin, ifVglinis specified for the target model, otherwiseVgs=Vdd. -
gm:
Vds=Vdlin, ifVdlinis specified for the target model, otherwiseVds=0.05V;Vgs=Vglin, ifVglinis specified for the target model, otherwiseVgs=Vdd. -
Vth:
Vds=Vdlin, ifVdlinis specified for the target model, otherwiseVds=0.05V;Vgs=Vglin, ifVglinis specified for the target model, otherwiseVgs=Vdd.
-
Idsat:
-
PMOSFET
-
Idsat:
Vds=Vdd,Vgs=Vgsat, ifVgsatis specified for the target model, otherwiseVgs=Vdd. -
Idlin:
Vds=Vdlin, ifVdlinis specified for the target model, otherwiseVds=-0.05V;Vgs=Vglin, ifVglinis specified for the target model, otherwiseVgs=0.05. -
gm:
Vds=Vdlin, ifVdlinis specified for the target model, otherwiseVds=-0.05V;Vgs=Vglin, ifVglinis specified for the target model, otherwiseVgs=Vdd. -
Vth:
Vds=Vdlin, ifVdlinis specified for the target model, otherwiseVds=-0.05V;Vgs=Vglin, ifVglinis specified for the target model, otherwiseVgs=0.05.
-
Idsat:
You can specify the device degradation values for the models using one of the following methods:
Using GUI
Follow these steps to specify device degradation values through GUI:
-
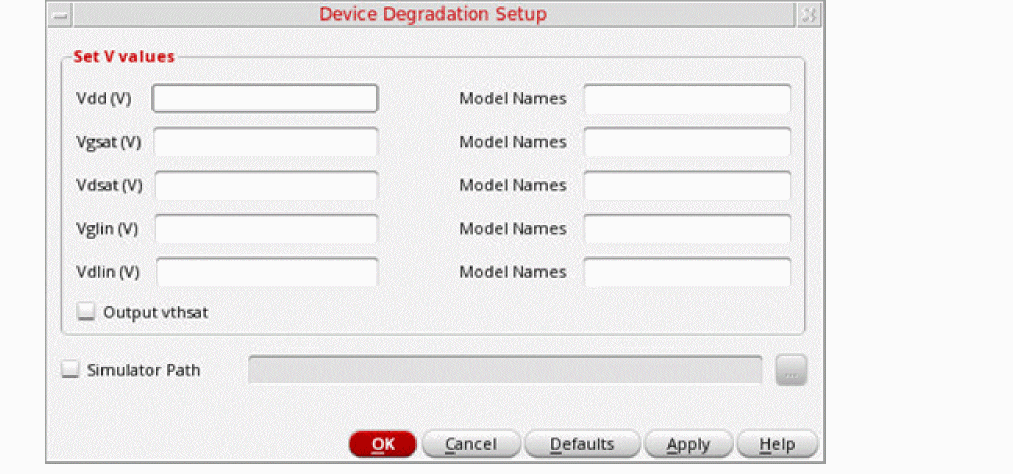
On the Degradation tab, in the Device Degradation section, choose GUI, and then click Setup, as shown in the following figure:
The Device Degradation Setup form opens.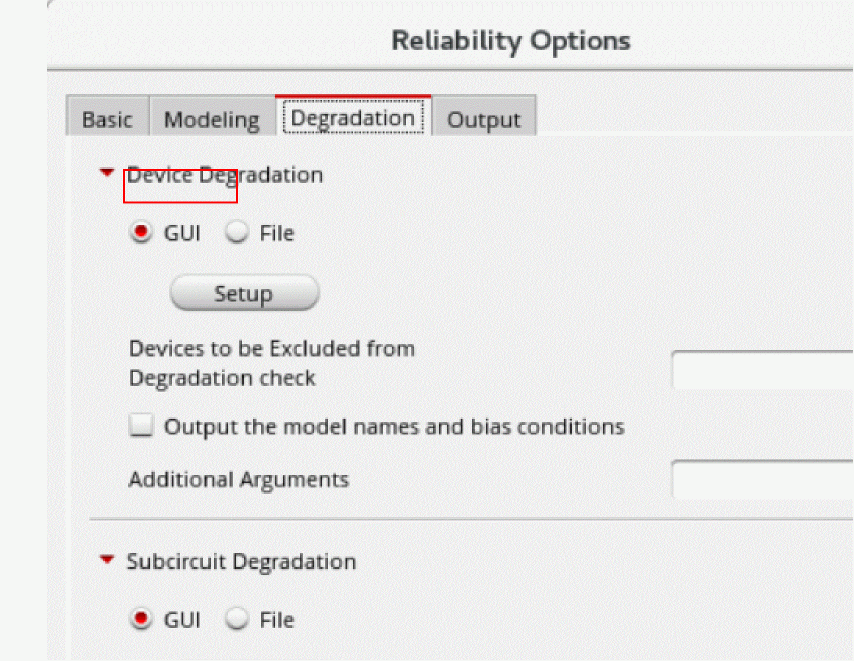
-
In the Set V values section, do the following:
-
Specify the following values for calculating the device degradation values:
-
In the Vdd (V) field, specify the bias voltage for the device to obtain
gm,gds,Idlin,Idsat, andVthdegradation. -
In the Vgsat (V) field, specify the
Vgsvalue forIdsatmeasurement. -
In the Vdsat (V) field, specify the
Vdsvalue forIdsatmeasurement. -
In the Vglin (V) field, specify the
Vgsvalue forIdlin/Vt/Gmmeasurement. -
In the Vdlin (V) field, specify the
Vdsvalue forIdlin/Vt/Gmmeasurement
-
In the Vdd (V) field, specify the bias voltage for the device to obtain
-
For each voltage value, specify the corresponding models in the Model Names field. For example,
pmos,nmos, and so on.
The following example sets the Vdd values fornmos,pmos, anddioto1.2,1.3, and1.8Vrespectively.
The following example sets the Vdd values for
nmos,pmos, anddioto1.2,1.2, and1.8Vrespectively.

-
Specify the following values for calculating the device degradation values:
-
Select the Output vthsat check box to print
vthsatinformation in theinput.bt0file. -
Select the Simulator Path check box to specify the full path to the simulator that you want to use for aging simulation.
- Click OK.
Using Setup File
Follow these steps to specify the device degradation values using a setup file:
-
On the Degradation tab, in the Device Degradation section, choose File. The Setup File field is displayed, as shown in the following figure.
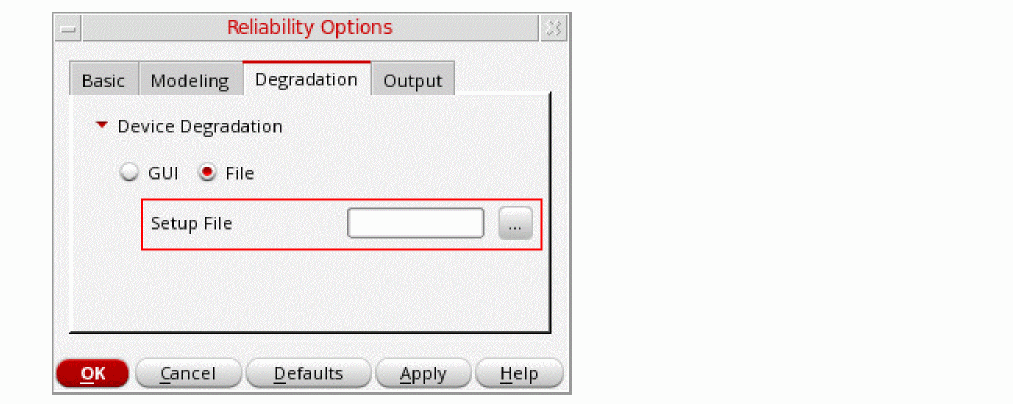
- In the Setup File field, specify the path to the setup file containing the device degradation values for the models in use. Alternatively, you can click the ellipsis (...) button to select the setup file.
- Click OK.
Specifying Subcircuit Degradation Values
The subcircuit degradation calculation is based on following fixed bias conditions:
-
NMOSFET
-
Idsat:
Vds=Vdd,Vgs=VgsatifVgsatis specified for the target subcircuit, otherwiseVgs=Vdd. -
Idlin:
Vds=VdlinifVdlinis specified for the target subcircuit, otherwiseVds=0.05V;Vgs=VglinifVglinis specified for the target subcircuit, otherwiseVgs=0.05. -
Vth:
Vds=VdlinifVdlinis specified for the target subcircuit, otherwiseVds=0.05V;Vgs=VglinifVglinis specified for the target subcircuit, otherwiseVgs=0.05.
-
Idsat:
-
PMOSFET
-
Idsat:
Vds=Vdd,Vgs=VgsatifVgsatis specified for the target subcircuit, otherwiseVgs=Vdd. -
Idlin:
Vds=VdlinifVdlinis specified for the target subcircuit, otherwiseVds=-0.05V;Vgs=VglinifVglinis specified for the target subcircuit, otherwiseVgs=0.05. -
Vth:
Vds=VdlinifVdlinis specified for the target subcircuit, otherwiseVds=-0.05V;Vgs=VglinifVglinis specified for the target subcircuit, otherwiseVgs=0.05.
-
Idsat:
You can specify the subcircuit degradation values using one of the following methods:
Using GUI
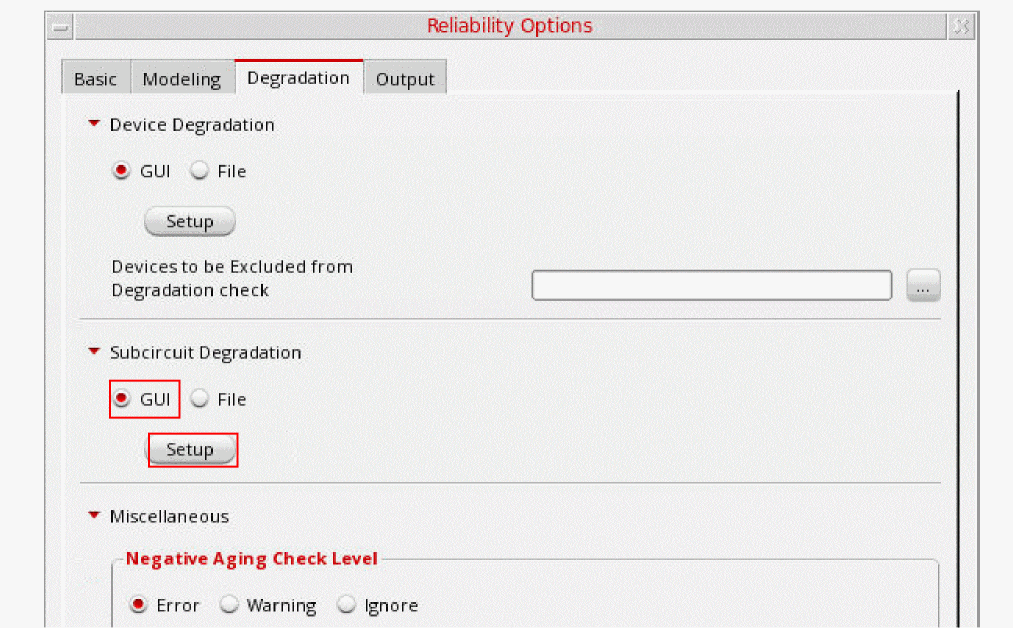
Follow these steps to specify subcircuit degradation values through GUI:
-
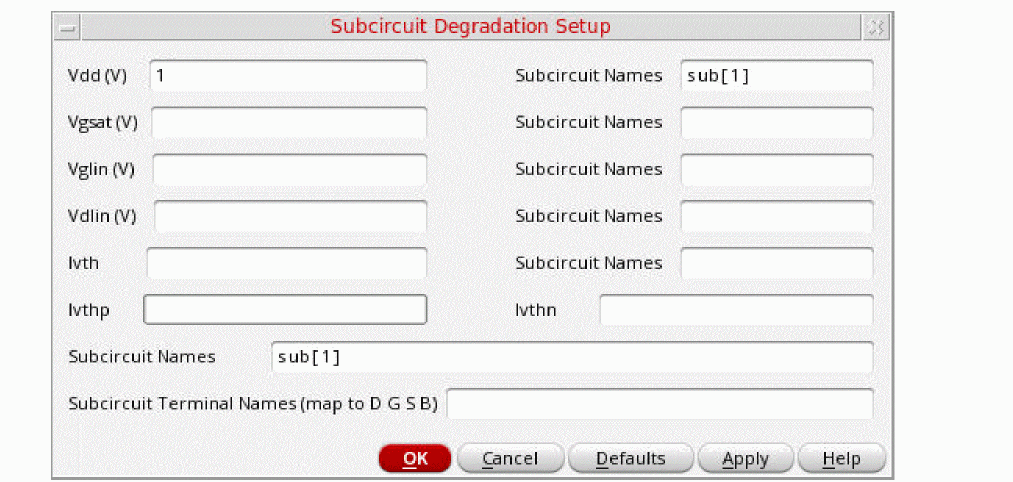
On the Degradation tab, in the Device Degradation section, choose GUI, and then click Setup, as shown in the following figure.The Subcircuit Degradation Setup form opens.
-
In the Vdd (V) field, specify the bias voltage for the subcircuit to obtain
gm,gds,Idlin,Idsat, andVthdegradation. This field is mandatory. -
In the Vgsat(V) field, specify the
Vgsvalue forIdsatmeasurement. -
In the VgIin(V) field, specify the
Vgsvalue forIdlin/Vtmeasurement. -
In the VdIin(V) field, specify the
Vdsvalue forIdlin/Vtmeasurement. - In the Ivth field, specify the constant current value for the specified model.
-
In the corresponding Subcircuit Names field, specify the name of the subcircuits. For example,
sub[1].
The following example sets the Vdd values fornmos,pmos, anddioto1.2,1.3, and1.8Vrespectively.
The following example sets the Vdd values for
nmos,pmos, anddioto1.2,1.2, and1.8Vrespectively.
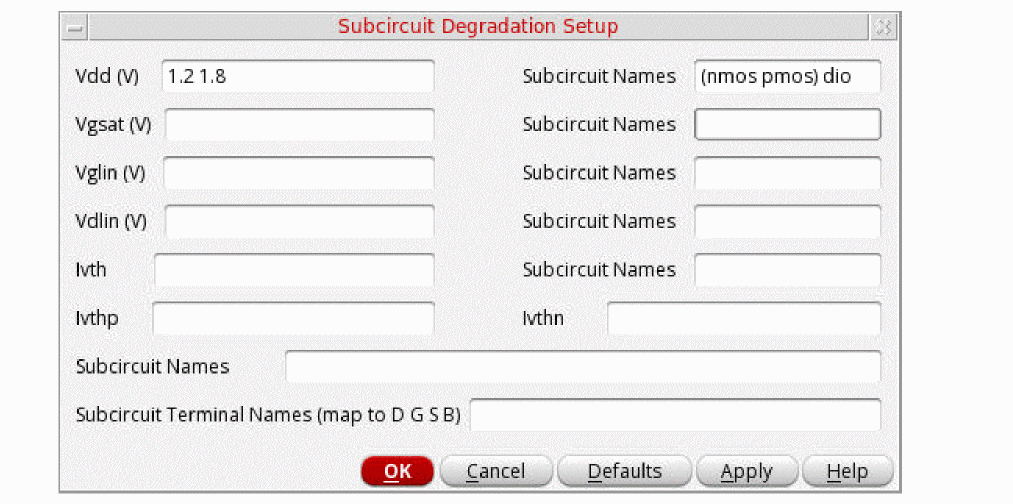
- In the Ivthp field, specify the constant current value for PMOS.
- In the Ivthn field, specify the constant current value for NMOS.
- In the Subcircuit Names field, specify the list of subcircuits for which degradation needs to be performed.
-
In the Subcircuit Terminal Names field, specify the four-terminal node name in the order
D G S Bfor each subcircuit. If a node is not specified, the first four terminals of the subcircuit are taken asD G S Bby default. -
Select the Simulator Path check box to specify the full path to the simulator that you want to use for aging simulation.
- Click OK.
Using Setup File
Follow these steps to specify the device degradation values using a setup file:
-
On the Degradation tab, in the Subcircuit Degradation section, choose File. The Setup File field is displayed, as shown in the following figure.
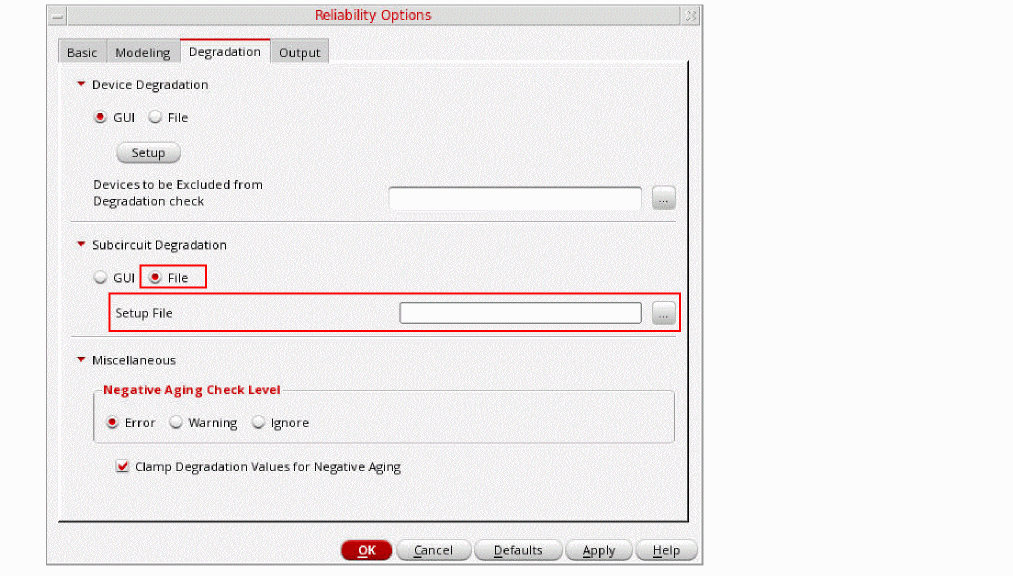
- In the Setup File field, specify the path to the setup file containing the subcircuit degradation values. Alternatively, you can click the ellipsis (...) button to select the setup file.
- Click OK.
Creating Outputs for Reliability Analysis
Similar to other analysis, you can create outputs for reliability analysis in the Outputs Setup tab. An output can be a signal or an expression.
To create an expression that is based on the output value of another reliability analysis from the same or another simulation history, use the calcVal function. Either you can type in the expression in the Expr column or use Expression Builder. When using the calcVal function in an output expression, you must specify different tests for stress and aged test to avoid cyclic dependencies.
Related Topics
Adding or Modifying an Output Expression
Masking Devices
You can use the options in the Device Masking section to specify the devices that you want to include and exclude when calculating device degradation values.
-
In the Device Masking section on the Basic tab of the Reliability Options form, select Mask Devices.
The options in the Device Masking section are enabled.
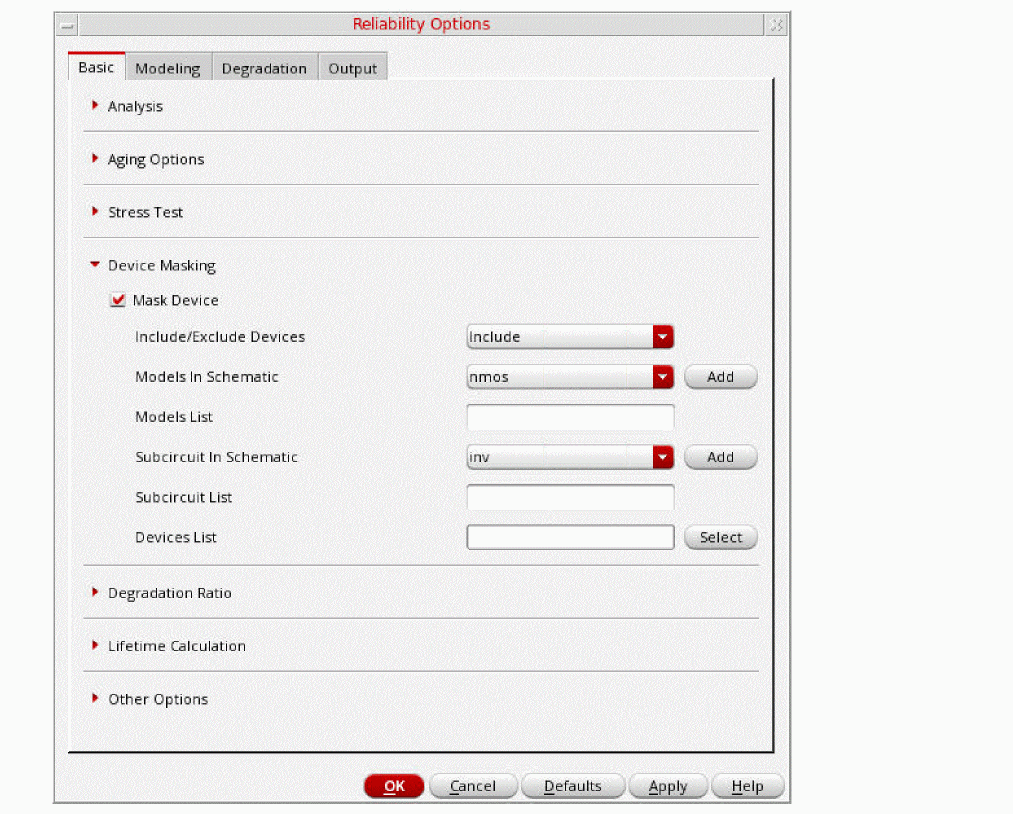
- From the Include/Exclude Devices drop-down list, select one of the following options:
-
From the Models In Schematic drop-down list, select a model, and then click Add.
The selected model is added to the Models List. Repeat this step to add another model to the list. Devices in these models are included or excluded when performing reliability analysis, depending on the selection you made in step 2. -
From the Subcircuit in Schematic drop-down list, select a subcircuit, and then click Add.
The selected subcircuit is added the Subcircuit List. Repeat this step to add another subcircuit to the list. Devices in these subcircuits are included or excluded when performing reliability analysis, depending on the selection you made in step 2. -
Click Select next to the Devices List field to select the instances from the schematic. After selecting the instances, press the Esc key on your keyboard.
The selected instances are added to the Devices List field. - Click OK to close the form.
Copying Reliability Setup
You can reuse an existing reliability setup by creating its copies. You can then make certain modifications and see their effects on the simulation results. This way, you can not only save your time, but also retain the original setup.
Follow these steps to copy a reliability setup:
- In the Data View assistant pane, expand the Reliability Analyses node, and then select the reliability setup that you want to copy.
-
Right-click the selected setup and then choose Create Setup Copy.
The settings in the selected setup are copied to a new setup, which is created with the name, <Name_of_the_existing_reliability_setup>: 1.
Loading Reliability Settings
To your existing reliability setup, you can import the reliability settings from another reliability setup that is defined in an ADE L state or a maestro cellview.
Perform the following steps to import the reliability settings:
- In the Data View assistant, under Reliability Analyses node, select the reliability setup to which you want to import the reliability settings.
-
Right-click the selected setup, and then choose Load Reliability Settings.
The Load Reliability Options form appears.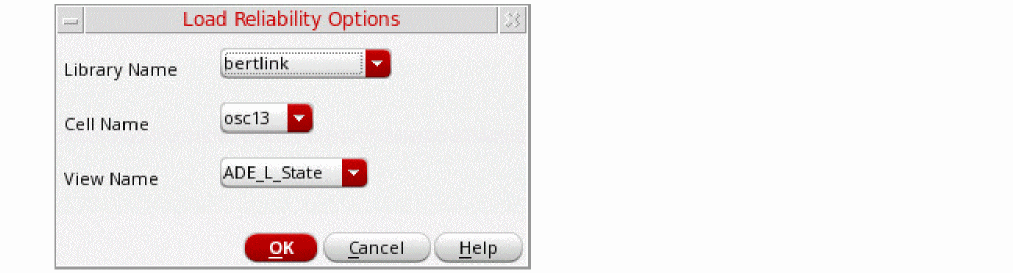
- From the Library Name, Cell Name, and View Name drop-down lists, select the ADE L state or the maestro cellview where you have defined the reliability setup whose settings you want to import.
- Click OK to import the reliability settings to the selected reliability setup.
Setting Up Reliability Analysis for Scenarios with Varying Corner Conditions
You can run a reliability simulation with different corner conditions for stress and aged tests. For this, you can create stress corners in the Corners Setup form, and use those corners in the reliability setup for stress corners.
To use this kind of a setup for reliability analysis, you need to change the reliability mode by setting the defaultReliabilityMode environment variable to "AgingScenarios". When this setting is enabled, the Corners Setup form shows an additional row named Stress Corner at the bottom. You can create special stress conditions for certain corners and select the Stress Corner check box to identify those corners as stress corners.
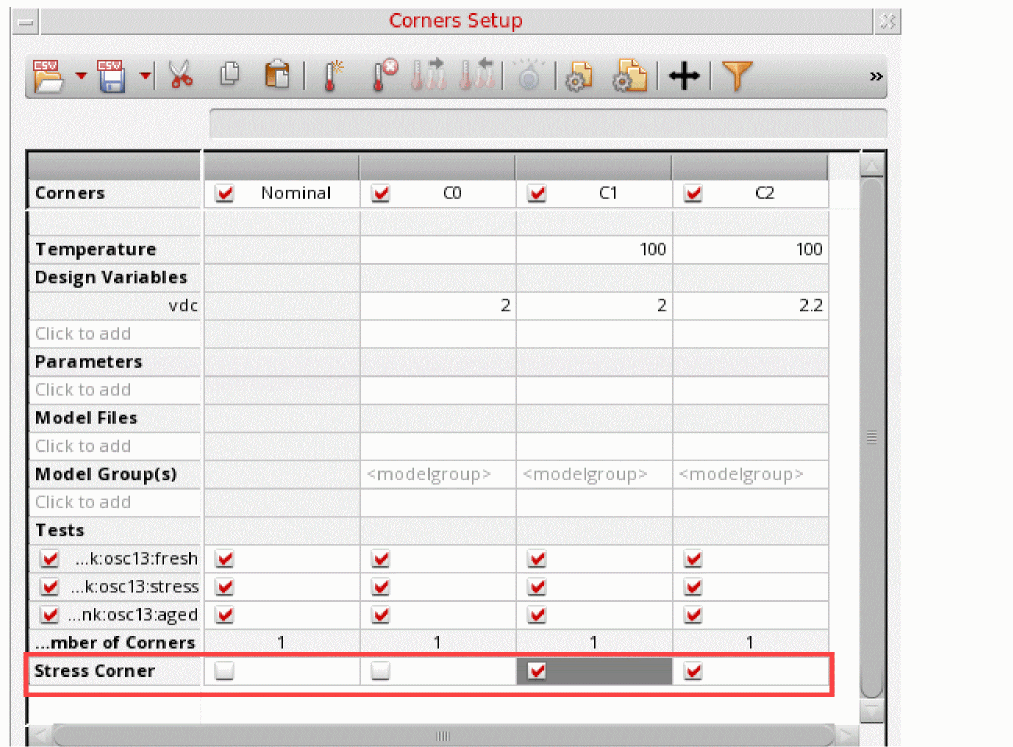
In addition, the "AgingScenarios" setting also shows additional fields on the Reliability Scenarios Setup form to specify the stress corners to be associated with the stress simulation, as shown below.
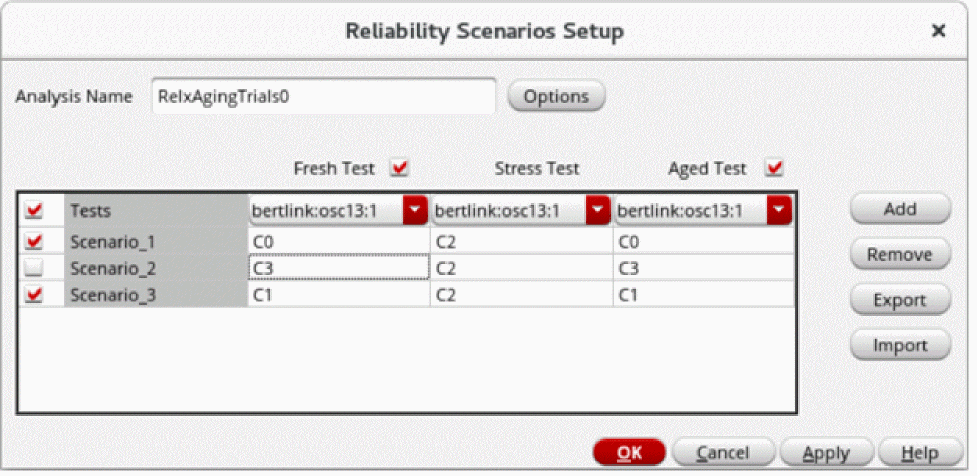
This kind of setup enables consistent reliability signoff conditions across different setups.
Important Points to Note:
- The default reliability analysis name for scenarios with varying corner conditions is RelxAgingTrials0.
- You can select only stress corners for the stress tests. When no stress corner is available in the corners setup, the form displays an error message to indicate the same.
Enabling or Disabling a Reliability Scenario
To enable or disable a reliability scenario in the reliability scenario setup:
- Select or deselect the check boxes next to the reliability scenarios that you want to enable or disable.
- Click Apply and then click OK.
-
Select the reliability scenario row that you want to enable or disable. Hold down the
Ctrlkey to select multiple reliability scenarios. - Right-click any of the selected rows and choose one of the following:
- Click Apply and then click OK.
Only the reliability scenarios that are enabled in the reliability scenario setup are simulated.
Exporting a Reliability Scenario Setup
You can export a reliability scenario setup to a CSV file. You can later import this CSV file to make a copy of this setup.
To export a reliability scenario setup:
- In the Data View assistant, click Reliability Scenarios to view a list of available reliability scenario setups.
-
Right-click the reliability scenario setup that you want to export and then choose Open Setup. Alternatively, double-click the reliability scenario setup.
The Reliability Scenarios Setup form opens.
- Edit the reliability scenario setup if required. You can add, remove, enable, or disable reliability scenario rows by using the Add, Remove, Enable, or Disable commands, respectively.
-
Click Export to export the setup to a CSV file.
The Export Scenarios to CSV form opens.
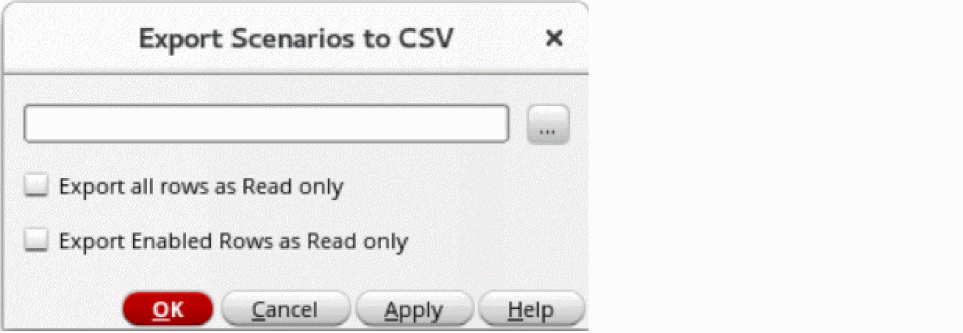
-
Specify the path to the CSV file to which you want to export the setup.
Alternatively, you can click the Ellipsis (...) icon to select the CSV file. - Select one of the following options:
-
Click OK to export the setup.
The reliability scenario setup is exported to the specified CSV file.
Related Topics
Importing a Reliability Scenario Setup from the CSV File
Contents of the Exported CSV File
Contents of the Exported CSV File
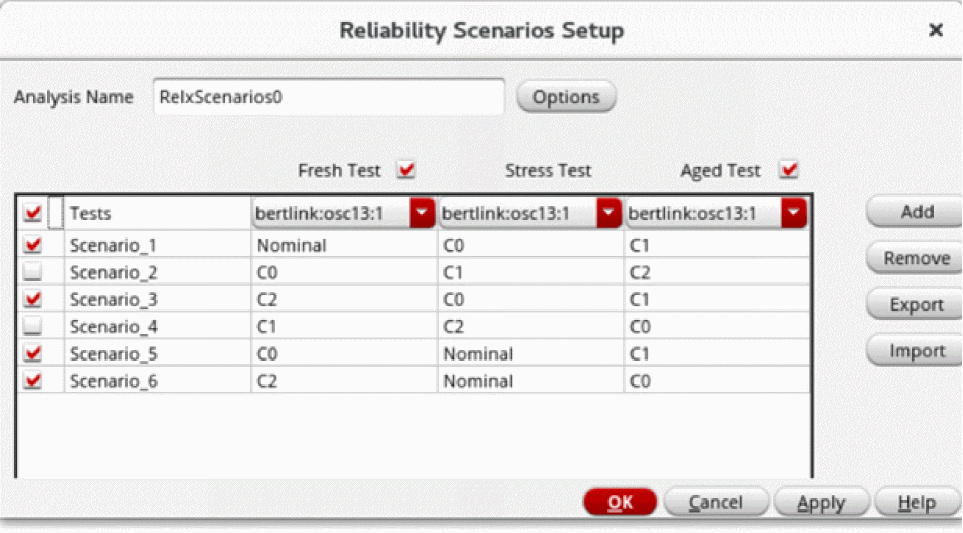
The contents of the CSV file are as follows:
t,Scenario_1,Nominal,C0,C1,r
nil,Scenario_2,C0,C1,C2,e
t,Scenario_3,C2,C0,C1,r
nil,Scenario_4,C1,C2,C0,e
t,Scenario_5,C0,Nominal,C1,r
t,Scenario_6,C2,Nominal,C0,r
The CSV file contains entries for each reliability scenarios in separate rows. Each row has six comma-separated values. The following table explains the attributes these values represent.
Related Topics
Exporting a Reliability Scenario Setup
Importing a Reliability Scenario Setup from the CSV File
Importing a Reliability Scenario Setup from the CSV File
You can either create a new reliability scenario setup or edit an existing reliability scenario setup by importing the setup saved in a CSV file.
To import a reliability scenario setup:
- In the Data View assistant, click Reliability Scenarios to view a list of available reliability scenario setups.
-
Right-click the reliability scenario setup that you want to edit and then choose Open Setup. Alternatively, double-click the reliability scenario setup.
If there are no existing reliability scenarios setups, click Click to add reliability scenarios setup to create a new setup.
The Reliability Scenarios Setup form opens.

-
Click Import to import the setup from a CSV file.
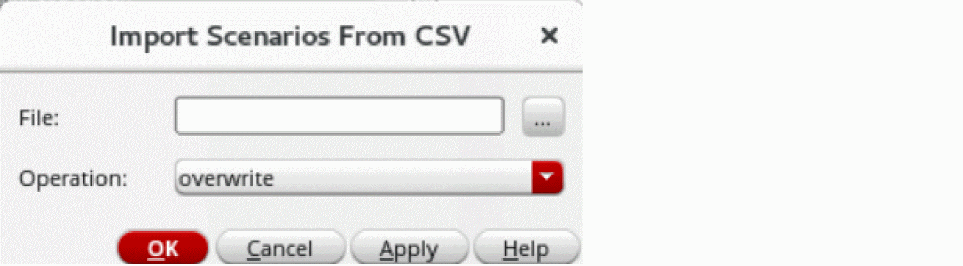
The Import Scenarios From CSV form opens.
-
Specify the path to the CSV file from which you want to import the setup.
Alternatively, you can click the Ellipsis (...) icon to select the CSV file. -
From the Operations drop-down list, select one of the following options:
- overwrite: All existing scenarios are deleted from the Reliability Scenarios Setup form, and scenarios from the CSV file are added to the form. This is the default value.
-
retain: If a scenario name being imported from the CSV file already exists in the Reliability Scenarios Setup form, its import is discarded from the CSV file, and the existing scenario in the form is retained as is.
When you select this option: -
merge: If a scenario name being imported from the CSV file already exists in the Reliability Scenarios Setup form, the existing scenario is deleted from the form, and its details are copied from the CSV to the form.
When you select this option:
- Click OK to import the setup.
Related Topics
Exporting a Reliability Scenario Setup
Contents of the Exported CSV File
Running the Reliability Simulation
Before you run reliability simulation, ensure that the following prerequisites are met:
- A Spectre or APS transient analysis is set up and enabled for the stress test. You can set these by using the ADE Assembler Test Editor.
- The Enable Reliability check box is selected in the RelXpert Options form.
To run the reliability simulation:
-
Click the Run Simulation button
 .
.
The fresh, stress, and aging simulations are run for the specified tests. To view the RelXpert simulation result data, right-click the Results tab and choose an appropriate option from the menu shown in the following figure.
For more details on how to view RelXpert simulation result data, refer to Working with Reliability Data.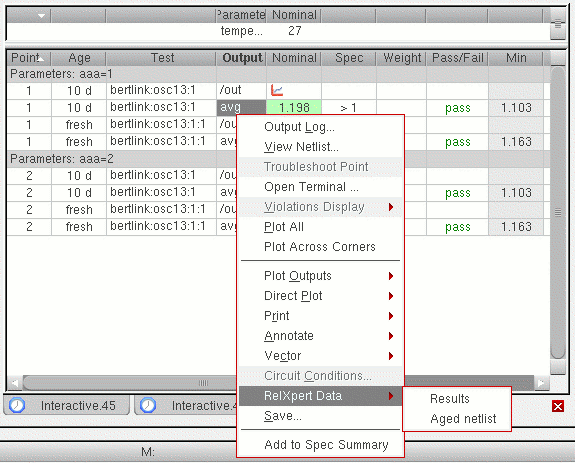
Important Points to Note
-
You can also run multiple RelXpert setups simultaneously. When you run multiple setups, an additional column, Relx, is visible before the Age Column on the Results tab. The Relx column specifies the name of the corresponding RelXpert setup.
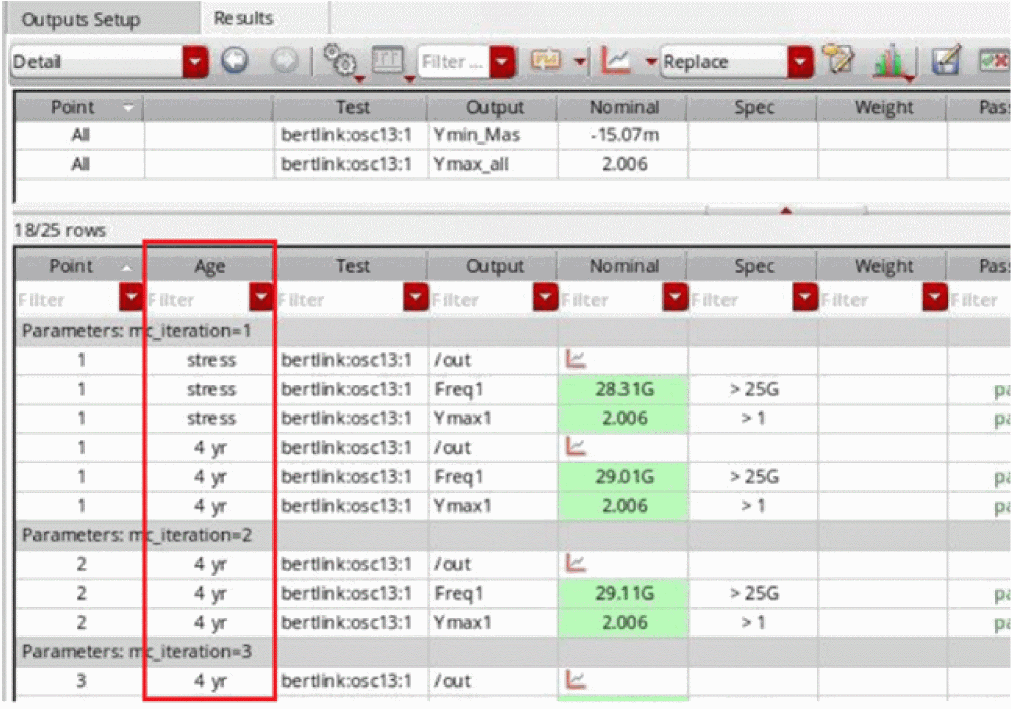
The number of results sets generated from the reliability analysis is determined by the total number of data points on which the simulations specified in the reliability analysis setup is run. Consider a reliability analysis with the following data that needs to be run for fresh and aged tests (two age points):
In this example, each simulation (one fresh and two aging) is run 6 times. Therefore, the total number of data points for which the reliability analysis is run is 18.
For more information, see the Working with Reliability Data. -
If we have enabled Reliability Analysis in ADE Assembler, simulations are run only for those tests that are part of any of the Reliability Analysis setup. Therefore, if there are any tests that are enabled in ADE Assembler user interface, but are not used as fresh, stress, or aged tests in the Reliability Analysis setup, those tests are ignored. In such a case, the following warning message is displayed in CIW.
WARNING (ADEXL-7005): The following tests are not being used in any of the enabled Reliability Analysis setups and hence it will be disabled for the current run
-
RelXpert Reliability Simulator always runs in batch mode. Therefore, ADE Assembler too automatically runs in batch mode when you enable RelXpert. The following message is displayed in CIW indicating the change in mode:
WARNING: The Spectre run mode needs to be 'batch' when running RelXpert. Automatically setting the run mode to 'batch'. -
Consider the case of an ADE Assembler setup in which reliability analysis is not set up. If you modify a testbench in the ADE Assembler Test Editor, and enable reliability analysis, after you close the Test Editor, a default reliability setup named
Default_Relxis created in the Data View pane. - The default ADE Assembler reliability setup will be created only for the test for which reliability setup is enabled in the Test Editor. Once a default setup has been created for a test, if you create or modify another test in the Test Editor, no default setup will be created for that test.
Difference Between Reliability Mode And Aging Scenarios
The following table lists the differences between reliability mode and aging scenarios.
| Reliability Mode | Aging Scenarios |
|---|---|
|
|
Working with Reliability Data
With reliability data, you can do the following:
- Viewing Simulation Results
- Viewing Aged Netlist
- Viewing Output Logs for Reliability Simulations
- Plotting Results
- Plotting Results Across Corners
- Printing or Plotting Stress Results for Gradual Aging Run
- Annotating Simulation Results to Schematic View
Viewing Simulation Results
To view simulation results, do the following:
- On the Results tab, select the required test.
- Right-click the selected test and choose Reliability Data.
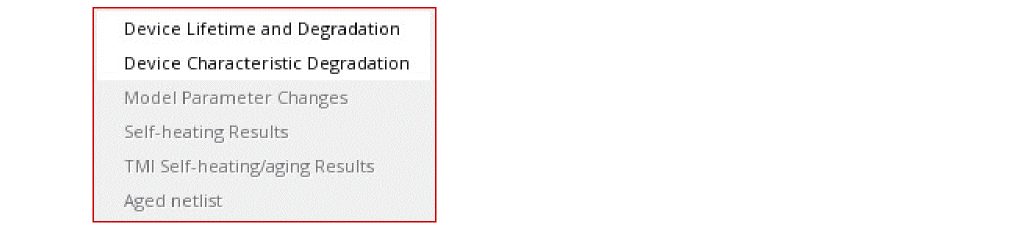
- Depending on the MMSIM version used to run the simulation, the following submenu is displayed:
-
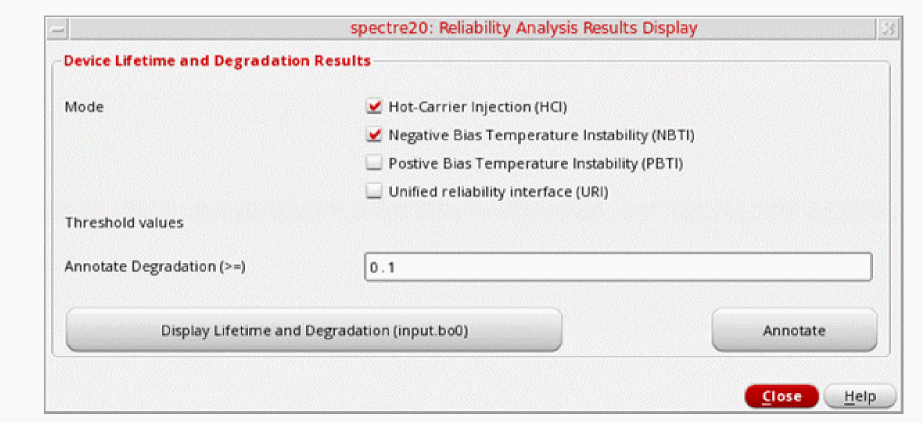
Choose the result that you want to view.
The Reliability Analysis Results Display form appears. The options displayed on this form depend upon the type of results that you chose. The following figure shows an example of the form when Reliability Data > Device Lifetime and Degradation is selected.
-
In the Reliability Analysis Results Display form, do the following:
Click... To... Display the lifetime and degradation values for all degraded devices.
See the Displaying Lifetime and Degradation Results section for more information.
Display the device degradation for the specified aging time period.
See the Displaying Device Characteristic Degradation Results section for more information.
Display fresh and aged parameter information.
See the Displaying Model Parameter Change Results section for more information.
Display the temperature rise for each device.
See the Displaying Self-Heating Results section for more information.
Displaying Lifetime and Degradation Results
The lifetime and degradation results display a list of devices whose electrical properties have degraded by at least the value specified in the Degradation Value field on the Basic tab of the Reliability Options form.
If you set the Degradation Value to 0.1, the lifetime and degradation results display a list of devices whose electrical properties have degraded by 10% or more.
Follow these steps to view the lifetime and degradation results of the devices:
-
On the Results tab, right-click a result and select Reliability Data – Device Lifetime and Degradation.
The Reliability Analysis Results Display form appears.
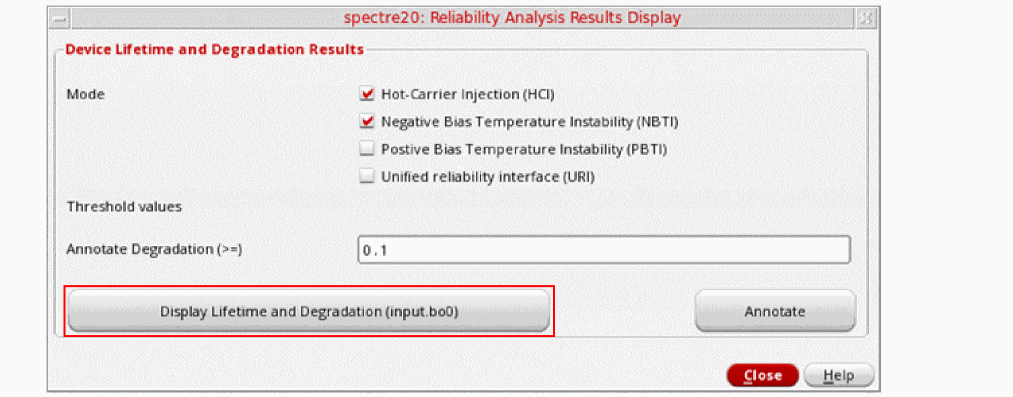
-
Click Display Lifetime and Degradation to view the results.
The Device Lifetime and Degradation Results form appears, displaying the results in a table.
You can click the column headers to sort the values in ascending or descending order.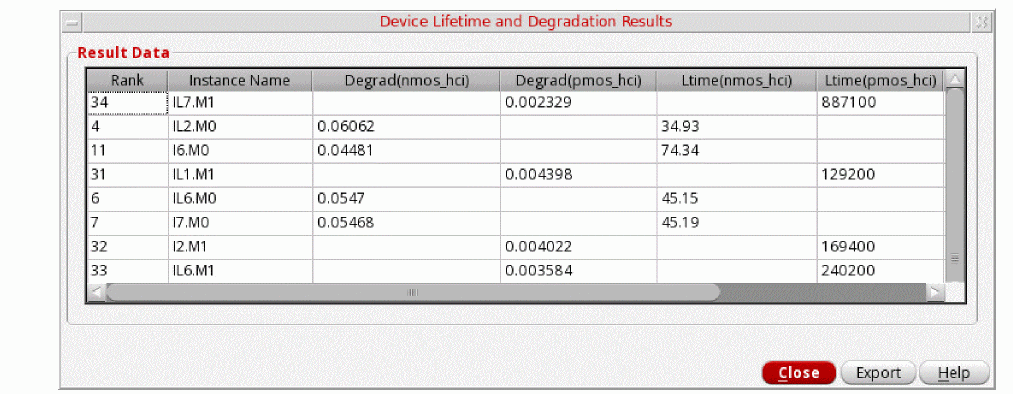
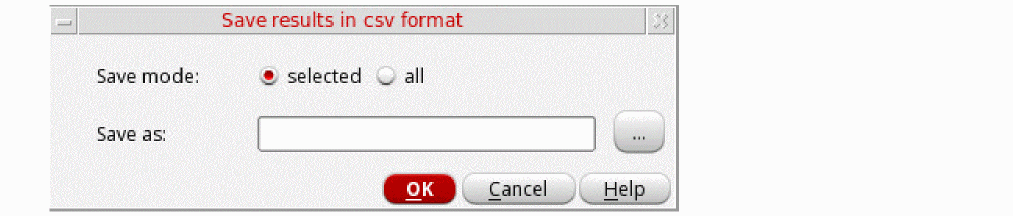
Exporting the Lifetime and Degradation Results
Follow these steps to export the lifetime and degradation results of the devices:
-
In the Device Lifetime and Degradation Results form, select the cells in the table that you want to export to the CSV file, and then click Export.
The Save results in csv format form appears.

- In the Save mode field, select one of the following options:
- In the Save as field, type the name of the CSV file to which you want to export the result data.
- Click OK.
Displaying Device Characteristic Degradation Results
Follow these steps to view the characteristic degradation results of the devices:
-
On the Results tab, right-click a result, and choose Reliability Data – Device Characteristic Degradation.
The Reliability Analysis Results Display form appears.
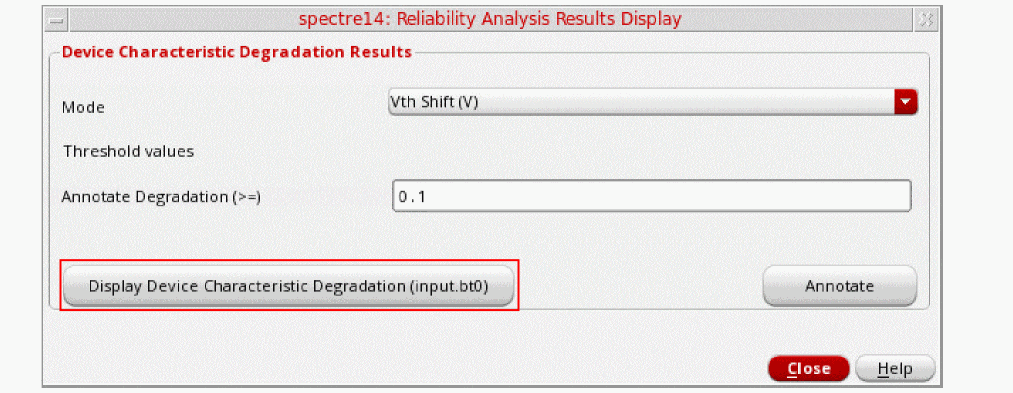
-
Click Display Device Characteristic Degradation (input.bt0) to view the results.
The Device Characteristic Degradation Results form appears, displaying the results in a table.
You can click the column headers to sort the values in ascending or descending order.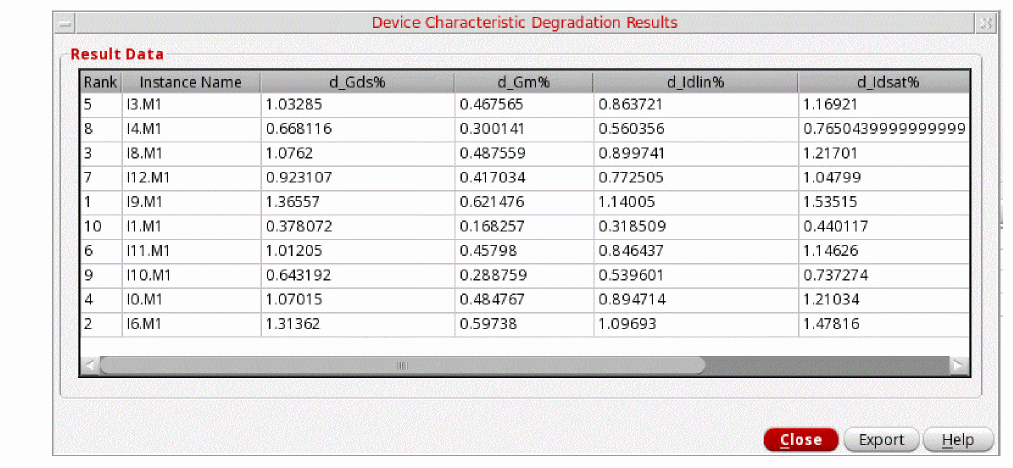
Exporting the Device Characteristic Degradation Results
Follow these steps to export the device characteristic degradation results:
-
In the Device Characteristic Degradation Results form, select the cells in the table that you want to export to the CSV file, and then click Export.
The Save results in csv format form appears.

- In the Save mode field, select one of the following options:
- In the Save as field, type the name of the CSV file to which you want to export the result data.
- Click OK.
Displaying Model Parameter Change Results
Follow these steps to view the model parameter change results:
-
On the Results tab, right-click a result, and choose Reliability Data > Model Parameter Changes.
The Reliability Analysis Results Display form appears.
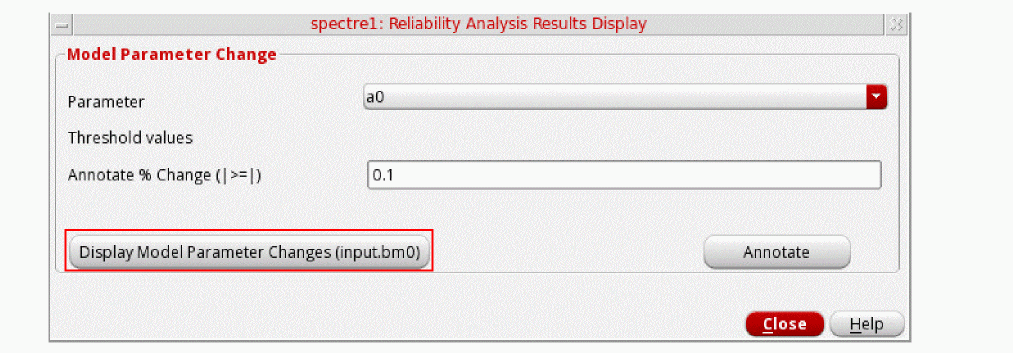
-
Click Display Model Parameter Changes (input.bm0) to view the results.
The Model Parameter Change Results form appears, displaying the results in a table.
You can click the column headers to sort the values in ascending or descending order.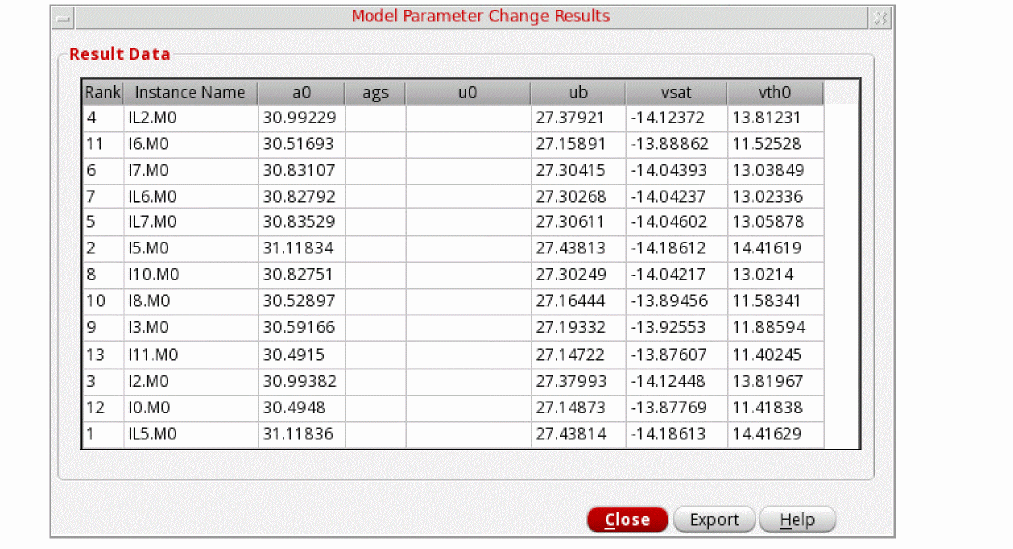
Exporting the Model Parameter Change Results
Follow these steps to export the model parameter change results:
-
In the Model Parameter Change Results form, select the cells in the table that you want to export to the CSV file, and then click Export.
The Save results in csv format form appears.
- In the Save mode field, select one of the following options:
- In the Save as field, type the name of the CSV file to which you want to export the result data.
- Click OK.
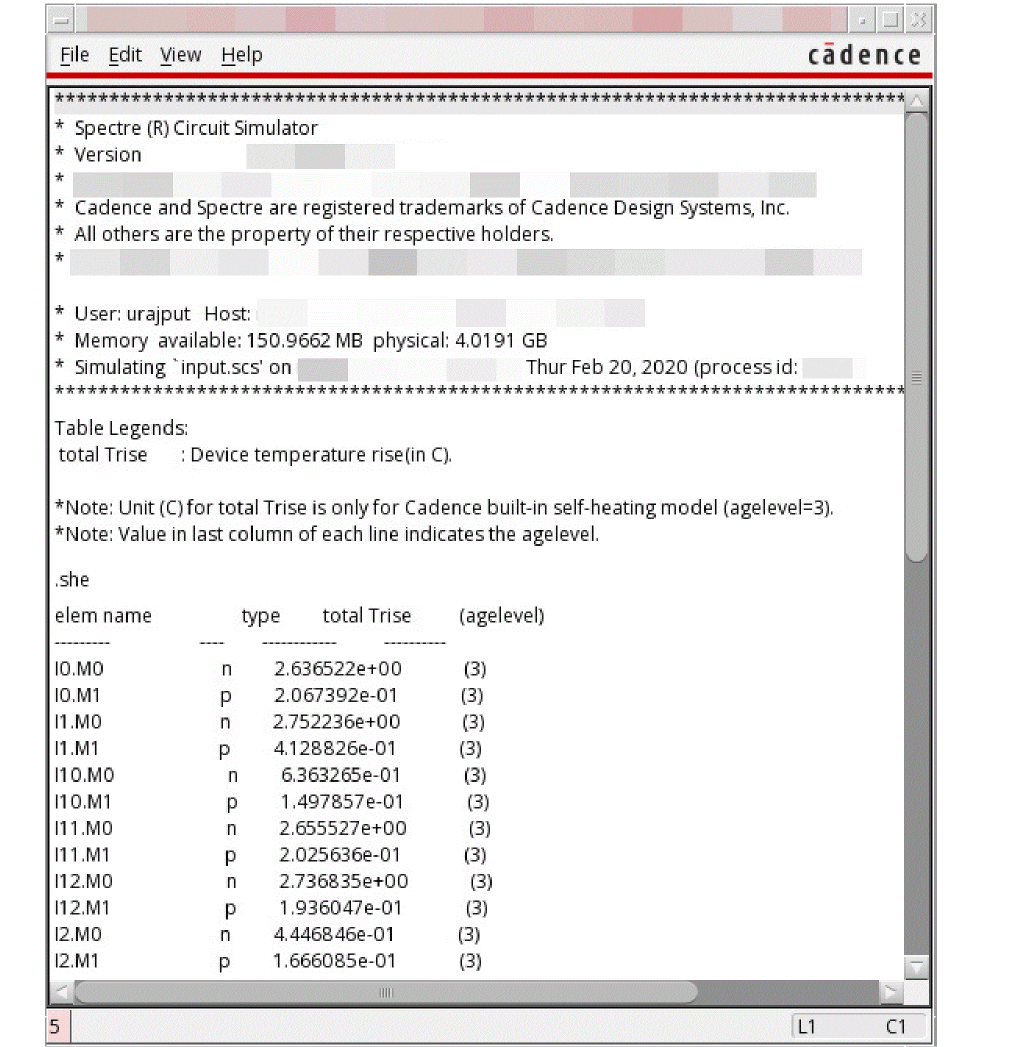
Displaying Self-Heating Results
Follow these steps to view the self-heating results:
-
On the Results tab, right-click a result, and choose Reliability Data > Self-Heating Results.
The Reliability Analysis Results Display form appears.
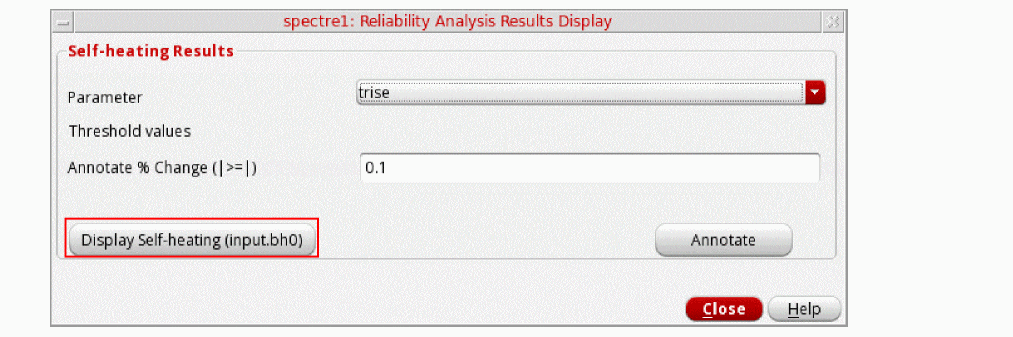
-
Click Display Self-heating (input.bh0) to view the results.
The self-heating results are displayed in a new window.
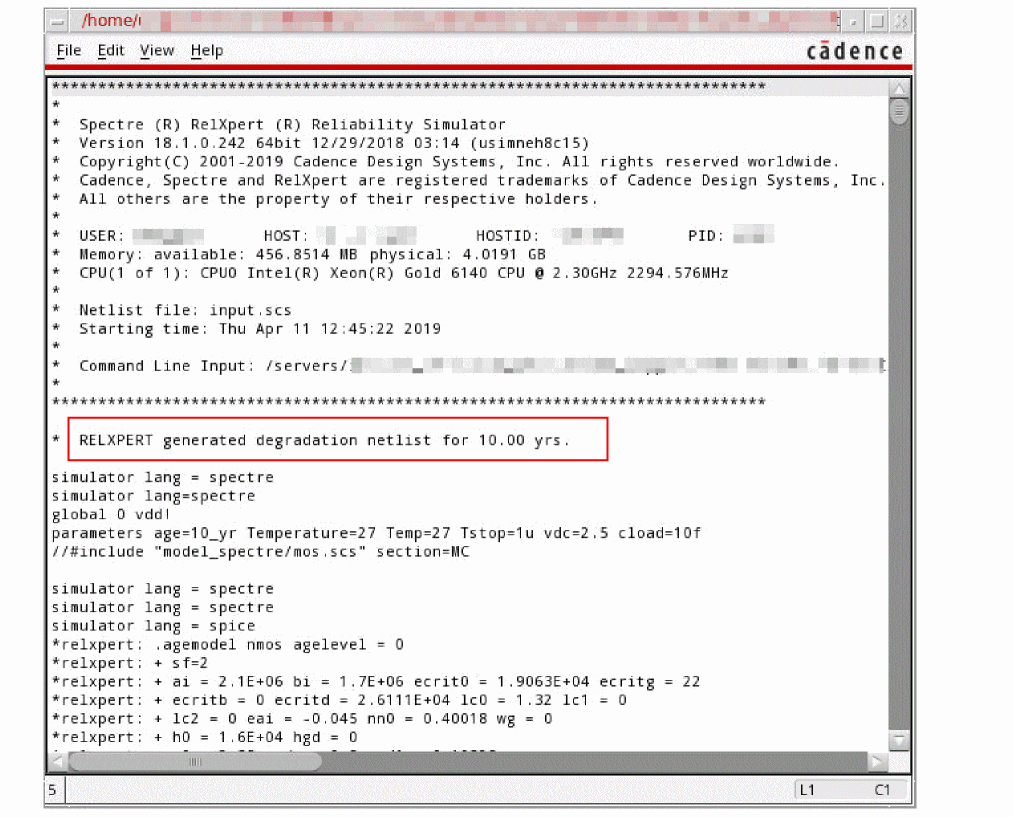
Viewing Aged Netlist
To view the aged netlist for a test:
- In the Virtuoso ADE Assembler window on the Results tab, select the result of an aged test.
-
Right-click the selected test and choose Reliability Data – Aged netlist.
The Aged netlist is available only in RelXpert mode. You can switch to RelXpert mode by setting the following environment variable:envSetVal("maestro.gui" "showNativeRelxpertSwitch" 'boolean t)
The aged netlist generated by the reliability simulator is displayed in a new window. A sample is shown below.
Viewing Output Logs for Reliability Simulations
Perform the following steps to view the output logs for a reliability simulation result:
- In the Results window, select the test for which you want to view the output log.
-
Right-click the selected test and then choose Output Log.
The output log is displayed in a new window.
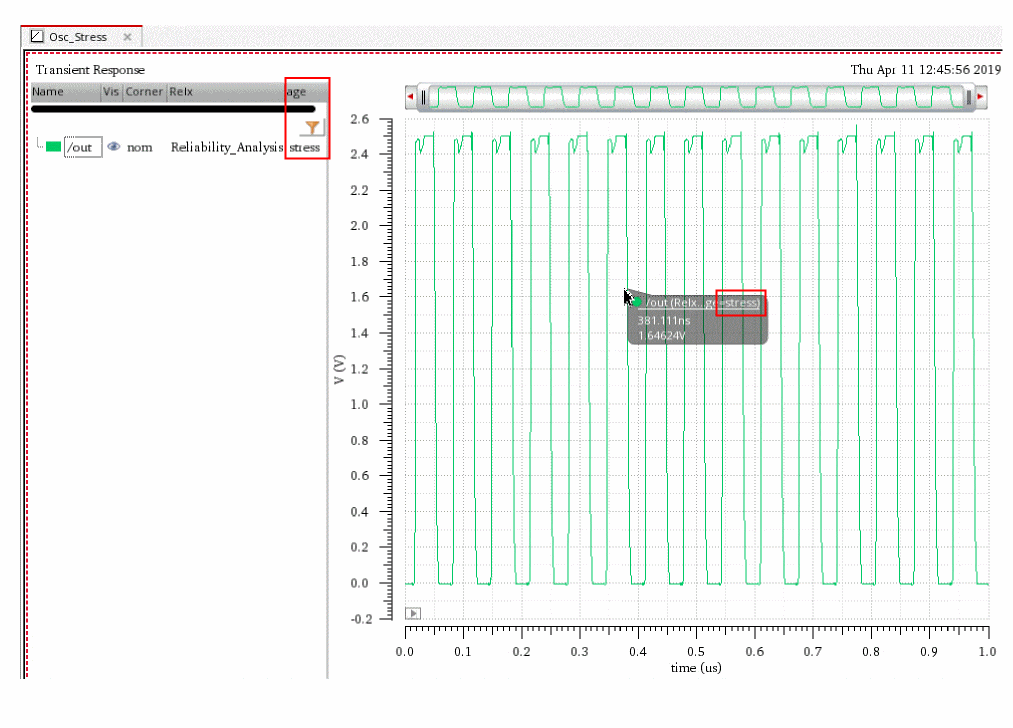
Plotting Results
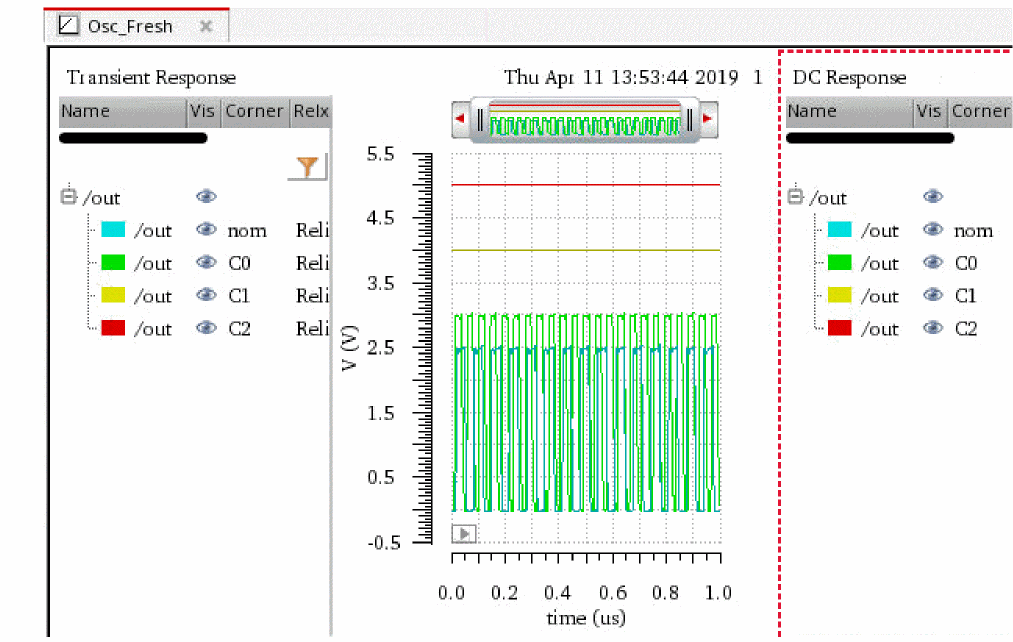
You can plot the fresh, stress, or aged results in the Virtuoso Visualization and Analysis XL window.
-
On the Results tab, right-click the fresh, stress, or aged result and choose Plot.
The results are plotted in the Virtuoso Visualization and Analysis XL window. In the plot of fresh test, the graph legend shows age value as0and for the age test, the legend shows the age in years. However, for the stress result, the trace legend and trace name for the stress plot showsage=stressto indicate that the results are plotted for stress results, as shown below.
Plotting Results Across Corners
You can plot the fresh and aged results across corners.
To plot results across corners:
-
On the Results tab, right-click the fresh, stress, or aged result and choose Plot Across Corners.
The results are plotted in the Virtuoso Visualization and Analysis XL window, as shown below.
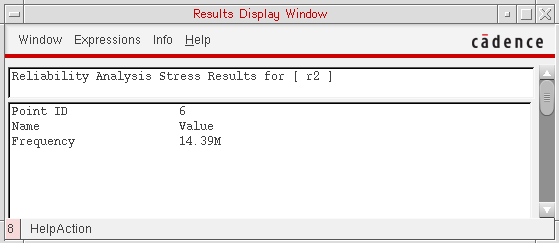
Printing or Plotting Stress Results for Gradual Aging Run
If you had chosen to save the results data for gradual aging, you can print or plot the stress results for every age point for which data was saved.
Printing Stress Results for an Age Point
To print stress results for an age point:
- On the Results tab, select the result of that age point.
-
Right-click and choose Print Stress Results.
A text file containing the stress results is displayed, as shown below.
Plotting Stress Results for an Age Point
To plot stress results for an age point:
- On the Results tab, select the result of that age point.
-
Right-click and choose Plot Stress Results.
The results are plotted in the Virtuoso Visualization and Analysis XL window, as shown below.

Annotating Simulation Results to Schematic View
To annotate the device lifetime and degradation results to schematic view:
- In the Virtuoso ADE Assembler window, on the Results tab, select the required test.
-
Right-click the selected test and choose Reliability Data – Results.
The RelXpert Results Display form is displayed.
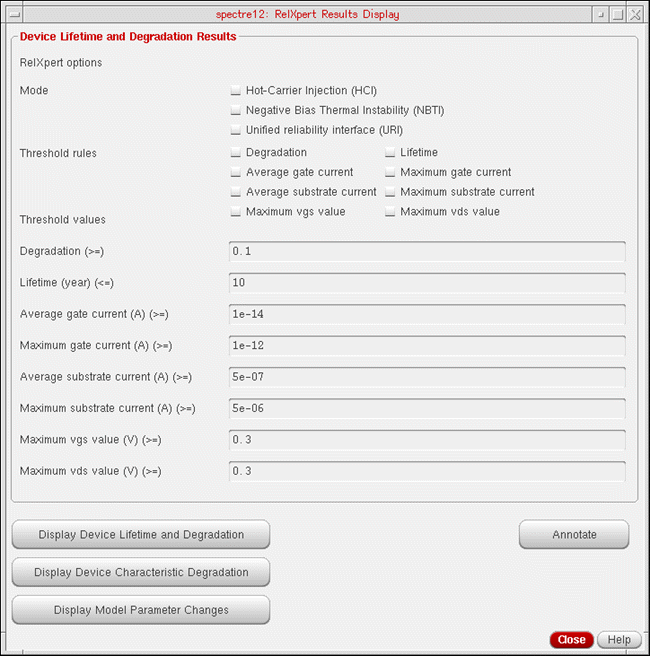
-
Select the RelXpert modes for which you want to backannotate the results.
Results are backannotated based on the specified threshold values. For example, if the Lifetime (year) (<=) field specifies a threshold value of 10, results are backannotated only to those instances whose lifetime is less than or equal to 10 years. - Select the threshold rules based on which you want to backannotate the results. The threshold rules corresponding to the selected modes are displayed in the form. The fields containing the default threshold values for the selected rules become available.
-
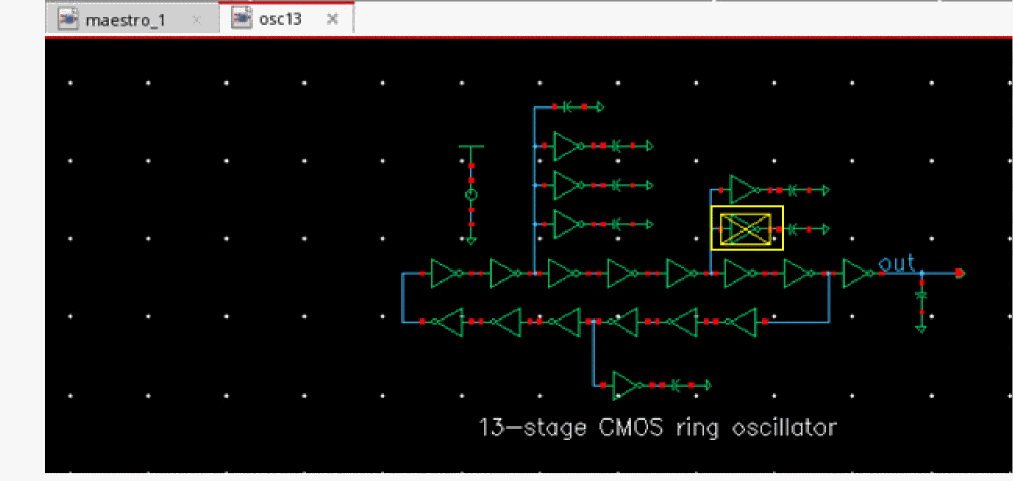
Click the Annotate button. The instances to which the results are backannotated are highlighted in yellow in the schematic.
Performing Reliability Analysis for Monte Carlo Run Mode
You can perform reliability analysis in the Monte Carlo Sampling run mode using the Standard Monte Carlo method.
After running the simulation, use the
In this view, the Age column displays the source of simulation results. The possible values are:
-
fresh: fresh simulation -
stress: stress simulation - <age point>: aged simulation
-
she: self-heating simulation - <age point>_she: combination self-heating and aged simulation
Limitations
The following features are not supported with reliability analysis in a Monte Carlo simulation:
- Gradual Aging
- Advanced Monte Carlo methods
- Latin Hypercube and Low Discrepancy Sequence sampling methods
- Job distribution
-
Measure outputs for SPICEWhen reliability analysis is run with the Monte Carlo run mode, stress simulation is run in 1: N ratio of total iterations. That is, for all N iterations, only one stress simulation is run. The stress simulation is run for nominal point followed by aging simulation for the remaining points. A stress simulation run for Monte Carlo does not consider statistical variations. Therefore, you may note that the results of a Monte Carlo stress simulation does not match the results of statistical corner simulations.
Viewing Reliability Report
Reliability report lets you view reliability analysis results in a tabular format. The tabular format makes it easy to view, sort, and filter reliability results data.
To view reliability report, do one of the following:
- In the Results tab, from the Select the results view drop-down list, select Reliability Report.
- In the Results tab, right-click an output value for a stress result and then select Reliability Data – Switch to Reliability Report.
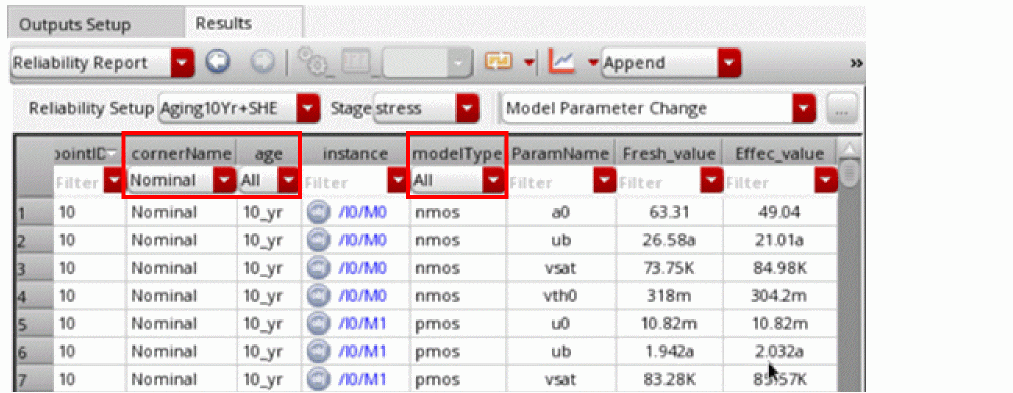
The following figure shows an example of how the reliability report shows the results of Model Parameter Change for the Reliability Setup, Reliability0.
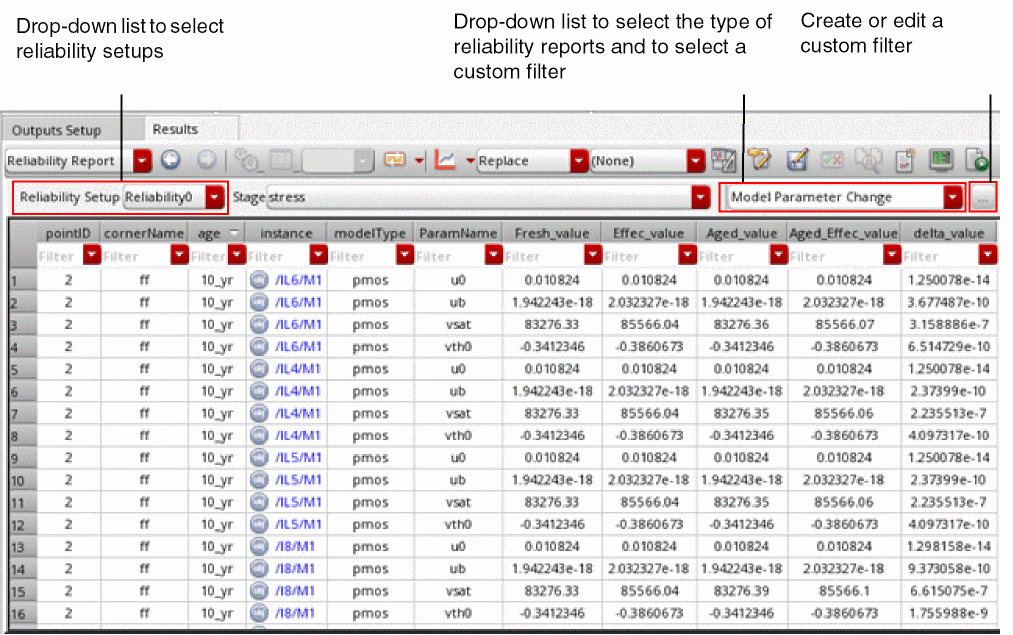
By default, the drop-down list in the top-right corner in the Reliability Report view of the Results tab displays only the main types of reliability reports, such as Device Characteristic Degradation, Device Lifetime and Degradation, and Model Parameter Change.
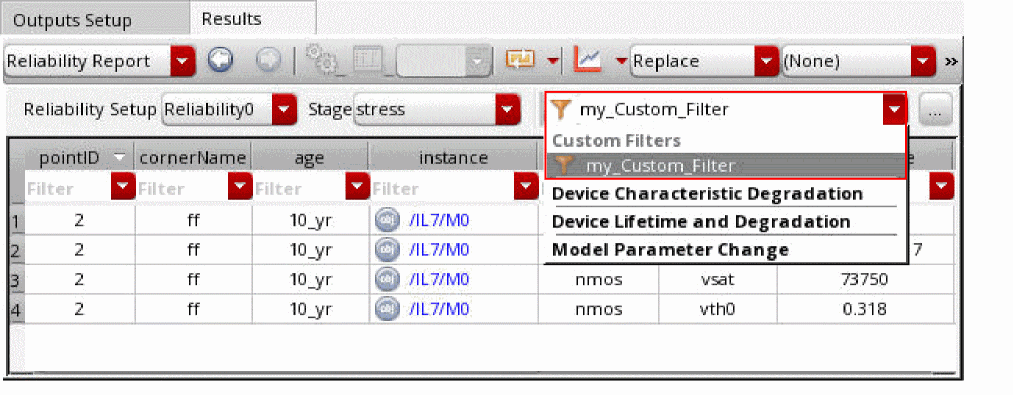
However, a new category, Custom Filters, is added at the top of this drop-down list. All the custom filters are listed under this category.
You can also open an instance in the schematic directly from the reliability report by clicking the hyperlink of that instance in the instance column.
In case of post-layout simulations, reliability report also supports annotations for out-of-context devices, which means that when you click the hyperlinks of such instances in the reliability report, it will open these instances in the schematic.
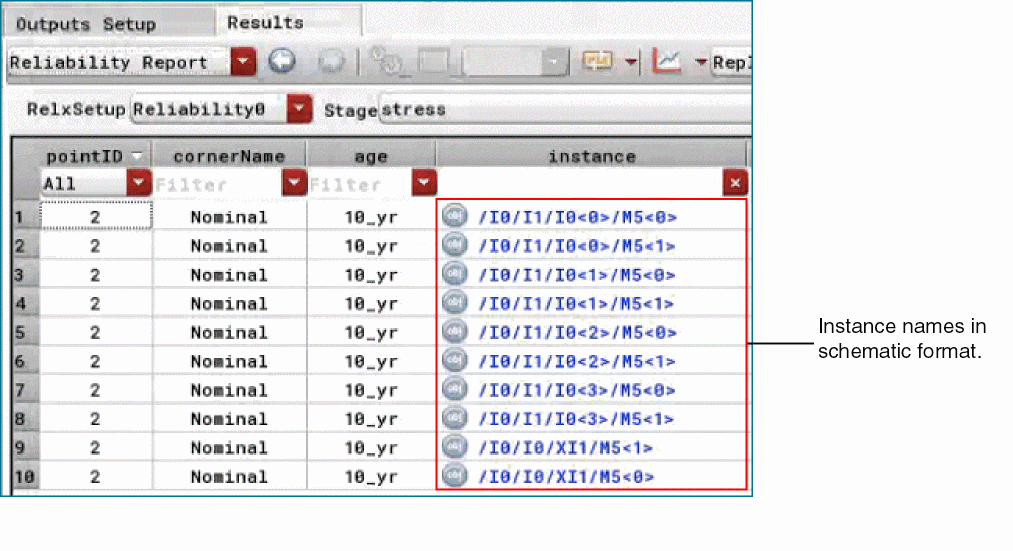
By default, reliability report shows instance names in post-layout format.
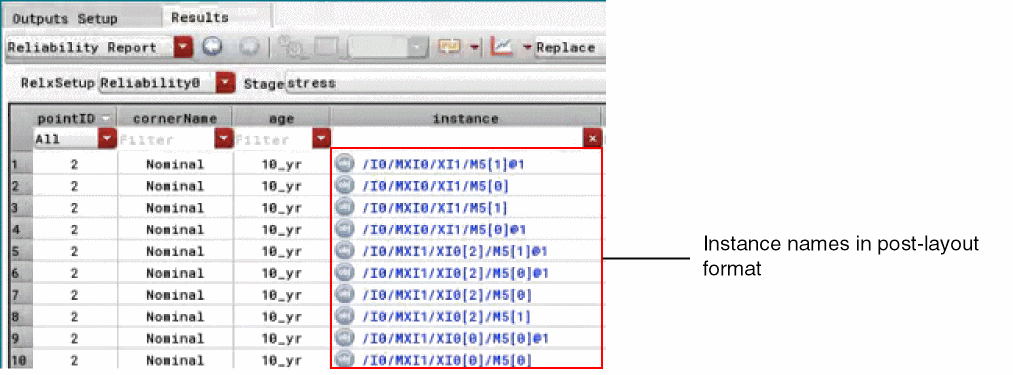
However, you can set the environment variable maestro.results postLayoutToSchematicInRelReport to t to view instance names in schematic format in the reliability report.
You can also read the related blog at
Related Topics
Customize Reliability Data Filters Form
Annotating Degradation Parameters on the Schematic
Customizing the Display of the Reliability Report
Creating a Custom Reliability Data Filter
Annotating Degradation Parameters on the Schematic
To annotate a degradation parameter on the schematic:
-
In the reliability report, right-click a degradation parameter, and choose Annotate parameter on Schematic.
The degradation parameter is annotated on the schematic.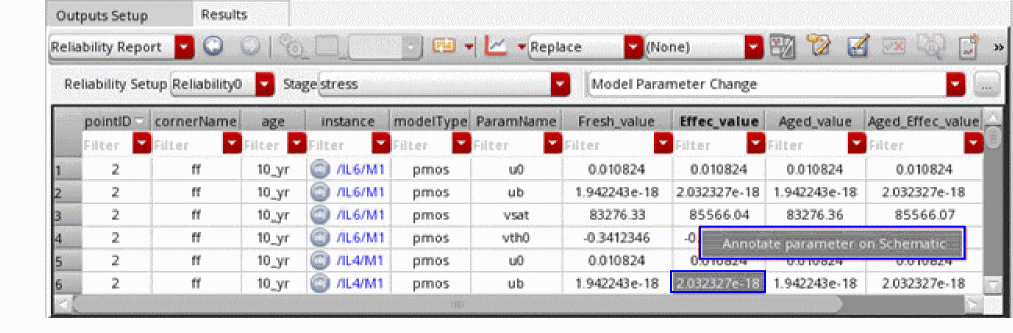
Related Topics
Customizing the Display of the Reliability Report
You can customize the display of the reliability report in the following ways:
- Hide a column: Right-click a column header and then select Hide Column to hide the column you do not want to see. To view the hidden columns, right-click any column header and select Show All Columns.
- Change the order in which columns are displayed: Select the column that you want to move and drag it to the location where you want to place it.
Related Topics
Creating a Data Filter to Hide Selected Columns
To create a data filter to hide the selected columns in the Reliability Report view:
- Right-click the header name of the column that you want to hide, and choose Hide Column.
-
Repeat step 1 for other columns you want to hide.
For example: cornerName, instance, d_Vthsat, d_Gm, and d_Gds. -
Type the name of the data filter in the Select a reliability data filter field.
For example:hiddenColumnFilter.
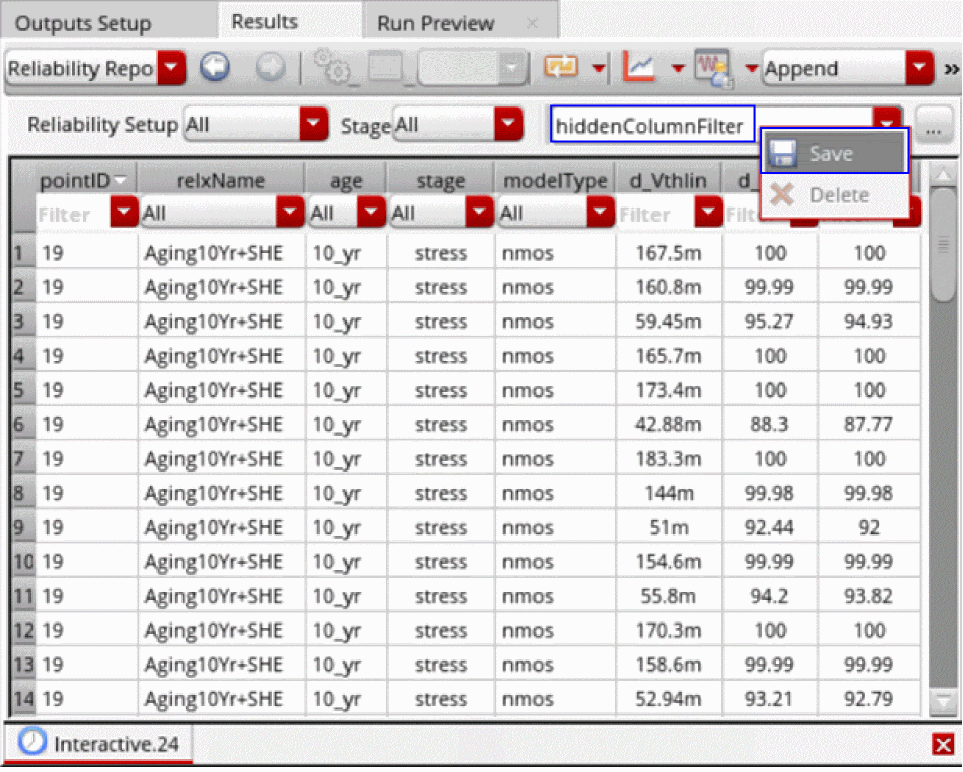
-
Right-click anywhere in the field, and click Save.
The filter is saved with the specified name. When you apply this filter, the columns you selected to hide are not displayed in the Reliability Report view.
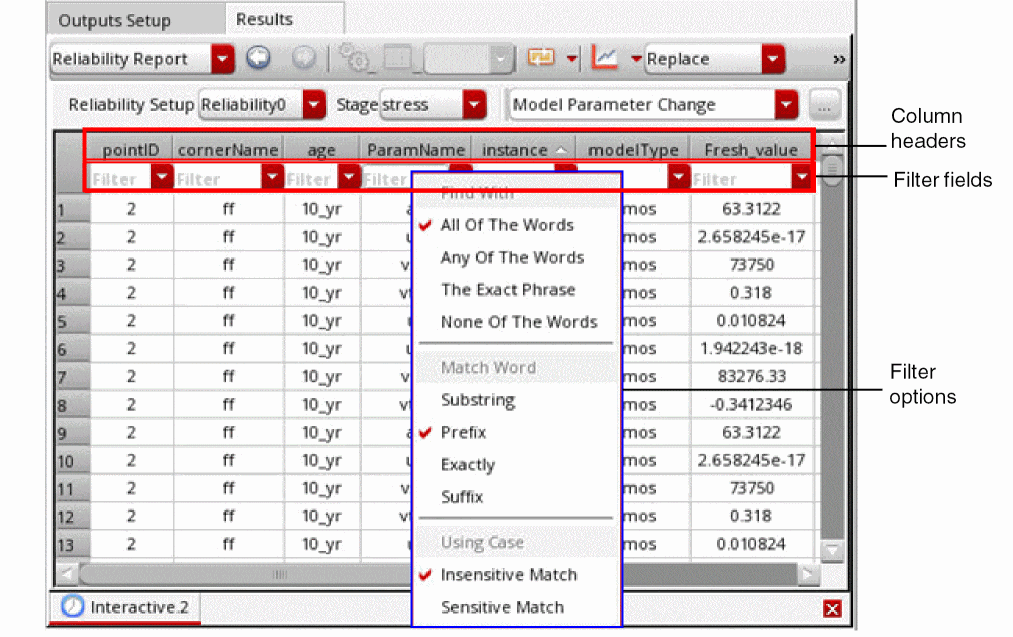
Applying Filters to Columns
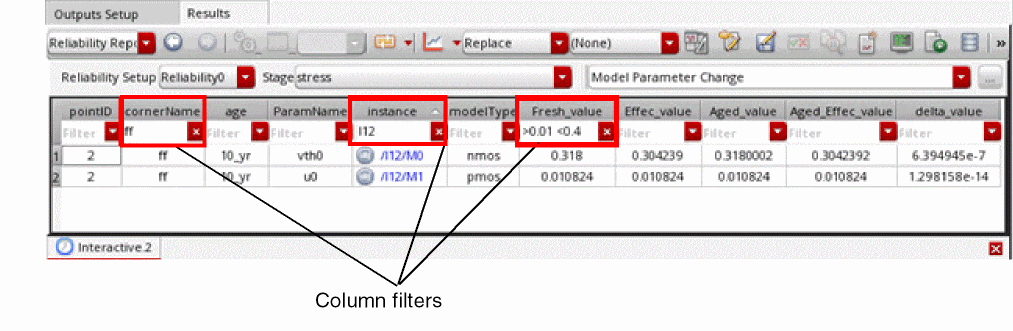
You can apply filter criteria to column to selectively view the results that match the specified filter criteria.
To apply filter criteria to columns:
-
Right-click anywhere in the Filter field below the column header to which you want to apply the filter, and select the filter options.
-
Enter the filter criteria in the Filter field and click Enter to filter the reliability results in the reliability report.
The following example shows how multiple column filters have been used to view the reliability results only for the cornerNameffand instanceI12, where the Fresh_value is between0.01and0.4.
-
In the drop-down list for the custom filter selection, type a name with which you want to save the filter, and right-click the drop-down list and choose Save.
The filters are saved in the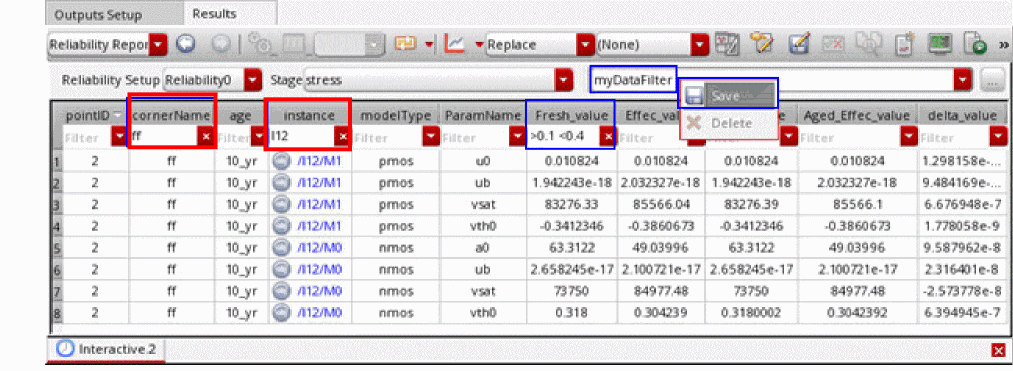
.cadence/dfII/maestro/reliability-filtersdirectory and are available for use when you reopen the cellview later. You can reapply a saved filter by selecting it from the list of custom filters. If not required, you can delete a saved filter by using the Delete command in the context-sensitive menu of the drop-down list.
The saved filters are also available in the Customize Reliability Data Filters form, where you can modify them further.
You can use the drop-down lists below the headers of the cornerName, age, and modelType columns to filter values in these columns.
Filter Options
The following table describes various filter options that can be applied on the column headers of the reliability report to filter the results.
Related Topics
Creating a Custom Reliability Data Filter
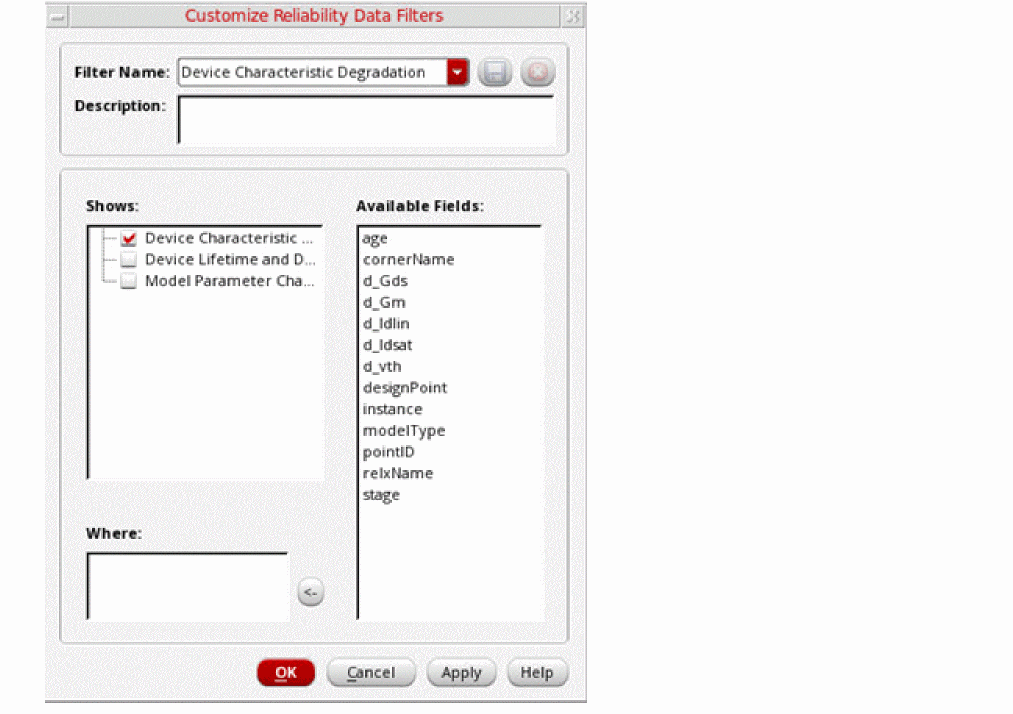
You can create your own custom reliability data filters with different filter criteria and save these custom filters so that they can be reused for the same or different reliability analysis reports and reliability setups.
To create a custom reliability data filter:
-
In the Reliability Report view of the Results tab, click the Edit or create custom reliability data filter command.
The Customize Reliability Data Filters form opens.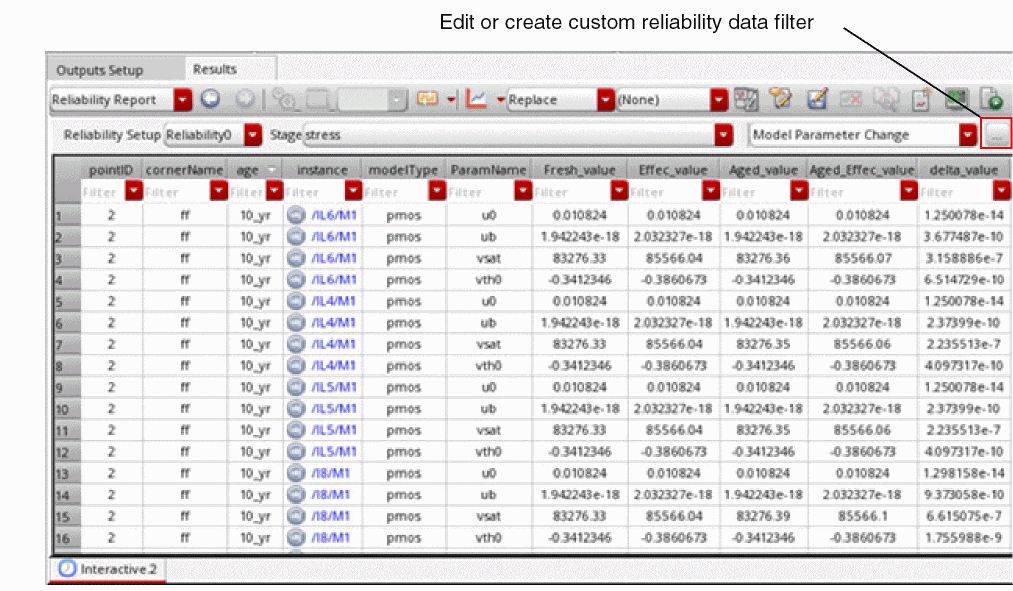
- In the Filter Name field, enter the name of the custom reliability data filter that you want to create.
- In the Description field, add a description for the custom reliability data filter.
- From the Shows list, select the type of reliability report to which you want to apply the custom filter.
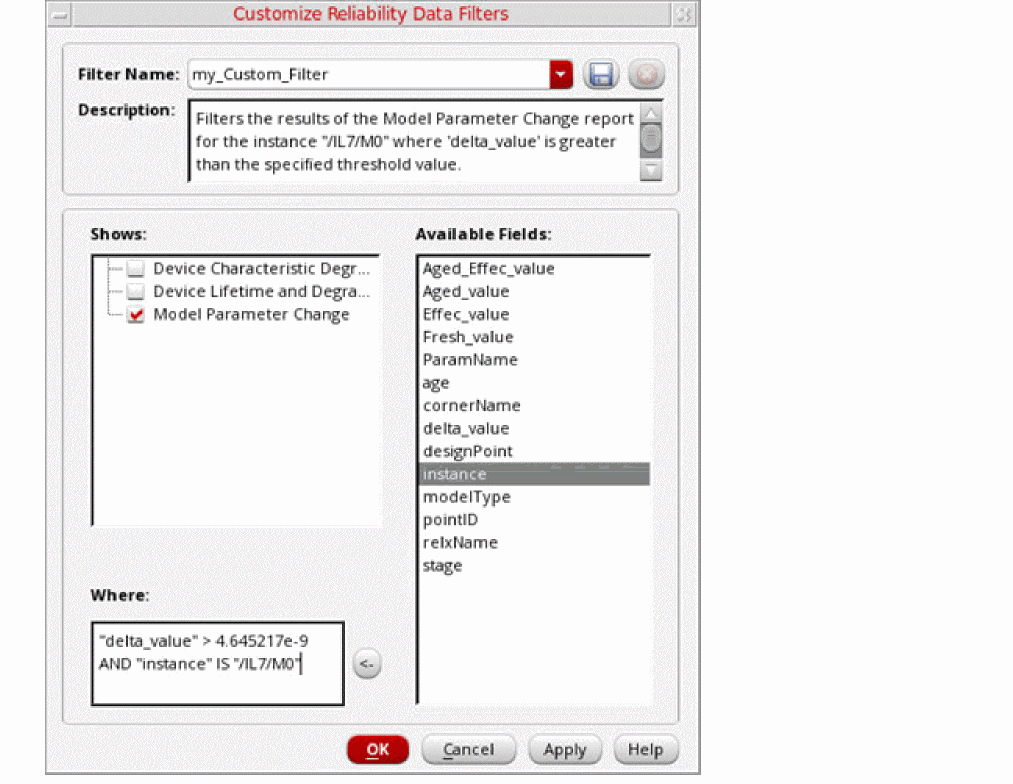
- From the Available Fields list, select a column name and then click the left arrow (<-) to add it to the Where field.
-
In the Where field, you can build expressions to define filter criteria using SQLite operators.
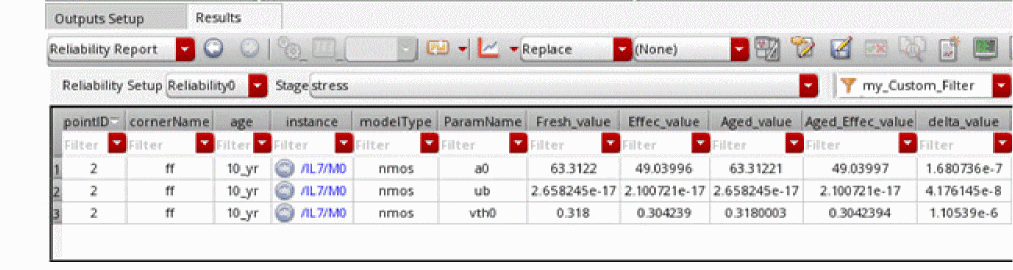
The following example shows a custom filter namedmy_Custom_Filterthat filters the results of the Model Parameter Change report in which delta_value is greater than4.645217e-9for the instance/IL7/M0.
-
Click Save on the Customize Reliability Data Filters form to save these settings in the custom filter.The custom filters are saved as XML files in the
.cadencedirectory under thedfII/maestro/reliability-filterssubdirectory. You can configure the Cadence Setup Search File mechanism (CSF) to specify additional locations from where filters can be read. This allows you to create a library of filters that can be shared amongst multiple users. - Click OK to apply the custom filter to the reliability report.
-
The results of the reliability report are filtered based on the applied custom filter.
Related Topics
Creating a Custom Reliability Data Filter
Query Operators for Custom Filters
Custom Filter Syntax
-
Instance and net names must use the schematic namespace, not the simulator namespace. For example,
/IL7/M0is correct, whereasIL7.M0is incorrect. - Query operators are case-insensitive.
- Strings can be in single or double quotes.
- If the field names contain spaces or special characters, they must be enclosed in double quotes.
- The borders of the Where field on the Custom Reliability Data Filters form are highlighted in red if there are errors in the syntax of the custom filter. A tooltip is also displayed, indicating the location of the syntax error when you hover over the Where field.
Related Topics
Creating a Custom Reliability Data Filter
Query Operators for Custom Filters
Query Operators for Custom Filters
The custom filters support all SQLite operators. The following table lists some of the commonly used operators.
| Operator | Definition | Example |
|
Greater than, less than, greater than or equal, less than or equal |
||
|
Searches for a case insensitive pattern. % is used to define wildcards before and after the pattern. |
||
Related Topics
Creating a Custom Reliability Data Filter
Customize Reliability Data Filters Form
Use the Customize Reliability Data Filters form to create or edit filter criteria to selectively view the reliability results data.
Related Topics
Creating a Custom Reliability Data Filter
Query Operators for Custom Filters
Return to top