2
Customizing the Circuit Prospector
The Circuit Prospector assistant can be customized to identify circuit patterns in a schematic, list the found members, as per each searched pattern, as candidates for constraint setting, and then suggest a set of relevant constraints.
You can then selectively choose a subset of candidates and apply the associated constraints (using the Create Default Constraints option in the Constraint Manager assistant).
Each particular circuit pattern to identify, and the associated constraints, are described in finders, with subsets of finders being grouped into categories.
This chapter describes how to create and register customized constraint generators, new finders, new categories, and how to load them into the Circuit Prospector.
The following topics are discussed:
- Creating Custom Constraint Generators
- Creating New Finders
-
Creating New CategoriesFor information on removing any PDK dependencies from the Circuit Prospector, see the relevant SKILL API commands in the Circuit Prospector Assistant Customization SKILL Commands section of the Virtuoso Unified Custom Constraints SKILL Reference.
PDK Setup for the Circuit Prospector
To set up a PDK with customization for the Circuit Prospector, use the libInit.il file to define the components for recognition by the Circuit Prospector.
For assistance, a setup example for gpdk090 is detailed below:
when( isCallable('ciRegisterDevice)
ciRegisterDevice("nfet" append(ciGetDeviceNames("nfet") '(
'("gpdk090" "nmos1v" nil)'("gpdk090" "nmos1v_hvt" nil)
'("gpdk090" "nmos1v_iso" nil)
'("gpdk090" "nmos1v_nat" nil)
'("gpdk090" "nmos2v" nil)
'("gpdk090" "nmos2v_nat" nil)
)))
ciRegisterDevice("pfet" append(ciGetDeviceNames("pfet") '(
'("gpdk090" "pmos1v" nil)
'("gpdk090" "pmos1v_hvt" nil)
'("gpdk090" "pmos2v" nil)
)))
ciRegisterDevice("npn" append(ciGetDeviceNames("npn") '(
'("gpdk090" "npn" nil)
)))
ciRegisterDevice("pnp" append(ciGetDeviceNames("pnp") '(
'("gpdk090" "pnp" nil)
'("gpdk090" "vpnp2" nil)
'("gpdk090" "vpnp5" nil)
'("gpdk090" "vpnp10" nil)
)))
ciRegisterDevice("capacitor" append(ciGetDeviceNames("capacitor") '(
'("gpdk090" "mimcap" nil)
)))
ciRegisterDevice("resistor" append(ciGetDeviceNames("resistor") '(
'("gpdk090" "resm1" nil)
'("gpdk090" "resm2" nil)
'("gpdk090" "resm3" nil)
'("gpdk090" "resm4" nil)
'("gpdk090" "resm6" nil)
'("gpdk090" "resm6" nil)
'("gpdk090" "resm7" nil)
'("gpdk090" "resm8" nil)
'("gpdk090" "resm9" nil)
'("gpdk090" "resnsndiff" nil)
'("gpdk090" "resnspoly" nil)
'("gpdk090" "resnspdiff" nil)
'("gpdk090" "resnsppoly" nil)
'("gpdk090" "resnwoxide" nil)
'("gpdk090" "resnwsti" nil)
'("gpdk090" "ressndiff" nil)
'("gpdk090" "ressnpoly" nil)
'("gpdk090" "resspdiff" nil)
'("gpdk090" "ressppoly" nil)
)))
ciRegisterDevice("fet" append(ciGetDeviceNames("nfet") ciGetDeviceNames("pfet"))) ciRegisterDevice("bjt" append(ciGetDeviceNames("npn") ciGetDeviceNames("pnp")))
ciRegisterDevice("passive" append( ciGetDeviceNames("capacitor")
ciGetDeviceNames("resistor")))
ciRegisterDevice("passive" append( ciGetDeviceNames("passive")
ciGetDeviceNames("inductor")))

) ; when
when( isCallable('ciMapParam)
ciMapParam("width" append(ciGetParamMapping("width") '("w")))
ciMapParam("length" append(ciGetParamMapping("length") '("l")))
ciMapParam("fingerCount" append(ciGetParamMapping("fingerCount") '("fingers")))
ciMapParam("fingerWidth" append(ciGetParamMapping("fingerWidth") '("fw")))
ciMapParam("mFactor" append(ciGetParamMapping("mFactor") '("m")))

) ; when
when( isCallable('ciMapTerm)
ciMapTerm("gate" append(ciGetTermNames("gate") '("G")))
ciMapTerm("source" append(ciGetTermNames("source") '("S")))
ciMapTerm("drain" append(ciGetTermNames("drain") '("D")))
ciMapTerm("bulk" append(ciGetTermNames("bulk") '("B")))
) ; when
Creating Custom Constraint Generators
A constraint generator is a SKILL expression that, when evaluated, creates a constraints. The expression is evaluated within an internal function that makes available variables for accessing the selected instances, nets, and pins (instsNetsPins) and the constraints cache. You can create and register customized constraints using the ciRegisterConstraintGenerator SKILL function. When registering your own plug-in constraints, you can choose to optionally add them to the Constraint Manager toolbar and/or the Generate Constraints constraint list in the Constraint Manager context-menu. The constraint generator can also be set as the default generator for a Circuit Prospector finder.
Registering a Custom Constraint Generator
When you use the ciRegisterConstraintGenerator() SKILL function, it registers the specified constraint generator with the Constraint Manager assistant and adds an icon for it to the Constraint Manager toolbar. This means that the new constraint generator can be used to generate one or more constraints with preset parameters from the selections made on the canvas.
The custom constraint generator can be registered by loading the SKILL file into the application or by storing the file in a .cadence/dfII/ci/generators directory prior to launching a DFII session.
For information about how to load files with custom constraint generator after Virtuoso startup, refer to Loading Customized Startup Files On Demand.
The settings of a constraint generator dialog box are stored in the .cadence/dfII/ci/1/<generatorName>_cGen.ini file. When you call the dialog box next time, it is opened with the previous settings.
When you select multiple devices for constraint creation and open any constraint generator dialog box, a button named OK All is also displayed in the dialog box to apply the same settings for the entire selection. However, some settings are device specific and might not be applicable to all device selections. In this case, the default settings are used.
- Creating and Overriding Custom Constraint Types
- Constraints SKILL API Commands in the Virtuoso Unified Custom Constraints SKILL Reference
The constraint generator can optionally specify arguments that might display a window when the generator is run. This is to allow you to specify values for these arguments. The values of the arguments may then determine what constraints are generated and their parameter settings. The argument values are made available to the constraint generator expression through the variable, args. This variable is a disembodied property list and the argument values can be accessed through the argument name, for example args->strength.
The argument types can be one of the following: bool, int, float, enum, string (a single-line string), multiString (a multi-line string), pattern (a multi-line string with fixed-pitch font), orient (a multi-line string with fixed-pitch font), separator, beginExpandedOptions, or endExpandedOptions. The pattern, orient, separator, beginExpandedOptions, and endExpandedOptions argument types are described in more detail in the Virtuoso Unified Custom Constraints SKILL Reference.
A drop-down list box can be added to the constraint generator dialog box by declaring it using one of the following ways:
-
Set the type to
stringand the widget type to“comboBox“.
The valid values can contain spaces and can be updated dynamically in the callback. To add new valid values in the callback, use one of the following ways:- Set the argument to a value that does not already belong to the valid values list.
-
Update the valid values through the widget properties, as shown below:
("dyn_cb" string "\"value 2\"" widgetType "comboBox" legalValues "\"value 1; value 2; value 3; value 3\"")
-> dynamic combo box allowing spaces in name. 'value 2' will be the default
-
Set the type to
enum.
The valid values can contain spaces, but cannot be updated automatically in the constraint generator dialog box. The format for defining valid values with spaces and modifiable drop-down list box is illustrated below:("enum_cb" enum "" legalValues "\"value 1; value 2; value 3; value 2\"")
-> non-dynamic combo box allowing spaces in name. 'value 2' will be the default
("enum_cb1" enum "\"value 1\"" legalValues "\"value 0; value 1; value 2; value 3\"")
-> non-dynamic combo box allowing spaces in name. 'value 1' will be the default
The example below shows how to register the Matching (strength) constraint generator that is displayed as an option in the Constraint Manager toolbar and the Generate Constraints context-menu:
ciRegisterConstraintGenerator(
list(nil
'name "Matching (strength)"
'description "Generate various levels of Matching constraints"
'expression "ciRunMatchingConstraintsGenerator(args instsNetsPins cache)" ;;; expression to generate constraints
'addToToolbar t ;;; whether you want to add a button to the toolbar for this generator
'iconName "templateMatched" ;;; icon to use on the toolbar. templateMatched.png must exist in the icon search path
'args list( "strength" 'enum "low" "medium" "high")
'menu list( "Custom1” "Custom2")
)
Constraint Template Storage
Template storage is possible for all constraints that have independent Open Access (OA) storage.
However, the
If you attempt to add one of these constraint types into a template, the Constraint Manager will issue a warning and will not add that constraint to template storage. The constraint will still remain visible in the Constraint Manager, but will not be presented and stored as part of a template.
Setting Widget Properties in Constraint Generator Arguments
While defining the constraint generator arguments, the widget properties can be set by adding a 'widgetProperties directive to the argument definition. This directive accepts one of the following inputs:
In the constraint generator argument, the list of widget property can have two to three elements. If there are three elements, the list is of the following format:
list('widgetName 'propName propNameValue)
The value can also be set as a string expression. To set a value of string type, ensure that the value is wrapped within double quotes. For example: value = “\“sampletext”\”
If there are two elements in the property list, the 'widgetName directive is automatically set to the argName.
procedure(myTab1Props()
list(
list('title "\"Tab 1\"")
list( 'toolTip"\"some explanation1\"")
)
)
Arg1 = list("Tab1" 'separator 'widgetType "tabSeparator"
'widgetProperties "myTab1Props()")
Setting Properties in Callback Procedure
The properties of all widgets are appended at the end of the args function in the callback procedure. To access the widget properties, use one of the following syntaxes:
The format of the properties is a disembodied property list of the following format:
list('widgetProperties
'widgetName1 list('propertyList'propName1 value1 … 'propNameN valueN)
…
‘widgetNameX list('propertyList'propNamei valuei… 'propNameX valueX)
)
Consequently, a property can be set in the following way:
properties->widgetName->propName= myValue
Accessing a Widget Name
Widget names are constructed based on the argument names set for a generator. While doing so, the following should be kept into consideration:
- The argument and the widget used to edit its value should have the same name.
-
The name of the label in front of the argument name is
argName.label. -
The name of any widget created by using
legalValueson the argument is of the formatargName.legalValue1.
list("CheckBoxes" 'string "" 'widgetType "checkBoxGroup"
'legalValues "\"cb1; cb2; cb3\"")
Creates the following widgets on which properties can be set:
Available Widget Properties
You can use the following properties for your widgets:
-
toolTip -
text(Not fortextEditwidgetorgroupBoxes) -
title(Equivalent totextfor group boxes and tabs) -
hide -
enable -
guiOnly
These properties support the following types of values:
However, remember that the widget properties do not update the status of the parameter dynamically in the Constraint Manager. In addition, changing the text of a label on the argument does not update the parameter name in the Constraint Manager. The name can be changed in the config.xml file.
Enabling or Disabling Callbacks to Widget Properties
To enable or disable the triggers to callbacks for the status of widget properties, set 'widgetPropertiesEnabled with the 'settings argument of the ciRegisterConstraintGenerator SKILL function. For example,
ciRegisterConstraintGenerator(list(nil
'name "MyTemplateForWarnings"
'description "Callback will create warnings"
'expression "ciTemplateCreate(cache \"MyTemplateForWarnings\" ?members instsNetsPins)"
'addToToolbar t
'iconName "CurrentMirror"
'args "ciGetStructArgs('MyTemplateForWarnings)"
'menu "Rapid Analog Prototype"
'useCGenForEdit t
'templateName "MyTemplateForWarnings"
'settings list(nil 'widgetPropertiesEnabled nil)
)
)
By default, triggers to callbacks for widget properties are disabled, unless some 'widgetProperties are defined on any argument. To enable such triggers, set 'widgetPropertiesEnabled to t. The following table shows the status of 'widgetProperties in the different scenarios:
|
|
Viewing Arguments in GUI Only and Not Saving as Template Parameters
By default, arguments are stored as template parameters. You can control this behavior using the guiOnly widget property. This property can accept t or nil as a value, where nil is the default.
To avoid storing of arguments as template parameters, set the guiOnly widget property to t.
However, the arguments of following types are always guiOnly and cannot be set to be saved as template parameters:
guiOnly widget property is set to t is not saved in a template. If the value needs to be retrieved when loading a constraint generator dialog box to edit the template, it is up to you to handle how to store and how to retrieve the value.
For example, any template generator registered with the following arguments will have only two parameters 'area' and 'perimeter':
myArgs = list( list( "form" 'string "\"Square\"" 'widgetType "radioButtons" 'legalValues "\"Square; Rectangle; Circle\""
'widgetProperties '((guiOnly t) (form\.label text "\"Select form:\"")) 'callback callback ) ;; not saved as a parameter
list("r0" 'float "float(1 + 1)" 'callback callback 'widgetProperties '((guiOnly t) (r0\.label text "\"Edge [m]\""))) ;; not saved as a parameter
list("r1" 'float 0.0 'callback callback 'widgetProperties '((guiOnly t) (hide t) (r1\.label hide t))) ;; not saved as a parameter
list("area" 'float 0.0 'callback callback 'widgetProperties '((area\.label text "\"Area [m^2]\"")) 'readOnly) ;template parameter
list("perimeter" 'float 0.0 'callback callback 'widgetProperties '((perimeter\.label text "\"Perimeter [m]\"")) 'readOnly) ;template parameter
)
Overriding the Behavior of Defaults Button in Constraint Generator Forms
On the various constraint generator forms, the Defaults button can be used to rollback any user-defined values in the fields to their valid default values. This means that the button resets the fields to their default values after the callbacks have been triggered. This is the system-provided behavior of the Defaults button. However, you can override this behavior by setting defaultButtonCallback for the constraint generator to the name of the procedure that needs to be called when you click the Defaults button. The following arguments are supported in this callback:
-
cache -
instsNetsPins -
oldArgs(First valid arguments) -
defaultArgs(Original default before the saved values (from template or settings) are loaded and callbacks have not yet been triggered.) -
args(Current arguments in the constraint generator dialog box)
The following syntax shows the usage of these arguments:
ciRegisterConstraintGenerator(list(nil
'name "MyGenericModgen" ;; Must match the template name which is the structure symbol name as a string
...
...
'settings '(nil widgetPropertiesEnabled t helpTag "genericModgenRAP" 'defaultButtonCallback "defaultButtonCallback(cache instsNetsPins oldArgs defaultArgs args)")
)
)
Example of Setting Widget Properties
Generator Arguments
myExampleArgs= list(
list("myGroupBox" 'separator);; Regroup widget into a groupBox
list( "RadioButtons" ;; Argument Name
'string"\"Show Arg1 + label\"" ;;buttons selected by default
'widgetType "radioButtons" ;;A group box of radio buttons
'legalValues "\"Show All 'GroupBox Title'; Hide Field 'GroupBox Title'; Show Field 'GroupBox Title'; Hide Label 'GroupBox Title'; Show Label 'GroupBox Title'; Hide All 'GroupBox Title'\"" ;; Four radio buttons
'callback "myExampleCallback(
cache argName args oldArgs instsNetsPins userEdit)"
;; callback with all available argument
'widgetPropertieslist(
list('enable nil )
;;disable radio buttons
list('RadioButtons\.label 'text "\"NewRadiobuttonsText\""
;;update the text for the radiobuttons
list('Radiobuttons\.Show\All\'GroupBox\Title
'tooltip "tooltipExpression()"
;;The tooltip set on the radio buttons named Show, All, 'GroupBox,
;;Title will be set to the string value returned by the procedure
;;tooltipExpression
)
)
...
...
list("GroupBox Title" ;;Argument group box title
'string "\"\"" ;; A line edit
'callback "myExampleCallback(
cache argName args oldArgs instsNetsPins userEdit)"
;;Note: callback does not need to be the same
)
list("Change label"
'string "\"\"" ;;A line edit
'callback "myExampleCallback(
cache argName args oldArgs instsNetsPins userEdit)"
;;Note: callback does not need to be the same
)
)
Generator Definition
ciSetStructArgs('MyExamplemyExampleArgs)
ciSetStructGeneratorExpressions('MyExample ciGetStructGeneratorExpressions(
'GenericModgen))
procedure(createMyCon(cache instsNetsPins structType args @key (params nil)
(userParamsnil))
let( (templateCons)
templateCons= ciConCreateExpanded(cache 'modgen ?members instsNetsPins)
)
)
ciRegisterConstraintGenerator(
list(nil 'name "MyExample"
'description "An example on how to change properties on widgets"
'expression "ciTemplateCreate(cache \"MyExample\" ?members instsNetsPins)"
'addToToolbar t
'iconName "CurrentMirror"
'args "ciGetStructArgs('MyExample)"
'menu "Rapid Analog Prototype"
'useCGenForEdit t
'templateName "MyExample"
'settings list(nil 'widgetPropertiesEnabled t)
;;The 'setting argument is not mandatory in this example because widget
;;properties have been defined on some arguments of the generator.
)
)
ciTemplateCreateDefinition("MyExample" 'MyExample 'createMyCon
?acceptsUserParams t)
ciReinitStructTemplateDefs()
Generator Callback
procedure(myExampleCallback(cache argName args oldArgs instsNetsPins userEdit)
let(((properties args->properties) (lbl nil))
case(argName ;;argName is the argument that triggers the callback
("RadioButtons"
when(isRadioButtonCheck(args "Show All 'GroupBox Title'")
properties->GroupBox\Title->hide = nil
properties->GroupBox\Title\.label->hide = nil
)
when(isRadioButtonCheck(args "Hide Field 'GroupBox Title'")
properties->GroupBox\Title->hide = t )
when(isRadioButtonCheck(args "Show Field 'GroupBox Title'")
properties->GroupBox\Title->hide = nil )
when(isRadioButtonCheck(args "Hide Label 'GroupBox Title'")
properties->GroupBox\Title\.label->hide = t)
when(isRadioButtonCheck(args "Show Label 'GroupBox Title'")
properties->GroupBox\Title\.label->hide = nil )
when(isRadioButtonCheck(args "Hide All 'GroupBox Title'")
properties->GroupBox\Title->hide = t
properties->GroupBox\Title\.label->hide = t
)
)
("GroupBox Title" properties->myGroupBox->title = args->GroupBox\Title )
("Change label"
lbl= args->Change\label
when(lbl&& lbl!= "" properties->GroupBox\Title\.label->text = lbl)
)
)
args
);;end let
);; end procedure
;;Procedure to check if a radio button is checked
procedure(isRadioButtonCheck(args radioButton)
exists(x parseString(args->RadioButtons";") (x == radioButton))
)
Creating New Iterators
You can create and register customized iterators using a SKILL API.
After registering your own plug-in and iterators using ciRegisterIterator, you will then be able to select them from the Search Using Iterator drop-down list of iterators in the Edit Finder form. This means that your new iterator can be used by any new finder.
The custom iterator can be registered by loading the SKILL file into the current session or by storing the file in the .cadence/dfII/ci/iterators directory. For information about how to load files with custom iterators after Virtuoso startup, refer to Loading Customized Startup Files On Demand.
The matching expression associated with the finder is evaluated by the iterator at run time.
-
The SKILL file must have an
.ilextension. -
The
.cadencedirectory must be in the file search path (see The Cadence Setup Search File: setup.loc in the Cadence Application Infrastructure User Guide).
Creating New Finders
Finders are grouped by categories and listed in the Circuit Prospector under the Search for pull-down list.
When a filter is selected and run, any searched candidates found in the current schematic will be listed in the table in the lower section of the Circuit Prospector.
A finder comprises of three elements:
-
An iterator
An iterator is a pre-filter that retrieves the element found in the schematic on a per type basis (devices, nets or pins), or by symmetry or structure. -
A matching expression
A matching expression is used to operate a second level of filtering. The expression is submitted as a string of characters to the iterator for evaluation. If the result of the evaluation for each object of the same sublist isnil, then that object is filtered out by the iterator. -
A default constraint generator
A default constraint generator defines the set of constraints to apply to the found members of the corresponding searched pattern.
You can create and register customized finders using a SKILL API. When registering your own plug-in finder using the ciRegisterFinder function (see Creating a New Finder Using SKILL API), the finder name is added to the current category and to the finder list under the Search for pull-down.
When you select the new finder in the Circuit Prospector, the list of members of the searched pattern for the corresponding finder will be displayed in the table.
The iterator and constraint generator listed in the ciRegisterFinder function must be correctly registered (see Creating Custom Constraint Generators). The custom finder can be registered by loading the SKILL file into the application or by storing the file in a .cadence/dfII/ci/finders directory.
-
The SKILL file must have the naming format of
<finder>.il. -
Where
<finder>must be the name used to register the finder with an “_” (underscore) character replacing each blank. -
The
.cadencedirectory must be on the file search path (see The Cadence Setup Search File: setup.loc in the Cadence Application Infrastructure User Guide).
You can create and register customized finders using either of the following methods:
- Using the Edit Finder form (see Creating a New Finder Using the Edit Finder Form)
- Using SKILL API (see Creating a New Finder Using SKILL API)
For information about how to load files with customized finders after Virtuoso startup, refer to Loading Customized Startup Files On Demand.
Creating a New Finder Using the Edit Finder Form
Using the Edit Finder form is simplest way to create a new finder.
You can access the Edit Finder form in the Circuit Prospector by clicking on the “...” button that is adjacent to the Search for field (having already selected a finder from the pull-down).
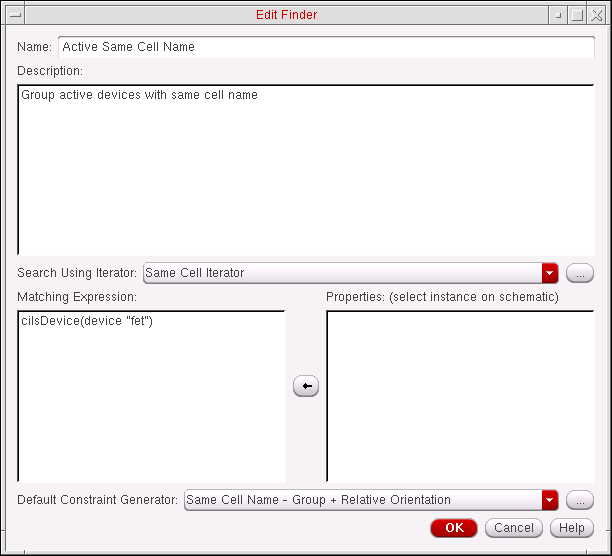
Figure 2-1 The Edit Finder Form
In the Edit Finder form you can:
- Enter a new finder name in the Name field.
- Change the Description to fit the new finder.
- Select a different iterator from the Search Using Iterator pull-down list.
- Modify or enter a new matching expression in the Matching Expression section.
- Select an alternative Default Constraint Generator.
After you select OK to register your changes this will save your new finder as a SKILL file in the current .cadence/dfII/ci/finders directory. This new finder will then be listed at the end of the category currently selected in the Circuit Prospector, with the changed category being saved in the .cadence/dfII/ci/categories directory.
Instead of modifying a category it is preferred that you create a new one (see Creating New Categories).
.cadence/dfII/ci/finders directory and start a new DFII session to retrieve the original finder.Creating a New Finder Using SKILL API
The ciRegisterFinder SKILL command can be used to register a finder within the Circuit Prospector. The name of the new finder will be added to the end of the current finder list.
-
Each finder has a name defined as a string under
‘name. -
A comment can be registered as a string under
‘description. -
You can specify the iterator for your finder as a string under
‘iterator. -
The matching expression is defined as a SKILL expression under
‘expression. -
You can store the string name of an existing constraint generator using
‘defaultCGen.
For the matching expression, depending on the selected iterator, you can use any of the following variables and SKILL API functions:
| Iterator | Variable | SKILL API |
For example, to catch all nets that are named with either one of the substrings “clk” or “clock” in your schematic, you can define a new finder in a Clocks_Nets.il file. This file will be stored in the .cadence/dfII/ci/finders directory located in the file search path (see
The content of the Clocks_Nets.il file may look like:
ciRegisterFinder(
list(nil
‘name “Clock Nets”
‘description “Find all clock nets by scanning their names”
‘iterator “Net Iterator”
‘expression “if(index(net->name \”clk\”) || index(net->name \”clock\”) then net->name else nil)”
‘defaultCGen “Custom Clock Net Priority”
‘legal CGens nil
)
)
Creating New Categories
A category (also referred to as an assistant) is a sequential list of finders. Customized categories can be created and registered using specific
After registering a customized (plug-in) category using the ciRegisterAssistant function (see the Category Creation Example below), the category name will be added to the Category pull-down list in the Circuit Prospector. When you select this new category, the list of finders for the corresponding category will be displayed in the Search for pull-down list.
Each finder listed in the ciRegisterAssistant function must be correctly registered for the corresponding category to be successfully registered (see Creating New Finders). The custom category can be registered by loading the associated SKILL file directly into the application or by storing the file in a .cadence/dfII/ci/categories directory. The .cadence directory must be on the file search path. For more information, see
<categoryName>.il. Where <categoryName> must be the name used to register the category with an “_” (underscore) character to replacing each blank.For information about how to load files with custom categories after Virtuoso startup, refer to Loading Customized Startup Files On Demand.
Category Creation Example
The ciRegisterAssistant function is used to register a category (assistant) in the Circuit Prospector, with the name of the new category being added to the end of the Category pull-down list.
The current pre-defined categories are Active Devices, Passive Devices, Structures, Nets, and Pins. For more information see
In the Circuit Prospector, Select A Finder and ALL are automatically added to the default list of finders.
When you select ALL, from the Search for pull-down list, an internal procedure scans the current schematic and lists all found groups in the order of the finders listed here. When you then select all the found groups and apply the default constraints (by selecting Create Default Constraints from the constraints pull-down in the Constraint Manager), the corresponding constraints will be set in the order of the selected groups in the Circuit Prospector.
To set constraints versus net types, you should first of all create a list of finders for the Circuit Prospector to look for relevant candidates. Then, you can register a custom category for these new finders with, for example, a “Various_Nets.il” file containing the following:
ciRegisterAssistant(
list(nil
'name "Various Nets"
'description "Net finders"
'finderNames list(
"Supply Nets"
"Ground Nets"
"Clock Nets"
"Sample and Hold Nets"
"Differential Nets"
"All Nets"
)
)
)
-
Each category has a name defined as a string under
'name. -
A comment can be registered as a string under
'description. -
A category is a list of finders to make them accessible in the Circuit Prospector, defined as a string list under
'finderNames.
Loading Customized Startup Files On Demand
On Virtuoso startup, the following type of files are loaded:
-
.cadence/icons/16x16/*.png -
.cadence/dfII/ci/config.xml -
.cadence/dfII/ci/iterators/*.il *.ile *.cxt -
.cadence/dfII/ci/generators/*.il *.ile *.cxt -
.cadence/dfII/ci/structures/*.il *.ile *.cxt -
.cadence/dfII/ci/finders/*.il *.ile *.cxt -
.cadence/dfII/ci/categories/*.il *.ile *.cxt -
.cadence/dfII/ci/categories/org/*.il *.ile *.cxt
All config.xml files and the icon files in .cadence/icons/16x16 directories on the Cadence Search Path are loaded and merged in the order they are found in the setup.loc file. If you want to load a customized config.xml file on demand after Virtuoso startup, for example when a design library or PDK is loaded, you can use the ciLoadConfigXML SKILL function. In the process, the new entries get merged into the existing config.xml files that have already been loaded and the existing entries are overwritten. Similarly, you can load specific or all icon files with .png extension on demand using the ciLoadIcon or ciLoadIcons SKILL function, respectively.
To load on demand all constraint-related files within the hierarchy of the specified .cadence directory, you can call the ciLoadDotCadenceFiles SKILL function from the CIW or from within any other SKILL function. It can also be called within the libInit.il file of a PDK or design library so that library-specific constraint customizations can be setup when the library is loaded. As you can have your own customizations, it is recommended that the following command is run to re-load those customizations:
ciLoadDotCadenceFiles("./.cadence")
Return to top