- An Overview of Routing and Constraint Interoperability
- Steps for Creating an Interoperable NDR in Virtuoso
- Creating Interoperable Shielding Constraints in Virtuoso
- Routing Constraints Understood by NanoRoute (Digital Router in Innovus)
- Creating/Viewing Interoperable Routing Constraints in Virtuoso
- Creating Interoperable Routing Constraints Using Innovus
- Hierarchical Propagation of Constraints
- Creating/Adding Mixed-Signal Routing Constraints on IP Blocks
- Routing Constraints Interoperability between NanoRoute and VSR
- Trying the Constraint Interoperability Environment and the run_vsr Command in Innovus for the First Time
11.1 An Overview of Routing and Constraint Interoperability
Given the full interoperability of the OpenAccess environment between various Cadence tools, Cadence has taken steps to create an environment in which design constraints can be shared across various platforms. For instance, in the Mixed Signal flow where top level of the design is captured as schematics in Virtuoso, routing constraints can be defined in Virtuoso for the digital portion of the design, which will later be implemented by Innovus. Conversely, in a flow where the top level of the design is captured as a Verilog netlist in Innovus, Innovus can define routing constraints that will be used by block designers when such blocks are later implemented in Virtuoso. In addition to these capabilities, mixed signal IPs can be embedded with the required integration constraints so that when the end users instantiate such IPs in their designs, the embedded constraints can be pulled to the top level of the design. This ensures that the integration requirements of the particular IP are met during the design process. Refer to the section titled “Creating/Adding Mixed Signal Routing Constraints on IP blocks” for a detailed description of this functionality.
The picture below depicts the instantiation of an IP that contains embedded routing constraints which dictate that top-level nets connecting to certain terminals of the block should be routed as Differential Pairs. The OpenAccess abstract of the IP contains such embedded constraints.
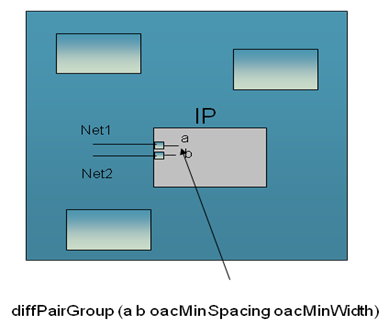
If the IP is instantiated in either Virtuoso or Innovus, the Differential Pair constraint is propagated to the top-level nets (Net1 and Net2 in the above example) when you invoke commands that propagate these constraints to the top level. In Innovus, the command to pull constraints to the top level is pull_block_constraint.
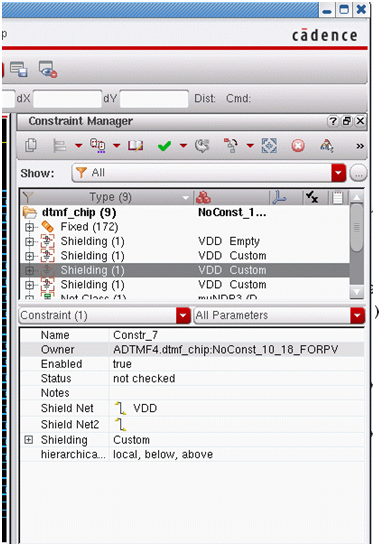
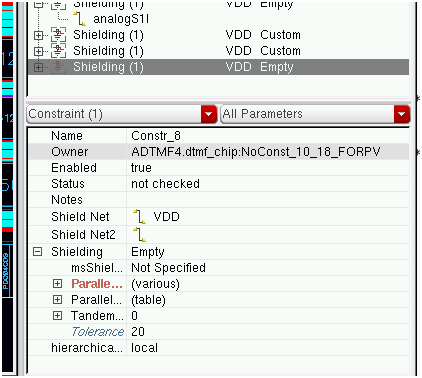
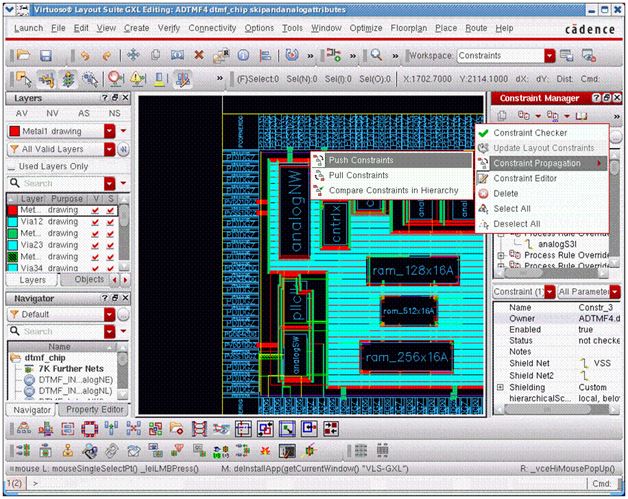
The hierarchical propagation of the constraints is controlled by the hierarchicalScope attribute, which is created at the time the constraints are initially created, either directly in a design or embedded in an IP. The hierarchicalScope property could be placed on any constraint, either in Virtuoso or in Innovus. The picture below shows how the hierarchical scope can be set on a shielding constraint. As the hierarchical scope value is local, below, above, it will instruct all applications to allow for Pushing (as defined by below) and Pulling (as defined by above) of this constraint.
After the implementation of the design is complete, PVS-cv can be used to check the final implementation of the design against embedded IP constraints that exist. Any implementation aspects of the design that do not conform to the intended design constraints are flagged as violations by PVS-cv.
A design checker utility is included in Innovus and Virtuoso installations. It could be used to check Virtuoso generated constraints for interoperability with Innovus. For more information, see the OpenAccess Database Interoperability Checker chapter.
11.2 Steps for Creating an Interoperable NDR in Virtuoso
The Virtuoso Constraint Manager (VCM) enables you to create interoperable Non-Default Rules (NDRs). Virtuoso XL or GXL licenses are needed to access the Virtuoso Constraint Manager environment. There are several ways to create an NDR in Virtuoso.
Use the following steps for creating an interoperable NDR.
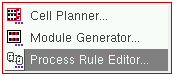
- After loading your design in Virtuoso, select the Process Rule Editor option from the Virtuoso Constraint Manager pull-down menu. (Remember to involve Virtuoso XL or GXL.)
- After the Process Rule Editor window is open, select the Design radio button. If there were existing NDRs in the design, you will see them displayed in the top part of the form.
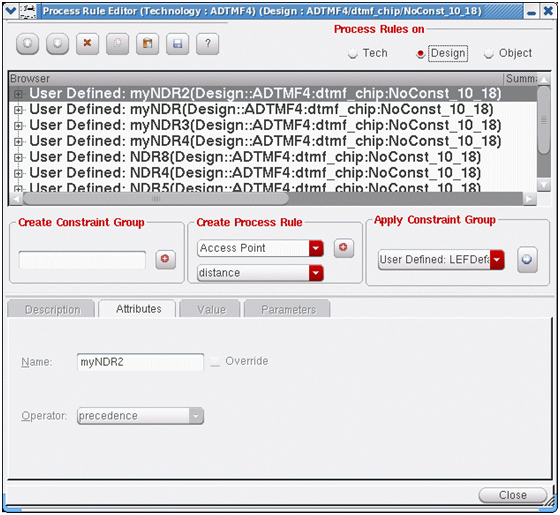
- In the Process Rule Editor window, enter a suitable name for the design NDR you are creating in the Create Constraint Group text box and then click the “+” sign next to it. You should now see the new NDR name in the upper portion of the form.
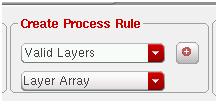
- Scroll down the Create Process Rule drop-down list and select the Valid Layers option as shown in the picture below. Click the “+” sign next to the field.
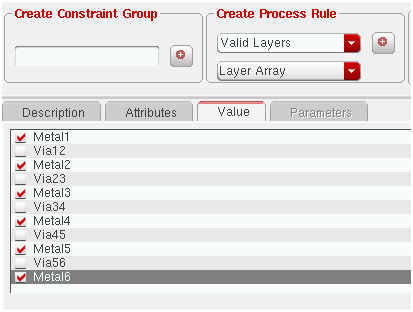
- Select the Value tab as shown in the picture below and select the routing layers you wish to have for this NDR. Note that in order for Innovus to recognize the NDR as valid, the routing layers for the NDR need to be selected from the routing layers defined in the LEFDefaultRouteSpec.
-
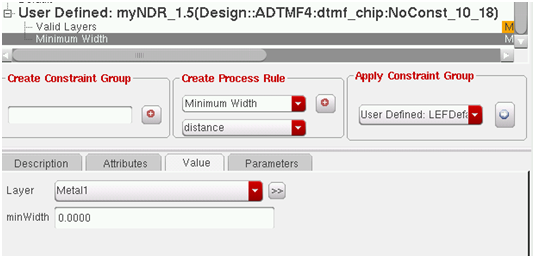
You have now completed the creation of a valid interoperable NDR/PRO between Innovus and Virtuoso. You can use the above method to create minimum width for all the layers, as well as any other attributes for this NDR/PRO. Refer to the picture below.
Note: Any PRO/NDR created using the above method is a design PRO/NDR. Ensure that you save the design after creation of PRO/NDRs. In addition, once the design is opened in Innovus, thewriteIntegRouteConstraintcommand can also be used within Innovus to dump out the constraint in text format for viewing, validation, and further modification.
11.3 Creating Interoperable Shielding Constraints in Virtuoso
The interoperable environment allows multiple methods for creating shielding constraints in Virtuoso. In the mixed-signal flow, you can use the Virtuoso Space-based Router (VSR) to pre-route some mixed-signal nets and then use NanoRoute to complete the routing for the design. The definition of the shielding constraint in Virtuoso determines which router will be used to route the net that is to be shielded.
-
If you would like to create a shielding constraint and use NanoRoute for creating the shielded net, you should create a shielding constraint in Virtuoso with
msShieldStyle = “Not Specified”or“parallel”. This will translate into a Simple Shielding constraint in Innovus that can be recognized by NanoRoute.Note: Except
msShieldStyle, no other parameter of the shielding constraint should be modified in Virtuoso. If any other parameters are modified, Innovus will not recognize the shield constraints as Simple Shielding. - If you would like to create a shielding constraint and use VSR for creating the shielded net, you need to create a shielding constraint in Virtuoso with
msShieldStyleset to the actual style you would like to use. The possible shield styles that you can use areTandem below,Tandem below + parallel,Tandem above,Tandem above + Parallel,Tandem, andCoaxial. When you do so, all the nets with this type of shielding constraint will be recognized as a complex shield in Innovus and will be recognized by VSR as valid routing constraints.
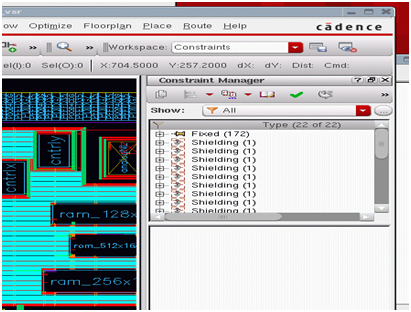
The picture below shows a correctly formed interoperable shielding constraint, which will be interpreted by Innovus and Virtuoso as a Simple Shielding constraint. Note that any nets having a Simple Shielding constraint can be routed by NanorRoute in Innovus. The msShieldStyle could have also been set to parallel:
Note that VSR can also be used to route shielded nets where the msShieldStyle = Not Specified or parallel. If these nets are routed by VSR before NanoRoute is used to route the rest of the nets in the design, you must use the following command in Innovus to ensure that NanoRoute does not remove the previously routed nets.
setAttribute -net net_name -skip_routing true
11.4 Routing Constraints Understood by NanoRoute (Digital Router in Innovus)
NanoRoute supports all of the following:
- Simple shielding
- Parallel shielding
- Nets with interoperable NDRs/PROs
- NetClass constraint (where a group of nets have the same constraints)
11.5 Creating/Viewing Interoperable Routing Constraints in Virtuoso
If you prefer to enter mixed-signal routing constraints using the Virtuoso environment, the Virtuoso Constraint Manager can be used to populate a design with the required routing constraints.
Virtuoso Constraint Manager is capable of creating some constraints that are used only by Virtuoso applications. Although these constraints are retained in the database as the design moves between Innovus and Virtuoso, none of the Innovus applications are able to interpret such constraints.
The Virtuoso Constraint Manager can be accessed by setting the workspace as constraints, using Virtuoso XL.
For more details on the user interface aspects of the tool, refer to the "Constraint Manager Assistant" chapter of the Virtuoso Unified Custom Constraints User Guide.
11.5.1 Creating Interoperable Constraints Using Virtuoso Constraint Manager
To create a differential pair or a match pair interoperable constraint using the Virtuoso Constraint Manager, follow these steps:
- Using the Navigator, select the nets that should be a part of the differential pair or the match pair constraint group.
- Using the Virtuoso Constraint Manager, select a differential pair constraint.
- If a differential pair must have shielding constraints, create an additional shielding constraint on the net members of a differential pair or a matched pair.
11.5.2 Checking OpenAccess Database with Constraints Prior to Bringing a Design into OA DB Checker System
OpenAccess Database (OA DB) Interoperability Checker is a SKILL-based utility which can be run in the Virtuoso Environment to ensure that the OpenAccess database being brought into Innovus is compatible for the place-and-route flow, and all constraints entered are interoperable. The OpenAccess database should contain all the necessary database objects which are required by applications within Innovus. At the same time, it should not contain any database object which would stop the Innovus implementation flow.
For information on loading the OA DB checker, see OpenAccess Database Interoperability Checker.
11.6 Creating Interoperable Routing Constraints Using Innovus
Use the Integration Constraint Editor in Innovus to create interoperable mixed-signal routing constraints.
Note: The routing constraint interoperability requires the OpenAccess database to be used while creating a design library. In addition, a mixed-signal ready OpenAccess PDK should be used as the technology library.
The Innovus constraint-entry mechanism can be accessed by choosing Tools - Mixed Signal - Integration Constraint Editor.
The active constraint tabs in the Integration Constraint Editor are labeled in red to make it easy for you to identify them. In addition, the Integration Constraint Editor also displays the constraint count on each active constraint tab.
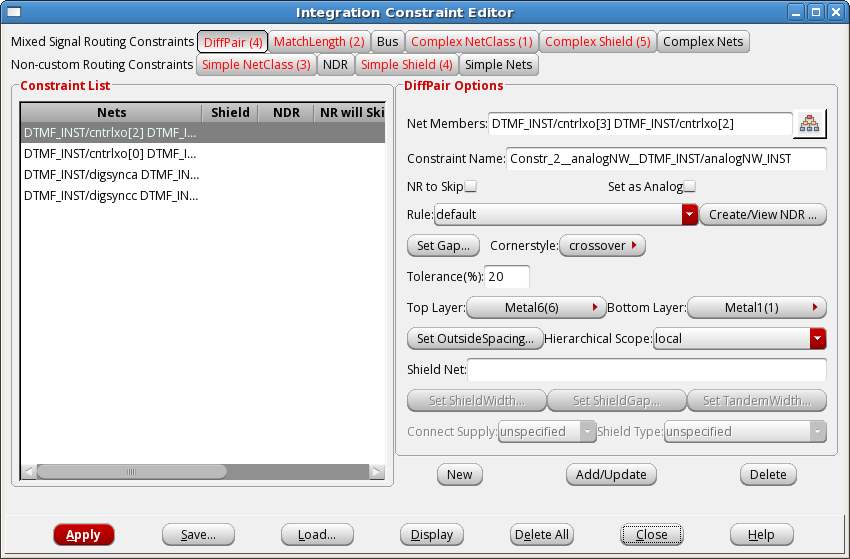
In the above form, the tabs in the Mixed Signal Routing Constraints row display nets that are routed using custom routing techniques. These nets have a property identifying them as Mixed Signal nets, instructing all applications in the Innovus environment to ignore them. The tabs in this row are:
- DiffPair
- MatchLength
- Bus
- Complex NetClass
- Complex Shield
- Complex Net
If a new constraint needs to be created, click the New button to clear the form so that nets can be added to the Net Members field. The net names can be entered either manually or by using the Design Browser button to the right of the Net Members field. This button opens Innovus's design browser within the Select Net Members form. After entering all required parameters of the constraint in the form, click the Add/Update button to add the constraint to the design. The net members are then shown under the Constraint List.
If an existing constraint needs to be modified, first select the constraint from the Constraint List and modify its parameters in the form. After the modification is complete, use the Add/Update button to save the constraint. If an existing constraint is to be deleted, first select it in the Constraint List and then click the Delete button. After the constraint is deleted, associated net names are no longer be shown in the Constraint List.
You can save all the constraints entered for the design into a file which can later be loaded and modified. This is not a necessary step, as all constraints are saved with the design in OpenAccess. If an existing constraint file is available, the Load button can be used to load the constraints and the Apply button to write such constraints into the database.
To see all constraints in the design in a spreadsheet format, click the Display button. The Display All Constraints form displays all design constraints.
For more information about the Integration Constraint Editor, see the Tools Menu chapter of the Innovus Menu Reference.
11.7 Hierarchical Propagation of Constraints
Virtuoso has the capability to push and pull routing constraints across hierarchies in a design. For instance, a shielding constraint could exist on the net in a sub-block of a design, which connects to a net at the top level. Virtuoso and Innovus can pull a shielding constraint from a sub-block and place it on the corresponding net at the top level. After the constraint is pulled, if NanoRoute or VSR are used to route the top-level nets in a design, the constraint is understood and honored by both the tools.
The Innovus command for pulling routing constraint is pull_block_constraint.
Note: The hierarchical scope constraint defines whether a particular constraint can be pulled or pushed across the physical hierarchy. The hierarchical scope can either be set in the Virtuoso Constraint Manager, or by using the following command in Innovus.
setIntegRouteConstraint
[-hierarchicalScope {local local_below local_above local_above_below}]
The local_below option indicates that the constraint can only be pushed down in a hierarchy, whereas the local_above_below option indicates that the particular constraint can be pulled and pushed across the physical hierarchy.
The pull/push of constraints in Virtuoso is done using the Virtuoso Constraint Manager .
11.8 Creating/Adding Mixed-Signal Routing Constraints on IP Blocks
As seen in the previous section of this document, design-level constraints can be created using the Virtuoso Constraint Manager, or Innovus's constraint entry environment. In the previous section, we also discussed the fact that constraints can be created hierarchically, thereby enabling users to pull imbedded constraints from sub-blocks or IP's, or push constraints from higher levels in the design down to the lower sub-blocks. As can be seen from the diagram below, enhancement have been made to the abstract generator to create and store constraints in the OpenAccess abstract of an IP/block, which can later be pulled /pushed across the design hierarchy.
Routing Constraints Use Model and Flow
|
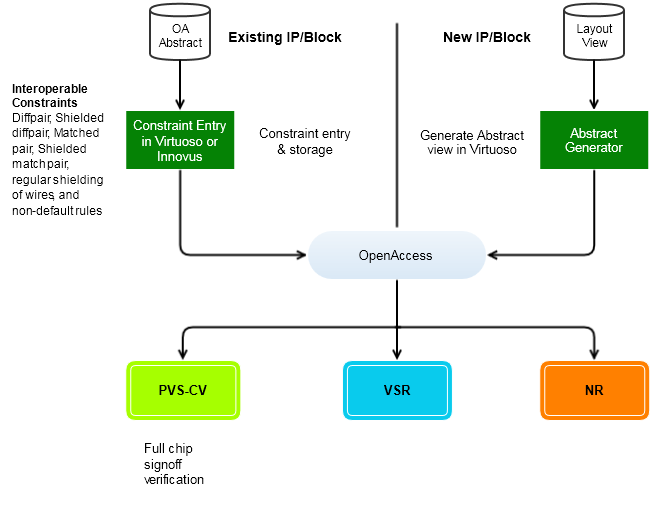
If a particular layout view has specific routing constraints defined, the abstract generator will be able to store such constraints in the resulting abstract.
To enable this functionality, the following setting needs to be used with the abstract generator:
absSetOption("CopyMSRoutingConstraints" true")
In order to enable the pushing or pulling of routing constraints in the flow, the addition of the hierarchicalScope parameter to the routing constraint is needed. For instance, if the designer of the block/IP wants to allow the intended user of the block/IP to have the ability to push or pull a particular constraint across the hierarchy, then the the following hierarchical scope should be used:
hierarchicalScope=local&below&above
localis always required.
belowtells the design environment that the particular constraint can be pushed down in the hierarchy.
abovetells the design environment that the particular constraint can be pulled up in the hierarchy.
For more information, refer to the Virtuoso® Abstract Generator User Guide.
11.9 Routing Constraints Interoperability between NanoRoute and VSR
The Virtuoso Space-Based Router (VSR) is used to route nets with differential pairs, match pairs, and complex-shielding constraints. Complex shielding is defined as any shield style other than tandem shields (the default), or those shielding constraints that do not use the default minimum spacing or width.
NanoRoute has been enhanced to recognize mixed-signal routing constraints, so if differential pair, match pair or complex shields are pre-routed by VSR, then NanoRoute will be able to route rest of the nets in a design without having the need to mark pre-routed nets as special routes/fixed routes, or with skip_routing attribute. In addition, if NanoRoute sees the simple shielding constraints, netClass constraint, or process rule overrides (NDRs), it routes such nets honoring the routing constraints stored in the database.
Note: If VSR is used to route NDRs or simple shields, add the skip_routing attribute on those nets and mark them as fixed, when the design is brought into Innovus. The skip_routing attribute could be set in Innovus as:
setAttribute -net net_name -skip_routing true
Failing to assign the skip_routing attribute to such pre-routed nets will result in the nets getting deleted when the design goes through placement, Early Global Route, CTS, and NanoRoute stages of the design flow
11.9.1 Getting a List of Nets with skip_routing Attribute
Innovus's dbGet command is a very powerful tool that can be used to extract valuable information from the database. In the context of interoperable routing constraints, this command can be used to get all nets having the skip_routing or the analog attributes.
To get the list of attributes of a net that one could search for with the dbGet [dbGet -p top.nets.skipRouting 1].name (will report all nets with skipRouting attribute)dbGet [dbGet -p top.nets.isAnalog 1].name (will report all nets with analog attribute)dbGet command, use:dbGet top.nets.?
Note: Virtuoso installation is needed in order to run VSR from Innovus.
The VSR interface can be accessed from Tools menu in Innovus by choosing Tools - Mixed Signal - Run VSR.
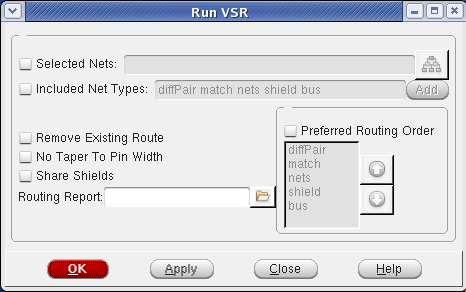
The Design Browser in Innovus can be used to select the nets to be routed. You can also instruct the router to route all nets with certain constraints.
11.9.2 Checking Routing Results Against the Routing Constraints
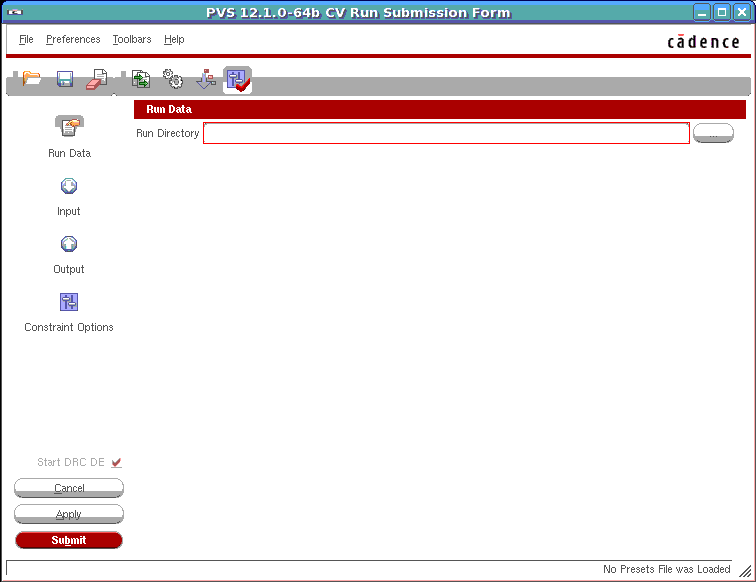
The PVS Constraints Validation (PVS-CV) tool can be used with Innovus to check and validate mixed-signal constraints in the Innovus design flow. PVS-CV can be used to check all interoperable MS routing constraints entered in Innovus or Virtuoso, against the actual routes created by VSR or NanoRoute. The error markers generated by PVS-CV can then be viewed using tools such as Violation Browser in Innovus.
To enable PVS-CV, select Run CV from the PVS menu in Innovus.
Note: PVS-CV is enabled only when a 64-bit version of Virtuoso installation exists on your system.
For information on PVS-CV, refer to the following chapters in the Cadence Physical Verification User Guide:
- Running PVS-CV
- Appendix H - PVS CV Functionality
11.9.3 Creating Interoperable Library between Innovus and Virtuoso
The compression of OpenAccess database is supported in Innovus and is done by default. However, the current Virtuoso 6.1.5 version does not support a compressed OpenAccess database as the input. So, in order to create an OpenAccess library that can interoperate with Virtuoso 6.1.5, the database compression in Innovus needs to be turned off using the following Innovus command:
setOaxMode -compressLevel false
Cellviews written to a library will follow the compression level of the library and not the setOaxMode -compressLevel setting at the time when the cellview is being created.
11.10 Trying the Constraint Interoperability Environment and the run_vsr Command in Innovus for the First Time
Constraint interoperability between Virtuoso and Innovus is possible only through the OpenAccess database. The creation of an OpenAccess database is divided in two steps, the reference library creation step and the design library creation step. The term “reference library” refers to the interoperable PDK that contains all the technology information needed for Innovus and Virtuoso to work properly.
If the OpenAccess library or the reference library is already available, you could reference it in Innovus’s global variable (*.globals) file to load the technology and IP-related information. Note - Global variables are the Tcl globals needed to initialize a design. In Innovus, all global variables are stored in the *.globals file when the design is saved using the saveDesign command.
If the reference library is not readily available, refer to the Cadence OpenAccess documentation on how to create an OpenAccess PDK. The library creation steps mentioned below are only used to create a quick OpenAccess library from LEF to try the constraint interoperability environment and the run_vsr interface. PLEASE NOTE THE REFERENCE LIBRARY CREATED BY THIS METHOD SHOULD NOT BE USED IN A PRODUCTION SETTING.
Method 1: Reference library does not exist, but a non-OA Innovus design is available.
The following flow steps are meant for users who have neither a previous OA-based Innovus database to start with, nor a reference library. This flow can be used for all nodes 16nm and higher.
- Creating the reference library
Before you run the library creation step, ensure that you have set up the path for Virtuoso correctly. (The compatible Virtuoso release is IC 6.1.6ISR2 or higher and Innovus release is 13.2 or higher.)
Example- write_oa_techfile tech.tf
After loading the Innovus database in Innovus with lef files, execute the above command. This command will output the Virtuoso tech file. This file would not contain fixed vias and LDRS (LEF Default Route Spec). These will be added in Step 3 below. - techLoadDump -l -createLib tech_base tech.tf
Where:tech_basespecifies the output reference library name.
tech.tfspecifies the technology file created in Step 1.
After you create a Virtuoso tech file, exit Innovus and execute the above command on a Unix prompt. This command will create an OA-based library using the Virtuoso tech file created in the previous step. - lef2oa -lib tech_pnr -techRefs tech_base -lef tech.lef -pnrLibDataOnly
Where:
-lib libraryspecifies the output reference library name.
-techRefs libListspecifies the list of libraries that contain the master technology databases.
-lefspecifies the list of technology and other LEF libraries.
-pnrLibDataOnlyindicates that only library-specific place and route information and macro definitions will be imported. All foundry rules for existing layers in the referenced tech are assumed to be correct. All foundry rules defined in the LEF file will be ignored.
Now execute the above command to create atech_pnrlibrary using thetech_basecreated in the above step and using the technology lefs and other lefs. The reference librarytech_pnrcan now be used for all interoperability purposes between Innovus and Virtuoso. - verilogAnnotate -refLibs tech_pnr -verilog stub.v
Where:-refLibsspecifies the OA reference library created in Step 3.-verilogspecifies the stub verilog file that has bus information.
Execute the above step to annotate bus information to abstract view through stub verilog. As we are just using the flow to try constraint interoperability and therun_vsrinterface, this step is an optional step.
- write_oa_techfile tech.tf
-
Loading the design in Innovus
- Set the following variables in the Innovus shell:
set init_pwr_net {power_nets}
#(Sets the power nets)set init_gnd_net {ground_nets}
#(Sets the ground nets)set init_oa_ref_lib {tech_pnr}
#(Sets the reference library created in Step 4)set init_verilog {verilog_netlist}#(Sets the verilog netlist)set init_top_cell {top_cell_name}
#(Sets the top cell name)init_design
#(Updates the above variables into the Innovus DB)
- Load the design information from floorplan or DEF file using command
loadFPlan filenameordefIn def_file. -
Run
saveDesign -cellview {designLib topCellName viewName}
The above command saves the design in OpenAccess mode and can be restored for any future sessions in Innovus or in Virtuoso.
To restore a previously saved OpenAccess design, run the following command at the Innovus prompt:restoreDesign -cellview {designLib topCellName viewName}
- Set the following variables in the Innovus shell:
Method 2: Flow to Load a Previously Implemented Design in Innovus if the Reference Library Already Exists
If the reference library already exists, ignore the library creation step in Method 1 and continue with the rest of the steps:
- Initialize the variables in Innovus (Reference library
tech_pnralready available)set init_pwr_net {power_nets}
#(Sets the power nets)set init_gnd_net {ground_nets}
#(Sets the ground nets)set init_oa_ref_lib {tech_pnr}
#(Sets the reference library)set init_verilog {verilog_netlist}#(Sets the verilog netlist)set init_top_cell {top_cell_name}
#(Sets the top cell name)init_design
#(Updates the above variables into Innovus DB)
- Load the design information from floorplan or DEF file using command
loadFPlan filenameordefIn def_file.