1
Design Rule Driven Editing
The Design Rule Driven (DRD) editing tool provides real-time dynamic DRC feedback to facilitate correct-by-construction layout design.You can use DRD editing to significantly reduce the number of design rule check (DRC) violations during layout editing. However, the features provided through DRD are not a replacement for physical verification tools such as Pegasus or PVS.
DRD checks the layout against design rules defined as constraints. For a list of constraints supported by DRD editing, see DRD Constraints Support.
This chapter contains the following topics:
- Turning on DRD Editing
- DRD Operating Modes
- Selecting Constraints for Verification
- Selecting Layers for Verification
- Managing Interactive Display Options
- Performing Color Checks
- DRD Editing and Blockage Objects
- Using DRD Editing in VLS XL and VLS EXL
- Batch-Check Mode
- Verifying Selected Objects
- Verifying Nets
Turning on DRD Editing
You can turn on DRD editing by using the icons available on the Options toolbar in Virtuoso or from the DRC Options Form form.
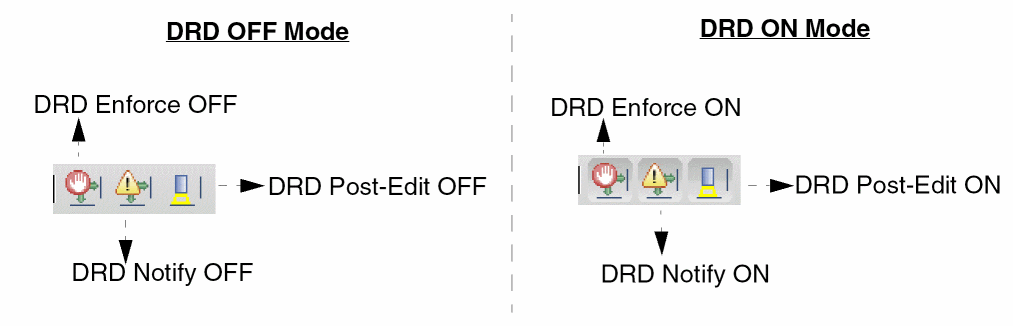
The figure below shows the icons for the three DRD editing modes in the OFF and ON states. By default, DRD editing is OFF.
Setting Up DRC Options
The DRC Options form allows you to set up the options that are checked by DRD during layout editing. To open the DRC Options form, do one of the following.
-
Click the DRC Options icon
 on the DRC toolbar. You can enable or disable the DRC toolbar using one of these methods:
 - Choose Options – DRC.
- Choose Verify – Design – Process Rules – DRC Options.
-
Press
F7if bindkeys are loaded.
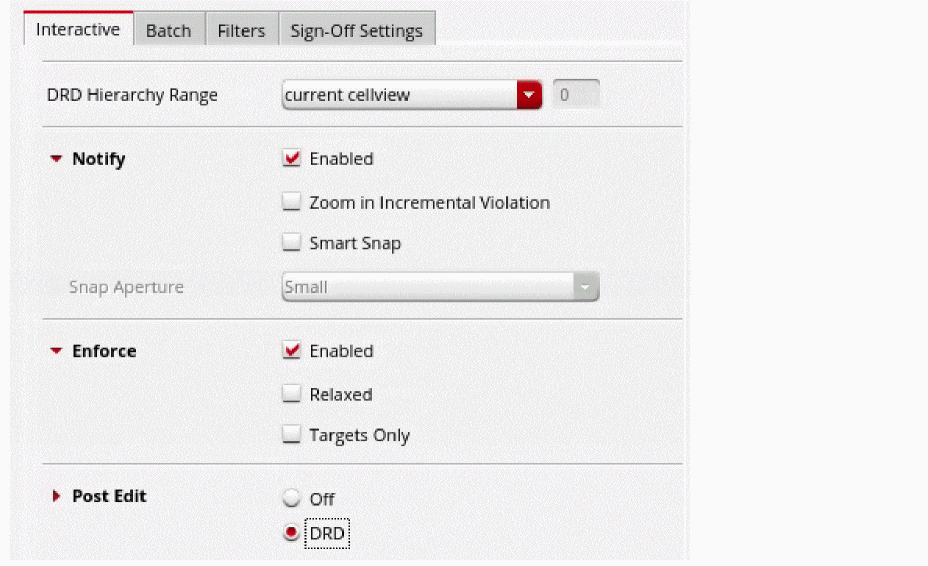
The DRC Options Form form is displayed. The form consists of the following tabs:
InteractiveBatch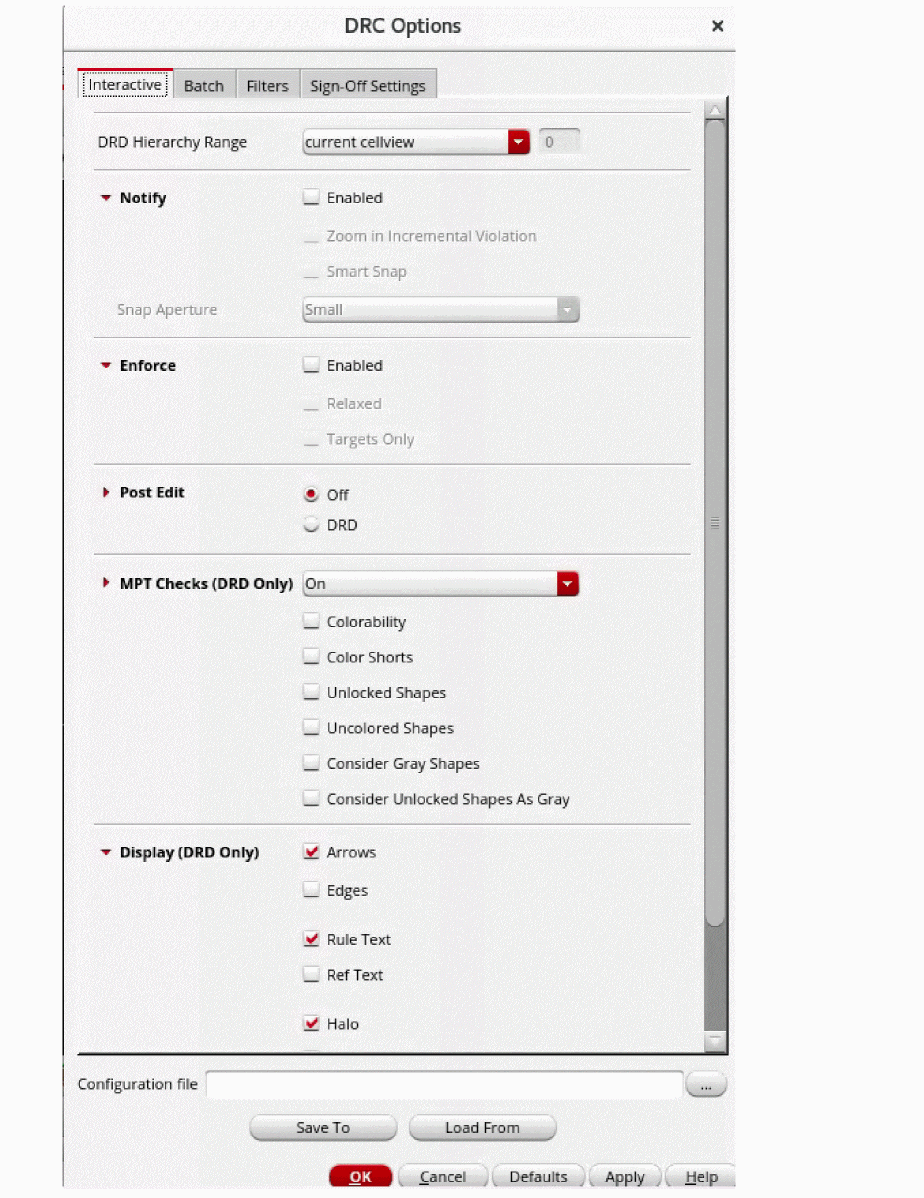 Filters
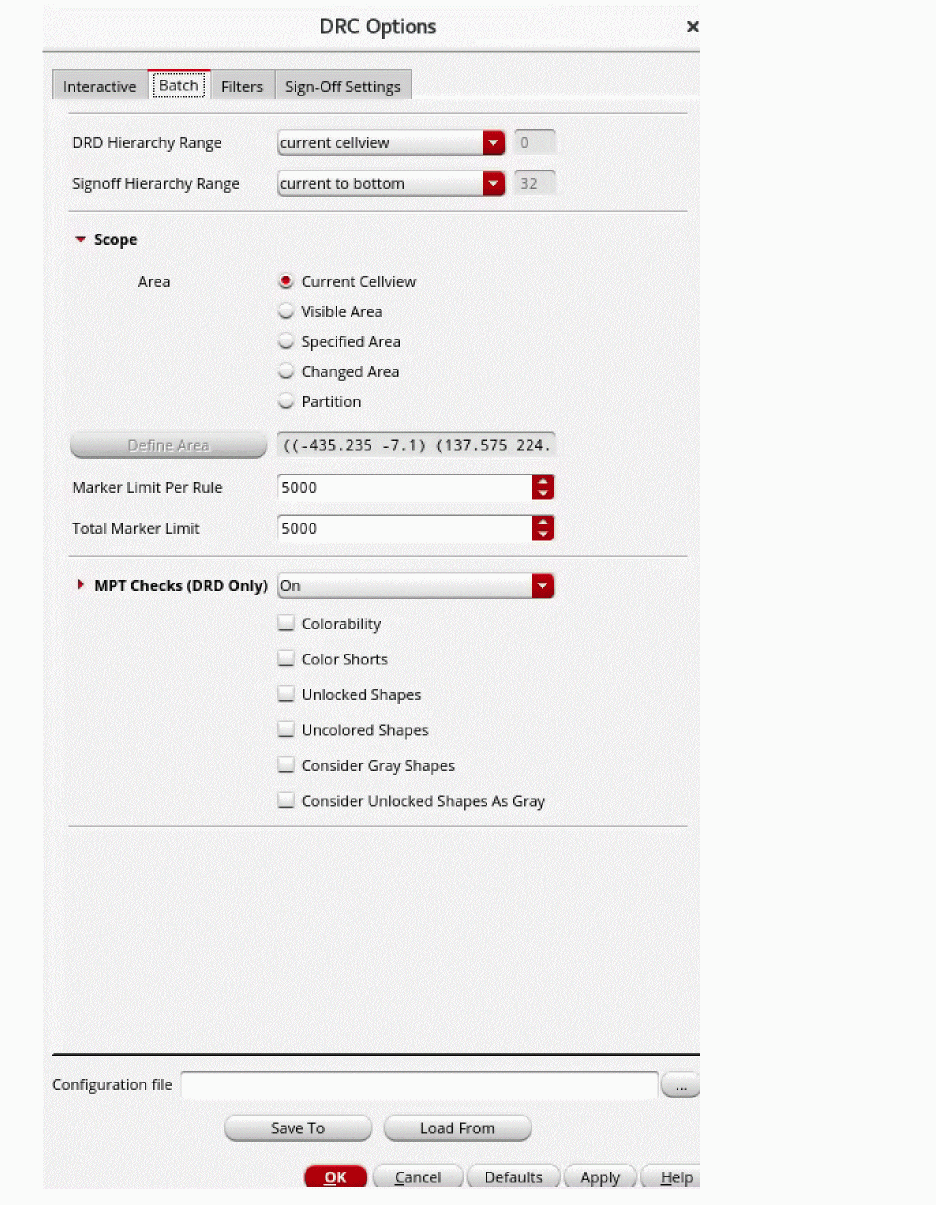
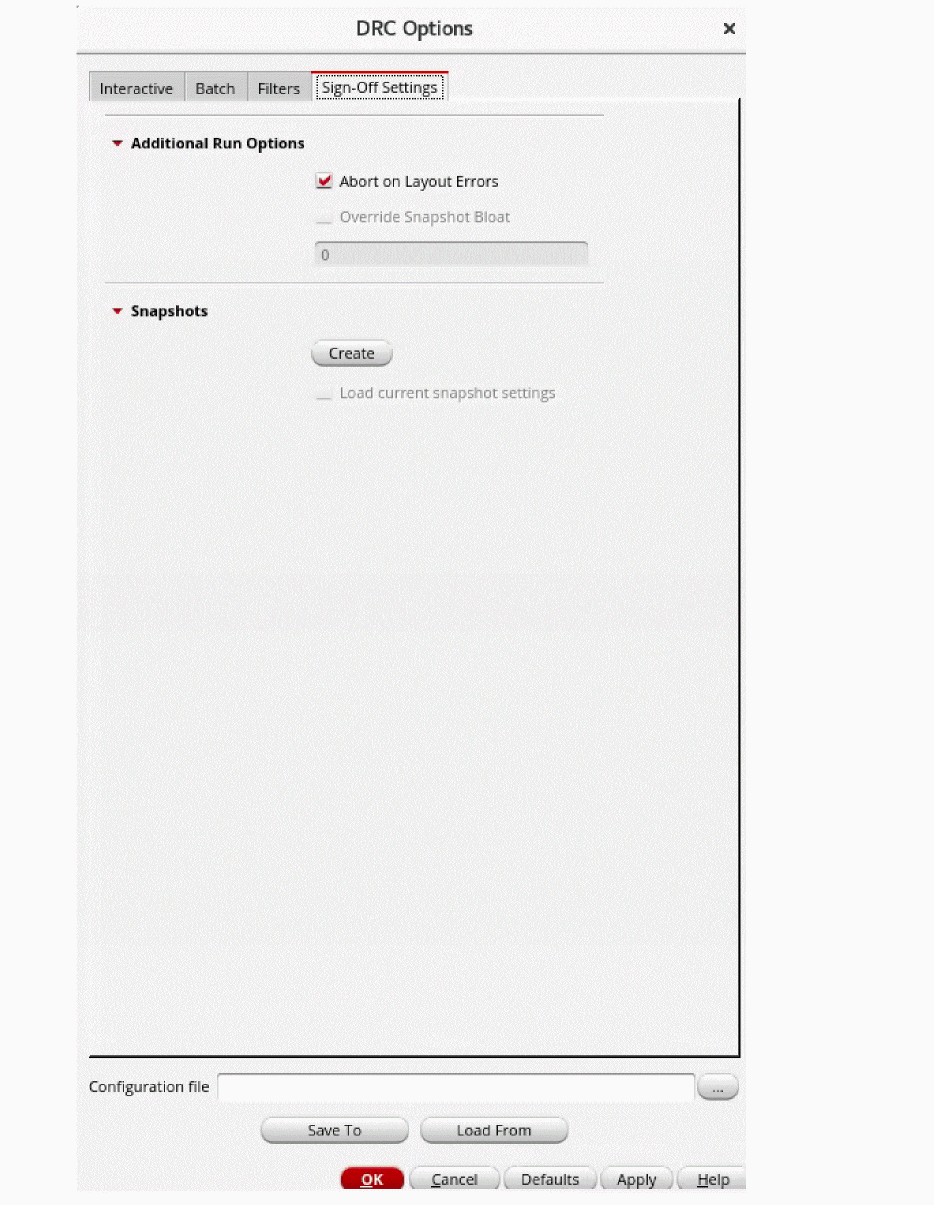
DRD Configuration File
The DRC Options form lets you save and load its settings by using a configuration file. You can work with this file by using the fields near the lower edge of the DRC Options form.

To specify a configuration file, type its name and path in the Configuration file field or use the browse button to locate and select an existing file. Ensure that you have write permissions to the path and file.
To save the current settings in the DRC Options form to the specified configuration file, click the Save To button.
To load settings from the specified configuration file into the DRC Options form, click the Load From button.
Specifying Options on the DRC Toolbar
You can access the DRC options using the icons available on the DRC toolbar in Virtuoso.
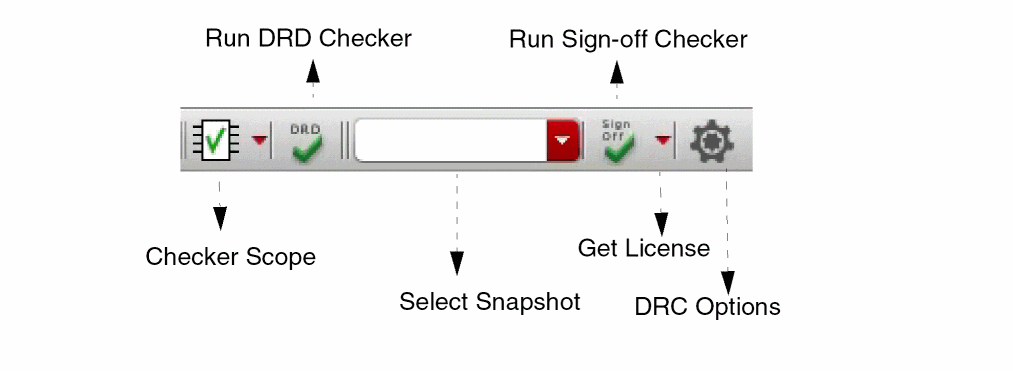
You can use the DRC toolbar to select the scope of DRC checking, to run the DRD checker, to select a snapshot to run the sign-off DRC, to run sign-off checker, and to open the DRC Options form to update the settings.
DRD Operating Modes
DRD flags violations dynamically when you create or edit shapes, such as paths, pathSegs, pins, rectangles, polygons, and multi-part paths, and instances, in the following three operating modes:
- Enforce stops cursor movement when the threshold for a design rule violation is reached.
- Notify displays visual feedback on design rule violations.
- Post Edit displays violation markers if creating or modifying an object in the layout results in design rule violations.
You can use DRD in the following combinations:
To change the mode, use one of the following options:
-
The DRC Options Form form – Interactive tab
-
The
Ctrl+ebindkey -
The leToggleDrdMode SKILL function
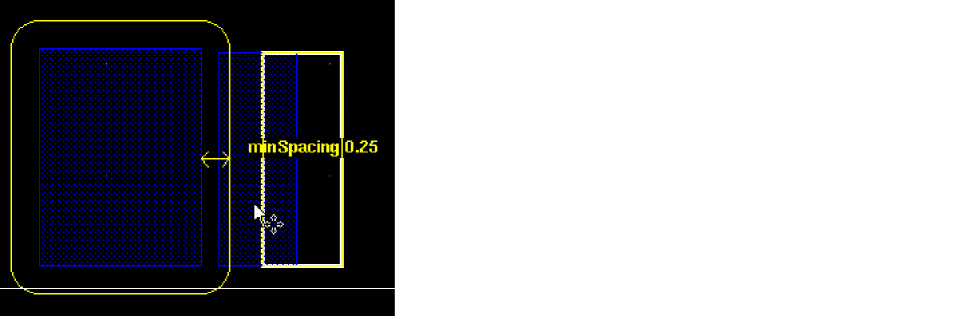
Using Enforce Mode
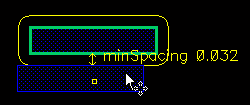
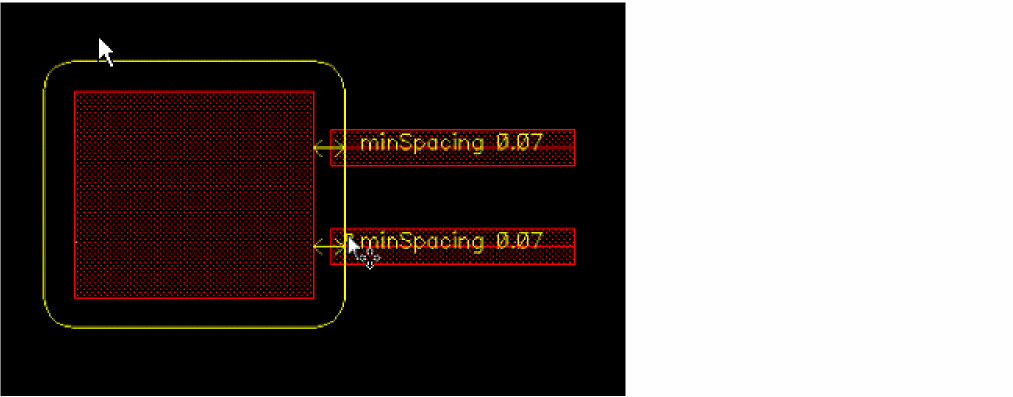
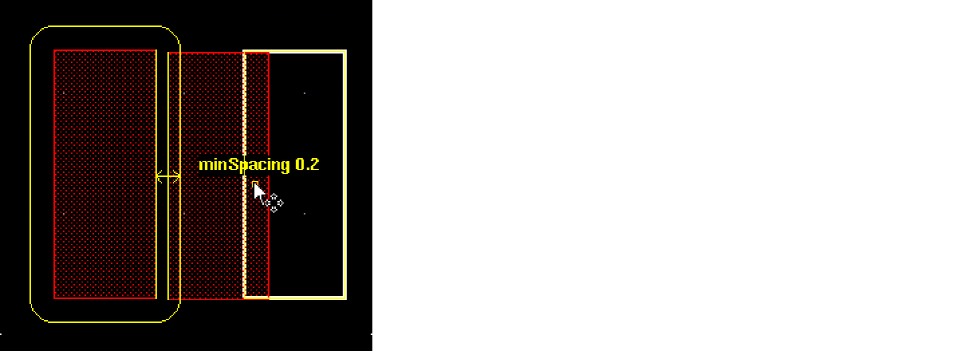
In Enforce mode, the pointer is constrained or halted when a spacing violation occurs.
The following figure shows an example of a violation created in Enforce mode.
For information about the constraints supported in Enforce mode, see DRD Constraints Support.
Using Notify Mode
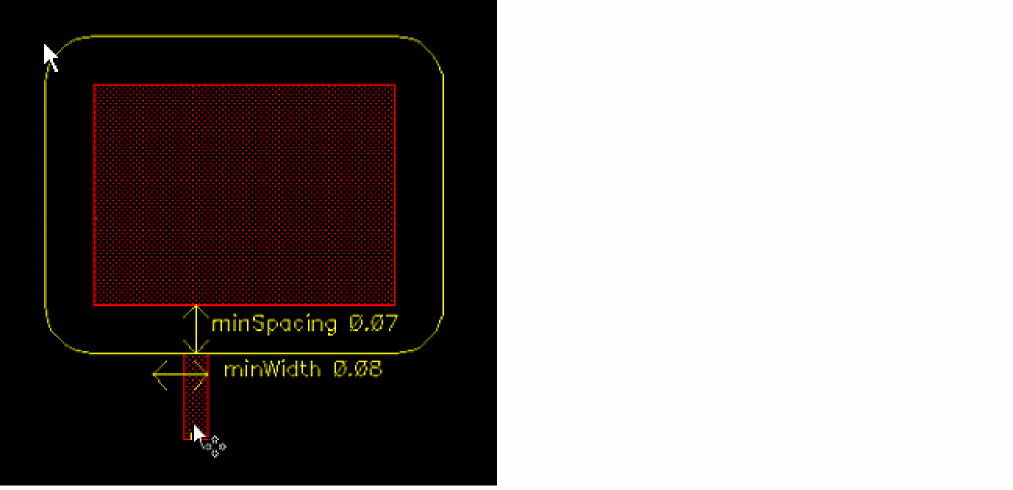
In Notify mode, the tool provides visual feedback (text, edges, halos, or arrows) when the specified design check rules are violated. However, the pointer is not constrained or halted, allowing you to create objects with design violations. If you create an object with design violations, the visual feedback about the violation disappears. To retain an indication of the design violation, you can turn on Post Edit mode. See,Using Post Edit Mode.
The following figure shows an ex vample of a violation created in Notify mode.
You can enable Enforce and Notify modes together to use their combined behavior. For example, in the figure below, spacing constraints are enforced and the other constraints are notified.
Using Post Edit Mode
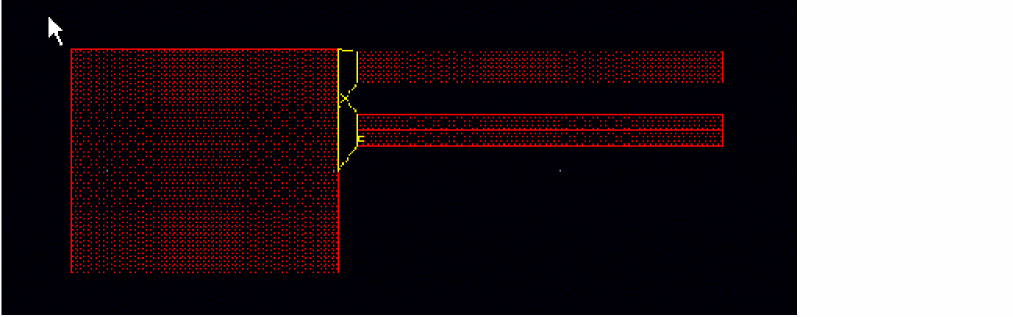
In Post Edit mode, DRD displays violation markers if creating or modifying an object in the layout results in design rule violations.
Post edit markers are displayed when data is modified, including any modification caused by a command run in the CIW; by user SKILL functions that create, modify, or delete data; and when using batch processing tools, such as the Virtuoso Custom Placer or the Virtuoso Custom Router. The following figure shows examples of post edit markers.
Ctrl+c to interrupt the checking process. Markers found before the process is interrupted are generated.
In Post Edit mode, an incremental check is performed on an area based on the objects that are edited. For example, if you stretch a segment on the Metal1 layer, DRD verifies the change and updates the markers related to Metal1. Existing markers that are not related to the object being edited are not deleted.
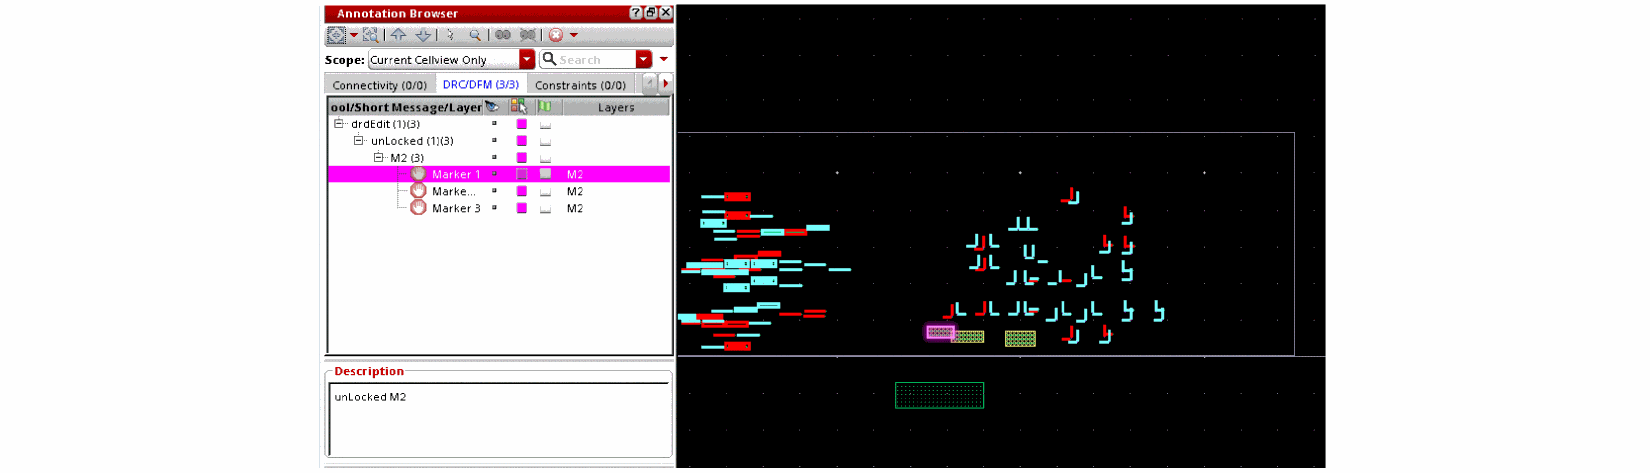
You can view, analyze, and filter post edit markers on the DRC/DFM tab of the Annotation Browser. The markers are persistent objects that can be saved. See,
You can search for, explain, and delete markers by using the commands on the Verify – Markers menu. See
Behavior of Post Edit Mode when Editing in Place
To display post edit markers when editing in place, ensure that you do the following:
- In the DRC Options form:
- In the Annotation Browser, select Scope as Top Cellview Only or Top Cellview To Depth.
To understand how Post Edit mode works when editing in place, consider the following example in which an instance and three shapes are placed at the top level.
Next, select the instance and choose Edit – Hierarchy – Edit In Place and edit a shape inside the cell.
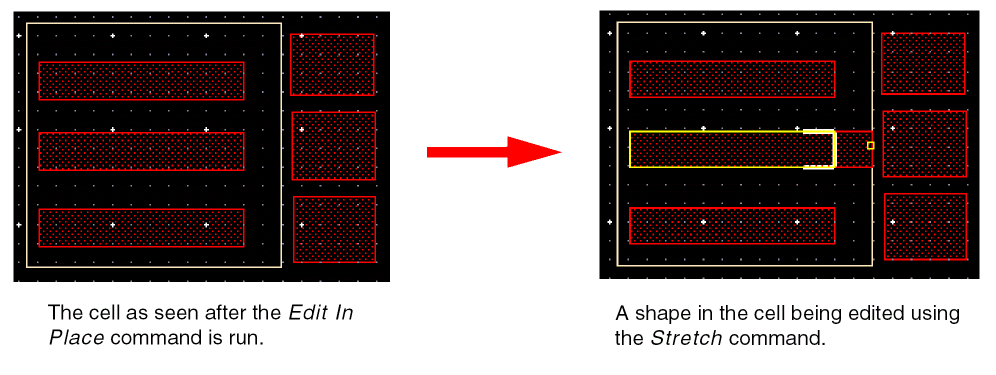
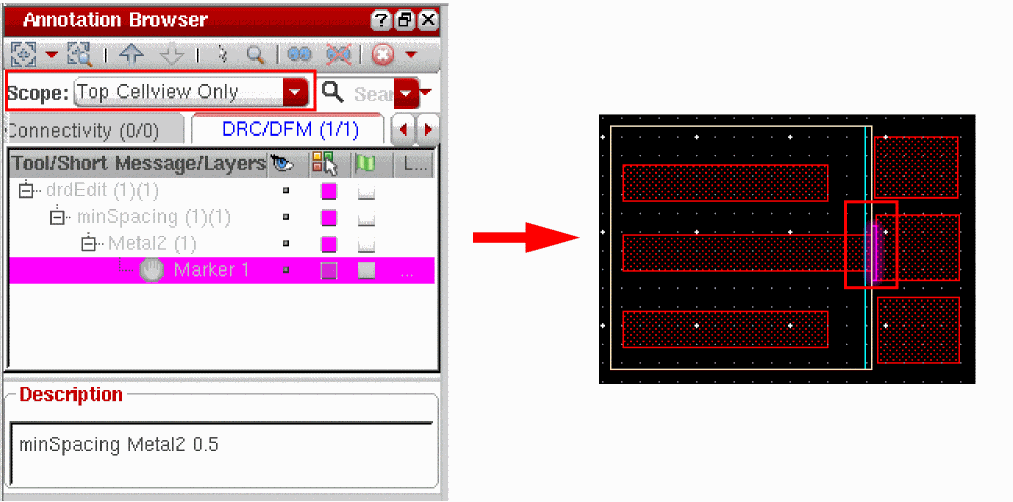
To view the post edit markers, choose Scope as Top Cellview Only in the Annotation Browser, as shown below. Select a marker in the Annotation Browser to highlight it in the canvas.
Related Environment Variables
The following environment variables control the behavior of Post Edit mode when editing in place:
-
drdPostEditEIPCheckTopView: Checks for DRC violations between the shape being edited and the shapes in the parent hierarchy and in the neighboring cells. The default value is
t. -
drdPostEditEIPAllInstances: Checks the environment around all instances of a cell for DRC violations when a shape in that cell is edited in place. The default value is
nil. -
drdPostEditEIPAllWindows: Applies the value set for
drdPostEditEIPCheckTopViewanddrdPostEditEIPAllInstancesto all open design windows. The default value isnil.
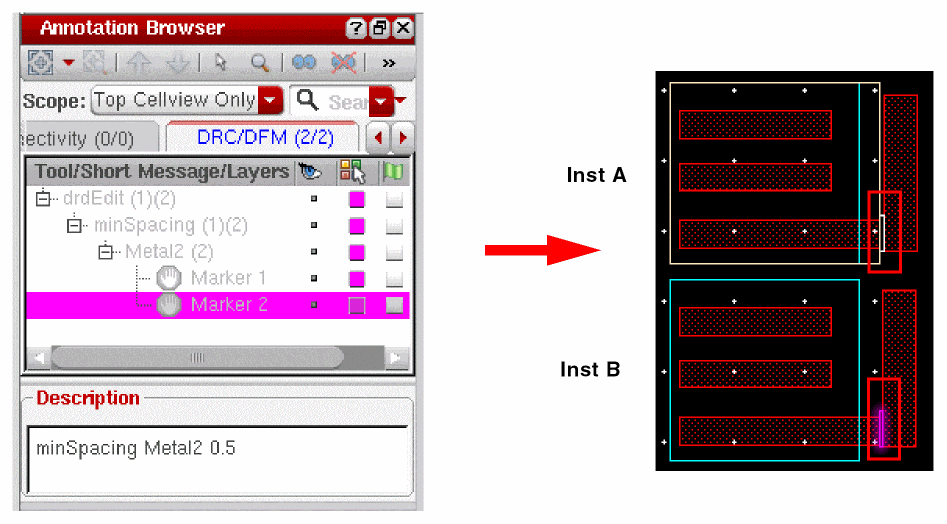
Example of Violations Created in All Instances of a Cell
The following figure illustrates the results of editing a shape in a cell with the drdPostEditEIPAllInstances environment variable set to t. You can see below two instances of the same cell, Inst A and Inst B. When a shape in Inst A is edited in place, it creates violations in both instances of the cell, as shown.
Ignoring Violations inside Instances
When Hierarchy Range is set as current to bottom, current to stop level, or current to user level, DRD in all modes reports DRC violations between a hierarchical object, such as an instance, and other hierarchical or top-level objects, such as wires, rectangles, and vias. However, in Enforce, Notify, and Post Edit modes, DRD does not report violations that may exist inside a hierarchical object if the shapes that cause violations are drawn on physical layers. This is because the drdEditIgnoreIntraInstanceChecks environment variable is by default set to t.
In Batch mode, when Hierarchy Range is set as current to bottom, current to stop level, or current to user level, DRD reports all violations that exist inside a hierarchical object, even when drdEditIgnoreIntraInstanceChecks is set to t.
Severity of DRD Markers
The severity type for DRD markers is Error. The severity for DRD markers is displayed in the Annotation Browser in the Severity column, as shown.
Selecting Constraints for Verification
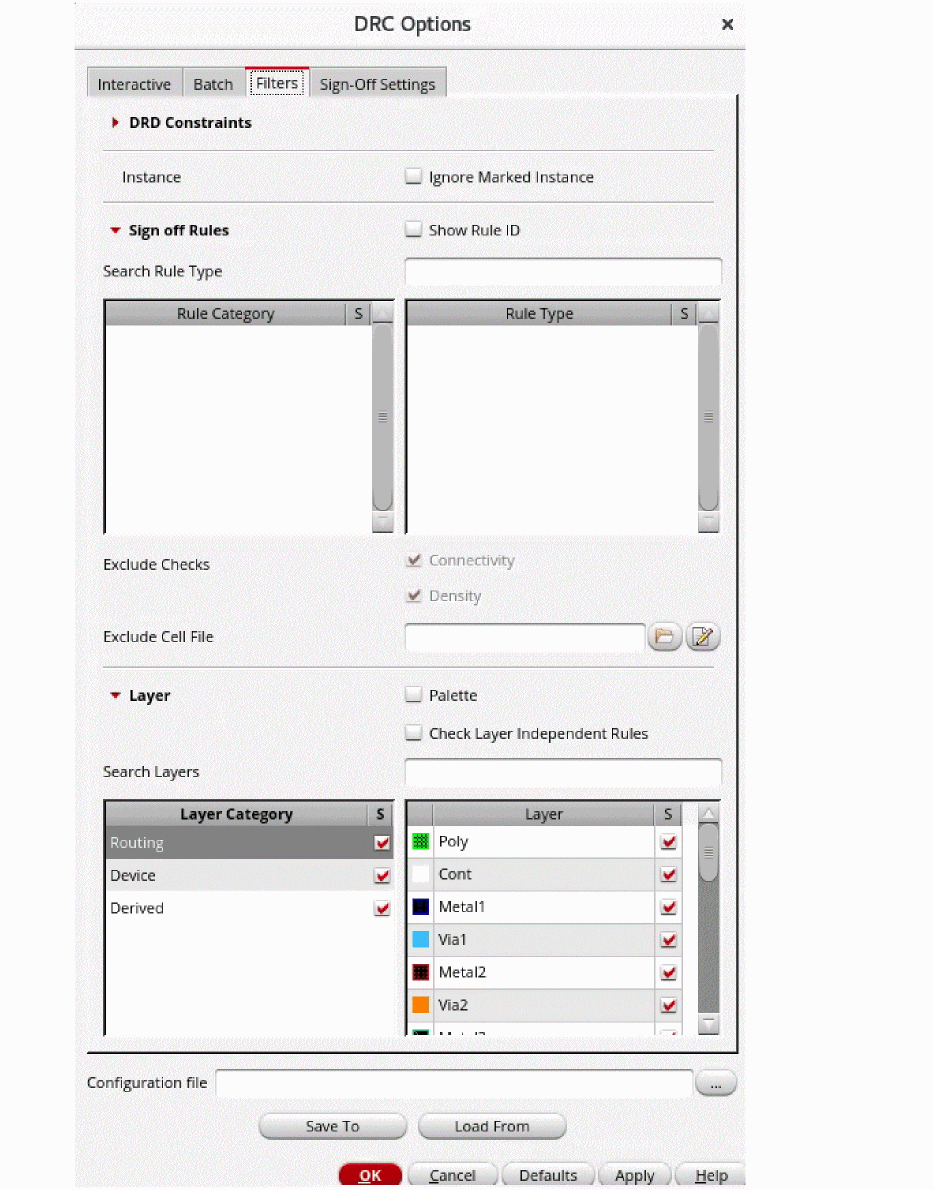
You can use the Filters tab of the DRC Options form to choose the constraints that you want to check for violations. The filter feature is available at both the constraint category and individual constraint levels.
To select a constraint for design verification, do one of the following:
-
Type a string in the Search Constraints field.
All the constraints containing the string are listed in the Constraint column, and the corresponding constraint categories are highlighted in the Constraint Category column. However, if you click a constraint category, the string is removed from the Search Constraints field and only the constraints belonging to that category are displayed in the Constraint column.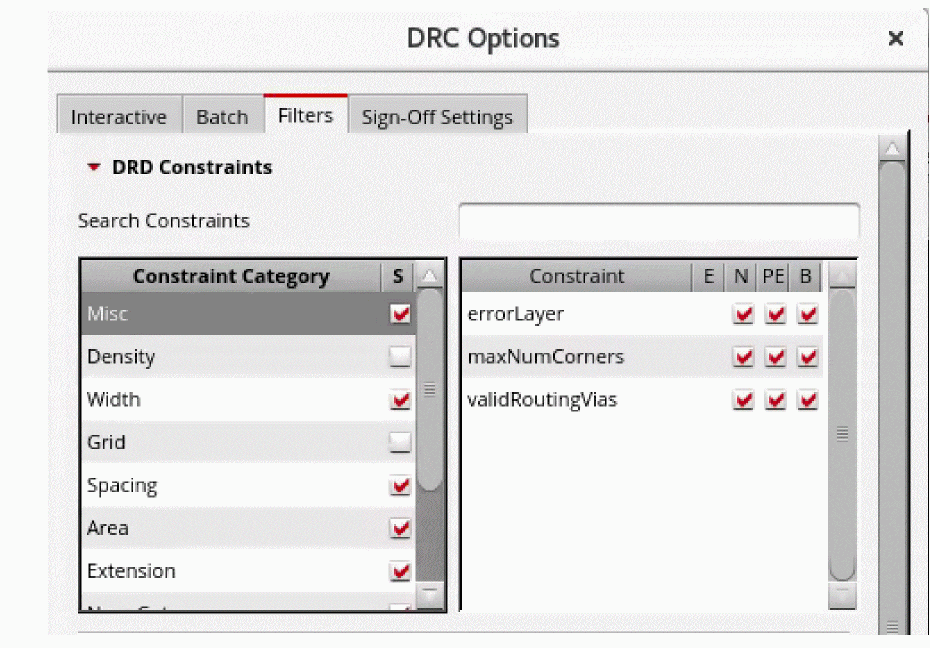
-
In the Constraint Category column, click the category you want to select or click and hold down the
Ctrlkey to select more than one category.
The constraints for the selected categories are displayed in the Constraint column.
To control the checking of constraints for a category or a individual constraint, select or deselect the check box against it.
To enable or disable the checking of all the constraint categories at one go, click the S column header next to Constraint Category.
To enable or disable the checking of all the selected constraints at one go, click the column headers that indicate the different supported modes. The E, N, PE, and B columns indicate the Enforce, Notify, Post Edit, and Batch modes, respectively.
Selecting Layers for Verification
The Filters tab of the DRC Options form lets you choose the layers that you want to check for violations. When you filter the layers, only those violations that involve shapes on the selected layers are displayed. You can select the layers from the three layer categories provided, that is, Routing, Device, and Derived. The filter feature is available at both the layer category and individual layer levels.
To select a layer for design verification, do one of the following:
-
Type a string in the Search Layers field.
All layers containing the string are listed in the Layer column, and the corresponding layer categories are highlighted in the Layer Category column. However, if you click a layer category, the string is removed from the Search Layers field and only the layers belonging to that category are displayed in the Layer column.For optimal performance, only layers included in the fabrication process and with a corresponding drawing purpose in the technology file are displayed in the Layer filter and will be checked through the filter.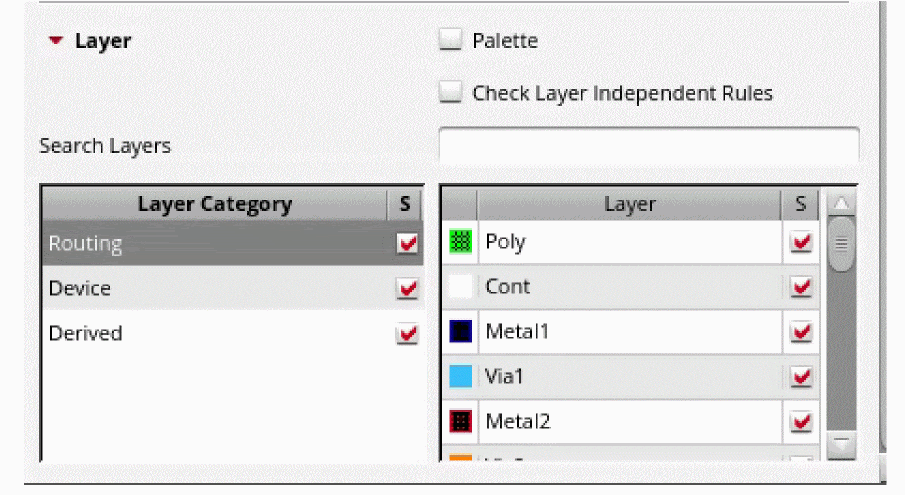
Layers are categorized as follows in DRD:- Routing: Includes physical layers whose functions are defined and whose material type is one of these: Cut, Poly, Metal, or Contactless Metal (excluding Other material type).
- Device: Includes layers that are not Routing or Derived layers and Cut layers in which the below layer is not Metal.
- Derived: Includes derived layers in the technology file.
- Other material types: Includes layers with undefined function.
-
In the Layer Category column, click the category you want to select or click and hold down the
Ctrlkey to select more than one category.
The layers for the selected categories are displayed in the Layer column.
To enable or disable the checking of shapes and objects on a layer or layer category, select or deselect the check box against it.
To enable or disable the checking of all the three layer categories at one go, click the S column header next to Layer Category.
To enable or disable the checking of all the selected layers at one go, click the S column header next to Layer.
Managing Interactive Display Options
The various Display options available on the Interactive tab work with DRD Enforce and DRD Notify modes:
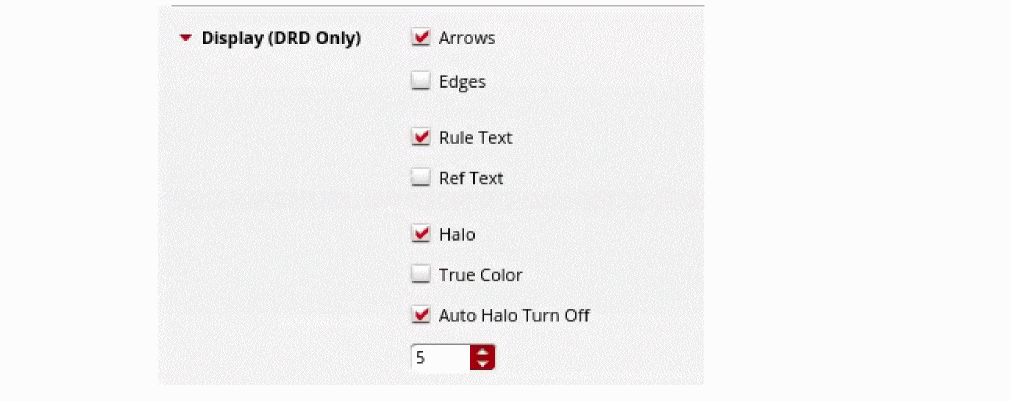
To enable an option, ensure that the corresponding check box is selected and specify the required value.
-
Arrows displays arrows to indicate optimum spacing between objects. The arrows are proportional to the size of the objects.
-
Edges highlights the edge where the violation occurs.
-
Rule Text displays the name of the violated constraint at the location where the violation occurs. You can use the displaySigDigits environment variable to specify the number of decimal digits the constraint value must be displayed with in the rule text.
If the bounding boxes for rule text overlap, the rule text for the violation that is encountered first is displayed. Trailing zeros are removed to improve readability. -
Ref Text displays the
reftext for a constraint from the technology file, followed by the constraint value. This text contains the rule ID from the Design Rule Manual (DRM) of the foundry, and is, therefore, more meaningful for a layout designer. When deselected, only the name of the violated constraint is displayed, as shown below.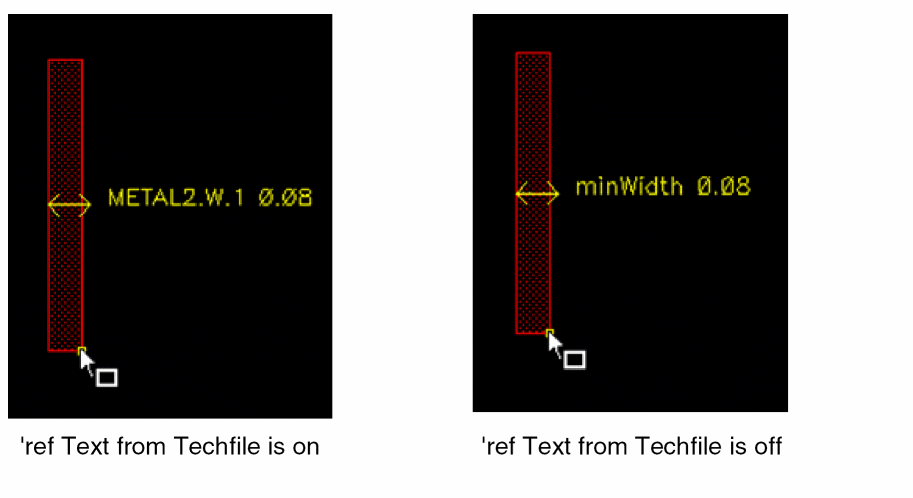
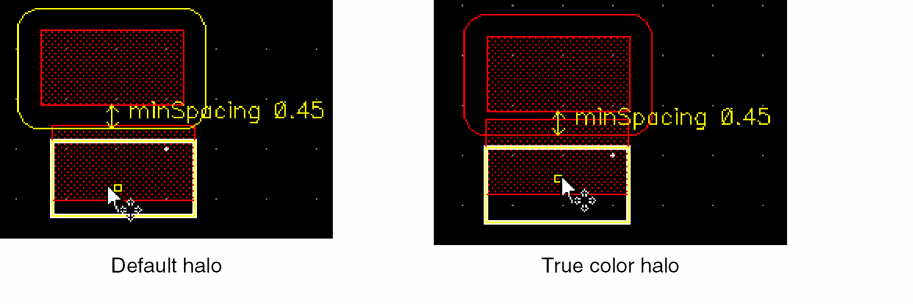
- Halo creates halos around stationary objects while creating or editing an object that violates a spacing constraint.
-
True Color halos for each layer are drawn in the color of that layer. This makes it easier to differentiate between halos on different layers.
-
Auto Halo Turn Off suppresses halos if the number of violations exceeds the value that you specify. Only arrows are displayed on the canvas when the defined limit is reached.
You can specify a value between1and1000.
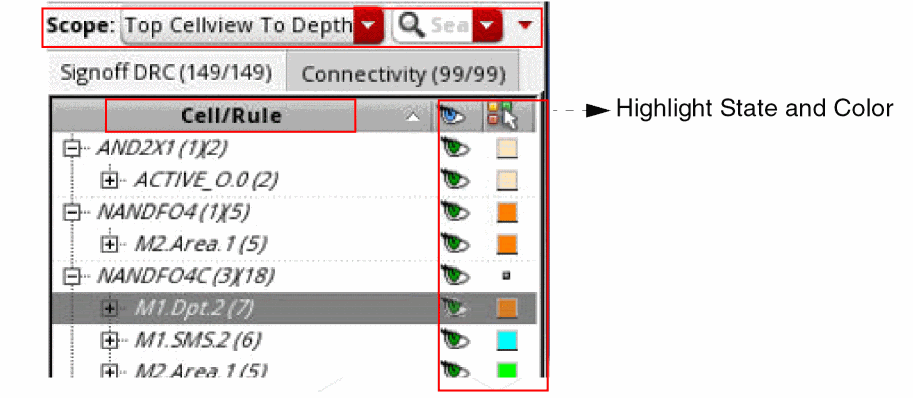
Viewing Sign-off Violations in the Annotation Browser
Sign-off violations are displayed in the Annotation Browser in the Signoff DRC tab of the Annotation Browser.
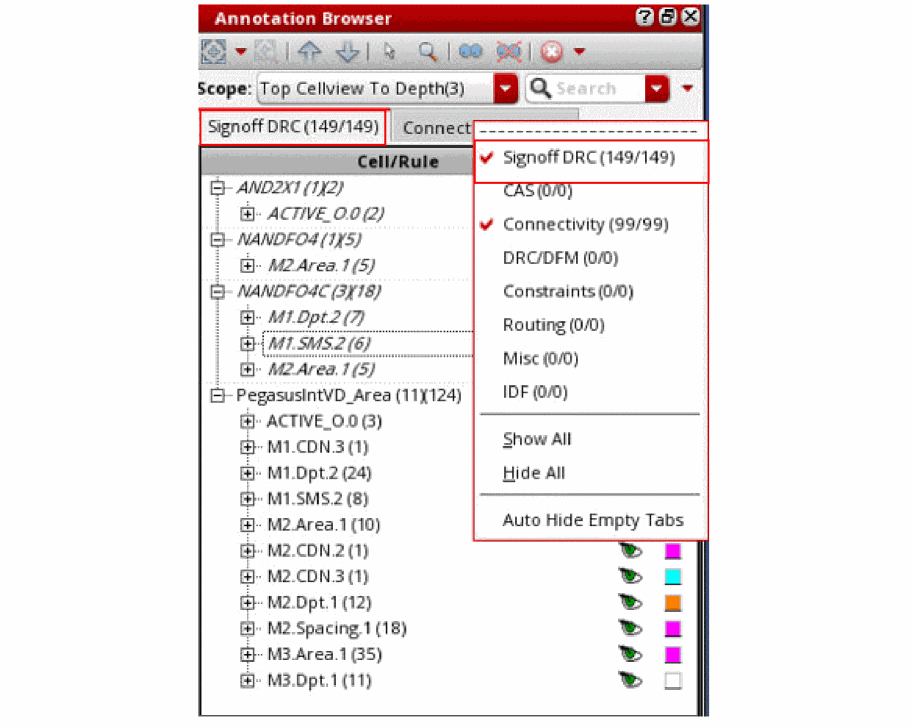
You can view the cells and their violations in the Annotation Browser. You can select the scope to display markers by selecting the options in the Scope field. You can also zoom to the selected marker. In the browser pane, you can specify the highlight state and color used to draw markers in the design.
Performing Color Checks
The MPT Checks options available on the Interactive and Batch tabs enable you to perform color checks on a Multi-Patterning Technology (MPT) design with DRD. These checks are divided into the following two categories:
Color Constraints Checks
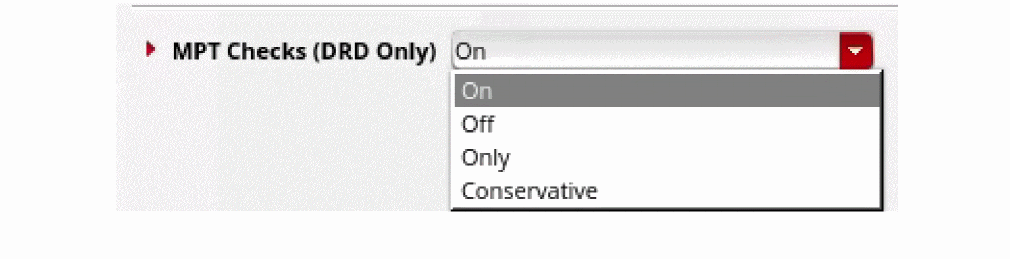
The MPT Checks drop-down menu lets you perform the checks for color constraints in different DRD modes. This drop-down list provides the following four options:
- On: (Default) DRD reports violations for all color-related constraints, including non-color constraints.
-
Off: DRD reports violations for all available constraints except those related to color constraints. For example, DRD in this mode reports all
minSpacingviolations exceptsameMaskviolations. - Only: DRD reports violations only for color-related constraints.
-
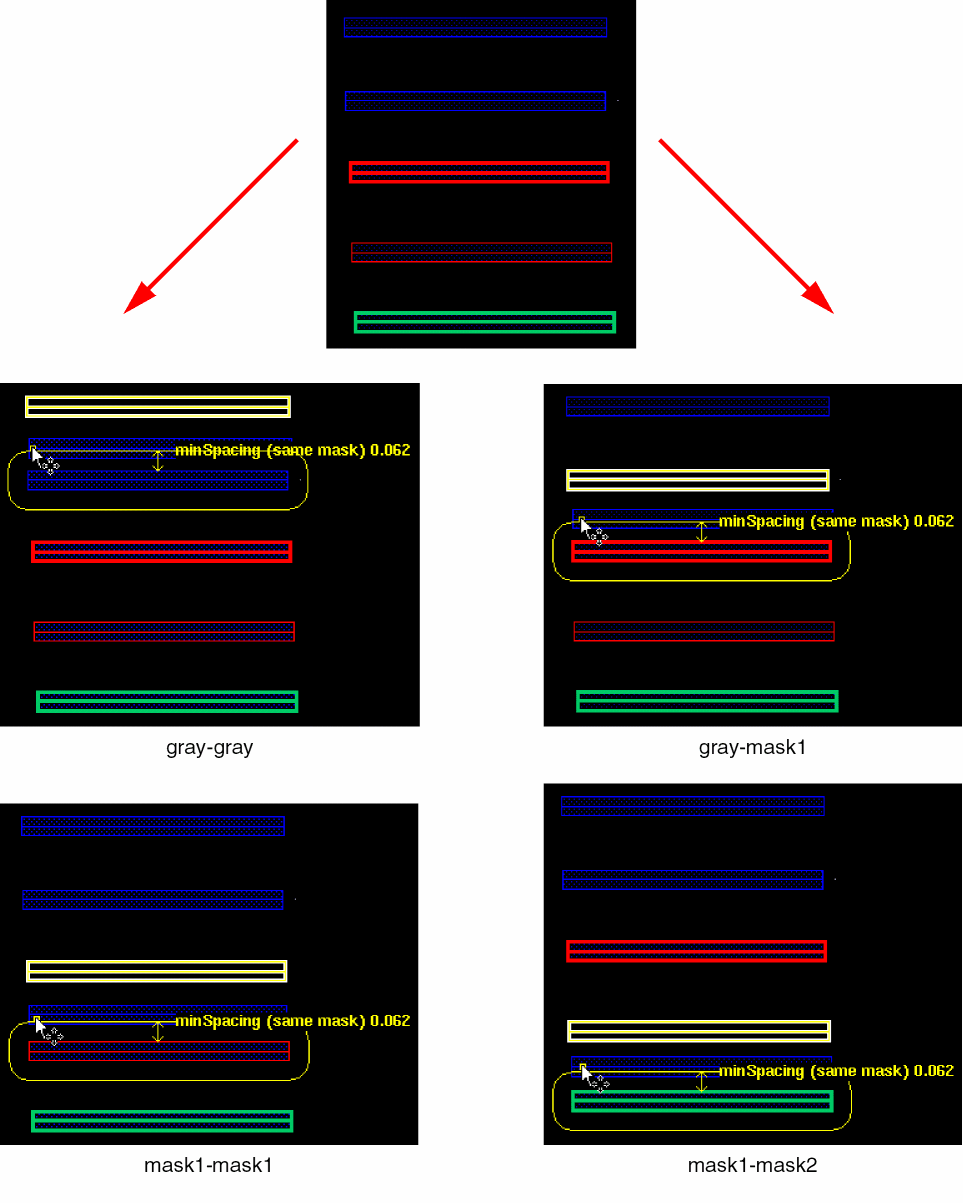
Conservative: DRD checks all color rules on all shapes irrespective of their color. For example, DRD reports same-mask violations as follows:
- Between shapes that are on the same mask, such as mask1-mask1 and mask2-mask2
- Between shapes that are on different masks, such as mask1-mask2
- Between gray shapes and other shapes of any other color, such as gray-gray or gray-maskN, where N = 1, 2, 3, …
The figure below shows violations that are reported when Conservative is selected:
While checking color constraints, you can select the Consider Gray Shapes check box to report violations for all gray shapes. This option is available only in the MPT Checks – On and MPT Checks – Only modes.

Color-Related Flow Checks
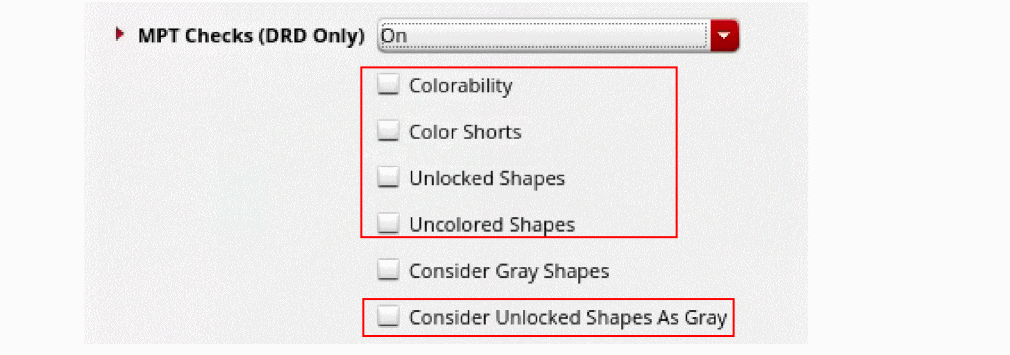
The color-related flow checks are described below. These checks are independent of the MPT Checks drop-down menu settings.
-
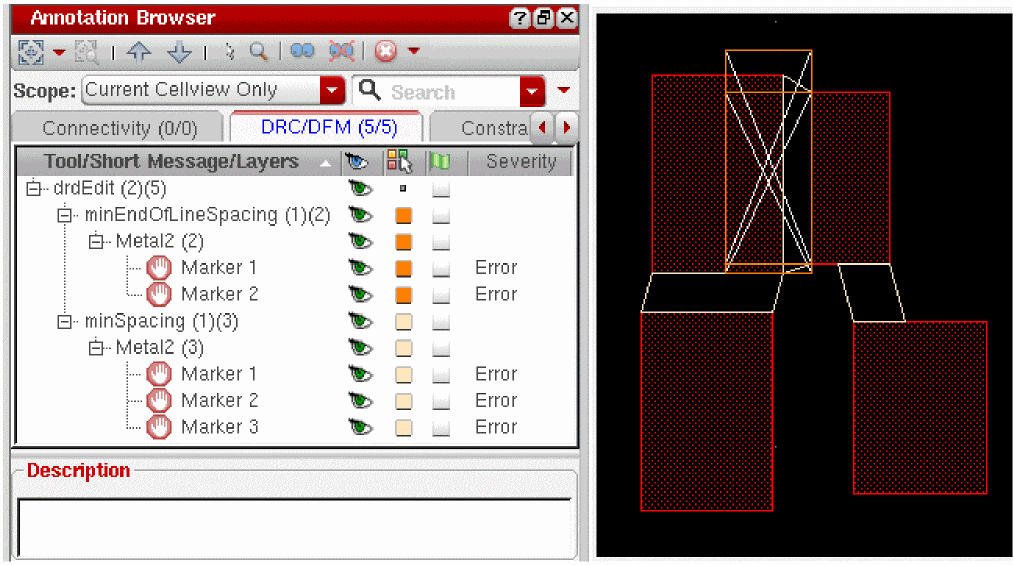
Colorability: Colorability check is performed to determine if a set of shapes is colorable without any color rule violation in an MPT environment. This check does not look for actual color of the shapes. If a set of shapes fails colorability check, those shapes cannot be colored using a certain number colors. In case of a Double Patterning Technology (DPT) environment, the set of shapes needs to be colored using two colors; in case of a Triple Patterning Technology (TPT) environment, the number of colors would be three. See multiMaskCheck in Virtuoso Technology Data Constraints Reference.Colorability checks are available only in DRD Notify, Post Edit, and Batch modes, and they can be performed only when the Spacing and Complex Spacing constraint groups are selected on the Filters tab of the DRC Options Form form.The figure below shows a double patterning loop violation:
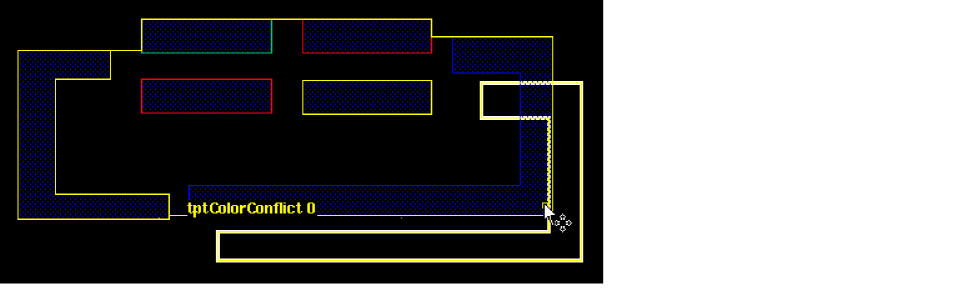
The figure below shows a triple patterning loop violation: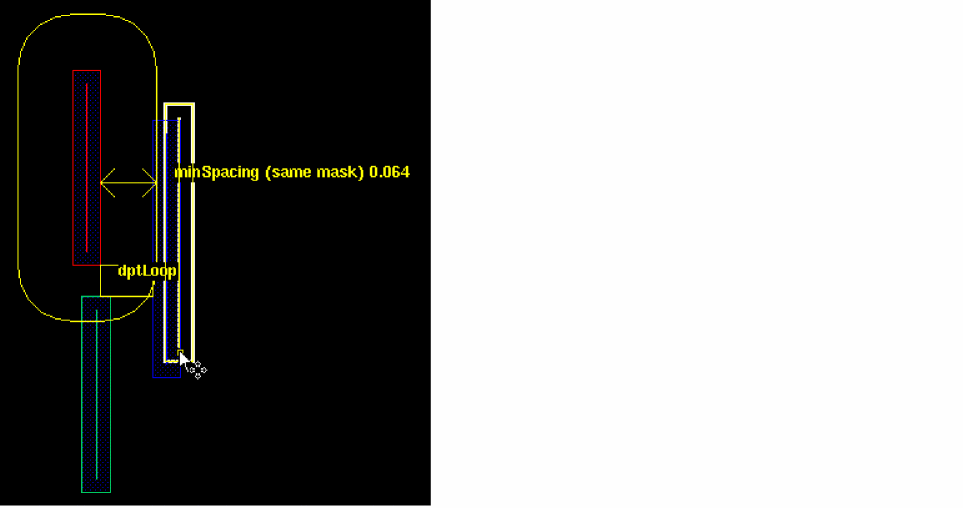
-
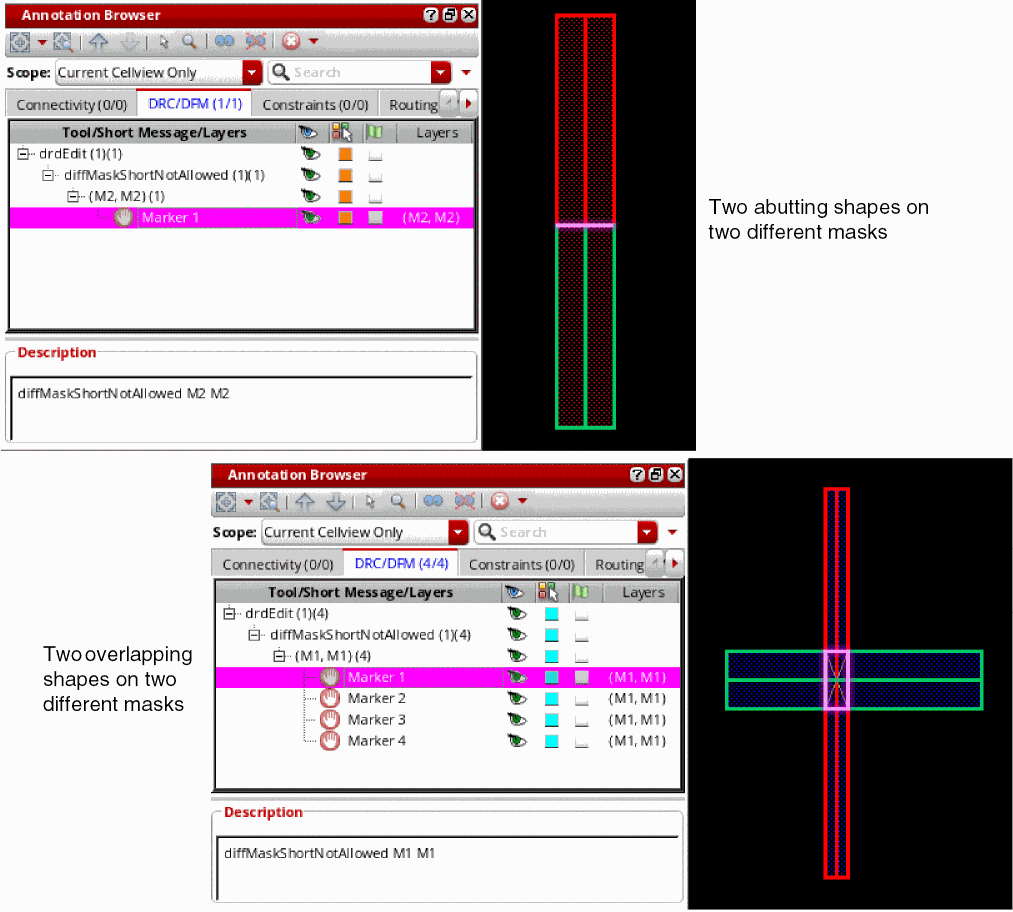
Color Shorts: Reports overlaps between shapes with different colors, irrespective of their lock status.
IfminStitchOverlapis defined for a layer, DRD reports stitch violations, instead of color shorts, for shapes on that layer. - Unlocked Shapes: Reports color-unlocked shapes on a layer.
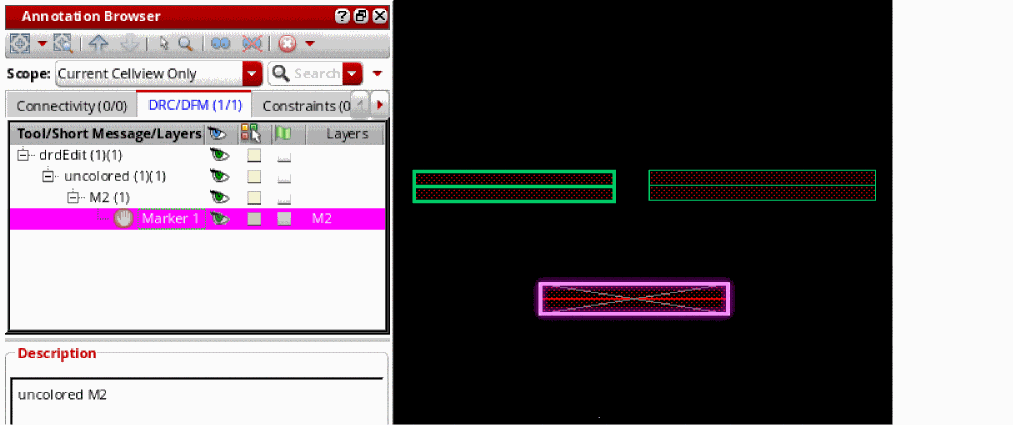
- Uncolored Shapes: Reports uncolored (gray) shapes on layers that support multiple masks.
- Consider Unlocked Shapes as Gray: Considers unlocked shapes as gray.
Using the Annotation Browser to View Color Check Violations
Color violations are displayed in the Annotation Browser under tool category drdEdit.
Viewing Color Shorts
The Annotation Browser lists the color shorts between shapes on different masks under diffMaskShortNotAllowed.
Viewing Uncolored Shapes
The Annotation Browser lists the uncolored (gray) shapes drawn on layers that support multiple masks under uncolored.
Viewing Color-Unlocked Shapes
The Annotation Browser lists the color-unlocked shapes on a layer under unLocked.
See Virtuoso Multi-Patterning Technology User Guide.
Related Environment Variables
The following environment variables can be used to set various color-related options in DRD:
- drdEditColorRules
- drdEditBatchColorRules
- drdColorability
- drdBatchColorability
- drdColorShorts
- drdBatchColorShorts
- drdUnlocked
- drdBatchUnlocked
- drdUncoloredShapes
- drdBatchUncoloredShapes
- drdConsiderGrayShapes
- drdBatchConsiderGrayShapes
- drdConsiderUnlockedShapesAsGray
- drdBatchConsiderUnlockedShapesAsGray
DRD Editing and Blockage Objects
A blockage object is a polygonal object that outlines illegal placement and/or routing areas for applicable types of objects in a given cellview. For example, a routing blockage is defined as an area where no interconnect objects may be placed on the specified layer.
If an interconnect object (path, via, or other basic shape) is created or edited on a layer to overlap blockage of the same layer, DRD editing violations are reported depending on the DRD editing settings (display of graphical feedback in Notify and Post Edit modes or adjustment of the interactive drag point in Enforce mode). The violation text message is “<type> blockage”, where “type” is one of the blockage types: routing, placement, wiring, fill, slot, pin, and placement halo. DRD editing does not consider blockage types “feedthru” and “screen”.
When a blockage object is near, contained within, or overlapping an interconnect object (path, via or other basic shape), violations are flagged only with post edit markers. DRD does not attempt to interactively flag with warnings (in Notify mode), nor attempt to adjust the drag point, nor move the non-blockage objects already placed (in Enforce mode). For example, if a path exists, and a routing blockage is created to overlap it, the violations are flagged with post edit markers by DRD editing if enabled.
When you use the Create, Move, Copy, Stretch or other edit commands on a blockage object, the markers are also only post edit if enabled. However, when you create design objects, all the three DRD modes are applied based on DRD editing settings.
Using DRD Editing in VLS XL and VLS EXL
The VLS EXL environments are connectivity and constraint driven, where the design is checked for short and open violations and for speciality routing constraints. DRD connectivity awareness is driven by the layout extractor. We therefore recommend that you run extraction when initially loading the design. The DRD modes use the XL extractor to assign connectivity to unassigned shapes when Create Wire, Stretch, Reshape, and Point to Point commands are run. To extract the design, choose Connectivity – Update – Extract Layout.
See
When DRD Enforce mode is enabled, assisted routing commands, such as point-to-point routing, guided routing, and finish wire, create routing after validating the commands based on the design rule checks.
See
Batch-Check Mode
You can run DRD in Batch mode either on the entire design or on a specified area in the design. This feature is available only in VLS EXL modes.
To run DRD in Batch mode, do one of the following.
-
Select the area of check from the drop-down list. The three area options are Current Cellview, Visible Area, Specified Area, Changed Area, and Partition.
Current Cellview (default) checks all the shapes in the current editable cellview.
Visible Area checks all the shapes in the current viewable area.
Select Area checks all the shapes in the specified area of the design.
When you select the Select Area option, specify the lower-left and upper-right coordinates for the region in this format((xlower ylower) (xupper yupper))in the text box provided on the DRD toolbar. Alternatively, you can define the area on the canvas. -
Click the DRC Options icon on the DRD toolbar, choose Options – DRC or choose Verify – Design – Process Rules – DRC Options.
The DRC Options Form form is displayed. Use the Batch to set up the various Batch mode options.
For information about running DRD in Batch mode on read-only cellviews, see
Verifying Selected Objects
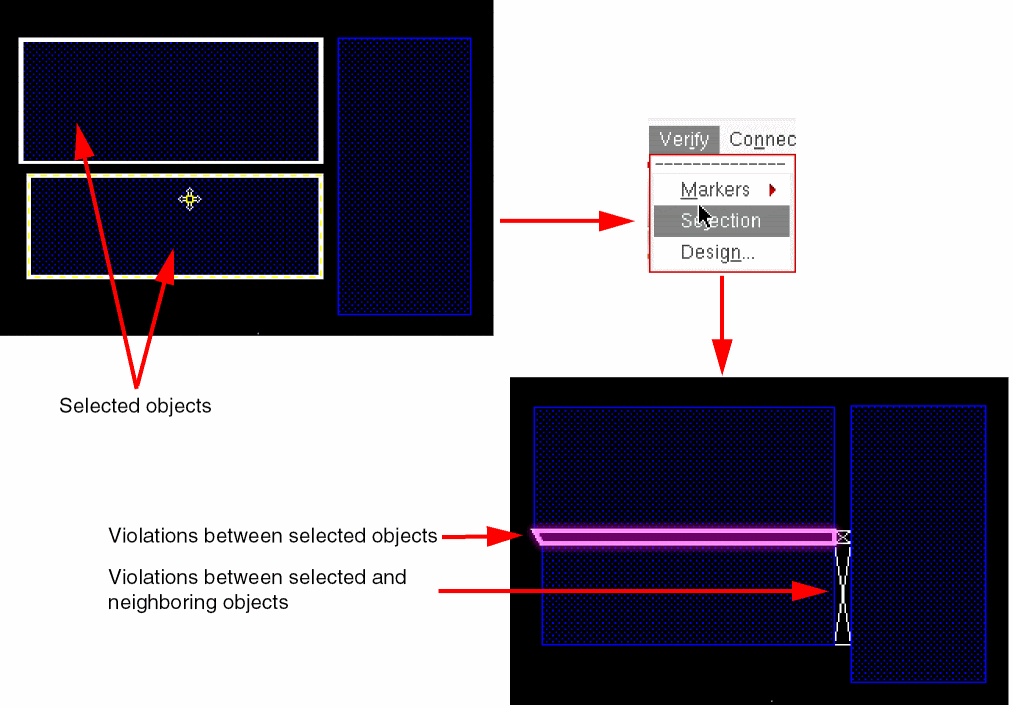
After selecting one or more objects in the layout, you can run a DRD check to verify if DRC violations exist between the selected objects and between the selected and the neighboring objects.
To verify selected objects, select one or more objects in the layout and choose Verify – Selection. You can verify up to 25 objects at a time.
The figure below shows the violations that exist between the selected objects and their neighboring objects.
You can also verify objects by using the drdVerifySelSet SKILL function.
Verifying Nets
The Verify DRC command enables you to check for DRC violations on a net or a set of nets. All shapes for the selected nets under the current hierarchy are checked for violations. To check for violations between the shapes on the selected nets and the shapes down the hierarchy, you can change the Hierarchy Range appropriately on the Batch tab of the DRC Options form.
The Verify DRC command is independent of the Scope options specified in the DRC Options form. That is, it is run for the selected nets on the entire cellview.
To run Verify DRC on a net, do the following:
-
In the Navigator assistant, select one or more nets, right-click, and choose Verify DRC from the context menu.
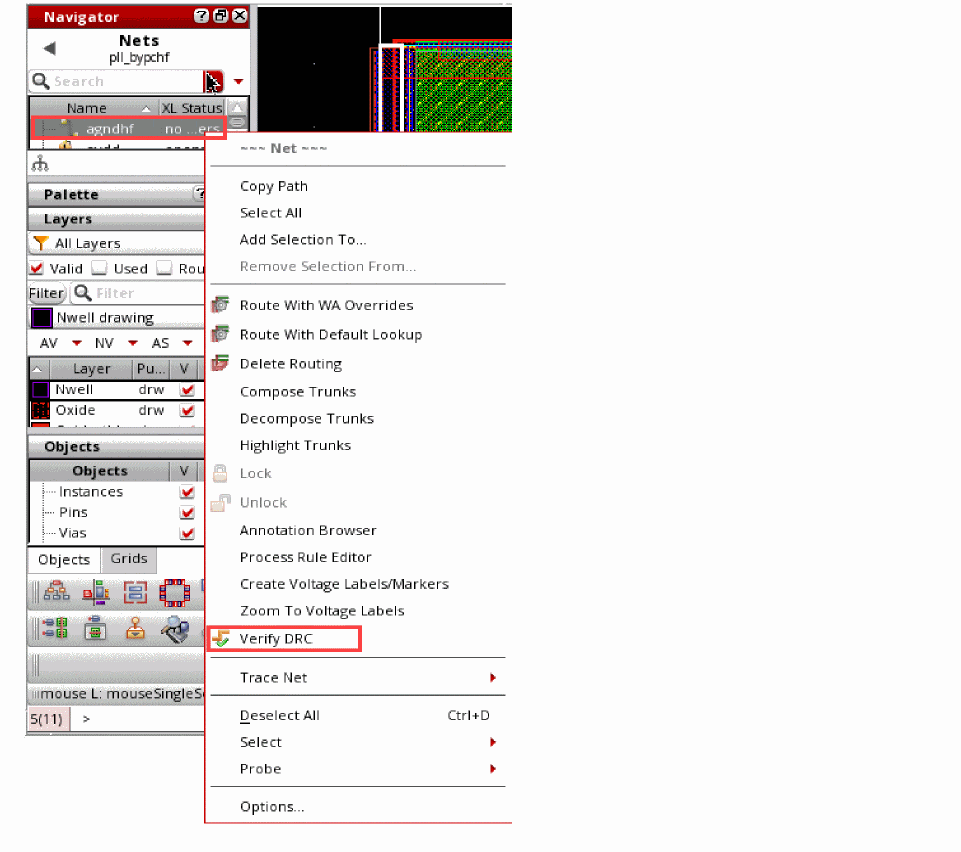
You can view, analyze, and filter the violation markers of net verification on the DRC/DFM tab of the Annotation Browser.
Return to top