Placement Options Form
The Placement Options form lets you control how various assisted and automatic placement tasks are to be performed. The form contains the following tabs.
| Tab | Description |
|---|---|
|
Specifies settings that are applicable to both, Assisted and Automatic modes. |
Assisted
The following table describes the fields available on the Assisted tab of the Placement Options form.
| Field | Description |
|---|---|
|
This group box provides advanced assisted features while moving objects in the layout. Environment variable: apMove |
|
|
Enables snapping of instances to the nearest rows instead of grids. The option also switches on Resolve Overlaps options.
The tool considers tap cells and boundary cells as fixed cells and so does not snap them to rows. Adding tap cells and boundary cells helps avoid latch-up effects and DRC violations. Boundary cells are cells with component class
In Virtuoso Layout EXL, the assisted placement snapping behavior overrides the snapping behavior set in the Snapping section of the Layout Editor Options form. Therefore, Instance to Row snapping and Snap Pattern Snapping settings are not applicable when Enable is selected. For information about the snapping options in the Layout Editor Options form, see Snapping.
Environment variable: apMove |
|
|
Displays an info balloon when objects are moved in the layout, which provides information about the wire length and snapping behavior. Environment variable: infoBalloon
In the Constraint-Aware Editing (CAE) mode, instances that lie outside the cluster boundaries are highlighted. An arrow indicates the respective cluster boundary, and the cluster violation count is displayed in the info balloon. For more information, see The displaySnappedInfo environment variable controls the display of snapping information in the info balloon. Snapping behavior is based on the row definition in the row template and also applies to Modgens, mosaics, and figGroups. |
|
|
Automatically resolves overlaps between instances after they are edited in the layout canvas by moving the instances to the left or right. Environment variables: displayResolveOverlapsColor, fixAdjustedForResolveOverlaps, snapColor |
|
|
Moves the overlapped device by a minimum distance in any direction. Environment variables: spreadType, insertDefaultSpreadType |
|
|
Moves the overlapped device by a minimum distance along the right or left directions within the same row as indicated below: 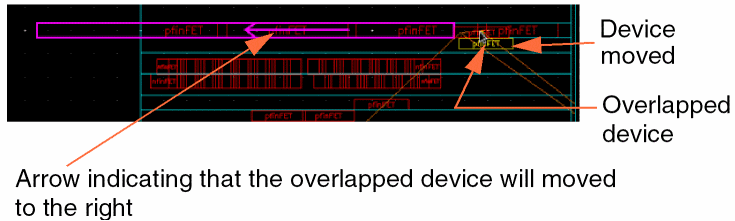 Environment variables: spreadType, insertDefaultSpreadType |
|
|
Moves the overlapped device to the right only. The devices being moved are placed sequentially by row. If more than one device is being moved, the relative positions of the devices are maintained while placing them at their new locations. 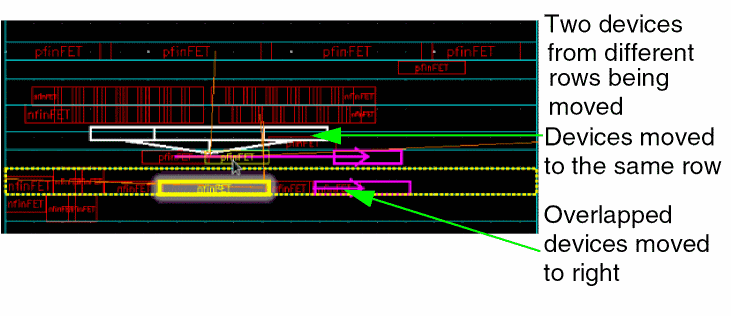 |
|
|
Moves the overlapped device to the right. The instances that are moved are placed sequentially in the same row. Environment variables: insertDefaultSpreadType |
|
|
Stacks the selected devices vertically before moving them. The overlapped devices are moved to the right as shown below: 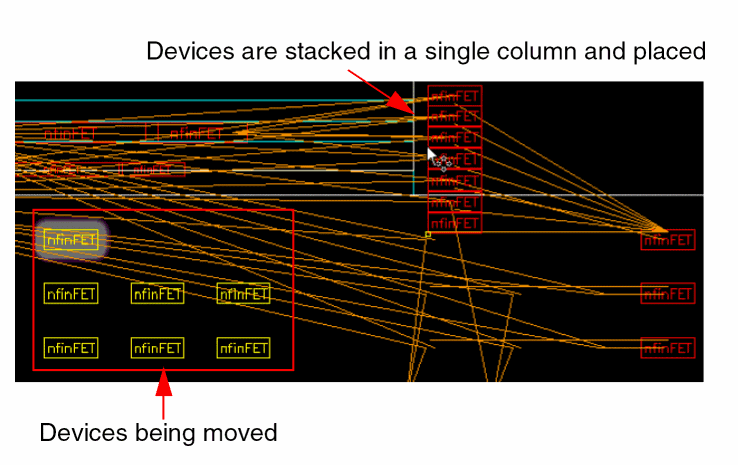 Environment variable: spreadType |
|
|
Controls whether abutment is based on connectivity or on the order of devices in the cellview (default). Environment variable: useDeviceOrder Disable this option when there are adjacent instances that do not have any common connectivity. If selected, then an extra dummy poly is inserted between the two instances to allow abutment. To avoid this, clear the check box. The devices are then reorganized to achieve a more compact abutment chain. |
Automatic
The following table describes the fields available on the Automatic tab of the Placement Options form.
| Field | Description |
|---|---|
|
This group box specifies the automatic placement rules. The options in the Rules section are generic, and apply to all design types. |
|
|
Specifies the technology file constraint group to be used for applying spacing rules. |
|
|
Specifies the minimum offset of instances from the PR boundary to a reference layer. Any layer inside the standard cell can be assigned as the reference layer. Specify the offset value and choose the required layer from the drop-down list. |
|
|
This section includes the following options applicable only to analog designs. These options are applicable only to analog designs. |
|
|
Automatically chains devices during placement. Environment variable: abutDevices |
|
|
Preserves existing chains during placement. This option cannot be used when Abut Devices is selected. |
|
|
Group mfactor devices and CMOS pairs defined to share connection. All such CMOS device pairs in the design that have been generated with chaining enabled are grouped together into a cluster. |
|
|
Places all P-devices to the top and N-devices to the bottom of the selected region. Environment variable: placePOverN |
|
|
This group box includes options that are applicable only to digital designs, and therefore apply only to the Custom Digital placement type in the Automatic Placement form. |
|
|
Distributes standard cells evenly in the rows by adding or removing space between them within each row. Selecting this option ensures that there is sufficient space to route between the standard cells in the rows. |
|
|
Inserts tap cells in rows. The following options are available:
|
|
|
This group box defines the following pin placement settings. These settings are generic, and so are applicable to all design types. |
|
|
Specifies whether the placer must consider the WSP direction while placing unconstrained pins. This option is enabled by default and is applicable only to designs with width spacing patterns (WSPs). For vertical WSPs, pins are placed along the left and right edges; for horizontal WSPs, pins are placed along the top and bottom edges.
Environment variable: |
|
|
Places all pins on the PR boundary. Environment variable: pinsOnBoundary |
|
|
Pushes passive devices such as large capacitors and resistors to the edge of the PR boundary, thereby separating them from the transistors in the design. This option is generic, and applicable to all design types.
What are passive devices? Passive devices are devices that cannot be used to amplify signals. These devices do not require an external source of energy to function. Rather, they store energy in the form of voltage or current. Examples: resistors and capacitors.
Environment variable: passiveOutside |
Common
The following table describes the fields available on the Common tab of the Placement Options form.
| Field | Description |
|---|---|
|
This group box specifies settings that are applicable to both devices and standard cells. |
|
|
Enables width-aware and constraint (CST)-aware snapping of instances and pins. Both interactive and automatic placers recognize the width spacing snap pattern grid that is defined using the
WSP snapping is possible only when the specified constraints, such as the Environment variable: WSPAware |
|
|
Specifies the layer-purpose pairs (LPPs) that the placer uses to derive the cell boundary for standard cells and devices when running Place Like Schematic, Analog Placer, and Digital Placer. |
|
|
This group box specifies settings for all Modgens that are either located in or are moved to the row regions. |
|
|
Specifies whether a Modgens regenerates after it is moved to a row region.
The orientations of the Modgen members are updated to match the orientations of the rows to which they are moved. For example, a Modgen member instance with orientation When deselected, Modgens are snapped only to rows with matching orientations. Environment variable: regenModgenPostProcess |
|
|
Specify the diffusion spacing for the NMOS transistors within the row. |
|
|
Specify the diffusion spacing for the PMOS transistors within the row. |
|
|
This group box specifies settings that are applicable only to standard cells. |
|
|
Specifies that the placement of standard cells should be such that each cell is aware of the context of the neighboring cell and supports placement in accordance with the EDGETYPE and CELLEDGESPACINGTABLE LEF5.8 constraints, which are either defined in the technology and macro LEF, or provided using an XML file. By default, this option is switched off. You can also specify a Context File, which is an XML file containing the edge spacing constraint information for performing context-aware placement. During context-aware placement, the placer honors the edge types and spacing constraints of tap cells. |
|
|
Specifies the XML file containing the edge spacing constraint information for performing context-aware placement. |
|
|
Considers the pin density of standard cells to optimize the placement and to improve routability. The assisted placement options are also pin density-aware. The pin density consideration can result in larger spacing between the placed standard cells. Pin density awareness is a heuristic to improve routability, and therefore is not checked during placement verification. Environment variable: pinDensityAwarePlacement |
|
|
Maximizes the number of WSP tracks that overlap the pins. Selecting this option improves routability by providing more access points to the router. Specify the Minimum Pin Access Count, which refers to the minimum number of access points that should be available. Environment variable: maximizePinAccess |
|
|
Specifies the minimum number of pin access points to achieve during the process of pin access maximization. Environment variable: minNumPinAccessPts |
|
|
Specifies the space to be left on either side of the master. Use the following syntax to enter values in this field:
Here, spacing of Environment variable: paddingForCells |
Related Topics
Setting the Assisted Placement Options in the Placement Options Form
Setting Automatic Placement Options in the Placement Options Form
Setting Common Options in the Placement Options Form
Return to top