Product Documentation
Virtuoso Abstract Generator User Guide
Product Version IC23.1, November 2023

Running step Abstract Form

The Running step Abstract form allows you to modify only the options that are relevant to the abstract steps about to be run.

The form contains the following tabs.

Tab Description

Adjust

Controls how pin shapes are adjusted during connectivity extraction for creating the final required pin shapes. These pin shapes are then fractured into rectangles. The options help you ensure that if a pin shape is reduced in any way, the discarded part of the pin is turned into a blockage, and the blockage is spaced sufficiently away from the reduced pin shape.

Blockage

Controls the final blockage geometry in the abstract view. Any blockage geometry already existing in the view is preserved and added to the final calculated blockages.

Density

Provides the specifications to Abstract Generator for calculating metal density (in percentage) for macros.

Fracture

Controls whether or not pins and blockages are fractured depending on the PR system you are using. By using the options on this tab, you can also control the modeling of 45-degree geometry. These options are available to all bins.

Site

Notifies the placer where it can place cells. All cells located in a particular bin share a common set of properties: symmetry, class (for example, pad or core), width, and height. These properties are used by the placer to assist in the placement process.

Overlap

Controlswhether Abstract Generator is able to update the overlap boundary geometry.

Adjust

The following table describes the fields available on the Adjust tab of the Running Step Abstract form.

Field Description

Signal Nets

This section provides options to control how pin shapes are adjusted during connectivity extraction to create the final required pin shapes for signal nets.

Create boundary pins

Lets you adjust the pin shapes created during extraction to be square and on the cell boundary. This can be useful when processing blocks where pin geometry extends deep inside the block after extraction. This option exists at two locations on the Adjust tab — Signal Nets and Power Nets groups. By default, this option is off for all bins except the Block bin and is disabled and off for Core bin. If this option is turned off, the pin will retain the shape generated by the Extract step, which can still be modified using the Layer Assignment for Signal Extraction table options.

The method used by Innovus to check width-dependent spacing rules might lead to false violations, so you should restrict the pin geometry to be a square near the boundary of the block by using the Create boundary pins option.

Boundary pin max distance to boundary

Allows you to specify the maximum distance (in microns) of the signal net or power net geometries from the boundary so that they can be considered as boundary pins. The geometries that are within the specified distance from the boundary are squared. By default, the shape(s) closest to the boundary is squared.

This option is available only when the Create boundary pins option is selected. This option is present in both the Signal Nets and Power Nets groups on the Adjust tab

Signal geometry groups

Controls how signal net shapes are grouped into LEF PORTS. This is useful for blocks with numerous signal pins on different layers. Usually, the presence of overlapping shapes on different layers means that the router should connect to only one of the overlapping shapes. This is achieved by grouping the overlapping shapes into the same LEF PORT.

This field provides the following options:

  • single: Creates a single LEF PORT for all the signal net shapes
  • separate: Creates a separate LEF PORT for each signal net shape
  • overlap: Forms LEF PORTS from groups of overlapping signal net shapes, that is, signal net shapes that overlap go into the same LEF PORT.

The default value for this option is single for Core, IO, and Corner bins and overlap for Block bins.

Set a value for this option after you have selected the Create boundary pins option for signal nets.

Power Nets

This section provides options to control how pin shapes are adjusted during connectivity extraction to create the final required pin shapes for power nets.

Create boundary pins

Lets you adjust the pin shapes created during extraction to be square and on the cell boundary. This can be useful when processing blocks where pin geometry extends deep inside the block after extraction.

Boundary pin max distance to boundary

Allows you to specify the maximum distance (in microns) of the signal net or power net geometries from the boundary so that they can be considered as boundary pins. The geometries that are within the specified distance from the boundary are squared. By default, the shape(s) closest to the boundary is squared.

Create ring pins

Creates ring pins where any extreme shapes, that are close to the cell boundary existing in a power net are found to form a ring. This option is available only if you are processing a block cell. The selection of this option is also mutually exclusive from the Create boundary pins option. By default, this option is turned off.

To create ring pins for these power rings, you must ensure that this option, along with the Extract power nets option on the Power tab in the Extract step, is turned on.

If a block cell is processed with this option selected, Abstract Generator displays a message box informing you whether or not the ring pins were successfully created.

Ring pin max distance to boundary

Specifies (in microns) the maximum distance within which the extracted power net geometry can be from the boundary in order for it to be considered as part of the ring, and therefore, be included in the abstract as pin geometry. This field is only available if you are processing a block cell and when the Create ring pins option is already selected.

Any vdd and vss net geometry found further than the specified distance from the boundary is not considered part of the ring geometry but is instead treated as an obstruction.

The default value for this field is 0, which means that Innovus finds the closest power shape to the boundary for each net, and that becomes the criterion distance used in determining the ring pin geometry for that net.

Follow ring pin

Considers all pin shapes, including the ones that are not part of the ring, as pins in the final abstract. This option is available only if you are processing a block cell and when the Create ring pins option is already selected.

The pins that are not part of the ring (‘follow rings pins’) are included in the final abstract based on the value specified in the Ring pin max distance to boundary field. When no value is specified, only the pin shapes whose distance from the boundary is the same or less than the distance of the farthest edge of the ring pin shape are included in the abstract. On the other hand, when a value is specified in the Ring pin max distance to boundary field, pin shapes are included in the abstract only if their distance from the boundary is within the distance specified in the field.

To prevent any filtering based on the distance, you can specify an arbitrarily large value in the Ring pin max distance to boundary field.

Power geometry groups

Controls how power shapes are grouped into LEF PORTS. This is useful for blocks with numerous power pins on different layers. Usually, the presence of overlapping power shapes on different layers means that the router should connect to only one of the overlapping shapes. This is achieved by grouping the overlapping shapes into the same LEF PORT.

Power geometry group is a cyclic field and provides the following options:

  • single: Creates a single LEF PORT for all the power shapes
  • separate: Creates a separate LEF PORT for each power shape
  • overlap: Forms LEF PORTS from groups of overlapping power pins, that is, power shapes that overlap go into the same LEF PORT.

The default value for this option is single for Core, IO, and Corner bins and overlap for Block bins.

Set a value for this option after you have selected the Create boundary pins option for power nets.

Examples

Power rail widths, offsets and shape

Provides an option to specify the characteristics of the power and ground rails for the current bin. The Abstract step does not assign feed through or abutment shape properties if there are no power terminal shapes that touch the PR boundary. For example, a voltage translator cell could have vdd and vss net geometry, but may also have an internal vdd net that cannot be classified under any shape class.

You can set the shape manually using Viewing and Editing Cell Terminal Properties in Abstract Generator.

Abstract Generator also examines the standard cell power pin shapes and sets the shape to either feed through or abutment. Additionally, checks are made at this time to ensure the following:

  • The selected standard cells have the same power rail width and the same ground rail width.
  • The selected standard cells have the power rails at the same offset from the cell origin so that the power rails can be connected by feed-through or abutment.
  • The rail width is the same at the right and left edges of standard cells.
  • The rail width is an even number when converted to LEF database units.

CORE/BUMP Ports

This section provides you options to specify the following CLASS CORE-specific information to Abstract Generator. These options apply only to the cells in the IO bin.

Cell edge facing core

Specifies the direction in which the CORE-facing edge is pointing, north, south, east, west, or a combination of any of the four core edges. The default value is north. You can specify multiple CORE-facing edges. The is a text field, which is enabled only when you process a pad cell in the IO bin.

Abstract Generator uses this value to determine the edge of the pad cell that it should check for locating the port to be classified as CLASS CORE in the LEF file. For example, the IO pad shown in the following figure will be placed to the left of the core. Therefore, the Cell edge facing core option for this pad should be set to east so that the correct port is identified as CLASS CORE in the LEF file.

Power/ground net to have CLASS CORE ports

Allows you to specify the nets that should have CLASS CORE ports. This can be specified by entering a regular expression in the field. This field is related with the Cell edge facing core option and therefore, available only when you process a pad cell in the IO bin..

The default entry for this field is ^((V(DD|CC))|(v(dd|cc)))(!)?$

Allow multiple CLASS CORE ports

Specifies that two ports equidistant from the core-facing edge of a pad are both assigned the CLASS CORE statement in LEF. This option is intended for pad cells processed in the IO bin. Only geometries with center lines perpendicular to the core-facing edge are considered.

The option is off by default, which means that only the geometry closest to the core-facing edge becomes a CLASS CORE port. In the figure below, the geometry that becomes a CLASS CORE port is the one on the right (VDD2).

When the option is off and there are two power geometries equidistant from the core-facing edge, only the geometry closer to the center line of the pad is defined as a CLASS CORE port in LEF. In the figure below, the geometry that becomes a CLASS CORE port is the one on the right (VDD2).

When you select this option, the behavior depends on the Power geometry groups setting, as described below:

  • If you select separate, the geometries shown in the second picture above appear in two separate CLASS CORE ports in LEF.
  • If you select single, they appear in the same CLASS CORE port.
  • If you select overlap, they appear in two separate CLASS CORE ports unless they overlap, in which case they will appear in the same CLASS CORE port.

Copy CLASS CORE ports

Duplicates any geometry found to belong to a CLASS CORE port on the net (set by using the Power/ground net to have CLASS CORE ports option) in a non-CLASS CORE port to the exported abstract LEF. This option is enabled only when you process a pad cell in the IO bin and is switched off by default.

When this option is off, Abstract Generator will find the power geometry group port (single, separate, overlap) whose geometry is closest to the core-facing edge and set it to CLASS CORE. Then, when exported to LEF, the port will only be represented once with the CLASS CORE property.

Create CLASS CORE ports only if pin meets cell boundary

Specifies that only the pins that either touch or cross the core-facing edge of the boundary become CLASS CORE ports in LEF. If the option is not selected, the pin closest to the core-facing edge becomes the CLASS CORE port.

Consider the situation as shown in the figure below. In this situation, if the option is selected, then only pinB will become a CLASS CORE pin.

Consider a situation in which the cell-edge facing core is set to south so the VDD pin on the right of the south edge becomes CLASS CORE in the LEF. Here is how this would look in the LEF file:

Create CLASS CORE ports if pin meets non-core facing edge

Allows the pins that touch the non-core facing edge — left or right (when the core-facing edge is north or south) to become eligible to be included as CLASS CORE ports. This option is switched on by default. The eligible pins become CLASS CORE ports if they satisfy other criteria (settings of other options on the Adjust tab).

When this option is off, pins touching the non-core facing edge are not considered for the CLASS CORE port creation.

  • Create CLASS CORE ports only if pin meets cell boundary = ON
    Assume that both pinA and pinB touch non-core facing edges. With the option Create CLASS CORE ports if pin meets non-core facing edge selected, both pinA and pinB are eligible to be considered as CLASS CORE ports. Since in this situation the Create CLASS CORE ports only if pin meets cell boundary option is also ON, only the pin touching the non-core facing edge that also touches the core-facing edge becomes the CLASS CORE port, which in this case is pinA.
    In the above figure, only pinA touches the non-core facing edge. However, since both Create CLASS CORE ports if pin meets non-core facing edge and Create CLASS CORE ports only if pin meets cell boundary options are ON, both pinA and pinB become the CLASS CORE ports.

  • Create CLASS CORE ports if pin meets non-core facing edge = ON
    Create CLASS CORE ports only if pin meets cell boundary = ON
  • Create CLASS CORE ports if pin meets non-core facing edge = OFF
    Create CLASS CORE ports only if pin meets cell boundary = ON
    In the above figure, though pinA touches the non-core facing edge but it will not be considered for creating CLASS CORE port because the Create CLASS CORE ports if pin meets non-core facing edge option is OFF. In this case, with the Create CLASS CORE ports only if pin meets cell boundary option ON, only pinB becomes the CLASS CORE port.

  • Create CLASS CORE ports if pin meets non-core facing edge = ON
    Create CLASS CORE ports only if pin meets cell boundary = OFF

In this situation, only the pin touching the non-core facing edge that is also the closest to the core-facing edge becomes the CLASS CORE port. In the following figure, the pin that qualifies this criteria is pin B.

Create CLASS BUMP ports

Considers power nets of cell type IO for creating the CLASS BUMP ports. The largest shapes (with the largest Area/Aspect ratio) on the top routing layer are created as bump ports. A CLASS BUMP pin can be used either for power or ground nets. This option is enabled only when you process a pad cell in the IO bin and is switched off by default.

A power net can have both CLASS CORE and CLASS BUMP ports.

Blockage

The following table describes the fields available on the Blockage tab of the Running step Abstract form.

Field Description

Layer Assignment for Blockages

This section is used to specify how blockages are to be modeled in the abstract.

Layer

Specifies the layers on which you want to create blockages. You can do one of the following:

  • Select a layer from the drop-down list available from the technology file.
    After you have selected a layer from the drop-down list, it is removed from the list for the next layer row.
  • Type the layer name directly in the Layer column.
    Specify each layer only once. If you enter an invalid layer, Abstract Generator will issue a warning.

If you do not create a table entry for a particular layer, Abstract Generator will not create any blockages on that layer in the final abstract.

Geometry Specification

Lets you enter the geometry specification for the layers on which you want the blockage to be implemented.

Blockage

Lets you specify the type of blockage you want to create on the specified layer: Cover, Detailed, or Shrink. The default is Detailed for the Core bin and Cover for the Block bin.

Use the AbstractBlockageUserDefinedWidth option to set the effective width attribute for layer blockages. Spacing and effective width attributes cannot be set together. Effective width can be set only if the spacing value is set to zero.

  • Cover: A Cover blockage is a blockage that covers an entire block for each metal layer used by the block. This type of blockage is typically generated for blocks or IO cells where you want to prevent over-the-cell routing to improve performance or to avoid electrical effects between tracks. Cover blockages follow the overlap layer, if present; else they follow the PR boundary. The cover blockage model does not generate any blockages outside PR boundary. Only exceptions to this are the shapes that are affected by pin cutout regions, where these shapes are considered to be part of the layout.
  • Shrink: A Shrink blockage is a blockage that fills in the smaller, less useful free spaces in a block and leaves out the larger spaces. Based on the specified Shrink Dist or Shrink Track, Abstract Generator combines blockages within that distance of each other, filling the space between them with more blockage. This results in a small number of large blockages separated by spaces that a router can use. This allows over-the-cell routing without modeling each obstruction individually. The Shrink blockage generation slows down the overall process of abstract generation but ultimately increases the speed of routing significantly, which is better than when Detailed blockages are routed.
  • Detailed: A Detailed blockage is a blockage that covers geometries that are not part of pins on the routing layers, thereby allowing maximum routing within the block. This type of blockage is used for standard cells and possibly for higher-level routing layers in blocks. Do not create detailed blockages on contact or via layers for large blocks. Creating detailed blockages can adversely affect the performance of Abstract Generator because of the number of individual shapes that need to be processed. Consider creating Shrink type of blockage by setting a distance to merge most of the obstructions. You can speed up the detailed blockage creation in some scenarios.

Pin Cutout

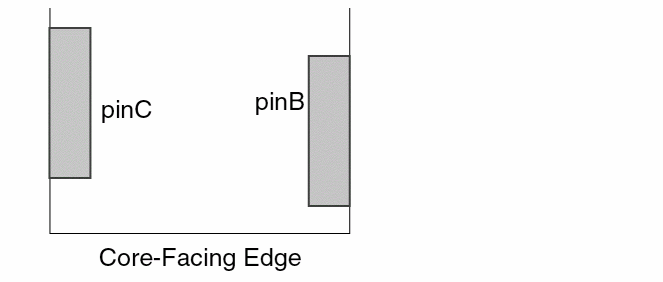
Enables Abstract Generator to cut the blockage around pins for allowing a router to access the pins. See Impact of Cutout and Spacing Options on Blockage Types.

Max Space

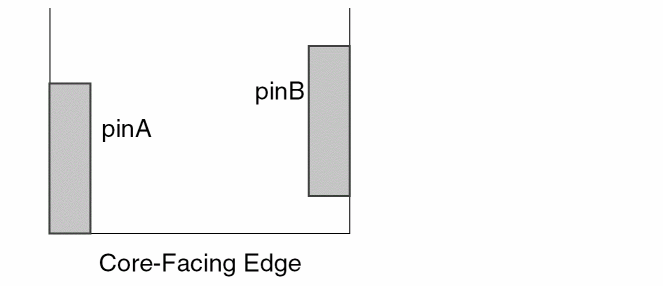
Enables Abstract Generator to create a boundary blockage around a block such that the top-level routes are maximum possible distance away from the block. The boundary blockage is interspersed between pins along the block boundary. You can use this option when you want to do routing for cells even when their detailed layout is still not complete but the pin positions and boundary have been finalized.

This option works only for Cover blockages and is not applicable for Detailed and Shrink blockages. See Impact of Cutout and Spacing Options on Blockage Types.

The Max Space option is effective only when the Pin Cutout option is selected. Further, when the Max Space option is selected along with the Pin Cutout option, the Corridor Cut option is ineffective.

Corridor Cut

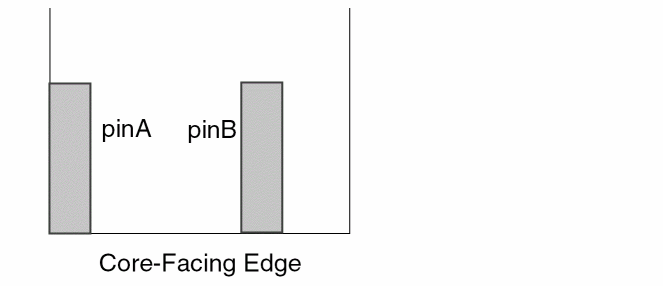
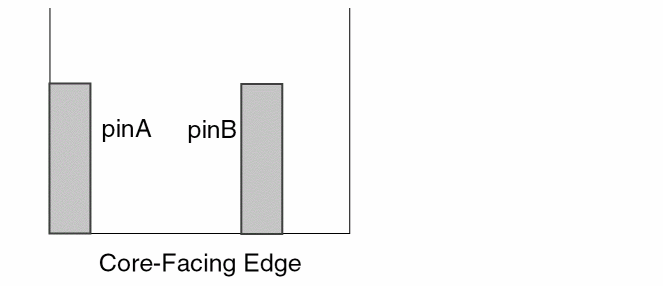
Enables Abstract Generator to create corridor paths that can allow routers to access internal pins. This option, when selected, first determines the existence of straight line paths that can route minWidth wires from the internal pins to the block boundary and then creates the corridor cuts. Also, Abstract Generator reads the direction of the pin and checks the possibility of creating corridor cut in a direction. If the pin direction matches with the nearest edge then the corridor is cut in that direction. However, if the pin direction does not match with the direction of the nearest edge then the corridor will not be cut and an error message will be displayed.

See Impact of Cutout and Spacing Options on Blockage Types.

You can use this option only when the Pin Cutout option is selected.

Cut Same

Specifies the distance to cut around pins on the same layer. If set as 0, the blockage completely covers the design, including the pin shape, and there is no pin cut out.

By default, Abstract Generator cuts out enough space to enable a via to be dropped from the layer above anywhere onto the pin without violation. This setting overrides the default size of the cut-out made around pins. The default is still used for any unlisted blockage layers.

See Automatic Pin Stretching.

Cut Below

Specifies the distance to cut around pins on the layer below. By default, Abstract Generator cuts a window from a blockage layer that overlaps pins on the layer below, leaving enough space to enable a via to be dropped from the blockage layer anywhere onto the pin without violation. For example, if you are creating cover blockages for metal 4, then pin cutouts are created on metal 4 blockages for pins in both, metal 4 and metal 3.

By default, the Cut Below field does not have any value. However, you can specify any value in this field. If you specify the value 0, then pin cutouts are created only on the current layer. In the above example, pin cutouts will only be created on metal 4. See Automatic Pin Stretching.

Shrink Dist

Specifies a minimum distance (in microns) between blockages. Blockages separated by a distance less than or equal to the specified distance are merged, irrespective of whether Pin Cutout is ON or OFF. Values entered in this field are considered only if you select to generate Shrink blockages.

Shrink Track

Specifies the minimum number of tracks between blockages. Blockages separated by a distance less than or equal to the specified number of tracks are merged. Values entered in this field are considered only if you select to create Shrink blockage.

The distance, D, required to accommodate a given number of tracks, n, is calculated (in microns) using the following formula:

D = (n * minTrackWidth) + ((n + 1) * minSpacing)

If you specify both Shrink Track and Shrink Dist, the values are added and blockages separated by a distance less than or equal to the total distance are merged. If you do not supply a distance, Abstract Generator uses a default value of 2 tracks.

If values are entered for layers for which Shrink blockage is not being generated, the values are ignored.

Boundary

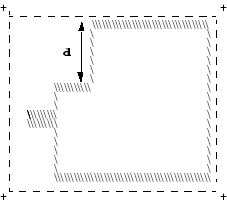
Specifies the minimum distance between a Cover blockage and the cell boundary. The default value of this option is 0. This option is valid only for the Cover blockage. The Add, Edit, and Delete buttons and the Specifying General Options in G-Spec Builder Form in conjunction with the Operators are used to work with the Layer Assignment for Blockages table. When you add a new layer row to the table, the type of blockage is set as Detailed for the Core bin and Cover for all other bins by default.

Cut window around pins large enough to drop via

Controls the size of the window cut into a blockage around a pin. This option is selected by default. When this option is selected, Abstract Generator cuts a window large enough for a via to be dropped to that pin. If you do not select this option, Abstract Generator cuts a window around the pin based purely on the range-based spacing rule for the pin width.

Alternatively, use the BlockageCutVia option.

Abstract Generator uses the minSpacing value for the minimum spacing for both metal and via layers. It does not use the viaSpacing rule. If you have viaSpacing tables, you need to ensure that the spacing for zero adjacent cuts is defined in the minSpacing rule.

This option applies only to the layer on which the pin and blockage exist. However, for a given blockage layer, Abstract Generator additionally cuts around pins on the layer below, again leaving space for a via to be dropped without violation. This option has no effect on the size of the cut-out around pins on the layer below.

If you want the cut-outs on all layers to be based only on the pin width, set the Cut Below value to 0 for the given blockage layer in the Layer Assignment for Blockages table.

Routing channel for cover blockage

Creates a routing channel when generating a cover blockage. Consider an example below:

Here, Metal1 refers to layer through which a routing obstruction needs to be cut. (y9 drawing) is the layer-purpose pair that indicates the shape of the routing channel.

You can use the AbstractBlockageRoutingChannelOnLayers option to create a routing channel when generating a cover blockage.

Example

absSetBinOption("Block" "AbstractBlockageRoutingChannelOnLayers" "(Metal1 (y9 drawing)) (Metal2 (y9 drawing))")

Layers (y [0-9] drawing) are system-defined layers. So, the results may not be accurate when these layers are used for creating routing channels.

Density

The following table describes the fields available on the Density tab of the Running step Abstract form.

Field Description

Calculate metal density

Specifies that metal density information is to be generated for the selected cell(s). When this option is selected, Abstract Generator generates the fill blockages that are specified in the DEF file. During LEF generation, these fill blockages are exported out as density. By default, this option on the Density tab is enabled. The other options become active only when the Calculate metal density option is enabled.

Use layer assignment for signal extraction, Use layer assignment for antenna extraction, Use layer assignment for power extraction

Lets you specify metal layers and their geometry specifications for metal density calculation. You can use the same metal layers and their corresponding geometry specifications as you would have specified for signal nets, power nets, or antenna data extraction in the Extract step. To do this, select one of the following options:

  • Use layer assignment for signal extraction
  • Use layer assignment for antenna extraction
  • Use layer assignment for power extraction

These options are mutually exclusive and selecting one disables the other two options. Only metal layers specified in the selected table will be considered for metal density calculation.

Layer Assignment for Metal Density Regions

This section provides options to select different set of geometry specifications for metal layers. To use the geometry specifications from this table, ensure that none of the three layer assignment options is selected. You can turn off these options individually.

If you select to use a layer assignment table for density calculations from a different tab, you can still use the Width and Height columns of the Layer Assignment for Metal Density Regions table on the Density tab. In this case, though the geometry specifications in the Layer Assignment for Metal Density Regions table will not be considered for metal density calculation but you need to ensure that a valid geometry specification exists for every layer specified in this table.

Layer

Lets you remove or edit the existing layers or add any removed layers. Density data will not be calculated for metal layers that are not specified in the table. This column is pre-populated with the metal layers from the technology file.

If you use the Layer Assignment for Metal Density Regions table and you have specified a non-metal layer in the table, Abstract Generator will issue a warning message during density calculation.

Geometry Specification

Lets you select the layer names corresponding to each metal layer name in the Layer column. You can modify these values as required.

The Width and Height columns are described in the section, Specifying the Dimensions of the Density Window.

Width

Lets you specify the width of the density window either for all the layers or separately for each layer.

Height

Lets you specify the height of the density window either for all the layers or separately for each layer.

Default density window width

Lets you specify the same width value for all the layers.

Default density window height

Lets you specify the same height value for all the layers.

The default value for both the Default density window width and Default density window height fields is 20, which is derived by calculating 10% of a typical 130nm window and 20% of a typical 90nm density check window size. You can modify this value to get Abstract Generator to override the default window size without having to change the Width and Height values for every layer.

Fracture

The following table describes the fields available on the Fracture tab of the Running step Abstract form.

Field Description

Fracture

This section provides options to specify whether you want to fracture pins or blockages by using the options in the Fracture section - Fracture pins and Fracture blockages. By default, both these options are disabled.

Fracture pins

Controls whether Abstract Generator creates each pin shape as a set of maximum rectangles or as a polygon. This lets you model 45-degree pins if your design requires it. This option is available for all bins.

When this option is not selected, which is the default, Abstract Generator creates each blockage shape as a polygon. This setting is recommended if the abstracts are to be routed using the IC Shape-Based Router. If you select this option, Abstract Generator creates each pin shape as a set of maximum rectangles.

You can also choose to fracture only rectilinear pin shapes. To do this, you can use the AbstractFractureRectilinearShapes option of the absAbstract SKILL function.

absSetBinOption("Block" "AbstractFractureRectilinearShapes" "true")

If you are using the Create boundary pins or Create ring pins option on the Adjust tab and Abstract Generator has stretched a pin, then that pin is not fractured by this option. For example, if you have boundary pins for power nets but not for signal nets, only the power nets are fractured.

Fracture blockages

Controls whether Abstract Generator creates each blockage shape as a set of maximum rectangles or as a polygon. This option is available for all bins. If you select this option, Abstract Generator creates each blockage shape as a set of maximum rectangles. When this option is not selected, which is the default, Abstract Generator creates each blockage shape as a polygon. This setting is recommended if the abstracts are to be routed using the IC Shape-Based Router.

During blockage generation, Abstract Generator converts ellipses, circles, and donuts into polygons before fracturing the blockages. By default, 64-point polygons are generated, which are snapped to the nearest manufacturing grid. You can overwrite this setting by using the following:

absSetOptionabsSetOption("numOfPointsInEllipseOrDonut" "number_of_points")

Example:

absSetOption("numOfPointsInEllipseOrDonut" "64")

45-degree geometry

This section provides options to convert a 45-degree geometry.

Stair-step coverage

Controls the degree to which stair-step blockages cover the 45-degree geometry. There are three settings available for this option: full, truncate, and partial.

Stair-steps width

Specifies the width of the blockage geometry to be created. Enter a value greater than zero. There is no minimum width restriction. The default value  is half the minSpacing of the Metal1 layer. If the minSpacing of Metal1 layer is not found in the technology data, then the default value is set to 5.

Site

The following table describes the fields available on the Site tab in the Running step Abstract form.

Field Description

Site name

Lets you select a site name defined in the technology library from the available list to be applied to all cells in the current bin. Alternatively, select the blank option and allow Abstract Generator to select an appropriate site based on cell property settings.

The name of the site will appear in the LEF file exported from Abstract Generator. For any site to appear in the LEF generated from Abstract Generator, it must be defined in the technology library.

Define new site name

Lets you specify the name of a new site to be used by all cells in the current bin. If the site does not already exist, Abstract Generator defines it in the technology file. An entry in the Define new site name field overrides any setting in the Site name field.

Leaving this field blank automatically instructs Abstract Generator to use the site selected in the Site name field. Both Site name and Define new site name fields associate cells with a single site.

Calculate site pattern for gate-array cells

Calculates site pattern for gate-array standard cells. For LEF 5.8, Abstract Generator can derive site patterns from the layout of gate-array standard cells. Abstract Generator provides this support only for gate-array cells with a single level of hierarchy. This site pattern calculation feature is available only for the Core bin.

For valid site pattern calculation, the selected sub-cellviews (building blocks of gate-array cells) should be either associated to a predefined site or mapped to an already existing site. You can map the sub-cellviews to sites in the Sub-Cellview to Site Mapping table.

This option works exclusive of the single site creation fields on the Site tab.

Sub-Cellview to Site Mapping

Lets you map the sub-cellviews to sites. For valid site pattern calculation, the selected sub-cellviews (building blocks of gate-array cells) should be either associated to a predefined site or mapped to an already existing site.

Overlap

The following table describes the fields available on the Overlap tab in the Running step Abstract form.

Field Description

Create overlap boundary

Lets you specify whether Abstract Generator should create an overlap boundary. This option is a cyclic field and you can choose one of the following values:

  • always: Abstract Generator always creates an overlap boundary. Any existing overlap layer geometry is overwritten.
  • as needed: Abstract Generator creates an overlap boundary if it is not already present or if it is present and was previously calculated by Abstract Generator.
  • off: Abstract Generator never creates an overlap boundary.

Using geometry on layers

Lets you specify the layers to be used in the overlap boundary calculation. The boundary is drawn so that it encloses all the geometry found on these layers.

If you specify only a layer name instead of a layer-purpose pair, Abstract Generator considers all the purposes on that layer except the ones specified in the Ignored Purpose(s) field on the General tab (File – General Options).

Size factor to apply

Lets you specify (in microns) the value by which an overlap layer is to be increased. This option is enabled when the Create overlap boundary option is set to always or as needed. The default values depend on the current bin. The default for the Block bin is 0.0; the default for the Core bin is half the minimum separation defined for the metal1 layer.

You can use this option to ensure that the placement of cells with abutting overlap layers does not lead to geometry contained in these cells causing violations. You are most likely to need this option when computing the overlap layer for standard cells that are placed automatically and abutted in rows. Blocks are abutted only rarely and should not require you to use this option.

Smooth factor to apply

Controls the shape of the overlap layer that is produced. This option is enabled when the Create overlap boundary option is set to always or as needed. The default values depend on the current bin. The default for the Block bin is 100 microns; the default for the Core bin is 0.

You can use this option to create less complex overlap boundary shapes, typically when processing blocks. The value you supply is the maximum distance that you do not want to be cut out of the overlap layer. Abstract Generator takes the computed overlap boundary and removes any cut-outs with a maximum dimension less than the specified distance.

Consider the following block. The PR boundary has been indicated with a broken line (--), and the outline of the geometry has been shown using the backslash character (\\\). This area marked by the backslashes indicates the area of the cell that contains shapes on the layers that will be used to create the overlap layer. (This area would become the overlap layer if the Smooth factor to apply was set to 0).

When computing the overlap layer, it is likely that you want to retain the cut-out in the top left corner as free space. To do this, you must specify the value for the Smooth factor to apply option as d, where d is the distance in microns slightly less than the minimum dimension of the cut-out. Abstract Generator removes all other free space between the initial overlap boundary and the PR boundary but keeps the region in question.

Related Topics

Customizing Pin Shapes in Standalone Abstract Generator

Modifying Blockage Geometry in the Abstract View

Density Calculation

Fracturing Pins and Blockages

Specifying Sites in Standalone Abstract Generator

Creating an Overlap Boundary


Return to top
 ⠀
X