8
Editing Properties
This chapter describes how to find and edit object properties.
- Using Command Shortcuts
- Searching for Objects That Have a Specific Property
- Replacing Properties
- Selecting Objects to Edit
- Selecting Objects by Filtering
- Object and Cellview Property Types and Values
- Editing Object Properties
- Editing Specific Object Properties
- Editing Cellview Properties
- Setting the Tool Filter
Using Command Shortcuts
Direct editing (or direct manipulation) is the quickest way to edit or create an object. You can use your mouse to start the following command operations, rather than selecting a menu command or an icon:
- Copying using direct manipulation
- Moving using direct manipulation
- Create a wire from a schematic pin
- Create a wire from a block pin
- Repeat the last command
- Rotating using the mouse
Searching for Objects That Have a Specific Property
Use the Edit – Find command to find objects that have a property that matches your specific search criteria.
To find objects that have a specific property,
-
From the view, choose Edit – Find.
The Schematic Find form appears. The title bar reflects the editor name.
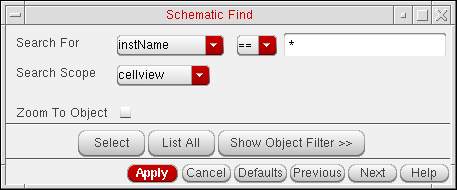
-
In the Search For cyclic field, choose the specific property to search for.
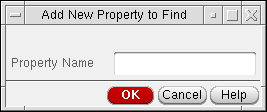
If you set the Search For cyclic field to other, the Add New Property to Find form appears.
-
Click Apply.
When a match exists,- A message reports the number of matching properties.
- All the properties that match the criteria specified on the Find form are added to a list. To display the list of matches, click the List All button.
- The software highlights the first matching object
If no match exists, a dialog box confirms no objects were found. -
Click Next.
In the schematic window, the software highlights the next matching object. - To end the command, click Cancel or close the form window.
Search String Wildcards
Wildcards help you replace properties using partial string substitution. You can use one or more wildcards or tagged fields in the search and replace fields on the Schematic Find or Schematic Replace form.
| Search String Wildcards | Description |
|---|---|
|
Referred to as the escape character, it causes the character following it to be treated normally, if it is: |
The system counts each occurrence of an “ * ”, “ . ” or “[c..]” as one single wildcard, except when the “ . ” and “ * ” appear together, in that order. In this case, the system counts the two together as one wildcard only.
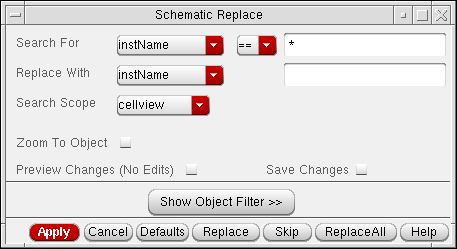
Replacing Properties
Use the Edit – Replace command to find objects that have a property that matches the search criteria you specify on the Replace form. You can then replace the property or the value with another property or value, which you also specify on the Replace form.
To find and replace properties,
-
From the view, choose Edit – Replace.
The Schematic Replace form appears. The title bar reflects the editor name.
-
In the Search For cyclic field, chose the specific property to search for.
When you set the Search For cyclic field to other, the Add New Property to Find/Replace form appears. When you click OK, the new name appears in the cyclic field on the Find form. - Check the object filter to make sure the property is selectable.
-
Click Apply.
If a match exists, a message reports the number of matching properties. If no match exists, a dialog box confirms no objects were found. - On the Replace form, do one of the following:
Replacing String-Tagged Characters
In the Virtuoso® Schematic Editor, you can use partial strings and wildcards in search-and-replace statements. The table below and the following examples describe the process.
If you have instances I0, I1, I2,…I10, and you want to replace them with M1, M2,…M10, enter the following:
You can specify the tagged fields in any order in the replace string. If you want to swap the start and end values for all buses with prefix ABC, enter the following:
The {2} tag in the replace string corresponds to the characters represented by the second asterisk in the search string, while {1} corresponds to the characters represented by the first asterisk in the search string.
In all buses with prefix ABC, keep the start value the same but change the end value to 20.
Replace: ABC<{1}:20> or ABC<*:20>
The {1} tag or * in the replace string corresponds to the characters represented by the first asterisk in the search string.
Search for CLK, CLK_, CLK_IN and replace with CLOCK, CLOCK_, CLOCK_IN.
The {1} tag or * in the replace string corresponds to the characters represented by the asterisk in the search string.
You can use any combination of wildcards in the search string. To search for net names A1B1C1, A2B2C2, and so forth, and replace them with P1Q1R1, P2Q2R2, and so forth, you can enter any one of the following:
Search: A[0-9]B[0-9]C[0-9] or
A.B.C. or
A*B*C* or
A[0-9]B.C. or
A.B[0-9]C[0-9] or
A*B.C. or
A.B*C*
Replace: P{1}Q{2}R{3} or
P*Q*R*
A tagged field can appear any number of times in the replace string. If you want to replace AfooB and AblahB by PfoofooQ and blahblahQ respectively, enter the following:
If the wildcards appear together in a sequence in the search string, each corresponds to a different tag except when a “ . ” and “ * ” appear together, in that order. In this case, the wildcards are treated together as one tag.
If you want to search for a string AxyzB and replace it with CxyzD, enter the following:
The result is CxD and not CxyzD because the “ * ” in the replace string is interpreted as the first tagged field, which is the wildcard “ . ”. To achieve the desired result, you can use C***D or C{1}{2}{3} as the replace string, or use A*B as the search string.
However, suppose you enter the following:
The result is CxyD, because the “ * ” in the replace string is interpreted as the first tagged field in the search string, which is the sequence “ .* ”.
To achieve the desired result, enter the following:
The character \ can be used to escape wildcard characters in the search-and-replace strings. If you want to replace A.B by A*B, enter the following:
The \ before “ * ” in the replace string indicates that the asterisk be treated as a literal and not as a wildcard.
If you had an array A[1], A[2], A[3] … A[n] and you wanted to replace all square brackets by curly braces, enter the following:
The \ before the first {in the replace string means treat the { as a literal and not as a tagged field.
If you want to replace ABC by A\B\C, enter the following:
Replace: A\\*\\* or A\\{1}\\{2}
Use \\ for each \ that you want to be treated as a normal character. The asterisk following the second backslash in the replace pattern is treated as a wildcard. If the replace string is A\\\*\\\* instead, then the result is A\*\*.
If the search string does not have a wildcard character and the replace string does, a substitution is not achieved. Suppose you had
In this case, the “ * ” and {1} in the replace string are treated as normal characters and not as wildcards.
If you had more than nine wildcards in the search-and-replace strings, only the first nine in the replace string can be substituted correctly. The rest are substituted with empty strings. Suppose you want to search for a string A1B2C3D4E5F6G7H8I9JKL by P1Q2R3S4T5U6V7W8X9YKZ:
Replace: P*Q*R*S*T*U*V*W*X*Y*Z
The result is P1Q2R3S4T5U6V7W8X9YZ. The last “ * ” in the replace string gets substituted by an empty string and not the substring corresponding to the last “ * ” in the search string.
Selecting Objects to Edit
You can select objects before or after you start an editing command.
If you select an object before you start an editing command, the system prompts you for a starting point called the reference point for the edit. The reference point is usually in the middle of the object.
When you select an object after you start a repeatable command (such as move, delete, copy), the command remains active (default) until you cancel the command by pressing the Esc key.
To change the default to nonrepeating,
-
From the view, choose Options – Editor.
The Editor Options form appears.
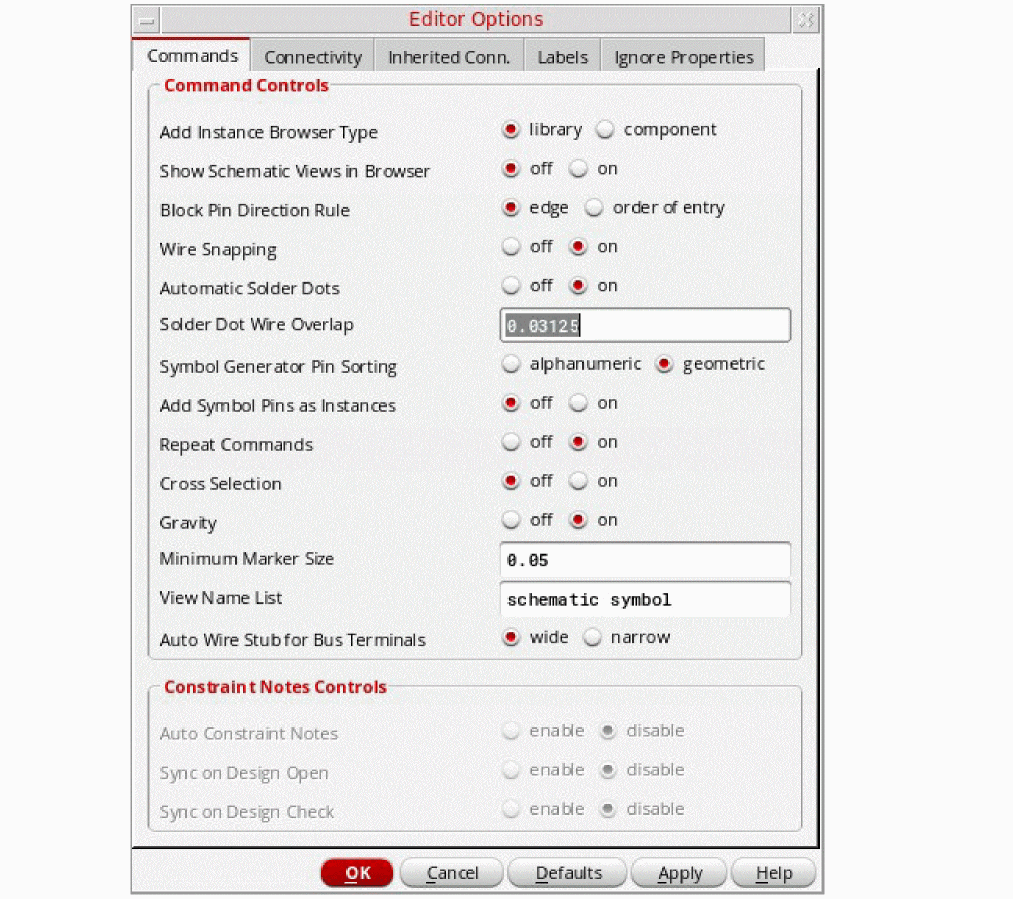
- In the Command tab, Turn Repeat Commands off.
- Click OK.
Using Repeating Commands
You do not have to repeatedly select a command if you plan to perform the same task several consecutive times. For example, editing commands automatically repeat when the Repeat Commands option is set to on (the default).
Selecting Objects Automatically by Type
You can set the software to select all the objects of one or more object types automatically. For example, you might want to select all the pins in your design.
To select all the objects of one or more object types,
-
From the view, choose Edit – Select – Select By Filter.
If you are in the schematic window, the Schematic Select By Filter form appears.
If you are in the symbol window, the Symbol Select By Filter form appears.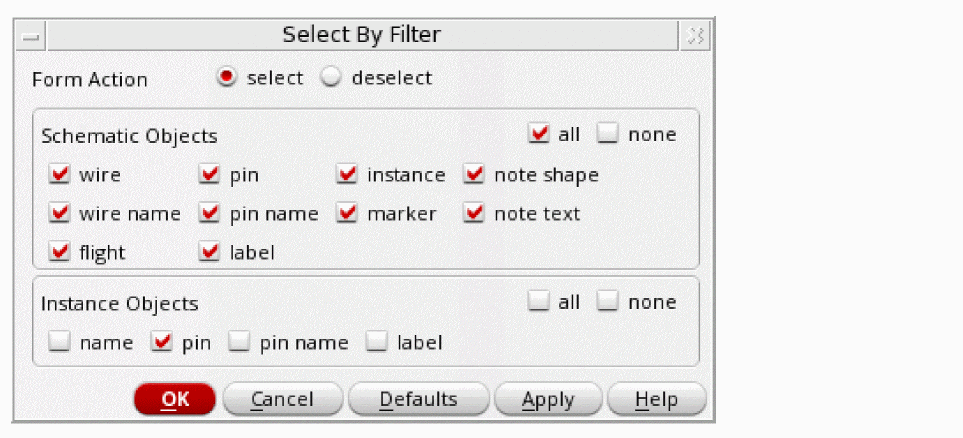
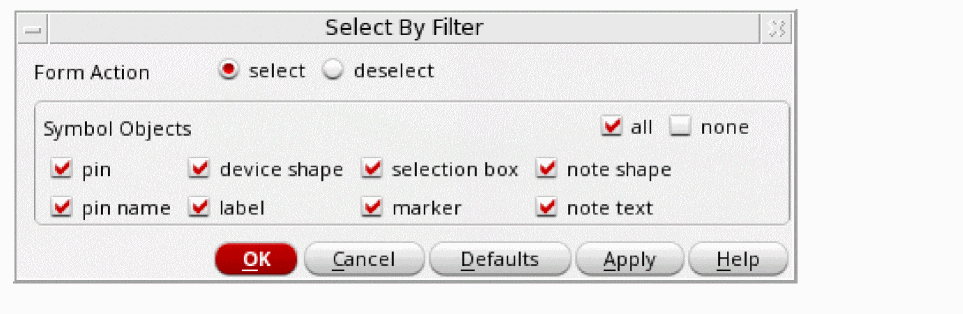
-
On the form, specify the object types you want to select.
The option none turns off all object types. -
Click OK.
The software highlights the specified objects in the design window.
Selecting Objects by Property
You can limit the selection set by specifying that the software select only those objects with certain property values.
To limit a selection set to object types with certain property values,
-
From the view, choose Edit – Select – Select By Property.
If you are in the schematic window, the Schematic Select By Property form appears.
If you are in the symbol window, the Symbol Select By Property form appears.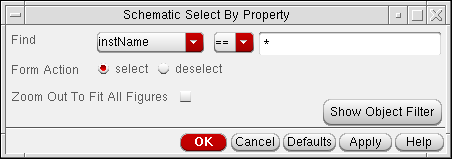

-
In the Find fields, specify the property name, relational operator, and property value.
You usually look for objects that have a particular property value. You can also use the relational operator cyclic field to control which objects are selected. - Click Show Object Filter to make sure the object type is selectable.
-
Click OK.
The software highlights the specified objects in the design window.
Adding a Property Name to the Search List
In either the schematic window or the symbol window, you can add a property name to the search list using the following procedure.
-
From the view, choose Edit – Select – By Property.
If you are in the schematic window, the Schematic Select By Property form appears.
If you are in the symbol window, the Symbol Select By Property form appears. -
In the Find cyclic field, choose other.
The Add New Property for Search form appears.
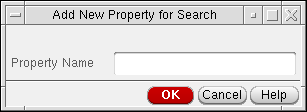
- In the Property Name field, type the property name that you want to add to the search list.
-
Click OK.
The new property name appears in the Find cyclic field on the Schematic or Symbol Select By Property form.
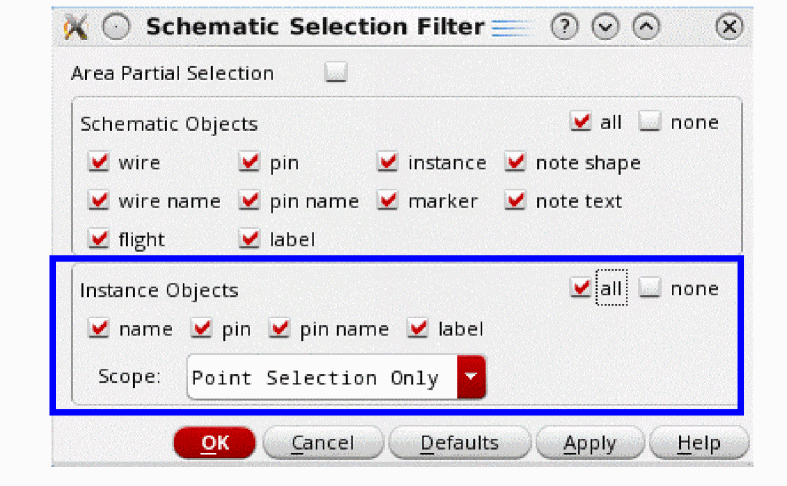
Selecting Objects by Filtering
The Selection Filter form lets you specify which object types you can select manually for editing. This is useful when you have many object types, or overlapping object types, in a small area of your design.
For example, if you want to work exclusively with pins, you can turn on selection capabilities for pins only. As a result, if you click another type of object that is near a pin, the other object is not selected.
To specify the objects you want to filter for selection,
-
From the view, choose Options – Select Filter.
If you are in the schematic window, the Schematic Selection Filter form appears.
If you are in the symbol window, the Symbol Selection Filter form appears.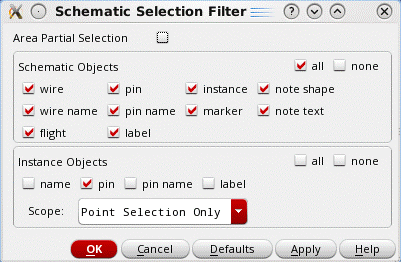
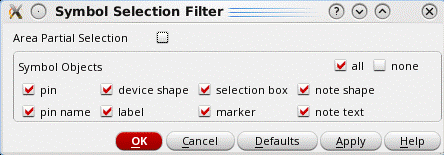
-
In the Schematic (or Symbol) Objects section, specify the object types you want to select for editing.
The option none turns off all object types. - Click OK.
Object and Cellview Property Types and Values
The following table lists and describes each property type that appears in the Type cyclic field on the Add Property, Delete Property, or Modify Property subform.
| Property Type | Description |
|---|---|
|
The parent to a list of other properties. Its value is a list of properties. |
Object and cellview property values must correspond to the property type shown in the Type cyclic field; for example,
-
If you use an integer type for a rise time property, you can type
10for 10 nanoseconds. - If you select int or float for the property type, you can type a minimum and maximum value to define a range.
- The minimum and maximum values must be valid for the int or float type. The value can be 0 or any positive or negative number. You can also specify infinity (no limit over 0), -infinity (no limit under 0), or leave the value blank to reflect no limit on the value.
- If you select string for the property type, you can specify a list of valid strings separated by spaces.
- The individual word specified represents the only possible values for this property. If the Choice field is left blank, any string is valid.
-
If you select time for the property type, use the following format:
mmm dd hh:mm:ss yyyy
where
mmmis the month, such as Jan
ddis the day of the month, from 01 to 31
hhis the hour from 00 to 23
mmis the number of minutes from 00 to 59
ssis the number of seconds from 00 to 59
yyyyis the year, such as 2000
For example, to set the valid time for July 26, 2000, 7:23 a.m., typeJul 26 07:23:00 2000
Editing Object Properties
Properties describe specific characteristics of a design object, such as values of wires and pins. You can add, delete, or modify properties.
This section provides information about the following:
- Applying Edits to Objects and Displaying Object Types
- Applying One or More CDF Parameter Edits to Multiple Objects
- Adding Object Properties
- Deleting Object Properties
- Modifying Object Properties
Applying Edits to Objects and Displaying Object Types
To change properties of specific objects,
-
From the view, choose Edit – Properties – Objects.
The Edit Object Properties – Basic form appears.
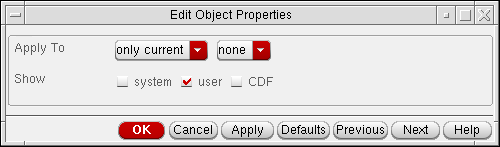
-
Set the Apply To options.
The Apply To option consists of up to three cyclic fields that you use to specify the group of objects whose properties you want to edit.
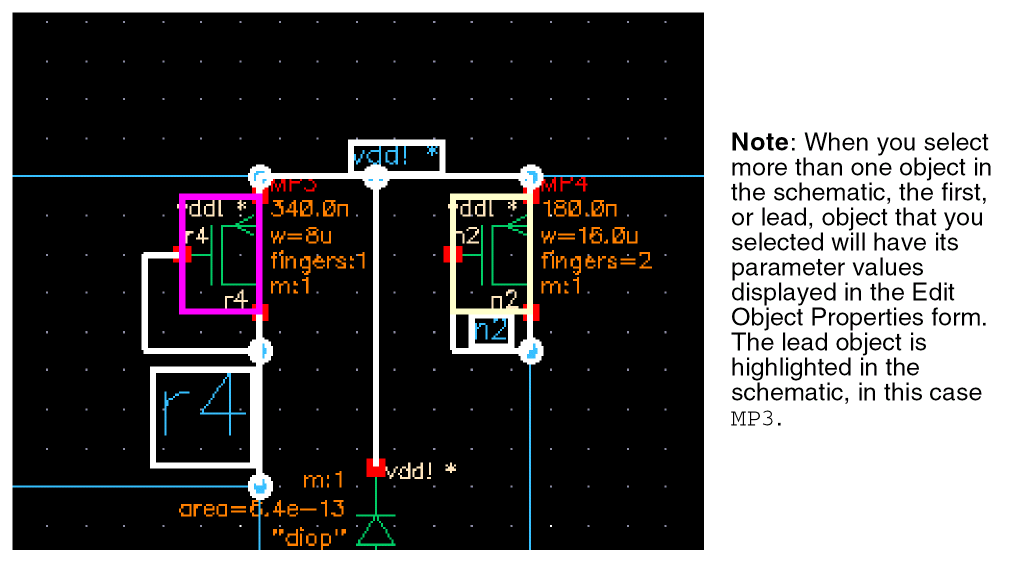
A current object exists when you select multiple objects in a selected set. The current object is highlighted in a color different from the selection highlight.
When you configure the Apply To cyclic fields to apply changes to multiple objects, the system highlights all affected objects (other than the current object) in a different color. -
To display the types of properties and attributes that you can edit, set the Show options.
The Show options let you view and edit properties: -
Select the object in your design to view its properties.
The Edit Object Properties form expands.
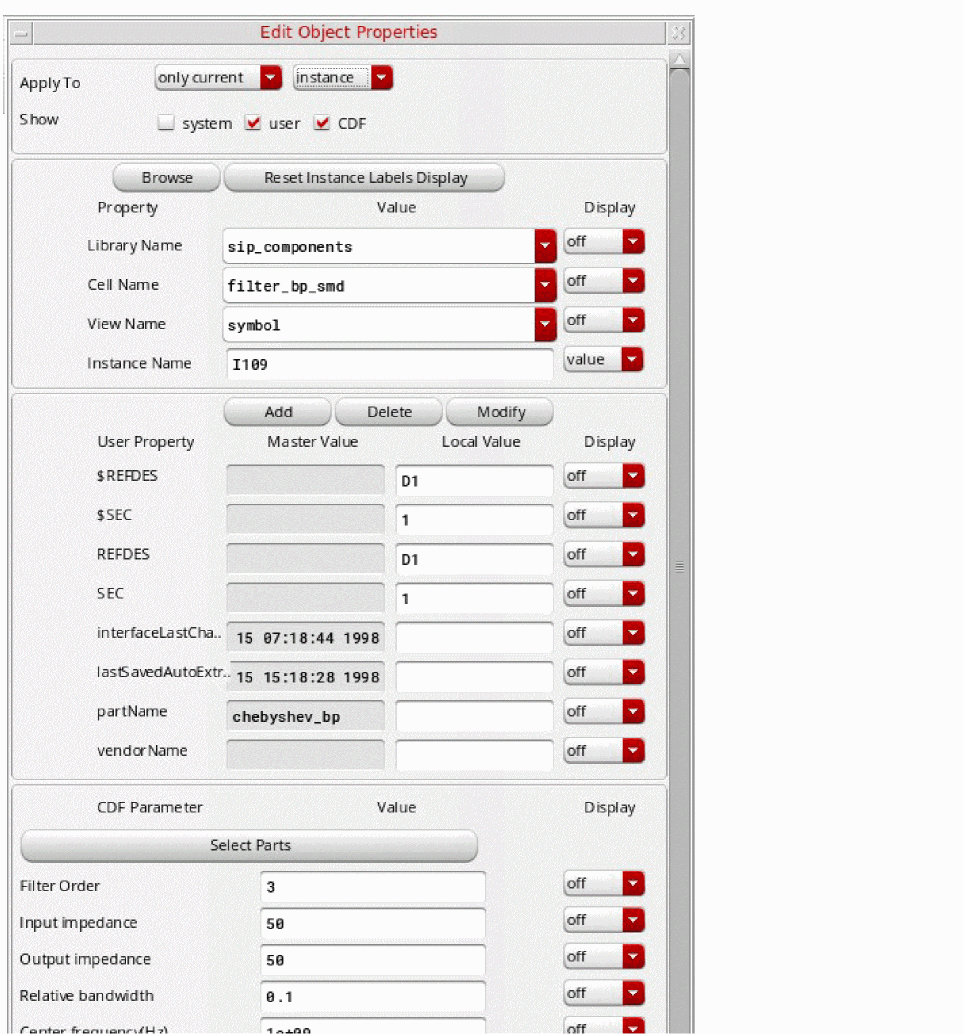
Applying One or More CDF Parameter Edits to Multiple Objects
You can select a number of objects in a schematic, and then access the Edit Object Properties form to change CDF parameters for all selected objects.
When applying CDF parameter edits to objects, the following CDF callbacks are used:
-
formInitProcwill be called for each object, prior to the modification of any parameter. -
doneProcwill be called for each object, following the modification of any parameter.
For more information see the
To apply one or more CDF parameter edits to multiple objects,
-
Select the objects on the schematic whose parameters you want to collectively change.
- Select Edit – Properties – Objects to display the Edit Object Properties form.
- In the Edit Object Properties (EOP) form, change the required CDF Parameter(s) and Value(s) as required.
- At the top of the EOP form, now choose to, for example, apply your single/multiple CDF parameter update(s) to all selected instances of the same master.
-
Click the OK button.
The parameter(s) that you modified will be set on all of the originally selected objects.
For example, consider an initial selection of a resistor that hasr/l/wparameters and a capacitor that hasc/l/wparameters, with the resistor being the lead object displayed in the EOP form. If you now decide to change therandwresistor parameter values, only thewparameter will be changed on the capacitor once these updates are applied.
Adding Object Properties
To add properties to an object,
-
From the view, choose Edit – Properties – Objects.
The Edit Object Properties – Basic form appears. - In your design, select an object to which you want to add a property.
-
In the Edit Object Properties form, click Add.
The Add Property – Edit Object Properties form appears.
The form varies depending on the object selected. -
Type the name of the property you want to add and the value of the property.
- Click OK to add the properties to the Edit Object Properties form.
- On the Edit Object Properties form, click OK to add the properties to the database object.
Adding Hierarchical Object Properties
Hierarchical properties (hierProps) are properties that can have other (sub) properties attached to them (including other hierProps). This allows you to build up data structures.
To add hierarchical object properties to an object:
-
From the view, choose Edit – Properties – Objects.
The Edit Object Properties – Basic form appears. - In your design, select an object to which you want to add a property.
-
In the Edit Object Properties form, click Add.
The Add Property – Edit Object Properties form appears.
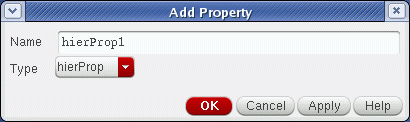
- Enter the Name of the hierarchical property.
- From the Type pull-down select hierProp.
-
Click the OK button.
The hierarchical property will be added to the selected object in the Edit Object Properties form. -
Click the Expand button.
This will display a properties form for the hierarhical property.

-
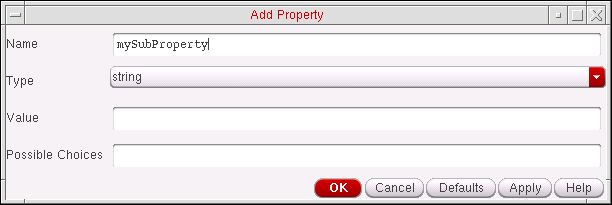
Click the Add button in the hierarchical properties form.
By clicking the Add button on the hierarchical property form you can begin to add sub-properties to the current hierarchical property.
The Add Property form is displayed.
-
Complete the Add Property form as required:
- Name specifies a name for the new property.
- Type specifies a property type.
- Value specifies a value for the property.
- Choices can be set when Type is set to string you have the option of setting a list of possible choices for the string value (not mandatory). If the string can have more than one value, type the possible values. Entries in this field must match an entry in the Value field.
- Minimum and Maximum can optionally be set when Type is set to int, float or time. Specify a range for the minimum and maximum range for the integer or floating-point value.
-
Click the OK button.
The sub-property will be added to the selected object’s hierarchical property in the sub-properties form.

- You can repeat steps 8-10 to add further sub-properties as required.
Deleting Object Properties
-
From the view, choose Edit – Properties – Objects.
The Edit Object Properties – Basic form appears. - In your design, select an object that has a property you want to delete.
-
In the Edit Object Properties form, click Delete.
The Delete Property – Edit Object Properties form appears. -
From the list box, select the property that you want to delete.
You can pressShiftand click to select multiple properties. -
Click OK.
After selecting OK, the properties will be shown as deleted in the Edit Object Properties form. - On the Edit Object Properties form, click OK to delete the properties from the database object.
Modifying Object Properties
-
From the view, choose Edit – Properties – Objects.
The Edit Object Properties – Basic form appears. - In your design, select an object that has a property you want to modify.
-
In the Edit Object Properties form, click Modify.
The Modify Property – Edit Object Properties form appears. - From the list box, select the property that you want to modify.
- Modify the properties.
-
Click OK.
The modified properties appear on the Edit Object Properties form. - On the Edit Object Properties form, click OK to modify the properties on the database object.
Editing Specific Object Properties
Before you can edit object properties, you must be in
You can edit object properties that describe the following objects:
Editing Object Properties (Text Edit) Directly on the Design Canvas

Figure 8-1 Text Label M2 in Direct Text Edit Mode
You can directly edit a text string (including multi-line notes) in the design canvas, if you are in edit mode, by using one of the following text selection mechanisms:
-
Selecting the Direct Text Edit enter function on Edit toolbar.
The status bar will then prompt you to click the text to be edited.
 Press the
Returnkey to finish your changes or theEsckey to cancel editing and revert back to the original text. While typing, you can also use standard text editing shortcuts, for example, you can use theleft/right/Home/Endkeys to move the cursor around, to select text you can useCtrl-A, and to select all text you can left-drag the mouse cursor over the text to select. For more information see Direct Text Edit Bindkeys. -
Selecting Edit – Direct Text Edit (bindkey
T). -
Double-clicking on the text (when the text is selectable).You must ensure that the instance object type has been selected in the Schematic Selection Filter form (select Options – Select Filter).
- Clicking the right-mouse button and selecting Direct Edit Text from the displayed content-menu.
If they are selectable and editable, the following object properties can be edited directly in any schematic or symbol view that is currently active:
- instance names
- instance labels
- instance parameters
- wire labels
- pin names
- single and multi-line notes
Importantly, you can use direct text edit to change the values of, for example, cdsParam() instance labels without having to open the Edit Object Properties form.
Figure 8-2 Editing parameter values without using the Edit Objects Properties form
To directly edit object properties on the design canvas:
- Optionally, zoom in closer to the object text string that you want to edit.
-
Use one of the direct text edit activation methods outlined above to select a text string for editing (for example, a pin name text string as shown below).
The text string will be selected.
Figure 8-3 Pin name “lbias” before and after double-click selection for direct text edit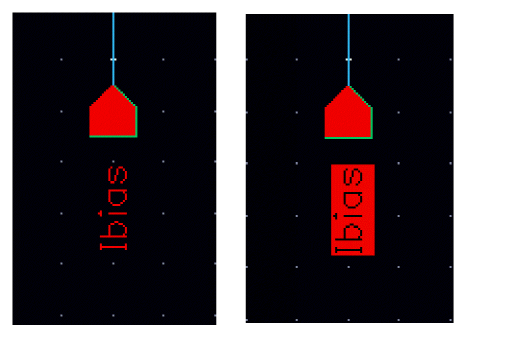
-
Start to type the new string name. The text will update directly.
A cursor is displayed as you type, indicating the current position of the next text character to be inserted (the cursor position can be changed using the cursor keys). If you need to remove any text, use thedeletekey to edit the text string again. -
When you have completed editing the text string, press the
Returnkey to register the updated string name.
Figure 8-4 The updated pin name after direct text edit
Changing Text Size in the Canvas
To increase or decrease the text size in the design canvas;
-
Choose Edit – Direct Text Edit.
Your cursor is now in direct text edit mode. -
Click the text in the design canvas whose size you want to change.
The text is highlighted. - Click incrementally on the Increase Text Size or Decrease Text Size options on the Edit toolbar to alter the selected text as required.
-
Once you have made the text size alteration, press the
Enterkey to register the text size change.
Figure 8-5 Changing the Text Size of Instance M21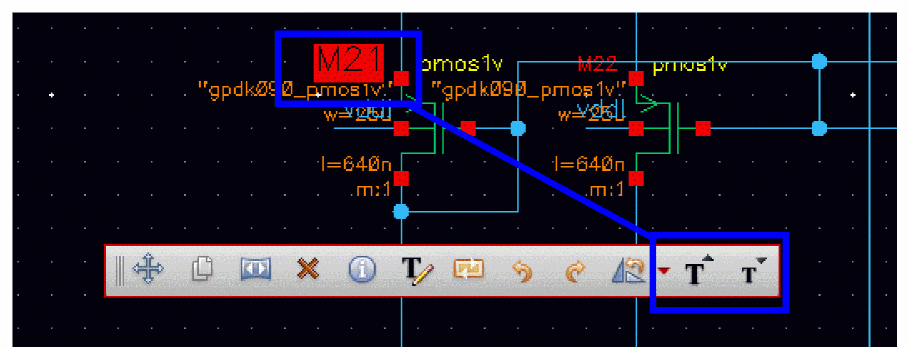
Direct Text Edit Bindkeys
The following bindkeys can be used when in Direct Text Edit mode:
Text That Cannot Be Edited
If text cannot be edited, a No Stop icon will be displayed.
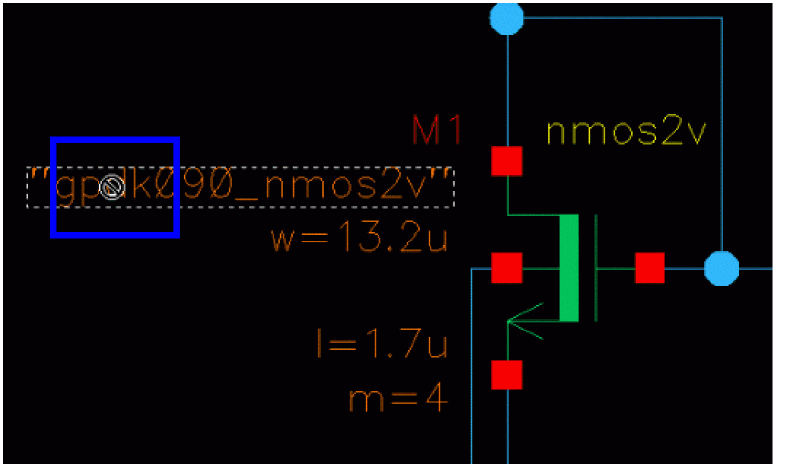
Figure 8-6 Text Edit Not Permiited
Editing Instance and Block Properties
To edit instance and block properties and their parameters and values,
- From the view, click an instance or block that has a property you want to edit.
-
Choose Edit – Properties – Objects to display the Edit Object Properties – Instance and Block form.If you clicked on an instance in your design,
- The Magnification and Origin fields appear when you enable the Show system field
- The Display cyclic field controls whether the value of a property appears in your schematic
If you clicked on a block in your design,-
The Origin, and FreezePinCreate fields appear when you enable the Show system field.
To automatically add a pin when you add a wire to a block, turn on FreezePinCreate.
You can change the direction and name of a block pin when you enable the Show system button.
To change the Instance Name default field, see Changing the Default Instance Name Prefix.
- Click OK.
Editing Pin Properties
To edit pin properties and their parameters and values,
- From the schematic window, click a pin that has a property you want to edit.
-
Choose Edit – Properties – Objects.
The Edit Object Properties – Pin form appears. - Change the Direction or Usage cyclic field of the pin.
- Click OK.
Designating the Order of Pins
A pin order property is often required for netlisting. You can update or swap the pin order either manually or by copying.
To manually redefine the logical pin ordering for netlisting,
-
From the view, choose Edit – Properties – Pin Order.
The Edit Pin Order form appears.
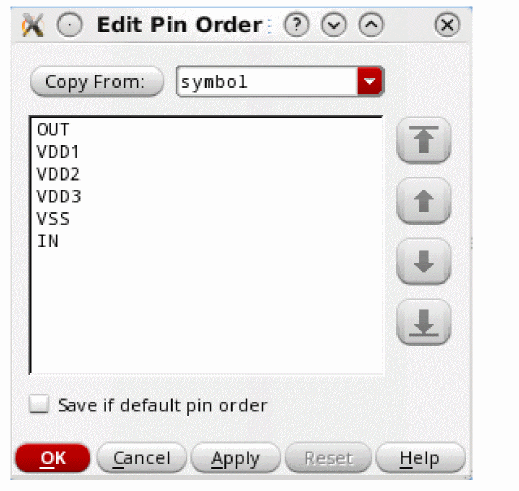
- Select a pin name by clicking on it in the list box.
- Click one of the move buttons to move the selected pin name up or down in the list.
-
If the order of pins you set is the same as the default order, select the Save if default pin order check box to save it.
- Click OK.
Copying a Pin Order from Another Cellview
To copy a pin order from another cellview,
-
From the view, choose Edit – Properties – Pin Order.
The Edit Pin Order form appears. - Select a pin name by clicking on it in the list box.
- Choose a view name from the Copy From pull-down from which to copy the pin order from.
-
If the order of pins you copied is the same as the default order, select the Save if default pin order check box to save it.
-
Click OK.
The pin order in the view list window changes to match the selected view.
Resolving Pin Mismatch
If the pins you want to copy are out of sync with the pins in the existing view, the Port Mismatch form appears.
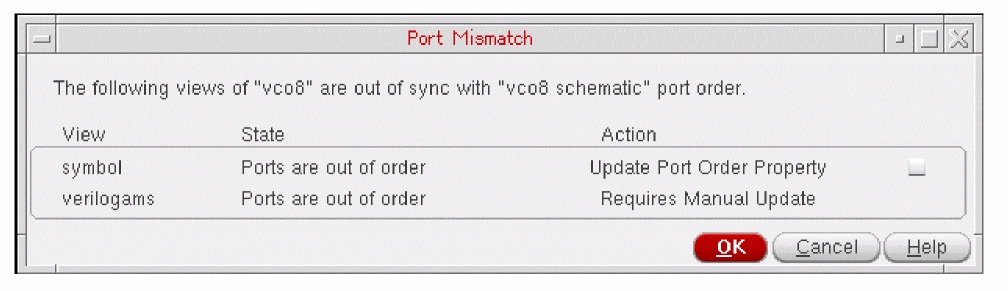
In the Port Mismatch form, you are given details of:
- The view name that has mismatched ports (View).
-
The reason the view has mismatched ports (State).
The reasons could be: -
The action you must take to resolve the mismatch (Action).
Here, the following recommended actions could be:
The first two of these recommended actions can however be automated using the disablePortOrderPopup environment variable.
Setting the boolean envar disablePortOrderPopup to t instructs VSE to perform these actions without displaying the Port Mismatch form. If a manual update is recommended, the form still displays irrespective of the environment variable setting.
If you want to disable only the port order check, set the environment variable vicCheckPinOrder. However, the port name mismatch issues in the cellviews are still reported. By default, the port order check is run (vicCheckPinOrder=t).
Verifying Pin Order
To verify pin order validity of your most recently defined pin ordering,
If you added, deleted, or renamed pins since you last defined the logical pin ordering, this command opens the Edit Pin Order form so you can verify or redefine the new pin ordering.
Editing Pin Name Properties
To edit pin name properties and pin name parameters and values,
- From the view, click a pin.
-
Choose Edit – Properties – Objects.
The Edit Object Properties – Pin Name form appears. - Change the Height, Font, or Justification fields.
- Click OK.
Editing Wire Properties
To edit the properties of a wire:
- From the view, click a wire.
-
Choose Edit – Properties – Objects.
The Edit Object Properties – Wire Segment form appears. - Edit the values in the Width, Signal Type, Color, or Line Style fields.
- Click OK.
Editing Wire Name Properties
To edit wire name parameters and values:
-
Select a wire name/label on the design canvas.
-
Choose Edit – Properties – Objects.
The Edit Object Properties – Wire Name form appears. - Edit the Label, Height, Font, Justification or Bundle Display fields as appropriate.
-
Click OK.
The connectivity automatically updates when any changes are applied.
Editing Instance Pin Properties on an Instance of a Block
To edit instance pin properties on an instance of a block,
-
Choose Edit – Properties – Objects.
The Edit Object Properties – Instance and Block form appears. - Click Add, Delete, or Modify.
- Edit the form that appears.
- Click OK on both forms.
Editing Label Properties
To edit label properties and label parameters and values,
- From the view, click a label whose properties you want to edit.
-
Choose Edit – Properties – Objects.
The Edit Object Properties – Label form appears. - Change the Height, Font, or Justification fields.
- Click OK.
Resetting Invisible Labels
If you turned off label display on the Edit Object Properties form while editing a label, you can reset invisible labels either manually or automatically.
To manually reset (make visible) individual labels,
-
From the view, choose Edit – Select – Filter.
Make sure the labels are selectable. -
Choose View – Reset Invisible Labels.
All the invisible labels appear as yellow (or the color of the marker/warning lpp).
All the visible labels appear as nonbinding highlighted objects. -
Click each of the highlighted labels that you want to make visible.
When you select an invisible label, the label color changes to white to indicate that this label would be made visible.
When you click again on a label to deselect it, it returns to being yellow again, indicating it will remain invisible when you quit the command. -
Press the
Esckey to end the command.
The selected labels remain visible in your design.
To automatically reset all invisible labels,
-
From the view, choose View – Reset Invisible Labels.
All invisible labels appear as blinking highlighted objects. -
Press the
F3key.
The Reset Invisible Labels form appears. -
Turn on visible.
All the invisible labels remain highlighted but stop blinking. -
Click Hide.
The Reset Invisible Labels form closes. -
Press the
Esckey to end the command.
The selected labels remain visible in your design, regardless of the Selection Filter settings.
Showing/Hiding Instance Labels
You can toggle the display of instance labels in any cellview that is open in the current session by selecting View – Show/Hide Instance Labels.
Figure 8-7 Schematic with Instance Labels Displayed
Figure 8-8 Schematic with Instance Labels Hidden
Editing netSet Properties
Refer to Adding Net Expression Labels to Create an Inherited Connection and Adding netSet Properties to Create an Inherited Connection for information about the netSet property.
Editing Note Text Properties
To edit text of a note after you add it to your design,
- From the view, select the note text.
-
Choose Edit – Properties – Objects.
The Edit Object Properties – Note Text form appears and displays text in the Note Text field. -
Make your changes using the default keystrokes (see link below).Virtuoso IC6.x uses a Qt-based UI. As part of this UI system, the default bindings for text fields were updated (from Xt/Motif-based GUI in IC5.1.41). For more information, see Default Keybindings for Text Fields in the Virtuoso Design Environment User Guide.
- Click OK.
Editing Note Shape Properties
To change the line property of a note shape from a solid line to a dashed line or to reposition a note shape using coordinates,
- From the view, click a note shape.
-
Choose Edit – Properties – Objects.
The Edit Object Properties – Note Shapes form appears. - Change Line Style or the position of the note shape.
-
Click OK.
You can also use the Move or Stretch commands for repositioning.
Editing Symbol Shape Properties
To change the width property of a symbol shape from narrow to wide or to reposition a symbol shape using coordinates,
- From the view, click a symbol shape.
-
Choose Edit – Properties – Objects.
The Edit Object Properties – Symbol Shape form appears. The form appearance changes to show all properties for the type of object selected. - Edit the appropriate fields.
-
Click OK.
You can also use the Move or Stretch commands for repositioning.
Editing Symbol Pin Properties
To edit symbol pin properties and symbol pin parameters and values,
- From the view, click a symbol pin.
-
Choose Edit – Properties – Objects.
The Edit Object Properties – Symbol Pin form appears. The form appearance changes to show all properties for the type of object selected. - Change the Direction cyclic field of the symbol pin.
- Click OK.
Editing Symbol Label Properties
To edit symbol label properties and symbol label parameters and values,
- From the view, click a symbol label.
-
Choose Edit – Properties – Objects.
The Edit Object Properties – Symbol Label form appears. The form appearance changes to show all properties for the type of object selected. - Change the properties of the label.
- Click OK.
Editing Symbol Selection Box Properties
To change the position of the selection box,
- From the symbol window, click the selection box.
-
Choose Edit – Properties – Objects.
The Edit Object Properties – Selection Box form appears. -
Change the position of the selection box by editing the coordinates.
You can also use the Move or Stretch commands for repositioning. - Click OK.
Editing User-Defined Object Properties
To edit visible user-defined object properties, values, and their display attributes,
- From the view, click the object property.
-
Choose Edit – Properties – Objects.
The Edit Object Properties – Other Object form appears. The form’s appearance depends on whether you click the property master or a property instance. If you select a user-defined property instance, the Edit Object Properties form displays values for Name and Value.
If you select a user-defined property master, the Edit Object Properties form displays values for Master Value and Local Value. You cannot edit the Master Value field. - Change the property values of Local Value, Height, Font, or Justification.
- Click OK.
Passing Parameters in a Design
To pass a parameter from the symbol view to the schematic, set up a CDF parameter for the parameter under consideration.
- From the schematic window, choose Edit – Properties – Objects on the instance and change the value of the instance parameter from a fixed value.
- Choose Create – Create Cellview – From Cellview and make appropriate drawing shape changes to the symbol.
- Save the symbol view.
-
Edit the CDF for this component by choosing CIW – Tools – CDF – Edit.
The Edit Component CDF form appears. - Complete the form as required, referring to CDF Commands in the Component Description Format User Guide if required.
Editing Cellview Properties
While using the Edit – Properties – Cellview command, you can add, delete, and modify the properties that appear on the form.
To add, modify, or delete properties, open a subform. You use the subform to specify the property type and value. When you click OK on the subform, the form reflects the change.
When you click Apply or OK on the form, the change is applied to the specified object in the design window.
To display cellview properties that you want to edit,
-
From the view, choose Edit – Properties – Cellview.
The Edit Cellview Properties form appears.
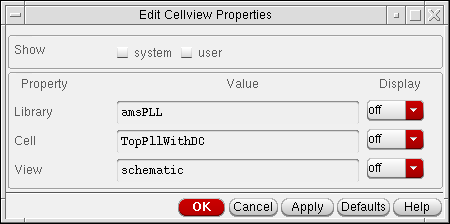
- Set the Show option as follows:
- Click OK.
Adding Cellview Properties
The Add option lets you add cellview properties.
-
From the view, choose Edit – Properties – Cellview.
The Edit Cellview Properties form appears. - Set the Show option to user.
-
At the bottom of the Edit Cellview Properties form, click Add.
The Add Property – Edit Object Properties form appears.
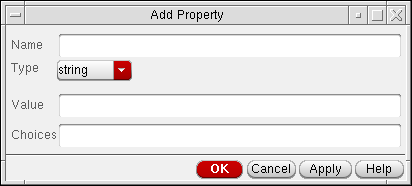
-
Type a new property name, and give it a value.
- Click OK.
- In the Edit Cellview Properties form, click OK.
Deleting Cellview Properties
To delete a cellview property,
-
From the view, choose Edit – Properties – Cellview.
The Edit Cellview Properties form appears. - Set the Show option to user.
-
Click Delete.
The Delete Property – Edit Object Properties form appears. -
Choose the property you want to delete.
You canShift-click to select multiple properties - Click OK.
- In the Edit Cellview Properties form, click OK.
Modifying Cellview Properties
The Modify option lets you modify cellview properties.
To modify a cellview property,
-
From the view, choose Edit – Properties – Cellview.
The Edit Cellview Properties form appears. - Set the Show option to user.
-
Click Modify.
The Modify Property – Edit Object Properties form appears. - Choose the property you want to modify.
- Change the property values for Type, Name, and Value.
- Click OK.
- In the Edit Cellview Properties form, click OK.
Editing VHDL Properties
To display VHDL properties in a cellview so you can set specific netlisting options,
-
From the view, choose Edit – Properties – VHDL.
The VHDL Properties form appears.
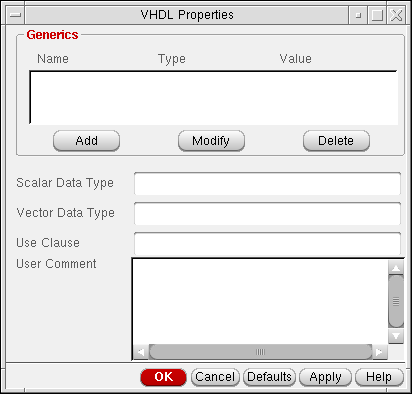
- Type editing commands in the User Comment text box.
Adding VHDL Properties
The Add button lets you add properties that represent VHDL generics.
-
From the view, choose Edit – Properties – VHDL.
The VHDL Properties form appears. -
Click Add.
The Add Generic – VHDL Properties form appears.
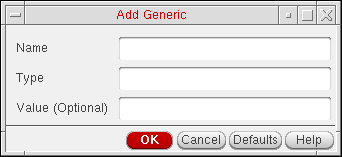
- Type a generic name, a type, and a value.
- Click OK.
- In the VHDL Properties form, click OK.
Deleting VHDL Properties
The Delete button lets you delete properties that represent VHDL generics.
-
From the view, choose Edit – Properties – VHDL.
The VHDL Properties form appears. -
Click Delete.
The Delete Generic – VHDL Properties form appears. - Type the generic name you want to delete.
- Click OK.
- In the VHDL Properties form, click OK.
Modifying VHDL Properties
The Modify button lets you modify properties that represent VHDL generics.
-
From the view, choose Edit – Properties – VHDL.
The VHDL Properties form appears. -
Click Modify.
The Modify Generic – VHDL Properties form appears.

- Type a generic name, a type, and a value.
- Click OK.
- In the VHDL Properties form, click OK.
Setting the Tool Filter
This section explains how to edit analog circuit design properties using the tool filter.
To display the analog circuit design simulators that are active in your cellview,
-
From the schematic window, choose Options – Tool Filter.
The Tool Filter form appears.
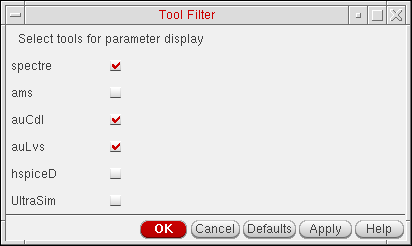
- Save your cellview.
-
Click the Defaults button.
The system displays the simulators that were active when you last saved your cellview.
By default, UltraSim is selected on the Tool Filter form. You can override this default by settingauCore.toolFilter defaultToolsin your$HOME/.cdsenvfile. You can also change the default within your entire site by changing thedfII/etc/tools/auCore/.cdsenvfile. For example, if you want to specify onlyspectreas the active default, add the following to your.cdsenvfile:auCore.toolFilter defaultTools string "spectre" nil
- Select the tools for the Tool Filter display.
- Click OK.
Activating the Auto-Update Tool Filter
To activate the auto-update tool filter,
-
In your
.cdsenvfile, set theautoUpdateenvironment variable as follows:auCore.toolFilter autoUpdate ’boolean t
When auto-update is activated, the tool filter setting is updated to show CDF parameters for the simulator selected in ADE. This situation occurs when you
- Bring up ADE from a schematic window
- Change the simulator in an ADE session to which a schematic window is attached
- Bring up a schematic window from ADE
- Select a new design in an ADE session to which a schematic window is attached
When auto-update is activated, the tool filter setting does not change when you traverse through the hierarchy in the schematic window. That is, the same tool filter setting applies for any instance at any level in the hierarchy.
You can change the default of the autoUpdate environment variable by setting auCore.toolFilter autoUpdate in your $HOME/.cdsenv file or in the dfII/etc/tools/auCore/.cdsenv file to change it sitewide. To deactivate this feature, set autoUpdate to nil.
Return to top