- Overview
- Guidelines for Placing a Standard-cell-based Design from Virtuoso in Innovus
- What are Sites and Rows in Innovus and Why They Are Needed
- Site Property in the Cell View of Standard Cells
- Site Definition in the Technology Library
- Standard Row Creation by Innovus During init_design
- Switching the Orientation of the Standard Rows
15.1 Overview
You can use the Innovus placer to place standard cells on a cell view that was originally created in Virtuoso. The OpenAccess-based Mixed Signal flow supports the following flows:
- The floorplanning step, like I/O pin assignment and design size, is done on a cell view in Virtuoso. This cell view is then brought into Innovus for placement of standard cells. You may choose to place certain standard cells in Virtuoso manually, while leaving the rest to be placed by Innovus. These manually placed cells will have to be set to the
FIXEDplacement attribute, either in Virtuoso or Innovus. Similarly, if the cell view contains macros/blocks, they can be pre-placed and fixed in the design. - Making minor changes in Innovus to a design that is already placed or implemented in Virtuoso. For example, a certain cell is required to be upsized or a new cell is to be added into the design. The ECO flow in Innovus allows the new cells to be ECO-placed while refining the placement of the rest of the standard cells.
- Some cells are constrained with inclusive cluster boundary. When the cell view is read by Innovus, the inclusive cluster boundary will be viewed as a floorplan object, named region, in Innovus. These cells are guided to be placed within the region. The rest of the standard cells will be as placed as normal.
In addition to offering flexibility in the flow, placing the design in Innovus offers some advantages:
- Innovus offers features such as timing driven placement if timing libraries and timing constraints are available.
- The ECO flow can also be exercised in which the tool can easily make changes to the design. Changes can be logical, such as cell changes, and physical, such as placement and/or routing.
- For lower nodes, the placer and router engines in Innovus are tuned to work together to achieve optimal quality of result.
After placement of standard cells is done, you can either save the resulting cell view to make it available to Virtuoso or proceed to route the design in Innovus using NanoRoute.
The OpenAccess-based Mixed Signal flow allows you to choose freely when to switch back to Virtuoso – either after placement or after routing.
15.2 Guidelines for Placing a Standard-cell-based Design from Virtuoso in Innovus
Keep the following guidelines in mind while using Innovus to place a Standard-cell-based Design from Virtuoso:
- The placer in Innovus requires rows based on the site(s) to be created. Rows created in Virtuoso may not be interoperable in Innovus, especially if rows or row regions are created in which no site is associated. Thus, it is recommended to create standard cell rows in Innovus. For more details on row and site, refer to the What Are Sites and Rows in Innovus and Why They Are Needed section.
- The Core Boundary in Innovus affects the way it creates the row. Refer to the Design and Core Boundary in Innovus chapter for details on Core Boundary. If some cells are already pre-placed in Virtuoso and some other cells are to be placed in Innovus, the Core Boundary may have to be re-adjusted so that the rows created in Innovus are aligned with the standard cell rows.
-
For a design that consists of blocks and standard cells, if the blocks are pre-placed in the design by Virtuoso and not to be moved by Innovus in the flow later, specify their placement attributes to be
Fixed(orLocked/Cover). If a block is not marked asFixed, its location may be altered by Innovus while placing the standard cells. This may also lead to the tool not being able to perform placement refinement successfully due to the inclusion of the area occupied byPLACEDorUNPLACEDblocks in the utilization calculation.
If only routing is to be done in Innovus (and, for example, no ECO placement), the placement attributes ofNoneorPlacedare also fine as they will be translated toPLACEDwhen the whole design is loaded into Innovus.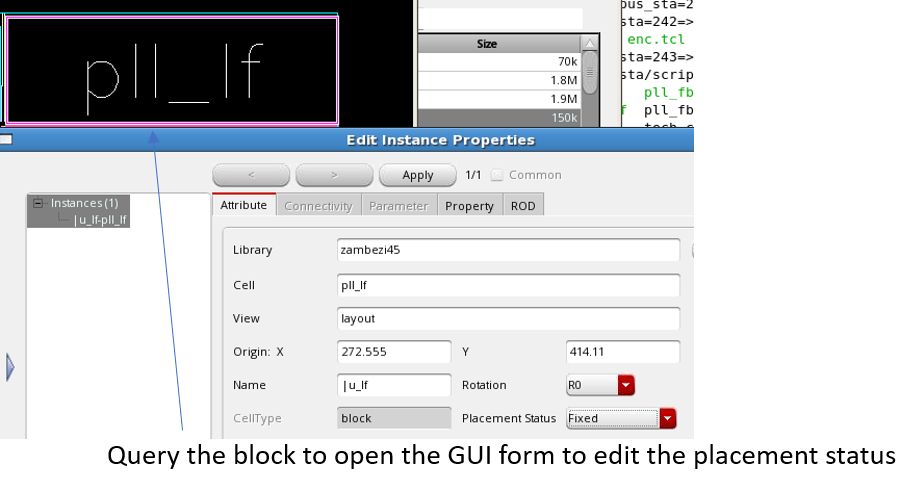
Note that in Innovus, it is a good practice to make blocks as
FIXEDonce their locations are finalized. You can run the following command to set the placement status of all blocks (hard macros) toFIXED:setInstancePlacementStatus -allHardMacros -status fixed
- If a group of standard cells is manually placed in the design, you may choose not to place filler cells in Virtuoso but to leave empty gaps between the standard cells and let Innovus auto-insert fillers in these gaps later in the flow. If you plan to do ECO placement in the cell view, inserting filler cells in Innovus allows you to remove them easily in Innovus during the ECO flow by running the
deleteFillercommand. Besides inserting filler cells, the Innovus placer also supports the insertion of tap cells and end cap cells.
15.3 What are Sites and Rows in Innovus and Why They Are Needed
Site and row are basic terms related to placement and routing. A site defines a placement site, and is a placement location that can be used by the cells that match the same site. Physically, it is a rectangle with a specific width and height. A repeating set of sites creates a row.
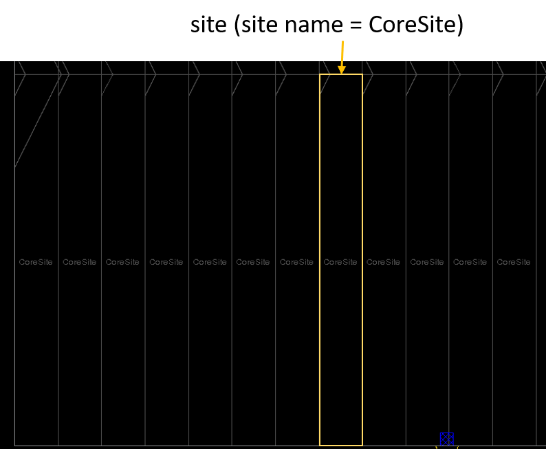
A site can either be an I/O pad site for the placement of I/O pads or a core site for the placement of standard cells. The above and below pictures show how the repeating sites form a horizontal standard cell row. Sites for standard cells are called core sites because the standard cells are placed in the core area of the design.

In Innovus, the standard cell rows in the design are not selectable by default. To make them selectable, check the Selectability check box for Standard Row in the Control Panel, which is located at the right of the main window. Similarly, the sites are not visible by default so you need to select the Visibility check box for Row Pattern to view the sites.
After selecting a standard cell row, double-click or press the Q key to view the Site Name, Site Width and Site Height, and other attributes of the row.
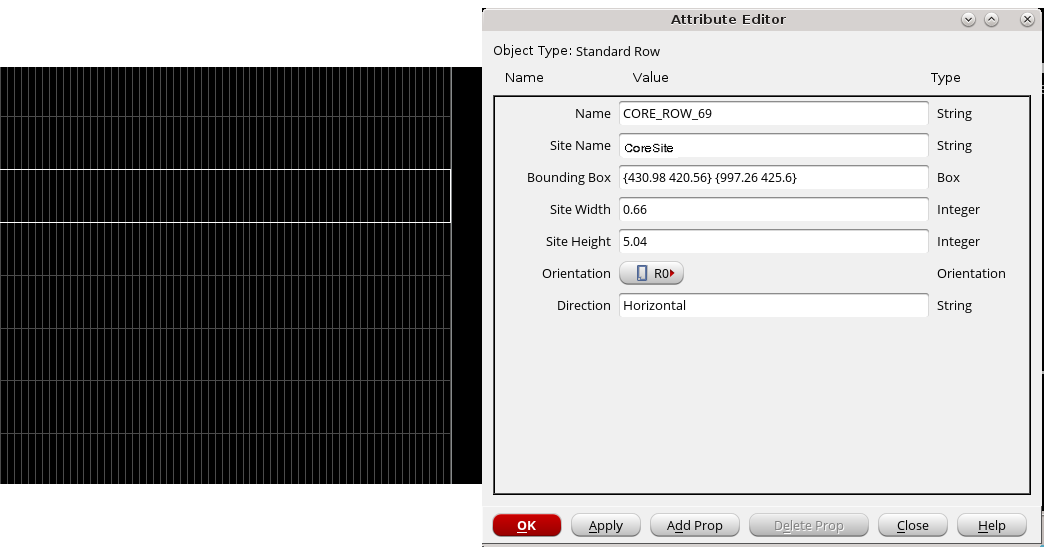
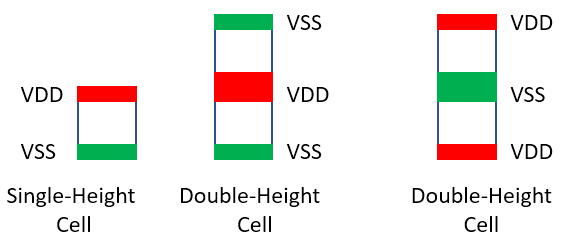
Typically, standard cells are structurally designed with heights that are integral multiples of the site height, such as single-height cells or double-height cells. This is done for several reasons, such as optimal use of the area, enabling placement of cells with alignment, allowing power rails to be shared, and so on. Most importantly, standard cell rows must be present in the floorplan for Innovus to auto-place the standard cells.
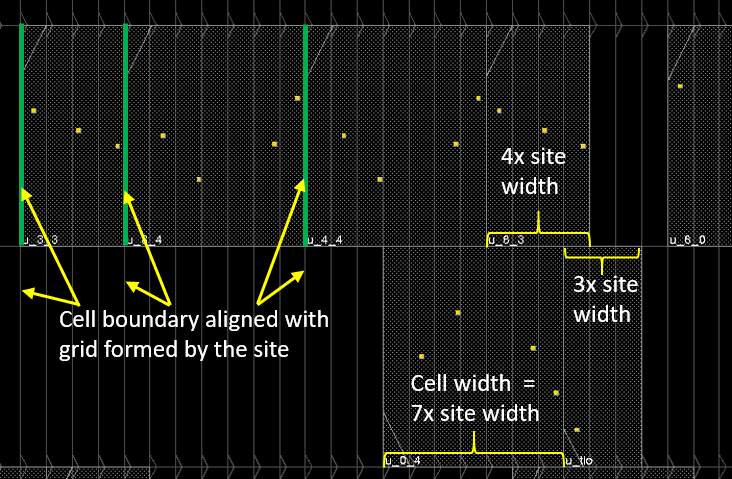
The diagram above shows how standard cells are placed along the row. These standard cells are single-height cells. Each row consists of abutted sites and the Placer in Innovus always snaps the cells to the site. With very few exceptions, standard cells are typically designed in a way that the cell widths are multiple integral value of the site width. For example, if the site width is 0.5um, the standard cells are designed with widths of 0.5um, 1um, 1.5um, and so on.
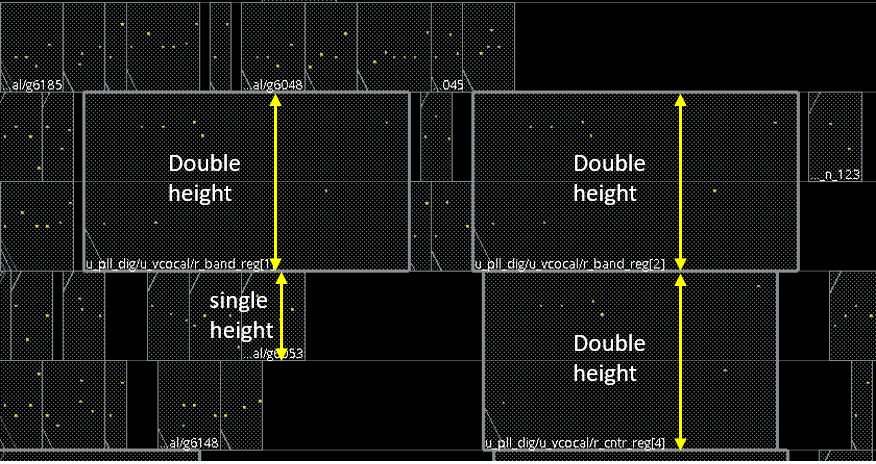
The diagram below shows three double-height cells placed along with many single-height cells.
To allow placement of both single- and double-height cells in the same area, both single-height rows and double-height rows are to be created such that they overlay each other. The following diagram shows how rows of different heights and orientations overlay each other.

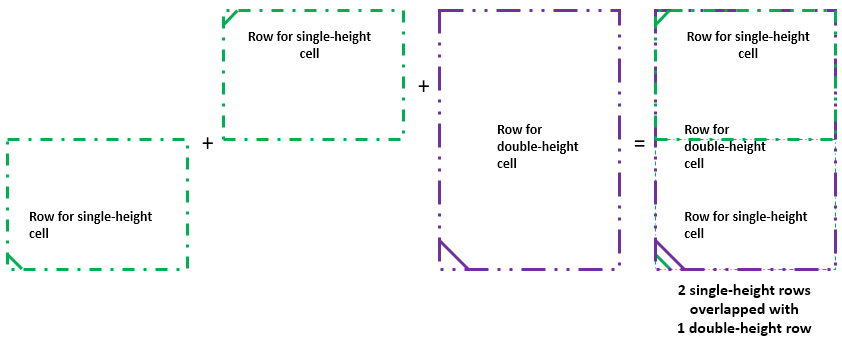
Note that CoreSiteDouble, for double-height standard cells, has the same site width as CoreSite, but its height is double that of CoreSite so that two single-height rows can overlay a double-height row completely.
15.4 Site Property in the Cell View of Standard Cells
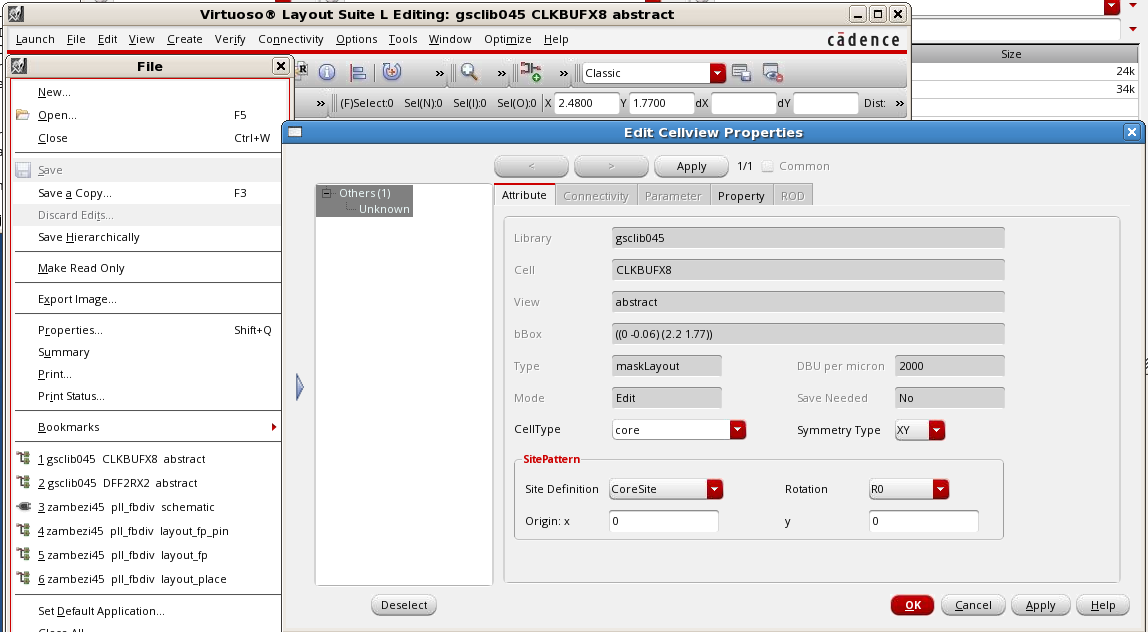
Site definition is a property that should be defined in the abstract of the standard cells. To view the site definition of a cell view, open it in Virtuoso and select File -> Properties from the menu bar. This displays the Edit Cellview Properties form. The following example shows the properties of the CLKBUFX8 standard cell. Its site name is CoreSite. Its Symmetry Type of XY indicates that it can also be placed with different orientations of R0, MX, MY, and R180. Note that this cell is of cellType core, which enables Innovus to identify it as a standard cell.
It is also possible to view the site property of a standard cell in Innovus. Simply run write_lef_library with the -macro_only option and search the generated output LEF file for the keyword SITE on that standard cell.
> write_lef_library -macro_only my_macro.lef
The following is the example for the CLKBUFX8 cell from the output LEF file:
MACRO CLKBUFX8
CLASS CORE ;
FOREIGN CLKBUFX8 0 0 ;
ORIGIN 0 0 ;
SIZE 2.2 BY 1.71 ;
SYMMETRY X Y ;
SITE CoreSite ;
...
Note that the LEF statements for CLKBUFX8 also show similar properties, such as symmetry type (SYMMETRY X Y), site name (SITE CoreSite), and cell type (CLASS CORE).
15.5 Site Definition in the Technology Library
The MSOA flow requires an MSOA PDK for the flow to be run successfully. A regular PDK (not MSOA PDK) meant for manual layout editing in Virtuoso will commonly not contain any site definition in the technology library. Refer to section "3.2 Technology Data Preparation" in the Technology Data Preparation chapter to see how the SITE definition contained in either the digital TLEF or the macro LEF are imported to the ITDB during the creation of an MSOA PDK.
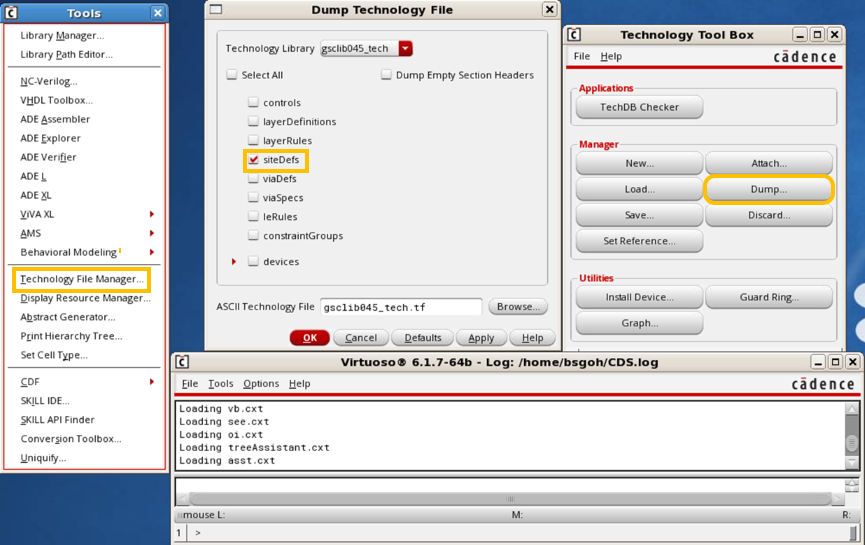
To see if the technology library contains any SITE definition, dump out the text technology file and view the siteDefs section. The steps are as follows:
- Invoke Virtuoso.
- In the Command Interface Window, select Tools -> Technology File Manager.
- In the resulting Technology Tool Box form, click the Dump button. This opens the Dump Technology File form.
- Select the desired technology library, select the siteDefs check box, specify the file name in the ASCII Technology File text box and click OK.
The following example shows the SITE definition section in a technology file. Two sites are defined: CoreSite and CoreSiteDouble.
;********************************
; SITEDEFS
;********************************
siteDefs(
scalarSiteDefs(
;( siteDefName type width height symInX symInY symInR90)
;( ----------- ---- ----- ------ ------ ------ -------)
( CoreSite core 0.2 1.71 nil t nil)
( CoreSiteDouble core 0.2 3.42 t t nil)
) ;scalarSiteDefs
) ;siteDefs
Alternatively, in Innovus, run write_lef_library -tech_only to generate an output LEF file that contains the technology information. Open the LEF file and search for the keyword SITE:
> write_lef_library -tech_only my_tech.lef
SITE CoreSite
CLASS CORE ;
SYMMETRY Y ;
SIZE 0.2 BY 1.71 ;
END CoreSite
SITE CoreSiteDouble
CLASS CORE ;
SYMMETRY X Y ;
SIZE 0.2 BY 3.42 ;
END CoreSiteDouble
In the above example, for the CoreSite definition meant for single-height standard cells, the t Boolean value for the SymInY attribute or the SYMMETRY Y statement in TLEF indicates that the row allows the standard cell with the SYMMETRY Y or SYMMETRY XY property to be flipped horizontally along the row. This is typical for single-height standard cells as flipping the cells vertically will cause a short on the power rails.
In double-height cells, the upper and lower cell edge typically contains the same type of power rail: either both are VDD or both are VSS. Therefore, double-height cells can be flipped vertically. So in the CoreSiteDouble definition meant for double-height standard cells, the t Boolean value for the SymInX attribute or the SYMMETRY X Y statement in TLEF indicates that the row allows the standard cell with the SYMMETRY Y or SYMMETRY XY property to be flipped horizontally along the row and standard cell with the SYMMETRY X or SYMMETRY XY property to be flipped vertically along the row.
Note that without having the site defined in the technology libraries, Innovus will issue a messages such as the following in the log file:
**ERROR: (IMPOAX-750): Tech site 'CoreSite' used in macro 'CLKBUFX8' is not found. Check if this macro in OpenAccess (OA) database has correct site information, and if the site is defined in OA technology database.
**WARN: (IMPOAX-755): Macro 'CLKBUFX8' has no SITE statement and it is a class CORE macro that requires a SITE statement. The SITE ENC_CORE_0 is chosen because it is a core site with height 1.7100 that matches the macro SIZE height.
When Innovus observes that the site property of a standard cell is not defined in the technology, it creates a dummy site with its best guess for site height and width. In general, it does a good job in computing the site height and width. However, the dummy site may not provide the correct symmetry type. The Placer may be able to place that standard cell, but there is no guarantee that all placement operations will work properly with the dummy site. As the site definitions for standard cell sets are often defined in the macro LEF or technology LEF, these files should always be imported when creating the MSOA PDK.
15.6 Standard Row Creation by Innovus During init_design
Consider a cell view that has no standard cell rows and has its PRBoundary object created in Virtuoso. When this cell view is loaded into Innovus through the init_design TCL command or through the Design Import form, Innovus detects the absence of rows and populates the entire design with rows.
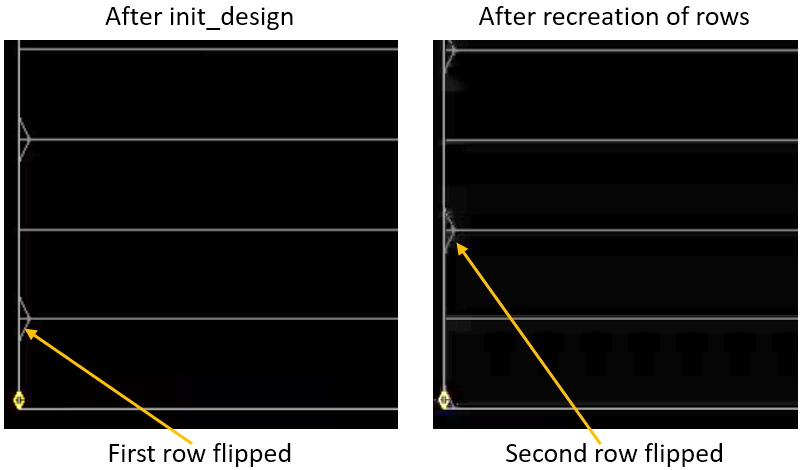
Innovus inserts the rows from the bottom to the top, with sites added from left to right. The bottom row is the first row added, and is flipped by default so that it can share the same power rail with the next row, which is not flipped. This implies that single-height standard cells with XY symmetry are placed either with the MX or R180 orientation in the first row. Similarly, for the other odd rows. All the even rows are not flipped, and therefore single-height standard cells in those rows are placed with either R0 or MY orientation.
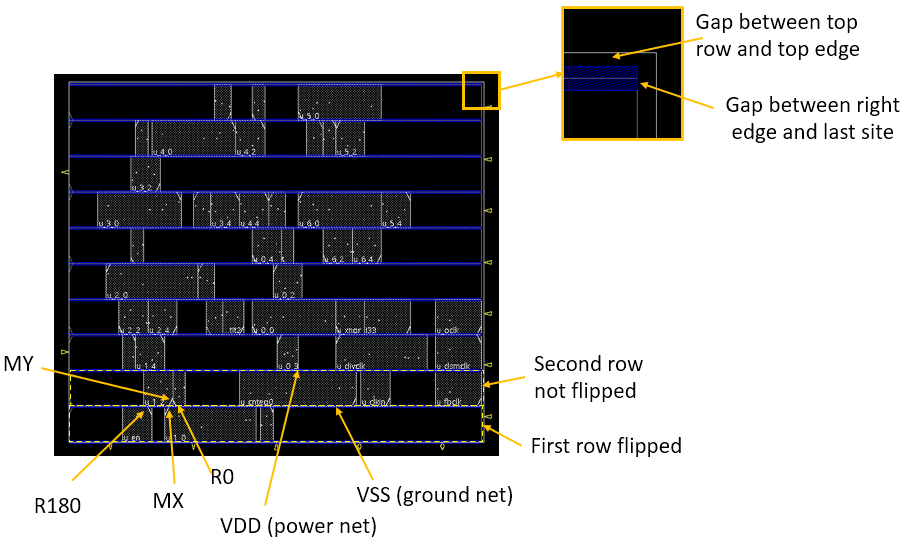
As shown in the picture above, the first row is inserted in such a way that the bottom edge of the row aligns with the bottom edge of the design boundary (determined by the specification of the PRBoundary object) and the left edge of the row aligns with the left edge of the design boundary.
As the tool fills up the design with only full sites and no partial site is created, some empty space is expected between the top edge of the top row and the top edge of the design boundary when the height of the design is not a value multiple of the row height. Similarly, there is empty space between the right edge of the row and the right edge of the design boundary too when the width of the design boundary is not a value multiple of the site width.
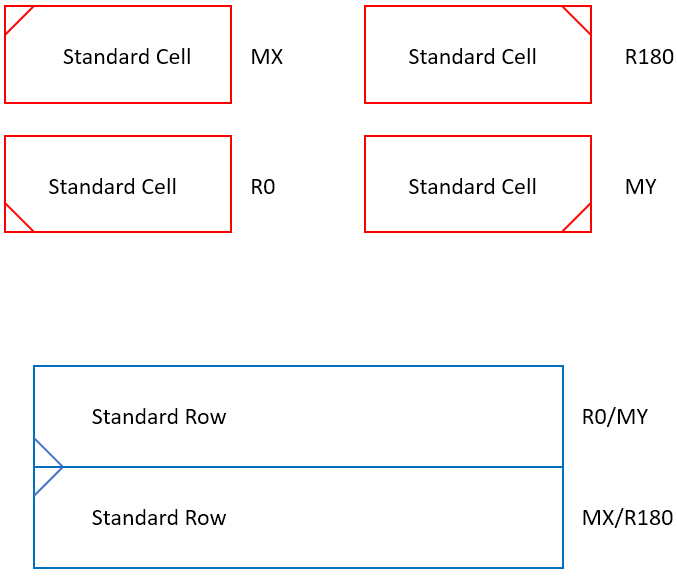
To identify the orientation of a row or cell, check which corner of the row or cell has the cross line.
15.7 Switching the Orientation of the Standard Rows
As the bottom row (and other odd number rows) created by init_design is flipped by default, these rows are unusable if the standard cells are to be placed with a different orientation. To recreate rows with a different orientation, follow the steps below:
deleteRow -allsetFlipping sinitCoreRow
This set of steps basically deletes the current rows and recreates the rows with a different orientation. The setFlipping command specifies that the second and other even rows are to be flipped.