12
Control Statements
The Spectre® circuit simulator lets you place a sequence of control statements in the netlist. You can use the same control statement more than once. Different Spectre control statements are discussed throughout this manual. The following are control statements:
- The alter and altergroup Statements
- The ic and nodeset Statements
- The info Statement
- The options Statement
- The paramset Statement
- The save Statement
- The print Statement
- The set Statement
- The shell Statement
- The statistics Statement
The alter and altergroup Statements
You modify individual parameters for devices, models, circuit, and subcircuit parameters during a simulation with the alter statement. The modifications apply to all analyses that follow the alter statement in your netlist until you request another parameter modification. You also use the alter statement to change the following options statement temperature parameters and scaling factors:
You can use the altergroup statement to respecify device, model, and circuit parameter statements that you want to change for subsequent analyses. You can also change subcircuits if you do not change the topology.
Changing Parameter Values for Components
To change a parameter value for a component device or model, you specify the device or model name, the parameter name, and the new parameter value in the alter statement. You can modify only one parameter with each alter statement, but you can put any number of alter statements in a netlist. The following example demonstrates alter statement syntax:
SetMag alter dev=Vt1 param=mag value=1
-
SetMagis the unique netlist name for thisalterstatement. (Like many Spectre statements, eachalterstatement must have a unique name.) -
The keyword
alteris the primitive name for thealterstatement. -
dev=Vt1identifiesVt1as the netlist name for the component statement you want to modify. You identify an instance statement withdevand amodelstatement withmod. When you use thealterstatement to modify a circuit parameter, you leave bothdevandmodunspecified. -
param=magidentifiesmagas the parameter you are modifying. If you omit this parameter, the Spectre simulator uses the first parameter listed for each component in the Spectre online help as the default. -
value=1identifies1as the new value for themagparameter. If you leavevalueunspecified, it is set to the default for the parameter.
Changing Parameter Values for Models
To change a parameter value for model files with the altergroup statement, you list the device, model, and circuit parameter statements as you would in the main netlist. Within an alter group, each model is first defaulted and then the model parameters are updated. You cannot nest alter groups. You cannot change from a model to a model group and vice versa. The following example demonstrates altergroup statement syntax:
ag1 altergroup {
    parameters p1=1
    model myres resistor r1=1e3 af=p1
    model mybsim bsim3v3 lmax=p1 lmin=3.5e-7
}
The following example shows the full replacement of models using the altergroup statement:
ff_25 altergroup {
    include "./models/corner_ff"
}
For each model or device being altered, the parameters are first defaulted and then set to the new values. The parameter dependencies are updated and maintained.
You can include files into the alter group and can use the simulator lang=spice command to switch language mode. For more details on the include command, see the Spectre online help (spectre -h include). A model defined in the netlist has to have the same model name and primitive type (such as bsim2, bsim3, or bjt) in the alter group. For model groups, you can change the number of models in the group. You cannot change from a model to a model group and vice versa. For details on model groups, see the Spectre online help (spectre -h bsim3v3).
If you include a file containing multiple corners using altergroup, you can use the +mp <numprocesses> command-line option to distribute the simulation across multiple machines. Spectre automatically detects the farm environment (LSF, SGE, RTDA, or Network Computer) and distributes the simulation statements to the specified number of child processes. If a farm environment is not detected, Spectre uses the fork option to distribute the corner simulation by creating multiple jobs on a single system.
Further Examples of Changing Component Parameter Values
This example changes the is parameter of a model named SH3 to the value 1e-15:
modify2 alter mod=SH3 param=is value=1e-15
The following examples show how to use the param default in an alter statement. The first parameter listed for resistors in the Spectre online help is the default. For resistors, this is the resistance parameter r.
Consequently, if R1 is a resistor, the following two alter statements are equivalent:
change1 alter dev=R1 param=r value=50
change1 alter dev=R1 value=50
Changing Parameter Values for Circuits
When you change a circuit parameter, you use the same syntax as when you change a device or model parameter except that you do not enter a dev or a mod parameter.
This example changes the ambient temperature to 0°C:
change2 alter param=temp value=0
The following table describes the circuit parameters you can change with the alter statement:
| Parameter | Description |
|---|---|
temp or tnom using an alter statement, all expressions with temp or tnom are reevaluated.The ic and nodeset Statements
The Spectre simulator lets you provide state information to the DC and transient analyses. You can specify two kinds of state information:
-
Initial conditions
Theicstatement lets you specify values for the starting point of a transient analysis. The values you can specify are voltages on nodes and capacitors, and currents on inductors. -
Nodesets
Nodesets are estimates of the solution you provide for the DC or transient analyses. Unlike initial conditions, their values have no effect on the final results. Nodesets usually act only as aids in speeding convergence, but if a circuit has more than one solution, as with a latch, nodesets can bias the solution to the one closest to the nodeset values.
Setting Initial Conditions for All Transient Analyses
You can specify initial conditions that apply to all transient analyses in a simulation or to a single transient analysis. The ic statement and the ic parameter described in this section set initial conditions for all transient analyses in the netlist. In general, you use the ic parameter of individual components to specify initial conditions for those components, and you use the ic statement to specify initial conditions for nodes. You can specify initial conditions for inductors with either method. Specifying cmin for a transient analysis does not satisfy the condition that a node has a capacitive path to ground.
ic parameter for individual components with the ic parameter of the transient analysis. The latter lets you select from among different initial conditions specifications for a given transient analysis.Specifying Initial Conditions for Components
You can specify initial conditions in the instance statements of capacitors, inductors, and windings for magnetic cores. The ic parameter specifies initial voltage values for capacitors and current values for inductors and windings. In the following example, the initial condition voltage on capacitor Cap13 is set to two volts:
Cap13 11 9 capacitor c=10n ic=2
Specifying Initial Conditions for Nodes
You use the ic statement to specify initial conditions for nodes or initial currents for inductors. The nodes can be inside a subcircuit or internal nodes to a component.
The following is the format for the ic statement:
icsignalName=value…
The format for specifying signals with the ic statement is similar to that used by the save statement. This method is described in detail in Saving Main Circuit Signals. Consult this discussion if you need further clarification about the following example.
ic Voff=0 X3.7=2.5 M1:int_d=3.5 L1:1=1u
This example sets the following initial conditions:
-
The voltage of node
Voffis set to 0. - Node 7 of subcircuit X3 is set to 2.5 V.
- The internal drain node of component M1 is set to 3.5 V. (See the following table for more information about specifying internal nodes.)
-
The current for inductor
L1is set to 1μ.
Specifying initial node voltages requires some additional discussion. The following table tells you the internal voltages you can specify with different components.
| Component | Internal Node Specifications |
|---|---|
Supplying Solution Estimates to Increase Speed
You use the nodeset statement to supply estimates of solutions that aid convergence or bias the simulation towards a given solution. You can use nodesets for all DC and initial transient analysis solutions in the netlist. The nodeset statement has the following format:
nodesetsignalName=value...
Values you can supply with the nodeset statement include voltages on topological nodes, including internal nodes, and currents through voltage sources, inductors, switches, transformers, N-ports, and transmission lines.
The format for specifying signals with the nodeset statement is similar to that used by the save statement. This method is described in detail in Saving Main Circuit Signals. Consult this discussion if you need further clarification about the following example.
nodeset Voff=0 X3.7=2.5 M1:int_d=3.5 L1:1=1u
This example sets the following solution estimates:
-
The voltage of node
Voffis set to 0. - Node 7 of subcircuit X3 is set to 2.5 V.
- The internal drain node of component M1 is set to 3.5 V. (See the table in the ic statements section of this chapter for more information about specifying internal nodes.)
-
The current for inductor
L1is set to 1μ.
Specifying State Information for Individual Analyses
You can specify state information for individual analyses in two ways:
-
You can use the
icparameter of the transient analysis to choose which previous specifications are used. - You can create a state file that is read by an individual analysis.
Choosing Which Initial Conditions Specifications Are Used for a Transient Analysis
The ic parameter in the transient analysis lets you select among several options for which initial conditions to use. You can choose the following settings:
Specifying State Information with State Files
You can also specify initial conditions and estimate solutions by creating a state file that is read by the appropriate analysis. You can create a state file in two ways:
- You can instruct the Spectre simulator to create a state file in a previous analysis for future use.
- You can create a state file manually in a text editor.
Telling the Spectre Simulator to Create a State File
You can instruct the Spectre simulator to create a state file from either the initial point or the final point in an analysis. To write a state file from the initial point in an analysis, use the write parameter. To write a state file from the final point, use the writefinal parameter. Each of the following two examples writes a state file named ua741.dc. The first example writes the state file from the initial point in the DC sweep, and the second example writes the state file from the final point in the DC sweep.
Drift dc param=temp start=0 stop=50.0 step=1 readns="ua741.dc" write="ua741.dc"
Drift dc param=temp start=0 stop=50.0 step=1 readns="ua741.dc" writefinal="ua741.dc"
Creating a State File Manually
The syntax for creating a state file in a text editor is simple. Each line contains a signal name and a signal value. Anything after a pound sign (#) is ignored as a comment. The following is an example of a simple state file:
# State file generated by Spectre from circuit file 'wilson'
# during 'stepresponse' at 5:39:38 PM, jan 21, 1992.
1       .588793510612534
2                1.17406247989272
3       14.9900516233357
pwr       15
vcc:p       -9.9483766642647e-06
Reading State Files
To read a state file as an initial condition, use the readic transient analysis parameter. To read a state file as a nodeset, use the readns parameter. This example reads the file intCond as initial conditions:
DoTran_z12 tran start=0 stop=0.003 \
    step=0.00015 maxstep=6e-06 readic="intCond"
This second example reads the file soluEst as a nodeset.
DoTran_z12 tran start=0 stop=0.003 \
    step=0.00015 maxstep=6e-06 readns="soluEst"
Special Uses for State Files
State files can be useful for the following reasons:
- You can save state files and use them in later simulations. For example, you can save the solution at the final point of a transient analysis and then continue the analysis in a later simulation by using the state file as the starting point for another transient analysis.
- You can use state files to create automatic updates of initial conditions and nodesets.
The following example demonstrates the usefulness of state files:
altTemp alter param=temp value=0
Drift dc param=temp start=0 stop=50.0 step=1 readns="ua741.dc0" write="ua741.dc0"
XferVsTemp xf param=temp start=0 stop=50 step=1 \ probe=Rload freq=1kHz readns="ua741.dc0"
The first analysis computes the DC solution at T=0C, saves it to a file called ua741.dc0, and then sweeps the temperature to T=50C. The transfer function analysis (xf) resets the temperature to zero. Because of the temperature change, the DC solution must be recomputed. Without the use of state files, this computation might slow the simulation because the only available estimate of the DC solution would be that computed at T=50C, the final point in the DC sweep. However, by using a state file to preserve the initial DC solution at T=0C, you can enable the Spectre simulator to compute the new DC solution quickly. The computation is fast because the Spectre simulator can use the DC solution computed at T=0C to estimate the new solution. You can also make future simulations of this circuit start quickly by using the state file to estimate the DC solution. Even if you have altered a circuit, it is usually faster to start the DC analysis from a previous solution than to start from the beginning.
Setting IC Priority Order
By default, if you specify an initial condition file with the readic parameter, initial conditions from the file are used, and the ic statements specified in the netlist are ignored. You can set the options statement parameter icpriority to netlist, (icpriority=netlist) to enable the simulator give precedence to the ic statements specified in the netlist. Similarly, if you specify the nodesets in a file using readns, and the icpriority parameter is set to netlist, then the nodeset statements in the netlist get higher priority.
Following is the order of precedence (from highest to lowest) when the icpriority parameter is set to netlist:
Following is the order of precedence (from highest to lowest) when the icpriority parameter is set to file:
The info Statement
You can generate lists of component parameter values with the info statement. With this statement, you can access the values of input, output, and operating-point parameters and print the node capacitance table. These parameter types are defined as follows:
-
Input parameters
Input parameters are those you specify in the netlist, such as the given length of a MOSFET or the saturation current of a bipolar resistor. -
Output parameters
Output parameters are those the simulator computes, such as temperature-dependent parameters and the effective length of a MOSFET after scaling. -
Operating-point parameters
Operating-point parameters are those that depend on the operating point. -
Node Capacitance Table
The node capacitance table displays the capacitance between the nodes of a circuit.
You can also list the minimum and maximum values for the input, output, and operating-point parameters, along with the names of the components that have those values.
Specifying the Parameters You Want to Save
You specify parameters you want to save with the info statement what parameter. You can give this parameter the following settings:
The difference between moscap and oppoint setting is in the junction capacitances for drain-bulk and source-bulk. moscap is used to calculate the capacitance of a single mosfet. A diagonal capacitor equals to the sum of all moscap capacitances connected to the terminal, so it includes junction capacitances. The following table shows how moscap is calculated in terms of oppoint:
| moscap | Expression by oppoint |
The info statement gives you some additional settings. You can use the save parameter of the info statement to specify groups of signals whose values you want to list. For more information about save parameter options, refer to Saving Groups of Signals. Finally, you can generate a summary of maximum and minimum parameter values with the extremes option.
Specifying the Output Destination
You can choose among several output destination options for the parameters you list with the info statement. With the info statement where parameter, you can
- Display the parameters on a screen
- Send the parameters to a log file, to the raw file, or to a file you create
When the info statement is called from a transient analysis or used inside of a sweep, the name of the info analysis is prepended by the parent analysis. If the file option is used to save the results, use the %A percent code (described in Description of Spectre Predefined Percent Codes) in the filename to prevent the file from being overwritten.
For example, the following info statement
tempSweep sweep param=temp start=27 stop=127 step=10 {dc1 dc dcInfo info what=oppoint where=file file="infodata.%A"}
infodata.tempSweep-000_dcInfo
infodata.tempSweep-001_dcInfo
infodata.tempSweep-002_dcInfo
infodata.tempSweep-003_dcInfo
Examples of the info Statement
You format the info statement as follows:
StatementNameinfoparameter=value
The following example tells the Spectre simulator to send the maximum and minimum input parameters for all models to a log file:
Inparams info what=models where=logfile extremes=only
For a complete description of the parameters available with the info statement, consult the lists of analysis and control statement parameters in the Spectre online help (spectre -h).
Printing the Node Capacitance Table
The Spectre simulator allows you to print node capacitance to an output file. This can help you in identifying possible causes of circuit performance problems due to capacitive loading.
The capacitance between nodes x and y is defined as
where
q
x is the sum of all charges in the terminal connected to node x, and
v
y is the voltage at node y.
The total capacitance at node
where charge
q
x and voltage
v
X are at the same node x.
Use the captab analysis to display the capacitance between the nodes in your circuit. This is an option in the info statement. Here is an example of the info settings you would set to perform a captab analysis:
For a complete list of captab parameters and values, consult the Spectre online help (spectre -h).
Use the infotimes option of the transient analysis when you bind the captab analysis to a transient analysis. This runs the captab analysis at specified time intervals. The syntax for the infotimes option is
where x1 and x2 are time points for which the info analysis should be performed. The following is an example of binding a captab analysis to a transient analysis.
tran1     tran  stop=1μ  infotimes=[0.1μ 0.5μ]    infoname=capInfo
capInfo     info  what=captab   where=file   file='capNodes' detail=nodetonode
Output Table
The output for the captab analysis is printed in the following format:
- The first column displays the names of the two nodes (From_node:To_Node).
- The second column displays the fixed (linear) capacitance between the two nodes.
- The third column is the variable (non-linear) capacitance between the two nodes.
- The last column displays the total capacitance between the nodes.
Table 12-1
Displays the output for the circuit below when detail=nodetonode:
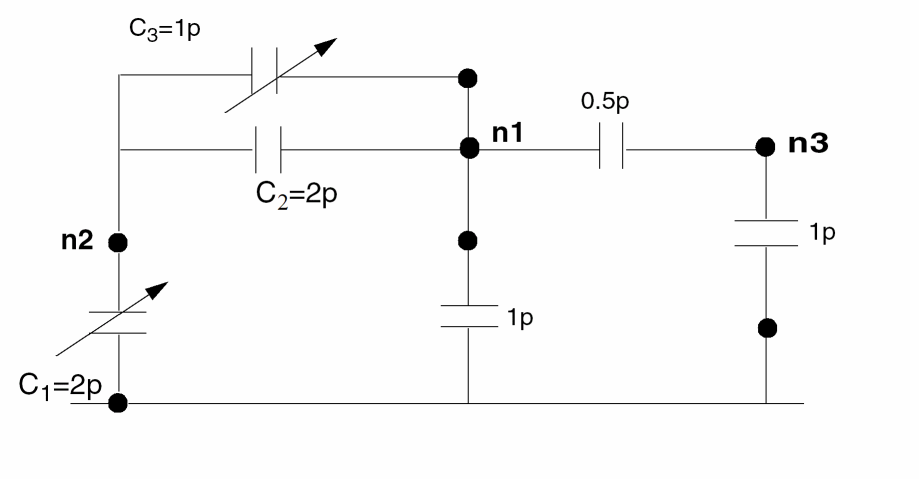
In this circuit, the total capacitance at node 2 (n2:n2 in the table) is
C1+C2+C3=5p
The total capacitance between node 2 and node 1 (n2:n1) is
C2(Linear)+C3(Non-Linear)=3p
Table 12-2 Node Capacitance Table Sorted by Value
The total node capacitance at nodes 1, 2, and 3 is represented by the rows n1:n1, n2:n2, and n3:n3 respectively.
There is no entry for n3:n2, which means there is no capacitance between these two nodes.
Table 7-1 is sorted by value. The rows are first grouped according to node names – the rows with the same From_Node are kept in a group. The row depicting the total capacitance at each node is always displayed first in the group, and the row displaying the node-to-ground capacitance is second. The remaining rows within each group are sorted in descending order of the Sum value.
2p (thresh=2p), the row n1:n3 will not be printed because the capacitance between the nodes is less than the threshold. The row n1:0 will be printed since the node-to-ground capacitance is always printed. The group n3:n3, n3:0, and n3:n1 will not be printed because the total node capacitance at node 3 (n3:n3) is less than the threshold.
If you sort the table by name (sort=name), it would look as follows:
Table 12-3 Node Capacitance Table Sorted by Name
In this case, the From_Node:To_Node column is sorted alpha-numerically. However, the row depicting the total capacitance at each node is always displayed first in the group, and the row displaying the node-to-ground capacitance is second.
Filtering RC Nodes Within an RC Net in XPS FastSPICE Mode
To filer the RC nodes and only report the pre-layout nodes, use the filter=rc option. For example:
simulator lang=spectre
capnode info what=captab where=file file="%C:r.info.captab" sort=value filter=rc
The above statement will generate the following:
XTOP.GPDWN : XTOP.GPDWN fixed=43.7231 f , variable=3.06673 f , sum=46.7898 f.
Here, the fixed value stands for the device/wire parasitic capacitance and the variable value stands for coupling and voltage-dependent capacitance.
The result of captab analysis includes all nodes and the output is located in outdir under ./XPS_result/top_netlist.info.captab.
Printing the Capacitance Values of Nets
The Spectre simulator allows you to print the capacitance values for each net. For each net, capacitance contribution from extracted view (DSPF, SPEF), design capacitor, and MOSFET-terminal capacitances are shown. To do this, use the netcap analysis, as shown below.
info1 info what=netcap where=file file=netlist.info.netcap
Here, netlist is the name of the netlist.
The output of the netcap analysis is printed in the file netlist.info.netcap in ascii format. The following is an example:
-
NetTypeis the type of net.schematicmeans that the net exists only in the design (pre-layout).postlayoutmeans that the net exists only inside the extracted view (DSPF).mixedmeans that the net exists in both pre-layout and postlayout. -
Cextractedis the capacitance contribution from the extracted view (DSPF, SPEF). -
Cdesignis the capacitance contribution from the design (pre-layout) capacitors. -
Cestimatedis the capacitance contribution from capacitors with special formats. -
Cinterconnectis the sum ofCextracted,CdesignandCestimated. -
Cdrainis the capacitance contribution from the MOSFET drain. -
Cgateis the capacitance contribution from the MOSFET gate. -
Csourceis the capacitance contribution from the MOSFET source. -
Cbulkis the capacitance contribution from the MOSFET bulk. -
Ctotalis the sum ofCinterconnect,Cdrain,Cgate,Csource, andCbulk.
Printing the Terminal Capacitance Values of MOSFETs
You can also print the terminal capacitance values for MOSFETs. To do this, use the moscap analysis, as shown below.
info1 info what=moscap where=file file=<netlist>.info.moscap
Here, netlist is the name of the netlist.
The output of the moscap analysis is printed in the file <netlist>.info.moscap in ascii format. The following is an example:
- Device Location shows whether the MOSFET exists in postlayout (DSPF) or schematic (pre-layout)
- Four terminals of MOSFET allows 16 capacitors.
The options Statement
To enter initial parameters for your simulation that you do not specify in your environment variables or on your command line, you use the options statement. You can control parameters in a number of areas with the options statement:
- Parameters that specify tolerances for accuracy
- Parameters that control temperature
- Parameters that select output data
- Parameters that help solve convergence difficulties
- Parameters that control error handling and annotation
- Parameters that control method of threshold voltage (vth) computation for MOS device. For BSIM3v3, BSIM4, PSP102 PSP103, and BSIMCMG. Spectre supports vth from model equation (std) or constant current vth (vthcc). Otherwise, Spectre only supports 'std' computation.
-
Parameters that specify the process options including
tnom,scale, andscalem. When these process parameters are specified in a subcircuit in the MTS mode, they are locally scoped to that subcircuit only.
For a complete list of the parameters you can set with the options statement, consult the Spectre online help (spectre -h).
options Statement Format
The options statement format is
Name options parameter=value ...
options Statement Example
Examp options rawfmt=psfbin audit=brief temp=30 \
    save=lvlpub nestlvl=3 rawfile=%C:r.raw useprobes=no
The example sets the rawfmt, audit, temp, save, nestlvl, rawfile, and useprobes parameters for an options statement named Examp. The backslash (\) at the end of the first line is a line continuation character. Nonnumerical parameter values are chosen from the possible values listed in the Spectre online help (spectre -h).
Performing Parasitic Reduction
You can use the parasitics option or the +parasitics command-line option to set the parasitics for RC reduction globally, as shown below.
Opt options parasitics=on
spectre +aps +parasitics input.scs
If you specify both the parasitics option and the +parasitics command-line option, the +parasitics command-line option takes higher precedence.
You can also perform parasitic reduction of instances and subcircuits with the scope specified for MTS. For example:
Opt options parasitics=off
Opt1 options parasitics=on inst=[x1]
Opt2 options parasitics=on subckt=[subckt1]
In the above example, parasitic RC reduction is disabled globally, however, parasitic RC reduction is performed for subcircuit instance x1 and subcircuit subckt1. So, if there are three subcircuit instances in the netlist, for example, x1, x2, and x3, and the following is specified, the parasitics RC reduction takes effect on x1, and not on x2 and x3:
Opt options parasitics=on inst=[x1]
In the following example, parasitic RC reduction is performed globally, however, it is not performed for the subcircuit instance x1 and subcircuit sub1:
opt1 options parasitics=on
opt2 options parasitics=off inst=[x1]
opt2 options parasitics=off sub=sub1
To perform parasitic reduction of instances and subcircuits with the scope specified for MTS, you need to specify +mts at the command line, as shown below.
% spectre +aps +mts....
When the above is specified, and you also use the +parasitics command-line option, the parasitics option takes higher precedence over the +parasitics command-line option. However, if parasitics is specified as a global option, then the +parasitics command-line option has the higher priority.
Setting Tolerances
You need to set tolerances if the Spectre simulator’s default settings do not suit your needs. This section tells you how to make the needed adjustments. If you need to examine default tolerances for any Spectre parameters, you can find them in the Spectre online help (spectre -h).
Setting Tolerances with the options Statement
The following options statement parameters control error tolerances:
Specifying Hierarchical Delimiters
You can use the hier_delimiter option to specify a hierarchical delimiter to represent the nodes inside a subcircuit hierarchy in your netlist. If you do not specify the hier_delimiter option, . is taken as the default hierarchical delimiter. The following is the syntax to specify the hier_delimiter option:
Opt options hier_delimiter="%"
.option hier_delimiter="%"
To specify " or \ as the hierarchical delimiter, the Escape symbol is required if you use double quotes (for example, hier_delimiter="\"").
Additional options Statement Settings You Might Need to Adjust
This section provides some explanation of commonly used options statement parameters. It is not a complete listing of options statement parameters. For a complete list, consult the Spectre online help (spectre -h).
Simulation Config file Support
Spectre supports simulation configuration file (spectre.cfg) that can be loaded to set the default options for the simulator.
This file is located and read from the following locations:
-
From the installation directory
<install_dir>/spectre/etc/configs. This file is always read. -
From the path specified using the
+configcommand-line option. This file is always read. If you specify multiple files using the+configcommand-line option, all files are read by Spectre. - From one of the following locations, in the given order of precedence:
Therefore, if a configuration file exists at all the above locations, Spectre will read at least three configuration files.
Computing the Constant Current
Spectre supports the following options to compute the constant current (Vth):
The following model parameters are added to the models that support constant current threshold (Vth) calculation:
| Parameter Name | Description |
|
Vth current parameter. The default value is taken from the options |
|
Computing the Drain Saturation Voltage Based on Output Conductance
Spectre supports the following options to compute the drain saturation voltage (Vdsat) based on output conductance (gds):
The following model parameters are added to the BSIMIMG and BSIMCMG models that support drain saturation voltage calculation:
| Parameter Name | Description |
The paramset Statement
For the sweep analysis only, the paramset statement allows you to specify a list of parameters and their values. This can be referred by a sweep analysis to sweep the set of parameters over the values specified. For each iteration of the sweep, the netlist parameters are set to the values specified by a row. The values have to be numbers, and the parameters’ names have to be defined in the input file (netlist) before they are used. The paramset statement is allowed only in the top level of the input file.
Nameparamset {list of netlist parameterslist of values foreach netlist parameterlist of values foreach netlist parameter...
}
Here is an example of the paramset statement:
parameters p1=1 p2=2 p3=3
data paramset {
    p1 p2 p3
    5  5  5
    4  3  2
}
The paramset statement also supports subcircuit parameters, as shown in the following example:
inline subckt rmod (g d s b)
parameters pert_fms=1 rx=1
rmod(d s) res
model res resistor l=100+pert_fms w=200+temp r=pert_fms+rx
ends
subckt rSubS A Y supply gnd
    rp(Y A supply supply) rmod
 rn(Y A gnd gnd) rmod rx=2
ends
XS (in output supply 0) rSubS
dataSub paramset {
    XS.rn:pert_fms XS.rn:rx
    3     514
    13    503
You can also specify the time, triggered by an event in the paramset statement, as shown below.
paramSet1 paramset {
time temp reltol
@(assert_1 0) 125 1e-3
}
The above statement means that whenever an event specified by the assert_1 happens, the temperature should be set to 125 and the value of reltol should be set to 1e-3.
Combining the paramset statement with the sweep analysis allows you to sweep multiple parameters simultaneously; for example, power supply voltage and temperature.
The save Statement
You can save signals for individual nodes and components or save groups of signals.
Saving Signals for Individual Nodes and Components
You can include signals for individual nodes and components in the save list by placing save statements (not to be confused with the save parameter) in your netlist. When you specify signals in a save statement, the Spectre simulator sends these signals to the output raw file, as long as the nestlvl setting does not filter them.
save statements are specified in the netlist file, they are executed in the order they appear in the netlist.In this section, you will learn how to save the following:
- Voltages for individual nodes
- Charge on a node
- All signals for an individual component
- Selected signals for an individual component
- Parameters of Stacked-FET
The syntax for the save statement varies slightly, depending on whether the requested data is from the main circuit or a subcircuit.
Saving Main Circuit Signals
The save statement general syntax has the following arguments. You can specify more than one argument with a single save statement, and you can mix the types of arguments in a single statement.
save signalName…
save signalName:q | dynamic
save compName…
savecompName:modifier…
savesubcircuitName:terminalIndex…
-
signalName is generally the netlist name of a node whose voltage you want to save. If the specified node name is not unique (an instance in the netlist has the same name), the Spectre circuit simulator saves the node. If the signal name is specified with the modifier
qordynamic, it saves the charge on the node instead of the voltage. For examplesave 7:qorsave 7:dynamicsaves the charge for the node named7. Wildcards are supported in node names. For example,save *:q. - compName is the netlist name of a component whose signals you want to save. Wildcards are supported in component names.
-
modifier specifies signals you want to save for a particular component. It can have the following types of values:
-
A terminal name
Terminal names for components are the names for nodes in component instance definitions. You can find instance definitions for each component in the component parameter listings in the Spectre online help (spectre -h). For example, the following is the instance definition of a microstrip line. The terminal names aret1,b1,t2, andb2. Wildcards are supported.Name t1 b1 t2 b2 msline parameter=value…
-
A terminal index
The terminal index is a number that indicates where a terminal is in the instance definition. You give the first terminal a terminal index of 1, the second a terminal index of 2, and so on. In this example, the terminal indexes are 1 forsinkand 2 forsrc.Name sink src isource parameter=value...
- A name of an operating-point parameter (from the lists of parameters for each component in the Spectre online help). Wildcards are supported.
- The name of a Verilog©-A internal variable.
-
One of the following keywords:
To save power dissipated on a circuit, subcircuit, or device
-
A terminal name
-
subcircuitName is the instance name of a subcircuit call. Saving terminal currents for subcircuit calls is the same as saving terminal currents for other instance statements except that you must identify individual terminal currents you want to save by the terminal index.
Saving Subcircuit Signals
- Give a full path to the subcircuit name. Start with the highest level subcircuit and identify the signals you want to save at the end of the path. Separate each name with a period.
Examples of the save Statement
The following table shows you examples of save statement syntax. When you specify node names, the Spectre simulator saves node voltages. Currents are identified by the terminal node name or the index number.
Exception: Currents through probes take the name of the probe.
Saving Individual Currents with Current Probes
A current probe is a component that measures the current passing between two nodes. Its effect is like placing an amp meter on two points of a circuit. It creates a new branch in the circuit between the two nodes, forces the voltages on the two nodes to be equal, and then measures the flow of current.
When to Use Current Probes
Use a probe instead of a save statement under the following circumstances:
-
If you want increased flexibility for giving currents descriptive names
With a current probe, you can name the current anything you want. With asavestatement, the name of the current must have a:name suffix. - If you are saving measurements for current-controlled components
- If you are saving currents for an AC analysis
-
If you are saving measurements for a current that passes between two parts of a circuit but not through a terminal
The following example inserts a current probe to measure the current flowing between A and B. Because there is no component between A and B, there is no other way to measure this current except to insert a current probe that has an identical current to the one you want to measure.

Example
Nameinoutiprobe
|
The unique netlist name for the current probe component. The measured current also receives this name. |
|
In the following example, the current probe measures the current between nodes src and in, names the measured current Iin, and saves Iin to the raw file.
Iin src in iprobe
save statement option. For further information, see the description of save statement keywords in this chapter.Saving Power
To save power dissipated on a circuit, subcircuit, or device, you use the pwr parameter. Power is calculated only during DC and transient analyses. The results are saved as a waveform, representing the instantaneous power dissipated in the circuit, subcircuit, or device.
Formatting the pwr Parameter
The syntax for the pwr parameter is illustrated by the following examples.
To save the power dissipated on a device or instance of a subcircuit, the syntax is
save instance_name:pwr
To save the total power, the syntax is
save :pwr
You can explicitly save particular power variables. For example:
save :pwr x1:pwr x1.x2.m1:pwr
This statement saves three power signals:
-
total power dissipated (
:pwr) -
power dissipated in the
x1subcircuit instance (x1:pwr) -
power dissipated in the
x1.x2.m1MOSFET
Power Options
The pwr parameter in the options statement can also be used to save power. The following table shows the five possible settings for the pwr option:
opts options pwr=total
save x1:pwr
This creates two power signals, :pwr (generated by the options statement) and x1:pwr (generated by the save statement).
Saving Groups of Signals
To save groups of signals as results, use the save and nestlvl parameters. Specify which signals you want to save with the save parameter. Use the nestlvl parameter when you save signals in subcircuits. The nestlvl parameter specifies how many levels deep into the subcircuit hierarchy you want to save signals. The save parameter only saves the node voltages and the source terminal currents. It does not save device currents and subcircuit terminal currents.
You can set these parameters as follows:
-
In
optionsstatements
If you set thesaveandnestlvlparameters with anoptionsstatement, the setting applies to signal data from all analyses that follow that statement in the netlist. -
In most analysis statements
If you set thesaveandnestlvlparameters with an analysis statement, the setting applies to that analysis only. It overrides any previoussaveornestlvlsettings.
Formatting the save and nestlvl Parameters
The syntax for both the save and nestlvl parameters is illustrated by the following options statement:
setting1 options save=lvlpub nestlvl=2
The save Parameter Options
The following table shows the possible settings for the save parameter:
Use lvl or all (instead of lvlpub or allpub) to include internal node voltages and currents through other components that compute current.
Use lvlpub or allpub to exclude signals at internal nodes on devices (the internal collector, base, emitter on a BJT, the internal drain and source on a FET, etc). lvlpub and allpub also exclude the currents through inductors, controlled sources, transmission lines, transformers, etc.
save parameter value to selected without any save statements in the netlist is not equivalent to specifying no output. Currently, the Spectre simulator automatically sets the save parameter to allpub.
If you specify the save parameter in a tran statement, Spectre, by default, saves all the data in the design. If you specify a parameter as a value to the save parameter, then Spectre rounds off the value to the nearest integer, assigns it to an enum type, and generates a warning message. For example:
simulator lang=spectre insensitive=yes
R1 1 2 resistor r=1k
R2 2 0 resistor r=1k
V1 1 0 vsource dc=1
tran tran stop=1u save=ttotal
simulator lang=spice
.probe v(2)
.param ttotal=1.1ns
simulator lang=spectre
In the above example, ttotal has been specified as a value to the save parameter. Spectre will round off 1.1ns to 1, assign it to enum type lvl and generate a warning message.
The following table displays how Spectre will round off the values and assign them to various enum types:
| Specified Value | Rounded Off Value | Enum Type Assigned |
Saving Subcircuit Signals
To save groups of signals for subcircuits, you must adjust two parameter settings:
-
Set the
saveparameter to eitherlvlorlvlpub. -
Set the
nestlvlparameter to the number of levels in the hierarchy you want to save. The default setting fornestlvlis infinity, which saves all levels.
Saving Groups of Currents
The currents parameter of the options statement computes and saves the device and source terminal currents and the inline subcircuit currents. You use it to create settings for currents that apply to all terminals in the netlist.
For two-terminal components, the Spectre simulator saves only the first terminal (entering) currents. You must use a save statement or set the values of the global redundant_currents and useprobes parameters of the options statement to yes to save data for the second terminal of a two-terminal component. For more information about the save statement, see Saving Signals for Individual Nodes and Components.
Setting the currents Parameter
The currents parameter has the following options:
currents parameter value to nonlinear or all and do not specify any node voltage and vsource current in the save statement, the Spectre simulator saves allpub signals as well as the currents you requested. This might change in future releases of the Spectre simulator.Examples of the currents Parameter
You use the following syntax for the currents parameter in the options statement. For more information about the options statement, see the parameter listings in the Spectre online help (spectre -h).
-
The Spectre simulator saves all terminal currents for nonlinear components, currents specified with the
savestatement, and routinely computed currents.opt1 options currents=nonlinear
-
The Spectre simulator saves all terminal currents.
opt2 options currents=all
Setting Multiple Current Probes
Sometimes you might need to set a large number of current probes. This could happen, for example, if you need to save a number of ACs. (Current probes can find such small signal currents when they are not normally computed.) You can specify that all currents be calculated with current probes by placing useprobes=yes in an options statement.
Setting multiple current probes can greatly increase the DC and transient analysis simulation times. Consequently, this method is typically used only for small circuits and AC analysis.
reltol.Saving Subcircuit Terminal Currents
Use the subcktprobelvl parameter to control the calculation of terminal currents for subcircuits and inline subcircuits. Current probes are added to the terminals of each subcircuit, up to subcktprobelvl deep.
subcktproblelvl parameter to compute the terminal currents for inline subcircuits, ensure that the useprobes option is set to no, otherwise, the device terminal currents are not plotted in ADE automatically. Saving Inline Subcircuit Terminal Currents
Use the inlinesubcktcurrent parameter to control the calculation of inline subcircuit terminal currents. When either currents or subcktprobelvl parameter is applied on the inline subcircuit terminal, or the inline subcircuit terminal is specified in the save statement, the inlinesubcktcurrent parameter controls whether the current is from an inline device or subcircuit. Possible values for the inlinesubcktcurrent parameter are device and subckt. The default value is subckt.
Hierarchical Current Probing
You can use the save statement to probe terminal currents hierarchically at a specified depth. You can specify the depth using the probelvl option to obtain the terminal current for all terminals connected to the specified terminal at that depth. The following is the syntax for obtaining the terminal currents:
save X:terminal probelvl=value
Here, X is the subcircuit name, terminal is the subcircuit terminal, and value is the depth of the terminal that is connected to the subcircuit terminal.
You can also save the currents of all terminals that are connected to a node by specifying the node name, as shown below.
save nodeName:currents probelvl=value
Consider a scenario where terminal A is connected to terminals B, C, D, and E. In addition, terminal E is connected to terminals F and G, as shown in the following figure:

To probe all terminal currents that are connected to terminal A till the third-level depth, you can specify the following:
save X1:A probelvl=3
To save the currents of all terminals that are connected to node nA, you can use the following save statement:
save nA:currents probelvl=2
The above statement will save the currents of all terminals connected to node nA, that is, A, X, Y, B, C, D, and E.
Using the subcktiprobes Parameter
You can save subcircuit terminal currents by using any of the following two methods:
-
savestatement. For example,save X1:1 -
subcktprobelvlparameter in theoptionsstatement. For example,opt options subcktprobelvl=1
No matter which method you choose to save the subcircuit terminal currents, the simulator calculates the current by using any of the following two methods:
- Accumulating the current of devices inside the subcircuit.
- Inserting a current probe between the subcircuit terminal and the connection outside the subcircuit, and obtaining the current from the current probe.
The second method (current probe method) is more accurate than the first one.
You can use the subcktiprobes parameter in the options statement to choose the method to save the subcircuit terminal currents. The subcktiprobes parameter accepts the following values:
no: does not insert a current probe for the save statement or the subcktprobelvl parameter.
save: inserts a current probe for the for the save statement but not for the subcktprobelvl parameter.
all: inserts a current probe for both subcktprobelvl parameter and save statement.
yes: (Default) If used with baseline Spectre, the behavior is equivalent to subcktiprobes=all; however, if used with Spectre APS, the behavior is equivalent to subcktiprobes=save.
Measuring Stacked-FET Parameters
Stacked-FET is a mechanism that creates longer devices by using fixed length (L) FinFETs. Spectre treats stacked FETs as subcircuits containing multiple MOSFETs connected serially. The subcircuit must contain at least one MOSFET. In addition, the subcircuit should contain a minimum of four or a maximum of five terminals, and the first four terminals should be defined as drain, gate, source, and bulk. Extra terminals are ignored.
To enable stacked-FET measurement, set the global option subcktoppoint to yes, as shown below.
Opt1 options subcktoppoint=yes
You can use the save statement to measure the parameters of stacked-FETs including term voltage, current, capacitance, conductance, and vth. All devices in the subcircuit can also be probed.
Here, inst_name is the subcircuit instance name and param_name is the name of the stacked FET parameter that needs to be measured. Wildcards are supported.
Following parameters are supported:
save I1:vth I1:vgs I1:vds
save *:oppoint devtype=subckt depth=3
save I0.*:oppoint devtype=subckt
You can use the subcktopfreq parameter in the options statement to set the frequency used in subcircuit operating point parameter calculation. The default value of subcktopfreq is 1/(2xpi) Hz.
Stacked-FET measurement is supported in dc, info, and tran analyses. In tran analysis, you need to specify the time point by using infotimes=[…].
| Analysis Name | Example |
|---|---|
|
dc dc save X1:vth X1:gds |
|
save X1:vth X1:gds tran1 tran infoname=info1 infotimes=[…] info1 info what=oppoint |
|
save X1:vth X1:gds info1 info what=oppoint |
Using Wildcards in the Save Statement
Wildcards provide a way to specify a pattern of a set of names without having to know all the names themselves. For example, the pattern X1.X2.* can match all node voltages in the subcircuit X1.X2.
You can use wildcards in Spectre for saving signals selectively and thus reducing runtime, memory usage, and disk space.
The syntax for using wildcards is:
save {X[:param] [depth=depth][sigtype=node|subckt|dev|all][devtype=devicetype] [subckt=subname1][xsubckt=subname2] [exclude=exclude][compression=yes|no][ports=yes|no] [filter=none|rc|colon] [logic=yes] [vlth=value] [vhth=value] [probelvl=value] [time_window= start1 stop1 start2 stop2...]}
Spectre supports the following wildcard pattern matching characters:
* – matches any string including the empty string and the hierarchical delimiter `.'
?– matches any character including `.'
For a wildcard expression X:param, * and ? is supported in the hierarchical name X and * is supported for param.
Examples of the Save Statement with Wildcard Patterns
The print Statement
You can print signal and instance data to an output file by using the print statement. You can use the print statement for AC, DC, transient, noise, and sweep analyses.
You format the print statement as follows:
item... [,item] ,name=mytran{to="filename" | addto="filename"} [precision="%15g"]
|
Name of the output file. This file will overwrite any existing files with the same name. |
||
Use the following syntax to access noise parameters:
<noise_analysis_name>:<parameter_name>
parameter_name can be out (output noise), in (input noise), F (noise factor), or NF (noise figure).
Examples
print im(I(vd1)),im(I(vd2)),im(I(vd3)), name=ac1 to="ac.out"
prints the imaginary parts of the current.
print I(vd), name=dc1 to="dc.out" precision="%15g"
print noise:out, name=noise to="noise.out"
The set Statement
Except for temperature parameters and scaling factors, you use the set statement to modify any options statement parameters you set at the beginning of the netlist. The new settings apply to all analyses that follow the set statement in the netlist.
You can change the initial settings for the state of the simulator by placing a set statement in the netlist. The set statement is similar to the options statement that sets the state of the simulator, but it is queued with the analysis statements in the order you place them in the netlist.
You use the set statement to change previous options or set statement specifications. The modifications apply to all analyses that follow the set statement in the netlist until you request another parameter modification. The set and options statements have many identical parameters, but the set statement cannot modify all options statement parameters. The parameter listings in the Spectre online help tell you which parameters you can reset with the set statement.
The following example demonstrates the set statement syntax. This example turns off several annotation parameters.
Quiet set narrate=no error=no info=no
-
Quietis the unique name you give to thesetstatement. -
The keyword
setis the primitive name for thesetstatement. -
narrate,error, andinfoare the parameters you are changing.
The shell Statement
The shell analysis passes a command to the operating system command interpreter given in the SHELL environment variable. The command behaves as if it were typed into the Command Interpreter Window, except that any %X codes in the command are expanded first.
The default action of the shell analysis is to terminate the simulation.
The following is the syntax for the shell statement:
Nameshellparameter=value...
The statistics Statement
The statistics blocks allow you to specify batch-to-batch (process) and per- instance (mismatch) variations for netlist parameters. These statistically varying netlist parameters can be referenced by models or instances in the main netlist and can represent IC manufacturing process variation or component variations for board-level designs. For more information about the statistics statement, see
Return to top