11
Mixed-Signal Aspects of Verilog-AMS
The Cadence® Verilog®-AMS language brings analog and digital modeling together in a single language. This chapter describes the mixed-signal features of Verilog-AMS and how the continuous (analog) and discrete (digital) domains interact.
Fundamental Mixed-Signal Concepts
Becoming familiar with the following terms will help you understand the discussion in this chapter.
Domains
The domain of a value refers to the method used to calculate the value. In Verilog-AMS,
- The potentials and flows described in natures are calculated in the continuous domain.
- Register contents and the states of gate primitives are calculated in the discrete domain.
- The values of real and integer variables are calculated in either the continuous or discrete domain, depending on the context in which their values are assigned. The domain of a variable is that of the context from which its value is assigned.
Values calculated in the discrete domain change value instantaneously and only at integer multiples of a minimum resolvable time. Values calculated in the continuous domain vary continuously.
Contexts
Statements in a Verilog-AMS module description can appear in the body of an analog block, in the body of an initial or always block, or outside of any block. Statements that appear in an analog block are in the continuous context; statements in any other location are in the discrete context. A particular variable can be assigned values in either context, but not in both contexts.
Nets, Nodes, Ports, and Signals
In Verilog-AMS, hierarchical structures are created when higher-level modules create instances of lower level modules and communicate with those instances through input, output, and bidirectional ports. A port represents the physical connection of an expression in the instantiating or parent module with an expression in the instantiated or child module. The expressions, which can include registers, variables, and nets of both continuous and discrete disciplines, are referred to as connections. A port of an instantiated module has two nets, the upper connection, which is a net in the instantiating module, and the lower connection, which is a net in the instantiated module.
A net is said to be in the discrete domain if it has an associated discrete discipline. A net is in the continuous domain if it has an associated continuous discipline. A signal is a hierarchical collection of nets that, because of port connections, are contiguous. If all the nets that make up a signal are in the discrete domain, the signal is a digital signal. If all the nets that make up a signal are in the continuous domain, the signal is an analog signal. A signal that consists of nets from both domains is called a mixed signal. Similarly, a port whose connections are both analog is an analog port, a port whose connections are both digital is a digital port, and a port with one analog connection and one digital connection is a mixed port.
Nets and variables in the continuous domain are termed continuous nets and continuous variables. Nets and variables in the discrete domain are termed discrete nets and discrete variables.
If a signal is analog or mixed, then it is associated with a node. Regardless of the number of analog nets in an analog or mixed signal, and regardless of how the analog nets in a mixed signal are interspersed with digital nets, the analog portion of an analog or mixed signal is represented by only a single electrical node. This guarantees that at any instant in time the analog portion of a mixed or analog signal has one, and only one, value that represents its potential with respect to ground.
Analog nodes and branches are allowed only as arguments to signal access functions, analog functions, and analog primitive and module instantiations. They cannot be connected to digital primitives.
For additional information, see Appendix A, “Nodal Analysis.”
Mixed-signal and Net Disciplines
The discipline of a continuous net specifies the tolerance (abstol) used to calculate the potential of the associated node. A mixed signal might have multiple continuous nets of different compatible continuous disciplines, with different abstol values. In this case, the abstol of the associated node is the smallest of the abstol values specified in the disciplines associated with the continuous nets of the signal.
Behavioral Interaction
Verilog-AMS supports various types of blocks used to describe behavior. In general, digital behavior is described in initial and always blocks and analog behavior is described in analog blocks. In a Verilog-AMS module, you can have, at most, one analog block and any number of initial and always blocks.
The nets and variables of each domain can be referenced in the other context, which is how information passes between the continuous and discrete domains. Read operations of nets and variables in both domains are allowed from both contexts. Write operations of nets and variables are only allowed from within the context of their domain.
The following example illustrates some of these capabilities.
`timescale 1ns/1ns
module mod (in);
integer abve;      // Will be an analog-owned variable.
integer below;     // Will be an analog-owned variable.
integer d;         // Will be a digital-owned variable.

electrical in;

always begin       // Enter the digital context.
    if ( abve )    // Read the analog variable in the digital context.
        d = 1;     // Write the variable d in the digital context.

    if ( below )
        d = 0;     // d, because written in digital context, is owned by digital.
    #5;
end

analog begin       // Enter the analog context.
    @ (cross (V(in) - 2.5, +1 ) )
        abve = 1;   // Write to the variable abve in the analog context.
    @ (cross (V(in) - 2.5, -1 ) )
        abve = 0;   // abve, because written in analog context,is owned by analog.

    if ( d == 1 )   // Read the value of d in the analog context.
        $strobe(" d is still high\n"); end

endmodule
- Access discrete primaries, such as nets and variables, from a continuous context
- Access continuous primaries, such as flows, potentials and variables, from a discrete context
- Detect discrete events from a continuous context
- Detect continuous events from a discrete context
Accessing Discrete Nets and Variables from a Continuous Context
Using Verilog-AMS, you can access discrete nets and variables from a continuous context. The following table shows how values map from the discrete context to the analog context.
The following example shows code that accesses the value of a discrete primary from a continuous context.
module onebit_dac (in, out) ;
input in ;
inout out ;
wire in ;
logic in ;
electrical out ;
real vout ;
analog
    if (in==0)          // "in" is a discrete primary.
        vout = 0.0 ;
    else
        vout 3.0 ;
    V(out) <+ vout ;
endmodule
Accessing Continuous Nets and Variables from a Discrete Context
Using access functions, you can probe continuous nets from within a discrete context. All probes that are legal in the continuous context of a module are also legal from within the discrete context. For more information on access functions, see “Obtaining and Setting Signal Values”.
The following example illustrates how you might access a continuous net from the discrete context.
module sampler (in, clk, out);
inout in;
input clk;
output out;
electrical in;   // "in" is a continuous net.
wire clk;
reg out;
always @(posedge clk)   // Entering the discrete context.
    out = V(in);       // Access the continuous net.
endmodule
Continuous variables can be accessed for reading from any discrete context in the same module that the continuous variables are declared. Because the discrete domain can fully represent all continuous types, a continuous variable is fully visible when it is read in a discrete context.
The following example illustrates this capability.
real aVar;            // Will be a continuous analog variable.
electrical in;
reg dReg;
analog begin          // Enter the analog context.
    @ (cross (V(in) - 2.5, +1 ) )
       aVar = 1;     // Write to variable, so aVar is now owned by analog.
end
always begin          // Enter the digital context.
    #5 dReg = aVar;  // Read value of analog aVar within digital context.
end
Detecting Discrete Events from a Continuous Context
You can detect discrete events from within a continuous context. The arguments to discrete events in continuous contexts are considered part of the discrete context. A discrete event in a continuous context is non-blocking, like the other events allowed in continuous contexts.
The following example illustrates a discrete event being detected in a continuous context.
module sampler3 (in, clk1, clk2, out);
input in, clk1, clk2;
output out;
wire clk1;
real vout ;
electrical in, clk2, out;
analog begin                               // Enter the continuous context.
    @(posedge clk1, 1))                   // Detect discrete event posedge clk1.
        vout = V(in);
    V(out) <+ vout;
end
endmodule
Detecting Continuous Events from a Discrete Context
You can detect analog (continuous) events from within a discrete context. The arguments to these events are considered part of the continuous context. An analog event used in a discrete context is blocking like other discrete events.
The following example illustrates an analog event being detected in a discrete context.
module sampler2 (in, clk, out);
input in, clk;
output out;
wire in;
reg out;
electrical clk;
always @(cross(V(clk) - 2.5, 1))   // Code to detect the analog event.
    out = in;
endmodule
Connect Modules
The Verilog-AMS language allows you to describe analog and digital components and to connect these components together. A connect module is a module automatically or manually inserted to connect the continuous and discrete disciplines (mixed-nets) of the design hierarchy together. A connect module contains the code required to translate and propagate signals between the analog and digital components. This section contains details about the following aspects of using connect modules.
- Coding connect modules
- Understanding the factors affecting the placement of connect modules
- Understanding the behavior of connect modules
Some additional examples of connect modules can be found at:
your_install_dir/tools/affirma_ams/etc/connect_lib
Coding Connect Modules
Connect modules have the following syntax.
connectmodule_declaration ::=
        connectmodule module_identifier ( port, port ) ;
 [   connectmodule_items ]
     endmodule
port ::=
        port_identifier
connectmodule_items ::=
        { connectmodule_item }
    |   analog_block
connectmodule_item ::=
        connectmodule_item_declaration
    |   defparam_override
    |   analog_primitive_instantiation
    |   digital_continuous_assignment
    |   digital_gate_instantiation
    |   digital_udp_instantiation
    |   digital_specify_block
    |   digital_initial_construct
    |   digital_always_construct
connectmodule_item_declaration ::=
        parameter_declaration
    |   input_declaration
    |   output_declaration
    |   inout_declaration
    |   integer_declaration
    |   net_discipline_declaration
    |   real_declaration
Specifying Port Directions in Connect Modules
The disciplines associated with the two specified ports, and the directions declared in the module, together determine when the connect module can be used to connect the discrete and continuous domains of a mixed net.
For example, the following connect module, d2a, can bridge
- A mixed input port whose upper connection is compatible with the logic discipline and whose lower connection is compatible with the electrical discipline
- A mixed output port whose upper connection is compatible with the electrical discipline and whose lower connection is compatible with the logic discipline.
connectmodule d2a(in,out);
    input in ;
    output out ;
    logic in ;
    electrical out ;
endmodule
The next example, a2d, defines a connect module that can bridge
- A mixed output port whose upper connection is compatible with the logical discipline and whose lower connection is compatible with the electrical discipline
- A mixed input port whose upper connection is compatible with the electrical discipline and whose lower connection is compatible with the logic discipline
connectmodule a2d(out, in) ;
    output out ;
    input in ;
    logic out ;
    electrical in ;
endmodule
The final example, bidir, defines a connect module that can bridge any mixed port where one connection is compatible with the logic discipline and the other connection is compatible with the electrical discipline.
connectmodule bidir(out, in) ;
    inout out ;
    inout in ;
    logic out ;
    electrical in ;
endmodule
The d2a, a2d, and bidir examples illustrate all the direction combinations that are allowed in a connect module. You must not define a connect module that declares both ports as input or both ports as output.
Coding to Meet Connect Module Requirements
Connect modules have two functions:
- Translating between the analog and digital domains
- Using analog information to control the propagation of digital signals
This section presents examples that illustrate how to code connect modules to handle these requirements. For more information, see “Driver-Receiver Segregation”.
Example: Using Analog Data to Control Digital Propagation
In the following connect module, the analog code determines when the ordinary driver outputs propagate to the ordinary receivers. The c2e connect module drives the digital port d (through the register tmp) only when the analog value rises above or falls below a 2.5-volt threshold.
connectmodule c2e(d,a);
inout d;
inout a;
cmos1 d;
electrical a;
reg tmp;
assign d = tmp ; // Bind d to a register.
analog                // Translate from digital to analog.
    V(a) <+ transition( d == 1 ? 5.0 : 0.0, 3n, 3n);
always @( cross ( V(a) - 2.5, +1 ) )
    tmp = 1‘b1;       // Propagate the digital signal when
                      // the analog value rises to 2.5v.
always @( cross ( V(a) - 2.5, -1 ) )
    tmp = 1‘b0;       // Propagate the digital signal when
                      // the analog value falls to 2.5v.
endmodule
Example: Using Driver Access Functions to Control Digital Propagation
The connect module described in this section uses driver access functions to examine the values of individual digital drivers. The module uses assumptions about the analog characteristics of a cmos1 (logic) driver to present to port a an accurate analog equivalent of the digital signal. The module then uses the voltage at port a to determine the logic state that propagates to the receivers of the digital signal.
The module embodies the following assumptions about cmos1 (logic):
-
The equivalent analog circuit of an output is a function of the rail-to-ground supply voltage
supply. -
The equivalent analog circuit when a gate output in
cmos1 (logic)is driven high can be approximated by a resistanceimpedence1between the output and the rail. -
The equivalent analog circuit when a gate output in
cmos1 (logic)is driven low can be approximated by a resistanceimpedence0between the output and ground. - The effect of the impedance between output and rail when the output is driven low, and of the impedance between output and ground when the output is driven high, is negligible.
This connect module effectively adds another parallel resistor from output to ground whenever a digital output connected to the net goes low and adds another parallel resistor from output to rail (supply) whenever a digital output connected to the net goes high.
‘include "disciplines.vams"
‘timescale 1ns/1ps
connectmodule d2a(d,a);
input d;
output a;
logic d;
electrical rail, a, gnd;
reg out;
ground gnd;
branch (rail,a) pull_up;
branch (a,gnd) pull_down;
branch (rail,gnd) power;
parameter real impedence0 = 120.0;
parameter real impedence1 = 100.0;
parameter real impedenceOff = 1e6;
parameter real vt_hi = 3.5;
parameter real vt_lo = 1.5;
parameter real supply = 5.0;
integer i, num_ones, num_zeros;
// net_resolution(d, out);
    assign d=out;  // Cadence method used instead of net_resolution
initial begin
    num_ones=0;
    num_zeros=0;
end
always @(driver_update(d)) begin
    num_ones = 0;
    num_zeros = 0;
    for ( i = 0; i < $driver_count(d); i=i+1 )
     if ( $driver_state(d,i) == 1 )
   num_ones = num_ones + 1;
  else
   num_zeros = num_zeros + 1;
end
always @(cross(V(a) - vt_hi, -1) or cross(V(a) - vt_lo, +1))
    out = 1’bx;
always @(cross(V(a) - vt_hi, +1))
    out = 1’b1;
always @(cross(V(a) - vt_lo, -1))
    out = 1’b0;
analog begin
// Approximately one impedence1 resistor to rail per high output
// connected to the digital net.
    V(pull_up) <+ 1/((1/impedence1)*num_ones+(1/impedenceOff)) * I(pull_up);
// Approximately one impedence0 resistor to ground per low output
// connected to the digital net.
    V(pull_down) <+ 1/((1/impedence0)*num_zeros+(1/impedenceOff)) *I(pull_down);
 V(power) <+ supply;
end
endmodule
If this module is used as the d2a in the following schematic,
- The delay from digital drivers to the digital receiver is a function of the value of the capacitor
-
The delay with two gates driving the signal is approximately half as long as the delay with one gate driving the signal
Using String Parameter in Connect Modules
You can use the string parameter in a connect module to indicate a global supply, as shown in the following example:
connectmodule elect_to_logic(el, cm);
input el;
output cm;
reg cm;
electrical el;
ddiscrete cm;
string parameter vdd = "(not_given)"; // Set via the CR
...
endmodule
You can also use the string parameter in the connect statement to override the string parameter inside connect module, as shown below.
connectrules mixedsignal;
connect elect_to_logic #(.vdd("$root.global_supply.vdd"));
connect logic_to_elect #(.vdd("$root.global_supply.vdd"));
endconnectrules
Using Automatically-Inserted Connect Modules
To make use of an automatically-inserted connect module, you must specify the circumstances in which it is to be used. To do that, use the connect specification discussed in the next section. After that, the simulator automatically inserts the connect module according to the criteria that you specify. For an example of a design that uses automatically inserted connect modules, see “Example: Automatic Insertion of Connect Modules”.
Choosing and Specializing Connect Modules
Use the connect specification to declare which connect modules are to be automatically inserted in mixed ports. There can be multiple connect module declarations with port disciplines and directions that match each discrete/continuous discipline pair. The connect specification specifies which to use.
connect_specification ::=
        connectrules connectrule_identifier ;
        { connect_spec_item }
        endconnectrules
connect_spec_item ::=
        connect_insertion
    |   connect_resolution
connect_insertion ::= connectconnect_module_identifier[connect_mode] [#(attribute_list)] [ [direction]discipline_iden, [direction]discipline_iden] ;
connect_mode ::=
        merged
    |   split
attribute_list ::=
        attribute
    |   attribute_list , attribute
attribute ::= .parameter_identifier(expression)
direction ::=
        input
    |   output
    |   inout
connect_module_identifier is the connect module to be used to connect mixed nets that have the disciplines declared in the connect module. For example, if d2a is defined as
connectmodule d2a(in,out);
    input in ;
    output out ;
    logic in ;
    electrical out ;
endmodule
connect d2a ;
designates the d2a module as the connect module to insert automatically to bridge a mixed input port whose upper connection is compatible with the logic discipline and whose lower connection is compatible with the electrical discipline.
connect_resolution is further defined as follows.
connect_resolution ::=
        connect discipline_list resolveto discipline_identifier ;
discipline_list ::=discipline_identifier| discipline_list,discipline_identifier
You use the connect_resolution statement to specify a single discipline to use during the discipline resolution process when multiple nets with compatible discipline are part of the same mixed net.
connect_mode specifies whether all ports of a common discrete discipline and port direction share a single connect module or have individual connect modules. This attribute is discussed further in “connect_mode Attribute Affects Connect Module Placement”.
attribute_list allows you to override the default parameter values of the connect module. The expressions that specify the overriding values must not be out-of-module references. For example, the following statement specifies values for tt and vcc.
connect d2a_035u #(.tt(3.5n), .vcc(3.3)) ;
direction allows you to override the port directions specified in the connect module. For example, using the connect module d2a, defined above, the statement
connect d2a output logic, input electrical ;
designates the d2a module as the connect module to insert automatically to bridge a mixed input port whose upper connection is compatible with the electrical discipline and whose lower connection is compatible with the logic discipline or a mixed output port whose lower connection is compatible with electrical and whose upper connection is compatible with logic.
You can use the discipline identifiers to specify different discipline combinations for the connect module. For example, the connect module d2a, as it is coded, can only be used to bridge the logic and electrical disciplines. However, you can use it for other discipline pairs by coding something like this.
connect d2a logic, sig_flow_i ;
To use this discipline override form of the connect specification, the discipline you specify for the continuous domain must be compatible with the continuous discipline specified in the connect module. Similarly, the discipline you specify for the discrete domain must be compatible with the discrete discipline specified in the connect module.
Where AMS Designer Searches for Connect Rules and Connect Modules
On the xmelab command line, you can list multiple connectrules blocks, each of which can contain many connect rules. Each connect rule specifies a connect module to be inserted when the connect rule is selected. A connect rule and the connect module it specifies can be in different libraries.
The AMS elaborator uses the following approach to determine which connectrules block and which connect rule to use.
-
The elaborator searches, in order, as many of the
connectrulesblocks listed on the command line as necessary to find a valid connect rule. For example, if the command line isxmelab cRuleBlockA cRuleBlockB
the elaborator looks first at the connect rules incRuleBlockA. If there are no valid connect rules incRuleBlockA, then the elaborator looks at the connect rules incRuleBlockB. - To determine whether a connect rule is valid, the elaborator attempts to locate (as described in the next step) a connect module that matches the name specified by the connect rule and the discipline and direction requirements for the port and net being connected.
-
The elaborator searches the following locations, in order, for a connect module that matches each connect rule in the
connectrulesblock.-
The parent library of the connect module instance.
The elaborator inserts connect modules between a lower port and an upper net. The parent library is the library containing the module in which the upper net is located. -
The library that contains the
connectrulesblock. -
The libraries listed in the
cds.libfile.
If, in any single one of these libraries, the elaborator finds one (and only one) connect module that matches the selected connect rule, the connect rule is valid. After finding a connect module that makes the connect rule valid, the elaborator searches the rest of the current library, but does not go on to other libraries.
If any single one of these libraries contains more than one connect module that matches the selected connect rule, the elaborator issues an error. -
The parent library of the connect module instance.
-
If, in a
connectrulesblock, there are multiple valid connect rules, the elaborator selects the last such valid connect rule listed. If there are no valid connect rules, the elaborator looks in the nextconnectrulesblock listed on thexmelabcommand.
Example: Automatic Insertion of Connect Modules
This example describes a ring of digital and analog inverters. To bridge between the discrete and continuous domains, the design uses two connect modules: elec_to_logic and logic_to_elect. The simulator automatically inserts the elec_to_logic connect module between the out port of instance a3 and net n1, which is bound to the in port of instance d1. The simulator automatically inserts the logic_to_elect connect module between the out port of instance d2 and net n3, which is bound to the in port of instance a3.
module ring;
    dig_inv d1 (n1, n2);
    dig_inv d2 (n2, n3);
    analog_inv a3 (n3, n1);
endmodule
module dig_inv(in, out);
    input in;
    output out;
    logic in, out
 always begin
     out = #10 ~in;
 end
endmodule
module analog_inv(in, out);
    input in;
    output out;
    electrical in, out;
    parameter real vth =2.5;
 analog begin
     if (V(in) > vth)) outval = 0;
 else
     outval = 5 ;
 V(out) <+ transition(outval);
 end
endmodule
connectmodule elect_to_logic(el,cm);
    input el;
    output cm;
    reg cm;
    electrical el;
    logic cm;
 always
     @(cross(V(el) - 2.5, 1) cm = 1;
 always
     @(cross(V(el) - 2.5, -1) cm = 0;
endmodule
connectmodule logic_to_elect(cm,el);
    input cm;
    output el;
    logic cm;
    electrical el;
    analog
        V(el) <+ transition((cm == 1) ? 5.0 : 0.0);
endmodule
connectrules crules ;
    connect elect_to_logic; // Specifies which appropriate connect module to use.
    connect logic_to_elect;
endconnectrules
Names for Automatically Inserted Connect Module Instances
Parameters of automatically inserted connection instances can be individually set by using the defparam statement. To facilitate this, the instance names for the automatically inserted modules are entirely predictable.
To determine the name of a connect module instance when the connect_mode attribute value is merged
- Identify the discipline, DisciplineName, at the bottom connection.
- Identify the common signal, Net.
- Identify the connect module, ModuleName.
The instance name of the connect module is
Net__ModuleName__DisciplineName
where the name sections are joined by double underscores.
To determine an instance name when the connect_mode attribute value is split
- Identify the discipline of the common net, Net, at the top connection.
- Identify the local instance name (non-hierarchical name) at the bottom connection, InstName.
- Identify the port name at the bottom connection, PortName.
The instance name of the connect module is,
Net__InstName__PortName
where the name sections are joined by double underscores.
Understanding the Factors Affecting Connect Module Placement
By definition, connect modules are inserted between analog nets and digital nets. There are several factors, however, that affect where the boundary between analog and digital nets is drawn. These factors include
-
The value of the
connect_modeattributes ofconnectstatements - The disciplines used to explicitly declare nets
- The result of discipline resolution, which assigns disciplines and domains to nets whose disciplines and domains are otherwise unknown
- The use of aliased ports, which can result in the insertion of connect modules.
connect_mode Attribute Affects Connect Module Placement
The connect_mode attribute of the connect statement controls the segmentation of the signal at each level of the hierarchy when a connect module is inserted. This attribute applies only when there is more than one port of discrete discipline on a signal for which the connect statement applies. The attribute has two possible values: split and merged. The split value indicates that there should be one connect module inserted per port. The merged value, which is the default, specifies that there is to be only one connect module inserted for all the ports on a signal that match a given connect statement.
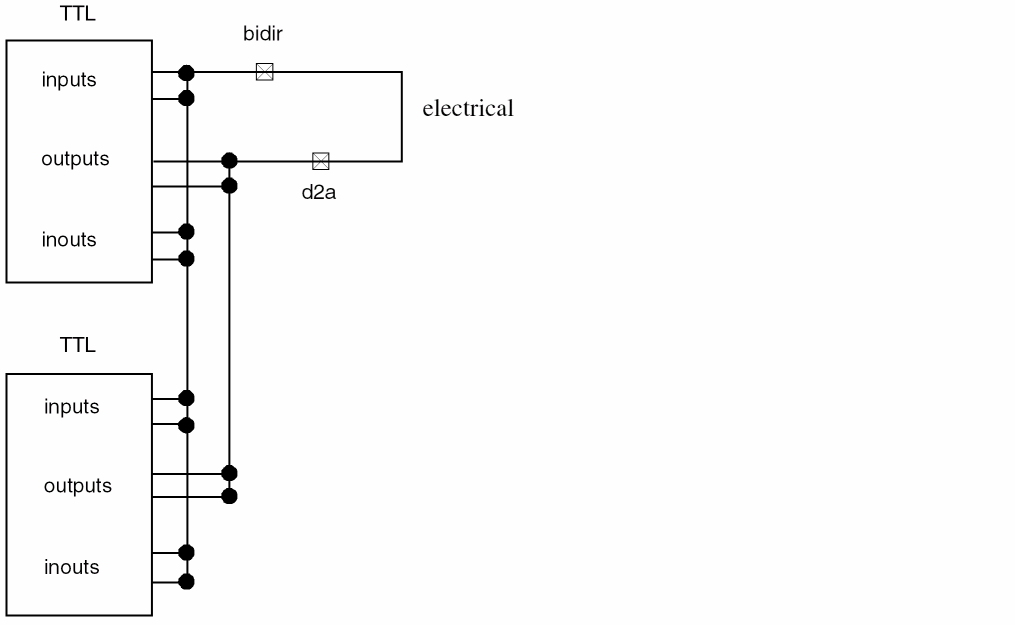
connect_mode Merged
The merged value for the connect_mode attribute instructs the elaborator to group all ports (whether input, output, or inout) and to insert just one connect module for all of them, provided that the needed connect module is the same for all the ports.
The following figure illustrates the effect of the merged value in three connect statements.
connectrules example ;
    connect d2a merged input ttl, output electrical ;
    connect bidir merged output electrical, input ttl ;
    connect bidir merged inout ttl, inout electrical ;
endconnectrules
Notice how connecting the electrical signal to the TTL input and inout ports results in the insertion of a single connect module, bidir. Connecting the electrical signal to the TTL output ports results in the insertion of a single, but different, module, d2a.
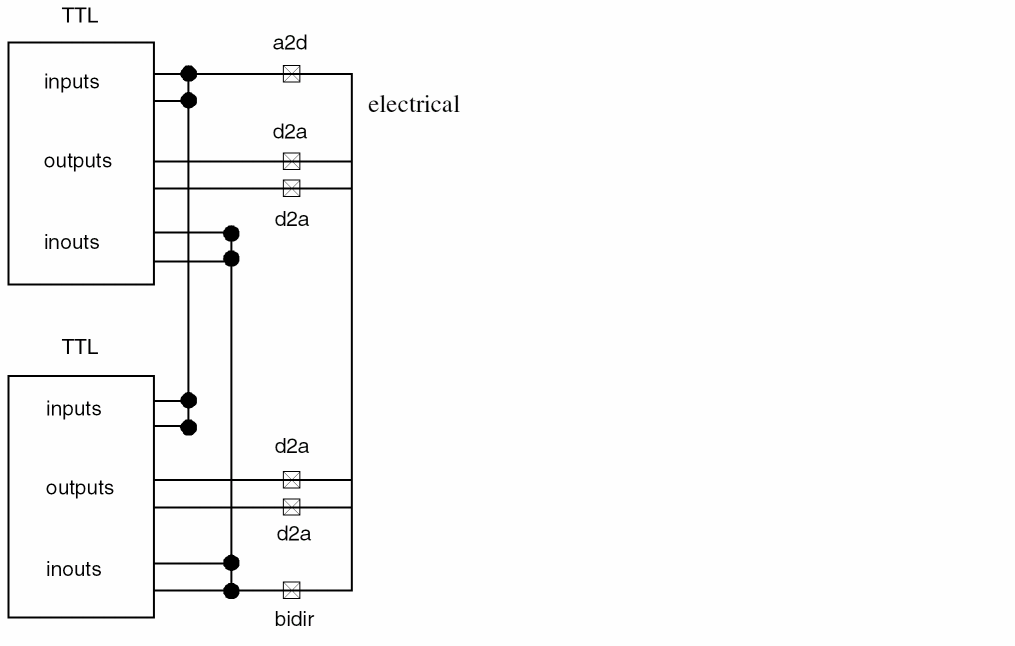
connect_mode Split
The split value for the connect_mode attribute instructs the simulator to insert a connect module for each port. The following figure illustrates the effect of the split value in three connect statements.
connectrules example ;
    connect d2a split input ttl, output electrical ;
    connect a2d merged output electrical, input ttl ;
    connect bidir merged inout ttl, inout electrical ;
endconnectrules
With this specification, connecting the electrical signal to the TTL input ports results in the insertion of a single instance of the a2d connect module, as specified by the merged value. Similarly, a single instance of the bidir connect module is inserted for the inout ports. However, the split value used for the d2a connect statement results in the insertion of a distinct instance of the connect module for each output port.
Disciplines Used to Declare Nets Affect Connect Module Placement
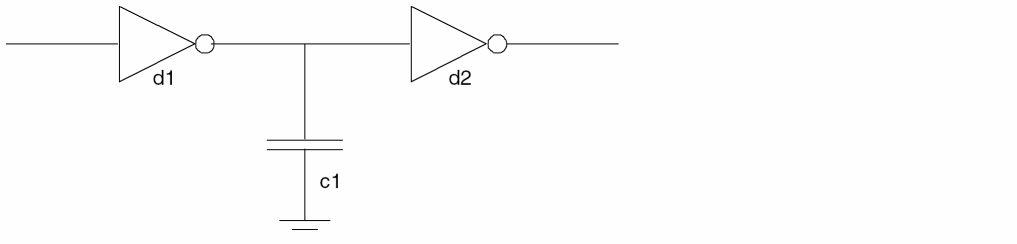
Connect modules are inserted at the boundary between the analog and digital domains. It follows that changing the location of the boundary can affect where connect modules are placed. For example, if the wires in the following schematic are digital, a single connect module is inserted between the analog capacitor and the digital inverters.
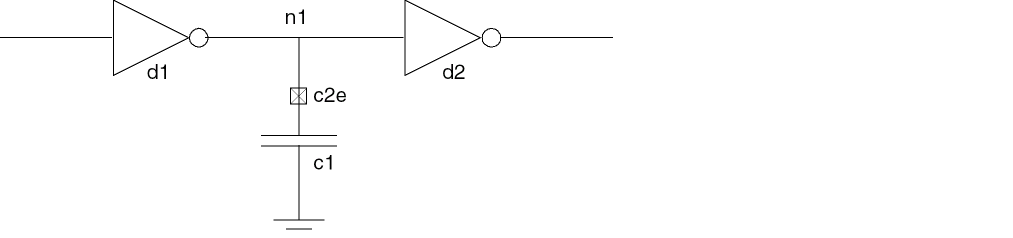
However, if net n1 is analog, two connect modules are inserted.
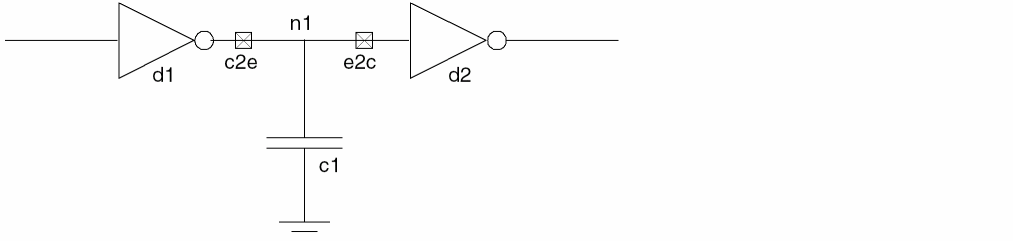
In this case, the c2e module translates the digital output of inverter d1 into analog voltage for n1, and the e2c module translates analog voltage back into a digital signal for inverter d2. The analog capacitor connects directly to analog net n1.
Discipline Resolution Affects Connect Module Placement
Another factor that affects the location of the boundary between the analog and digital domains and, therefore, where connect modules are inserted, is discipline resolution. Discipline resolution is the process of assigning a domain and discipline to nets whose domain and discipline are otherwise unknown (or whose discipline is wire).
The factors that affect discipline resolution are listed in the following table.
Using Discipline Resolution Connect Statements
Use the discipline resolution connect statement to specify a single discipline to resolve to when multiple nets with compatible disciplines are part of the same mixed net.
connect_resolution ::=
        connect discipline_list resolveto discipline_to_use;
discipline_list ::=discipline_identifier| discipline_list,discipline_identifier
discipline_to_use is the single discipline to be used for the net.
discipline_list is the list of compatible disciplines that are to resolve to a single discipline.
connect electrical, electrical_hi_cur, electrical_low_power resolveto electrical
Discipline Resolution Methods
Verilog-AMS provides two methods of discipline resolution: default and detailed. The two methods assign domains and disciplines to unknown signal segments in different ways, resulting in different boundaries between the analog and digital domains. If you do not want to use the default method, you can specify the detailed method using the -disres detailed elaborator option.
The default and detailed methods have different effects, as follows:
Discipline resolution applies to the following kinds of nets: wire, tri, wor, trireg, wand, tri0, tri1, supply0, supply1, wreal, and nets of unknown disciplines. If a net resolves to the analog domain, the software ignores any digital property the net has. If a net resolves to the digital domain, the software considers any digital property that it has during further processing.
The methods use the following steps to assign domains and disciplines:
- Traverse each signal hierarchically, starting at the bottom, until a net is found that has no assigned discipline.
-
Examine the connections of the segment and assign a domain to the segment.
- For the default method, examine the connections of the segment to only the upper parts of ports. If all such connections are digital, assign the segment to the digital domain. If any such connection is analog, assign the segment to the analog domain.
- For the detailed method, examine the connections of the segment to both the upper and the lower parts of ports. If all such connections are digital, assign the segment to the digital domain. If any such connection is analog, assign the segment to the analog domain.
-
Apply
‘default_disciplinedirectives, as appropriate, to nets with digital domains. -
For each net that has not yet been assigned a discipline, examine the ports to which the segment is connected.
- For the default method, examine all ports to which the segment forms the upper connection. Create a list of all the disciplines at the lower connections of these ports whose domains match the domain of the net.
- For the detailed method, examine all ports to which the segment forms the upper or lower connection. Create a list of all the disciplines at the other connections of these ports whose domains match the domain of the net.
-
Use the list created in the previous step to determine the discipline of the net.
- If there is only a single discipline in the list, assign that discipline to the net.
-
If there is more than one discipline in the list, and the contents of the list match the discipline list of a resolution connect statement (the
connect…usingsyntax), assign to the net the resolved discipline given by the statement. - If there is more than one discipline in the list but the contents of the list do not match the discipline list of a resolution connect statement, the discipline of the net remains unknown.
- (detailed method only.) Traverse each signal hierarchically, starting at the top. When a net is found that has no assigned discipline, repeat step 2 through step 5.
Discipline Resolution in Buses
The individual nets in a bus with an unknown domain are assigned domains according to the following rules.
- If any net in a bus with an unknown domain is used in a behavioral statement, every net in the bus is assigned to the digital domain.
- If any net in a bus with an unknown domain is connected to an analog primitive, every net in the bus is assigned to the analog domain.
-
The nets in buses that are used only to establish connectivity can, according to how they are connected, all be assigned to the analog domain, all be assigned to the digital domain, or some nets can be assigned to the analog domain and some to the digital domain. This latter kind of bus is known as a mixed bus.
In a mixed bus, the domains of each net are individually determined by the connections of that particular net, using the discipline resolution methods described in “Discipline Resolution Methods”.
Understanding How Connect Modules Operate
The previous sections discuss the factors that affect where the software inserts connect modules in a design. The following sections discuss the behavior of connect modules after the software inserts them. The issues include
Driver-Receiver Segregation
In a purely digital net, drivers generate signals that propagate directly to receivers. In a mixed net, analog components can affect the propagation of the digital signals. To allow for this possibility, the AMS Designer simulator uses a technique called driver-receiver segregation. With driver-receiver segregation, which occurs with every mixed net, digital signals propagate only through connect modules inserted between the drivers and receivers.
Digital nets connected to the ports of manually-inserted connect modules behave as mixed nets and are subject to driver-receiver segregation.
Conceptual Overview of Driver-Receiver Segregation
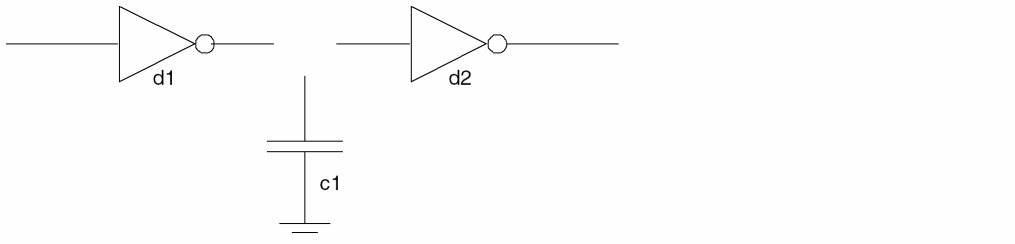
Consider the following purely digital circuit containing two inverters.

The driver, d1, contributes a value directly to the receiver, d2.
Adding an analog capacitor to the circuit, turns the net between d1 and d2 into a mixed net:
Because the net is mixed, it is subject to driver-receiver segregation, which severs the direct connection between d1 and d2. After driver-receiver segregation, the circuit looks like this:
A connect module, c2e, reestablishes the link between the digital components and translates between the analog and digital domains. Conceptually, the circuit has the following schematic with the connect module added:

The connect module, c2e, has both a digital input side and a digital output side, even when c2e is coded with only a single digital port. The c2e module must have two sides because part of its function is reading values from d1 and propagating them to d2. This is an important point. To ensure that digital values propagate through a connect module, the connect module code must be written to handle the task. Otherwise, the drivers have no effect on the receivers.
In a connect module, as in regular modules, all digital ports behave like inout ports, whether they are coded as inout, input, or output ports. For example, in the following code for the connect module c2e, the single digital port is both read and driven, in spite of the fact that the port is defined as input.
module c2e(d,a);

input d;        // Define a digital port as input.
output a;
cmos1 d;
electrical a;
assign d = d ; // Both read and drive the digital port.
analog          // Perform digital to analog translation.
     V(a) <+ transition( d == 1 ? 5.0 : 0.0 );
endmodule
To summarize the basic concepts in driver-receiver segregation:
- Every mixed net is subject to driver-receiver segregation.
- Drivers segregated from receivers by a connect module can drive signals to receivers only if the connect module propagates the signals.
- Digital ports in connect modules can be both read and driven, regardless of the way they are defined.
Digital Islands Limit the Range of Connect Modules
An important aspect of driver-receiver segregation has to do with the concept of digital islands. A digital island is the set of drivers and receivers interconnected by a purely digital net. Digital islands end at any connection to a mixed or analog net. For example, the following schematic contains three digital islands, each identified with dashed lines.

In this schematic, e2c1, c2e1, and c2e2 are connect modules, each connecting a digital island to the analog wire, W1.
A connect module receives digital signals only from within the digital island isolated by the connect module and drives only the receivers located in the digital island. For example, referring to the above schematic, the digital port on the c2e1 module receives signals only from d1 and d3, which are the drivers in the digital island connected to the module. The c2e1 module does not receive signals from d4 and d5, which are located in a different digital island. Similarly, c2e1 propagates digital values only to the receiver d2. The c2e1 module does not propagate digital values to d6, which is in a different digital island.
Multiple Connect Modules Act Independently
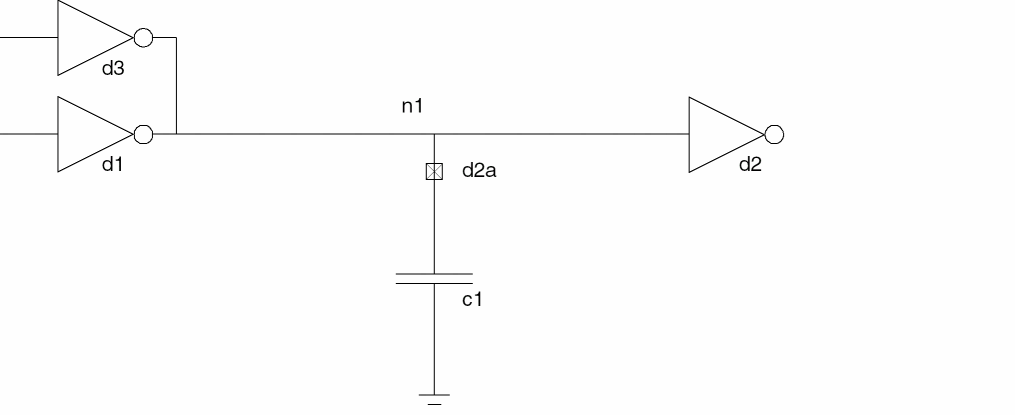
In a purely digital circuit with multiple drivers, the digital value acted on by the receiver is resolved from all of the digital values written by drivers. In the following schematic, for example, the Verilog-AMS simulator resolves the values written by d3 and d1 and propagates the result to d2.

When connect modules act as drivers and receivers, however, there is another consideration: each connect module behaves as though it is the only connect module involved. For example, add an analog source and an analog capacitor to the previous schematic so that it looks like this.
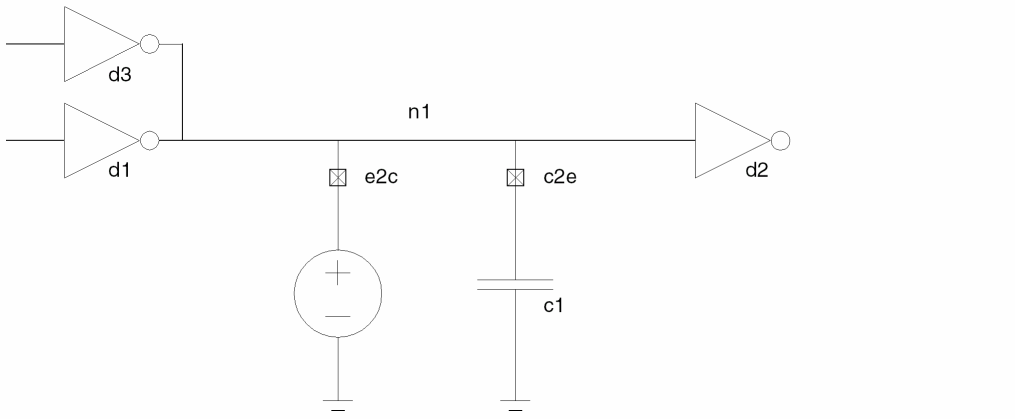
The e2c connect module behaves as though the c2e connect module does not exist, so the only drivers that affect e2c are the ordinary drivers d3 and d1. Similarly, c2e is affected only by drivers d3 and d1, not by any digital value that e2c might contribute.
The connect modules e2c and c2e both write to their digital ports as they propagate digital values from the ordinary drivers to the ordinary receivers. Again, each connect module operates independently of the other, so each one sends a digital signal. The simulator resolves the two signals and sends the resolved signal to d2.
The independence of connect modules is also apparent when you use the driver access functions. For example, applying the driver_count function to the digital port of e2c returns the value 2, indicating that there are two drivers associated with that signal. Similarly, applying driver_count to the digital port of c2e returns the value 2, indicating that there are two drivers associated with the signal. Neither count includes the other connect module because each connect module behaves as though the other does not exist.
Return to top