1
About the VHDL Integration Environment
VHDL Toolbox is an integrated netlisting and simulation environment that you can use to generate structural VHDL (IEEE93/87) text netlists from hierarchical schematics and run simulations in the Cadence NC environment.
This user guide is aimed at developers and designers of integrated circuits and assumes that you are familiar with:
- The Virtuoso Studio design environment and application infrastructure mechanisms designed to support consistent operations between all Cadence® tools.
- The applications used to design and develop integrated circuits in the Virtuoso Studio design environment, notably, the Virtuoso Layout Suite, and Virtuoso Schematic Editor.
This topic explains VHDL-related concepts and procedures and the conditions that you need to know when netlisting and simulating your VHDL design. It also describes the VHDL Toolbox and explains how to run VHDL netlister in standalone mode using Cadence Simulation Environment (SI) of Open Simulation System (OSS).
In this chapter, you will learn about the following topics:
- Licensing Requirements
- Schematic Design Process Flow
- VHDL Integration Environment Tools
- Managing the Run Directory
- How Data is Organized
- Netlist and Simulate a VHDL Design
Licensing Requirements
For information about licensing in the Virtuoso Studio design environment, see Virtuoso Software Licensing and Configuration Guide.
Schematic Design Process Flow
In a schematic design, you work at the gate level or the Register Transfer Level (RTL). You build the design hierarchy with schematics and VHDL models at the leaf level. The design is simulated and debugged using the VHDL simulator to make it ready for use by a physical layout tool.
As a designer, you need to ensure that the schematic design is up to date and the connectivity is extracted by using the Virtuoso Schematic Editor window. In addition, you need to ensure that the VHDL text files are already in the DFII5.x structure with a valid database reference. For information about organization of data, refer to How Data is Organized.
The flowchart given below provides an overview of the schematic design process flow.

Updating a Design
You use the Virtuoso Schematic Editor to edit your data. The VHDL netlister supports automatic data type propagation from the leaf level VHDL to top level schematic ports, so you do not need to add any VHDL-specific properties to the schematic in the VHDL netlister. However, you can specify VHDL data types for pins and nets, VHDL generics, and netlist options for blackbox devices, which are devices that have no VHDL textviews in DFII.
If you want to be prompted for a pin data type during the creation and editing of a pin, change the pin master map to point to the pins in the VHDL_PINS category in the basic library and set the Options – Editor command option Add Symbol Pins As Instances to yes. In addition, you can run the source rule checker using Check – Current Cellview to verify that the design is legal VHDL. The checks are grouped together under the VHDL check on the Check – Rules Setup command form. You can browse any errors or warnings that generate markers in the schematic using the Check – Markers commands.
If you have an existing schematic design, you can add data types to the schematic using the Edit – Properties – Objects command. The Edit – Properties – VHDL command defines the set of properties that are included in the VHDL design unit. Specify which properties of the cellview or the cellview’s CDF should be included. You can reference any existing properties without entering a duplicate set of properties for VHDL netlisting and simulation. You can set the netlister options using the Edit – Properties – VHDL command. Use the VHDL package check to ensure that legal VHDL can be generated from the schematic. Fix any errors in naming before proceeding further.
For more information on VHDL netlister properties, refer to Appendix 8, “VHDL Netlister Properties.”
cdsTextTo5x command. This command also lets you generate the symbol views of the imported cellviews. For details, see Importing Design Data by Using cdsTextTo5x. You can also use this command to create text cellviews (5x structure), symbol views, and shadow database for SPICE, Spectre, DSPF, and PSpice.Netlisting the Design
To netlist a design, you need to specify the design as library name, cell name, and view name. The netlister traverses the design hierarchy and converts all the schematics into VHDL design units. The traversal is defined by a switch list, a stop view list, and a stop library list as you specified in the Setup – Netlist command in VHDL Toolbox. After netlisting, you have the option to convert the hierarchy specification into a VHDL configuration by using the VHDL netlister.
For each schematic in the hierarchy, the netlister generates a VHDL architecture. The netlister also creates a VHDL entity, once per cell. You can customize the code generation by setting default values in the Setup – Netlist command in the VHDL Toolbox. You can override these values on a per-cellview basis or a per-object basis in Virtuoso Schematic Editor L.
Specifying a Testbench
You can specify an existing testbench or create a new using the VHDL Toolbox. To create a testbench for the top-level schematic by using the VHDL Toolbox window, choose Command – Edit Test Bench. This command creates an entity and an architecture. The entity has no ports and the architecture instantiates the top-level schematic. The VHDL Toolbox automatically displays the testbench architecture in a text editor window, which is used to enter the stimulus data.
Simulating the Design
Now you are ready to simulate the design using the Simulate command in the VHDL Toolbox. The Simulate command invokes the VHDL elaborator to create a simulation model. When elaboration completes successfully, the VHDL simulator is run in batch or interactive mode based on options you specify in the Setup Simulate command.
In the simulation and debug loop, edit the source and simulate until you obtain correct results. The steps to complete the loop are
- Access source data using the Library Manager or Browser.
- Edit the schematics using Virtuoso Schematic Editor L.
- Use the Simulate command to update any modified cellviews by netlisting and analysis. If successful, it also elaborates the design and invokes the simulator.
You use the SimCompare window to compare two simulation results.
VHDL Integration Environment Tools
The VHDL integration environment consists of the following:
VHDL Toolbox Window
The VHDL Toolbox window, shown below, appears when you access the VHDL integration environment. This window provides access to simulation commands, command forms, and support tools.
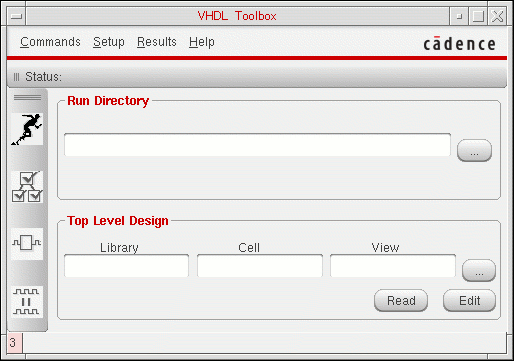
The various parts of the VHDL Toolbox window are described in detail in Chapter 2, “Introducing the VHDL Toolbox.”
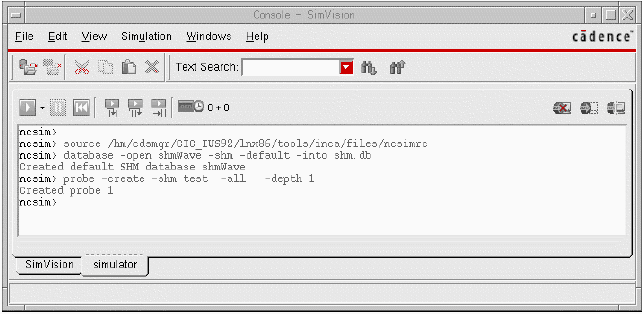
Simulation Window
The Simulation window, which you launch from the main VHDL Toolbox window, is used to interactively simulate and debug the design. You use the Simulation window to directly interact with the simulator. You can open a database, trace signals, set breakpoints, observe signals, and perform many other functions to verify your design.
The Simulation window opens when you perform an interactive simulation. In an interactive simulation, you can select in the VHDL Toolbox window the options to compile, elaborate, and simulate the design. The Console - SimVision and Design Browser SimVision windows are displayed after the design has been successfully compiled and elaborated.
Console - SimVision
Design Browser - SimVision
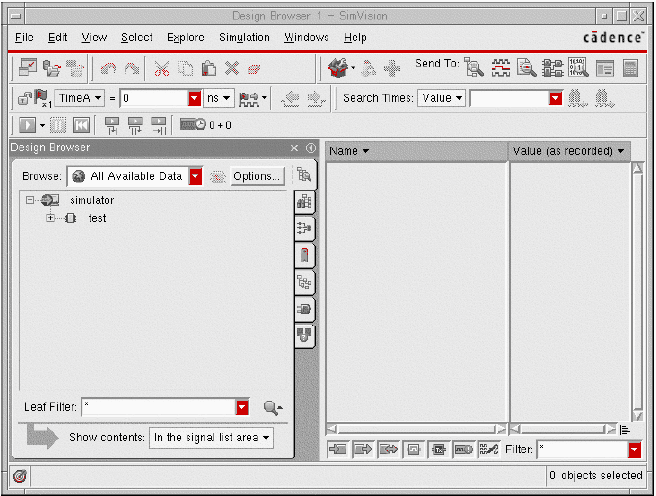
The Simulation window is part of the Cadence® SimVision Analysis environment, which is a unified graphical debugging environment for Cadence simulators.
SimCompare Tool
The SimCompare tool is used by VHDL Toolbox in the background to compare the results obtained from different simulations. It is run when you select the Simulation Compare option from the fixed menu. SimCompare provides a description of any differences that are found.
The VHDL Toolbox uses this tool to compare simulation results. The tool runs in the background. To run the SimCompare tool, select the Compare Simulation option from the fixed menu. You can also run the SimCompare tool by choosing Commands – Compare Simulation.
SimCompare can compare simulation results stored in SST2 or VCD format. For more information about using the SimCompare tool, refer to SimCompare User Guide.
If SimCompare is not available, VHDL uses the Comparescan tool for comparing simulation results. For more information about using the Comparescan tool, refer to Comparescan User Guide.
Managing the Run Directory
You store in the run directory the files that you require to run a simulation, such as the testbench files. Files created during a simulation run, such as the simulation result files, are also stored in the run directory. The following figure shows the structure of a run directory.
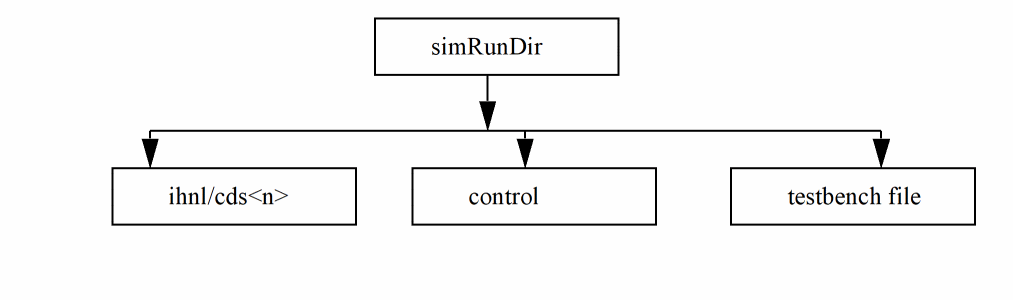
For detailed information about testbench files, refer to Chapter 4, “Creating a Testbench.”
How Data is Organized
You use the Library Manager and Team Design Manager (TDM) to manage your designs. The Library Manager and TDM support browsing, file-locking, and archiving the schematics. You specify the paths to your libraries in the cds.lib file.
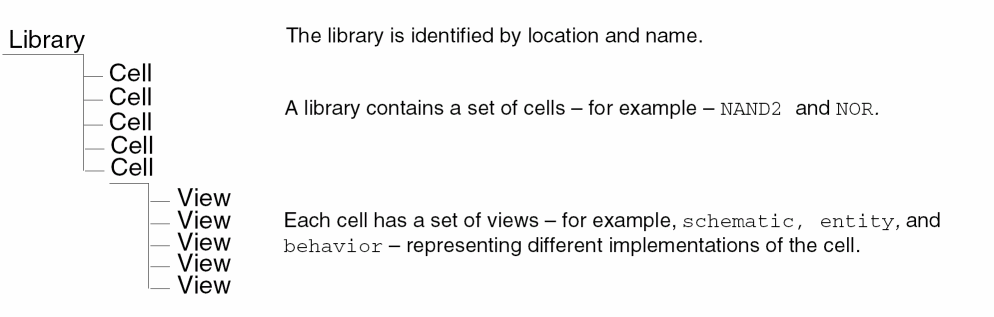
VHDL design units are stored in Cadence design libraries as views of a cell. Refer to the New Cadence Library Structure section in Chapter 1, Compatibility Guide for details.
Design Library Storage
Cadence design libraries are organized in three levels shown below.
VHDL Design Units
VHDL defines three primary and two secondary design unit classes.
- Entity declaration (primary unit)
- Architecture body (secondary unit, related to an entity)
- Configuration declaration (primary unit)
- Package declaration (primary unit)
- Package body (secondary unit, related to a package)
The following diagram shows a typical organization for a design library containing a mixture of schematic and VHDL source data. These five sample design units are described in this section.
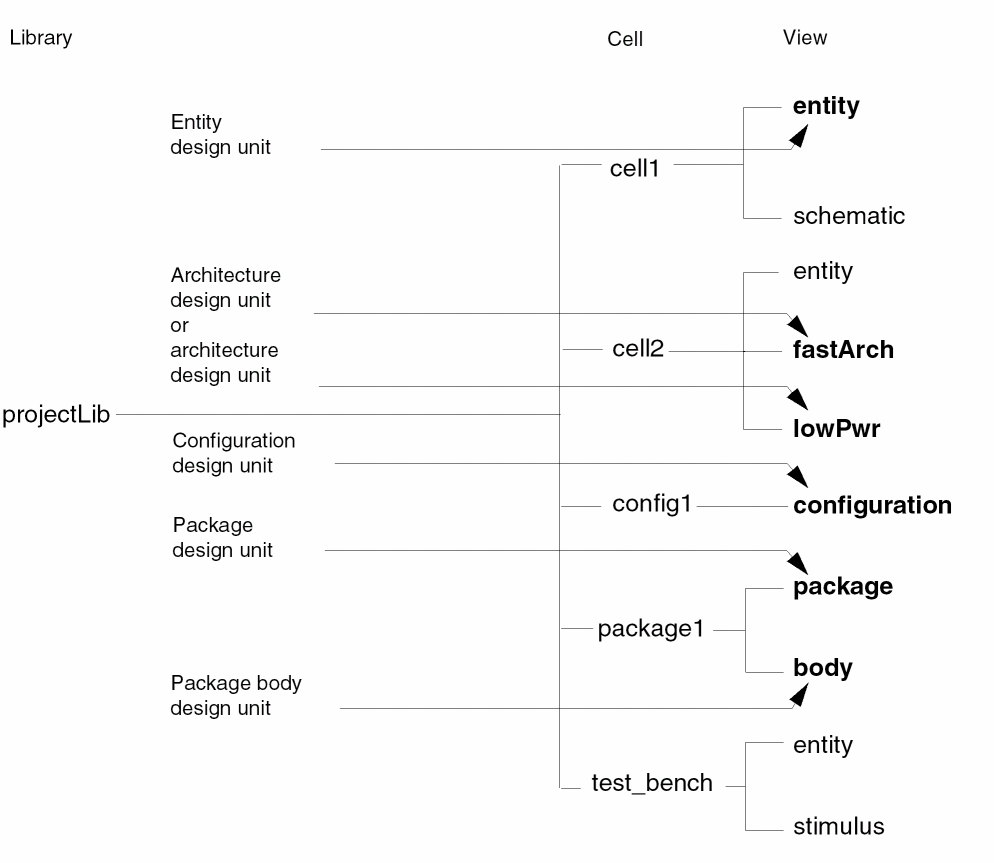
The five VHDL design units are maintained in a design library, in this case, projectLib.
-
Entity design units are stored as the
entityview name under the cell name that matches the entity name. In the previous example, the entity forcell1is maintained asprojectLib cell1 entity. -
Architecture design units are stored with the view name matching the architecture name and the cell name matching the entity name. In the example,
fastArchofcell2is shown. -
Configuration design units are maintained as the configuration view name under the cell matching the name of the configuration. In the example, configuration
config1is stored asprojectLib config1 configuration. -
Package design units are maintained as
packageview name for the declaration. They are stored under the cell name, which matches the package name. For example,package1has a declaration and a body. The body is optional. -
Package body design units are maintained as
bodyview name for the body. They are stored under the cell name, which matches the package name. For example,package1has a declaration and a body. The body is optional.
stimulus is the name of the view for testbenches.Design Views
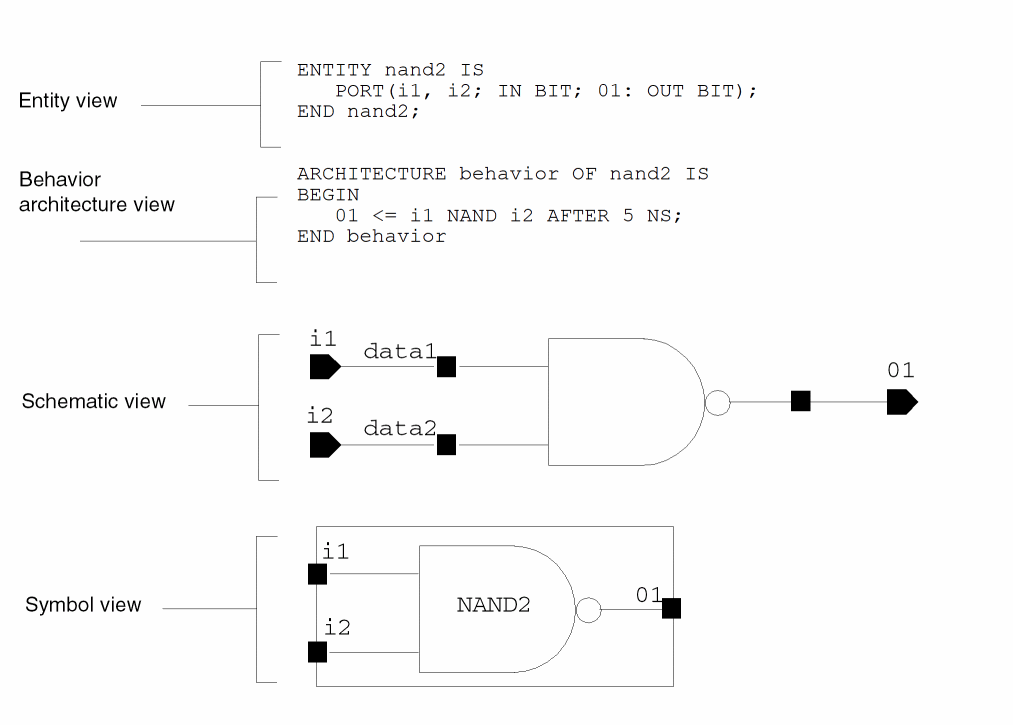
The following example shows textual and symbolic views of a nand2 gate.
VHDL Name Mapping
Cadence developed a consistent strategy for dealing with naming problems between tools. The strategy is called name mapping. Each Cadence tool interprets names according to a consistent set of rules. Data is interoperable across many tools and data formats. Also, data is interoperable between UNIX and NT operating systems.
You can avoid name mapping issues by following some rules, such as always choosing names that use only lowercase letters and digits.
For details on VHDL name mapping, see “
For details on name mapping in general, see Cadence Application Infrastructure User Guide.
VHDL Text View Database
You can create the database for the VHDL text views in the following ways:
-
By calling the
vmsUpdateCellViewsfunction. For more details of this function, see Appendix D, SKILL Functions and Customization Variables in Spectre AMS Designer Environment User Guide. -
Open the VHDL entity in a text editor, save and close it. An
.oadatabase will be automatically created.
When the database is created, by default, the names of identifiers are converted to lowercase. To preserve the case of identifiers in VHDL text views:
-
Set the
vhdlKeepCaseAsNCastin the .cdsinit file. For more details, see Appendix D, SKILL Functions and Customization Variables in Spectre AMS Designer Environment User Guide. -
Add the following declaration in the hdl.var file:
'define xmvhdlopts -keepcase4use5x'
If you have set the vhdlKeepCaseAsNC as t, it is also recommended to set the hnlVHDLDonotUseCdsNmp variable as t in the .simrc file before netlisting.
Netlist and Simulate a VHDL Design
In the Virtuoso Studio design environment, you can netlist and simulate a VHDL design using:
Using the Command-Line Interface
From the command-line interface, you can generate a netlist and simulate the VHDL design by using the xrun utility in the batch or interactive mode.
Generating a Netlist
To generate a netlist and to set up your VHDL design for simulation as a batch:
-
Create the
si.envfile in the run directory and add VHDL hierarchical netlister (HNL) variables to the file. For information about VHDL HNL variables that the VHDL netlister uses while netlisting a design, refer to the Setting VHDL HNL Variables section in Appendix B. You can also set these variables in the.simrcfile.For more information about these variables, see “SE Variables” section in Chapter 3, Customizing the Simulation Environment (SW) of Open Simulation System Reference. -
Run the following
sicommand, which represents the OSS binary file, to generate a netlist:
si -batch -command netlist -cdslib cds.lib
The command-line options used with thesicommand are:-
-batch: Refers to the batch simulation mode -
-command: Specifies the command to generate a netlist -
-loadLocal: Loads thesi.localfile from the simulation run directory -
-cdslib: Specifies thecds.liblibrary, which defines the design libraries and the path to these libraries. You are required to specify the complete path of thecds.liblibrary while running this command.
-
Simulating a Netlisted VHDL Design
To simulate a netlisted VHDL design as a batch process:
-
Add the VHDL xrun variables in the
si.envor.simrcfile. For information about the SKILL variables that are used for the xrun utility, refer to the Setting xrun Variables section in Appendix B.
If you already have these variables set in the.vhdlrcfile in the run directory, you do not need to add these variables to thesi.envor .simrcfiles. The settings from.vhdlrcare used.
.simrc file are set in the VHDL Toolbox as default values. After you save the values, only the saved settings are used. -
In the
.simrcfile, add the following information:vhdlSimSimulator=”xrun”
-
Run the following
sicommand to generate a netlist:
si -batch -command netlist -cdslib cds.lib -
After the design is successfully netlisted, run the following
sicommand to simulate the design by using the xrun utility:
si <simRunDirName> -batch -command vosLaunchIrunSimulation
The command-line options used with this command are:
Alternatively, to netlist and simulate the design together, set the vhdlSimNetlistandSimulate variable. If this variable is set, you do not need to run step 4, given above.
Using the Graphical User Interface
From the graphical user interface (GUI), you can generate a netlist and simulate the VHDL design by using the VHDL Toolbox, which is described in detail in the following chapters.
Return to top