Attribute Tab of Various Objects
Different objects support different attributes. The following table lists the Edit Properties forms in which you can modify the attributes of various objects.
For information about tabs in the property editor, see Edit Properties Form.
Attributes in the Edit Area Boundary Properties Form
The following table describes the fields available on the Attributes tab of the Edit Area Boundary Properties form.
| Field | Description |
|---|---|
|
Displays the coordinates of the box surrounding the area boundary. |
|
Attributes in the Edit Blockage Properties Form
The following table describes the fields available on the Attributes tab of the Edit Blockage Properties form.
Attributes in the Edit Cluster Boundary Properties Form
The following table describes the fields available on the Attributes tab of the Edit Cluster Boundary Properties form.
Curvy Shapes Attributes
(Virtuoso Photonics Option) The following table describes the fields available for curvy shapes on the Attributes tab of the Edit Properties form.
Attributes in the Edit Donut Properties Form
The following table describes the fields available on the Attributes tab of the Edit Donut Properties form.
| Field | Description |
|---|---|
|
Enables you to search for a layer-purpose pair and narrow down the available choices in the Layer list. |
|
|
Sets the inner and outer radius of the donut. 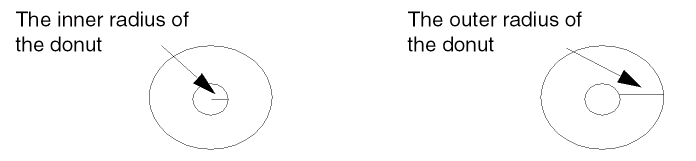 |
Attributes in the Edit Donut Pin Properties Form
The following table describes the fields available on the Attributes tab of the Edit Donut Pin Properties form.
| Field | Description |
|---|---|
|
Enables you to search for a layer-purpose pair and narrow down the available choices in the Layer list. |
|
|
Sets the inner and outer radius of the donut.  |
|
|
Displays the placement status of the instance in a cyclic field. The choices are Unplaced, None, Placed, Fixed, and Locked/Cover. If the placement status is Unplaced, the instance will not be visible. See |
|
|
Displays the routing method of the pin in a cyclic field. The choices are symbolic and geometric. When Update Net Signal Type is enabled, terminals with nets that have a Signal Type of Power or Ground in the schematic are automatically given a Route Method of Geometric when either the Generate All From Source or Update Components and Nets commands are run. |
Attributes in the Edit Dot Pin Properties Form
The following table describes the fields available on the Attributes tab of the Edit Dot Pin Properties form:
| Field | Description |
|---|---|
|
Enables you to search for a layer-purpose pair and narrow down the available choices in the Layer list. |
|
|
Displays the placement status of the instance in a cyclic field. The choices are Unplaced, None, Placed, Fixed, and Locked/Cover. If the placement status is Unplaced, the instance will not be visible. See |
|
|
Displays the routing method of the pin in a cyclic field. The choices are symbolic and geometric. When Update Net Signal Type is enabled, terminals with nets that have a Signal Type of Power or Ground in the schematic are automatically given a Route Method of Geometric when either the Generate All From Source or Update Components and Nets commands are run. |
|
Attributes in the Edit Ellipse Properties Form
The following table describes the fields available in the Attributes tab of the Edit Ellipse Properties form.
| Field | Description |
|---|---|
|
Enables you to search for a layer-purpose pair and narrow down the available choices in the Layer list. |
|
|
Sets the coordinates of the box that defines the ellipse or circle. |
Attributes in the Edit Ellipse Pin Properties Form
The following table describes the fields available in the Attributes tab of the Edit Ellipse Pin Properties form.
| Field | Description |
|---|---|
|
Enables you to search for a layer-purpose pair and narrow down the available choices in the Layer list. |
|
|
Sets the coordinates of the box that defines the ellipse or circle. |
|
|
Displays the placement status of the pin in a cyclic field. The choices are Unplaced, None, Placed, Fixed, and Locked/Cover. If the placement status is Unplaced, the instance will not be visible. See |
|
|
Displays the routing method of the pin in a cyclic field. The choices are symbolic and geometric. When Update Net Signal Type is enabled, terminals with nets that have a Signal Type of Power or Ground in the schematic are automatically given a Route Method of Geometric when either the Generate All From Source or Update Components and Nets commands are run. |
Attributes in the Edit Group Properties Form
The following table describes the fields available on the Attributes tab of the Edit Group Properties form.
| Field | Description |
|---|---|
|
Sets whether the group is rotated or mirrored. See |
|
|
Displays the appropriate Edit Properties form for the types of objects contained in the group. For example, if the first object in the group is a rectangle, the Edit Rectangle Properties form appears. To continue through the objects in the group, use the Next and Previous buttons on the form. You can edit the properties of each member of the group using these Edit Properties forms. This chapter describes all of the Edit Properties forms that might appear as a result of the query. |
Attributes in the Edit Group Array Properties Form
The following table describes the fields available on the Attributes tab of the Edit Group Array Properties form.
| Field | Description |
|---|---|
|
Sets a specific point in a group array as its origin. You can specify the values in the X and Y fields. |
|
|
Specifies the dimensions of the array. It determines the number of cells or members in a group array. |
|
|
Disables the Mode, X, and Y fields. When this option is selected, spacing mode and spacing values for the group array cannot be edited. |
|
|
Lets you select the spacing mode for the group array.
You can specify the distance in the X and Y fields. Based on the spacing mode selected, the specified distance is kept between the cells of a group array. |
|
|
Specifies the layer-purpose pair (LPP) used for computing the bounding box of the cells in a group array. The bounding box of the geometries on the specified reference LPP is used for calculating the spacing between cells. When the value is set to None, the combined bounding box of all the geometries in a cell is used for determining the spacing between cells. |
|
|
Specifies whether a group array is rotated or mirrored. For information, see |
|
|
Lets you specify the orientation of individual cells of a group array. You can select a predefined or custom pattern.
You can specify the orientation values directly in the text field by enclosing them in quotation marks. You can also select a predefined or custom pattern from the drop-down list. Alternatively, you can use the Array Pattern form, which is accessed by clicking the Open Array Pattern editor button
For more information, see |
Attributes in the Edit Instance Properties Form
The following table describes the fields available on the Attributes tab of the Edit Instance Properties form.
| Field | Description |
|---|---|
|
Sets the library, cell, and view names of the master cell for this instance.
You can use the SKILL function leEnableInstPropEditFields to enable or disable the Library or Cell fields for an instance in the Property Editor form.
|
|
|
Lets you select the library, cell, and view names by clicking on them in the browser. |
|
|
Sets the name assigned to this instance. The layout editor automatically assigns instance names that begin with the letter I, followed by a number. |
|
|
Sets whether the instance is rotated or mirrored. See |
|
|
Displays the master cell type used to describe the nature of a physical block or cell. Layout editor does not support any level one editing on any of these design objects. These cell types are used in Virtuoso Layout Suite XL and Virtuoso Floorplanning. See |
|
|
Specifies the name of the cluster associated with the instance. |
|
|
Displays the maximum voltage if the cluster is a power domain cluster. |
|
|
Displays the placement status of the instance in a cyclic field.The choices are Unplaced, None, Placed, Fixed, and Locked/Cover. If the placement status is Unplaced, the instance will not be visible. See |
Attributes in the Edit Instance Pin Properties Form
The following table describes the fields available on the Attributes tab of the Edit Instance Pin Properties form.
| Field | Description |
|---|---|
|
Sets the library, cell, and view names of the master cell for this instance.
You can use the SKILL function leEnableInstPropEditFields to enable or disable the Library or Cell fields for an instance in the Property Editor form.
|
|
|
Lets you select the library, cell, and view names by clicking on them in the browser. |
|
|
Sets the name assigned to this instance. The layout editor automatically assigns instance names that begin with the letter I, followed by a number. |
|
|
Sets whether the instance is rotated or mirrored. See |
|
|
Displays the master cell type used to describe the nature of a physical block or cell. Layout editor does not support any level one editing on any of these design objects. These cell types are used in Virtuoso Layout Suite XL and Virtuoso Floorplanning. See |
|
|
Specifies the name of the cluster associated with the instance. |
|
|
Displays the maximum voltage if the cluster is a power domain cluster. |
|
|
Displays the placement status of the instance in a cyclic field.The choices are Unplaced, None, Placed, Fixed, and Locked/Cover. If the placement status is Unplaced, the instance will not be visible. See |
|
|
Displays the routing method of the pin in a cyclic field. The choices are symbolic and geometric. When Update Net Signal Type is enabled, terminals with nets that have a Signal Type of Power or Ground in the schematic are automatically given a Route Method of Geometric when either the Generate All From Source or Update Components and Nets commands are run. |
Attributes in the Edit Label Properties Form
The following table describes the fields available on the Attributes tab of the Edit Label Properties form.
| Field | Description |
|---|---|
|
Enables you to search for a layer-purpose pair and narrow down the available choices in the Layer list. |
|
|
Sets the height of the label, in user units (usually microns). |
|
|
Sets whether the label is rotated or mirrored. See |
|
|
Sets the location of the label origin. The origin appears as a small square on the label when you place or select it. |
|
|
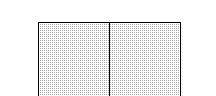
Specifies a display option that determines how text strings containing underscore characters are displayed in a layout window. When the overbar is disabled (default), the software displays underscore characters ( _ ) as part of the text string. When the overbar is enabled, the software interprets underscore characters ( _ ) in the text string name as toggle switches that control where overbars begin and end. Overbars appear above the text string, as shown in the examples. 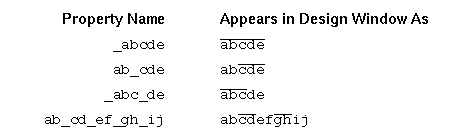 |
Attributes in the Edit Line Properties Form
The following table describes the fields available on the Attributes tab of the Edit Line Properties form.
| Field | Description |
|---|---|
|
Enables you to search for a layer-purpose pair and narrow down the available choices in the Layer list. |
|
Attributes in the Edit Modgen Properties Form
The following table describes the fields available on the Attributes tab of the Edit Modgen Properties form.
| Field | Description |
|---|---|
|
Sets whether the modgen is rotated or mirrored. See |
|
|
Layer and Purpose: Sets the layer and purpose of the reference layer of the modgen. |
|
Attributes in the Edit Mosaic Properties Form
The following table describes the fields available on the Attributes tab of the Edit Mosaic Properties form.
| Field | Description |
|---|---|
|
Sets the library, cell, and view names of the master cell for this instance. |
|
|
Sets the name assigned to this instance. The layout editor automatically assigns instance names that begin with the letter I, followed by a number. |
|
|
Sets the number of rows and columns in an array of instances. |
|
|
Sets the spacing between rows and columns in an array of instances. |
|
|
Sets whether the mosaic is rotated or mirrored. See |
Attributes in the Edit Path Properties Form
The following table describes the fields available on the Attributes tab of the Edit Path Properties form.
Attributes in the Edit Path Pin Properties Form
The following table describes the fields available on the Attributes tab of the Edit Path Pin Properties form.
| Field | Description |
|---|---|
|
Enables you to search for a layer-purpose pair and narrow down the available choices in the Layer list. |
|
|
Controls how the path ends are drawn.
|
|
|
Sets the length of the beginning and ending extension in user units if Type is set to variable. |
|
|
Indicates the status of the route containing the path.
|
|
|
Indicates whether or not the path is part of a route. By default, it is FALSE for paths. |
|
|
Appears if the path is a multipart path and has subparts. (Virtuoso RF Option) For curved paths, End Type, Begin Extension, End Extension, Part of a Route, and Route Status attributes are disabled. |
|
|
Displays the placement status of the pin in a cyclic field. The choices are Unplaced, None, Placed, Fixed, and Locked/Cover. If the placement status is Unplaced, the instance will not be visible. See |
|
|
Displays the routing method of the pin in a cyclic field. The choices are symbolic and geometric. When Update Net Signal Type is enabled, terminals with nets that have a Signal Type of Power or Ground in the schematic are automatically given a Route Method of Geometric when either the Generate All From Source or Update Components and Nets commands are run. |
Attributes in the Edit PathSeg Properties Form
The following table describes the fields available on the Attributes tab of the Edit PathSeg Properties form.
| Field | Description |
|---|---|
|
Enables you to search for a layer-purpose pair and narrow down the available choices in the Layer list. |
|
|
Specifies the path width in user units (usually microns).This field always displays the width in orthogonal units, even though a path segment may be diagonal. |
|
|
Sets the coordinates of the beginning point of the path segment. |
|
|
Sets the coordinates of the beginning point of the path segment. |
|
|
Controls how the path segment beginning is drawn. You can choose from truncate, extend, variable, or custom. For more information, see PathSeg Begin and End Styles. |
|
|
Controls how the path segment end is drawn. You can choose from truncate, extend, variable, or custom. |
|
|
Sets the length of the beginning and ending extension in user units if Type is set to variable. |
|
|
Indicates the status of the route containing the pathseg.
|
|
|
Indicates the topology pattern of the pathseg. The valid topology values are None, RING, STRIPE, FOLLOWPIN, IOWIRE, COREWIRE, BLOCKWIRE, PADRING, and BLOCKRING. The default value is The Topology field is visible only if the Part of a Route field is set to FALSE. When the Part of a Route field is set to TRUE, the Edit Properties form title is updated to Edit PathSeg in Route Properties. |
|
|
Displays the constraint group from which the data is initialized. |
Attributes in the Edit PathSeg Pin Properties Form
The following table describes the fields available on the Attributes tab of the Edit PathSeg Pin Properties form.
| Field | Description |
|---|---|
|
Enables you to search for a layer-purpose pair and narrow down the available choices in the Layer list. |
|
|
Specifies the path width in user units (usually microns).This field always displays the width in orthogonal units, even though a path segment may be diagonal. |
|
|
Sets the coordinates of the beginning point of the path segment. |
|
|
Sets the coordinates of the beginning point of the path segment. |
|
|
Controls how the path segment beginning is drawn. You can choose from truncate, extend, variable, or custom. For more information, see PathSeg Begin and End Styles. |
|
|
Controls how the path segment end is drawn. You can choose from truncate, extend, variable, or custom. |
|
|
Sets the length of the beginning and ending extension in user units if Type is set to variable. |
|
|
Indicates the status of the route containing the pathseg.
|
|
|
Indicates the topology pattern of the pathseg. The valid topology values are None, RING, STRIPE, FOLLOWPIN, IOWIRE, COREWIRE, BLOCKWIRE, PADRING, and BLOCKRING. The default value is The Topology field is visible only if the Part of a Route field is set to FALSE. When the Part of a Route field is set to TRUE, the Edit Properties form title is updated to Edit PathSeg in Route Properties. |
|
|
Displays the constraint group from which the data is initialized. |
|
|
Displays the placement status of the pin in a cyclic field. The choices are Unplaced, None, Placed, Fixed, and Locked/Cover. If the placement status is Unplaced, the instance will not be visible. See |
|
|
Displays the routing method of the pin in a cyclic field. The choices are symbolic and geometric. When Update Net Signal Type is enabled, terminals with nets that have a Signal Type of Power or Ground in the schematic are automatically given a Route Method of Geometric when either the Generate All From Source or Update Components and Nets commands are run. |
PathSeg Begin and End Styles
The following table describes the options available to draw the beginning and end of a pathSeg. You can choose them from the Begin Style and End Style attributes of a pathSeg.
Pin Name or Other Text Display Attributes
The following table describes the fields available for pin name or other text display attributes on the Edit Properties form.
| Field | Description |
|---|---|
|
Enables you to search for a layer-purpose pair and narrow down the available choices in the Layer list. |
|
|
Displays the coordinates of the box surrounding the text display. |
|
|
Displays the text of the text display for the associated pin and is not editable. |
|
|
Sets the height of the text display in user units (usually microns). |
|
|
Sets whether the text display is rotated or mirrored. See |
|
|
Sets the location of the origin of the text display origin. The origin appears as a small square on the pin name when you place or select it. |
|
|
Specifies a display option that determines how text strings containing underscore characters are displayed in a layout window. When the overbar is disabled (default), the software displays underscore characters ( _ ) as part of the text string. When the overbar is enabled, the software interprets underscore characters ( _ ) in the text string name as toggle switches that control where overbars begin and end. Overbars appear above the text string, as shown in the examples. |
Placement Halo Blockage Attributes
The following table describes the fields available on the Attributes tab of the Edit Properties form for placement halo blockage.
Attributes in the Edit Polygon Properties Form
The following table describes the fields available on the Attributes tab of the Edit Polygon Properties form.
| Field | Description |
|---|---|
|
Enables you to search for a layer-purpose pair and narrow down the available choices in the Layer list. |
|
Attributes in the Edit Polygon Pin Properties Form
The following table describes the fields available on the Attributes tab of the Edit Polygon Pin Properties form.
| Field | Description |
|---|---|
|
Enables you to search for a layer-purpose pair and narrow down the available choices in the Layer list. |
|
|
Displays the placement status of the pin in a cyclic field. The choices are Unplaced, None, Placed, Fixed, and Locked/Cover. If the placement status is Unplaced, the instance will not be visible. See |
|
|
Displays the routing method of the pin in a cyclic field. The choices are symbolic and geometric. When Update Net Signal Type is enabled, terminals with nets that have a Signal Type of Power or Ground in the schematic are automatically given a Route Method of Geometric when either the Generate All From Source or Update Components and Nets commands are run. |
|
|
Displays the color and state of the pin. (Virtuoso RF Option) For curved polygon pins, you can view the attributes described in this table. |
The following table describes the additional options that are displayed for a photonics pin on the Attribute tab of the Edit Properties form.
You need the Virtuoso_Photonics_Option license to use this functionality. For information on obtaining the required license, contact your local Cadence representative.
Attributes in the Edit PR Boundary Properties Form
The following table describes the fields available on the Attributes tab of the Edit PR Boundary Properties form.
| Field | Description |
|---|---|
|
Displays the coordinates of the box surrounding the PR boundary. |
|
|
Displays whether a boundary is a rectangle or a polygon. The PR boundary is always a rectangle. |
|
|
Allows you to optionally create a new or edit an existing area halo associated with the PR boundary object. This area halo is always on offset to the bounding box of the PR boundary object. |
|
|
Displays the Left, Bottom, Right, and Top coordinates of the bounding box of the IOBox. IOBox represents the area reserved for pads. |
|
|
Displays the Left, Bottom, Right, and Top coordinates of the bounding box. CoreBoxSpec is a rectangular grid of sites where multiple rows can be placed in horizontal or vertical direction. This is the area where standard cells can be placed. An IOBox, together with the CoreBox, indicates the area for the IO cells. |
|
|
Displays the site definition as core or pad, as defined in the technology file. |
|
|
Displays which rows in the site can be flipped. Cyclic choices include Even, Odd, None. |
|
|
Displays the rows to which the spacing value applies. Cyclic choices include Every, Even, Odd. In the example below, the prBoundary has an IO box and a coreBox. The coreBox has four horizontal rows of siteDef A. All rows are separated by a distance row spacing. Every odd numbered row is flipped. The number of rows and row geometry is computed based on the overall bBox of the coreBox and the siteDef of the coreBox.
API is available to retrieve the number of rows and bounding box of each row. For information about accessing boundary attributes, see 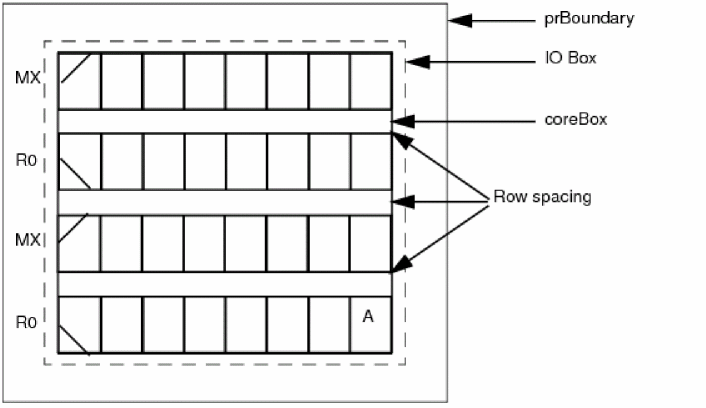 |
Attributes in the Edit Rectangle Pin Properties Form
The following table describes the fields available on the Attributes tab of the Edit Rectangle Pin Properties form.
| Field | Description |
|---|---|
|
Enables you to search for a layer-purpose pair and narrow down the available choices in the Layer list. |
|
|
Specifies a radio button that lets you edit the coordinates. This is the topmost edit button. |
|
|
Displays the placement status of the pin in a cyclic field. The choices are Unplaced, None, Placed, Fixed, and Locked/Cover. If the placement status is Unplaced, the instance will not be visible. See |
|
|
Displays the routing method of the pin in a cyclic field. The choices are symbolic and geometric. When Update Net Signal Type is enabled, terminals with nets that have a Signal Type of Power or Ground in the schematic are automatically given a Route Method of Geometric when either the Generate All From Source or Update Components and Nets commands are run. |
|
ROD Multipart Path - Master Path Fields Attributes
The following table describes the fields available on the Attributes tab for ROD Multipart Path.
| Field | Description |
|---|---|
|
Enables you to search for a layer-purpose pair and narrow down the available choices in the Layer list. |
|
|
Sets the length of the beginning and ending extension in user units if Type is set to variable. |
|
|
Indicates whether or not a ROD path can be chopped. The value must be |
|
|
Opens one of the three Edit ROD Subpart forms, Offset Subpath, Enclosure Subpath, or Subrectangle. See the ROD Subpart Form for a description of the fields and options. |
Routing, Slot, Pin, or Feed Through Blockage Attributes
The following table describes the fields available on the Attributes tab of the Edit Properties form for routing, slot, pin, or feed through blockage attributes.
Attributes in the Edit Row Properties Form
The following table describes the fields available on the Attributes tab of the Edit Row Properties form.
| Field | Description |
|---|---|
|
Allows you to enter a unique name for each row object you create. You enter the base name and the software adds an underscore followed by a number which is greater than or equal to 1. As you enter new sites, each site is incremented by 1. For example, if your base name is ROW_1, the name assigned to the first site is ROW_1_1, the next is ROW_1_2, the next is ROW_1_3, and so on. If you do not enter a custom row name the software assigns the name row_number, which increments by 1 each time you add a site and rows. |
|
|
Allows you to set the row orientation. See |
|
|
Allows you to set a corner of the row at a specific point in the cellview. |
|
|
Specifies a read only field displaying the name of the current row. |
|
|
Specifies a read only field displaying the technology library the original row was defined in. |
|
|
Specifies a read-only field displaying the type of site definition (core or pad) that is the current site in the Site Definition Name field. This information contains the type (core or pad), the width and height of the site definition, and three types of symmetry. This information is specified in the technology library site definitions. The symmetry can be SymmetricInX, SymmetricInY, or SymmetricInR90. |
|
|
Sets the number of sites in each row. The number of sites is any integer equal to or greater than zero. |
|
|
Allows you to place rails and/or components automatically into the rows. |
|
|
Displays Rails, Allowed Components, or Both in the Pre-Defined section of the form. You move them into the Selected section of the form using the arrows. Once they are in the Selected section of the form, you add the components individually selected from the Selected field. |
Attributes in the Edit Snap Boundary Properties Form
The following table describes the fields available on the Attributes tab of the Edit Snap Boundary Properties form.
| Field | Description |
|---|---|
|
Displays the coordinates of the box surrounding the snap boundary. |
|
Attributes in the Edit Via Properties Form
The following table describes the fields available on the Attributes tab of the Edit Via Properties form.
Attributes in the Edit Via Pin Properties Form
The following table describes the fields available on the Attributes tab of the Edit Via Pin Properties form.
| Field | Description |
|---|---|
|
Lists all valid via definitions available in the effective technology file. Choosing a via from the cyclic field selects the via from the effective technology file. |
|
|
Applies a net name to the via you are placing in the cellview. |
|
|
Specifies a read only field that displays the technology library from which the selected via definition is obtained. If you select a via definition from the list which is defined in a different library, the field is updated to that library name. The field also displays the type of |
|
|
Sets the origin of a via. Choose |
|
|
Enables you to reset the values in the form to the technology database values if you want to revert from the manually updated parameter values to the defaults. You can reset the values to Minimum Rules then ViaDef, Minimum Rules, or Minimum Rule Enclosures. |
|
|
This section provides options available in Compute From section. |
|
|
Sets the number of rows or the number of columns of via cuts in a via array. If you change the values in the Rows and Columns fields, the values in the other fields, such as Width, Length, Row Spacing, and Column Spacing, are dynamically updated.When you update the value in the Row or Column field, this will the update other values in the form and apply the constraints. This will happen when you finish editing the values in the Row or Column fields and click at some other area in the form. |
|
|
Swaps the values in the Rows and Columns fields. If the swapped values violate the minimum rules, the spacing and enclosure values are re-calculated based on the Reset Parameters to setting. |
|
|
Sets the width and height of the via, in user units (typically microns) |
|
|
Displays cut class choices only if a
If you update the Cut Class selection, the values in the other fields, such as Rows, Columns, Width, Length, Row Spacing, and Column Spacing, are dynamically updated. |
|
|
Sets the width and length of the via cut, in user units (typically microns). If a Cut Class is selected, the cut Width and Length are automatically updated to the cut size values defined for that cut class in the |
|
|
Sets the distance between the horizontal edge to edge cuts in a via. |
|
|
Sets the distance between the vertical edge to edge cuts in a via. |
|
|
Swaps the values in the Row Spacing and Column Spacing fields. |
|
|
Opens the Edit Cut Pattern Form and enables you to edit cut patterns on via arrays. |
|
|
Sets directional offset distances on Layer 1, the bottom routing layer, and Layer 2, the top routing layer. |
|
|
Calculates enclosures automatically. The Compute Enclosures setting does not impact the via you create in the Auto mode. |
|
|
|
|
|
|
|
|
|
|
|
|
|
|
Indicates the status of the route containing the via.
|
|
|
For a selected via, you can set the colors for Layer1, CutLayer, and Layer2. For all the via layers, the following MPT colors are available: grayColor, mask1Color, mask2Color, and mask3Color. |
|
|
Displays the placement status of the pin in a cyclic field. The choices are Unplaced, None, Placed, Fixed, and Locked/Cover. If the placement status is Unplaced, the instance will not be visible. See |
|
|
Displays the routing method of the pin in a cyclic field. The choices are symbolic and geometric. When Update Net Signal Type is enabled, terminals with nets that have a Signal Type of Power or Ground in the schematic are automatically given a Route Method of Geometric when either the Generate All From Source or Update Components and Nets commands are run. |
Attributes in the Edit Via Stack Properties Form
The following table describes the fields available on the Attributes tab of the Edit Via Stack Properties form.
Virtual Hierarchy / VH Clone Attributes
The following table describes the fields available on the Attributes tab of the Edit Properties form for a virtual hierarchy or clone.
| Field | Description |
|---|---|
|
Displays the name of the virtual hierarchy or virtual hierarchy clone. |
|
|
Displays the library, cell, and view name of the virtual hierarchy or virtual hierarchy clone. |
|
|
Displays the type of virtual hierarchy or virtual hierarchy clone, Generated or Created. |
|
|
Sets whether the virtual hierarchy or virtual hierarchy clone is frozen or not. |
|
|
Displays the family of the virtual hierarchy or virtual hierarchy clone. |
|
|
Sets the origin point of the virtual hierarchy or virtual hierarchy clone. |
|
|
Sets whether the virtual hierarchy or virtual hierarchy clone is rotated or mirrored. See |
|
|
Displays the number of members in the virtual hierarchy or virtual hierarchy clone. |
Placement Status Valid Values
Orientation Valid Values
| Value | Description |
|---|---|
Related Topics
Return to top