4
Hierarchical Designs
A design hierarchy comprises many levels of a design. Each time you descend into the design hierarchy, you view a smaller division of the larger design in greater detail. Hierarchical designs are created by placing instances of other cellviews inside a cellview. Levels of hierarchy are numbered from top to bottom, with the top cellview having the lowest number. The top cell is the cellview you are currently viewing in a design window, unless you have descended into the hierarchy or are using Edit In Place.
The following figure illustrates a design hierarchy. When you view Top cell, it is level 0. When you view Cell C or Cell D, it is considered level 1, and Cell A and Cell B are considered level 2.
You can descend into any level of an instance hierarchy and view the contents. You can also choose the view type or view name when descending into instances. By default, you are not prompted for a view type.
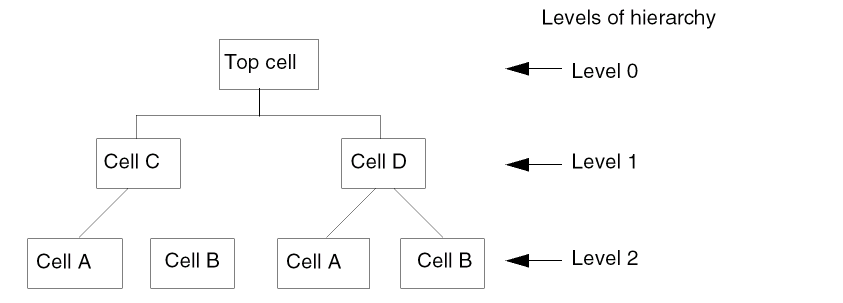
When you place a cellview within another cellview, the placed reference of the cellview is called an instance. The placed instance now has a master cellview. In the figure, Cell A has been placed twice in the design. If you edit the master of Cell A, all instances of that cellview are changed.
You can view the hierarchy tree of a design by using Edit – Hierarchy – Tree and CIW – Tools – Print Hierarchy Tree. The Edit – Hierarchy – Tree option prints the hierarchy as displayed in the Navigator assistant. It considers edits in the virtual memory. However, CIW – Tools – Print Hierarchy Tree does not consider edits in the virtual memory which are not committed. For more information, see
Related Topics
Returning to a Different Hierarchy Level
Freezing and Unfreezing Pcell Instances
Copying and Cutting Through the Hierarchy
Refreshing Cellviews to Reflect Updated Masters
Return to top