2
Technology Requirements
This section discusses the following:
Technology File Requirements
This section specifies minimum requirements for the technology file.
Specifying Layer Order
The layerRules section of the technology file specifies attributes for user-defined layers. You must specify the mask number for each interconnect layer and the preferred routing direction for each routing layer.
The mask number assigned to each layer in the technology file functions section is the layer sequence number, which helps determine if layers are adjacent to each other.
- Order the layers in the Select Via form.
- Determine the next layer in sequence when using the Via Up or Via Down command.
- Determine automatically the “next” or “previous” layer when the Create Wire command is run with a non-routing layer as the current layer.
If mask numbers are not specified, layer-purpose priority is used. However, this is not as reliable as defining the mask numbers because mask numbers are independent of purposes.
Valid Values: cut, li, metal, ndiff, pdiff, nplus, pplus, nwell, pwell, poly, diff, recognition, other, unknown
Note that the following example is specific to space-based routing. The layerRules section in your techfile can have more layers and layer definitions.
layerRules(
functions(Note:
;( layer function [maskNumber])
;( ----- -------- ------------)
( POLY "poly" 0 )
( CO "cut" 1 )
( Metal1 "metal" 2 )
( VIA "cut" 3 )
( Metal2 "metal" 4 )
...
- Include only one poly layer in the technology file because Virtuoso Space-based Router can route only one poly layer at a time.
- Define only one cut layer between each pair of metal layers.
-
If the functions section is not defined or is defined without the mask numbers, vias are still available when the Create – Wire command is run. However, the following warning message is displayed.
\w *WARNING* geViaSet : Incomplete layer maskNumber, the order of the vias may not be correct.
For more information about functions, see
Specifying Routing Layer Directions
Set a preferred routing direction for each routing layer.
layerRules(
 routingDirections(
 ;( layer direction )
 ;( ----- --------- )
  ( POLY       "none" )
  ( Metal1     "horizontal" )
  ( Metal2     "vertical" )
 ;routingDirections
) ;layerRules
For more information, see
Specifying Via Definitions
At a minimum, define all standard vias for interconnect using routing layers in the viaDefs section of the technology file. Typically, this is a set of standard vias between the poly layer and the highest metal layer.
viaDefs(
standardViaDefs(
;( viaDefName  layer1  layer2  (cutLayer  cutWidth  cutHeight  [resistancePerCut])
; (cutRows  cutCol  (cutSpace))
; (layer1Enc)   (layer2Enc)   (layer1Offset)   (layer2Offset)   (origOffset)
; [implant1     (implant1Enc) [implant2        (implant2Enc)  [well/substrate]]])
;( -------------------------------------------------------------------------- )
  ( mpoly    Metal1  POLY    ("CO"      0.09      0.09)
    (1        1      (0.11 0.11))
    (0.04 0.0)    (0.04 0.01)   (0.0 0.0)      (0.0 0.0)        (0.0 0.0)
  )
  ( m1m2     Metal1  Metal2  ("VIA"     0.1       0.1)
    (1        1      (0.1 0.1))
    (0.04 0.0)    (0.04 0.0)    (0.0 0.0)      (0.0 0.0)        (0.0 0.0)
  )
...
By default, standard vias are automatically created before assisted routing. To disable the creation of standard vias and use only the existing vias in the validRoutingVias constraint, specify the following:
rdeSetVar "db.enable_create_derived_vias" "false"
In addition, define the custom vias required for routing.
customViaDefs(
;( viaDefName libName cellName viewName layer1 layer2 resistancePerCut)
;(------------ --------- --------- --------- ------- ------ --------------)
(VIAm1m2_2CUT_N tsmc65lp VIAm1m2 via Metal1 Metal2 0.95)
(VIAm1m2_2CUT_S tsmc65lp VIAm1m2 via Metal1 Metal2 0.95)
(VIAm1m2_2CUT_E tsmc65lp VIAm1m2 via Metal1 Metal2 0.95)
(VIAm1m2_2CUT_W tsmc65lp VIAm1m2 via Metal1 Metal2 0.95)
...
For more information, see Technology File Via Definitions and Via Specifications in Virtuoso Technology Data ASCII Files Reference.
Specifying Valid Layers and Valid Vias
Define a list of valid layers and vias in the virtuosoDefaultSetup constraint group. Use the foundry constraint group to define only process rules. Do not use the foundry constraint group to define valid layers and valid vias.
;( group [override] )
;( ----- ---------- )
 ( "virtuosoDefaultSetup" nil
    interconnect(
    ( validLayers    (POLY    Metal1    Metal2 ...) )
    ( validVias      (mpoly   m1m2    ... ) )
    ) ;interconnect
) ;virtuosoDefaultSetup
validVias statement exists, a full set of standard via is defined for the session based on the layers defined in the validLayers statement.The automatic router uses vias that have both layers defined as valid routing layers. If a via has a metal layer that is not a valid routing layer, the router can still use the via for pin access provided it is in the valid via list. In particular, vias for which the bottom layer is oxide, well, or implant are not used during automatic routing. Virtuoso Space-based Router displays a warning message when initializing a design if the constraint group contains such vias.
For more information, see validLayers and validVias in the Routing Constraints chapter of the Virtuoso Technology Data Constraints Reference.
Limiting Routing on a layer
The current method for restricting the amount of wiring on any given layer is to apply a taper constraint group. The intent is to enable the router to connect to the pins on the restricted layer, but limit the amount of routing on the layer using a taper constraint group.
To restrict the amount of routing, define a taper constraint group similar to the one below. These examples illustrate how to restrict routing on the Poly layer, but this technique can be applied to any layer(s).
taperHalo value. Routing on the restricted layer will occur only within the halo of the pins.constraintGroups( ;( group [override] ) ;( ----- ---------- ) ( "virtuosoDefaultTaper" nil "taper" interconnect( ( validLayers (Poly Metal1 ) ) ( validVias (M1_PO ) ) ) ;interconnect spacings( ( taperHalo 1.4 ) ) ;spacings ) ;virtuosoDefaultTaper
);constraintGroups
validLayers statement. Otherwise routing may occur beyond the taper value limit.
;( group [override] )
;( ----- ---------- )
( "virtuosoDefaultSetup" nil
interconnect(
( validLayers (Metal1 Metal2 ...) )
( validVias (M1_Poly m1m2 ... ) )
) ;interconnect
) ;virtuosoDefaultSetup
Via Usage Model
For detail routing, Virtuoso Space-based Router considers a limited number of vias and via variations for each layer pair. The standard via variations are chosen based on the constraints and the type of route (for example, taper).
The detail router chooses a limited number of custom vias and derived standard via variations based on the amount of routing resources required by each. The vias and the via variations chosen are those that require the fewest resources.
Specifying Track Patterns and Width Spacing Patterns
You can snap wires to track patterns and snap patterns. A track is a system reserved purpose and can be combined with any physical layer to create a layer-purpose pair. The tracks that make up the track pattern provide guidelines for laying interconnect routes.
For more information on how to create tracks and width spacing patterns, see
Supporting Colored Trim Metal Layers
Virtuoso Space-based router supports colored trim metal layers with the correct color assignment when creating trim shapes on a routing layer. A colored trim layer can have color information specified using the color attribute, which lets you add more than one color mask to a single trim layer.
For more information about how colored trim layers are defined in the technology file, see functions.
Using Layer-Purpose Pairs
In the Virtuoso Studio design environment, you can define technology rules for layer-purpose pairs (LPP). However, OpenAccess rules are applicable only to layers, and not layer-purpose pairs. In the Virtuoso Studio design environment, any technology rule that is defined for a layer-purpose pair is stored as a private extension and is available only to Virtuoso applications.
Layers based on purposes can be selected from the Palette, provided the layer-purpose pair is valid and visible. However, when tapping an existing shape, the layer-purpose pair is not used directly. You can create a prioritized list of purposes that allow you to use a layer based on a purpose. See Tapping Wires.
Poly Pins over an Implant Layer
If minSpacing is defined between poly and implant layers, then any poly pin shape that is fully overlapped by an implant layer is viewed as blocked and is not accessible to the automatic router and the Point-to-Point router, and results in routing failures.
Support For 45 nm Rules
In order to use the newer 45 nm technology rules, these rules must coded in the technology file techLayerProperties section. The following example shows LEF57_AREA, LEF57_ENCLOSUREEDGE, and LEF57_SPACING for second EOL rule support.
techLayerProperties(
;( PropName Layer1 [ Layer2 ] PropValue )
;( -------- ------ ---------- --------- )
( LEF57_AREA   Metal1  "AREA 0.07 EXCEPTEDGELENGTH 0.41 EXCEPTMINSIZE 0.41 0.14 ;" )
( LEF57_ENCLOSUREEDGE  Via2   "ENCLOSUREEDGE 0.08 WIDTH 0.26 PARALLEL 0.5 WITHIN 0.4 ;" )
( LEF57_SPACING  metal1   "SPACING 0.12 ENDOFLINE 0.10 WITHIN 0.035 MINLENGTH 0.07 PARALLELEDGE 0.12 WITHIN 0.10 ENCLOSECUT BELOW 0.05 CUTSPACING 0.15 ;")

) ;techLayerProperties
Supported Constraints with Supported Parameters
In interactive routing, constraints are considered only if the constraints are supported and do not have any unsupported parameters in the technology file. For Example, minViaSpacing is a supported constraint and therefore, the following statement is supported.
‘(minViaSpacing “Via1” 0.5)’
However, the following statement is ignored because orthogonalEnclosingMetal is an unsupported parameter in the minViaSpacing constraint.
‘(minViaSpacing “Via1” 'orthogonalEnclosingMetal 0.5)’
Constraint Groups
A constraint group contains a set of constraints or rules to be applied to a design under different circumstances, which allows the flexibility to experiment with less or more stringent process rules at different stages of the design process. Constraint groups are classified as follows.
-
Foundry constraint group
Example:foundry -
Application-specific constraint group(s)
Examples:virtuosoDefaultExtractorSetup, virtuosoDefaultSetup, LEFDefaultRouteSpec -
User-defined constraint group(s)
Examples are unlimited: shieldTheseNets, wideWires
Foundry, Application-specific and User-defined constraint groups may be created automatically during a translation process such as lef2oa, and are based on the information in the LEF/DEF file. Other constraint groups may be created by your CAD group, and still others created by the individual layout designer. Some can be stored in a technology database and/or on the design itself.
Constraint groups are stored in the technology or design database and can be created by your CAD group or by the layout designer. Constraint groups can also be created automatically during the translation process, such as lef2oa.
In Virtuoso XL and higher tiers, you typically have the following three constraint groups as a required minimum:
Foundry Constraint Group
The foundry constraint group represents the absolute minimum rules (i.e. minWidth/minSpacing, etc.,) which must be adhered to in order to manufacture the design. These are commonly referred to as the base process rules and are stored only in the technology database.
Define the complete set of process rules in the foundry constraint group. Do not depend on a technology file translated from elsewhere to contain all needed rules. For example, a 65nm tech file translated from CDB will not include all required rules because not all 65nm rules are code able in CDB.
-
Creating the Foundry Constraint Group
Thefoundryconstraint group is created and populated with information during the lef2oa translation. The translator get the information from section within the LEF file.
Alternatively, you can create thefoundryconstraint group by loading an ASCII technology file containing the foundry constraint group information through the Technology File Manager Toolbox, which you can invoke from the CIW. -
Information in the foundry constraint group
Thefoundryconstraint group contains all of the information necessary to manufacture the design. Everything fromminSpacing/minWidthfor layers,minEnclosure, minStep, to via rules, to electrical constraints such as antenna rules. -
Using the foundry constraint group in Virtuoso
Thefoundryconstraint group is the final stop along the constraint precedence lookup trail. If a constraint override is not defined elsewhere, the tools use the value(s) in thefoundryconstraint group.
Most all functionality uses thefoundryconstraint group at some point. As the last stop in constraint precedence lookup, thefoundryconstraint group is the final place and many times the only place the value(s) for a constraint are defined.
Thefoundryconstraint group is not typically writable for most users, but can be viewed in the Process Rule Editor. You can launch the Process Rule Editor by clicking the RMB in the Constraint Manager assistant or by clicking the PRE icon from the toolbar in the Constraint Manger assistant. Within this dialog you can set the scope to Technology and view the foundry constraint group.
Application Constraint Groups
An application constraint group is used to target a basic set of rules within a given application. Although you can define numerous application specific constraint groups and switch between them at any time, you can reference only one as the default by setting the Wire cyclic field in the Layout Editor Options form (Options – Editor...) at any given time. It is important to note, however, that at any given time during routing or wire editing, the rules to apply to specific objects may be derived from a number of different constraint groups, based on specific constraint group lookup precedence.
Application-specific constraint groups can be stored within the technology database or directly on the design itself (i.e. lib/cell/cellview).
Examples:
Specifying the Default Constraint Group for Routing
You can define numerous application-specific constraint groups and switch between them, but you can reference only one constraint group at any given time.
virtuosoDefaultExtractorSetup
The virtuosoDefaultExtractorSetup constraint group is used by default by the extractor for connectivity extraction. This constraint group must contain a list of valid interconnect layers and can optionally include a list of valid vias. The layers can be physical, such as metal and poly, or derived, such as those used to define stop layers and bulk layers. In the technology file, physical layers are defined in the layerRules section and derived layer are defined in the techDerivedLayers section.
The setupConstraintGroup environment variable in your .cdsenv file is used to specify virtuosoDefaultExtractorSetup as the default constraint group for connectivity extraction. If required, you can change this default value by specifying the name of another constraint group. If the setupConstraintGroup environment variable is not specified or is set to an empty string, the extractor prompts you for a constraint group to use for extraction.
The virtuosoDefaultExtractorSetup constraint group can be stored in the technology database or in the design database along with the library/cell/view information.
virtuosoDefaultSetup
The virtuosoDefaultSetup constraint group is by default used for interactive and automatic routing. For example, if a signal selected for routing does not have a constraint group assigned to it, the constraints in the virtuosoDefaultSetup constraint group apply. Moreover, the set of valid layers and vias defined in the virtuosoDefaultSetup constraint group is used exclusively for wiring and is usually a subset of that defined in the virtuosoDefaultExtractorSetup constraint group. You can also specify in this constraint group any process rules that should override those defined in the foundry constraint group.
The contents of validLayers in virtuosoDefaultSetup are usually a subset of those defined in the virtuosoDefaultExtractorSetup constraint group because, while you may want to extract connectivity for non-metal layers, you do not want interactive and automatic routing to use the non-metal layers.
The wireConstraintGroup environment variable in your .cdsenv file is used to specify virtuosoDefaultSetup as the default constraint group for interactive and automatic routing. If the wireConstraintGroup environment variable is not set, interactive and automatic routing use the value of the setupConstraintGroup environment variable as the default constraint group. Because the constraint group specified with setupConstraintGroup is for extraction, you do not want it to be used for routing. Therefore, ensure that you set a default constraint group for routing.
You can also specify virtuosoDefaultSetup as the default constraint group for interactive and automatic routing by using the Default Wire Constraint Group list in the Layout Editor Options form.
LEFDefaultRouteSpec
The LEFDefaultRouteSpec constraint group contains rules typically used in digital standard cell applications or custom and mixed signal applications that require only metal layers.
The LEFDefaultRouteSpec constraint group is specific to a LEF/DEF design flow and is created during lef2oa translation. As a result, the valid layers, the valid via definitions, and the valid rules become part of the LEFDefaultRouteSpec constraint group.
lef2oa translator translates any NONDEFAULTRULES in LEF as constraint groups in the OpenAccess technology database.
The LEFDefaultRouteSpec constraint group contains valid layer and via definitions. The via definitions typically include standard vias and several custom vias used by other routers such as NanoRoute in the Innovus environment. The LEFDefaultRouteSpec constraint group also contains process rules for wide metal shapes.
You can specify LEFDefaultRouteSpec as the default constraint group for interactive or automatic routing by selecting it from the Default Wire Constraint Group list in the Wire Editing section of the Layout Editor Options form.
virtuosoDefaultTaper
If routing requires tapering, for best results define a virtuosoDefaultTaper constraint group with type taper. Explicitly defining a taper constraint group ensures that the correct layers and widths are used for tapered wires.
The primary purpose of a constraint group of this type is to taper the width of a wire to match the width of the pin to which it connects. You can also adjust the widths of taper routing. Many different constraints can be included in the taper constraint group.
You can also use a constraint group of type taper to restrict routing on a layer to control the taper length. For more information, see
taper, such as to restrict routing on poly, you cannot use the constraint group to also taper the widths of wires on other layers.
The wireTaperConstraintGroup environment variable in your .cdsenv file is used to specify virtuosoDefaultTaper as the default constraint group for tapering wires. The virtuosoDefaultTaper constraint group is only used when the router cannot connect to a target pin by using the regular net, design, or default constraints.
How the Router Uses the Taper Constraint Group
When you invoke the design, there are three constraint groups the application searches for by default. These constraint groups, whether they are defined in your technology library or not, are specified in the default .cdsenv with the following environment variables.
-
layout setupConstraintGroup string
"virtuosoDefaultExtractorSetup" -
layout wireConstraintGroup string
"virtuosoDefaultSetup" -
layout wireTaperConstraintGroup string
"virtuosoDefaultTaper"
It is important to note, however, that at any given time during routing or wire editing, the rules to apply to specific objects may be derived from a number of different constraint groups, based on specific constraint group lookup precedence.
First, the router attempts to route a net using constraints from the net constraint group, design constraint group, and application default constraint group. The precedence order is
If the router cannot connect to a pin for some reason, it attempts to connect using constraints from the input/output taper constraint group, application default taper constraint group. The precedence order is
Defining the Taper Constraint Group
When routing requires tapering, for best results define a virtuosoDefaultTaper constraint group. Explicitly defining a taper constraint group ensures that the correct layers and widths are being used for the tapered wires. You can control the global taper routing mode using the environment variable setTaperMode.
Also, in order to load the taper constraint, the constraint must be specifically marked with taper tag. The following is an example of a taper constraint group.
constraintGroups(
;( group [override] )
;( ----- ---------- )
( "virtuosoDefaultTaper" nil "taper"
interconnect(
( validLayers (Poly Metal1 ) )
( validVias (M1_PO ) )
) ;interconnect
spacings(
( taperHalo 1.4 )
) ;spacings
) ;virtuosoDefaultTaper
;constraintGroups
You can then use the Technology File Manager to load the constraint group.
validLayers constraint of the taper constraint group, but some of your nets require a more restricted layer set, use the input and output taper constraint groups to reduce the validLayers list for those specific nets. You can use the Process Rule Editor to assign the validLayers constraint to the input/output taper constraint groups.minWidth defined in that constraint group is greater than the width of the pins, the router may taper down using the minWidth defined in the wire constraint group when connecting to those pins. This optimizes routing for pin connections. The router does not consider the behavior as a violation of the net based constraint group. See the illustration below.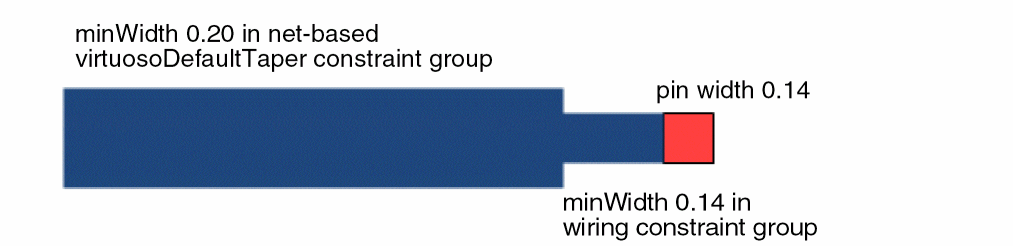
User-Defined Constraint Groups
Non-default constraint groups defined in the technology LEF will be translated as user-defined constraint groups and stored in the technology database.
A common example of a user-defined constraint group would be for wide wire rules for a particular set of signals. User-defined constraint groups can be used whenever particular routing considerations need to be applied to signal(s).
minWidth defined in that constraint group is greater than the width of the pins, the router may taper down using the minWidth defined in the wire constraint group when connecting to those pins. This optimizes routing for pin connections. The router does not consider the behavior as a violation of the net based constraint group.customRoutingConstraintGroup Use Model
The customRouting limits the use of constraints that can be used. This limitation is based on the override limitation. The Virtuoso Space-based router can override only the following constraints: minWidth, minSpacing (One Layer), minNumCuts, validLayers, validVias, minSpacing (Two Layers), and minOppExtension.
Storing Constraint Groups
The foundry constraint group is stored in the OpenAccess technology database. Application-specific and user-defined constraint groups are also stored in the OpenAccess technology database. Constraint groups stored in the technology database apply to all designs associated with the design specific constraints.
Design-specific constraints that apply to specific objects in a design, instead of the entire design, are stored in the OpenAccess design database.
You can also store any user-defined constraint groups within the technology database, provided you have write permission to the technology database. This has the advantage of being a centrally accessible location and provides added control over the definitions in the constraint groups.
Constraint Group Lookup Precedence
In Virtuoso, the foundry constraint group provides process rules for all objects. However, you can override the rules in the foundry constraint group for specific objects or for the design.
A technology database can contain multiple constraint groups that define the same constraints. When this is the case, the constraint groups are applied according to the following precedence:
- The constraint group, being referenced by a command that is currently active in the design window.
- A setup or a constraint group recognized as the constraint group of first precedence by Virtuoso.
-
The
foundryconstraint group.
Virtuoso searches for the constraint groups it recognizes in the order of precedence. It applies first the hard constraint it finds. If a hard constraint is not found, it applies the first soft constraint that it finds.
The following diagram shows the simplified constraint search hierarchy.

The following table shows constraint group lookup precedence in the Virtuoso Space-based Router. Precedence starts with constraints attached to objects and ends with constraints in the Foundry constraint group.
| Entities | Examples |
|---|---|
For more information, see Getting Started with Virtuoso Unified Custom Constraints and Virtuoso Technology Data Constraints Reference.
Scalar Versus Table Spacing Rule Precedence
When both scalar and table spacing rules exist in the technology database, the rules are applied as follows.
- When both are present in a single constraint group, the first spacing rule found is the one applied. The second one is ignored. This precedence holds true regardless of whether the value is a scalar spacing rule or a table spacing rule.
- When each exists alone in its own constraint group, the scalar value is used as a default regardless of the precedence order. The table values are also used, but only for the larger widths, not the default.
Supported Constraints and Parameters
Interactive and Assisted routing commands use technology library constraints and constraint groups to edit the design and to know about the potential rules violations during interactive editing.The following table shows the constraints supported by the Interactive and assisted routing commands.
| ConstraintName | Interactive Routing Commands | Assisted Routing Commands |
|---|---|---|
|
minEndOfLineEdgeExt |
| Constraint Manager Constraints | Interactive Routing Commands | Assisted Routing Commands |
|---|---|---|
Supported Constraints and Parameters (Virtuoso Advanced Node for Layout Standard)
| Constraint Name | Interactive Routing Commands | Assisted Routing Commands |
|---|---|---|
Supported Constraints and Parameters (Virtuoso Advanced Node for Layout Only)
The Interactive and assisted routing commands have been enhanced to provide support for new rules. The commands have been enhanced to support fully interactive and automatic multi-patterned routing to avoid complex coloring conflicts. This simplifies layout creation and minimizes coloring errors that can occur when designing at 10nm. In addition,Virtuoso Space-based Router has added support for pre- and post-optimization of routes to account for the complex EM rules at 10nm and below.
Return to top