3
The Process Rule Editor
A process rule is a rule that constrains the implementation of a design based on the physical characteristics of the process technology being used. For example, a minSpacing rule specifies the minimum distance allowed between two shapes on a specified layer.
A constraint group is a collection of constraints and process rules created for a technology database or a specific design.
A process rule can exist only in a constraint group. Therefore, for a process rule to be applied to an object, design, or technology; it must be a member of a constraint group applied to that object, design, or technology.
The Process Rule Editor lets you create new process rules and constraint groups and apply them to objects, constraints, designs, or technology databases; and change or remove existing process rules and constraint groups.
The Process Rule Editor lets you create new process rules and constraint groups and apply them to objects, constraints, designs, or technology databases; and change or remove existing process rules and constraint groups. The Process Rule Editor supports the creation of process rules and constraint groups for:
- Design objects such as nets
- Certain constraints such as Diff Pair, Matched Length, Net Class, Shielding, Process Rule Overrides, Bus Net, and Symmetry
- Entire design
- Technology databases
Important Points to Remember
-
When dealing with Process Rule Override (PRO) on nets, you may encounter a mismatch between the representation on the schematic and the layout for the same PRO constraint. This may be due to an incorrect set up in the selected value for the Wire Editing constraint group (Layout: Options – Editor menu). The default value for this is the
virtuosoDefaultSetup constraintgroup. To prevent the issue, ensure that the selected wire editing constraint group (default:virtuosoDefaultSetup) contains valid layers and valid vias. - To use table-based spacing rules in a PRO constraint, specify the rules in a Constraint Group along with other rules in the design using the Process Rule Editor or the technology file. Then, choose this Constraint Group from the drop-down list for the Default parameter (that specifies the default constraint group for the member object) of the PRO constraint in the Constraint Manager. All of these can be done procedurally using SKILL as well. For more information, see Creating a Constraint Group and Creating a New Process Rule.
-
When dealing with Process Rule Override (PRO) on nets, you may encounter a mismatch between the representation on the schematic and the layout for the same PRO constraint. This may be due to an incorrect set up in the selected value for the Wire Editing constraint group (Layout: Options – Editor menu). The default value for this is the
For a complete list of process rules supported by the Process Rule Editor, see Process Rules Supported by the Process Rule Editor.
Starting the Process Rule Editor
To start the Process Rule Editor:
Note:The Process Rule Editor Graphical User Interface is displayed. The interface supports viewing multiple PRE windows simultaneously. Each PRE window responds to the changes in the design window from which it was opened.
For example, you have two designs open, design_A and design_B. Any changes you make to design_A will only update the Process Rule Editor you invoke from this design.
To make the Process Rule Editor respond to selections made in design_B:
Process Rules Supported by the Process Rule Editor
The table below lists the process rules and their corresponding Virtuoso constraint names. You can edit these rules by using the Process Rule Editor.
| Process Rule Name | Virtuoso Constraint Name |
|---|---|
|
Techfile Name: allowedShapeAngles |
|
|
allowedShapeAngles |
|
|
Techfile Name: cutClasses |
|
|
Techfile Name: horizontalOffset |
|
|
Techfile Name: horizontalPitch (One layer) |
|
|
Techfile Name: leftDiagOffset |
|
|
Techfile Name: leftDiagPitch |
|
|
Techfile Name: rightDiagOffset |
|
|
Techfile Name: rightDiagPitch |
|
|
Techfile Name: verticalOffset |
|
|
Techfile Name: verticalPitch (One layer) |
|
|
Techfile Name: horizontalOffset |
|
|
Techfile Name: horizontalPitch |
|
|
Techfile Name: horizontalOffset |
|
|
Techfile Name: horizontalPitch |
|
|
Techfile Name: leftDiagOffset |
|
|
Techfile Name: leftDiagPitch |
|
|
Techfile Name: minCenterLineSpacing (Two layers) |
|
|
Techfile Name: minCutClassSpacing (Two layers) |
|
|
Techfile Name: minCutClassSpacing (One layer) |
|
|
Techfile Name: minCutRoutingSpacing (Two layers) |
|
|
Techfile Name: minInnerVertexSpacing (Two layers) |
|
|
Techfile Name: minParallelViaSpacing (One layer) |
|
|
Techfile Name: minParallelViaSpacing (Two layers plus metal) |
|
|
Minimum Protruded Spacing, Same Layer, Within Influencing Shape |
|
|
Techfile Name: minSameNetSpacing (Two layers) |
|
|
Techfile Name: minSameNetSpacing (One layer) |
|
|
Techfile Name: minSpacing (Two layers) |
|
|
Techfile Name: minSpacing (One layer) |
|
|
Techfile Name: minViaSpacing (Two layers) |
|
|
Techfile Name: minViaSpacing (One layer) |
|
|
Techfile Name: minVoltageSpacing (Two layers) |
|
|
Techfile Name: rightDiagOffset |
|
|
Techfile Name: rightDiagPitch |
|
|
Techfile Name: verticalPitch (One layer) |
|
|
Techfile Name: verticalOffset |
|
|
Techfile Name: verticalPitch |
|
Process Rule Editor Graphical User Interface
This section describes the seven different elements that comprise the Process Rule Editor graphical user interface. These GUI elements are:
- Toolbar
- Scope Selection Section
- Browser Pane
- Create Constraint Group Section
- Create Process Rule Section
- Dynamic Widget
- Apply Constraint Group Section
Before you explore the GUI elements, it will help to familiarize yourself with some useful features supported by the GUI:
- Resizable form that allows controlling the various widget sizes independently, helps reduce the widget area to a minimal size.
- Resizable Tree window widget that helps adjusting the height of the Tree and the Dynamic widget by moving the edge between the two areas.
- Support for assigning purposes to layers for the selected constraint.
- Attributes and Parameters tabs to specify the attribute and parameter values for the selected process rule.
- Commands on the shortcut menu to expand and collapse the constraint tree in the browser pane.
Toolbar
The toolbar lets you access certain frequently-used functions.

For more information on the individual buttons on the toolbar, see the table below.
| Icon | Button Name | Description |
|---|---|---|
|
Increases the precedence of the selected constraint group or process rule by moving it up one position in the browser pane.
This function is not available for objects at the top level of the browser tree, comprising the Constraint Groups.
For more information, see Setting the Precedence of a Constraint Group or Process Rule. |
||
|
Decreases the precedence of the selected constraint group or process rule by moving it down one position in the browser pane.
This function is not available for objects at the top level of the browser tree, comprising the Constraint Groups.
For more information, see Setting the Precedence of a Constraint Group or Process Rule. |
||
|
Removes the selected constraint group or process rule from the Process Rule Editor. For more information, see Removing a Constraint Group or Process Rule. |
||
|
Copies the selected rules to the Process Rule Editor clipboard. For more information, see Copying an Existing Process Rule. |
||
|
Pastes the process rules in the clipboard into the selected constraint group. For more information, see Copying an Existing Process Rule. |
||
|
Saves the changes made since the Process Rule Editor was opened or the last time the Save Technology button was pressed. For more information, see Saving Changes and Closing the Process Rule Editor. |
||


Scope Selection Section
The Process Rules on section lets you choose the scope for the changes you make in the Process Rule Editor. The section is also referred to as the Scope Selection section. In this section, choose:
Technology to define rules and overrides that apply to all the designs using the current technology databases.
Design to define rules and overrides that apply for the current design only.
Object to define rules and overrides for the selected objects or constraints in the design.
Browser Pane
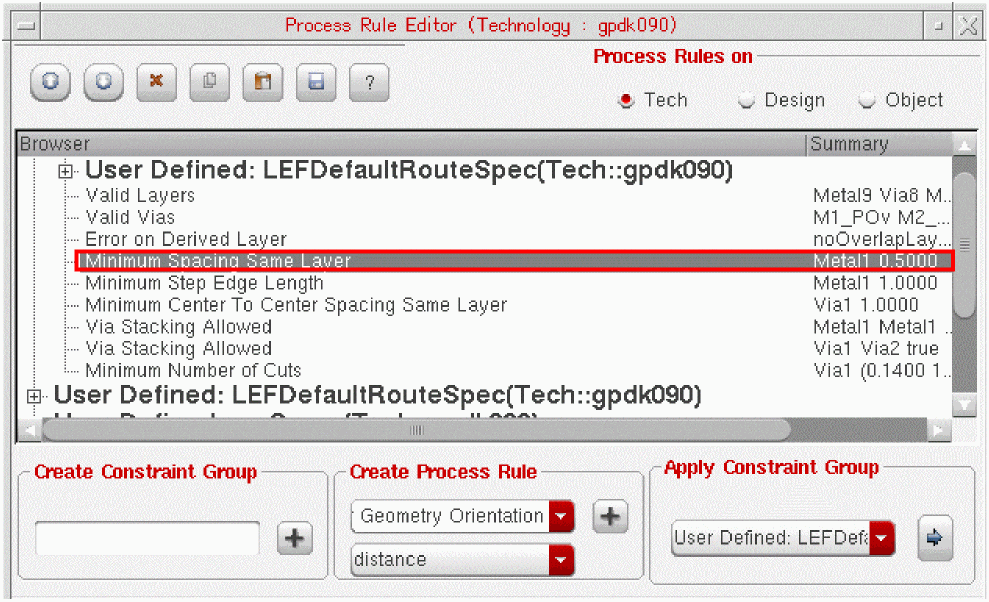
The browser pane displays the current constraint groups, process rules, and a summary of the layers used for the selected process rule and the process rule values. The browser pane is divided into the following columns:
- The Browser column lists the constraint groups in all the technology databases applicable for the design. These are listed as the top level tree items and the constraint groups and process rules defined within the top level constraint groups appear at the appropriate sublevels in the tree.
-
The Summary column displays a single concatenated string representing the layers used for the selected process rule and the current value of the constraint. For example, if the current layer and width values for a Minimum Width constraint are oxide and 0.0250 respectively, the string displayed in the Summary column is
oxide 0.0250. This is displayed in the figure below.
-
The contents of the browser pane are determined by the option selected in the Process Rules on section, which is also called the Scope Selection section.
-
When set to Technology, the browser pane lists all the rules defined in the constraint groups across all the technology databases applicable to the current design.
The top level of the tree lists the name of the constraint group along with the technology database in which it resides. Expanding a constraint group reveals the rules defined within it. Provided the technology database is writable, you can override the setting for the current rules or create new rules in the selected constraint group. -
When set to Design, the browser pane lists the constraint groups and process rules defined only for the current design. Here too, provided the design is writable, you can override the setting for the current rules or create new rules that apply only to the current design.
-
When set to Object, the browser pane lists only the rules and constraint groups that apply for the selected object or constraint. For example, if you select a net, you see only the technology categories relevant for a net: Default, Input Taper, and Output Taper. In addition, you will see the rules associated with any constraints applied to the net (for example, a Shielding constraint).
-
When set to Technology, the browser pane lists all the rules defined in the constraint groups across all the technology databases applicable to the current design.
Process Rule Editor Context Menu
The Process Rule Editor shortcut menu provides a number of context-specific options that you can apply on a constraint group or a process rule. To display the menu, right-click a constraint group or a process rule in the browser pane.
For example, when you are at the top-most level of the Constraint Group tree, the Move Up command appears inactive.
The various commands in the context menu are tabulated below along with their description.
| Command Name | Description |
|
Copies the selected process rules to the clipboard. This feature only copies the supported process rules. Any unsupported process rules are ignored by the command. For more information, see Copying an Existing Process Rule. |
|
|
Pastes the selected process rules from the clipboard to the specified location. You can paste the rules in the clipboard into as many locations as you want by repeatedly clicking the Paste Rules button. For more information, see Copying an Existing Process Rule. |
|
|
Removes the selected constraint groups or process rules from the Process Rule Editor. If you delete a process rule in the browser in between copying and pasting, the deleted rule is also removed from the clipboard and is not subsequently pasted.For more information, see Removing a Constraint Group or Process Rule. |
|
|
Increases or decreases the precedence of the selected constraint group or process rule by moving it up or down one position in the browser pane. The commands are not available for the objects at the top level of the browser tree. For more information, see Setting the Precedence of a Constraint Group or Process Rule. |
Create Constraint Group Section
You can use this section to create a new constraint group that contains process rules. For information about how to perform the task, see Creating a Constraint Group.
Create Process Rule Section
You can use this section to create a new process rule in the selected constraint group. The Create Process Rule section includes:
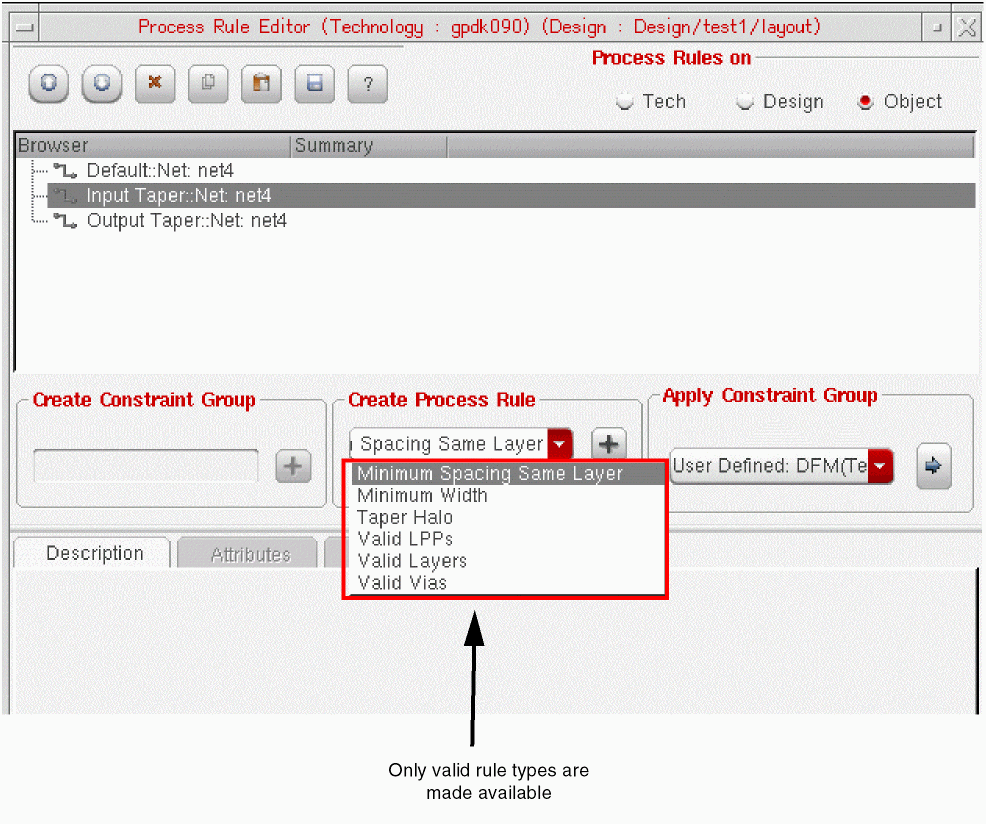
- The drop-down list box at the top that enables you to specify the type of rule you want to create. The list contains only those rules that are valid for the selected constraint group or object.
-
The drop-down list box at the bottom that enables you to choose an appropriate data value format for defining a particular rule. For example, you can define a Minimum Spacing Same Layer rule in terms of distance or as a 1D Table or a 2D Table, as displayed in the figure below.
The most common data value formats are: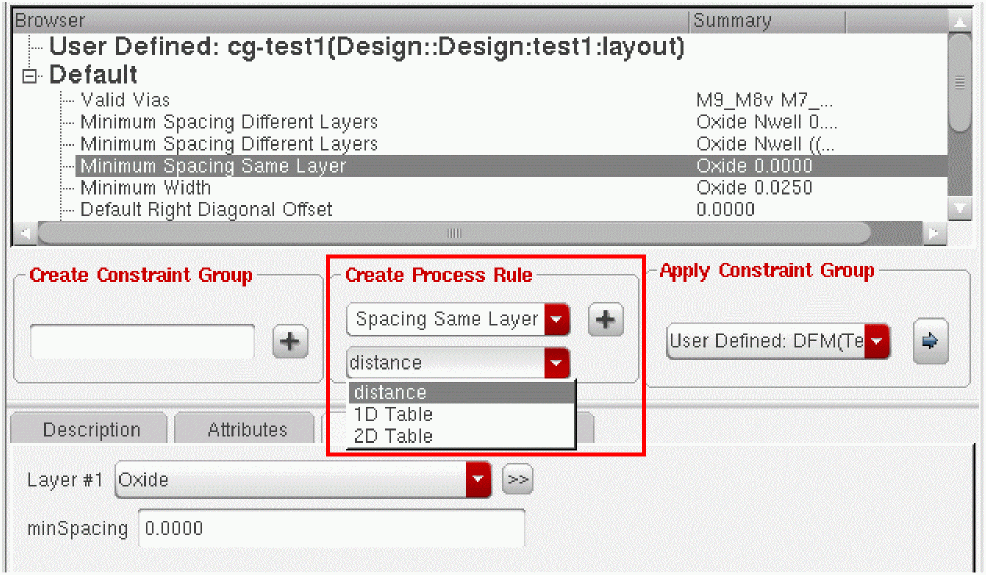
Some other supported formats are:- 2 layers, distance
- 2 layers, 2D table
- 2layers, dual distance
- dual distance table
- Layer Array
- Via Array
- direction
- BooleanValue
- voltage, spacing
- IntFltTblValue
- FltValue
The type of process rule you choose from the drop-down list at the top governs the data value formats that are available in the Dynamic Widget. - The plus (+) button that creates a new process rule and displays the process rule Description and the Attributes, Value, and Parameters, if applicable.
IntFltTblValue
This data format value represents a 1D integer lookup table value where the value is a float.
FltValue
This data format value represents a float value.
Dynamic Widget
You can use this widget to set the values for a new process rule.The widget comprises the following tabs:
You can also use these tabs to edit the values for an existing process rule. However, only relevant tabs are available for each rule.
Description Tab
This tab provides a pictorial and a textual description of the selected process rule, as displayed in the figure below.

The textual description is a generic definition of the process rule and the associated picture elaborates on this definition. The contents of the tab cannot be edited.
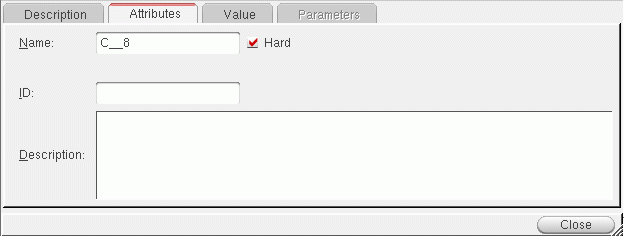
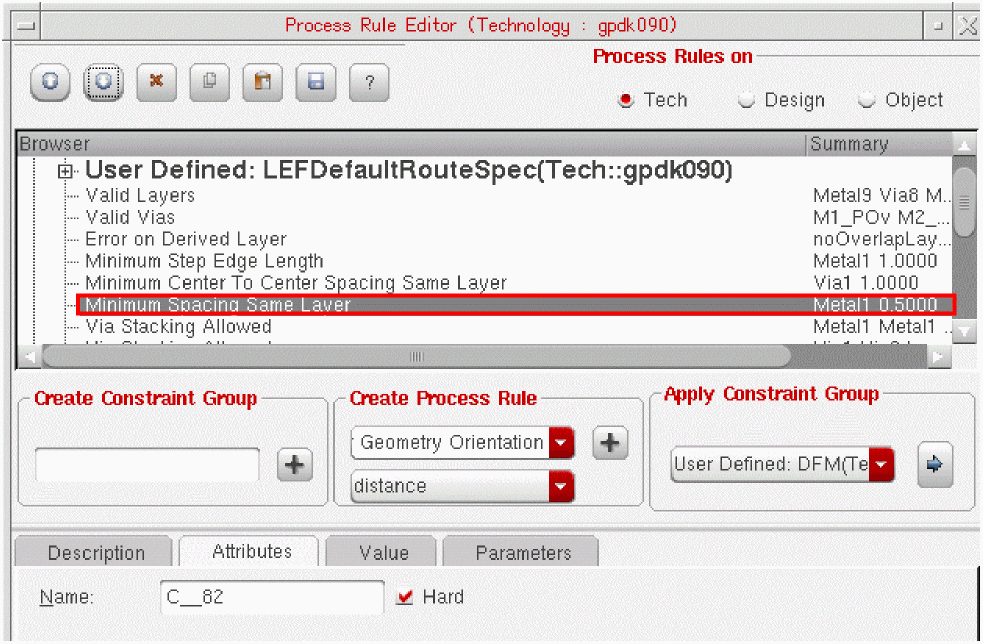
Attributes Tab
You can use this tab to specify the process rule attributes, such as name, ID, and description. In addition, you can use the tab to specify if the process constraint is hard or soft.
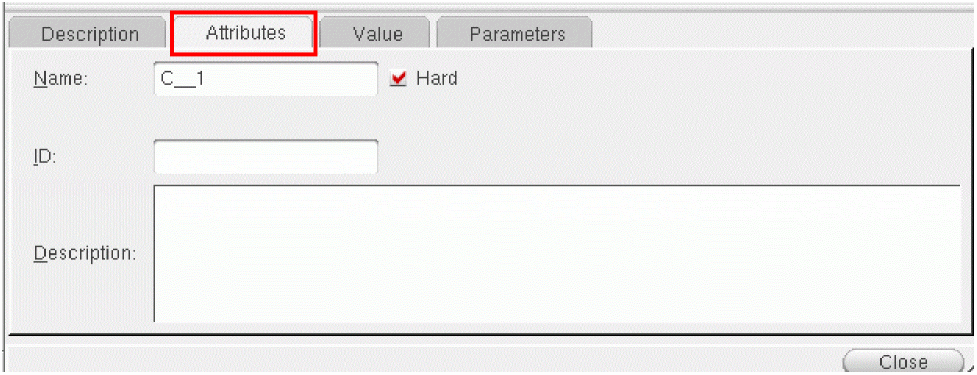
-
Name
: A unique, default name is displayed in this field for every process rule that you add. You can replace this name with a new name, if needed.
- Hard : Select the Hard check box for a process rule if you do not want another process constraint to over-ride this rule.
- ID : Use the ID field to assign an ID to the process rule.
- Description : Use the Description field to provide a brief description of the process rule in the context of its current scope (Tech. Design, or Object) or the constraint group to which the rule is applied.
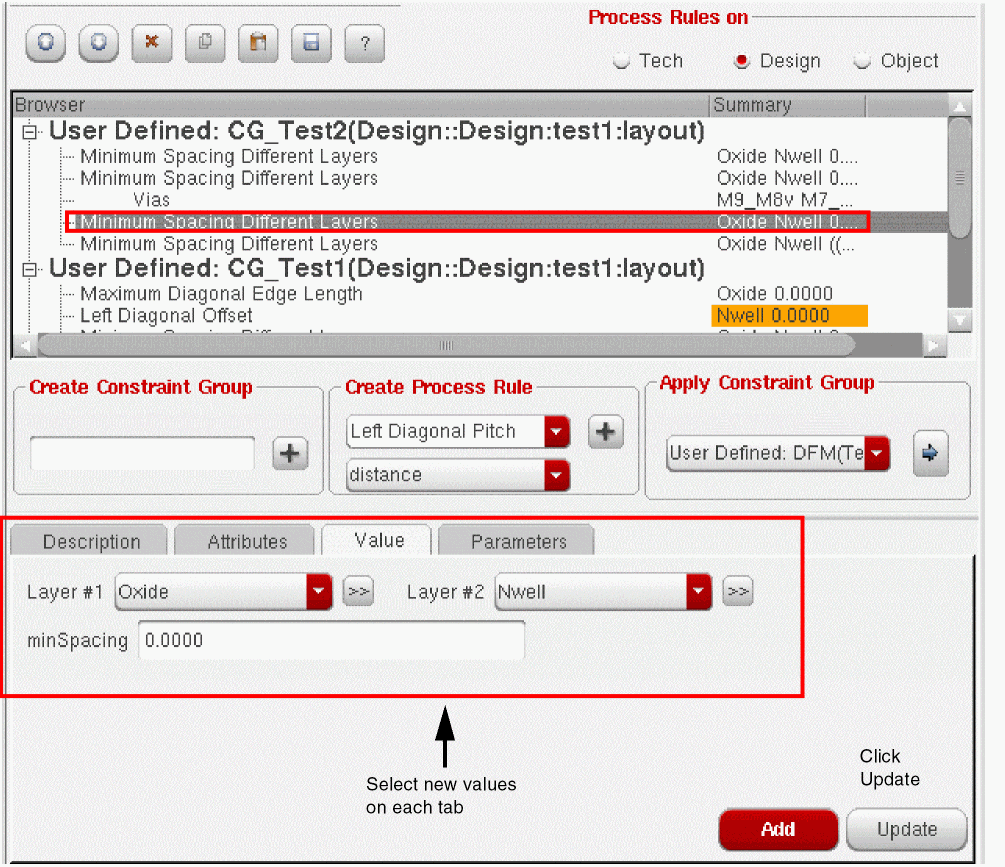
Value Tab
You can use this tab to select a layer such as Metal2, a constraint value such as 0.03, and an appropriate layer purpose, such as drawing, for the process rule you are creating. You can use the layer-purpose widget provided by the Value tab to create layer-purpose pairs, as required. For more information about creating layer-purpose pairs, see Creating a Layer-Purpose Pair.
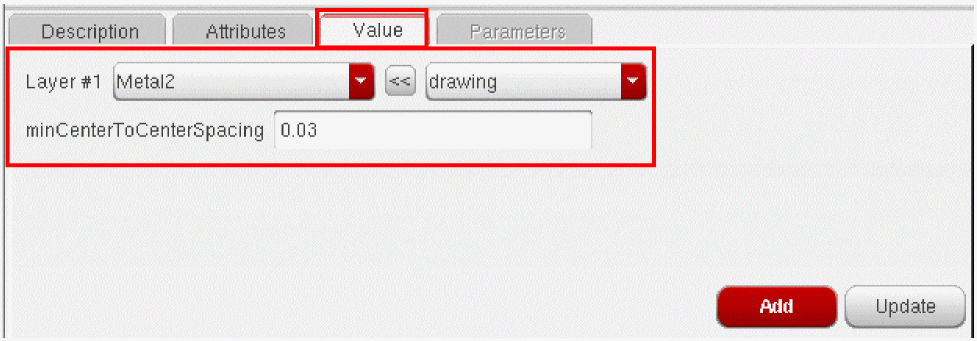
Some process rules, such as Minimum Spacing Different Layers, may require you to select two layers and specify the associated purposes.

Parameters Tab
You can use this tab to specify the parameters, such as distance, width, and endOfLineSpace, that define the conditions governing when or how a process rule can be applied.
Depending on the process rule you select, the parameters displayed on this tab vary.
- If a process rule has no associated parameters, the Parameters tab is unavailable.
- If a process rule has several associated parameters, default values are displayed for all the constraint parameters. You can modify these default values, as required.
- If a process rule has several parameters of which some are currently not supported, these parameters display “UNSUPPORTED” next to their name. The supported parameters display a default value that you can modify.
If you modify the default value of a parameter, the Restore Default Value ( ) button appears next to the new parameter value. You can click this button to revert to the default value for this parameter.
- The value you enter for a parameter is validated against the data types allowed for that parameter, such as integer or string. An unsupported data type is not accepted.
Apply Constraint Group Section
This section lets you apply a constraint group from the same or different scope to the selected constraint group in your current scope. In other words, the Apply Constraint Group section acts as a link, making all the applicable Constraint Groups available in the current scope.
For example, you can select a constraint group from the Tech scope and apply it to a custom constraint in the Design scope. However, you can apply a constraint group to a selected constraint only once. For information on how to perform the tasks, see Applying a Constraint Group.
For more information about using the Apply Constraint Group section, see Applying a Constraint Group.
For information on the tasks you can perform in the Process Rule Editor, see the topics listed below.
- Creating a Constraint Group
- Customizing a Constraint Group
-
Creating a New Process Rule
- Creating a New Process Rule in the Technology or Design Mode
- Creating a New Process Rule for a Selected Object
- Creating a New Process Rule for a Constraint
- Copying an Existing Process Rule
- Creating a Layer-Purpose Pair
- Applying Valid LPPs Process Rule
- Creating a Voltage Dependent Process Rule
- Editing Existing Process Rule Values
- Applying a Constraint Group
- Setting the Precedence of a Constraint Group or Process Rule
- Virtuoso Generated Constraint Groups
- Applying an Existing Constraint Group to a Selected Object
- Removing a Constraint Group or Process Rule
- Saving Changes and Closing the Process Rule Editor
Creating a Constraint Group
You can create a new constraint group only in the Technology or Design mode by using the Create Constraint Group field. In the Object mode, the field is inactive.
To create a new constraint group:
-
On the Constraint Manager toolbar, click the Process Rule Editor button (
 ).Alternatively, right-click the design object in the layout canvas or the layout navigator and choose Process Rule Editor from the shortcut menu.The Process Rule Editor Graphical User Interface is displayed.
 - In the Process Rules on section, choose one of the following:
-
Type a name for the new constraint group in the Create Constraint Group section.
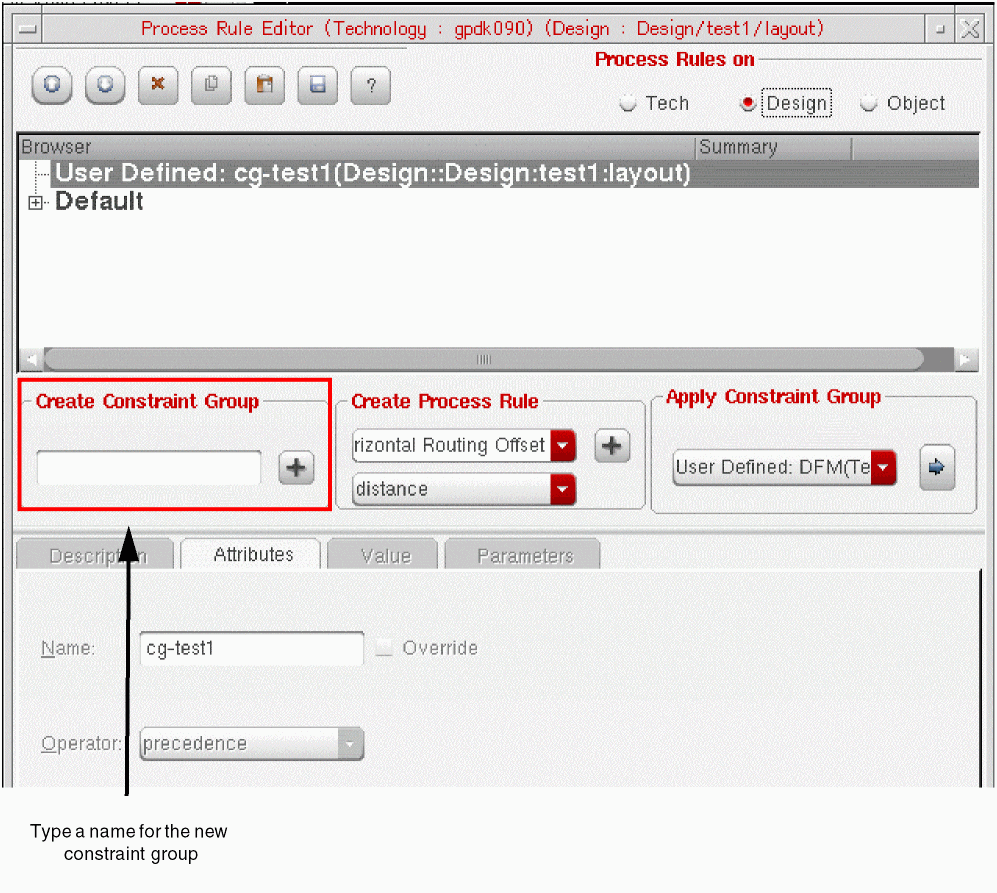
- Click the plus (+) button in the Create Constraint Group section to add the new group to the database you selected.
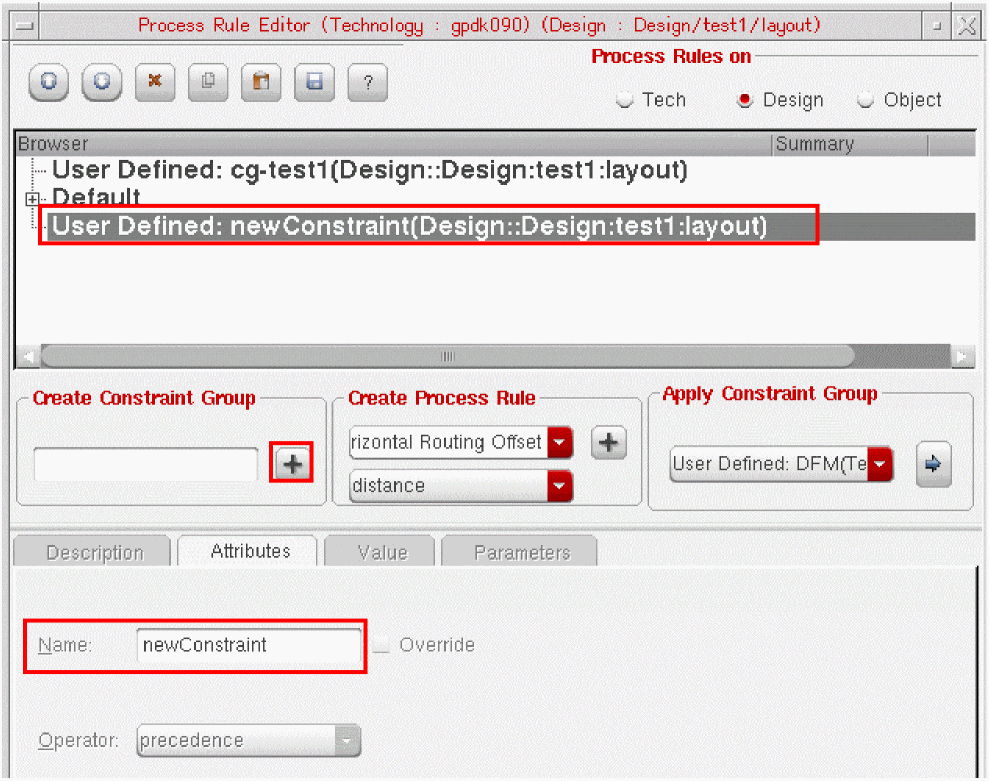
The constraint group you created is added to the browser pane as displayed in the figure above.
The new constraint group is created as an empty floating constraint group for the selected mode (technology or design).
Customizing a Constraint Group
There can be constraints that are specified by adding information with the PRE. This information can be directly added or viewed in the constraint manager when you want to apply a single pre-existing constraint group to the available fields in the PRE. However, there are cases where you may not have any available constraint groups that meet your requirement. Therefore, you can generate customized constraint groups that are specific to your naming convention and as per the required design or style.
This customization can be provided in the form of the following SKILL functions:
isConstraintGroupApplicable(
    ciCon, CGDefName, CG
)
=> t|nil
listGroupsThatCanBeGenerated(
    ciCon, CGDefName
)
=> a list of strings)
generateConstraintGroup(
    ciCon, CGDefName, CGName
)
=> a SKILL Constraint Group Object
-
ciConis the SKILL object representing the current constraint in the constraint manager. -
cgDefNameis the name of the CI constraint group's definition that you are trying to fill. For example,shielding,transReflexive,reflexive,default,taper,inputTaper, andoutputTaper. -
CGis the SKILL object representing a constraint group that you want to test. -
CGNameis the string name of the constraint group that you want to generate.
In addition, you can override the built-in functions by:
- Creating replacement functions with arguments and return values as shown above.
- Calling the ciSetCMCGSKILLCallbacks SKILL function.
You can use nil for any of these values if you want to reset them to default.
Creating a Custom Constraint Group and Defining Default Parameter Values
Alternatively, you can also create a custom constraint group and define default parameter values using the SKILL commands ciAddRuleGroup and ciAddProcessRules in the CIW. For example,
-
In the CIW, create a new constraint group called
myRG1, using theciAddRuleGroupcommand:cv=geGetEditCellView()
myRG1=ciAddRuleGroup(cv "myRG1")
-
Define default values for the top and bottom layers of the constraint group
myRG1using theciAddProcessRulescommand:ciAddProcessRules(myRG1 '( ("minWidth" "Metal1" 1.0) ("minWidth" "Metal2" 1.2) ("validLayers" nil ("Metal1" "Metal2" "Metal3"))))
The new constraint group can now be selected as the Default Group (Constraint Group) on the Constraint Parameter Editor.
Creating a New Process Rule
You can create new process rules for the entire technology or design, for one or more selected objects, or for a constraint applied to an object in your design. You can also copy process rules from one or more constraint groups to another constraint group. In addition, you can edit an existing process rule and specify layer purposes. You can also create and apply rules that are voltage dependent.
- Creating a New Process Rule in the Technology or Design Mode
- Creating a New Process Rule for a Selected Object
- Creating a New Process Rule for a Constraint
- Copying an Existing Process Rule
- Creating a Layer-Purpose Pair
- Applying Valid LPPs Process Rule
- Creating a Voltage Dependent Process Rule
- Editing Existing Process Rule Values
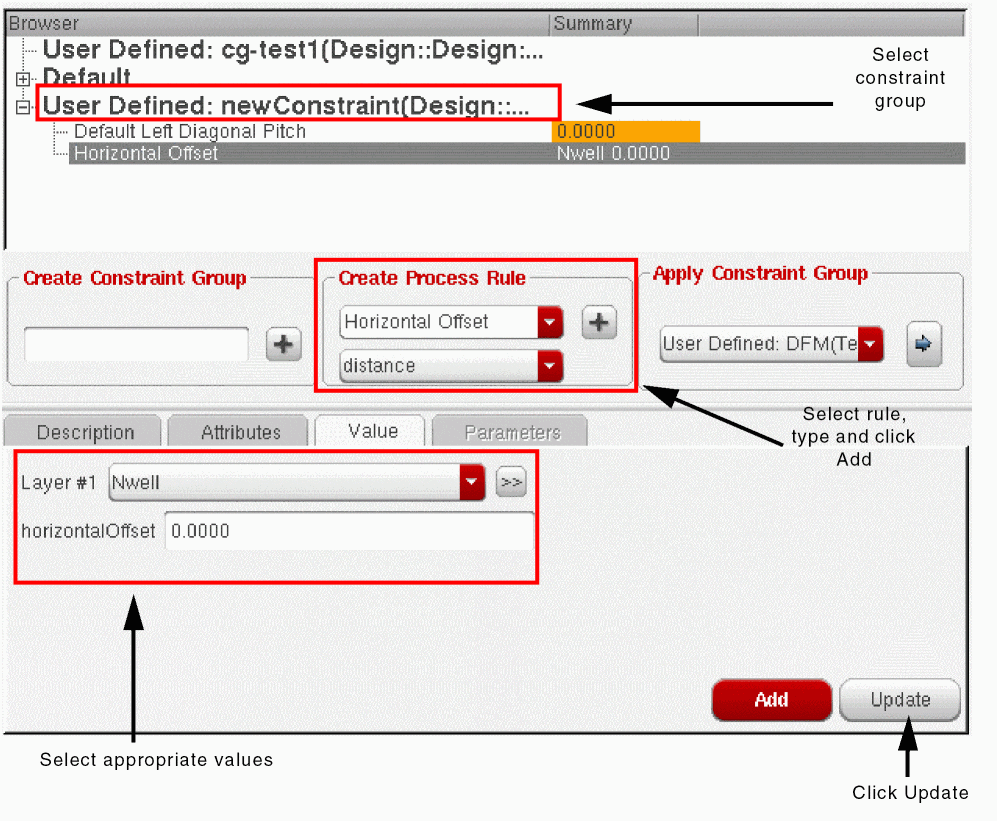
Creating a New Process Rule in the Technology or Design Mode
To create a new process rule in a constraint group using the Technology or Design mode:
- In the browser pane, choose the constraint group in which you want to create the new rule.
- In the Create Process Rule section, choose
-
Click the plus (+) button in the Create Process Rule section to add a new process rule to the selected constraint group.
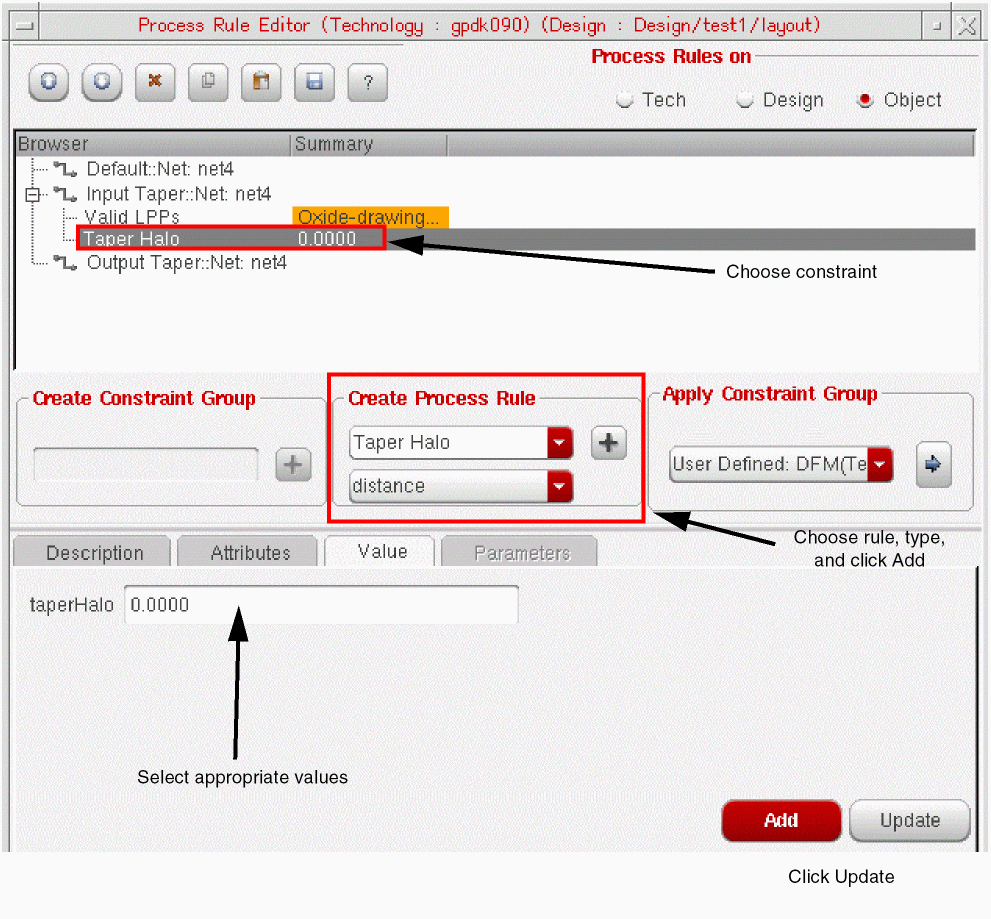
The process rule is added to the list. The Summary field in the browser pane is highlighted brown to indicate that the rule was created using the default values. You can modify the rule by changing the default values. This also removes the highlight from the Summary column. -
Modify the rule by specifying appropriate data on the Attributes, Value, and Parameters tabs.
-
Click Update to apply the value you set in the Value tab.The changes you make on the Attributes and Parameters tabs are automatically saved. Therefore, you do not need to click the Update button to save these changes.The new values that you specify on the Value tab appear in the Summary column of the browser pane.
- Select each new rule you added and edit the values, as required.
Creating a New Process Rule for a Selected Object
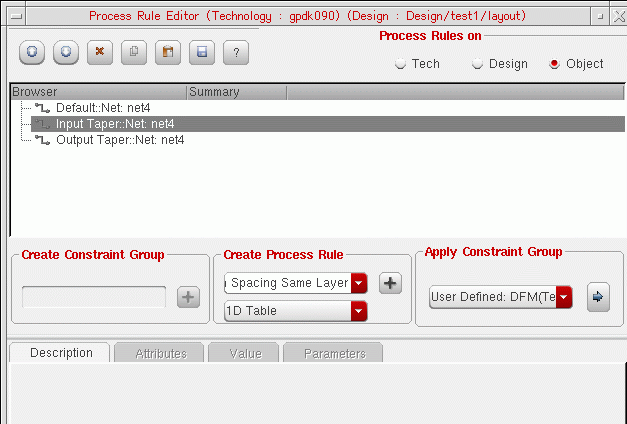
You can use the Process Rule Editor to create process rules for the selected objects in your design. In this mode, the browser pane shows only the categories that are applicable for the selected objects. For example, if you select a net object, you see only the Default, Input Taper, and Output Taper categories.
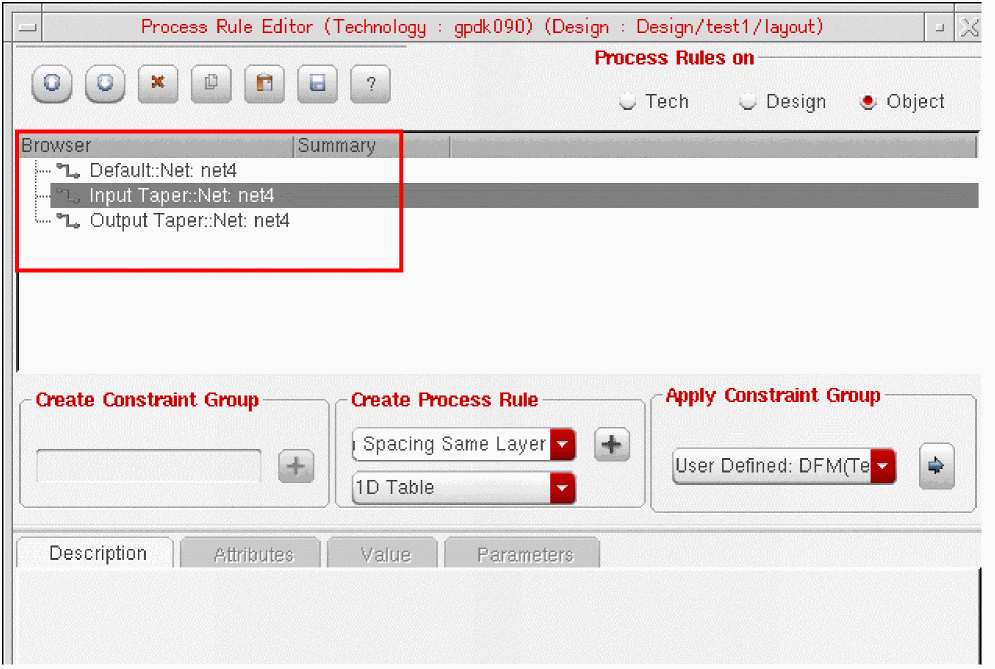
Selecting one of the categories populates the Create Process Rule section with the rules you can define in that particular category. For example, for Input Taper, as displayed in the figure above, you can define the following rules only:
To create a process rule in the Object mode:
- Use the Navigator assistant or the design window to select the object to which you want to add a process rule.
- In the browser pane, choose the category for which you want to create the rule.
- In the Create Process Rule section, choose
-
Click the plus (+) button in the Create Process Rule section to add the new process rule to the selected constraint group.
The process rule is added to the list. The Summary field in the browser pane is highlighted brown to indicate that the rule was created using the default values. -
Modify the rule by changing the default data on the Attributes, Value, and Parameters tabs.
-
Click Update to apply the new values you set in the Value tab.The changes you make on the Attributes and Parameters tabs are automatically saved. Therefore, you do not need to click the Update button to save these changes.The new values that you specify on the Value tab appear in the Summary column of the browser pane. The brown highlight disappears indicating that the rule has been modified.
-
Select each new rule you added and edit the values, as required.
You can also create an appropriate Virtuoso-generated constraint group or apply an existing constraint group to a selected object. For more information, see Applying a Virtuoso Generated Constraint Group and Applying an Existing Constraint Group to a Selected Object.
Creating a New Process Rule for a Constraint
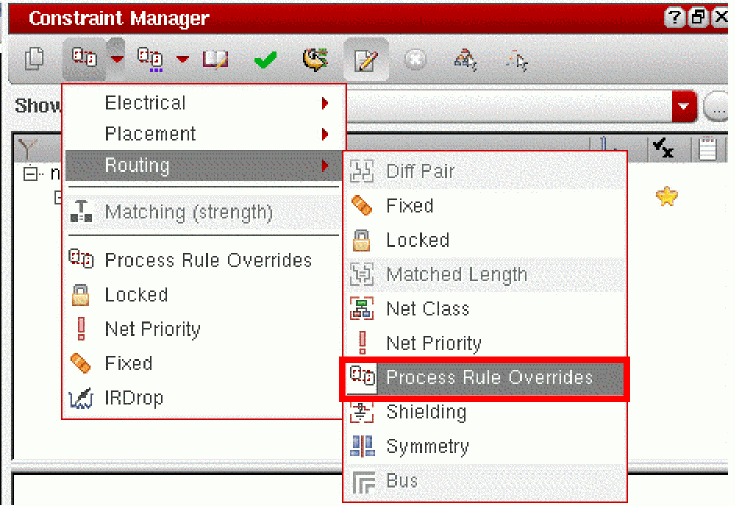
You can use the Process Rule Editor to create process rules for constraints selected in the Constraint Manager assistant. The following constraints are supported.
When you define process rules for constraints, the browser pane displays only the process rule categories that apply to the selected constraint. For example, for a Diff Pair constraint, you can see the Group to Outside Group, Within Group, and Default categories.
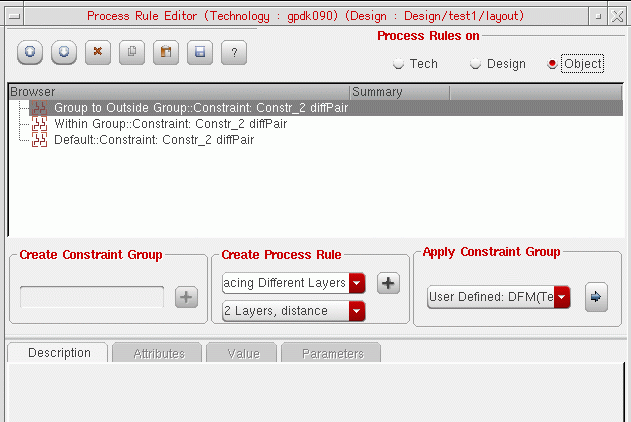
- Group to Outside Group refers to rules that apply between the members of the current constraint and the objects outside the current constraint.
- Within Group refers to rules that apply between the members of a constraint.
- Default refers to the default set of constraints that apply to the members of the current constraint.
Selecting one of these categories populates the Create Process Rule section with the rules you can define in that particular category. For example, for Group to Outside Group, you can define the Minimum Spacing Different Layers and Minimum Spacing Same Layer rules.
To create a process rule for a constraint;
- Select the constraint for which the rule is to be created in the Constraint Manager assistant.
-
If the Process Rule Editor is not displayed, click the Process Rule Editor button (
) on the Constraint Manager toolbar.
- In the Process Rule Editor browser pane, select the category for which you want to create the rule. For this example, let us select the Group to Outside Group category.
- In the Create Process Rule section, choose
-
Click the plus (+) button in the Create Process Rule section to add the new process rule to the selected constraint group.
The process rule is added to the list. The Summary field in the browser pane is highlighted brown to indicate that the rule was created using the default values. You can modify the rule by changing the default values. This also removes the highlight from the Summary column.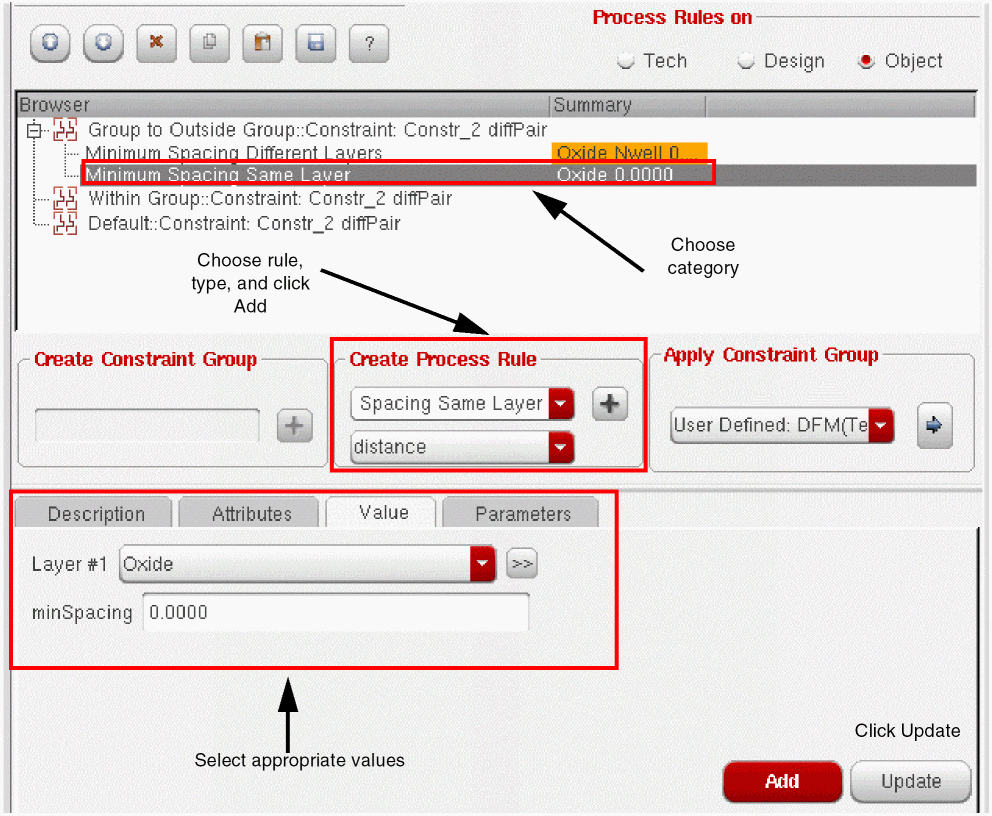
-
Modify the rule by specifying appropriate data on the Attributes, Value, and Parameters tabs.
-
Click Update to apply the values you set in the Value tab.The changes you make on the Attributes and Parameters tabs are automatically saved. Therefore, you do not need to click the Update button to save these changes.The new values that you specify on the Value tab appear in the Summary column of the browser pane.
- Select each new rule you added and edit the values, as required.
Copying an Existing Process Rule
You can quickly create new process rules by copying the existing ones.
To copy some existing process rules to a new location:
-
In the browser pane, select one or more process rules you want to copy.
Note:
-
Click the Copy Rules button on the toolbar.
The selected rules are copied to the clipboard. -
Select the constraint group to which you want to copy the selected rules and click the Paste Rules button on the toolbar.
The process rules are pasted into the new location as displayed in the figure below.
Note: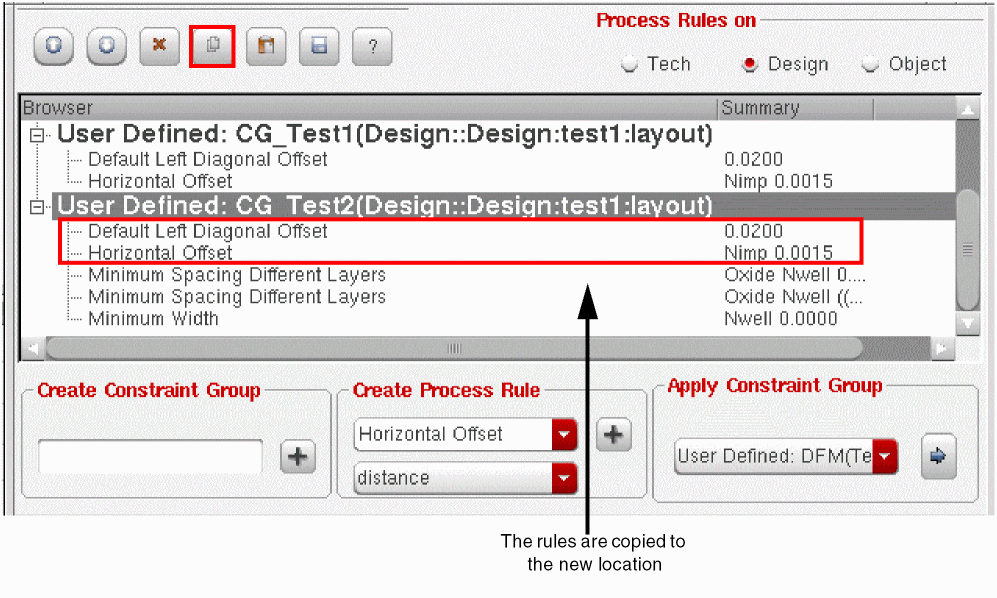
- You can paste the copied rules to a single constraint group at a time. The tool does not support selecting multiple target destinations for pasting the copied rules.
- To copy a rule to different target destinations, select each target at a time and click the Paste Rules button on the toolbar. Alternatively, you can use the Paste Rules command from the shortcut menu.
If you delete a process rule in the browser in between copying and pasting, the deleted rule is also removed from the clipboard and is not subsequently pasted.
Creating a Layer-Purpose Pair
To create a layer-purpose pair in PRE:
-
Select a layer from the drop-down list box and click the arrow (
 ) button to the right of the list.
A new purpose drop-down list box appears, as displayed in the figure below.
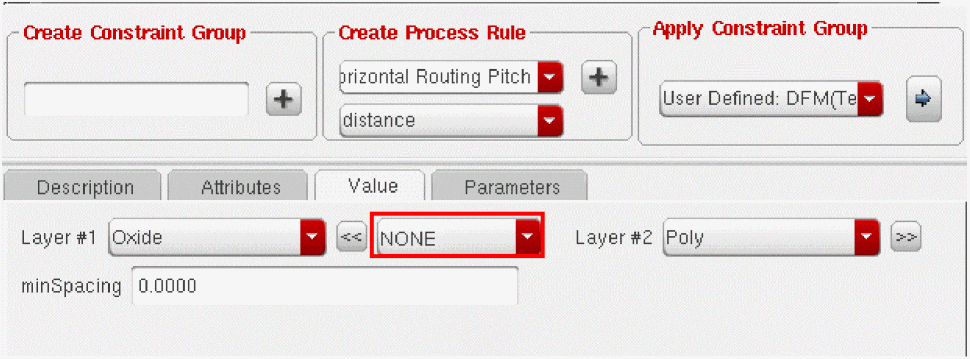
-
Select an appropriate purpose, such as
drawing, for the selected layer.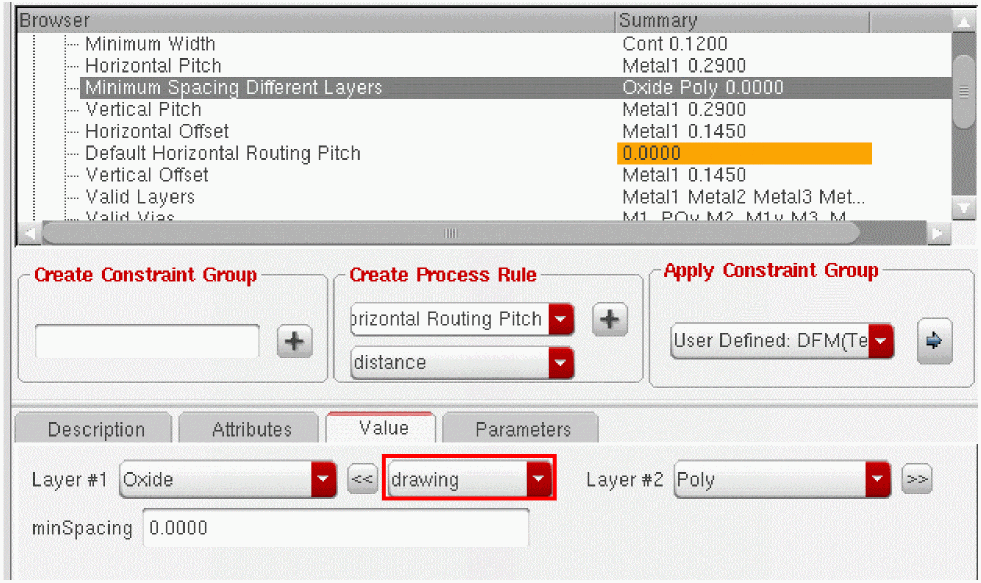 Currently, PRE supports default purposes for most of the layer constraints. However, other Virtuoso applications fully support purposes only for the following constraints: Minimum Spacing, Minimum Width, and Minimum Clearance. Therefore, the default state of the Purpose cyclic field for the constraints that are not “purpose-supported” by other Virtuoso applications is
NONE.For more information about the layer-purpose pairs supported by the Virtuoso technology file, see Purpose-Aware Derived Layers and techPurposes in the Virtuoso Technology Data ASCII Files Reference User Guide. -
Specify an appropriate data format value for the selected layer. For example, when creating a Minimum Spacing Different Layers
0.0250, between the two selected layers.
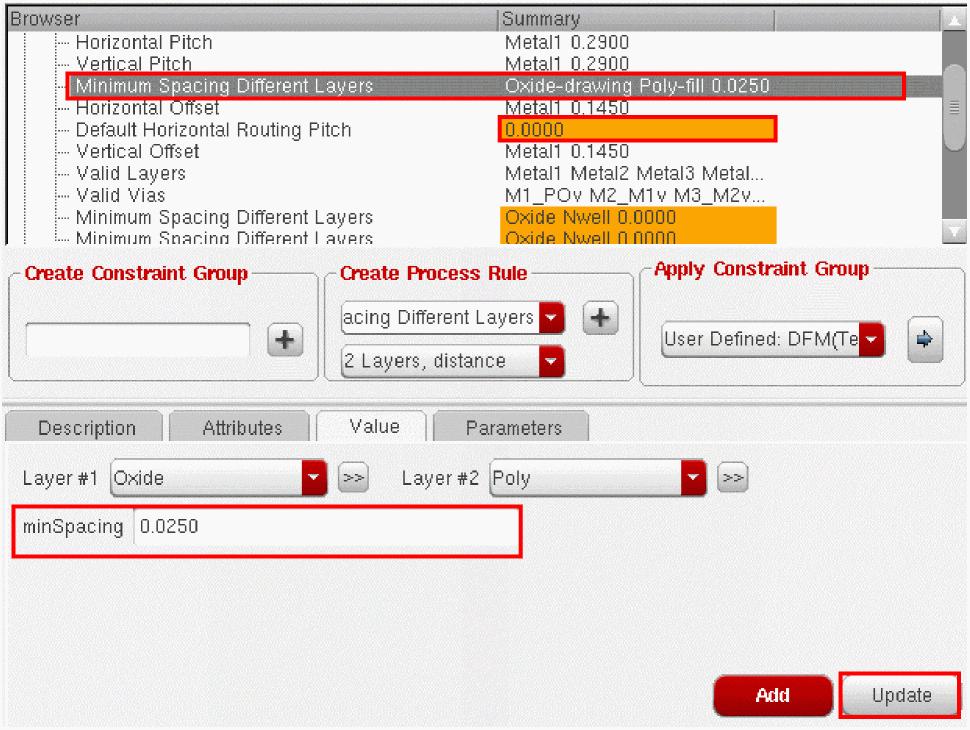
- Click Update to apply the new values you set on the Value tab.
The Summary column displays a single concatenated string representing the layers used for the selected process rule and the current value of the constraint. The brown color indicates that the process rule has been created using default values, which might need to be changed.
Applying Valid LPPs Process Rule
In addition to allowing purposes to be defined for the selected layer when creating a process rule, the Process Rule Editor supports the Valid LPPs (Valid Layer Purpose Pairs) process rule. This rule defines the valid layer-purpose pairs that can be used for routing. Like most other process rules, you can add this process rule to a constraint group in the Technology or Design scopes or to an Object. You can also modify or delete the process rule, as required.
To select a valid layer-purpose pair from the Valid LPPs process rule:
-
Select the
Valid LPPsprocess rule in the browser pane and click the Value tab. - From the list of layer-purpose pairs displayed on the Value tab, select the check box next to the layer name in the row that carries the required layer-purpose combination.
-
Click Update to apply the layer-purpose values you selected.
The layer-purpose pair that you selected displays as a single, hyphenated string in the Summary column of the browser pane.
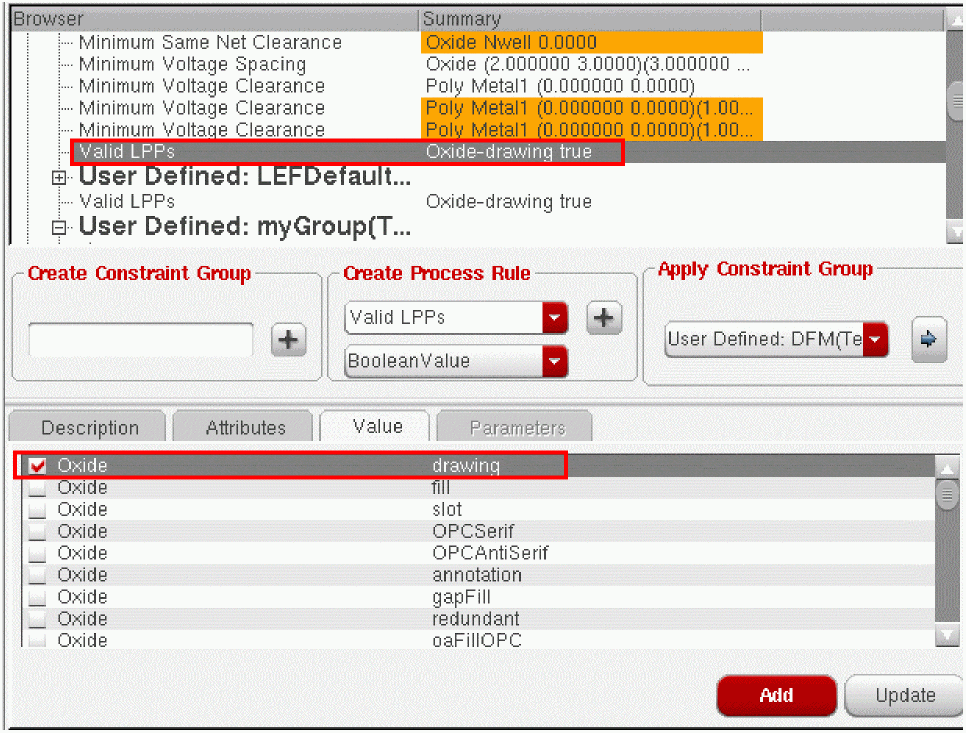
For information about creating a layer-purpose pair in PRE, see Creating a Layer-Purpose Pair.
Creating a Voltage Dependent Process Rule
Voltage dependent rules are the ones that define a process constraint in terms of a voltage level. Currently, PRE supports two such rules—minVoltageSpacing and minVoltageClearance. Both these rules define the separation constraint between two devices in terms of voltage levels. The data value format supported by both the rules is voltage, spacing.
minVoltageSpacing defines the spacing between devices along a single layer, whereas minVoltageClearance defines the spacing between devices on two layers. You can define the required voltage values and the corresponding spacing for both the process rules using the VOLTAGE-Spacing table in the Value tab, as displayed below.
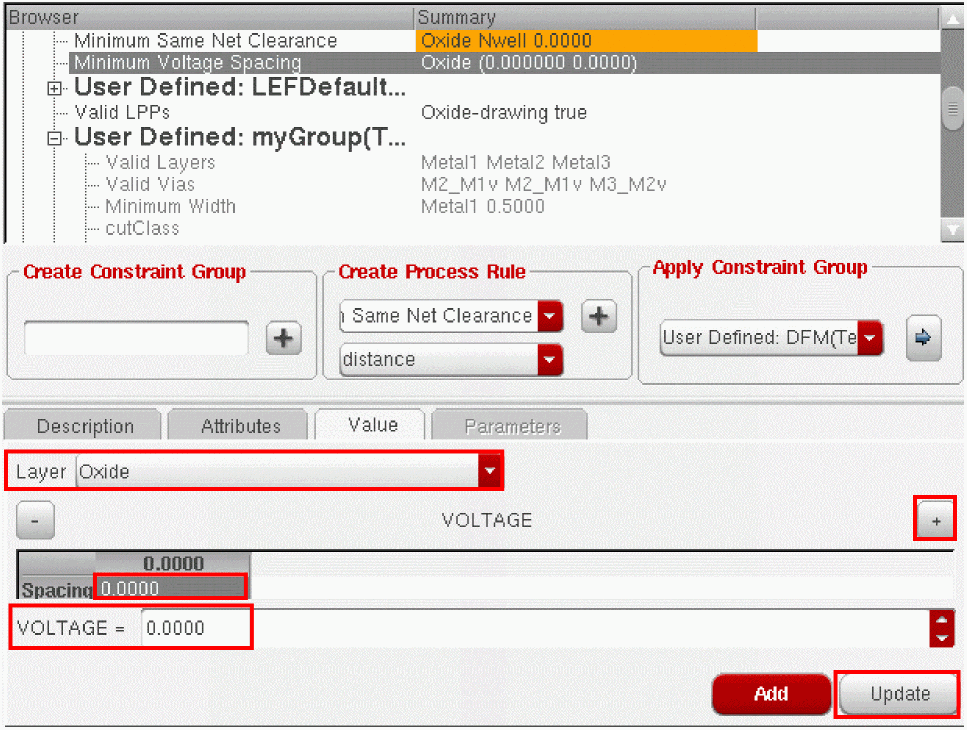
To specify the required voltage and spacing values for a selected layer:
- Type an appropriate value for the voltage in the VOLTAGE field.
- Double-click the Spacing field and type in an appropriate value.
-
To add another voltage-spacing column to the table, click the Insert new column (+) button on the right.
A new VOLTAGE-Spacing column is added as displayed below.
If you click the Insert new column (+) button multiple times, multiple columns are added. By default, the voltage in each column increments by 1. You can select each column and modify the voltage and spacing values, as required.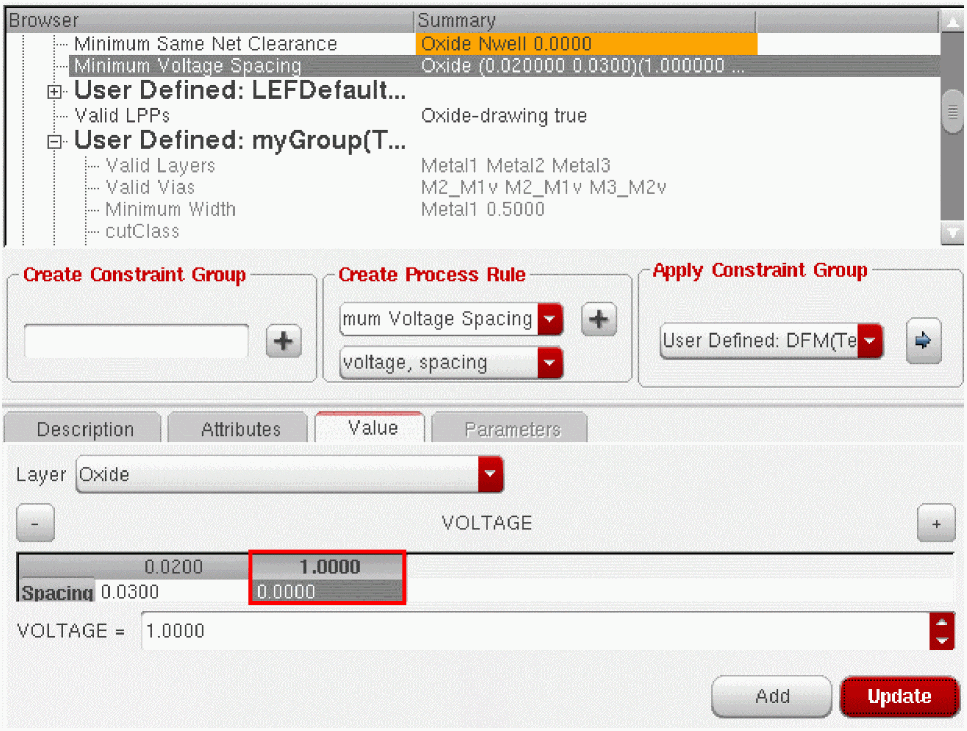
-
Click Update to apply the values you set.
The new values that you specify on the Value tab appear in the Summary column of the browser pane.
For minVoltageClearance, you need to select two layers instead of one and perform the steps as described above.
Editing Existing Process Rule Values
To edit the layer-specific values for an existing process rule:
-
In the browser pane, select the process rule you want to change.
A dynamic widget is displayed. The widget comprises the following tabs:
Each tab displays the current values for the selected process rule. -
To edit the existing process rule values, change the values in each of the tabs, as required.
-
Click the Update button to save the values you changed on the Value tab. The changes you make on the Attributes and Parameters tabs are automatically saved. Therefore, you do not need to click the Update button to save these changes.The process rule is updated to reflect the new settings.
Applying a Constraint Group
For a process rule to be applied to a technology, design, or object; it must be a member of a constraint group that supports the rule. Likewise, when applying a constraint group, the target constraint should support the applied constraint group.
For example, when applying a Constraint Group in the Technology scope, you can only select the Constraint Groups that are supported by the Technology database. The supported items are the ones that appear in the Constraint Group drop-down menu for each database.
To apply a constraint group to another constraint group, use the data value formats in the Apply Constraint Group section. The Constraint Group drop-down menu reflects the associated database as a tag (Tech or Design). This helps avoid confusion when selecting the constraint groups.
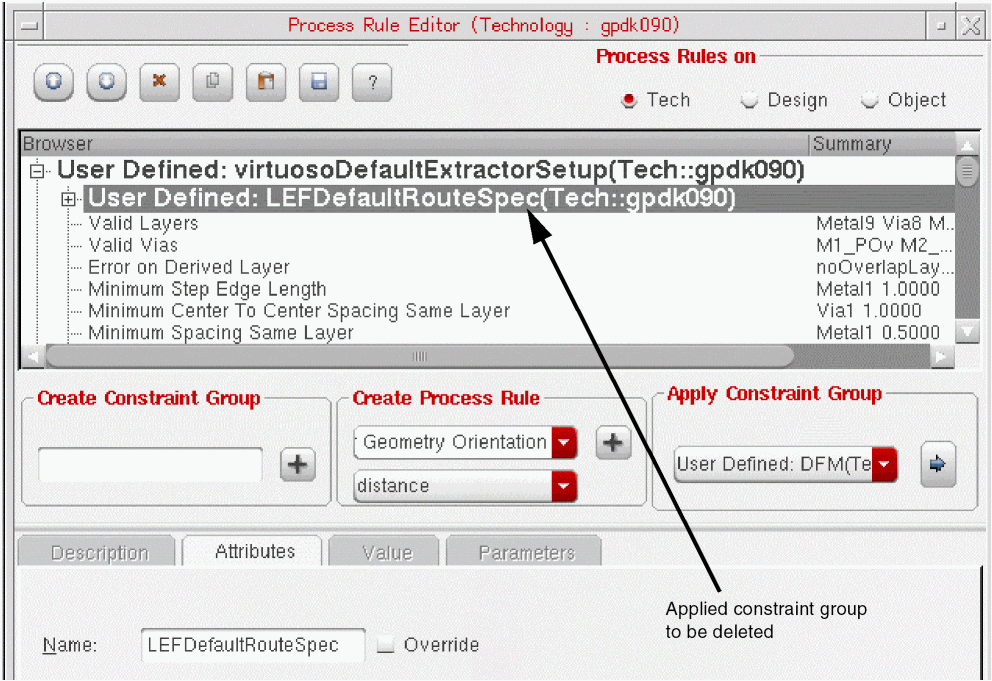
Let us now apply a constraint group to the virtuosoDefaultExtractorSetup constraint group in the browser.
-
Select the virtuosoDefaultExtractorSetup constraint group in the browser pane.
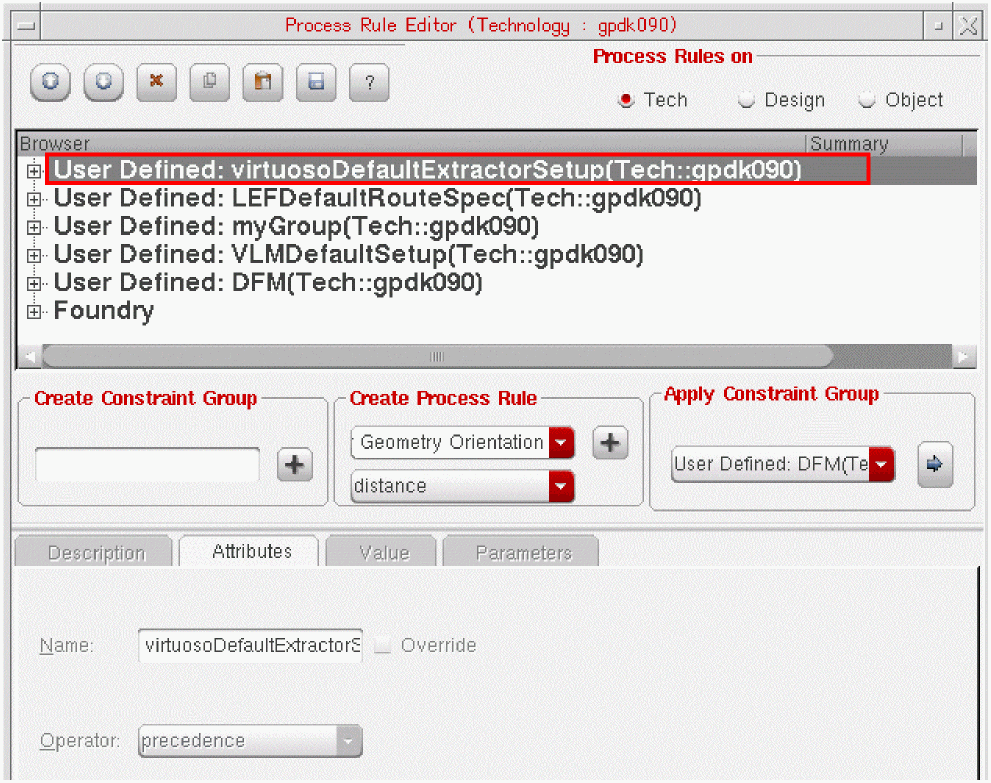
-
Choose the constraint group you want to apply from the drop-down list box in the Apply Constraint Group section.
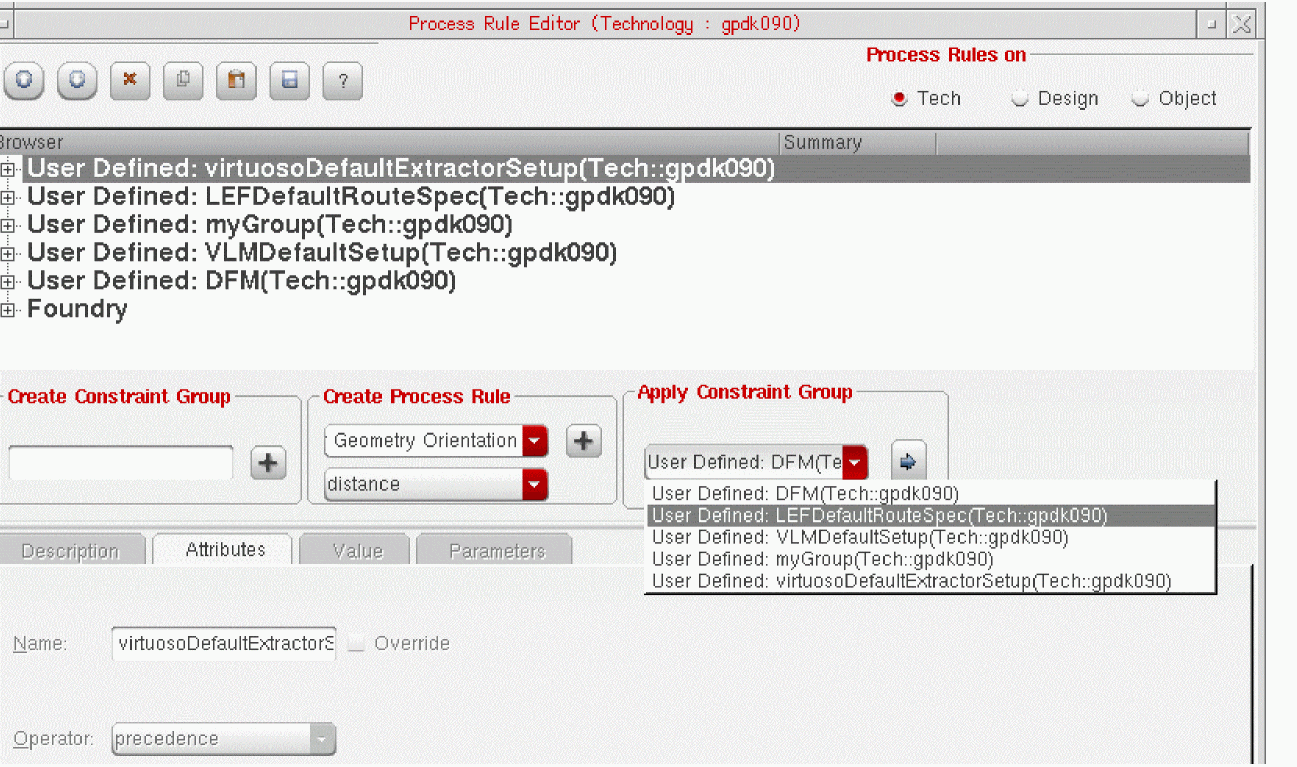
- Click the arrow button on the right of the list box to apply the constraint group.
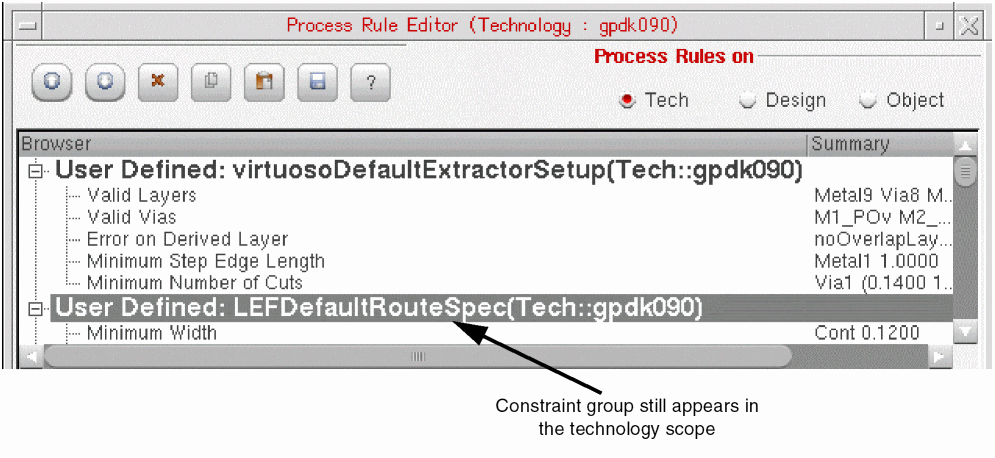
The constraint group is inserted into the virtuosoDefaultExtractorSetup constraint group in the browser pane. Any process rules defined in the DefaultRouteSpec constraint will now be applied to any design referencing the virtuosoDefaultExtractorSetup constraint group.
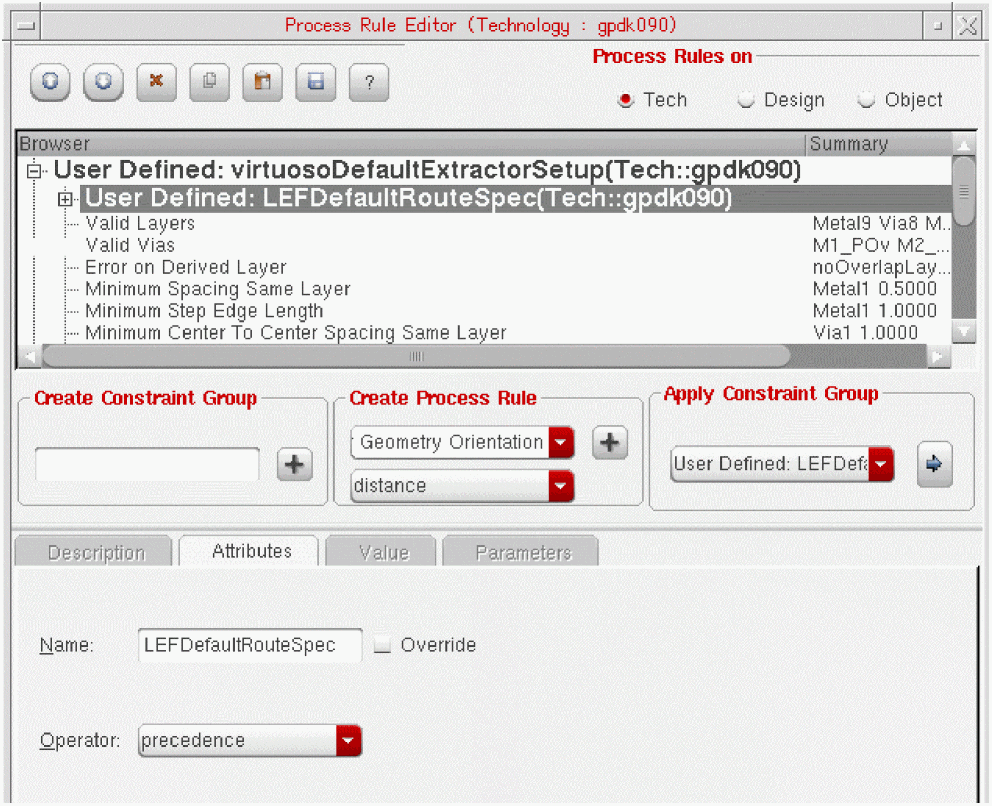
The constraint group is still also listed on the main branch of the browser pane.
To make any changes to the Constraint Group, you must update the source Constraint Group and not the one linked in. Applied constraint groups are not available for editing. In fact, any changes you make to the source automatically reflect at instances where the constraint group is linked.
For example, to update the process rules for LEFDefaultRouteSpec, you must update the constraint group in the main browser pane instead of trying to update the instance appearing under virtuosoDefaultExtractorSetup.
Setting the Precedence of a Constraint Group or Process Rule
Process rules are applied in the order in which they are listed inside a constraint group. However, you can change the precedence of an applied constraint group or individual process rule by using the Move Up and Move Down arrow buttons on the toolbar.
To change the precedence of an applied constraint group or process rule:
-
Select the constraint group or process rule you want to move.
-
Do one of the following:
- Hold down the left mouse button to drag the constraint group to its new location. This method lets you move the selected constraint group or process rule more than one position at a time.
-
Right-click the constraint group or process rule and choose Move Up to increase or Move Down to decrease the precedence. This moves the selected object up or down the list one position at a time.
-
Click the Move Up or Move Down button on the Process Rule Editor toolbar. This moves the selected object up or down the list one position at a time.

Virtuoso Generated Constraint Groups
Virtuoso ships with a number of predefined constraint groups, which you can generate and apply to selected objects or constraints in your design.
These constraint groups are generated with a predefined set of rules set to values that are based on the available technology information. A generated constraint group is stored in the design when you apply it to a selected object or constraint in that design. The constraint group can also be applied to other objects and constraints. This lets you quickly generate and reuse constraints groups without having to manually enter the long list of common process rules. Furthermore, this allows the users to create their own Constraint Groups and modify them, as required, in less time.You can generate a predefined constraint group from the Constraint Manager parameters pane. To do this, select the object or constraint to be constrained, generate the type of constraint group you need, and then add, modify, or remove the process rules, as required.
For example, the picture below shows the constraint groups you can generate for a Shielding constraint – Parallel, Tandem, and Coaxial.
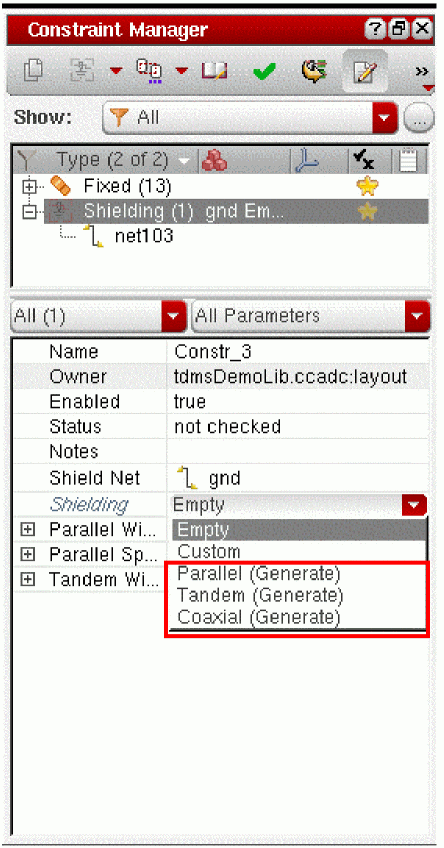
The label Generate at the end of each constraint group name indicates that this is a predefined constraint group that has not yet been generated for the current design. When you choose a constraint group from the Shielding drop-down list box, that group is generated with its default rules in the Process Rule Editor browser pane. This causes the Generate entry to be removed from the list box and is replaced by a Design entry of the same name. This indicates that the constraint group has been generated and stored in the design.
The table below lists the predefined constraint groups you can generate for each constraint type.
Applying a Virtuoso Generated Constraint Group
You have a design which you want to route with a minimum width that is double the width defined in the technology files. You need to create and apply a constraint group that contains process rules re-specifying the minimum width for all the valid routing layers in your design.
You can either create this constraint group manually and add and set the value for each rule individually, or you can have Virtuoso generate a constraint group containing the rules you need. To do this,
-
On the Constraint Manager toolbar, click the Process Rule Editor button.
The Process Rule Editor Graphical User Interface is displayed. - From the Navigator assistant, select an object in the design.
-
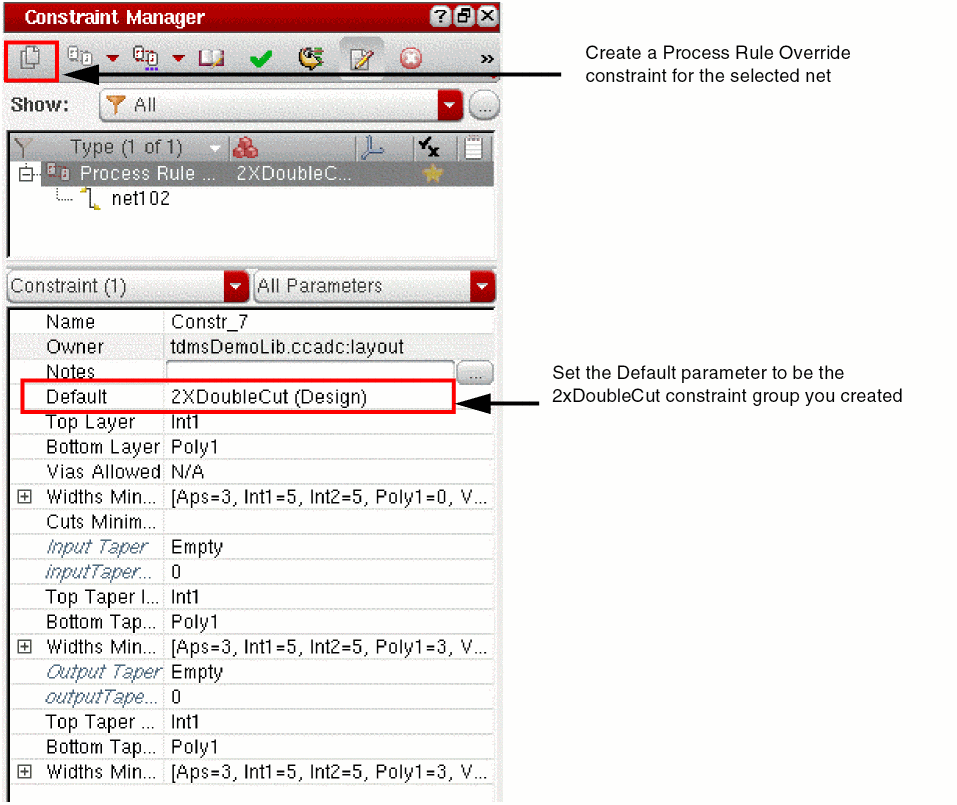
In the Constraint Manager assistant, create a Process Rule Override constraint for that object.
-
Pull down the list next to the Default parameter and choose the 2x Width generated constraint group.
The 2x Width constraint group contains rules that redefine the minimum width for each routing layer to be double the value defined in the technology files.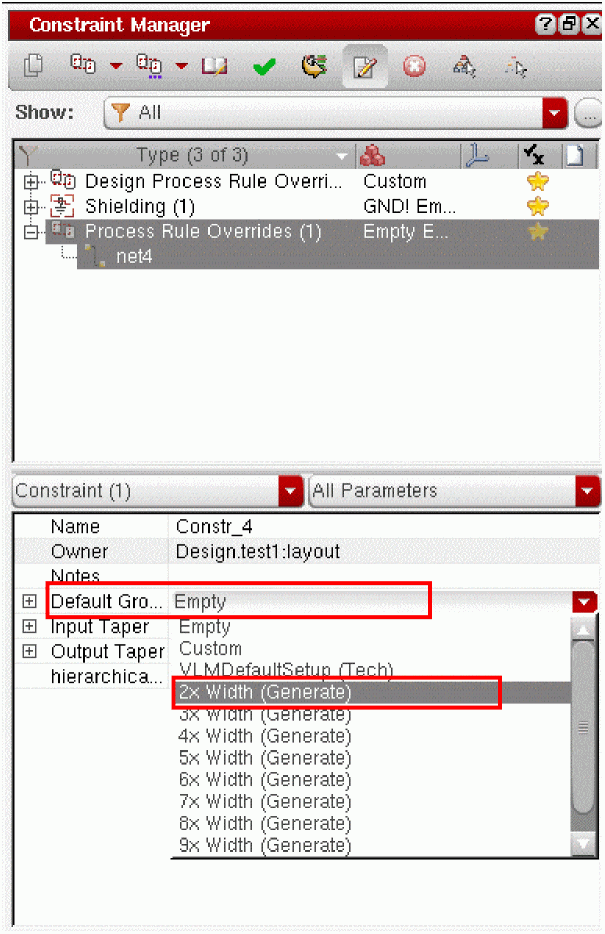
The predefined constraint group is added to the Design scope of the Process Rule Editor.
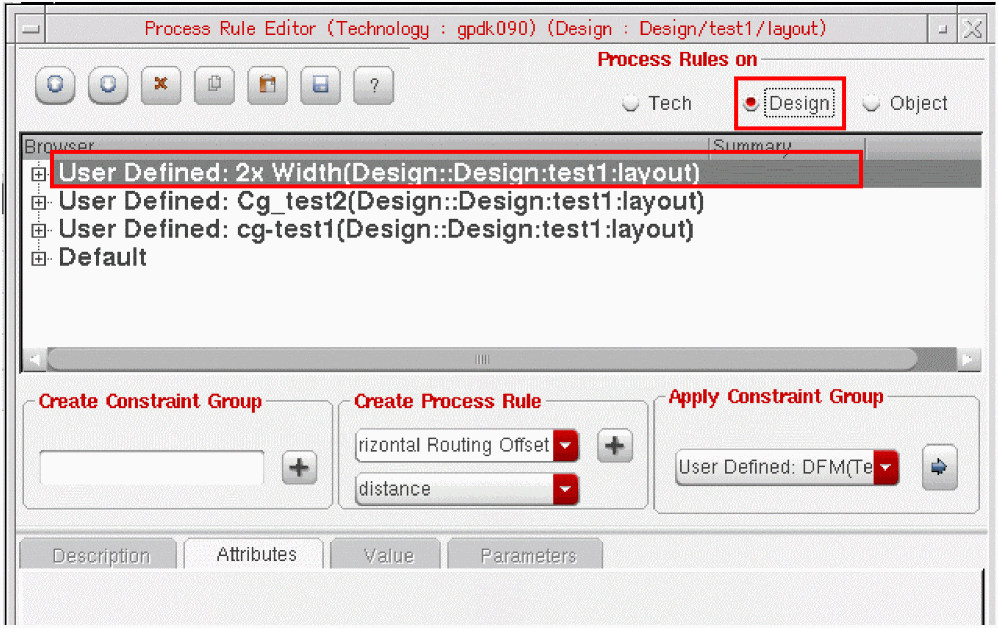
You can edit the constraint group directly or use the copy and paste functions to make the predefined constraint group more specific for your design.
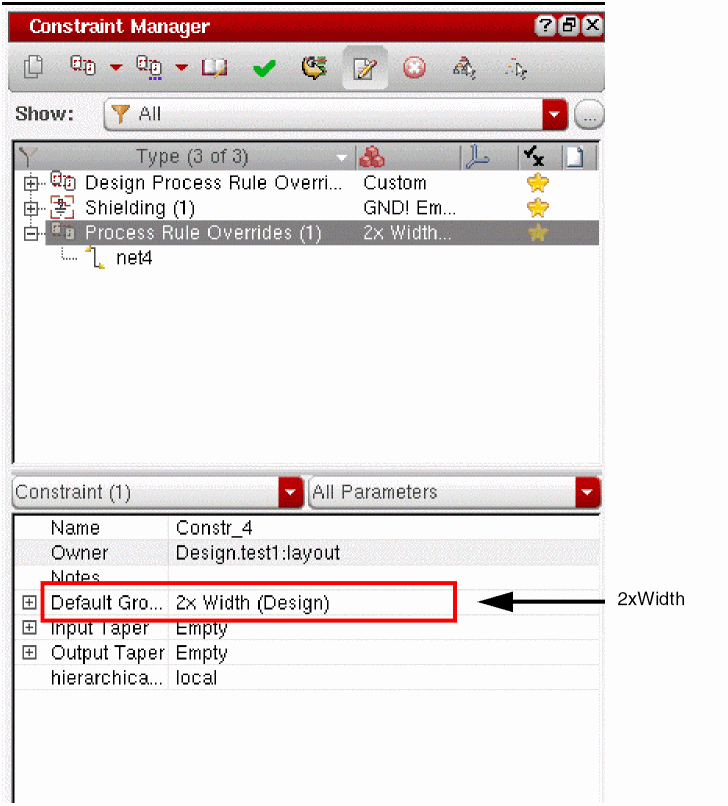
If you now check the Default parameter drop-down list box in the Constraint Manager, you will see that the Generate entry has changed to the corresponding Design entry. This indicates the constraint group has been generated and added to the Design library. You can add this constraint group to any net in the Design or Object scope other than net102 in the example.
Applying an Existing Constraint Group to a Selected Object
In addition to generating a new constraint group for an object, you can reapply an existing constraint group to another object. The parameters pane in the Constraint Manager assistant allows you this feature.
Assume that you have nets in your design.You want to route these nets using double-cut vias and with a minimum width larger than that defined in the technology files. To do this,
-
On the Constraint Manager toolbar, click the Process Rule Editor button (
).
The Process Rule Editor Graphical User Interface is displayed. -
Create a constraint group containing the individual constraints you need.
- Choose Design in the Process Rules on section.
- Create a constraint group to contain the process rules you require. See Creating a Constraint Group.
- Add the process rules you require. See Creating a New Process Rule.
You have created a constraint group definition such as the 2xDoubleCut constraint group shown below, which specifies the list of valid layers, double cuts for each via and a larger width than the minimum specified in the technology file.
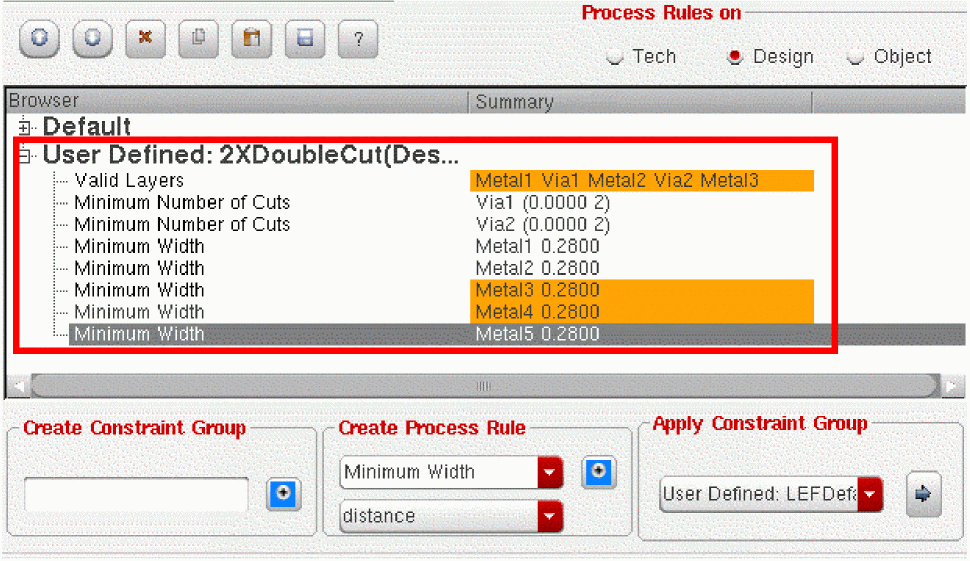 You could generate a constraint group like the one above more quickly by using one of the Virtuoso generated constraint groups as a starting point and adding the specific rules you need. For example, you could start with the 2xWidth constraint group and then edit the generated group to limit the layers and create double cuts for all the vias. For more information, see Applying a Virtuoso Generated Constraint Group.
 - From the Navigator assistant, select the first net to which you want to apply this constraint group.
- In the Constraint Manager assistant, create a Process Rule Override constraint for the selected net.
-
Pull down the list next to the Default parameter and choose the 2xDoubleCut constraint group you created previously.
-
Repeat steps 3 through 5 for each net to which you want to apply these constraints.
This lets you apply the same process rule overrides to different objects without having to re-enter the same process rules manually every time.
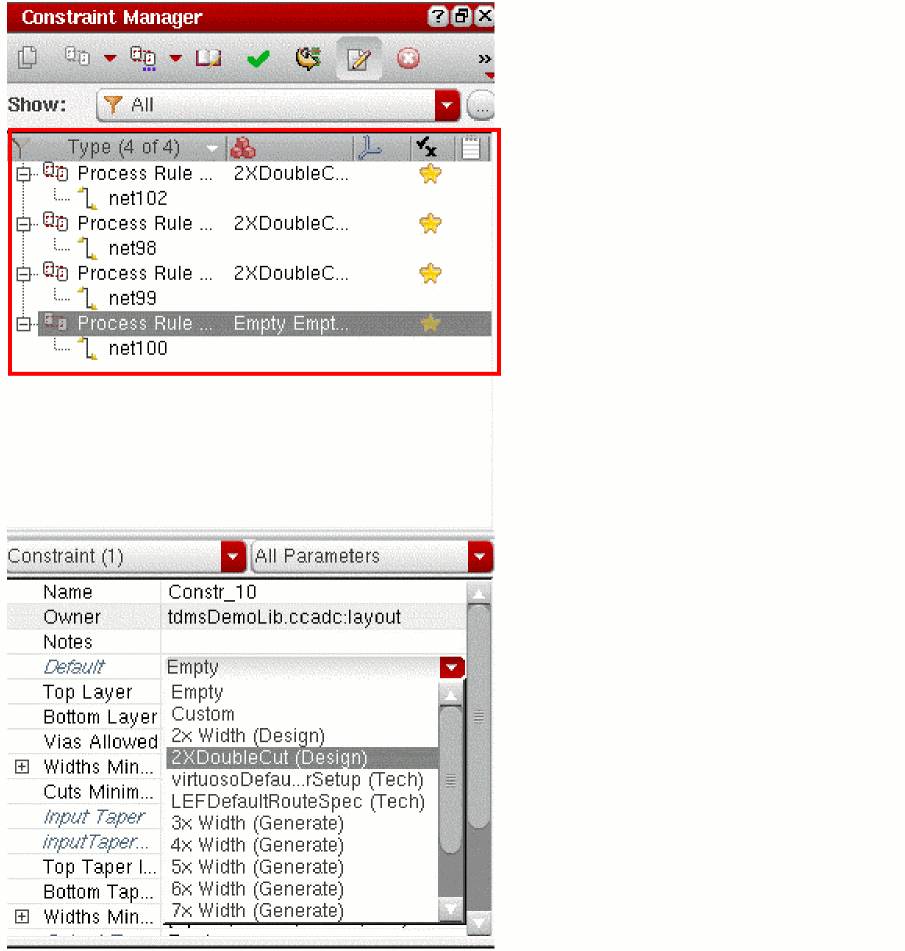
For example, assume the Default field in the Constraint Manager shows Empty. You open the Process Rule Editor and apply the 2xDoubleCut constraint group. The Default field in the Constraint Manager now updates to show 2xDoubleCut (Design).
- If the Process Rule Editor is empty, the Default field shows Empty.
- If the Process Rule Editor contains a single group, the Default field always shows the name of that group.
-
If you apply some process rules to the Default Constraint Group in the Object scope, the Default field in the Process Rule Editor shows Custom. If you then apply a constraint group to the Default constraint group, the value of the Default field changes to a constraint group string. The string includes the name of the new constraint you added. In addition, it displays Custom to indicate you have also added some custom Process Rules to the Default constraint group. The constraint string is displayed by both, the Constraint Manager and the Constraint Editor.
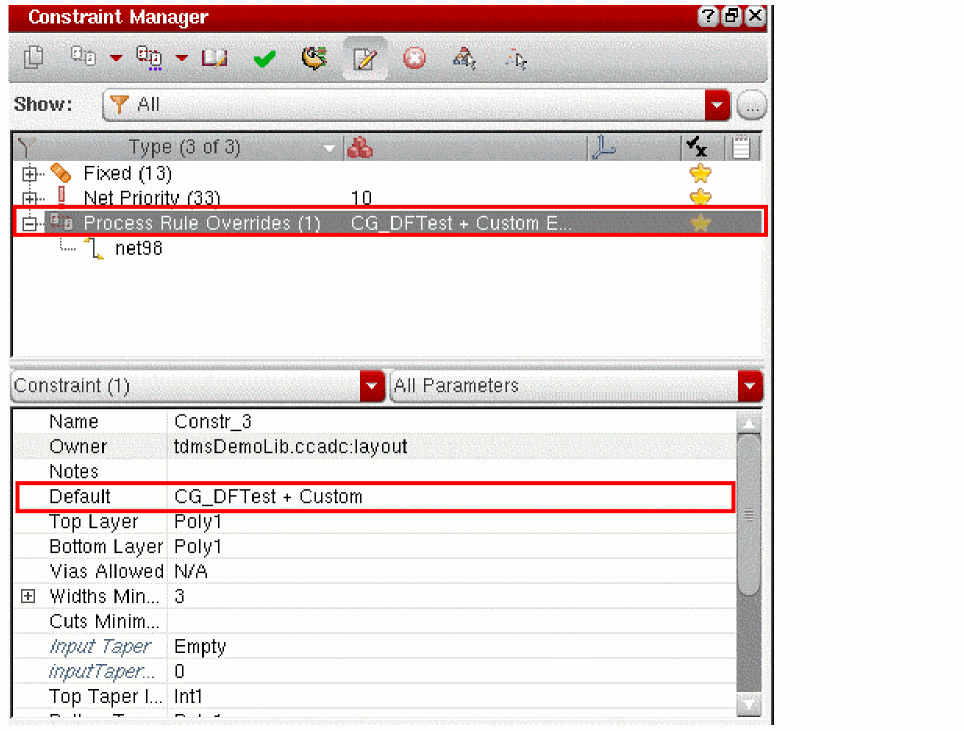
- When you try to change the setting of the Default field from Custom to a different value, you see a warning that doing so will replace all the custom edits you have made. This prevents you from inadvertently replacing a large amount of custom work with a single reference to a constraint group.
Removing a Constraint Group or Process Rule
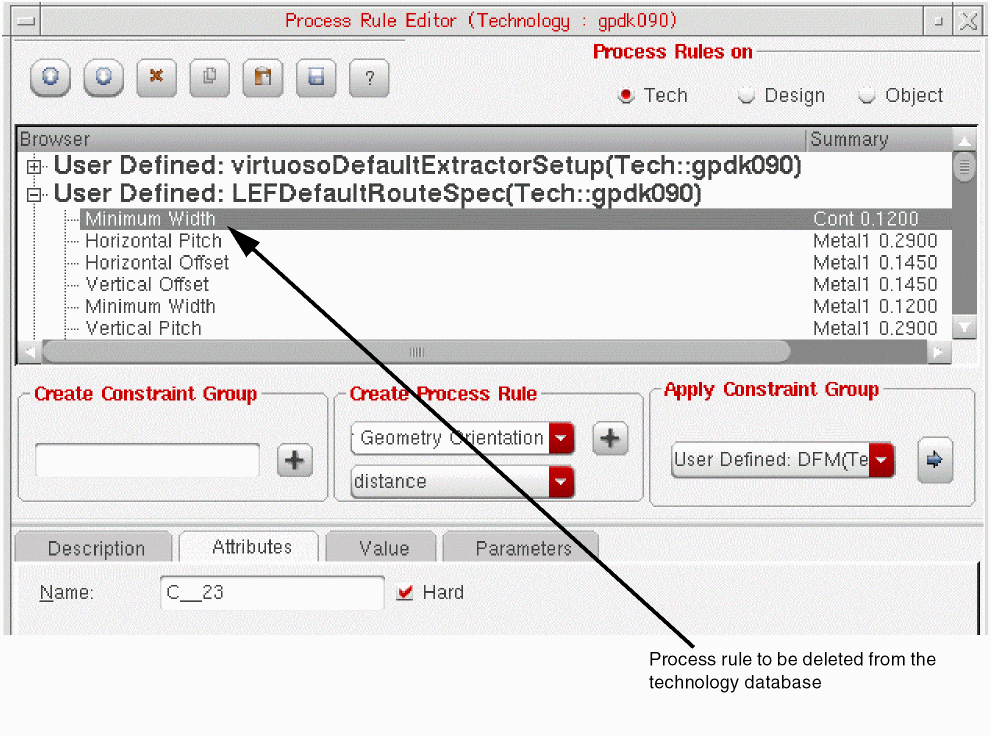
You can remove a constraint group or an individual process rule from the Process Rule Editor to prevent it from being applied to the current design or object. The behavior is different depending on what you are removing.
-
A process rule, the rule is deleted from the technology database.
-
A constraint group applied to another constraint group, the reference is removed from the browser pane but the constraint group is not deleted from the technology database.
-
A constraint group definition on the main branch of the browser pane, the constraint group is deleted from the technology database, is removed from the main branch, and removed from any constraint group that references it.

To remove a constraint group or process rule from the browser pane:

Saving Changes and Closing the Process Rule Editor
To save the changes you have made at any time:
-
Click the Save Technology button in the Process Rule Editor toolbar.
The changes are saved but the Process Rule Editor is not closed. Use this to save your work periodically as you define process rules.
To close the Process Rule Editor:
-
Click the Exit button in the bottom right corner of the Process Rule Editor window.
Any unsaved changes are saved and the Process Rule Editor window closes.
Related Topics
For a list of process rules supported by the Process Rule Editor, see
For more information on the Process Rule Editor graphical user interface, see
Return to top